Fehling Instruments CERAMO CONCEPT X PUNCHES User manual

FEHLING
INSTRUMENTS
M 11
1-01/10
1
ASSEMBLY INSTRUCTIONS
CERAMO®CONCEPT X PUNCHES
1 Disassembly
a) For disassembly place the punch on a solid worktop. Unscrew the hex head screw (pos.1)
by turning it clockwise using the supplied screwdriver TXX-0X, and remove.
b) Pull the anterior handle element (pos.2) downward to separate it from the punch body
(pos. 4). To ease the unlocking the slider (Pos. 3) should be pushed toward punch foot at
the same time.
c) Now the slider (pos.3) can be easily removed from the punch body.
d) Always clean the four components punch body, slider, anterior handle element and screw
in the same container.
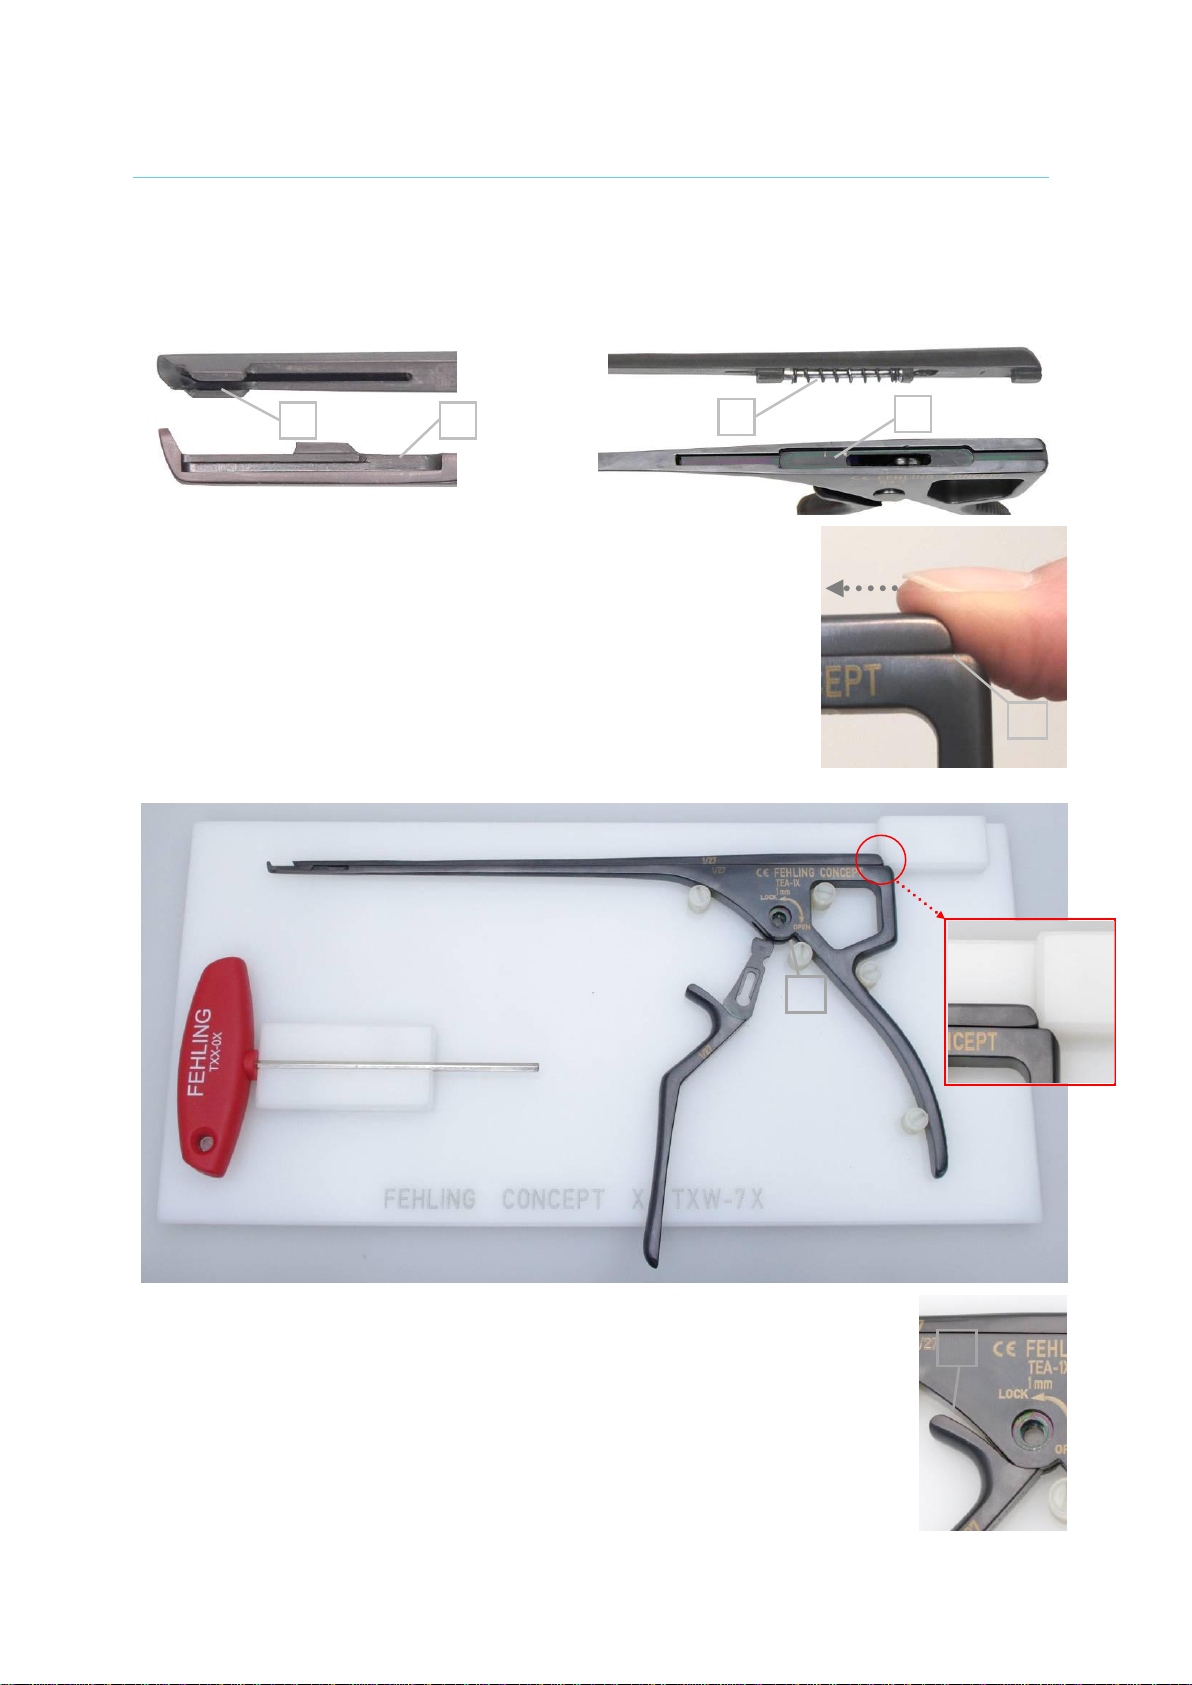
2 Assembly (with the aid of the fitting device TXW-7X)
1
2
3
4
5
6
FEHLING
INSTRUMENTS
M 11
1-01/10
2
ASSEMBLY INSTRUCTIONS
Only components belonging to the same unit may be assembled, with the exception of the
screw which fits all punches. Component compatibility can be verified by means of the identi-
fication number (pos.5) that is marked on all components (except the screw).
NOTE: Before assembling the contact areas (pos. 6) have to be lubricated.
a) Before placing the punch in the fitting device the slider has
to be attached to the punch body. For doing so place the front
guide of the slider (pos. 7) on the guiding rail (pos. 8) of the
punch body, and the slider with the spring (pos. 9) on the milled
groove (pos. 10) in the punch body at the same time.
b) Push slider strongly with the thumb beyond the external edge in
direction of the punch foot until a little step (pos. 11) has formed.
Use other hand to keep the position of the slider and place the
two parts in the fitting device - the slider must push against the
upper plastic block so that it is kept automatically in this position
c) Slowly push the handle element completely into the matching recess (pos.
12) in the punch body. While pushing the handle element should be moved
plane on the fitting device and not be lifted to avoid that it gets jammed.
NOTE: The finger bow doesn’t touch the punch body in the end position
(pos. 13).
d) Screw the hex head screw counterclockwise into the provided screw hole
using the supplied screwdriver TXX-0X. Tighten the screw. ATTENTION:
Do not over-tighten.
e) The punch is ready for use after a functional test.
8
7
9
10
11
12
13

FEHLING
INSTRUMENTS
M 11
1-01/10
3
ASSEMBLY INSTRUCTIONS
FEHLING
INSTRUMENTS
Hanauer Landstr. 7A · 63791 Karlstein/Germany · www.fehling-instruments.de
+49 (0) 61 88 –95 74.40 · +49 (0) 61 88 –95 74.45 · info@fehling-instruments.de
The screwdriver TXX-0X and the fitting device TXW-6X can be cleaned with warm
water and a mild detergent. Hot water and steam sterilisation at 134°C can destroy
screwdriver and fitting device.
Table of contents
Other Fehling Instruments Medical Equipment manuals


Popular Medical Equipment manuals by other brands


Amico
Amico GoLift Installation and operation instructions

Balanced Body
Balanced Body Contrology Cadillac How to assemble

PANat
PANat Urias Johnstone user guide

chinesport
chinesport ERGO 10 installation manual

Dreamland
Dreamland E0801 operating instructions

Vitalograph
Vitalograph Pneumotrac User instructions