Focal Meditech Gowing2 User manual

ID manual: 606103
Revision / Revisie: 1.0.0
Date / Datum: 01-02-2020
Quick Start Guide / Snelstartgids
Gowing2

3
Introduction / Voorwoord
This is the Quick start guide for Gowing2, a dynamic arm support system.
This product is developed, manufactured and possibly distributed by
Focal Meditech B.V. This quick start guide contains the basic information
regarding Gowing2. The aim of this information is to ensure successful, safe
and effective use of the device. This quick start guide will give you a quick
look on the features and important safety warnings of Gowing2 Please take
note of the safety warnings before using Gowing2.
Dit is de snelstartkaart voor Gowing2, een dynamische armondersteuning.
Dit product wordt ontwikkeld, geproduceerd en eventueel gedistribueerd
door Focal Meditech B.V. Deze snelstartkaart bevat de basisinformatie over
Gowing2. Het doel van deze informatie is te zorgen voor een succesvol, veilig
en effectief gebruik van het apparaat. Deze snelstartkaart geeft u een snelle
blik op de functies en belangrijke veiligheidswaarschuwingen van Gowing2.
Houd rekening met de veiligheidswaarschuwingen voordat u Gowing2
gebruikt.

4 5
Overview / Overzicht
Eject knob / Ejectschakelaar
Load arm / Draagarm
Elbow fitting / Elleboogsteun
Arm fitting / Armschaal
Wrist support /
Polsondersteuning
Indication LED / Indicatie LED
On / off switch /
Aan/uitschakelaar
Power module
Handle / Hendel
Tilt module / Kantelmodule
Rotation /
Rotatie
Body /
Romp
Figure 1: Overview Gowing2 with terms of specic parts
Figuur 1: Overzicht Gowing2 met benaming specifieke onderdelen
Safety notices / Veiligheidsnotities
Danger: Prevent direct contact with water or any other liquid.
Failure of this can lead to malfunctioning of device or bodily harm.
Gevaar: Voorkom direct contact met water of enige andere vloeistof.
Het niet voorkomen hiervan kan leiden tot onjuist functioneren van
het apparaat of tot lichamelijke schade.
Danger: Prevent extreme temperature (see environment
conditions). Failure of this can lead to malfunctioning of the device
or bodily harm.
Gevaar: Voorkom blootstelling aan extreme temperaturen. Het niet
voorkomen hiervan kan leiden tot onjuist functioneren van het
apparaat of tot lichamelijke schade.
Danger: During installation ensure there is a fuse of 7.5A between
power supply and Gowing2. Failure of this can lead to
malfunctioning of the device and bodily harm.
Gevaar: Let er tijdens de installatie op dat er zich tenminste een
zekering van 7,5A bevindt tussen de energiebron en Gowing2. Indien
dit niet gedaan wordt kan dit leiden tot onjuist functioneren van het
apparaat of tot lichamelijke schade.
Danger: Mechanical energy is stored for balancing the arm. During
non-intended removal of the arm from the arm fitting of Gowing2,
this mechanical energy will be released resulting in a fast moving
lever and arm fitting which can result in bodily harm.
Gevaar: Mechanische energie wordt opgeslagen om de arm te
balanceren. Tijdens niet-bedoelde verwijdering van de arm uit de
armschaal van Gowing2 zal deze mechanische energie vrijkomen wat
resulteert in een snel bewegende hendel en armschaal wat
lichamelijk letsel tot gevolg zou kunnen hebben.

6 7
Warning: Do not modify any part of this equipment without
authorization of the manufacturer. Failure of this can lead to
malfunctioning and will void the warranty.
Waarschuwing: Wijzig geen enkel onderdeel van dit apparaat zonder
toestemming van de fabrikant. Indien dit toch gedaan wordt, kan dit
leiden tot onjuist functioneren van het apparaat en het verlies van
garantie.
Warning: In case of a faulty device contact Focal. Do not try to fix it
yourself. Failure of this will void the warranty.
Waarschuwing: Neem indien het apparaat onjuist functioneert
direct contact op met Focal. Probeer het niet zelf te repareren. Het
niet opvolgen van deze waarschuwing kan leiden tot het verlies van
garantie.
Warning: In case of doubt about the safety of the device contact
Focal Meditech.
Waarschuwing: Neem in geval van twijfel over de veiligheid van het
apparaat contact op met Focal Meditech.
Warning: In case of a serious incident when using the device,
contact Focal Meditech and the national authority of your country.
Waarschuwing: Bij een ernstig voorval met betrekking tot dit
apparaat dient contact te worden opgenomen met Focal Meditech
en de bevoegde autoriteit van de lidstaat.
Switch on Gowing2 / Aanzetten Gowing2
Indication led
On/off switch
Figure 2: Picture of on/off switch with indication LED
Figuur 2: Afbeelding van de aan/uit schakelaar met indicatie LED
Before switching on Gowing2, the Gowing2 has to be attached to the Power
Module (See “Attach / Detach Gowing2”). Gowing2 can be switched on by
turning the on/off switch to (I). The indication LED will light up green. If the
LED lights up red Gowing2 might not be properly attached to the Power
Module.
Voordat de Gowing2 ingeschakeld mag worden, moet Gowing2 zijn
bevestigd aan de Power Module (zie “koppelen / ontkoppelen Gowing2”).
Gowing2 kan worden ingeschakeld door de aan/uit naar (I) te schakelen.
De indicatie-LED zal groen oplichten. Als de LED rood oplicht, is Gowing2
mogelijk niet goed bevestigd aan de Power Module.

8 9
Attach / Detach Gowing2 / Koppelen / ontkoppelen Gowing2
Hand
position 2
Hand
position 1
Figure 3: Indications of hand
positions to detach Gowing2
Figuur 3: Aanduiding van
handposities om Gowing2
te ontkoppelen
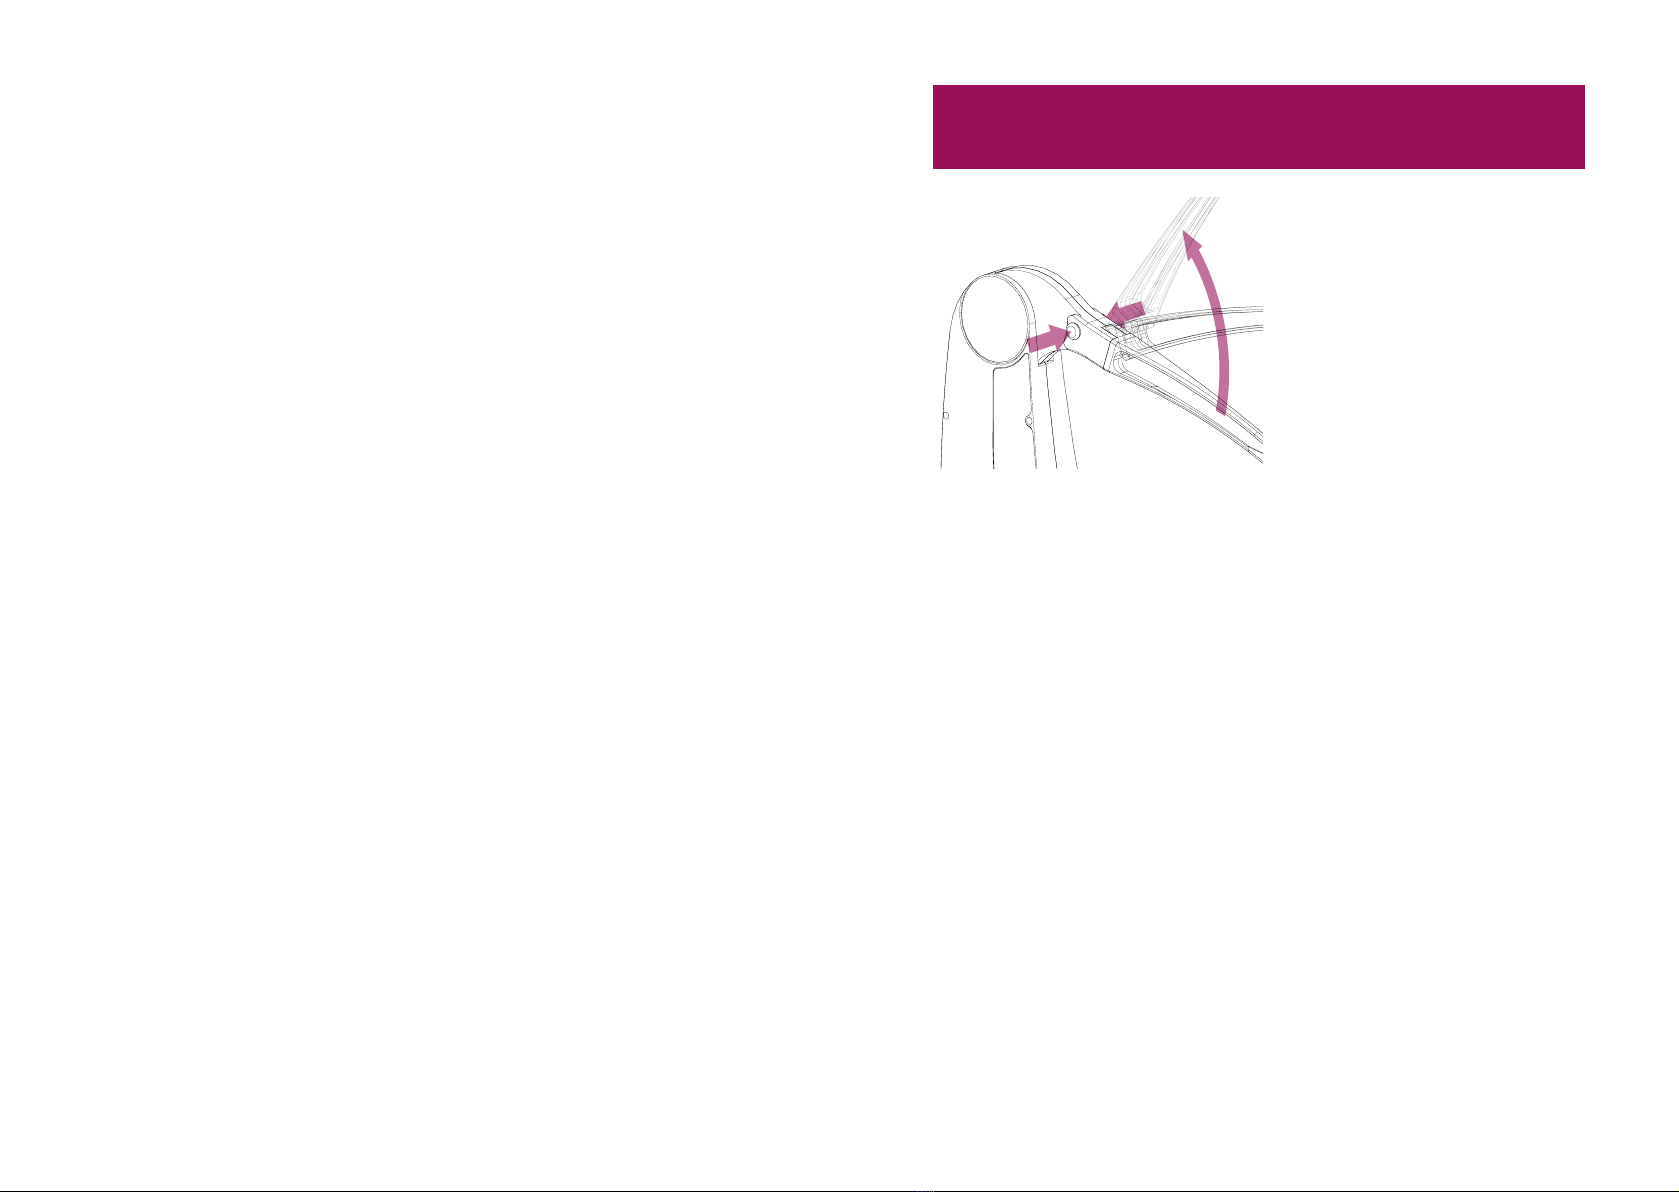
Figure 4: Rotate the red
handle upwards
Figuur 4: Trek de rode
hendel omhoog
Figure 5: Tilt Gowing215°
Figuur 5: Kantel Gowing2 15°
Figure 6: Take Gowing2 apart
from the Power Module
Figuur 6: Neem Gowing2 los
van de Power Module
Detach Gowing2 from Power Module (right handed version):
STEP 1: Set all settings to default
STEP 2: Remove the user’s arm
STEP 3: Switch off Gowing2
STEP 4: Disconnect the human interface and store it in the case
STEP 5: Place your right hand on position 1 and your left hand on position 2
(see Figure 3)
STEP 6: Rotate the red handle upwards in the direction of the arrow
(see Figure 4)
STEP 7: Tilt the Gowing2 approximately 15° in the direction of the arrow
(see Figure 5)
STEP 8: Move the Gowing2 up in a slanted line until it is free from the Power
Module (see Figure 6)
STEP 9: Store Gowing2 always in its case to prevent the Gowing2 from
breaking or being damaged.
Het ontkoppelen van Gowing2 van de Power Module
(rechtshandige versie):
STAP 1: Zet terug naar de standaardinstelling
STAP 2: Neem de arm van de gebruiker weg
STAP 3: Schakel Gowing2 uit
STAP 4: Koppel de human interface los en bewaar deze in de opbergdoos
STAP 5: Plaats uw rechterhand op positie 1 en uw linkerhand op positie 2 (zie
Figuur 3)
STAP 6: Trek de rode hendel omhoog in de richting van de pijl
(zie Figuur 4)
STAP 7: Kantel de Gowing2 ongeveer 15° in de richting van de pijl
(zie Figuur 5)
STAP 8: Verplaats de Gowing2 omhoog in een schuine lijn totdat deze vrij is
van de Power Module (zie Figuur 6)
STAP 9: Bewaar Gowing2 altijd in de opbergdoos om te voorkomen dat de
Gowing2 wordt beschadigd
10 11
Attach Gowing2 to the Power Module (right handed version):
STEP 1: Grab Gowing2 with your right and on position 1 and your left
hand on position 2
STEP 2: Hold Gowing2 above the Power Module in a tilted position of
approximately 15°
STEP 3: Lower Gowing2 in a slanted line until it catches the hook of the power
module
STEP 4: Tilt Gowing2 straight until the body of Gowing2 is vertical
STEP 5: Push down the red handle
STEP 6: Attach the human interface to Gowing2
STEP 7: Position the user’s arm in the arm fitting
STEP 8: Switch on Gowing2
Het plaatsen van de Gowing2 van de Power Module
(rechtshandige versie):
STAP 1: Pak Gowing2 met uw rechterhand op positie 1 en uw linkerhand op
positie 2
STAP 2: Houd Gowing2 in een gekantelde positie van ongeveer 15° boven de
Power Module
STAP 3: Laat Gowing2 zakken totdat deze in de haak van de Power Module
grijpt
STAP 4: Kantel Gowing2 naar beneden totdat Gowing2 rechtop staat
STAP 5: Druk de rode hendel naar beneden
STAP 6: Bevestig de human interface op Gowing2
STAP 7: Plaats de arm van de gebruiker in de armschaal
STAP 8: Schakel Gowing2 in
The attach/detach procedure of the left handed version of Gowing2 is
similar. The only difference is that your left hand is on position 1 and your
right hand on position 2.
De procedure voor het afnemen en plaatsen van de linkshandige versie van
Gowing2 is gelijk. Het enige verschil is dat de linkerhand geplaatst moet
worden op positie 1 en de rechterhand op positie 2.
Attach / Detach the human interface /
Koppelen / ontkoppelen van de human interface
Figure 7: Attach / detach human interface
Figuur 7: Koppelen / ontkoppelen human interface
The human interface containing the load arm, arm fitting, elbow fitting
and wrist support can be removed easily. To detach the human interface,
press both red eject knobs at the top of Gowing2, and move the human
interface away from the body in the upwards direction.
De human interface inclusief draagarm, de armschaal, elleboogsteun en
polssteun kunnen gemakkelijk worden afgenomen. Om de human interface
te ontgrendelen moeten de beide rode ontkoppelknoppen bovenaan de
Gowing2 worden ingedrukt. Beweeg de human interface in bovenwaartse
richting van de behuizing van Gowing2 weg (zie Figuur 7).
Attaching the human interface can be done by pushing the lever into the
body. The buttons do not have to be pushed. When the human interface is
in position, it cannot be removed without pressing the buttons.
De human interface kan worden teruggeplaatst door deze in het
behuizingsdeel te drukken. De knoppen hoeven niet ingedrukt te worden.
Eenmaal op zijn plek kan de human interface niet worden verwijderd
zonder de rode knoppen in te drukken.
12 13
Eneaswitch2 keypad control / Eneaswitch2 toetsen bediening
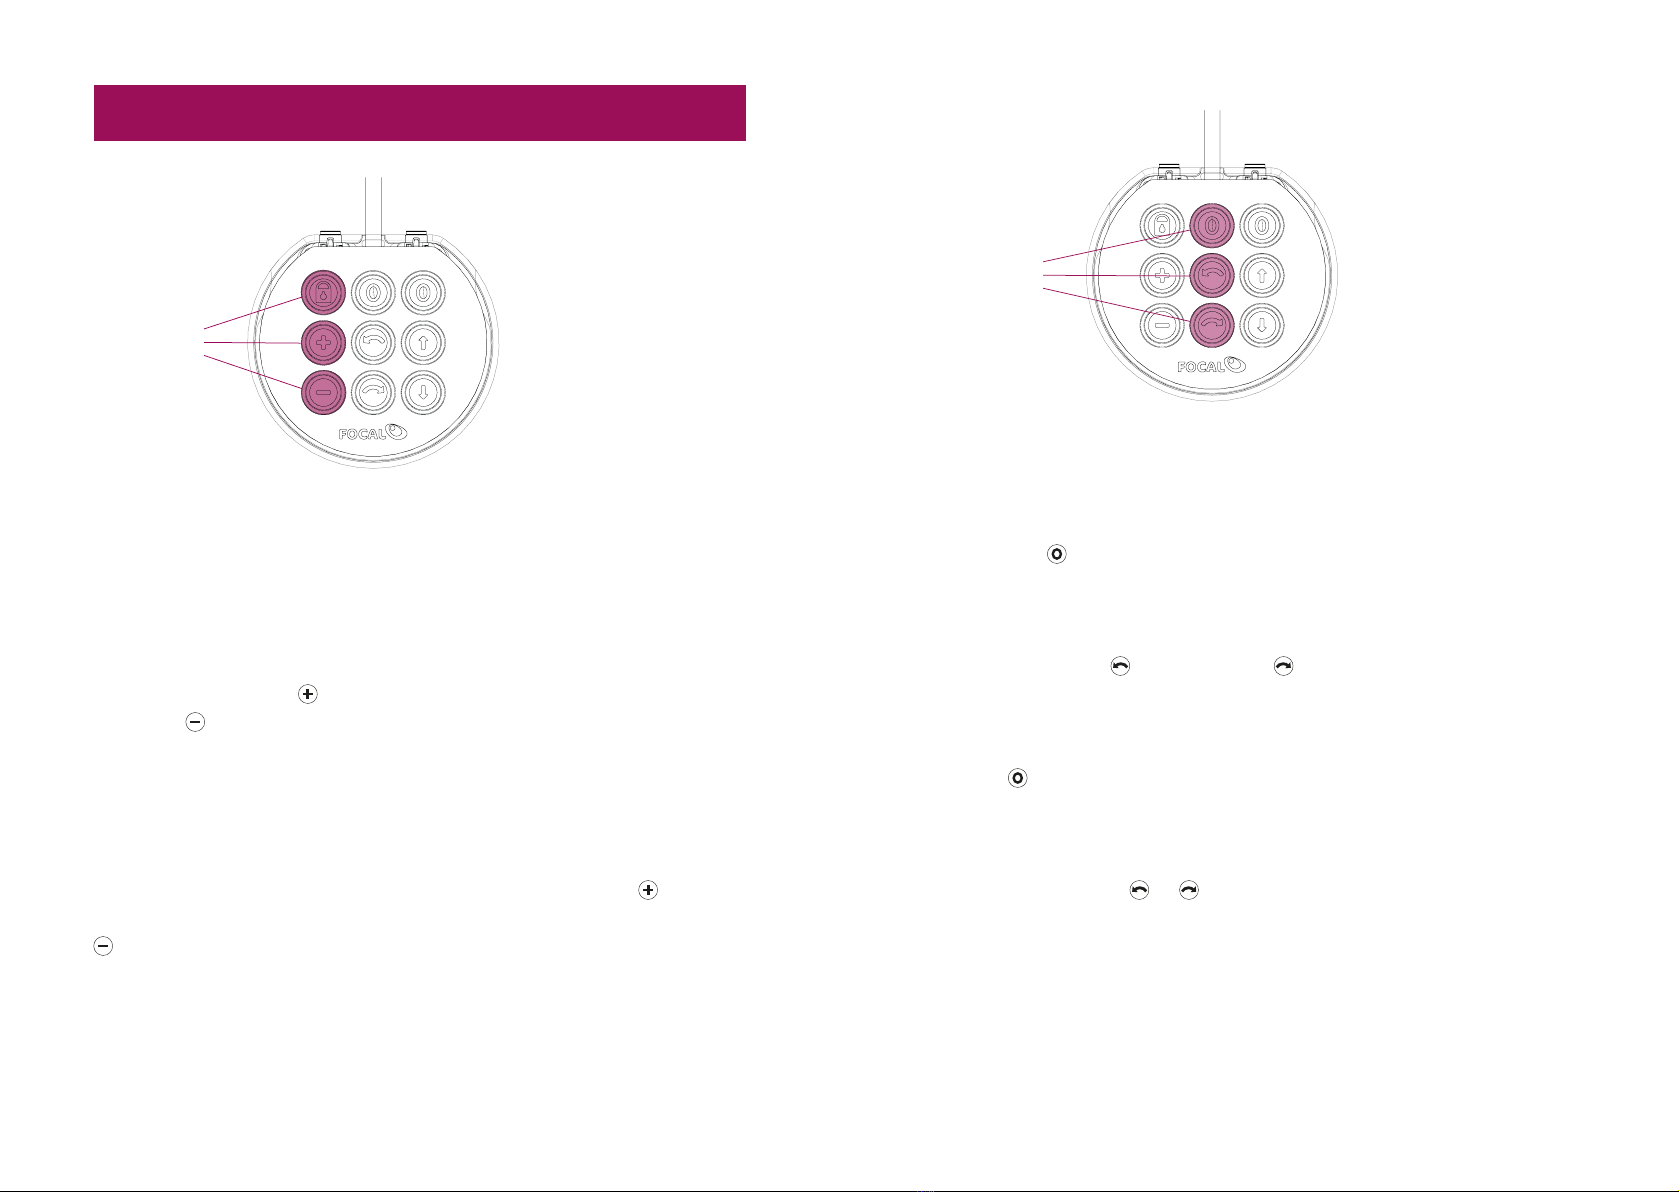
Buttons of the
left column
Figure 8: Blocking function / adjustment of balancing force
Figuur 8: Blokkeer functie / verstelling van balanceerkracht
The left column contains the blocking function and the adjustment of
the balancing force. Gowing2 has blocking mechanisms for its up/down
movement, forward/backward movement and rotation (in the horizontal
plane). Two buttons are assigned to adjust the balance force in the vertical
plane. Pushing the plus button will increase the balance force. Pushing
the minus button will decrease the balance force.
De linker kolom bevat de blokkeerfunctie en de aanpassing van de
balanceerkracht. Gowing2 heeft blokkeermechanismes voor hoog/laag
en voor/achterwaarts bewegingen en de rotaties (in het horizontale
vlak). Twee knoppen in de linker kolom dienen voor het aanpassen van
de balanskracht in het verticale vlak. Het indrukken van de plus knop
resulteert in een toename van de balanskracht. Het indrukken van de minus
knop resulteert in afname van de balanskracht. De snelheid waarmee de
balanskracht aangepast wordt is afhankelijk van de duur van het indrukken
van de knop. De aanpassing zal sneller plaatsvinden als de knop langer
wordt ingedrukt.
Buttons of the
middle column
Figure 9: Adjust tilt angle of Gowing2
Figuur 9: Verstelling kantelhoek van Gowing2
The buttons in middle column are used for the tilt function. The button
marked with will adjust the tilt module to the position where the
rotating axis is set perpendicular to the gravity plane. After pressing this
button the LEDs around this button will start blinking green and the tilt
module will level to 0°. For most users the 0° position will be the best
setting. The buttons for forward and for backwards can be used to
adjust the tilt of Gowing2.
De knoppen in de middelste kolom worden gebruikt voor de kantelfunctie.
De knop past de kantelmodule aan naar de positie waar de roterende as
loodrecht op het zwaartekrachtsvlak staat. Bij het indrukken van de 0-knop
beginnen de LED’s rond deze knop groen te knipperen en de kantelmodule
wordt op 0° ingesteld. Voor de meeste gebruikers is de 0°-positie de beste
instelling. De knoppen en kunnen worden gebruikt om de kanteling
van de Gowing2 aan te passen.
14 15
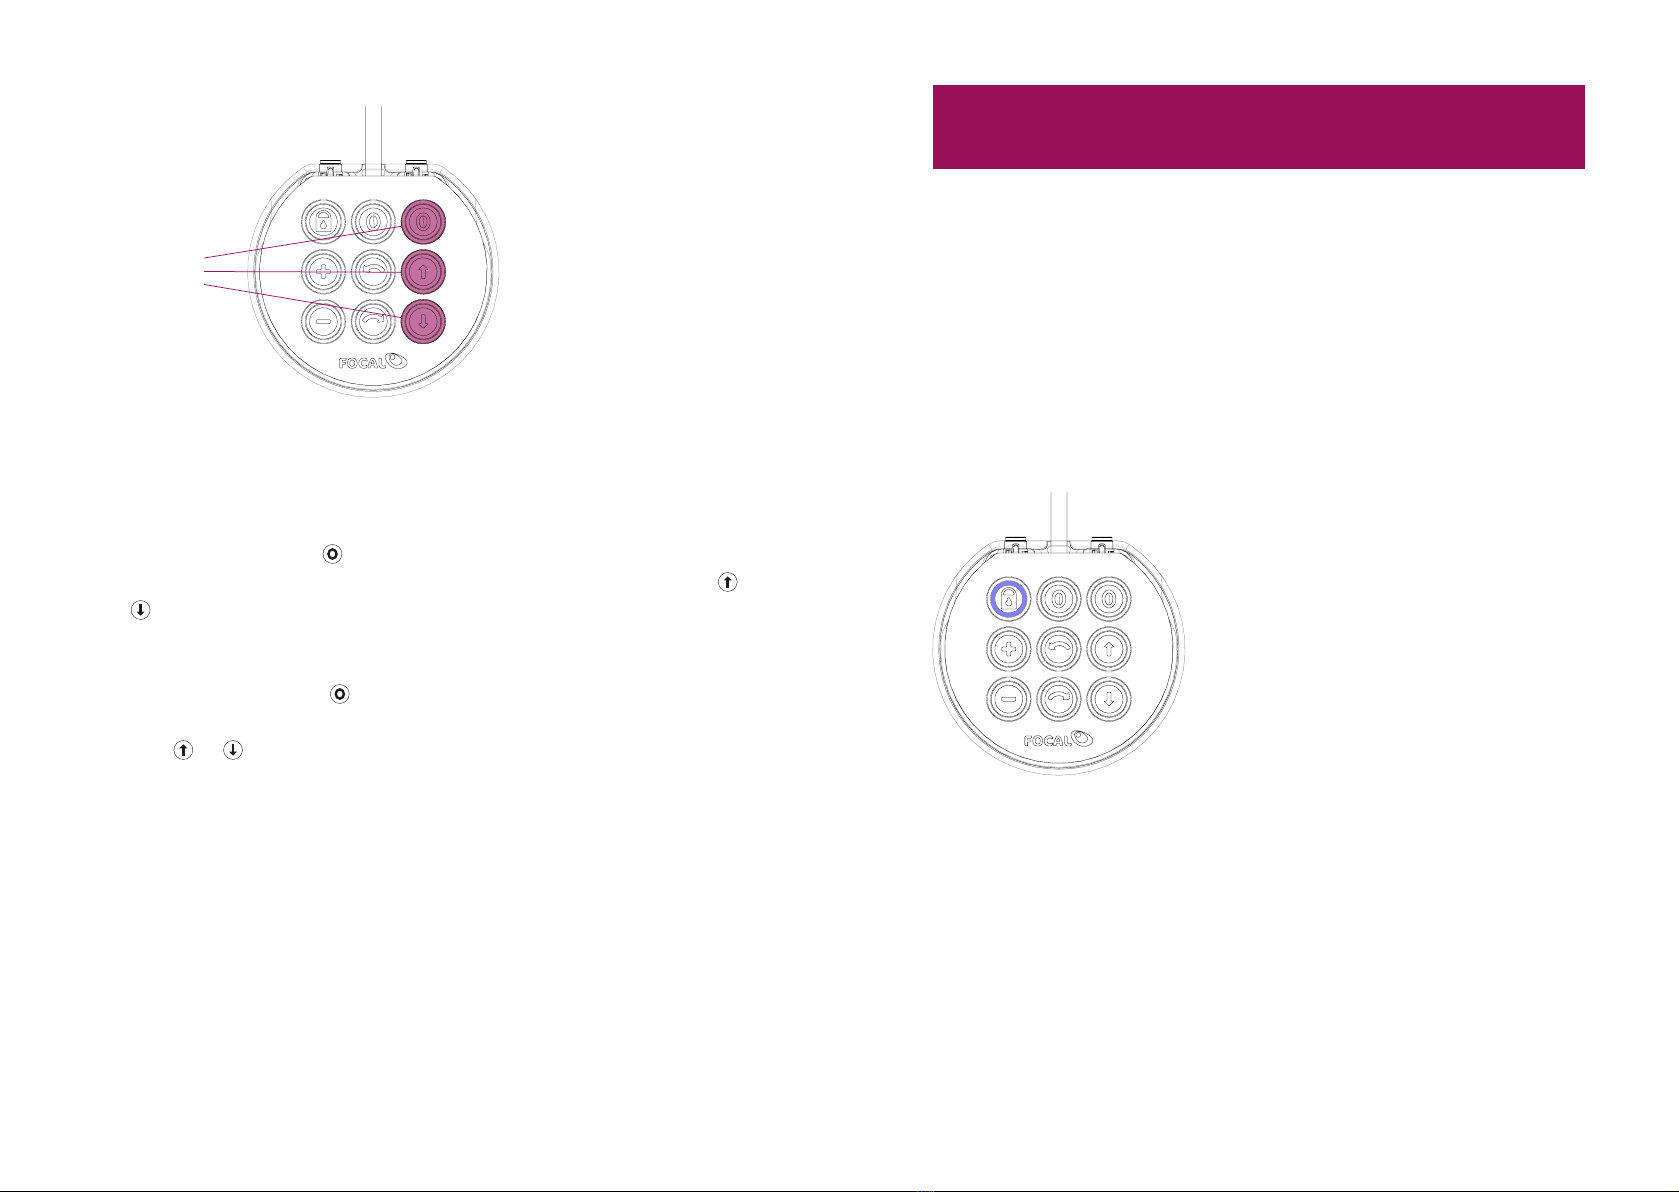
Buttons of the
right column
Figure 10: Adjust tilt angle of Gowing2
Figuur 10: Verstelling liftfunctie van Gowing2
The buttons in the right column are used for the lift function of Gowing2.
When pushing the button , the human interface will go to the lowest
position. The user is now able to move the arm freely again. The buttons
and can be used to adjust the lift position.
De knoppen in de rechterkolom worden gebruikt voor de liftfunctie van
Gowing2. Wanneer de knop wordt ingedrukt, gaat de human interface
naar de laagste positie. De gebruiker kan nu de arm weer vrij bewegen. De
knoppen en kunnen worden gebruikt om de liftpositie aan te passen.
Eneaswitch2 Single switch control /
Eneaswitch2 een-knops bediening
The single switch mode of Gowing2 allows the user to control the Gowing2
with only one switch. To control Gowing2 in single switch mode there must
one external switch be configured as “Single switch”. This can be only be
done by authorised people.
De single switch-modus van Gowing2 stelt de gebruiker in staat om de
Gowing2 met slechts één schakelaar te bedienen. Om de Gowing2 in
een-knops bediening te gebruikten, moet er één externe schakelaar worden
geconfigureerd als “Single switch”. Dit kan alleen worden gedaan door
geautoriseerde personen.
Figure 11: Lock function selected
Figuur 11: Blokkeer functie geselecteerd
The single switch control starts scanning after pressing the external switch.
The function that is indicated by the blue LED will be activated when
the external switch is being pressed. For example, In Figure 11 the “lock”
function will be activated when the external switch is being pressed. If the
user does not give an input within 1 second the scanning resumes.
16 17
De bediening met één schakelaar begint te scannen na het indrukken van
de externe knop. De functie die door de blauwe LED wordt aangegeven,
wordt geactiveerd wanneer de externe schakelaar wordt ingedrukt.
Bijvoorbeeld in Figuur 11 zal de blokkeer functie worden geactiveerd
wanneer op de externe schakelaar wordt gedrukt. Als de gebruiker
gedurende 1 seconde geen input geeft, wordt het scannen hervat.
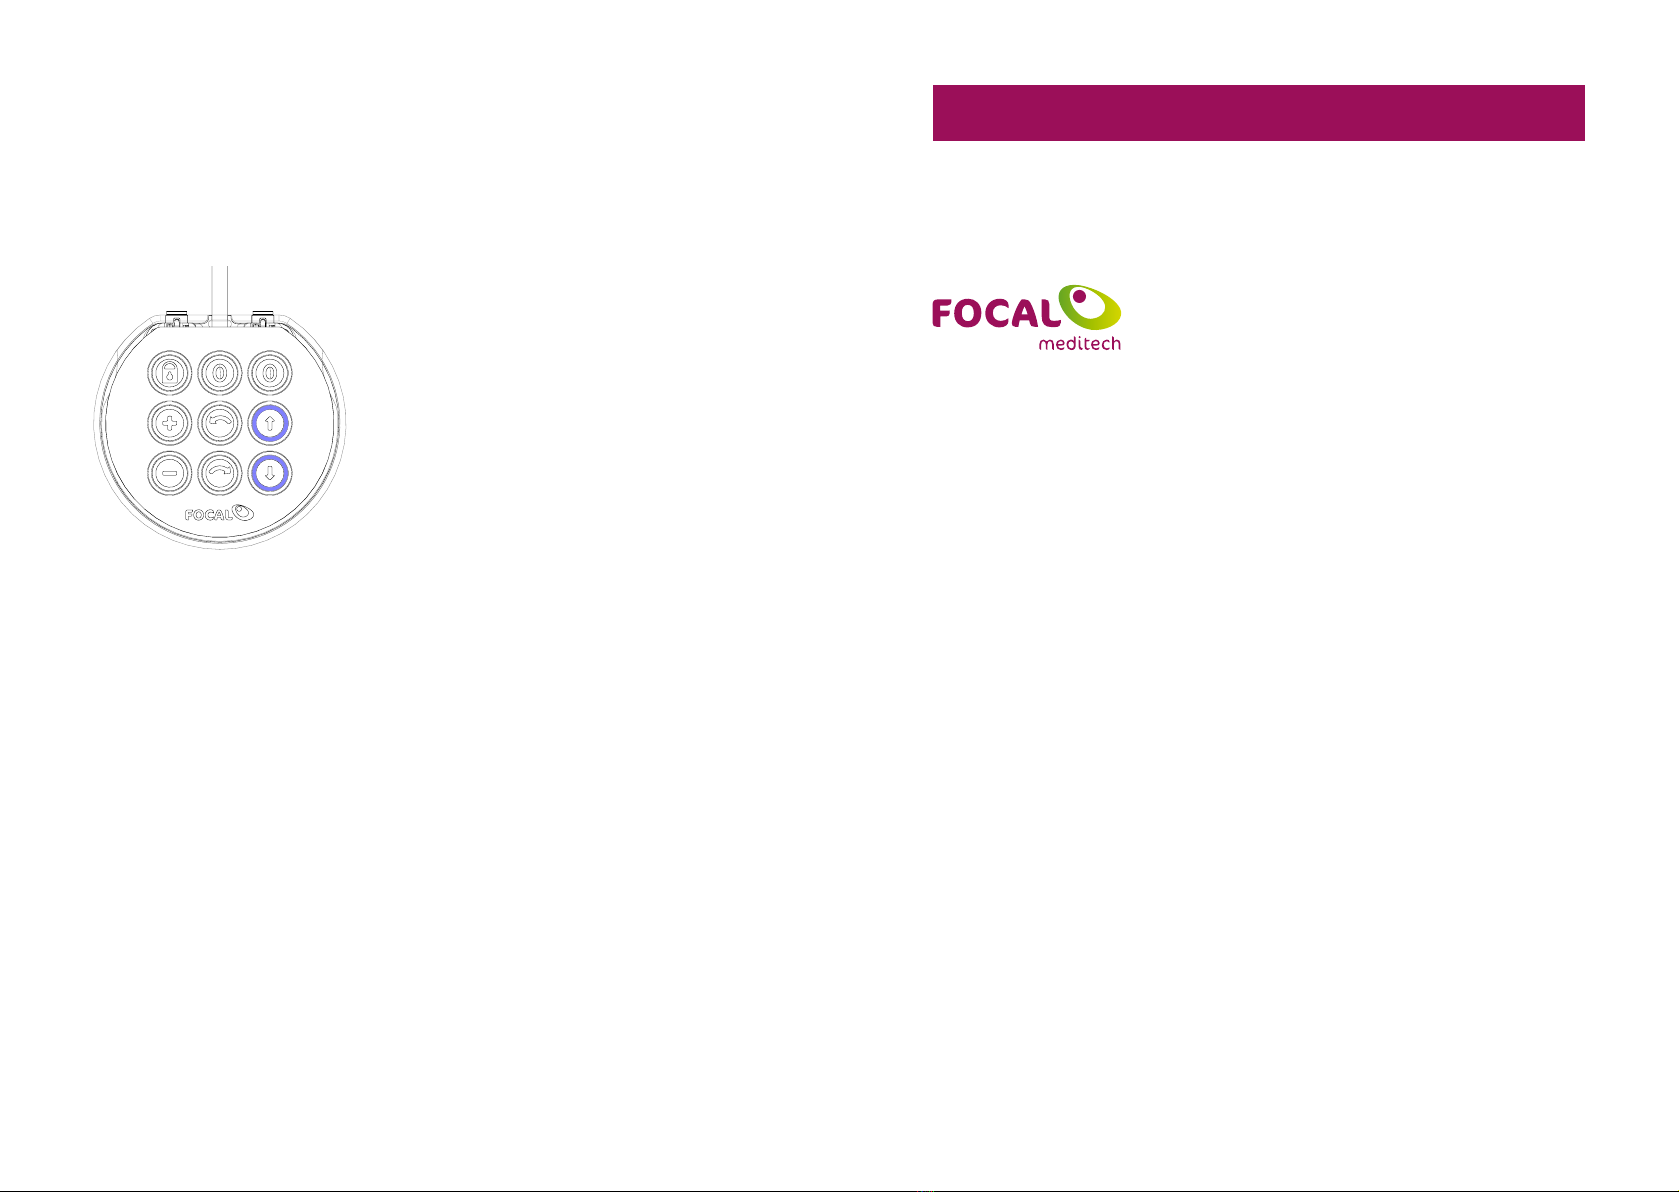
Figure 12: Lift function selected
Figuur 12: Lift functie geselecteerd
If a function is indicated by two blue LEDs, the corresponding function will
also be activated when the external switch is being pressed. Subsequently
the activated function will toggle between the two indicated blue LEDS.
See Figure 12 where the lift function will be activated when the external
switch is being pressed. If the user does not give an input for 1 second the
scanning resumes.
Als een functie wordt aangegeven door twee blauwe LEDs, wordt de
bijbehorende functie ook geactiveerd wanneer de externe schakelaar
wordt ingedrukt. Vervolgens wisselt de geactiveerde functie tussen de
twee aangegeven blauwe LEDs’. Zie Figuur 12 waar de lift functie zal
worden geactiveerd wanneer de externe schakelaar wordt ingedrukt. Als de
gebruiker gedurende 1 seconde geen input geeft, wordt het scannen hervat.
Contact information / Contact informatie
Gowing2 is manufactured and sold by:
Gowing2 wordt gefabriceerd en verkocht door:
Focal Meditech BV
Droogdokkeneiland 19
5026 SP Tilburg
Netherlands
Tel.: +31 13 533 31 03
Fax: +31 13 533 50 04
E-mail: info@focalmeditech.nl
Internet: www.focalmeditech.nl
The complete user manual is available on our website and can be
downloaded (https://www.focalmeditech.nl/nl/documentatie). In case
you want to receive a printed user manual in your own language, please
contact us at +31 (0)13 533 31 03 and we will send you without any costs a
hard copy.
De complete gebruikershandleiding is beschikbaar op onze website en
gedownload worden op (https://www.focalmeditech.nl/nl/documentatie).
In het geval dat u een geprinte gebruikershandleiding wil, neem contact op
via +31 (0)13 533 31 03 en we zenden u een geprint exemplaar toe.

18
Other manuals for Gowing2
1
Other Focal Meditech Medical Equipment manuals


Popular Medical Equipment manuals by other brands


I-care
I-care HOME instruction manual

Care Fusion
Care Fusion Alaris GP Technical & service manual

Hillrom
Hillrom TruSystem 7500 U14 Instructions for use

Contec Medical Systems Co.
Contec Medical Systems Co. 22-01-CMS50D instructions

Hillrom
Hillrom MC700 Replacement instructions

In Light
In Light Facemask 104 manual