manuals.online logo
Brands
  1. Home
  2. •
  3. Brands
  4. •
  5. Ferm
  6. •
  7. Inverter
  8. •
  9. Ferm FGG-2000N User manual

Ferm FGG-2000N User manual

This manual suits for next models

1

Other Ferm Inverter manuals

Ferm PGM1010 User manual

Ferm

Ferm PGM1010 User manual

Ferm FGG-1100 User manual

Ferm

Ferm FGG-1100 User manual

Ferm FGG-800 User manual

Ferm

Ferm FGG-800 User manual

Ferm PGM1008 User manual

Ferm

Ferm PGM1008 User manual

Popular Inverter manuals by other brands

Omnik New Energy Omniksol-1.5k-TL user manual

Omnik New Energy

Omnik New Energy Omniksol-1.5k-TL user manual

Agilent Technologies 33250A user guide

Agilent Technologies

Agilent Technologies 33250A user guide

4-noks ZR-SWITCH-RC instruction manual

4-noks

4-noks ZR-SWITCH-RC instruction manual

V&T V5 Series user manual

V&T

V&T V5 Series user manual

Hon Turing HT-T-S1000-12 introduction

Hon Turing

Hon Turing HT-T-S1000-12 introduction

Metabo E 140 SP Plus Original operating instructions

Metabo

Metabo E 140 SP Plus Original operating instructions

BARRON EXITRONIX Tucson Micro Series installation instructions

BARRON

BARRON EXITRONIX Tucson Micro Series installation instructions

Baumer HUBNER TDP 0,2 Series Mounting and operating instructions

Baumer

Baumer HUBNER TDP 0,2 Series Mounting and operating instructions

electroil ITTPD11W-RS-BC Operation and Maintenance Handbook

electroil

electroil ITTPD11W-RS-BC Operation and Maintenance Handbook

Silicon Solar TPS555-1230 instruction manual

Silicon Solar

Silicon Solar TPS555-1230 instruction manual

Mission Critical Xantrex Freedom SW-RVC owner's guide

Mission Critical

Mission Critical Xantrex Freedom SW-RVC owner's guide

HP 3312A Operating and service manual

HP

HP 3312A Operating and service manual

Hoymiles HM-500T user manual

Hoymiles

Hoymiles HM-500T user manual

Nitecore SPM10 user manual

Nitecore

Nitecore SPM10 user manual

AEG Protect PV installation manual

AEG

AEG Protect PV installation manual

On Board TruePower Plus 1200MS owner's manual

On Board

On Board TruePower Plus 1200MS owner's manual

Plugreen PGM-200P-230 Installation and operation manual

Plugreen

Plugreen PGM-200P-230 Installation and operation manual

Fourgroup Easy use and Programming Handbook

Fourgroup

Fourgroup Easy use and Programming Handbook

manuals.online logo
manuals.online logoBrands
  • About & Mission
  • Contact us
  • Privacy Policy
  • Terms and Conditions

Copyright 2025 Manuals.Online. All Rights Reserved.

wwwwww..ffeerrmm..ccoomm00881100--1155..11
G
GB
BS
Su
ub
bj
je
ec
ct
tt
to
oc
ch
ha
an
ng
ge
e
D
DÄ
Än
nd
de
er
ru
un
ng
ge
en
nv
vo
or
rb
be
eh
ha
al
lt
te
en
n
N
NL
LW
Wi
ij
jz
zi
ig
gi
in
ng
ge
en
nv
vo
oo
or
rb
be
eh
ho
ou
ud
de
en
n
F
FS
So
ou
us
sr
ré
és
se
er
rv
ve
ed
de
em
mo
od
di
if
fi
ic
ca
at
ti
io
on
ns
s
E
ER
Re
es
se
er
rv
va
ad
do
oe
el
ld
de
er
re
ec
ch
ho
od
de
e
m
mo
od
di
if
fi
ic
ca
ac
ci
io
on
ne
es
st
té
éc
cn
ni
ic
ca
as
s
P
PR
Re
es
se
er
rv
va
ad
do
oo
od
di
ir
re
ei
it
to
oa
am
mo
od
di
if
fi
ic
ca
aç
çõ
õe
es
s
I
IC
Co
on
nr
re
es
se
er
rv
va
ad
di
im
mo
od
di
if
fi
ic
ch
he
e
w
ww
ww
w.
.f
fe
er
rm
m.
.c
co
om
m
F
FG
GG
G-
-2
20
00
00
0N
N
A
A
r
r
t
t
.
.
n
n
o
o
P
P
G
G
M
M
1
1
0
0
0
0
6
6
GGBB
D
D
N
NL
L
F
F
E
E
P
P
I
I
UUSSEERRSSMMAANNUUAALL0044
GGEEBBRRAAUUCCHHSSAANNWWEEIISSUUNNGG0099
GGEEBBRRUUIIKKSSAAAANNWWIIJJZZIINNGG1144
MMOODDEEDD’’EEMMPPLLOOII2200
MMAANNUUAALLDDEEIINNSSTTRRUUCCCCIIOONNEESS2255
IISSTTRRUUÇÇÕÕNNAAUUSSAARR3311
MMAANNUUAALLEEUUTTIILLIIZZZZAATTII3366
2
2Ferm Ferm 4
48
8
E
EX
XP
PL
LO
OD
DE
ED
DV
VI
IE
EW
WF
F
E
EX
XP
PL
LO
OD
DE
ED
DV
VI
IE
EW
WG
G
13
15
16
14
3
4
6
7
5
1
2
9
8
12
11
10
17
FFiigg..11
4
47
7Ferm Ferm 3
3
E
EX
XP
PL
LO
OD
DE
ED
DV
VI
IE
EW
WD
D
E
EX
XP
PL
LO
OD
DE
ED
DV
VI
IE
EW
WE
E
FFiigg..22
FFiigg..44
FFiigg..33
FFiigg..55
(0.70 - 0.80 mm)
X
A
M
N
I
M
15
16
G
GE
EN
NE
ER
RA
AT
TO
OR
R(
(4
4S
ST
TR
RO
OK
KE
E)
)
T
TH
HE
EN
NU
UM
MB
BE
ER
RS
SI
IN
NT
TH
HE
EF
FO
OL
LL
LO
OW
WI
IN
NG
GT
TE
EX
XT
T
C
CO
OR
RR
RE
ES
SP
PO
ON
ND
DW
WI
IT
TH
HT
TH
HE
EP
PI
IC
CT
TU
UR
RE
ES
SA
AT
T
P
PA
AG
GE
E2
2+
+3
3
S
SA
AF
FE
ET
TY
YA
AN
ND
DO
OP
PE
ER
RA
AT
TI
IN
NG
G
I
IN
NS
ST
TR
RU
UC
CT
TI
IO
ON
NS
S
For your own safety and for the safety
of others, please read these
instructions carefully before using
this appliance. It will help you understand
your product more easily and avoid
unnecessary risks. Keep this instruction
manual in a safe place for future use.
C
CO
ON
NT
TE
EN
NT
TS
S:
:
1. Machinedata
2. Safetyinstructions
3. Use
4. Service&maintenance
1
1.
.M
MA
AC
CH
HI
IN
NE
ED
DA
AT
TA
A
I
IN
NT
TR
RO
OD
DU
UC
CT
TI
IO
ON
N
Thegeneratorisdesignatedtogenerate
electricitywithhelpofa4strokefuelengine.
Nowyoucanuseyourelectrictoolsinthefield
inspiteofthelackoftheelectricitygrid.
A
AV
VR
R
TheAVR-systemAutomaticVoltage
Regulator)insidethisgeneratorproducesa
stableandprecisevoltageoutput.
T
TE
EC
CH
HN
NI
IC
CA
AL
LS
SP
PE
EC
CI
IF
FI
IC
CA
AT
TI
IO
ON
N
F
FE
EA
AT
TU
UR
RE
ES
S
F
Fi
ig
g.
.1
1
1.Fueltank
2.Fuellevelindicator
3.Fuelcap
4.Exhaust
5.ACsocket
6.Groundterminal
7.ACSwitch
8.Oilfillercap
9.Oildrainplug
10.Oilsensor
11.Voltmeter
12.Engineswitch
13.Chokelever
14.Recoilstarter
15.Fueltap
16.Airfiltercover
17.Sparkplug
T
Ty
yp
pe
eE
En
ng
gi
in
ne
e|
|A
Ai
ir
rc
co
oo
ol
le
ed
d
|
|4
4-
-s
st
tr
ro
ok
ke
ep
pe
et
tr
ro
ol
l
Cylinderarrangement | Inclined,1
cylinder
Continuous |4.0kW
Max.output | 4.8 kW
Operationhours | 13hours
Fuel | Unleadedpetrol
Fueltankcapacity | 15L
Engineoilcapacity | 600 ml
Sparkcontact
pointdistance | 0.7–0.8mm
Ratedvoltage | AC230V
Ratedfrequency(AC) | 50Hz
Ratedoutput | 2000W
Max.outputpower
ofapparatus
| 2200 W
Toolclass | I
Weight | 44kg
Dimensions | 590x430x440 mm
Outdoornoise(Lwa) | 94,0dB(A)
Soundpressurecapacity(
Lpa
)
| 65,0dB(A)
4
4Ferm Ferm 4
45
5
E
EX
XP
PL
LO
OD
DE
ED
DV
VI
IE
EW
WB
B
E
EX
XP
PL
LO
OD
DE
ED
DV
VI
IE
EW
WC
C
2
2.
.S
SA
AF
FE
ET
TY
YI
IN
NS
ST
TR
RU
UC
CT
TI
IO
ON
NS
S
Explanationofsymbols
Inthismanualand/oronthemachinethe
followingsymbolsareused:
In accordance with essential
applicable safety standards of
European directives
Risk of damaging material and/or
physical
injuries
Risk of an electric shock
Read instruction manual
Keep bystanders away
Do not expose to rain
Outdoor noise
Risk of high temperature
Caution: the generator contains some
parts which might reach high
temperatures
Faulty and/or discarded electrical or
electronic apparatus have to be
collected at the appropriate recycling
locations.
S
SA
AF
FE
ET
TY
YI
IN
NS
ST
TR
RU
UC
CT
TI
IO
ON
NS
S
P
Pe
er
rs
so
on
ns
s
• Neverallowchildrenorpeopleunfamiliar
withtheseinstructionstousethe
appliance.Localregulationsmayrestrict
theageoftheoperator.
• Alwaysoperateoutdoorswithgood
ventilation.Exhaustgascontains
poisonouscarbonmonoxide.
•Alwaysstoptheenginebeforerefillingthe
fueltankandcleanthemachineafterfilling
thefueltank.
•Donotinhalefumesfrompetrol.
E
El
le
ec
ct
tr
ri
ic
ci
it
ty
y
• Donottouchthegeneratorifyouhavewet
hands
• Donotoperatethegeneratorinwet
conditions.
•Donotoperatethegeneratornearwater.
• Neverconnecttwogeneratorstogether.
• Neverconnectthegeneratortoany
commercialpoweroutlet.
• Makesureanyextensioncordsusedarein
asafeconditionandofsufficientcapacity
forthetask.
• Ensurethattheloadonthegeneratorfalls
withinitscapacityasspecifiedinthetable
beforeplugginginanycords.
F
Fi
ir
re
ea
an
nd
db
bu
ur
rn
nh
ha
az
za
ar
rd
ds
s
• Theexhaustsystemgetshotenoughto
ignitesomematerials:
- keepthegeneratoratleast1meter
awayfrombuildingsandother
equipmentduringoperation.
- keepflammablematerialsawayfrom
thegenerator.
•Theexhaustbecomesveryhotduring
operationsandremainshotforawhile
afterstoppingtheengine:
- Lettheenginecoolbeforestoringthe
generatorindoors.
- Donottouchthehotexhaustwithyour
hands.
• Gasolineisextremelyflammableandis
explosiveundercertainconditions.Donot
smokeorallowflamesorsparkswherethe
generatorisrefueledorwheregasolineis
stored.
•Fuelvaporsareextremelyflammableand
mayigniteaftertheenginehasstarted.
Makesurethatanyspilledfuelhasbeen
wipedupbeforestartingthegenerator.
• Nevershadethegeneratorwithclothesor
otherarticles.
Ferm 5
5
4
44
4Ferm
S
SP
PA
AR
RE
EP
PA
AR
RT
TS
SL
LI
IS
ST
T
NNOO..DDEESSCCRRIIPPTTIIOONNPPOOSSIITTIIOONN
203078 GASKETSETCYLINDERHEAD A3,12
203079 SPARKPLUG A10
203080 SPARKPLUGWRENCH A15,16
203081 GASKETSETCARBURATOR B14,15,17
203082 AIRFILTERCOMPLETE C10
203083 GASKETSETEXHAUST D5,11
203084 FUELCAP E2,3
203086 FILTER E4
203092 FUELGAUGE E5
203091 GASKET E15
203087 MOTORSUPPORT F2
203089 MOTORSUPPORT F3
203085 RUBBERFOOT F6,7
400890 ENGINESWITCH -
400891 CIRCUITBREAKERSWITCH -
203093 CARBONBRUSHWITH HOLDER -
15
16
E
EX
XP
PL
LO
OD
DE
ED
DV
VI
IE
EW
WA
A
Ferm 4
43
3
3
3.
.U
US
SE
E
B
BE
EF
FO
OR
RE
ES
ST
TA
AR
RT
TI
IN
NG
GT
TH
HE
E
G
GE
EN
NE
ER
RA
AT
TO
OR
R
Ground terminal
The generator ground terminal is
connected to the frame of the generator, the
metal non-current-carrying parts of the
generator, and the ground terminals of each
receptacle. Before using the ground terminal,
consult a qualified electrician, electrical
inspector or local agency having jurisdiction for
local codes or ordinances that apply to the
intended use of the generator.
F
Fi
il
ll
la
an
nd
dc
ch
he
ec
ck
ko
oi
il
ll
le
ev
ve
el
l(
(q
qu
ua
an
nt
ti
it
ty
yi
is
s6
60
00
0m
ml
l)
)
Alwayschecktheoillevel(withmachineina
levelposition)beforestartingandifthe
engineunexpectedlystops(fig.2).
Forgeneraluseyoucanusean“all
temperature”oil10W-30
≤0ºC SAE#10
0ºC-25ºC SAE#20
25ºC-35ºC SAE#30
≥35ºC SAE#40
F
Fi
il
ll
la
an
nd
dc
ch
he
ec
ck
kf
fu
ue
el
ll
le
ev
ve
el
l
•Useunleadedfuelonly
• Removeanypowercords
•Turnpowerswitchesoff
• Donotoverfill–leaveairgapattopoffuel
level
•Alwaysscrewdownfuelcap
• Cleanupanyspilledfuel
• Donotsmokewhileoperatingthe
generator
Always use caution!
S
St
ta
ar
rt
ti
in
ng
gt
th
he
eg
ge
en
ne
er
ra
at
to
or
r
F
Fi
ig
g.
.1
1+
+4
4+
+5
5
1. Turnonfueltap(15).
2. Turnonengineswitch(12).
3. Movechokelever(13)toclosedposition
(torestartawarmengine,leavethechoke
leverinopenorhalf-openposition).
4. Pullslowlyonthestartercorduntilit
engages,thenpullsharplytostartthe
engine(14).
5. Allowtheenginetorununtilitwarmsup,
andthenmovethechokelevertotheopen
position(13).
U
Us
si
in
ng
gt
th
he
eA
AC
CO
Ou
ut
tp
pu
ut
t(
(2
23
30
0V
V)
)
• Startthegenerator.
• Plugintheelectricalapplianceplug.
•PressACcurrentprotectordownwardto
“ON”(7).
• Thevoltmeter(11)displaysthevoltageon
theACsocket.Normallythisshouldbe±
230Vduringuse.
S
St
to
op
pp
pi
in
ng
gt
th
he
eg
ge
en
ne
er
ra
at
to
or
r
F
Fi
ig
g.
.1
1+
+5
5
1. Unplugallcords(5)
2. Turnengineswitchto“OFF”(12)
3. Turnofffueltap(15)
4
4.
.S
SE
ER
RV
VI
IC
CE
E&
&M
MA
AI
IN
NT
TE
EN
NA
AN
NC
CE
E
P
PE
ER
RI
IO
OD
DI
IC
CM
MA
AI
IN
NT
TE
EN
NA
AN
NC
CE
E
Daily(pre-operationcheck)
• Checkengineoillevel
• Checkfuelhoseforcracksorother
damage.Replaceifnecessary.
• Checkexhaust-systemforleakage.
Retightenorreplacegasketifnecessary.
• Checkchokeoperation
• Checkrecoilstarteroperation
1
1s
st
tM
Mo
on
nt
th
ho
or
r2
20
0h
hr
rs
s
• Replaceengineoil
3
3M
Mo
on
nt
th
hs
so
or
r5
50
0h
hr
rs
s
•Checkconditionofsparkplug.Adjustgap
andclean.Replaceifnecessary.
•Clean,replaceifnecessary.
6
6M
Mo
on
nt
th
hs
so
or
r1
10
00
0h
hr
rs
s
•Replaceengineoil
• Cleanfueltapandfueltankfilter.Replaceif
necessary.
•Checkfittingsandfasteners.Replaceif
necessary.
1
12
2M
Mo
on
nt
th
hs
so
or
r3
30
00
0h
hr
rs
s
•Contactaspecializedservicecentreto
checkthevalveclearance.
•Checkthefanofthecoolingsystemfor
damage.
6
6Ferm
S
Se
er
rv
vi
ic
ce
e–
–n
no
ot
te
es
so
on
nm
ma
ai
in
nt
te
en
na
an
nc
ce
e
F
Fi
ig
g.
.1
1
O
Oi
il
lr
re
ep
pl
la
ac
ce
em
me
en
nt
t
• Warmupengineonlevelground
• Removefillercap(8)
•Opendrainplug(9)andletoildrain
completelyintoapanplacedunderthe
engine.
• Checkgaskets,replaceifrequired.Refit
drainplugandrefillenginewithcleanoil.
• Replacefillercap.
S
Sp
pa
ar
rk
kp
pl
lu
ug
gi
in
ns
sp
pe
ec
ct
ti
io
on
n
F
Fi
ig
g.
.3
3
• Disconnectthesparkplugcap,and
removeanydirtfromaroundthespark
plugarea.
• Removesparkplug(17)withtheplug
spannersupplied.
• Inspectthesparkplug.Itshouldbeatan
colour.
• Measurethegap(distancecontactpoint)
withasuitablegauge.Thegapshouldbe
0,7-0,8mm.Correctthegap,ifnecessary,
bycarefullybendingthesideelectrode.
• Replacethesparkplugiftheelectrodes
areworn,oriftheinsulatoriscrackedor
chipped.
• Installthesparkplugcarefully,byhand,to
avoidcross-threading.
• Placethesparkplugwithcorrecttorque:
20Nm.
• Attachthesparkplugcap.
E
Ex
xh
ha
au
us
st
ts
sc
cr
re
ee
en
n
• Waitforexhausttocool.
•Exhaustscreen maybeblockedupwith
carbondeposits.
•Undothescrewcapandremovethe
exhaustscreen.
• Cleanthescreenwithawirebrushand
refit.
•Replaceexhaustscreenifdamaged.
A
Ai
ir
rf
fi
il
lt
te
er
rc
cl
le
ea
an
ni
in
ng
g
•Removetheairfiltercover(16).
• Removefilterelementandwashwellin
solvent.
•Pourasmallamountofoilontothefilter
elementandgentlysqueezeoutany
excessoil.
•
Replacethefilterelementandairfiltercover.
• Besurethefiltercoversealsproperlyall
around.
Do not run the engine without the air
filter element in place.
Never place a wet filter (with solvent)
on the machine.
F
Fu
ue
el
lt
ta
ap
p
• Toremovethefueltapfilter,simplyundo
thecupatthebottomofthefueltank
• Useasmallspannertoremovethetap
•Cleanandwashoutthefilterandcup,and
replace.
T
TR
RO
OU
UB
BL
LE
ES
SH
HO
OO
OT
TI
IN
NG
G
B
Ba
as
si
ic
cc
ch
he
ec
ck
ks
s
•Makesureyouhaveplentyoffuel
• Makesurethefueltapison
•Makesuretheengine-switchison
• Makesuretheoilleveliscorrect
• Thegeneratorhasanoilsensor.Whenthe
oillevelistoolow,thegeneratorwillnotbe
abletostart.
• Removesparkplug,connectsparkplug
leadandearthittothegenerator.Pull
startercordgentlyandlookforaspark.If
thereisnospark,replacesparkplug.
S
Sp
pa
ar
rk
kp
pl
lu
ug
gi
is
sO
OK
K,
,b
bu
ut
te
en
ng
gi
in
ne
es
st
ti
il
ll
lw
wo
on
n’
’t
t
s
st
ta
ar
rt
t
• Checkfueltapfilterisclean
• Checkfuellineisclear
• Checkcarburetorisnotclogged
E
En
ng
gi
in
ne
ew
wi
il
ll
ln
no
ot
ts
st
ta
ar
rt
t
• Cleanorreplacesparkplug
• Checkignitionsystem–iffaulty,contact
yourservicecentre
• Checkcompression–iflow,contactyour
servicecentre
• Checkforloosecylinderhead–tighten
bolts
• Checkfordamagedcylinderheadgasket–
replaceifnecessary
Ferm 7
7
Dichiariamo,assumendolapiena
responsabilitàditaledichiarazione,cheil
F
FG
GG
G-
-2
20
00
00
0N
N
èconformealleseguentinormativeairelativi
documenti.
E
EN
N1
12
26
60
01
1,
,E
EN
N5
55
50
01
14
4-
-1
1,
,E
EN
N5
55
50
01
12
2,
,
E
EN
N6
61
10
00
00
0-
-6
6-
-1
1
conformealledirettive
9
98
8/
/3
37
7/
/E
EC
C,
,2
20
00
06
6/
/9
95
5/
/E
EC
C,
,2
20
00
04
4/
/1
10
08
8/
/E
EC
C,
,
2
20
00
02
2/
/9
95
5/
/E
EC
C,
,2
20
00
02
2/
/9
96
6/
/E
EC
C
dal01-01-2007
Z
ZW
WO
OL
LL
LE
EN
NL
L
J.A.Bakker-vanIngen J.Lodewijk
CEOFermBV QualityManager
FermGlobal
Lanostrapoliticaèsemprevoltaamigliorarei
nostriprodotti.Prodottisoggettiamodifiche
senzapreavviso.
F
Fe
er
rm
mB
BV
V•
•L
Li
in
ng
ge
en
ns
st
tr
ra
aa
at
t6
6•
•8
80
02
28
8P
PM
M
Z
Zw
wo
ol
ll
le
e•
•O
Ol
la
an
nd
da
am
m
CE
ı
D
DI
IC
CH
HI
IA
AR
RA
AZ
ZI
IO
ON
NE
ED
DI
IC
CO
ON
NF
FO
OR
RM
MI
IT
TÀ
À(
(I
I)
)
4
42
2Ferm
• Assicurarsichecisiailtappoperil
carburante
• Assicurarsichel’interruttoredelmotore
siaacceso
• Assicurarsicheillivellodell’oliosiagiusto
• Ilgeneratoreèdotatodiunsensoreolio.
Quandoillivellodell'olioètroppobasso,il
generatorenonpuòessereavviato.
• Rimuoverelacandelad’accensione,
collegareilfilodellacandelad’accensione
ecollegarloaterraalgeneratore.Tirare
gentilmenteilfilod’accensioneper
controllaresec’èunascintilla.Senonc’è
scintilla,sostituirelacandela
d’accensione.
L
La
ac
ca
an
nd
de
el
la
ad
d’
’a
ac
cc
ce
en
ns
si
io
on
ne
eè
èO
OK
K,
,m
ma
ai
il
l
m
mo
ot
to
or
re
en
no
on
np
pa
ar
rt
te
ea
an
nc
co
or
ra
a
• controllarecheilfiltrodeltappoperil
carburantesiapulito
• Controllarecheiltubodialimentazionesia
pulito
•Controllarecheilcarburatorenonsia
intasato
I
Il
lm
mo
ot
to
or
re
en
no
on
np
pa
ar
rt
te
e
• Pulireosostituirelacandeladi
accensione.
•Controllareilsistemadiaccensione–se
difettoso,contattareilpropriocentro
servizi
•Controllarelacompressione–sebassa,
contattareilpropriocentroservizi
• Controllarechelatestadelcilindrononsi
siaallentata–stringereibulloni
• Controllarechelaguarnizionedellatesta
delcilindrononsiadanneggiata–
sostituirlasenecessario
P
PU
UL
LI
IZ
ZI
IA
A
Pulirelacarcassaregolarmenteconun
pannomorbido,preferibilmenteprimad’ogni
uso. Eliminarepolvereesporcodallepresedi
ventilazione.
Toglierelosporcoostinatoconunostraccio
morbido,inumiditoconacquasaponata.
Nonusaresolventicomepetrolio,alcool,
ammoniaca,ecc.perchéquestipotrebbero
danneggiareicomponentidiplastica.
C
CO
ON
NS
SE
ER
RV
VA
AZ
ZI
IO
ON
NE
E(
(A
AL
LU
UN
NG
GO
O
T
TE
ER
RM
MI
IN
NE
E)
)
• Svuotareilserbatoio,iltappoperil
carburante,laciotoladelcarburatoreeil
carburatore.
• Versareunacoppad’oliodamotorenel
serbatoioescuotereilgeneratoreper
spargerel’oliointuttoilserbatoio.
Svuotarel’olioineccesso.
• Rimuoverelacandelad’accensionee
versarvi1cucchiaiodioliodamotore,
tirareilfilod’accensionediversevoltecon
l’interruttored’accensionespento.
Sostituirelacandeladiaccensione
• Tirareilfilod’accensionefinchénonsi
sentecompressioneefermarsi.
• Pulireigeneratoriesterioriedi
rivestimentoconunprodottoantiruggine.
• Posizionareilgeneratoresuunpianoe
coprirloconunpannoasciuttoepulito.
R
RI
IP
PA
AR
RA
AZ
ZI
IO
ON
NI
IE
EC
CO
OM
MM
ME
ER
RC
CI
IA
AN
NT
TI
I
Sesipresentanoproblemiacausadi,per
esempio,usuradiunapartedellasega,si
pregadicontattareilserviziodiassistenza
all'indirizzoriportatosullaschedadigaranzia.
A
AM
MB
BI
IE
EN
NT
TE
E
Perevitarechesidanneggiduranteil
trasporto,lamacchinaèimballatainun
contenitoreresistente.Lamaggiorpartedei
componentidell'imballaggiosonoriciclabili.
Portaretalimaterialipressogliappositicentri
diriciclaggio.
Strumenti elettrici e/o elettronici
difettosi o usurati devono essere
smaltiti in appropriate aree di
riciclaggio.
G
GA
AR
RA
AN
NZ
ZI
IA
A
Sipregadileggerelecondizionidigaranzia
sullacartadigaranziacheèinclusa.
Ferm 4
41
1
C
CL
LE
EA
AN
NI
IN
NG
G
Cleanthehousingregularlywithasoftcloth,
preferablyeverytimeitisused.Keeptheair
ventsfreeofdustanddirt.
Removestubborndirtwithasoftrag
moistenedinsoapywater.Donotuseany
solventssuchaspetrol,alcohol,ammonia,
etc.assuchsubstancescandamagethe
plasticparts.
S
ST
TO
OR
RA
AG
GE
E(
(L
LO
ON
NG
GT
TE
ER
RM
M)
)
• Drainfueltank,fueltap,carburetorbowl
andcarburetor
• Pour1cupofengineoilintothefueltank
andshakethegeneratortospreadtheoil
aroundthetank.Drainexcessoil.
• Removesparkplugandpourin1spoonful
ofengineoil,pullthestartercordseveral
timeswiththestarterswitchOFF.Replace
sparkplug.
• Pullonthestartercorduntilyoufeel
compressionandstop.
• Cleanthegeneratorsexteriorandcoat
withrustinhibitor.
• Placethegeneratoronflatgroundand
coverwithacleandrycloth.
F
FA
AU
UL
LT
TS
S
Shouldafaultoccur,e.g.afterwearofapart,
pleasecontacttheserviceaddressonthe
warrantycard.Inthebackofthismanualyou
findanexplodedviewshowingthepartsthat
canbeordered.
E
EN
NV
VI
IR
RO
ON
NM
ME
EN
NT
T
Topreventdamageduringtransport,the
applianceis
deliveredinasolidpackagingwhichconsists
largelyofreusablematerial.Thereforeplease
makeuseofoptionsforrecyclingthe
packaging.
Faulty and/or discarded electrical or
electronic apparatus have to be
collected at the appropriate recycling
locations.
W
WA
AR
RR
RA
AN
NT
TY
Y
Readthetermsofwarrantyontheseparate
warrantycardwhichisenclosed.
Wedeclareunderoursoleresponsibilitythat
this
F
FG
GG
G-
-2
20
00
00
0N
N
isinconformitywiththefollowingstandards
orstandardizeddocuments
E
EN
N1
12
26
60
01
1,
,E
EN
N5
55
50
01
14
4-
-1
1,
,E
EN
N5
55
50
01
12
2,
,
E
EN
N6
61
10
00
00
0-
-6
6-
-1
1
inaccordancewiththeregulations
9
98
8/
/3
37
7/
/E
EC
C,
,2
20
00
06
6/
/9
95
5/
/E
EC
C,
,2
20
00
04
4/
/1
10
08
8/
/E
EC
C,
,
2
20
00
02
2/
/9
95
5/
/E
EC
C,
,2
20
00
02
2/
/9
96
6/
/E
EC
C
from 01-01-2007
Z
ZW
WO
OL
LL
LE
EN
NL
L
J.A.Bakker-vanIngen J.Lodewijk
CEOFermBV QualityManager
FermGlobal
Itisourpolicytocontinuouslyimproveour
productsandwethereforereservetherightto
changetheproductspecificationwithout
priornotice.
F
Fe
er
rm
mB
BV
V•
•L
Li
in
ng
ge
en
ns
st
tr
ra
aa
at
t6
6•
•8
80
02
28
8P
PM
M
Z
Zw
wo
ol
ll
le
e•
•T
Th
he
eN
Ne
et
th
he
er
rl
la
an
nd
ds
s
CE
ı
D
DE
EC
CL
LA
AR
RA
AT
TI
IO
ON
NO
OF
FC
CO
ON
NF
FO
OR
RM
MI
IT
TY
Y(
(G
GB
B)
)
8
8Ferm
G
GE
EN
NE
ER
RA
AT
TO
OR
R(
(4
4-
-T
TA
AK
KT
T)
)
D
DI
IE
EN
NU
UM
MM
ME
ER
RN
NI
IM
MN
NA
AC
CH
HF
FO
OL
LG
GE
EN
ND
DE
EN
N
T
TE
EX
XT
TK
KO
OR
RR
RE
ES
SP
PO
ON
ND
DI
IE
ER
RE
EN
NM
MI
IT
TD
DE
EN
N
A
AB
BB
BI
IL
LD
DU
UN
NG
GE
EN
NA
AU
UF
FS
SE
EI
IT
TE
E2
2+
+3
3
S
SI
IC
CH
HE
ER
RH
HE
EI
IT
TS
SV
VO
OR
RS
SC
CH
HR
RI
IF
FT
TE
EN
NU
UN
ND
D
B
BE
ED
DI
IE
EN
NU
UN
NG
GS
SA
AN
NL
LE
EI
IT
TU
UN
NG
G
Lesen Sie diese Anleitung im Hinblick
auf Ihre eigene Sicherheit und die
Sicherheit anderer bitte vor der
Benutzung dieses Geräts gründlich durch.
Dadurch verstehen Sie Ihr Produkt besser
und vermeiden unnötige Risiken. Bewahren
Sie diese Anleitung zum künftigen Gebrauch
an einer sicheren Stelle auf.
I
IN
NH
HA
AL
LT
T:
:
1. Gerätedaten
2. Sicherheitsvorschriften
3. Benutzung
4. ServiceundWartung
1
1.
.G
GE
ER
RÄ
ÄT
TE
ED
DA
AT
TE
EN
N
E
EI
IN
NL
LE
EI
IT
TU
UN
NG
G
DerGeneratoristfürdieStromerzeugungmit
Hilfeeines4-Takt-Benzinmotorsausgelegt.
BeiAusfalldesStromnetzeskönnenSiealso
IhreElektrowerkzeugeaußenbenutzen.
A
AV
VR
R
DerautomatischeSpannungsreglerim
InnerendesStromerzeugerssorgtfüreine
stabile,präziseAusgangsspannung.
T
TE
EC
CH
HN
NI
IS
SC
CH
HE
ED
DA
AT
TE
EN
N
M
ME
ER
RK
KM
MA
AL
LE
E
A
Ab
bb
b.
.1
1
1.Kraftstofftank
2.Kraftstoffstandanzeige
3.Tankdeckel
4.Auspuff
5.Wechselstromanschluss
6.Erdanschluss
7.Wechselstromschalter
8.Öleinfüllverschluss
9.Ölablassstopfen
10.Ölsensor
11.Voltmeter
12.Motorschalter
13.Starterklappenhebel
14.Reversierstarter
15.Kraftstoffhahn
16.Luftfilterabdeckung
17.Zündkerze
M
Mo
ot
to
or
rT
Ty
yp
p|
|L
Lu
uf
ft
tg
ge
ek
kü
üh
hl
lt
te
er
r
|
|4
4-
-T
Ta
ak
kt
t-
-
|
|B
Be
en
nz
zi
in
nm
mo
ot
to
or
r
Zylinderanordnung | Geneigt,1
ZylinderKontinuLeistung
| 4.0kW
Max.Leistung | 4.8 kW
Betriebsstunden | 13Stunden
Kraftstoff | BleifreiesBenzin
Kraftstofftankinhalt | 15L
Motorölinhalt | 600 ml
Elektrodenabstand | 0.7 – 0.8 mm
Nennspannung | 230VAC
Nennfrequenz(AC) | 50Hz
Nennleistung | 2000W
Max.Ausgangsleist.
desGeräts | 2200 W
Werkzeugklasse | I
Gewicht | 44kg
Abmessungen |
590x430x440mm
Außengeräusch(Lwa) | 94,0dB(A)
Schalldruck(Lpa) | 65,0dB(A)
Ferm 9
9
3
3m
me
es
si
io
o5
50
0o
or
re
e
• Controllarelacondizionedella candela di
accensione.Regolarel’aperturae pulire.
Sostituirlasenecessario.
• Pulire,sostituirlasenecessario.
6
6m
me
es
si
io
o1
10
00
0o
or
re
e
• Sostituirel’olionelmotore
• Pulireiltappoperilcarburanteeilfiltrodel
serbatoioperilcarburante.Sostituirlise
necessario.
• Controllareaccessoriechiusure.
Sostituirlisenecessario.12mesio300ore
• Contattareuncentroservizispecializzato
percontrollarel’autorizzazionedella
valvola.
• Controllareilventilatoredelsistemadi
raffreddamentoperdanni.
R
RE
EV
VI
IS
SI
IO
ON
NE
E-
-N
NO
OT
TE
ES
SU
UL
LL
LA
A
M
MA
AN
NU
UT
TE
EN
NZ
ZI
IO
ON
NE
E
F
Fi
ig
g.
.1
1
Sostituzionedell’olio
• Scaldareilmotoreinpiano
• Togliereiltappodiriempimentoolio(8)
• Aprireil rubinettodiscarico (9)e lasciareche
l’olioscoli completamentenelpiatto
posizionatosotto almotore.
• Controllareleguarnizioni,sostituirlese
necessario.
• Risistemareilrubinettodiscaricoe
riempireilmotoreconoliopulito.
• Sostituireiltappodiriempimentoolio.
I
Is
sp
pe
ez
zi
io
on
ne
ed
de
el
ll
la
ac
ca
an
nd
de
el
la
ad
di
ia
ac
cc
ce
en
ns
si
io
on
ne
e
F
Fi
ig
g.
.3
3
• Scollegareilcappucciodellacandeladi
accensioneerimuoverelosporcointorno
allazonadellacandeladiaccensione.
• Rimuoverelacandeladiaccensione(17)
conlachiaveperlaspinaindotazione.
• Ispezionarelacandeladiaccensione.
Dovrebbeesseredicolormarronechiaro.
•Misurarelospazio(distanzapuntodi
contatto)conuncalibroadatto.Lospazio
dovrebbeessere0.7–0.8mm.Correggere
lospazio,senecessario,piegando
attentamentel’elettrodolaterale.
• Sostituirelacandelad’accensione se gli
elettrodisonoconsumatio se l’isolante è
spaccatooscheggiato.
• Installarelacandelad’accensione
attentamente,amano,evitandola
filettatura.
• Sistemarelacandelad’accensionecon
unacorrettacoppiaditorsione:20Nm.
• Attaccareilcappucciodellacandeladi
accensione.
F
Fi
il
lt
tr
ro
od
di
is
sc
ca
ar
ri
ic
co
o
•Aspettarecheloscaricosiraffreddi.
• Ilfiltrodiscarico potrebbeessereintasato
condepositidicarbone.
• Scioglierelaviteerimuovereilfiltrodi
scarico.
•Pulireilfiltro con una spazzolametallicae
risistemarlo.
• Sostituireilfiltrodiscaricose
danneggiato.
P
Pu
ul
li
iz
zi
ia
ad
de
el
lf
fi
il
lt
tr
ro
od
de
el
ll
l’
’a
ar
ri
ia
a
•Rimuoverelacoperturaperilfiltrodell’aria
(16).
• Rimuoverel’elementofiltroelavarlobene
nelsolvente.
• Versareunapiccolaquantitàdiolio
nell’elementofiltroespremere
gentilmenteognieccessodiolio.
• Sostituirel’elementofiltroelacopertura
perilfiltrodell’aria.
• Assicurarsichelacoperturaperilfiltro
dell’ariasigilliadeguatamentetutto
intorno.
Non azionare il motore senza che
l’elemento filtro dell’aria sia a posto.
Non mettere mai un filtro bagnato
(con solvente) sulla macchina.
T
Ta
ap
pp
po
op
pe
er
ri
il
lc
ca
ar
rb
bu
ur
ra
an
nt
te
e
• Perrimuovereilfiltrodeltappoperil
carburante,scioglieresemplicementela
coppainfondoalserbatoio.
• Usareunapiccolachiaveperrimuovereil
tappo
• Pulireetogliereilfiltroelacoppae
sostituirli.
R
RI
IS
SO
OL
LU
UZ
ZI
IO
ON
NE
ED
DE
EI
IP
PR
RO
OB
BL
LE
EM
MI
I
C
Co
on
nt
tr
ro
ol
ll
li
id
di
ib
ba
as
se
e
• Assicurarsidiaveresufficientecarburante
4
40
0Ferm
G
GE
EN
NE
ER
RA
AT
TO
OR
RE
E
Terminale di terra
Il terminale di terra è collegato al telaio
del generatore, alle parti metalliche non
destinate al trasporto di corrente e ai terminali di
terra di ogni presa elettrica.Prima di usare il
terminale di terra, consultare un elettricista
qualificato, un collaudatore di impianti o
un'agenzia locale che dispongano delle
normative o delle ordinanze previste per l'uso
del generatore.
R
Ri
ie
em
mp
pi
ir
re
ee
ec
co
on
nt
tr
ro
ol
ll
la
ar
re
ei
il
ll
li
iv
ve
el
ll
lo
o
d
de
el
ll
l’
’o
ol
li
io
o
(
(l
la
aq
qu
ua
an
nt
ti
it
tà
àè
è6
60
00
0m
ml
l)
)
Controllaresempreillivellodell’olio(conla
macchinainposizioneorizzontale)primadi
accendereeseilmotoresiferma
inaspettatamente(fig.2).
Perunusogeneralepoteteutilizzareuna
temperaturadell’olio10W-30
≤0ºC SAE#10
0ºC-25ºC SAE#20
25ºC-35ºC SAE#30
≥35ºC SAE#40
R
Ri
ie
em
mp
pi
ir
re
ee
ec
co
on
nt
tr
ro
ol
ll
la
ar
re
ei
il
ll
li
iv
ve
el
ll
lo
od
de
el
l
c
ca
ar
rb
bu
ur
ra
an
nt
te
e
• Usaresolocarburantesenzapiombo
• Rimuovereognifilodicorrente
• Spegneregliinterruttori
• Nonriempiretroppo–lasciareunospazio
d’ariasopraallivellodelcarburante
• Riavvitaresempreiltappoperil
carburante
• Pulireilcarburanterovesciato
• Nonfumarementresistaazionandoil
generatore
Stare sempre attenti!
A
Av
vv
vi
ia
ar
re
ei
il
lg
ge
en
ne
er
ra
at
to
or
re
e
F
Fi
ig
g.
.1
1+
+4
4+
+5
5
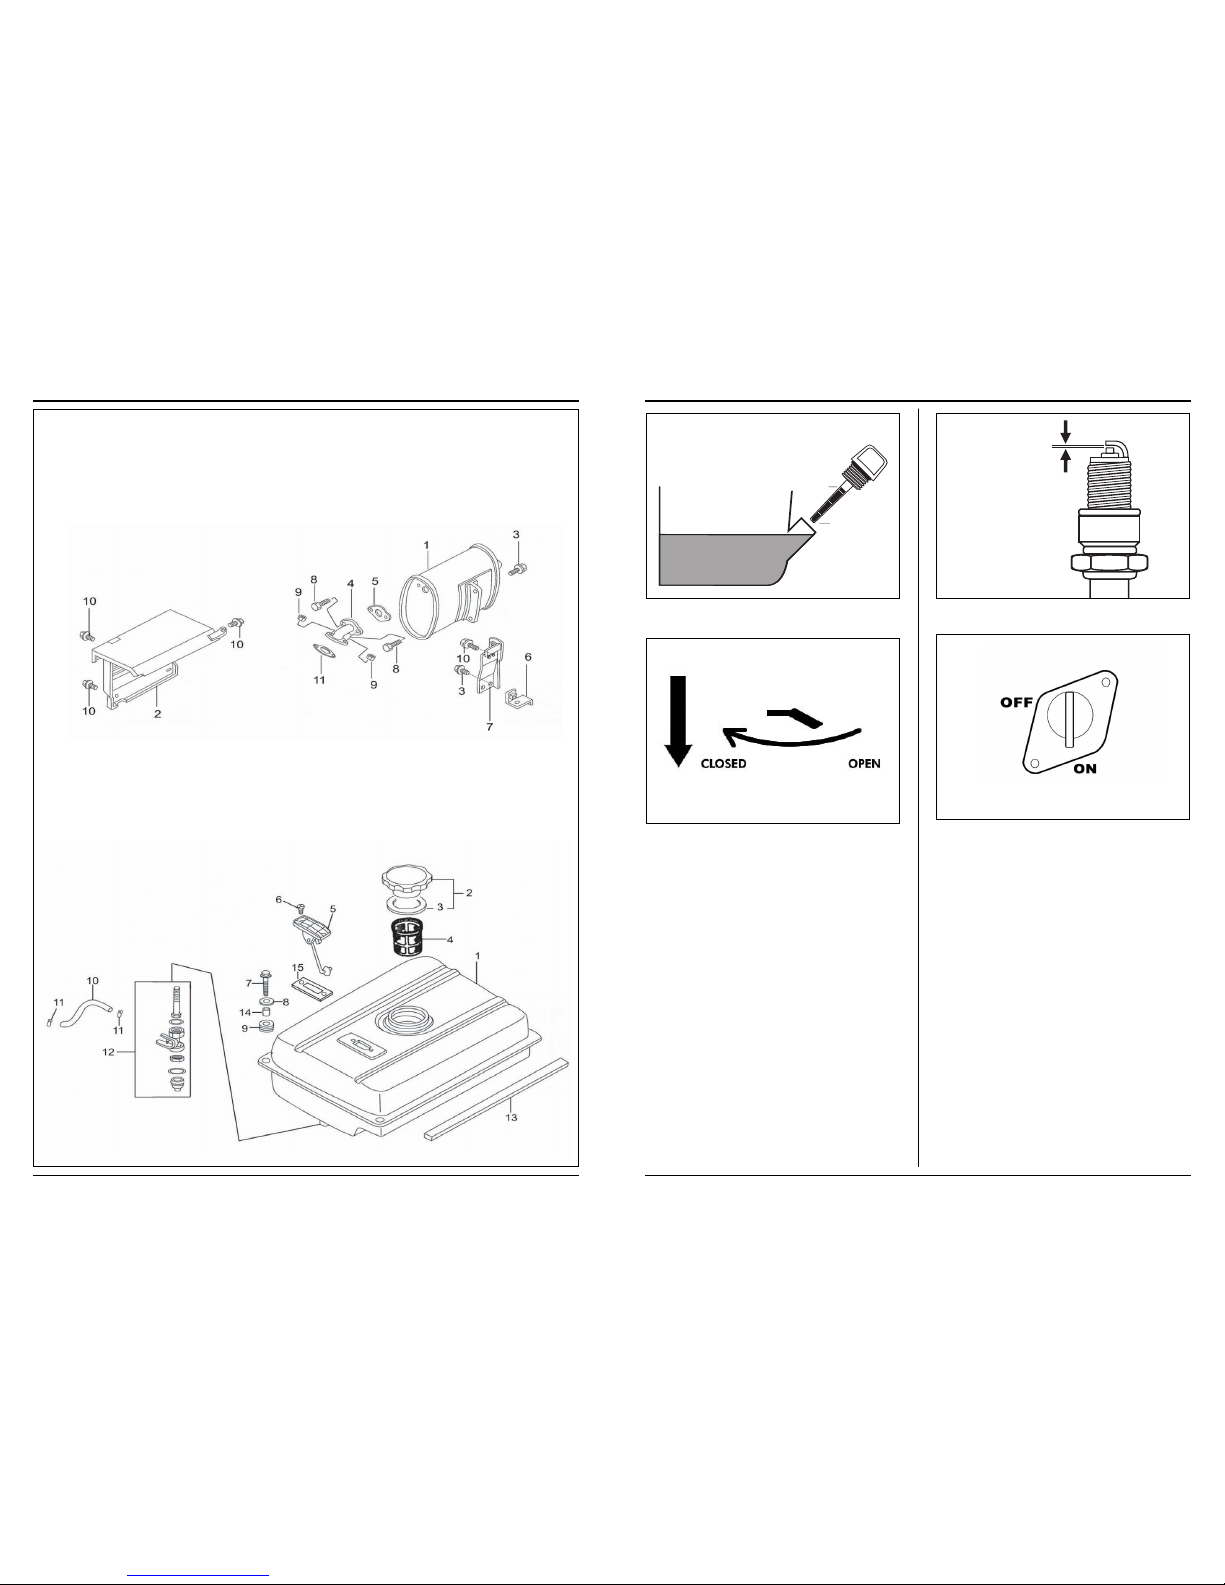
1. Aprireiltappoperilcarburante(15).
2. Accenderel’interruttoredelmotore(12).
3. Muoverelalevadellavalvoladell’aria(13)
sullaposizionechiuso(perriavviareil
motorecaldo,lasciarelalevadellavalvola
dell’ariasullaposizioneapertoosemi-
aperto).
4. Tirarelentamentesulfilodelmotorino
d’avviamentofinchésiinnesta,poitirare
bruscamenteperavviareilmotore(14).
5. Lasciareilmotore accesofinchési scaldae
poimuovere lalevadella valvoladell’aria
sullaposizione aperto(13).
U
Us
so
od
de
el
ll
l'
'u
us
sc
ci
it
ta
ac
c.
.a
a.
.(
(2
23
30
0V
V)
)
• Avviareilgeneratore
• Inserirelaspinadell'apparecchioelettrico
• Premerelaprotezionedacorrentec.a.
versoilbassoportandolasu“ON”(7).
• Ilvoltmetro(11)consentedivisualizzarela
tensionesullapresac.a.Normalmentela
tensionedovrebbeessereparia±230V
durantel'uso
F
Fe
er
rm
ma
ar
re
ei
il
lg
ge
en
ne
er
ra
at
to
or
re
e
F
Fi
ig
g.
.1
1+
+5
5
1. Scollegaretuttiifili(5)
2. Spegnerel’interruttoredelmotore(12).
3. Chiudereiltappoperilcarburante(15).
4
4.
.S
SE
ER
RV
VI
IZ
ZI
IO
O&
&M
MA
AN
NU
UT
TE
EN
NZ
ZI
IO
ON
NE
E
M
MA
AN
NU
UT
TE
EN
NZ
ZI
IO
ON
NE
EP
PE
ER
RI
IO
OD
DI
IC
CA
A
G
Gi
io
or
rn
na
al
lm
me
en
nt
te
e(
(c
co
on
nt
tr
ro
ol
ll
lo
od
di
ip
pr
re
e-
-u
us
so
o)
)
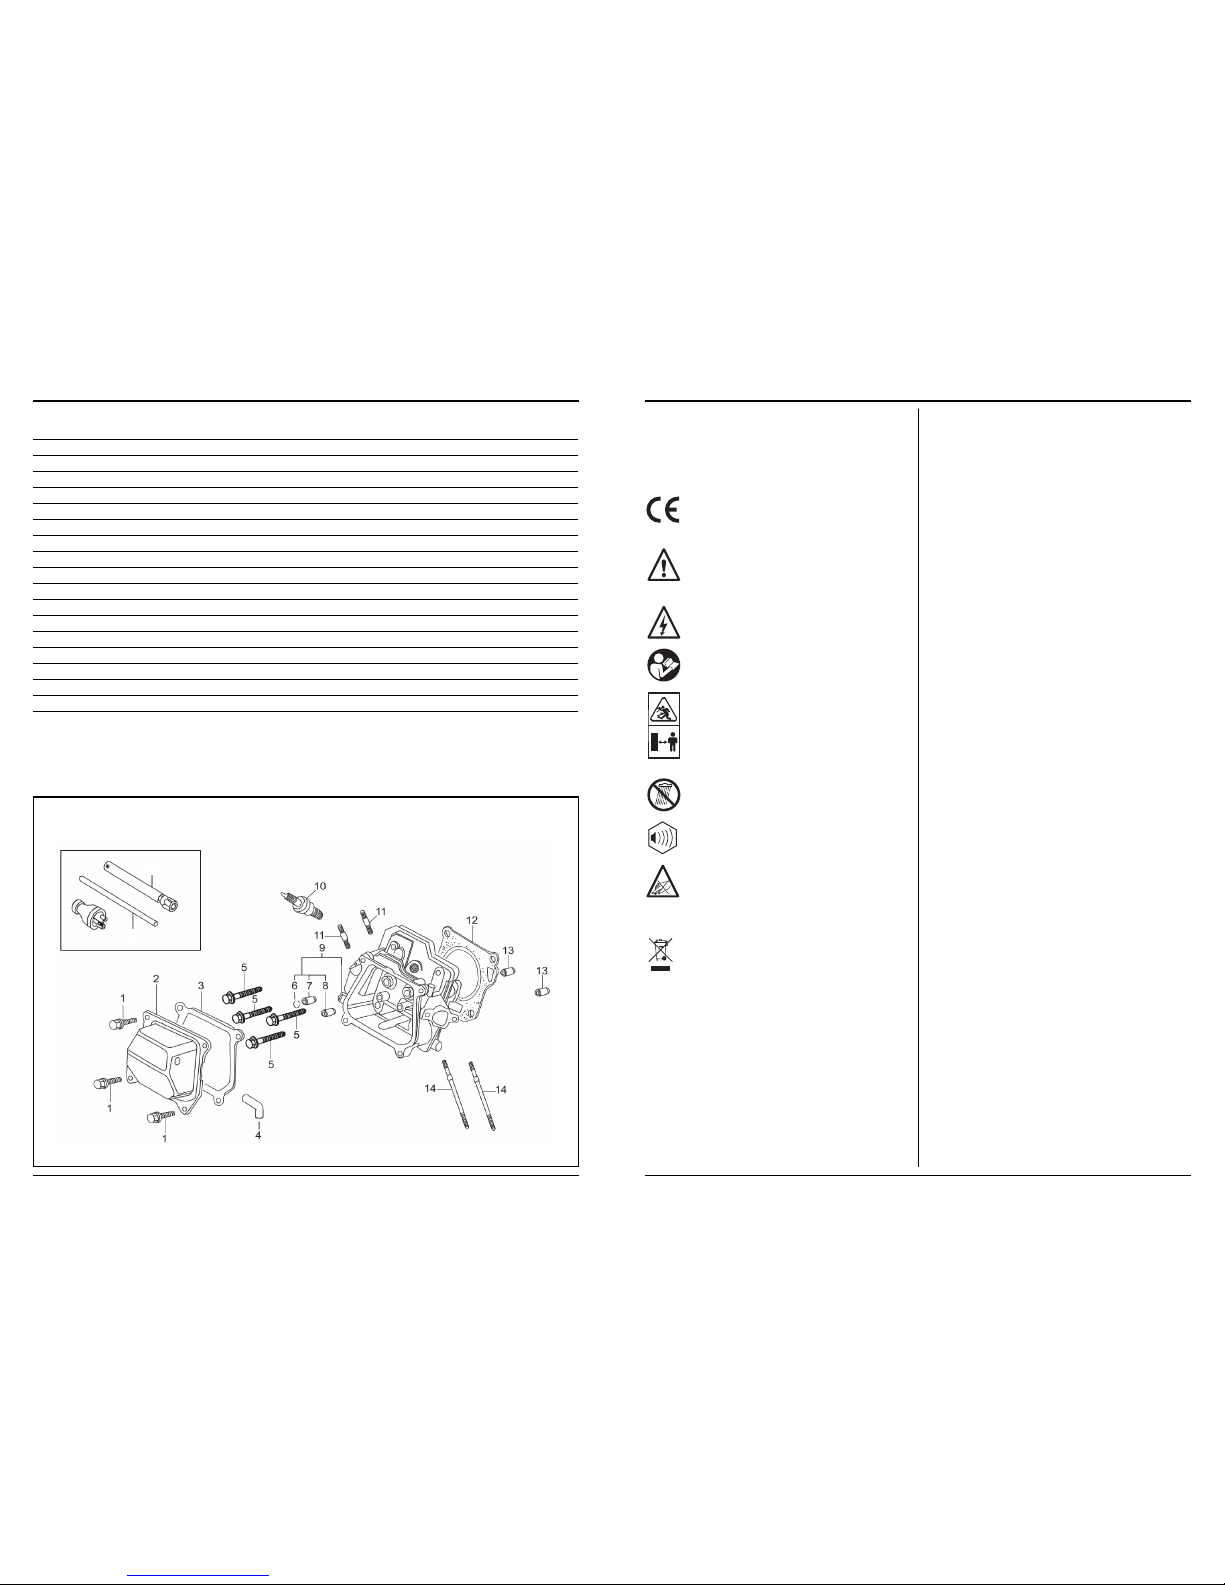
•Controllareillivellodiolionelmotore
• Controllareiltubodelcarburanteper
spaccatureoaltridanni.Sostituirlose
necessario.
• Controllareilsistemadiscaricoper
perdite.Ristringereosostituirela
guarnizionesenecessario.
• Controllareilfunzionamentodellavalvola
dell’aria
• Controllareilfunzionamentodelmotorino
d’avviamentoconrinculo
P
Pr
ri
im
mo
om
me
es
se
eo
o2
20
0o
or
re
e
• Sostituirel’olionelmotore
Ferm 3
39
9
2
2.
.S
SI
IC
CH
HE
ER
RH
HE
EI
IT
TS
SV
VO
OR
RS
SC
CH
HR
RI
IF
FT
TE
EN
N
ErklärungderSymbole
IndieserAnleitungund/oderamGerät
werdenfolgendeSymboleverwendet:
Entspricht grundlegenden
anwendbaren Sicherheitsnormen der
europäischen Richtlinien.
Gefahr von Materialbeschädigung
bzw. Verletzungen.
Bezeichnet Stromschlaggefahr.
Gebrauchsanleitung durchlesen
Zuschauer fernhalten
Keinem Regen aussetzen.
Außengeräusch
Gefährdung durch hohe
temperaturen. Achtung! Der
Generator enthält Bauteile, die sich
stark erhitzen können.
Schadhafte und/oder entsorgte
elektrische oder elektronische Geräte
müssen an den dafür vorgesehenen
Recycling-Stellen abgegeben
werden.
S
SI
IC
CH
HE
ER
RH
HE
EI
IT
TS
SV
VO
OR
RS
SC
CH
HR
RI
IF
FT
TE
EN
N
P
Pe
er
rs
so
on
ne
en
n
• LassenSiedasGerätnievonKindernoder
Personenbedienen,diedamitnicht
vertrautsind.Örtlichgeltende
Bestimmungenschreibenfürdie
BenutzungeventuelleinMindestaltervor.
• GerätimmerimFreienmitguterBelüftung
benutzen.Abgaseenthaltengiftiges
Kohlenmonoxid.
•StellenSiedenMotorvordemAuffüllen
desKraftstofftanksimmerabundreinigen
SiedasGerät,nachdemderKraftstofftank
gefülltwurde.
• Benzindämpfedürfennichteingeatmet
werden.
S
St
tr
ro
om
mn
ne
et
tz
z
• GeneratornichtmitfeuchtenHänden
berühren.
•GeneratornichtinnasserUmgebung
betreiben.
• GeneratornichtinderNähevonWasser
betreiben.
• NiemalszweiGeneratoren
zusammenschalten.
• NiemalsdenGeneratoraneine
handelsüblicheSteckdoseanschließen.
• VergewissernSiesich,dasseventuell
benutzteVerlängerungskabelsicherund
fürdiebetreffendeAufgabemit
ausreichenderKapazitätversehensind.
• VergewissernSiesich,dassdie
GeneratorbelastungindeninderTabelle
genanntenLeistungsbereichfällt,bevor
Kabeleingestecktwerden.
B
Br
ra
an
nd
d-
-u
un
nd
dV
Ve
er
rb
br
re
en
nn
nu
un
ng
gs
sg
ge
ef
fa
ah
hr
re
en
n
• DasAuspuffsystemwirdheißgenug,um
einigeMaterialienzuentzünden:
- HaltenSiedenGeneratorwährendder
Benutzungwenigstens1Metervon
GebäudenundanderenAusrüstungen
entfernt.
- HaltenSieentzündbareMaterialien
vomGeneratorfern.
• DerAuspuffwirdbeiderArbeitsehrheiß
undbleibtnachdemAbschaltendes
MotorseineZeitlangheiß:
- LassenSiedenMotor,bevorSieihnim
Gebäudeinnernunterbringen,
abkühlen.
- BerührenSiedenheißenAuspuffnicht
mitdenHänden.
• Benzinisthochentzündbarundunter
bestimmtenBedingungenexplosiv.An
Stellen,andenenderGenerator
aufgetanktoderBenzingelagertwird,darf
nichtgerauchtwerdenundesdürfenkeine
FlammenoderFunkenentstehen.
• Kraftstoffdämpfesindextrementzündbar
undkönnensichnachdemStartendes
Motorsentzünden.VergewissernSiesich,
1
10
0Ferm