Ferm ATM1042 User manual

WWW.FERM.COM
HU
CS
SL
PL
LT
LV
BS
RU
EL
MK
EN
DE
NL
FR
ES
PT
IT
SV
FI
NO
DA
Original instructions 04
Übersetzung der Originalbetriebsanleitung 09
Vertaling van de oorspronkelijke gebruiksaanwijzing 14
Traduction de la notice originale 19
Traducción del manual original 24
Tradução do manual original 29
Traduzione delle istruzioni originali 34
Översättning av bruksanvisning i original 39
Alkuperäisten ohjeiden käännös 43
Oversatt fra orginal veiledning 48
Oversættelse af den originale brugsanvisning 52
Eredeti használati utasítás fordítása 57
Překlad püvodního návodu k používání 62
Prevod izvirnih navodil 67
Tłumaczenie instrukcji oryginalnej 72
Originalios instrukcijos vertimas 77
Instrukciju tulkojums no oriģinālvalodas 82
Prevod originalnog uputstva 87
Prevod originalnog uputstva 87
Перевод исхоvдных инструкций 91
Μετάφραση του πρωτοτύπου των οδηγιών χρήσης 97
Превод на оригиналните упатства 102
SR
ATM1042
2
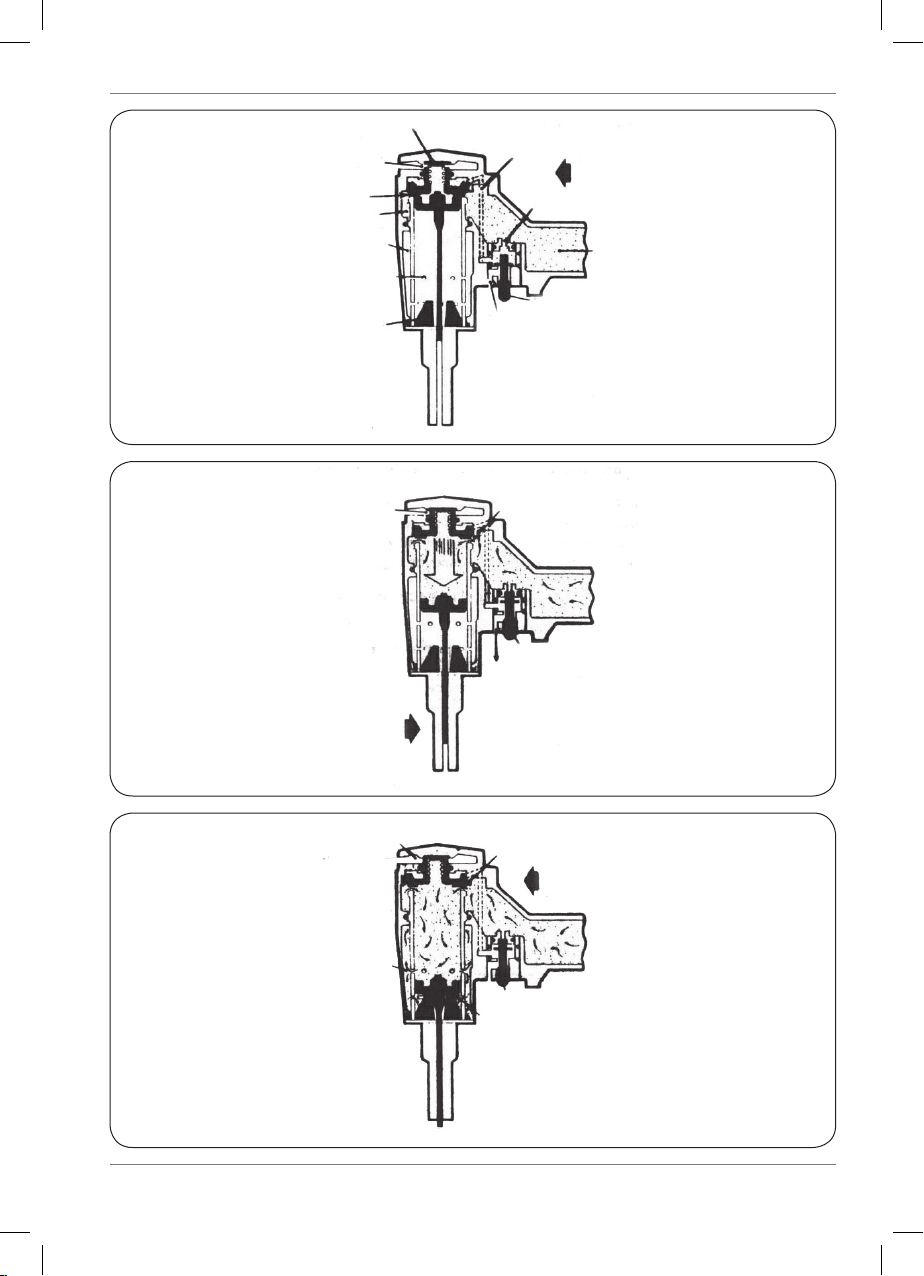
Fig. 1
Fig. 2
Fig. 3
Head valve bumper Port between head valve and trigger valve
Resevoir of high pressure air
Trigger valve released
Passage for air release from head valve
Bumper
Hole in cilinder wall
Return chamber
Resevoir of high pressure air
Head valve closed
Exhaust is open
Exhaust sealed by head valve bumper
Trigger valve actuated
Air released from above head valve
Driving stroke
Piston is sealed against bumper
Trigger valve still actuated
Air flows into return chamber
Exhaust still closed Head valve open
Head valve open
End of stroke trigger still pulled

3
Fig. 4
Fig. 5
Fig. 6
Trigger valve released.
Air pressure returns to top of head valve
Exhaust open Head valve closed
Returning
Air in return chamber pushes
piston forward

4
EN
PNEUMATIC TACKER, STAPLES
12-25MM
Thank you for buying this Ferm product.
By doing so you now have an excellent product,
delivered by one of Europeís leading suppliers.
All products delivered to you by Ferm are
manufactured according to the highest standards
of performance and safety. As part of our
philosophy we also provide an excellent customer
service, backed by our comprehensive Warranty.
We hope you will enjoy using this product for
many years to come.
The numbers in the text refer to the diagrams
on pages 2-3.
Read the operating instructions carefully
before using this device. Familiarize
yourself with its functions and basic
operation. Service the device as per the
instructions to ensure that it always
functions properly. The operating
instructions and the accompanying
documentation must be kept in the
vicinity of the device.
Contents
1. Technical specifications
2. Safety instructions
3. Air supply and connections
4. Loading the air stapler
5. Operating the air stapler
6. Maintaining the air stapler
1. TECHNICAL SPECIFICATIONS
Technical data
Air pressure 4 -7 bar (60-100 psi)
Max. staple size 1.05x5.1x0.58 mm
Package contents
1 Air stapler
1 Bottle machine oil
1 Strip fasteners 22 mm
1 DIN coupling
1 Instructions for Use
1 Warranty card
1 Safety instructions
2. SAFETY INSTRUCTIONS
Explanation of symbols
Indicates potential for bodily harm,
fatality or risk of damaging the machine,
in the event that the instructions in this
operator’s guide are ignored.
Wear ear and eye protection
Lubricate the appliance.
Note carefully the following supplementary
points for safe operation of the air stapler, as
well as the other cautions in these instructions
for use.
• Use the air stapler solely for the purpose for
which it was intended.
• Never use the air stapler in a way that could
lead to a fastener being fired at the user or
bystanders.
• Do not use the air stapler as a hammer.
• The air stapler should only be carried by the
handgrip. Never carry the air stapler by the air
hose.
• Never make any unauthorised changes or
modifications to the design or the function of
the air stapler.
• At all times, be aware that incorrect use can
lead to serious injury to yourself and others.
• Never leave the air stapler unattended with a
connected air hose.
• Never use the air stapler whenever there is no
legible warning label affixed to the appliance.
Special safety instructions for air tools and
compressors
• For proper operation of the machine with
a full continuous load under maximum
operating pressure, please make sure that the
temperature of the working environment in an
enclosed area is not more than +25°C.
• It is recommended to use the compressor
with a maximum operation of 70% in one hour
under full load, to allow for proper operation of
the product over time.

5
EN
• Check that the tank is fully decompressed before
connections with the tank are unscrewed.
• It is prohibited to make holes in, or welds to, or
purposely to distort the compressed air tank.
• Do not perform any actions on the compressor
without first having taken the plug out of the
plug socket.
• Do not aim water jets or jets of flammable
liquids at the compressor.
• Do not place flammable objects near the
compressor.
• Switch the pressure regulator to the “0”
position (OFF) during dwell time.
• Never aim the air jet at persons or animals.
• Do not transport the compressor with the tank
pressurised.
• N.B.: some parts of the compressor such as
the head and the feed-through pipes may
reach high temperatures. Do not touch these
parts to avoid burns.
• Transport the compressor by lifting it or by
using the special grips or handles.
• Children and animals should be kept far away
from the area of operation of the machine.
• If you use the compressor to spray paint:
a) Do not work in enclosed spaces or near
naked flames.
b) Make sure that the environment in which you
will be working has dedicated ventilation.
c) Protect your nose and mouth with a
dedicated mask.
• Do not use the compressor when the electrical
cable or the plug is damaged, and instruct an
authorised Support Service to replace them
with an original part.
• When the compressor is placed on a surface
higher than the floor, it should be secured to
prevent it from falling down during operation.
• Do not put objects or your hands in the
protective covers to avoid physical damage
and damage to the compressor.
• Do not use the compressor as a blunt
instrument against persons, objects or animals
in order to prevent serious damage
.
• If the compressor is no longer in use, always
take the plug out of the plug socket.
• Always make sure that compressed-air
hoses are used for compressed air and which
are characterised by a maximum pressure
adjusted to that of the compressor. Do not try
to repair the hose if it is damaged.
3. AIR SUPPLY AND
CONNECTIONS
Never use any oxygen, inflammable
gases or compressed air from gas
bottles to supply pressure to this
appliance, due to the hazard of explosion
and the potential for serious injury.
Quick-detachable couplings
Connect an air hose to the appliance using a QD
(quick-detachable) coupling. The QD coupling
also disengages the air pressure from the tool
when it is disconnected.
Air hoses
Air hoses should be able to sustain a working
pressure of at least 10 Bar. The air supply hose
should be equipped with a QD coupling to enable
”quick uncoupling” from the air stapler.
Compressed air
Only use clean, regulated compressed air for this
tool.
Pressure regulator
For safe operation of the air stapler, a pressure
regulator with an operating range of 4-7 Bar is
required for regulation of the working pressure. Do
not connect the air stapler to an air pressure that
might possibly exceed 10 Bar, as this may cause
damage to the air stapler, and could also result in
injuries.
Operating pressure
Never exceed the recommended maximum
pressure, as this will cause a substantial increase
in the rate of wear. The air supply must be
sufficient to maintain the appliance’s working
pressure. Should the pressure diminish, the
driving power of the air stapler will be reduced.
See “TECHNICAL SPECIFICATIONS” for the
correct working pressure of the air stapler.
Oil and water separator
Dirt and water in the air supply are the main cause
of wear on pneumatic tools. An oil and water
separator will help to ensure clean air pressure
for the best performance and least wear on the
air stapler. The oil and water separator must be
regularly tapped off, in order to function effectively
Table of contents
Languages:
Other Ferm Nail Gun manuals


Popular Nail Gun manuals by other brands

Metabo HPT
Metabo HPT NR 3675DD Instruction and safety manual

EXTOL PREMIUM
EXTOL PREMIUM 8894580 Translation of the original user manual

DeWalt
DeWalt XR Li-Ion DCN680D2 Original instructions

Performance Tool
Performance Tool M643 owner's manual

Hitachi
Hitachi VH650 - Fencing Nailer, Full Head instruction manual

Parkside
Parkside PET 25 B1 Operation and safety notes


