manuals.online logo
Brands
  1. Home
  2. •
  3. Brands
  4. •
  5. Ferno
  6. •
  7. Indoor Furnishing
  8. •
  9. Ferno 082-1998 User manual

Ferno 082-1998 User manual

1
© Ferno-Washington, Inc. 234-3324-00 July 2005
Accessory Kit 082-1998
Folding Handles for
24-MAXX™Mortuary Cot
Figure 1 - Folding Handle and Mounting Hardware
Description
Kit 082-1998 includes two folding handles with mounting
hardware (Figure 1). The handles are designed for use as
supplementary grasping points on Ferno’s 24-MAXX™
Mortuary Cot.
Parts Supplied
2 ea .................. Folding handle with integrated mount
2 ea .......................................................... Clamp block
8 ea ............................ 3/16" Socket head cap screws*
*Threadlocker pre-applied
Tool Required for Installation
1 ea ............................................... 3/16" Allen wrench
Guidelines for Handle Placement
Use the guidelines below to select attachment points for
the handles:
Handles may be attached to the cot main frame
at one or more pairsof the slots shown in Figure 2.
Place handles at identical points on both sides of
the cot to keep the cot balanced side-to-side when
lifted. Handles do not have a left- or right-hand
designation; each handle can be used on either side
of the cot.
At the control end of the cot, the handles can be
used with or without the accessory sidearms. At
the loading end of the cot, the handles can be used
only if there are no accessory sidearms installed.
Improper use can cause injury. Use the
handles only for the purpose described in
this manual.
WARNING
!
Figure 2 - Folding Handle Placement Options
Paired Slots for
Folding Handles
orAccessory
Sidearms
Paired Slots
for
Folding
Handles
Paired Slots for
Folding Handles
and/or Accessory
Sidearms
Loading
End Restraint Slots (4)
Folding Handle
with Integrated
Mount (2)
Clamp Block (2)
Socket Head
Cap Screws (8)
Control
End
2© Ferno-Washington, Inc. 234-3324-00 July 2005
Figure 3 - Attaching a Correctly Positioned Handle
Attaching the Folding Handles
1. Select attachment points for the handles according
to Guidelines for Handle Placement, page 1.
2. Position a handle with the hand grip directly below
the cot main frame and the mount and clamp block
perpendicular to the cot bed as shown in Figure 3.
3. Thread the four socket-head cap screws into the
clamp block and mount and lightly snug them with
the Allen wrench. Tighten the screws only enough
to prevent free movement of the handle and mount.
4. Slowly work the cot through all of its functions,
including raising, lowering, and loading/unloading.
Check for interference between the handles and the
cot lower frame, cot legs, posts and castings. Adjust
the placement of the handles if interference is found.
5. Tighten the screws in an “X” pattern using the Allen
wrench. Tightening the screws in this pattern will
secure the clamp block and handle mount to the cot
main frame with even pressure.
Note: After tightening, a slight gap may remain
between the mount and clamp block. This is normal,
but the gap should be even along the mating
surfaces.
6. Follow Steps 2-5 to attach the remaining handle or
handles.
Clamp
Block
Hand
Grip
Integrated
Mount
3
© Ferno-Washington, Inc. 234-3324-00 July 2005
Using the Folding Handles
Use the handles as supplementary grasping points when
raising or lowering the cot, loading the cot into a vehicle
or unloading it from a vehicle. The handles can also be
used to help steer and maneuver the cot.
LOCKING POSITIONS
Each handle locks in three positions:
• unfolded, perpendicular to the cot frame (for use)
• folded, parallel with the cot frame, toward the
control end of the cot (for storage)
• folded, parallel with the cot frame, toward the
loading end of the cot (for storage)
Note: Interference with cot structure may limit folding
to only one storage position.
Remember that the overall width of the cot increases
when the handles are unfolded. Fold the handles when
working in narrow areas.
OPERATINGTHE HANDLES
To unfold a handle for use: in a continuous motion,
pull the spring-loaded handle in line with the cot frame
to release the lock, then swing the handle perpendicular
to the cot frame (Figure 4). Release the handle to lock it
in the unfolded position.
To fold the handle for storage: in a continuous motion,
pull the spring-loaded handle outward to release the lock,
then swing the handle right or left until it is parallel with
the cot frame (Figure 5). Release the handle to lock it in
the folded position.
2
Figure 4 - Unfolding the Handle
1
Figure 5 - Folding the Handle
2
1
Important
Be aware of the cot’s width when the handles
are unfolded. If necessary, fold the handles
before entering doorways, the vehicle, or other
narrow spaces.
4© Ferno-Washington, Inc. 234-3324-00 July 2005
Maintenance
DISINFECT AND CLEAN REGULARLY
The handles require regular maintenance. Disinfect and
clean the handles on the same schedule used for
disinfecting and cleaning the 24-MAXX™Mortuary Cot.
When using maintenance products, follow the
manufacturers’ directions and read the manufacturers’
material safety data sheets.
Todisinfect thehandles:Wipe all surfaces with the same
disinfectant used on the cot. Ferno recommends
inspecting the handles for obvious damage as you
disinfect them.
To cleanthehandles: Wash the handles with warm water
and a mild detergent. Rinse with clear water. Dry with a
towel.
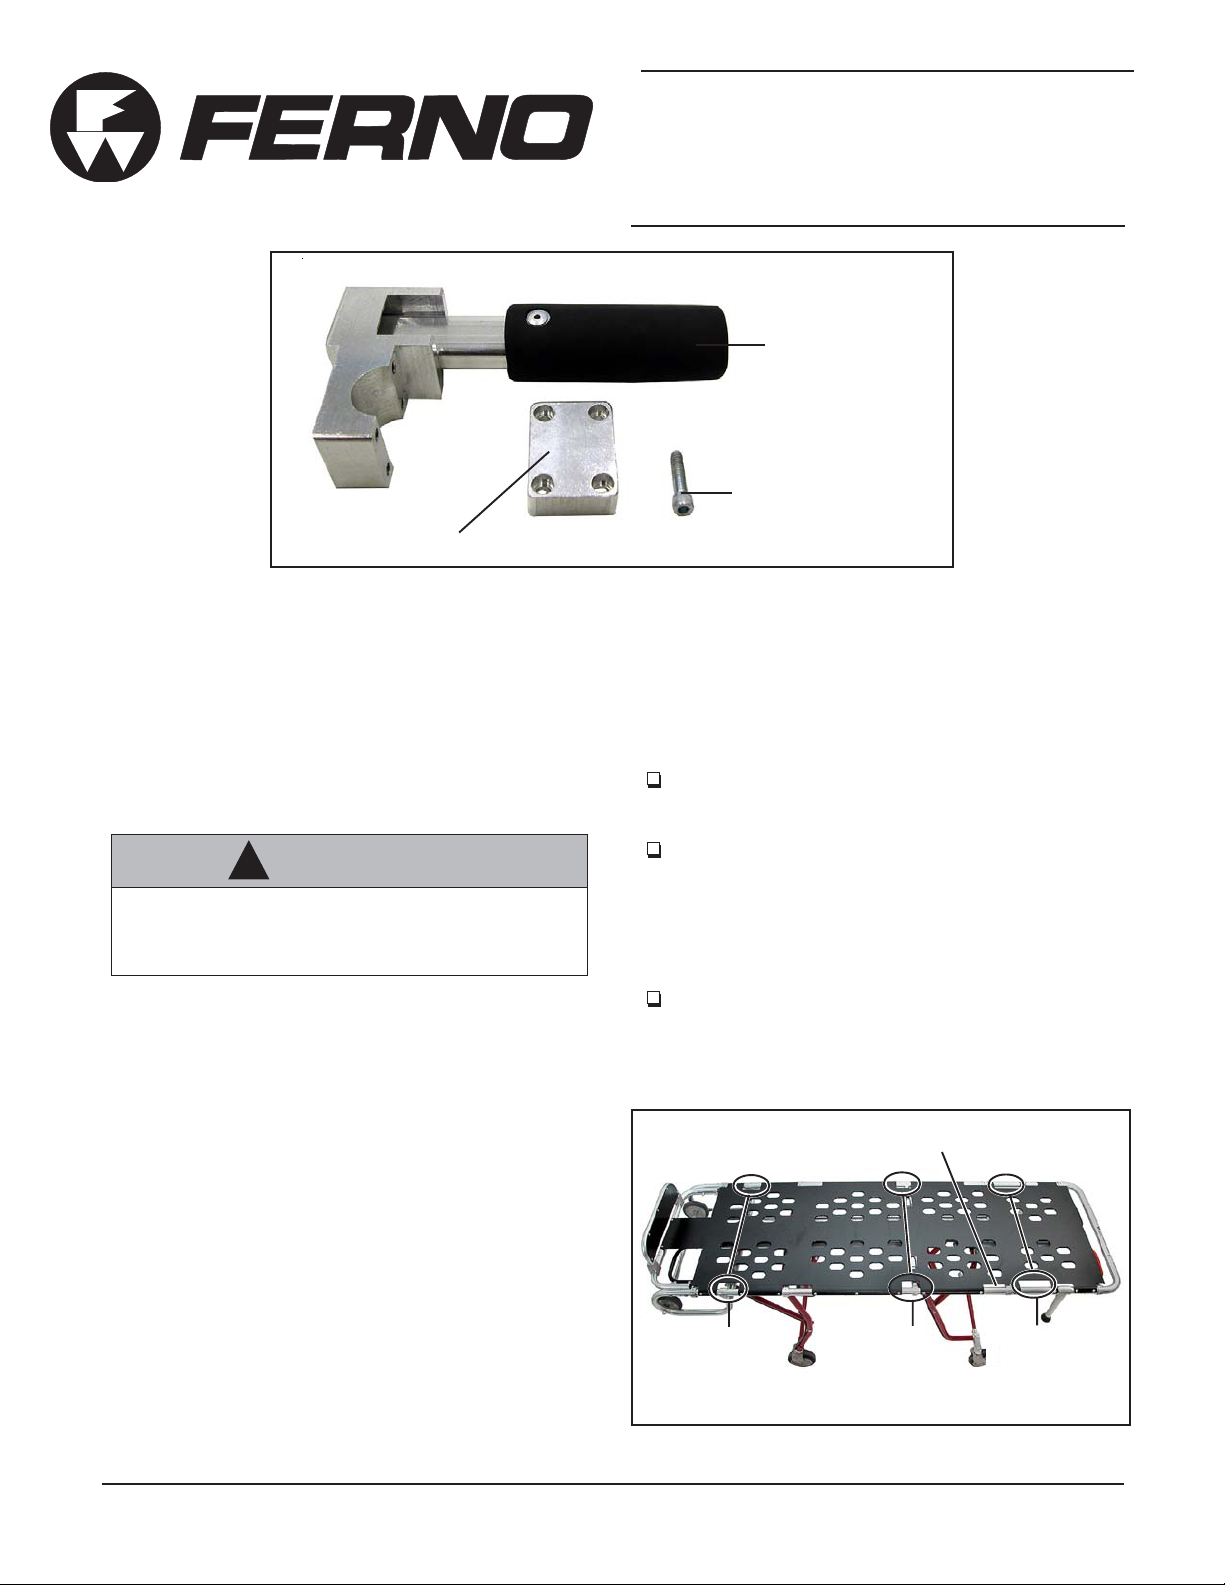
INSPECTTHE HANDLES REGULARLY
Inspect each handle during your regularly-scheduled cot
inspections. Follow the checklist below and work the
handles through their functions.
Use a 3/16” Allen wrench to tighten the screws as needed.
If inspection shows damage or excessive wear, remove
the handle from service until repair is made, or discard
the handle and replace it.
Important
Disinfectants and cleaners containing bleach,
phenolics, or iodines can cause damage.
Disinfect and clean only with products that do
not contain these chemicals.
DO NOT LUBRICATETHE HANDLES
The handles are constructed with parts that do not require
lubrication. Lubricating these parts allows dirt and foreign
particles to collect on them, resulting in damage.
INSPECTION CHECKLIST
Are all components present?
Are all screws, rivets and roll pins securely in
place?
Do all moving parts operate smoothly and
properly?
Does the handle lock properly into each
position?
Is the handle free of excessive wear?
Do the handles operate properly without
interfering with installed accessories
Limited Warranty Statement
The products sold by Ferno are covered by a limited
warranty. The actual terms and conditions of the limited
warranty, and the limitations of liability and disclaimers,
are available upon request by calling 1.800.733.3766 or
1.937.382.1451.
EMSAR®is the only organization authorized by
Ferno to manage, service, and repair Ferno products.
Telephone (Toll-free) ................ 1.800.73.EMSAR
Telephone (Worldwide)................. 1.937.383.1052
Fax (Worldwide) ........................... 1.937.383.1051
Internet .................................... www.EMSAR.com
REPAIRS OR PARTS
FERNO CUSTOMER RELATIONS
Customer service and product support are important
aspects of each Ferno product. Please have the serial
number of your Ferno cot available when calling
Ferno Customer Relations, and include it in all written
communications.
Telephone (Toll-free) ...................... 1.800.733.3766
Telephone (Worldwide)................... 1.937.382.1451
Fax (Toll-free) ................................. 1.888.388.1349
Fax (Worldwide) ............................. 1.937.382.1191
Internet ........................................... www.ferno.com
Ferno-Washington, Inc.
70 Weil Way
Wilmington, Ohio 45177-9371
U.S.A.

Other Ferno Indoor Furnishing manuals

Ferno EZ Glide PowerTraxx 59T User manual

Ferno

Ferno EZ Glide PowerTraxx 59T User manual

Ferno FWE2042 User manual

Ferno

Ferno FWE2042 User manual

Ferno 102 User manual

Ferno

Ferno 102 User manual

Ferno 34 User manual

Ferno

Ferno 34 User manual

Popular Indoor Furnishing manuals by other brands

Mocka Jesse Assembly instructions

Mocka

Mocka Jesse Assembly instructions

Arthur Berndt Selina 17 Assembly instructions

Arthur Berndt

Arthur Berndt Selina 17 Assembly instructions

Rowico FILIPPA 113714 Assembly instruction

Rowico

Rowico FILIPPA 113714 Assembly instruction

Exclusive Heritage CL-10160D installation guide

Exclusive Heritage

Exclusive Heritage CL-10160D installation guide

LDI SAFCO Uber 3491 Assembly instructions

LDI

LDI SAFCO Uber 3491 Assembly instructions

Allen + Roth 1483VA-30-201 manual

Allen + Roth

Allen + Roth 1483VA-30-201 manual

RH Teen SELBY TUFTED DAYBED quick start guide

RH Teen

RH Teen SELBY TUFTED DAYBED quick start guide

Madeira Modena Assembly instructions

Madeira

Madeira Modena Assembly instructions

Sonance Sonafill Acoustic Damping Material installation instructions

Sonance

Sonance Sonafill Acoustic Damping Material installation instructions

Englefield VALENCIA VANITY installation instructions

Englefield

Englefield VALENCIA VANITY installation instructions

SAFAVIEH COUTURE Parker DSK6400 manual

SAFAVIEH COUTURE

SAFAVIEH COUTURE Parker DSK6400 manual

BLACK RED WHITE INDIANA JSZF 3d2s Assembly manual

BLACK RED WHITE

BLACK RED WHITE INDIANA JSZF 3d2s Assembly manual

LEXINGTON 543-133C Assembly instructions

LEXINGTON

LEXINGTON 543-133C Assembly instructions

Tufferman Stoealex MT130 instructions

Tufferman

Tufferman Stoealex MT130 instructions

HAUTAU ATRIUM HS Mounting instructions

HAUTAU

HAUTAU ATRIUM HS Mounting instructions

Antonio Valanti CARNAVALE INSTALLATION CHART

Antonio Valanti

Antonio Valanti CARNAVALE INSTALLATION CHART

Broyhill CALCOLO MARBLE 7276B Assembly instruction

Broyhill

Broyhill CALCOLO MARBLE 7276B Assembly instruction

Amart Furniture SIGNATURE LA SALLE 65967 Assembly instruction

Amart Furniture

Amart Furniture SIGNATURE LA SALLE 65967 Assembly instruction

manuals.online logo
manuals.online logoBrands
  • About & Mission
  • Contact us
  • Privacy Policy
  • Terms and Conditions

Copyright 2025 Manuals.Online. All Rights Reserved.