Ferrofish A32 DANTE User manual

Owner’s Manual
Ferrofish A32 DANTE
Professional 32 x 32-Channel AD/DA Converter
Ferrofish – Brüderstrasse 10, 535 5 Linz am Rhein
www.ferrofish.de
Version 1.3
IMPORTANT SAFETY INSTRUCTIONS
SAFETY INSTRUCTIONSSAFETY INSTRUCTIONS
SAFETY INSTRUCTIONS
Safety symbols used in this manual:
This symbol is an alert that there are important maintenan e
and operating instru tions in the literature.
This symbol warns the user of uninsulated, potentially dangerous voltage inside the unit
that an ause an ele tri sho k.
This symbol warns the user that the output onne tors of the power supply ontain
voltages that an ause dangerous, potentially lethal sho ks.
oRead
Read Read
Read these Instru tions
oKeep
Keep Keep
Keep these instru tions
oHeed
HeedHeed
Heed
all warnings.
oFollow
FollowFollow
Follow
all instru tions.
1. Do not use this devi e near water.
2. Clean only with a dry loth. Do not spray liquid leaner onto the fa eplate or into the ventilation
slots. This may damage the front panel or ause a dangerous ondition.
3. Only install in a ordan e with the manufa turer’s instru tions.
4. Do not install or operate near heat sour es su h as stoves, radiators or other devi es that may
produ e heat.
5. NEVER ompromise the fun tioning of the power plug’s ground onne tion. When the provided
plug doesn’t fit into the outlet, please onsult a qualified ele tri ian for assistan e.
6. Use power adaptors and a essories spe ified by the manufa turer only.
7. Prote t the power ord from being pin hed or stepped on.
8. Unplug this devi e during lightning storms, or when not in use for extended periods of time.
9. Refer all servi ing to qualified servi e personnel only. Servi ing is required when the devi e has
been damaged in any way. For example when liquids have been spilled on the devi e, obje ts
have fallen onto it, or the devi e itself has been dropped. Servi ing is also essential when the
devi e no longer fun tions normally or has been exposed to rain or moisture.
10. This unit generates heat during normal operation. Use it in a well ventilated environment with at
least 1RU spa e between any other equipment.
11. This produ t in ombination with headphones or other external amplifiers and speakers may
produ e sound levels that ould lead to permanent hearing damage. Do not operate at high or
un omfortable volume levels for a long time. If you are experien ing ringing in your ears, a loss
of high frequen y sound information or other hearing loss, please onta t an audiologist
immediately.
12. WARNING: To redu e the risk of an ele tri sho k or fire, do not expose the devi e to rain or
moisture.
13. The power supply of this audio devi e may ause ele troni interferen e to surrounding
equipment. If you find that this or any nearby unit is malfun tioning, try resetting the devi e,
relo ating it, or getting an ele tri ian to install a powerline onditioner.
14. Always use a stand, 19“ ra k or table designed for the use of pro audio equipment. In a
permanent installation make sure that damage or even injury will not result from the mounting
of the devi e or from ables pulling on the devi e. When using a art, use aution when moving
the devi e inside the art to avoid injury from it tipping-over.

3
Introduction
Thank you for choosing the A32 DANTE as your new converter!
The A32 DANTE is an A/D - D/A converter with 32 x 32 analog inputs and
outputs, 6 x 6 Dante, 6 x 6 MADI and 32 x 32 ADAT digital channels.
Furthermore, the integrated FPGA and DSP enable routing of all
channels to every I/O and creating submixes which can be monitored by
an integrated monitoring matrix featuring a headphones output at the
front of the A32 DANTE.
Four TFT screens show all analog input and output levels at a time. The
intuitive one-knob-operation makes using the A32 DANTE a breeze. Last
but not least a permanent help system explains the most important
sections of the A32 DANTE so that you can operate the A32 DANTE even
without using the manual.
We’re sure that our A32 DANTE will become a valuable member of your
studio gear.
Symbols used in this manual:
This symbol indicated sections of detailed explanation.
Paragraphs showing this symbol require the reader’s particular
attention.
Software and updates
For more information, updates and support please visit our website:
www.ferrofish.de

Operation
The A32 DANTE can be operated completely from the front panel by
using the SELECT pot and the MENU button. The POWER button can be
used as a „home- button” and for
switching the unit on and off. For
switching it off, keep the button
pressed for longer than 3
seconds. When you do, a
countdown will be shown on the screen to prevent accidentally shutting
down the A32 DANTE. You can also control the A32 DANTE via Dante,
MIDI or MIDI-over-MADI.
The status line beneath the meters shows the following (from left to
right):
•The current synchronization source and sample frequency
•Whether there is MIDI input from the MIDI plugs, from MIDI-
over-MADI and/or from USB
•If power is attached to the left and/or right mains input
•Any input present on optical MADI, coax MADI and/or ADAT 1- .
The symbol will be yellow if only data is received and green if the
input is also synchronous to the sample frequency.
•BNC wordclock input is present
•Dante input is present (yellow), and is synchronized to the
A32 DANTE (green)
•Current preset number (if available)
When using an external wordclock source (MADI, ADAT, BNC, or Dante),
the corresponding icon shows a blinking pulse symbol.

5
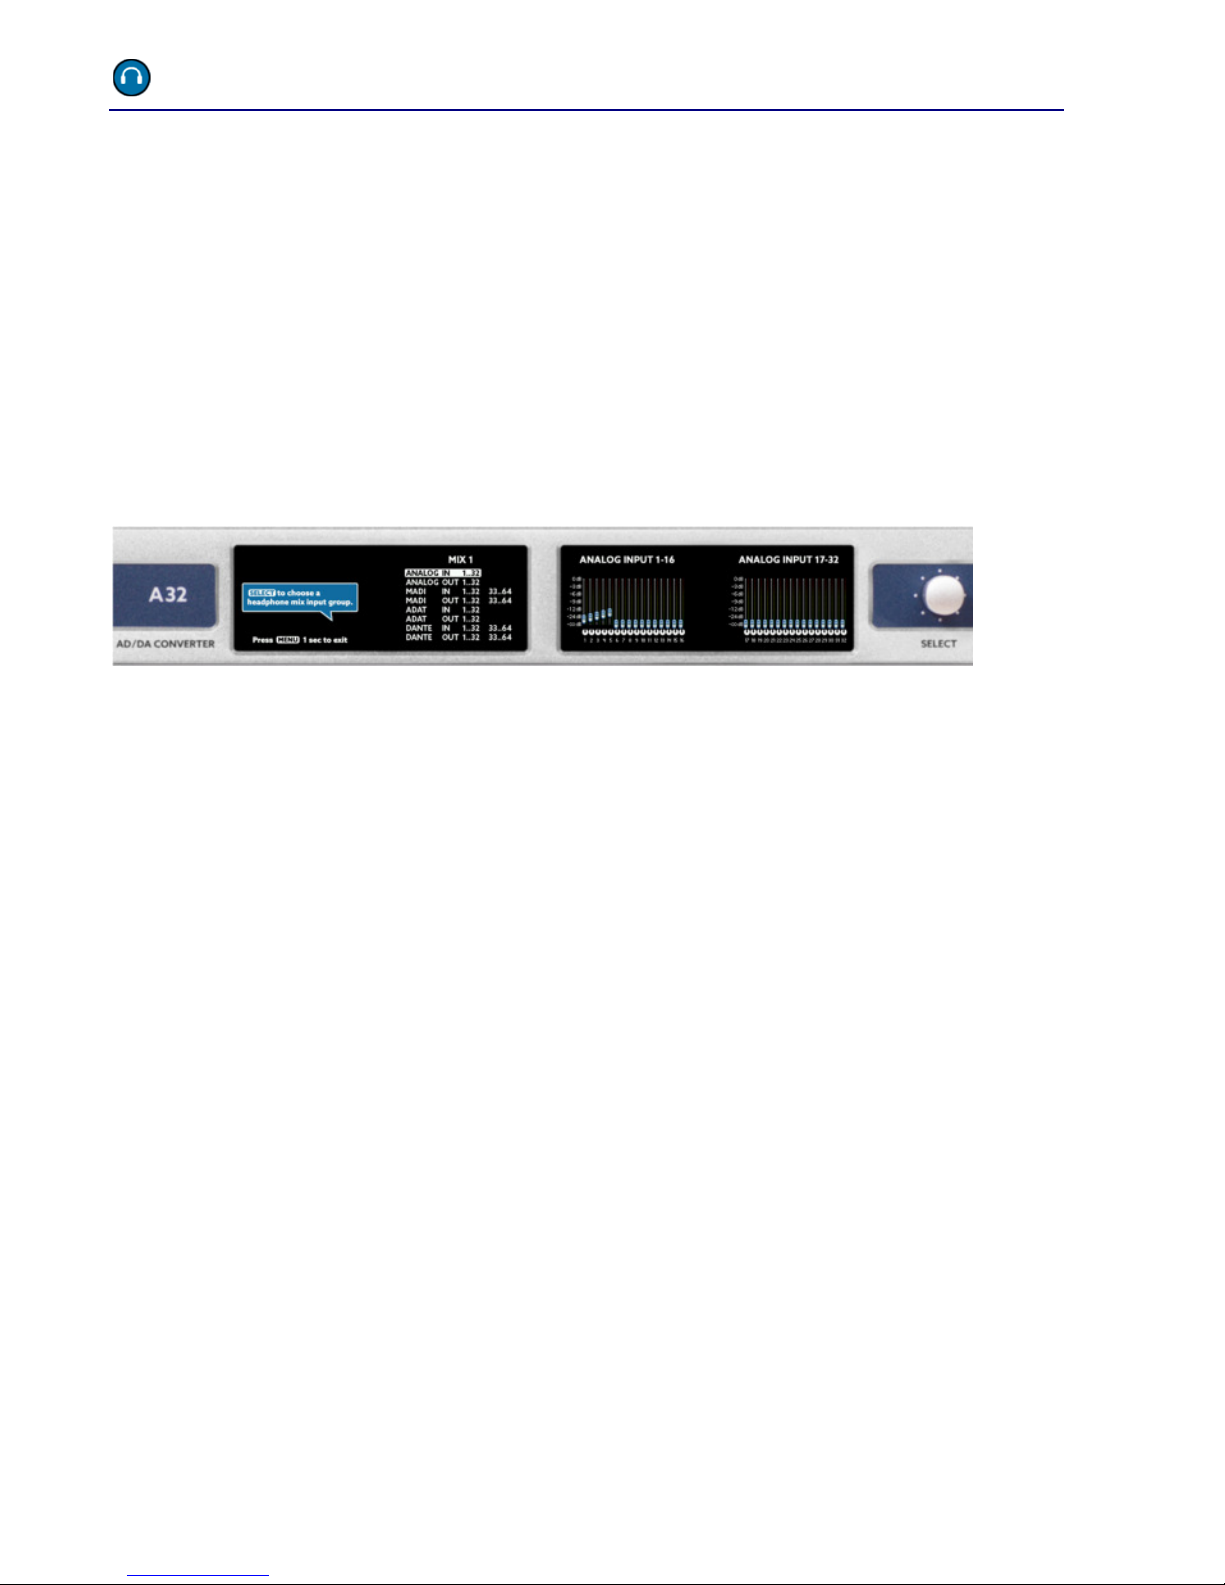
Headphones
When turning the SELECT pot on the main screen the headphone menu
is shown. You can select the volume of the headphone output now:
When pressing MENU again, you can change the following:
•Source: Choose between ANALOG IN / OUT, MADI IN / OUT,
ADAT IN / OUT, DANTE IN /OUT and MIX 1-7.
•Channel: Once you have chosen a source you can then select the
specific channel(s) to be monitored. Cycling thru the channels
will let you first select mono channels, followed by stereo
channel pairs.
Instead of listening to a mono or stereo signal you also can create up to
seven different mixes and select them here.
For further information regarding mixer function and features please see
the MIX-chapter.

6
ain enu
By pressing MENU you engage the main menu. Use the SELECT pot to
choose the desired menu point and press MENU to select it.
The main menu lets you choose from the following options:
CLOCK
Here you select if the A32 DANTE should generate the wordclock by
itself (master) or if it should listen to an external wordclock signal (slave)
from an external source. If choosing MASTER you can also select the
sample rate here.
IX
You can select, load and edit one of seven mixer presets in this menu.
The mixes can be monitored over the headphones output.
DANTE
In this menu you can see the analog I/O’s as meters and all digital I/O’s
as LED dots with a traffic light color scheme. This means that every dot
shows a digital channel, which changes the color according to the level
of the signal.
Pressing the MENU button again opens the Dante setup menu.
SETUP
The Setup lets you change the gain-levels of the analog inputs and the
levels of the analog output. Additionally, you can influence the routing
of the A32 DANTE, change the MIDI and MADI routing, change settings
or lock the front panel.

7
DSP
In the DSP menu optional DSP plugins can be loaded and edited.
PRESET
Levels, gains and the routing of the A32 DANTE can be saved and loaded
in up to six different preset slots.
HELP
You can change the language of the help system here and lookup the
firmware version of the A32 DANTE.

8
main menu - CLOCK
The CLOCK SOURCE menu lets you select the wordclock source and the
sample frequency of the A32 DANTE.
The numbers below the labels show the internally generated clock as
Master or the measured external sample rate. If no sample rate is
detected, „---“ will be displayed.
ASTER
If you set the clock source to MASTER, the internal A32 DANTE clock
generator will be used.
ADI, ADAT
When selecting MADI or ADAT, the wordclock will be extracted from the
corresponding data stream. This signal will be refreshed by the internal
digital PLL. When using higher sample frequencies, SMUX will be used.
Depending on the mode, you also need to select the correct SMUX mode
manually.
BNC
Another option is to directly apply a wordclock signal to the BNC input.
Same like with the other inputs, also this input will be refreshed by the
digital PLL.
DANTE
Here you can select Dante as wordclock master. If you intend to use
Dante, it’s generally recommended to use the Dante clock as wordclock.

9
main menu – CLOCK - S UX operation
Internally the A32 DANTE always uses all 32 analog channels, but the
number of digital MADI, ADAT and Dante channels is limited in relation
to the SMUX mode currently in use.
S UX/1
In SMUX/1 mode offers sample frequencies from 32kHz to 8kHz.
S UX/2
When running higher sample rates (6 kHz - 96kHz), the bandwidth
limitation makes it necessary to split the digital data for MADI, ADAT and
Dante into two separate channels (signal multiplexing). Thus, the
channel count reduces by half.
Both SMUX/1 and SMUX/2 offer signal redundancy for MADI. When the
MADI signal is lost, the A32 DANTE can switch automatically to the other
port if configured that way. Dante features also redundancy using the
two Dante ports.
S UX/4
When running SMUX/ Mode (128kHz-192kHz) the bandwidth increases
again, so now one data stream needs to be divided into four channels.
Therefore, the channel count reduces to a fourth of the original. ADAT is
not specified in this mode, so it is switched off.
Dante and MADI only offer 16 channels in this mode. In order to use all
32 analog channels, both MADI ports are configured as follows:
•optical MADI: sends and receives analog channels 1-16
•coaxial MADI: sends and receives analog channels 17-32
If Dante should be used in SMUX/ mode instead of MADI, please go to
the DANTE CONTROL screen, and switch “Use Dante for SMUX/ ?” to
ON. Dante only supports 16 channels in this mode, so the upper 16
analog channels are switched off.
10
main menu - IX
Inside the MIX menu you can select and modify one of the seven mix
presets. The A32 DANTE provides a downmix of all analog and digital
I/O’s which is sent to the stereo headphone output on the front panel of
the unit.
Select one of these mix presets by using MIX 1 to MIX 7 as source in the
headphones screen.
After pressing MENU you can edit the selected mix preset.
First, choose one of the 8 source groups. The actual settings of the group
you can see on the right screen. When pressing MENU again, you can
edit the settings in the following steps:
•Select the channel (single, stereo, or 8 channels), then press
MENU
•Now you can adjust the level of the selected channel(s), then press
MENU again
•Finally, you select the pan. If more than one channel is selected the
pan’s work in opposite ways.
These steps you can repeat as desired. When finished, press MENU long
to go back and select another source group.

11
main menu - DANTE DIGITAL
The DANTE DIGITAL menu shows all analog and digital inputs and
outputs. All digital inputs and outputs are shown as dots with a traffic
light color code.
This presents an overview about the signal flow between the interfaces.
The LED traffic light colors have the following meaning:
Pressing the MENU button again opens the DANTE Status & Control
menu.
Color Level range
red -3dBFS to 0dBFS
yellow -16dBFS to - dBFS
green -60dBFS to -17dBFS
grey -inf to -61dBFS
12
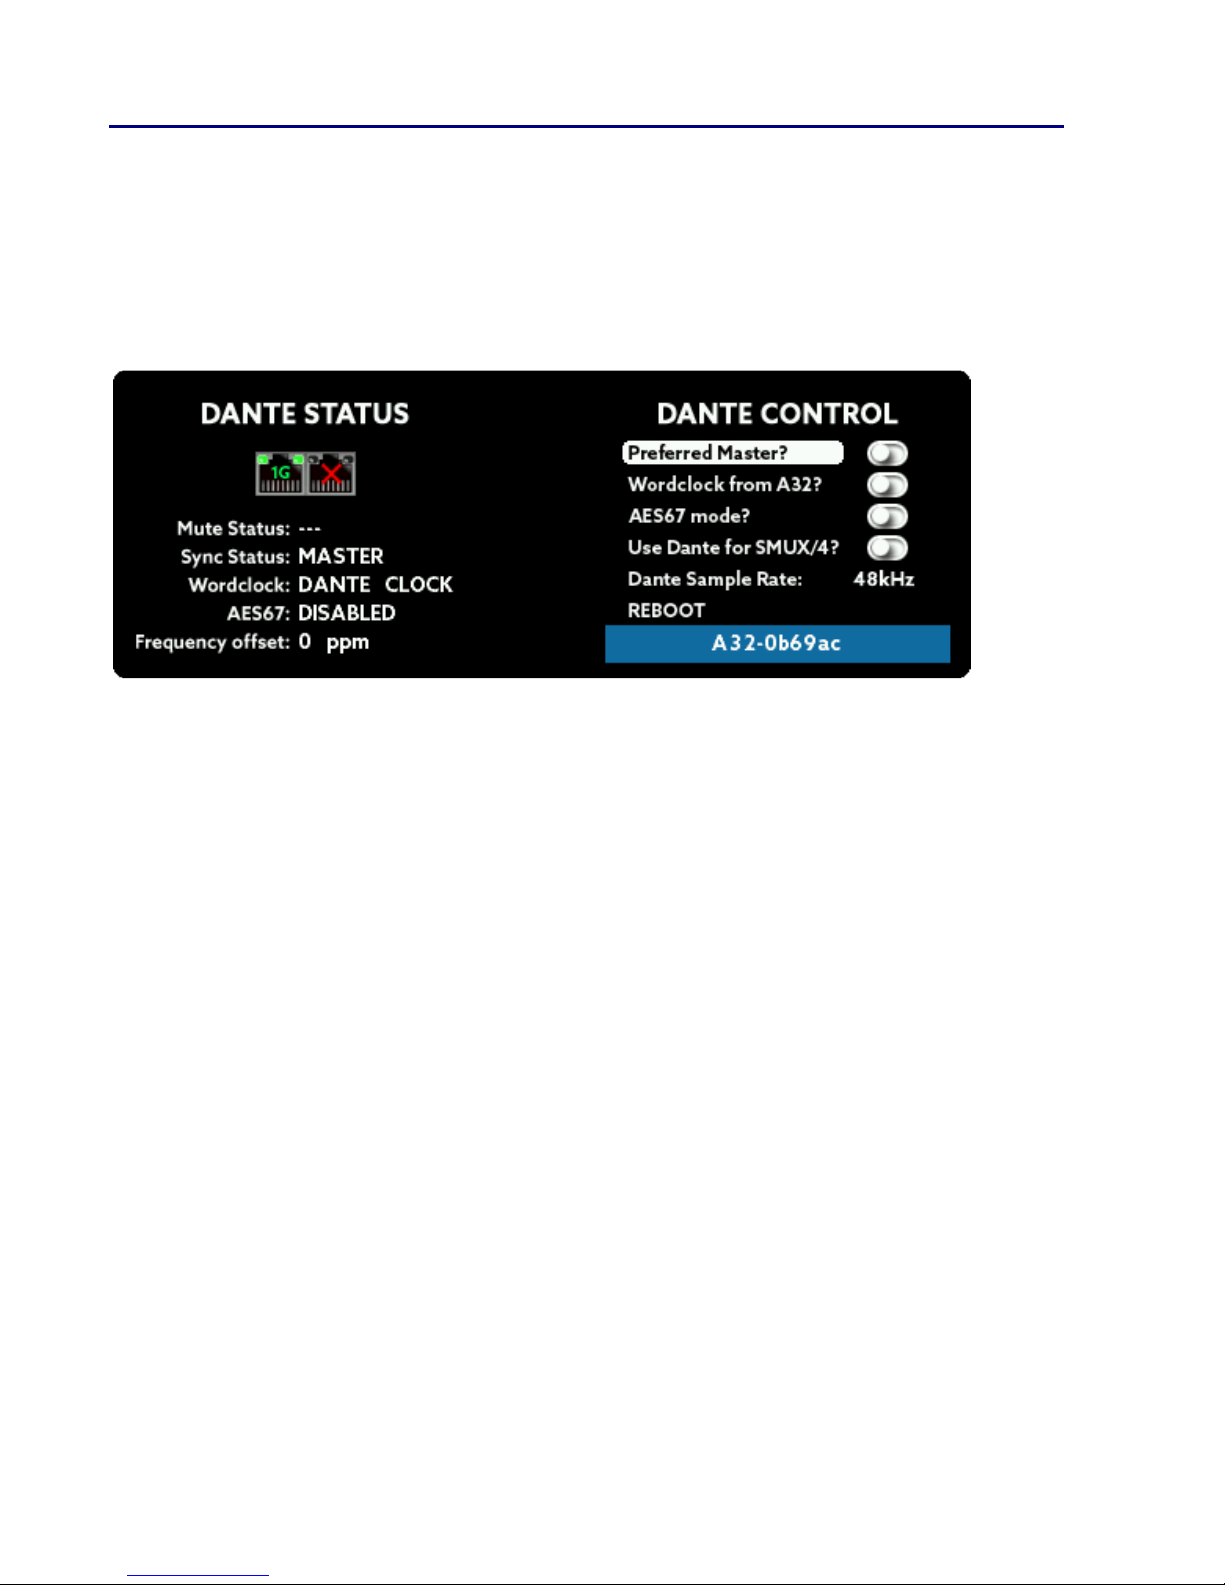
These screens allow a sophisticated analysis of the status of the Dante
Interface. Additionally, you can change some fundamental Dante
settings directly in this screen, which is very handy if you don’t have
access to the Dante Controller software from Audinate on your
computer.
Ethernet Ports: Shows the status and speed of the Ethernet ports in use
(Pri/Sec).
ute Status: Shows if the device is muted. In most cases a muted device
is an indication of a malfunction inside the Dante network.
Sync Status: Shows if the A32 DANTE has locked successfully to the
Dante network in slave mode (LOCKED). If this device is master on the
Dante network, MASTER is displayed.
Wordclock: Shows the actual clock source. Usually the wordclock comes
from the Dante network, but also the internal A32 DANTE worclock can
be used.
AES67: Shows if the AES67 compatibility mode is activated.
Frequency offset: Shows the offset between the received clock and the
internal clock. This value should not exceed +/-100ppm.

13
Preferred aster: If this is set to on, the A32 DANTE is handled as a
preferred clock generator. As long as no other device inside the Dante
network is flagged as “preferred master”, the A32 DANTE is chosen as
the master wordclock device.
Wordclock from A32: Uses the A32 DANTE internal wordclock
generator. Please note, that Dante don’t support the following sample
frequencies: 32kHz, 6 kHz, 128kHz
AES67 ode: Sets the AES67 compatibility mode to on or off.
Use Dante for S UX/4: In SMUX/ mode the A32 DANTE uses both
MADI ports (optical and coaxial) to feed the 32 analog inputs and
outputs. To use the Dante data stream instead of MADI, set this to “on”.
Please note that in SMUX/ (128 – 192kHz) Dante mode only 16 analog
inputs and output channels (1-16) are available. Channels 17-32 are
disabled.
Dante Sample Rate: Shows the actual sample frequency of the Dante
device. Press MENU to change sample rate. Please note that all devices
inside the Dante network have to be set to the same sample rate.
REBOOT: Reboots the Dante Interface.
Feed external wordclock into an existing Dante network
To feed an external wordclock into the Dante network, please proceed
as follows:
1.Set the “Preferred Master” setting to “on”. This shows the Dante
network that your A32 DANTE is the wordclock master – if no other
device is set to “Preferred Master” as well.
2.Set “Wordclock from A32” to “on”. This makes the Dante network use
the wordclock signal provided by the A32 DANTE.
3.Inside the clock menu set the wordclock source to MASTER (or MADI,
ADAT or BNC) and ensure the sample rate is identical to the one
provided in the Dante Control menu.

1
main menu - SETUP - GAINS
The analog inputs of the A32 DANTE can each be set to different
sensitivities. You can choose between three reference levels: + dBu,
+13dBu and +20dBu. Using the DSP, you can additionally set the
reference levels from -8dBu to +20dBu in 1 dB steps. The DSP always
calculates the optimum configuration. For example, if you set +12dBu,
the analog reference will be set to +13dBu and the signal will be
amplified by 1dB.
The number above the fader shows the maximum level (dBu), which the
input can handle. When the fader is set to 20, like shown in the picture
above, the input can handle a maximum input level of +20dBu. Avoid
exceeding this maximum level to prevent digital clipping.
In addition, to assist finding the correct gain, also the current levels of
the analog inputs are shown. The dB scale of these levels is found on the
right hand side of the screens. For reference, you also see the levels of
the channels here, referred to the dB scale on the right side.
The minimum value -8dBu corresponds
(approximately) to the reference level of -10dBV
used by consumer devices, like CD-players for
example.
15
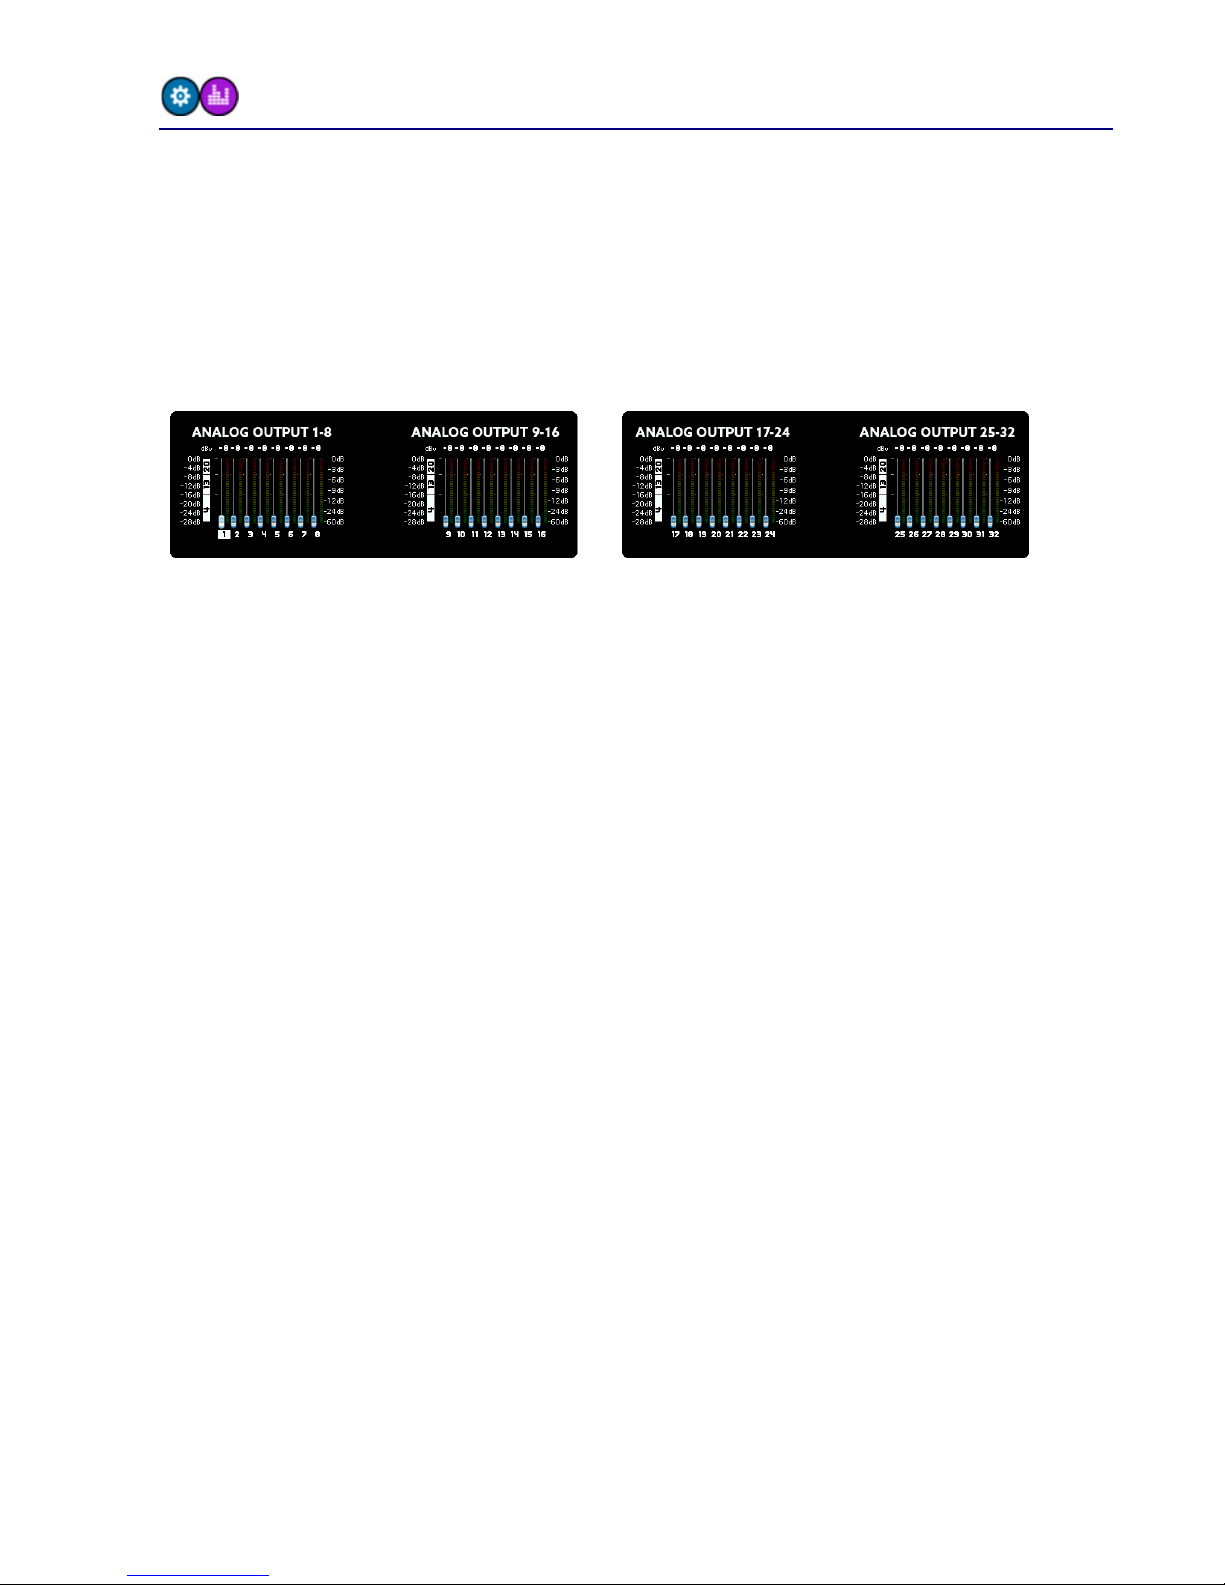
main menu - SETUP - LEVELS
The LEVELS screen is similar to the GAINS screen described on the
previous page and is responsible for the levels of the analog outputs. As
with the inputs, you can set the level of each channel in 1dB steps from -
8dBu to +20dBu. The A32 DANTE offers individual analog level switching
of + dBu, +13dBu and +20dBu. This means that this level is reached
when the digital output reaches 0dBFS.
If you select one of the three reference levels exactly, the digital signal
will be converted 1:1 to analog. However, if you select a value in
between these reference levels, the DSP will calculate the optimal
combination between analog and digital levelling. For example, if you
select +12dBu the analog output will be switched to +13dBu and the
digital signal will be attenuated by 1dB to reach the +12dBu output level.
Just like the inputs you can also meter the levels of the channels here.
Please note, the level of the outputs will not change when adjusting the
amplification here, because you see the digital level before digital and
analog amplification.
16
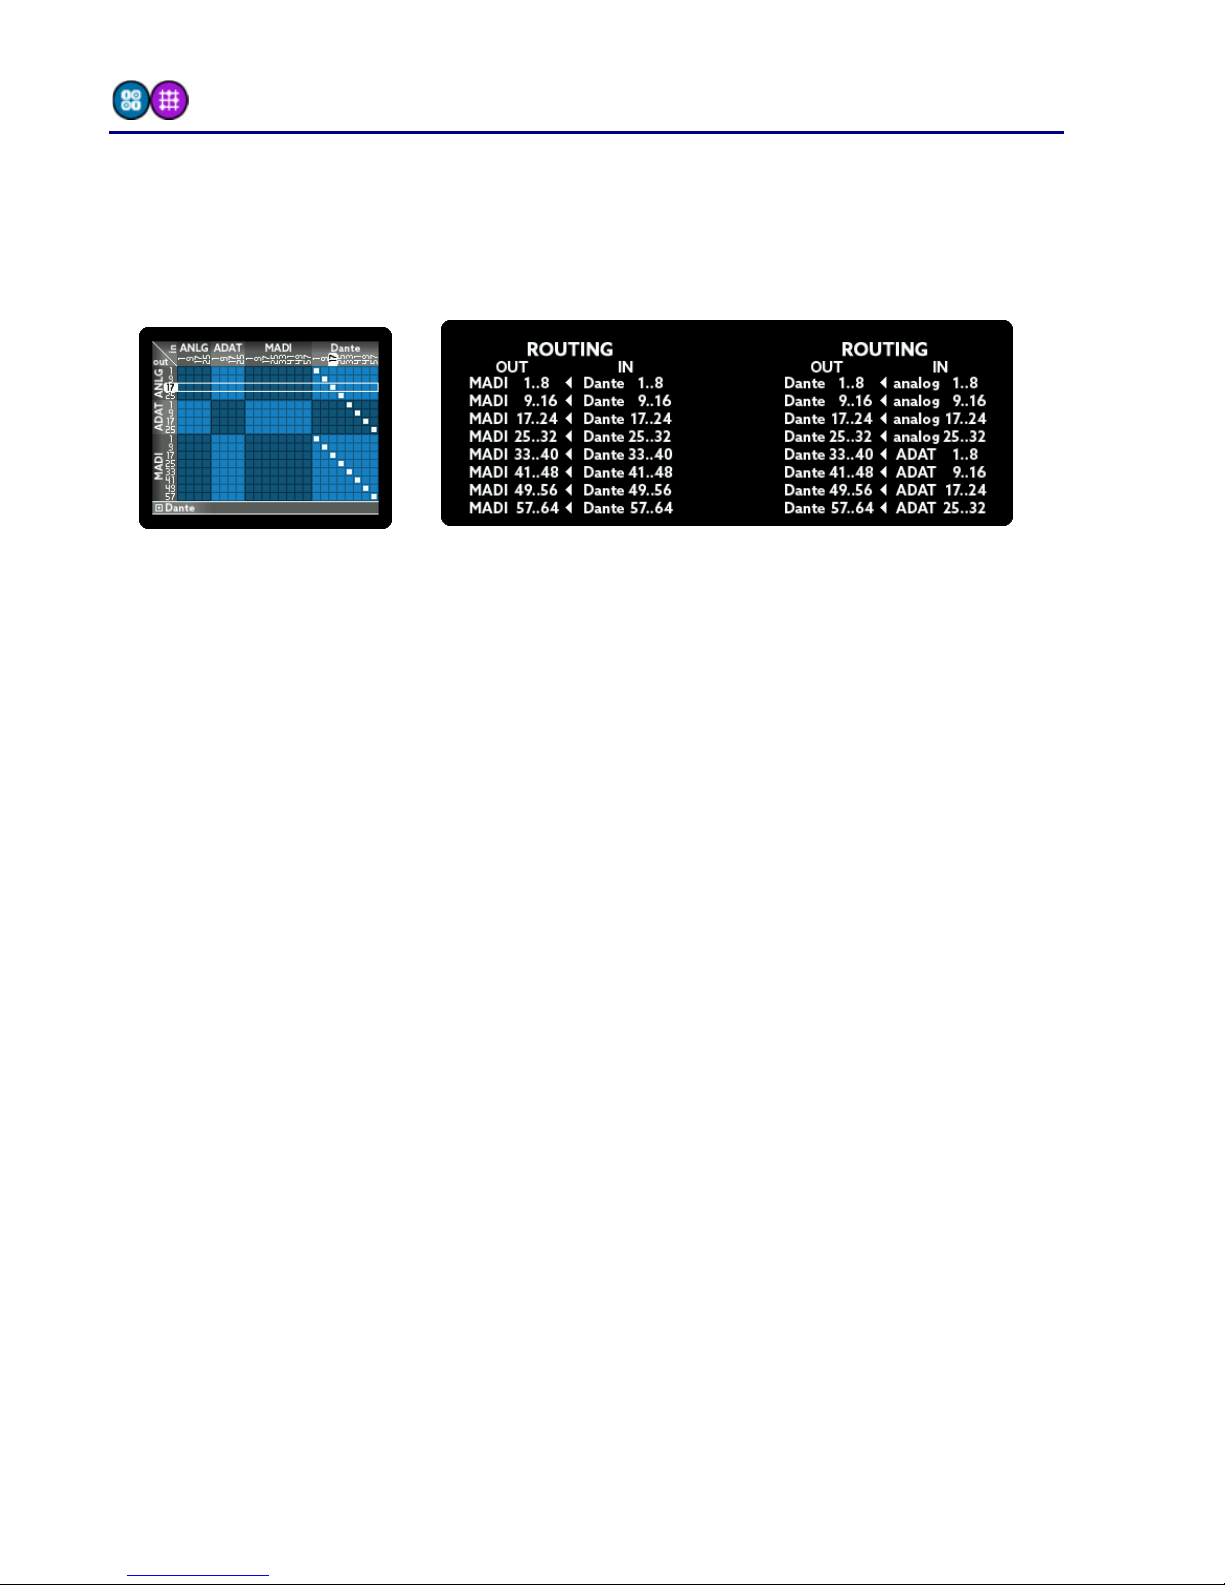
main menu - SETUP - Routing
The A32 DANTE features a sophisticated routing matrix. In the ROUTING
screen you can see a graphical representation on the left side and a list
view on the right screen.
To change the routing, do the following:
•Choose the output: Turn the SELECT rotary to highlight a block of 8
outputs. It corresponds to a row on the graphical view and a line on
the list view.
•Choose the input: Press MENU. You will now be able to connect an
input to the chosen output by turning the SELECT pot. The inputs
are shown as columns in the graphical view or as text on the right
hand side of the list view line.
Hold down the MENU button for a few seconds to leave the routing
screen.

17
main menu - SETUP - ADI
The A32 DANTE provides a flexible MADI routing using the two MADI
ports:
1 - optical
The A32 DANTE only uses the optical
MADI input. No automatic switching
between the formats will happen.
2 - optical
The A32 DANTE uses the optical MADI
input. When the signal is lost, the
A32 DANTE switches to coax MADI. It will
only switch back to optical if the coax
signal is subsequently removed.
3 - optical
Same function as 2. In addition, both
inputs are scanned constantly and if no
signal is present on one a warning will be
shown on the main screen.
4 - coax
The A32 DANTE only uses the coax MADI
input. No automatic switching between
the formats will happen.
5 - coax
The A32 DANTE uses the coax MADI
input. When the signal is lost, the
A32 DANTE switches to optical MADI. It
will only switch back to coax if the
optical signal is subsequently removed.
6 - coax
Same function as 5. In addition, both
inputs are scanned constantly and if no
signal is present on one a warning will
be shown on the main screen.
18
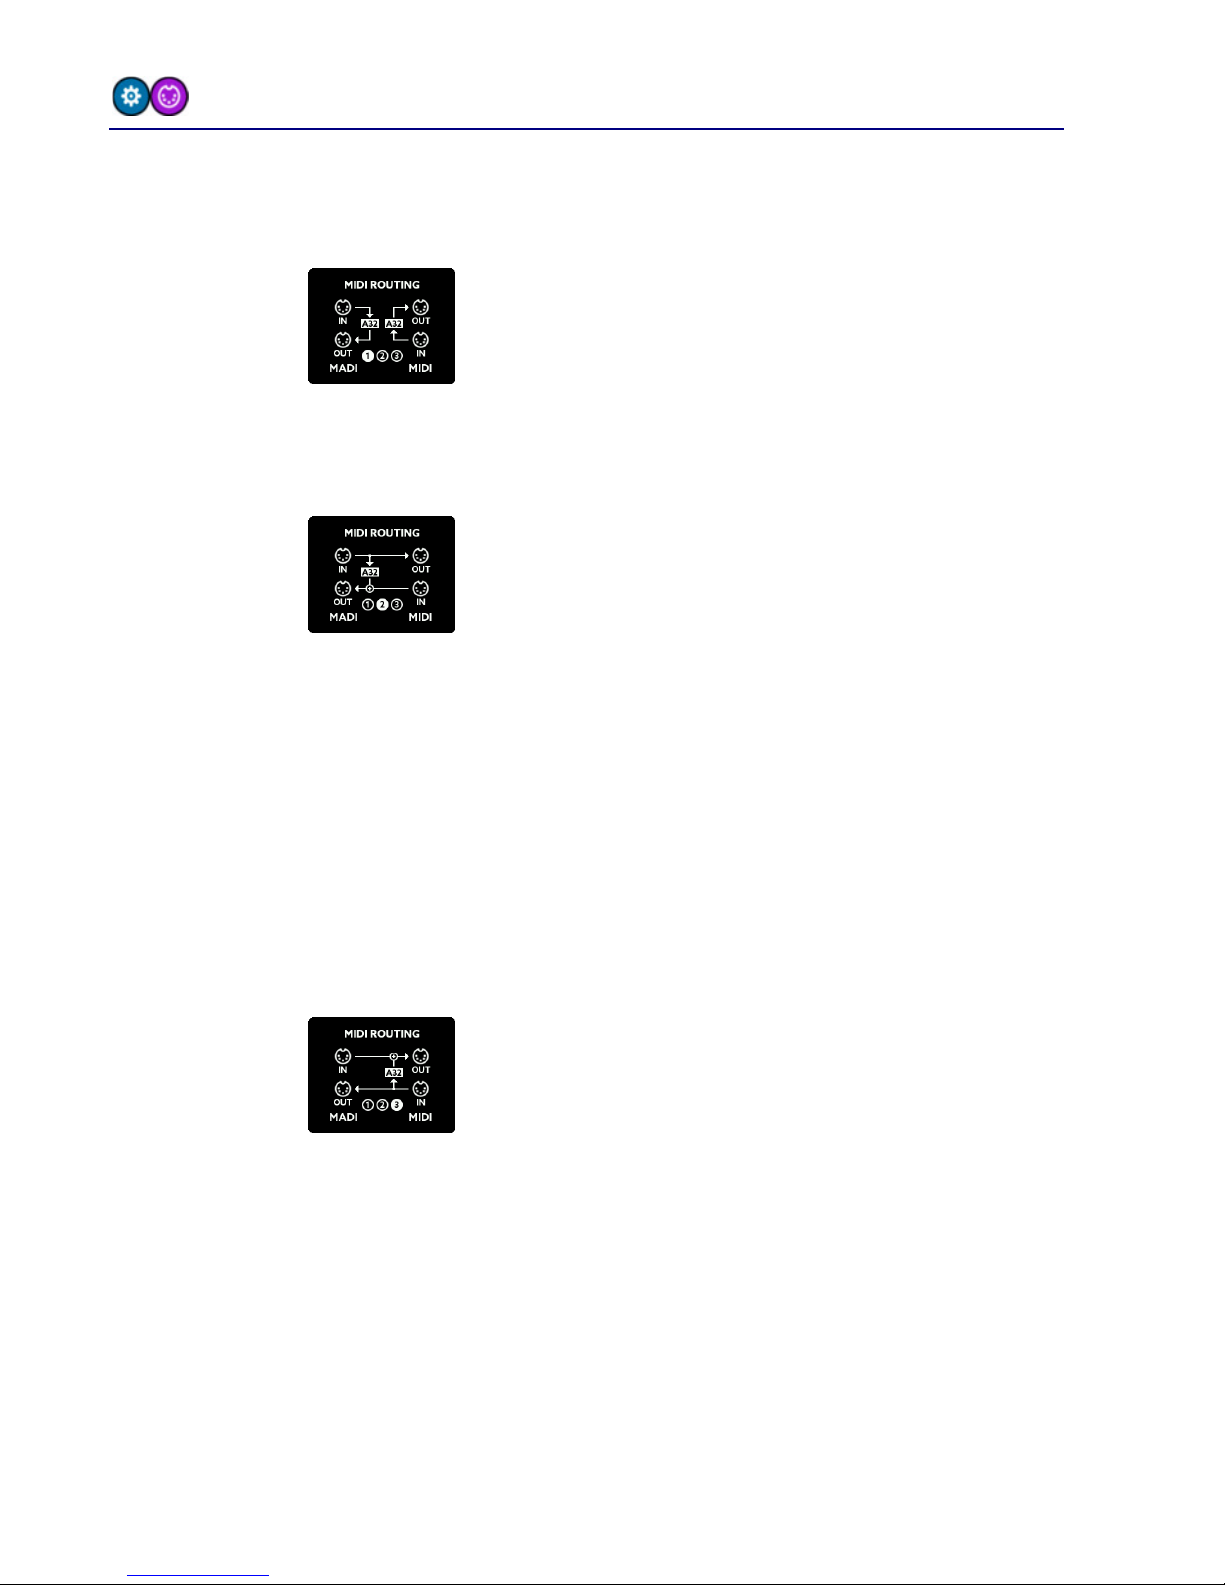
main menu - SETUP - IDI
The MIDI routing screen is intended to allow you to choose the way MIDI
data is routed between MIDI and MIDI over MADI:
1 - separate
MIDI-over-MADI und MIDI are
separated. MIDI commands and
commands for controlling the
A32 DANTE are being received from both
ports and send out directly to the
according MIDI output.
2 - ADI
priority
MIDI-over-MADI and MIDI are connected:
Data from the MIDI-over-MADI port is
sent to MIDI, and MIDI input is sent back
to MIDI-over-MADI.
The A32 DANTE receives and sends
control messages from/to the MIDI-over-
MADI port.
This way you can convert between MIDI-
over-MADI and MIDI while the
A32 DANTE listens to the MIDI-over-
MADI
port.
3 - IDI
priority
MIDI-over-MADI and MIDI are connected:
Data from the MIDI-over-MADI port is
sent to MIDI, and MIDI input is sent back
to MIDI-over-MADI.
The A32 DANTE receives and sends
control messages from/to the MIDI port.
This way you can convert between MIDI-
over-MADI and MIDI while the
A32 DANTE listens to the MIDI port.

19
main menu - SETUP - SETTINGS
Inside the SETTINGS menu the following items can be changed:
BNC Termination
The wordclock of the A32 DANTE is terminated internally with a 75 ohm
resistor by default. When daisy chaining the wordclock of several units,
you should leave this option set to ON. If you’re using T-connectors, set
this option to OFF.
ADI 96k Frame
There are two MADI transfer standards for the SMUX/2 mode (6 kHz –
96kHz):
•48k Frame: Identical to SMUX/1. The signal of 1 channel is split
(multiplexed) across a pair of 2 channels in order to double the
bandwidth. The usual 6 MADI channels are therefore reduced to
32 channels.
•96k Frame: The MADI stream is natively reduced to 32 channels by
increasing the frame size and allowing channels to be transmitted
directly.
Both formats transfer the same number of channels (32). The advantage
of the 96k frame mode is that the receiver can distinguish between
SMUX/1 and SMUX/2 mode automatically and can switch appropriately.
Please ensure all units use the same setting.
ADI short frame
Using the full bandwidth of MADI you can transfer 6 (SMUX/2: 32,
SMUX/ : 16) channels. By setting MADI short frame, the A32 DANTE will

20
only transfer 56 (SMUX/2: 28, SMUX/ : 1 ) channels. This setting
corresponds to an early MADI specification, which is capable of using the
remaining bandwidth for varispeed. Nowadays varispeed is not
commonly used in favor of having the full 6 channels.
Redundant Power
When using two power supplies for redundancy reasons, please set this
menu option to ON. If switched on, the A32 DANTE monitors both PSU
inputs. In case of a failure of one power supply, the A32 DANTE will
display a warning message on the main screen.
ADAT4 as S/PDIF
The fourth ADAT I/O port can be switched to stereo S/PDIF operation. If
the sample rate of the connected device differs from the sample rate of
the A32 DANTE, the external sample rate will be converted to the
A32 DANTE’s sample rate using a sample rate converter (SRC).
The stereo S/PDIF input will be distributed on the ADAT channels, the
stereo output is sourced by the first two ADAT channels.
Keyclick
This lets you switch the Keyclick sound on or off.
Delay compensation
When using MADI with more than one A32 DANTE unit in daisy chain
mode, set each device to the according order:
•Single: only one unit attached to MADI
•1 of 2: first unit in a chain of two
•2 of 2: second unit in a chain of two.
Delay compensation is intended for MADI only. In case
you connect via Dante, there is no need for manual
correction, since the Dante algorithm takes care for
proper timing.
Other manuals for A32 DANTE
1
Table of contents
Other Ferrofish Media Converter manuals

Ferrofish
Ferrofish A16 MK-II User manual

Ferrofish
Ferrofish Verto 32 User manual

Ferrofish
Ferrofish PULSE16 DX User manual

Ferrofish
Ferrofish PULSE 16 User manual

Ferrofish
Ferrofish A32 DANTE User manual

Ferrofish
Ferrofish Verto 32 User manual

Ferrofish
Ferrofish A32pro User manual

Ferrofish
Ferrofish A16 AE User manual


