Ferrofish PULSE16 DX User manual
Users Guide
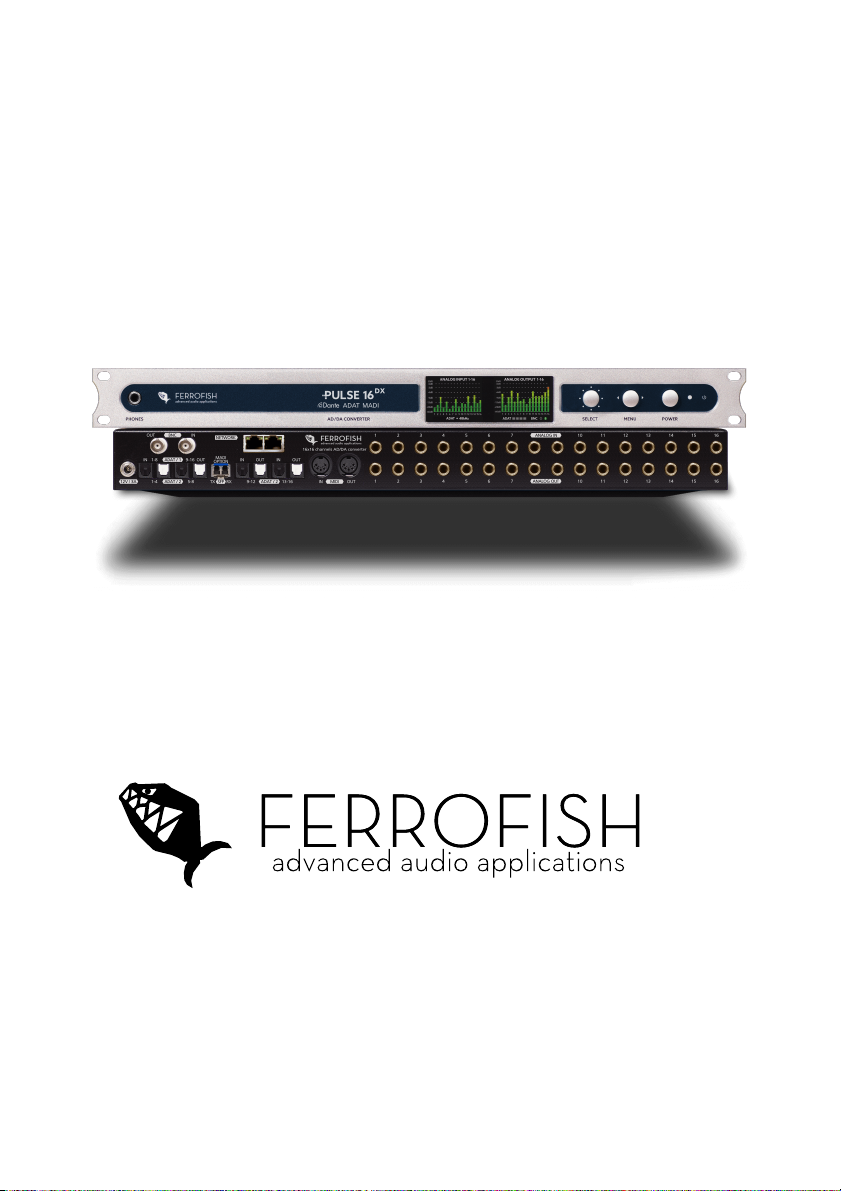
Ferrofish PULSE16 DX
Professional 16 x 16-channel A/D – D/A converter
Ferrofish – Brüderstrasse 10, 53545 Linz am Rhein
www.ferrofish.com
Version 2.0c

IMPORTANT SAFETY INSTRUCTIONS
Safety symbols used in this manual:
This symbol alerts that there are important maintainance
and operating instructions in the literature.
This symbol warns the user of uninsulated potentially dangerous voltage inside the
unit that can cause an electric shock.
This symbol warns the user that the output connectors of the power supply contain
voltagest hat can cause dangerous potentially lethal shocks.
o Read this Instructions
o Keep this instructions
o Heed all warnings.
o Follow all instructions.
1. Do not use this device near water.
2. Clean only with a dry cloth. Do not spray liquid cleaner onto the faceplate or into the
ventilation slots. This may damage the front panel or cause a dangerous condition.
3. Only install in accordance with the instructions oft he manufacturer.
4. Do not install or operate near heat sources as stoves, radiators or other devices that may
produce heat.
5. NEVER defeat the safety purpose of the grounding plug type. When the provided plug doesn’t
fit into the outlet, please consult an qualified electrician for further help.
6. Use power adaptors and accessories specified by the manufacturer only.
7. Protect the power cord from being pinched or walked on.
8. Unplug this device during lightning storms or when not in use for longer periods of time.
9. Refer all servicing to qualified service personnel only. Servicing is requires when the device has
been damaged in any way, such as when liquids have been spilled of objects have been fallen
into the device or the device has been dropped. Also when the device does no longer work
normally or has been exposed to rain or moisture.
10. This unit generated heat when operated normally. Operate in a well ventilated environment
with at least 1RU space between any other peripherial equipment.
11. This product in combination with headphones or other external amplifiers and speakers may
produce sound levels that could lead to a permanent hearing loss. Do not operate at higher or
uncomfortable volume levels for a longer time. If you are experiencing ringing in your ears, a
loss of high frequency sound information or other hearing loss, please contact an audiologist
immediately.
12. WARNING: To reduce the risk of an electric shock or fire, do not expose the device to rain or
moisture.
13. This power supply of this audio device may cause electronic interference to surrounding
objects. If you find that this or any surrounding unit is malfunctioning, try resetting the device,
relocating it or a install a powerline conditioner by an electrician.
14. Always use a stand, 19“ rack or table designed for the use of pro audio equipment. In a
permanent installation make sure that damage or even injury will not result from the mounting
of the device or from cables pulling on the device. When using a cart, use caution when moving
the device inside the cart to avoid injury from tipping-over.

Introduction
Dear customer,
thank you for purchasing our product. We are very pleased that you
have chosen the PULSE16 DX series from our product range. Using
your PULSE16 DX you can simultaneously convert 16 analog channels
to digital and 16 channels to analog. As digital interface, you can
choose between ADAT,MADI and Dante. You can freely route between
them in groups of 8 channels. We also added a headphone output so
you can monitor mono or stereo channels from an arbitrary source.
Two TFT screens show all analog input and output levels at a time. The
intuitive one-knob-operation makes using the PULSE16 DX a breeze.
We sincerely hope that you will enjoy using your PULSE16 DX as much
as we enjoyed developing it. Should you have any suggestions, praise
or criticism for us, please visit us on Facebook or at www.ferrofish.com
- a handwritten letter is of course also happily received.
Best greetings from Linz near the river Rhine.
The Ferrofish Team
Scope of Delivery
This package includes:
1x PULSE16 DX device
1x Instructions (German & English)
1x Power supply 12V
Symbols used in this manual
This symbol indicated sections of detailed explanation.
Paragraphs showing this symbol require the readers attention.
Software and Updates
For more information, updates and support please visit: www.ferrofish.com
Operation
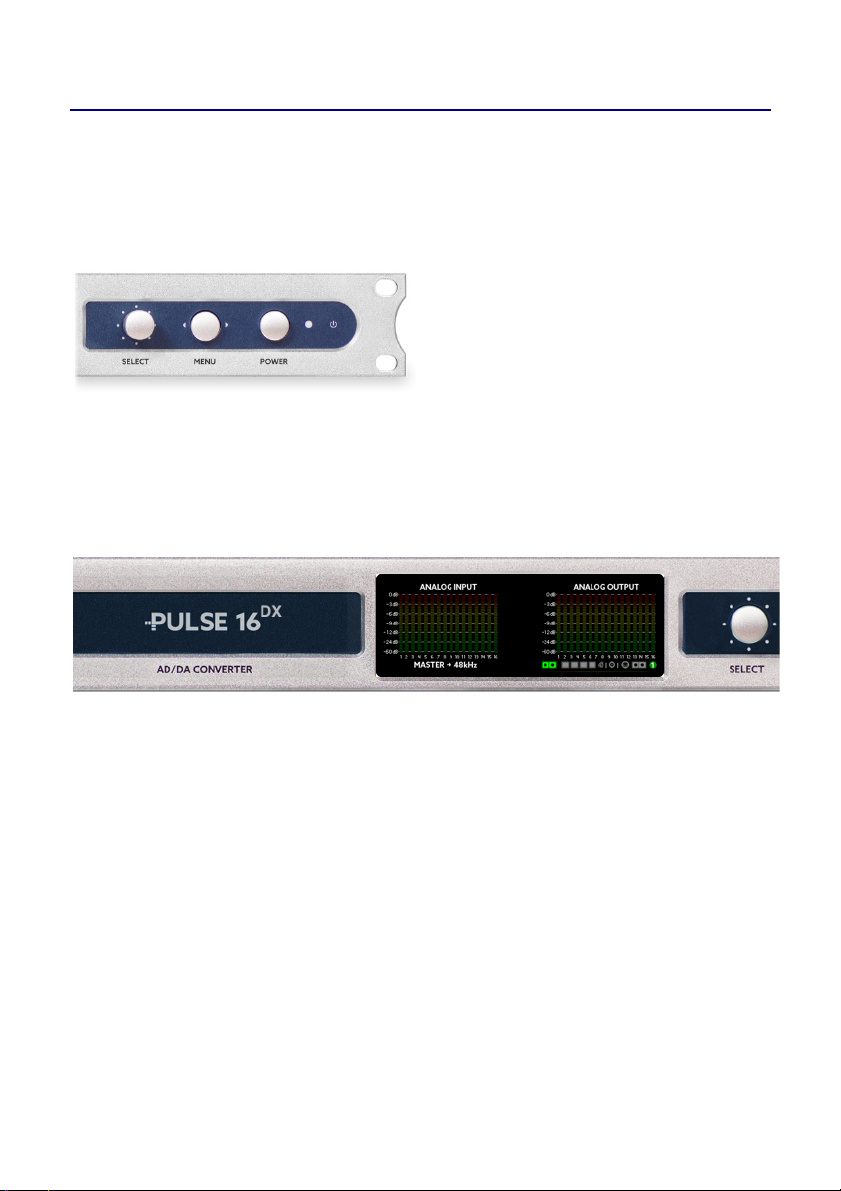
The PULSE16 DX can be operated completely from the front panel by
using the SELECT pot and the MENU button. The POWER button can be
used as a “home button” and for switching the unit on and off. For
switching it off, keep the button pressed for over 3 seconds. When you
do, a countdown will be shown
on the screen to prevent acci-
dentally shutting down the unit.
You can control the PULSE16 DX
over the 5-pin MIDI Port or via
MIDI-over-MADI or from the RemoteFish App (available for PC and
Mac) over the Dante Ethernet cable. The main screen shows the levels
of all 16 analog inputs and outputs as well as important status
information. Press POWER to get back into this screen from every sub
menu.
The status bar below the level I/O’s show:
• Wordclock sync source and sample frequency
• MADI I/O: grey = no connection, yellow = signal detected,
green = locked on sample frequency
• Status of the ADAT inputs 1-4. Same color coding like MADI.
• Status of the Dante Port
• BNC Wordclock Input
• MIDI input indicator
• MIDI-over-MADI I/O
• Active preset number
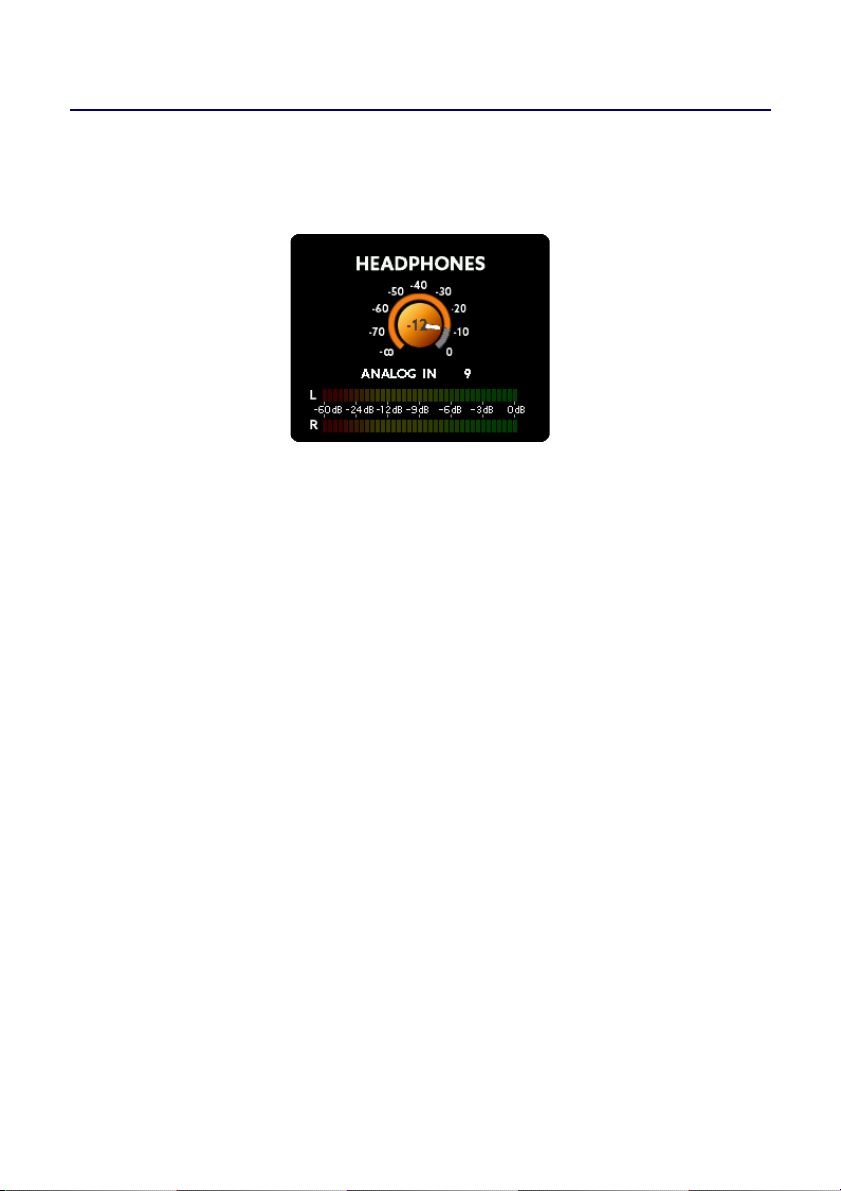
Headphones
When turning the SELECT pot inside the main screen the headphone
menu is shown. You can select the volume of the headphone output
now:
Press the MENU key to select:
• Source: You can choose between ANALOG IN / OUT, ADAT IN /
OUT, MADI IN / OUT and DANTE IN / OUT.
• Channel: Select the desired channel. The first cycle contains all
available channels in mono, the second cycle lets you listen to
the channels grouped in stereo pairs.
Please note that using headphones at high sound pressure levels for a
longer time can result in permanent hearing loss or hearing damage.
Take care of your ears – you only have this single pair.
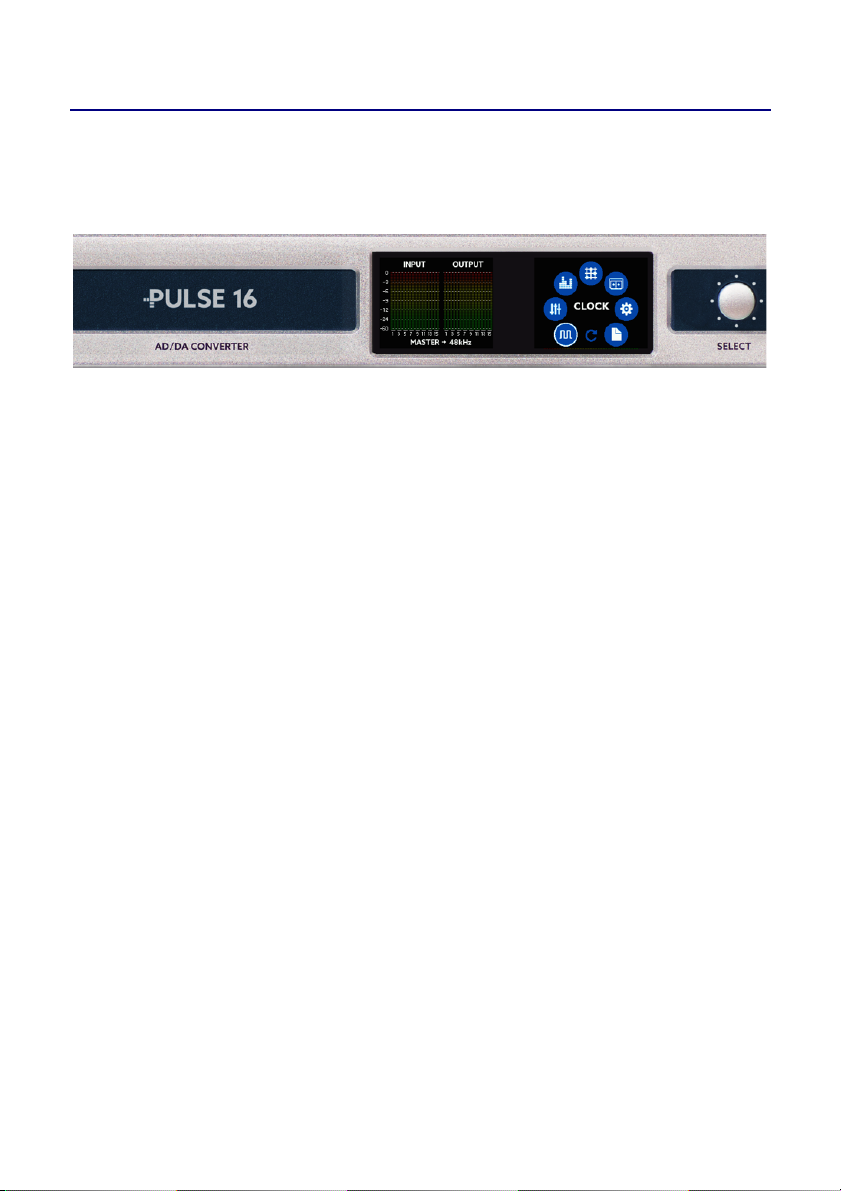
Main Menu
By pressing the MENU button you engage the main menu. Use the
SELECT pot to navigate to the desired menu point and press MENU to
select it.
Inside the Main Menu you can choose between:
CLOCK
Here you select if the PULSE16 DX should generate the wordclock
signal by itself (Clock Master/Leader) or if it should listen to an
wordclock signal (Slave/Follower) from an external source. If choosing
Master (Leader) you can also set the sample rate here.
GAINS
Here you can set the sensitivity of the 16 analog inputs individually.
LEVELS
Here you can set the level of the 16 analog outputs individually.
ROUTING
In this menu you can determine the routing of the inputs and outputs.
MADI SFP
Here you can see additional information from the MADI SFP Module
installed in your PULSE16 DX.
SETUP
The setup menu lets you control various settings
PRESET
You can load or save presets to one of a total six preset slots.
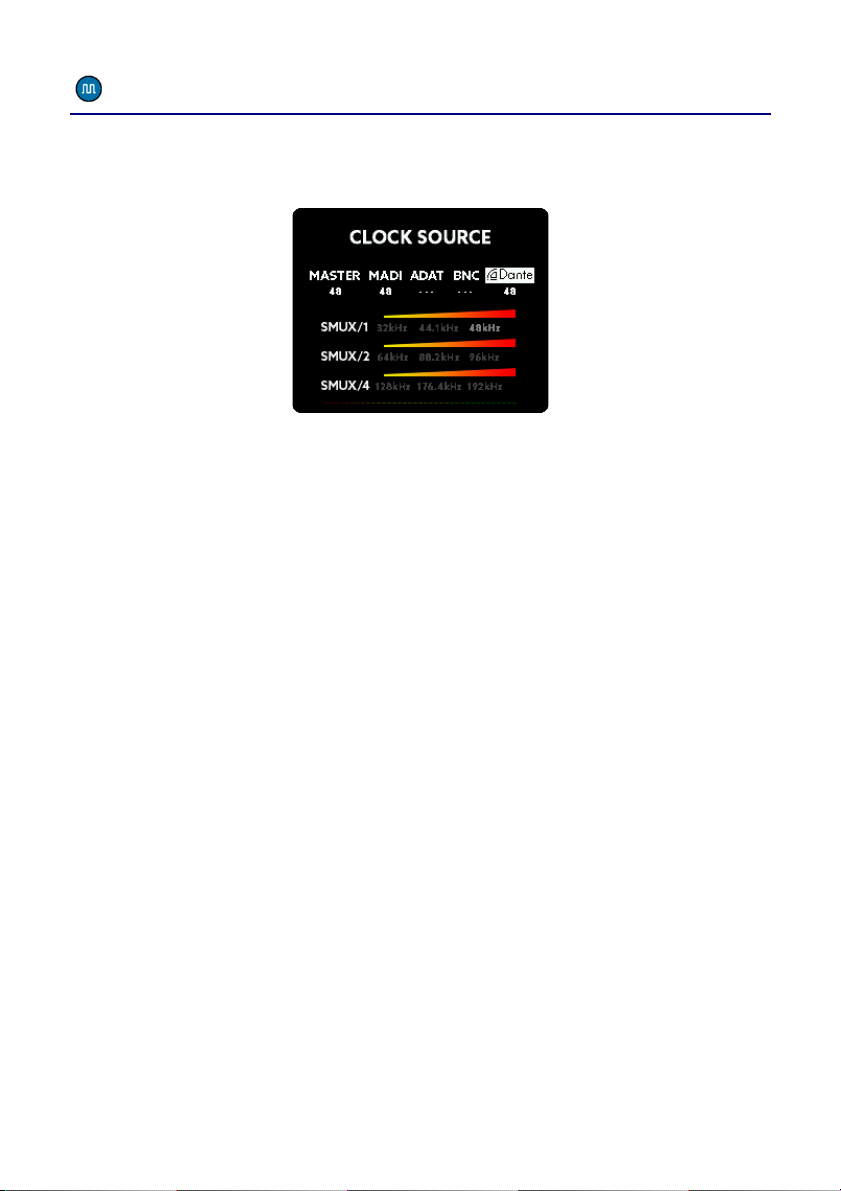
Main Menu – CLOCK
Inside this menu you can select the source of the wordclock and the
sample frequency of the PULSE16 DX when running as Master:
The numbers below the labels show the internal generated clock
frequency when set to Master or the measured external sample
frequency. If no sample rate is detected “---” is shown.
MASTER
If the clock source is set to Master (Leader), the internal wordclock
generator of the PULSE16 DX is used. All other digital devices attached
have to be set to Slave (Follower).
ADAT + MADI
The wordclock is extracted and conditioned from the ADAT or MADI
data stream and send to the Wordclock output. The conditioning (jitter
reduction) is done via a proprietary circuit.
BNC
When using an external wordclock on the BNC IN of the PULSE16 DX,
the wordclock signal will also be routed thru the jitter reduction stage
and sent back to the BNC OUT.
DANTE
The wordclock is extracted and conditioned from the Dante network.
Usually the Wordclock provided by Dante should be used, so choosing
this source is recommended when using Dante.

Main Menu – CLOCK - SMUX modes
Although the PULSE16 DX always works using the 16 analog input and
output channels, the number channels is determined on the sample
frequency and the SMUX mode:
SMUX/1
The SMUX/1 mode allows sampling rates from 32kHz up to 48kHz.
SMUX/2
When using higher sampling rates in SMUX/2 mode (64kHz to 96kHz),
the digital channels are being split into channel pairs (Signal
MUltipleXing). For this reason, the number of channels is reduced by
half. To overcome this limitation the digital ADAT I/O’s of the PULSE16
DX are available as a double configuration. So, you can run all 16
analog inputs and outputs at sample rated up to 96kHz in SMUX/2
mode. This also applies for MADI and Dante.
SMUX/4
At even higher sampling rates from 128kHz up to 192kHz the SMUX/4
mode is used. In this mode, an analog channel is being split up to four
digital channels.Using the MADI interface all 64 x 64 digital channels
are used for 16 analog inputs and 16 analog outputs. In other words:
A single PULSE16 DX unit can handle all full 16 inputs and outputs at
192kHz without any limitation of the total channelcount when using
MADI or Dante. When using the ADAT interface the channelcount is
reduced to 8x8 due to the bandwith limitation of the ADAT protocol.

Main Menu – GAINS (Inputs)
The analog inputs of the PULSE16 DX can be set to different
sensitivities in the range from -8dBu up to +20dBu in single steps of
1dB.
The number above the fader shows the maximum level in dBu, which
the input can handle. When the fader is set to “20” like in the picture
above the input can handle an maximum input level of +20dBu. Avoid
exceeding this maximum level to prevent digital clipping.
In addition to the fader you see the input level meters of the analog
inputs of the unit. This makes input setting easier. The dB scale on the
right side shows the resolution of these level meters.
The value of -8dBu is chosen on purpose, because it’s
close to the level of analog consumer gear (-10dBV =
-7.78dBu)
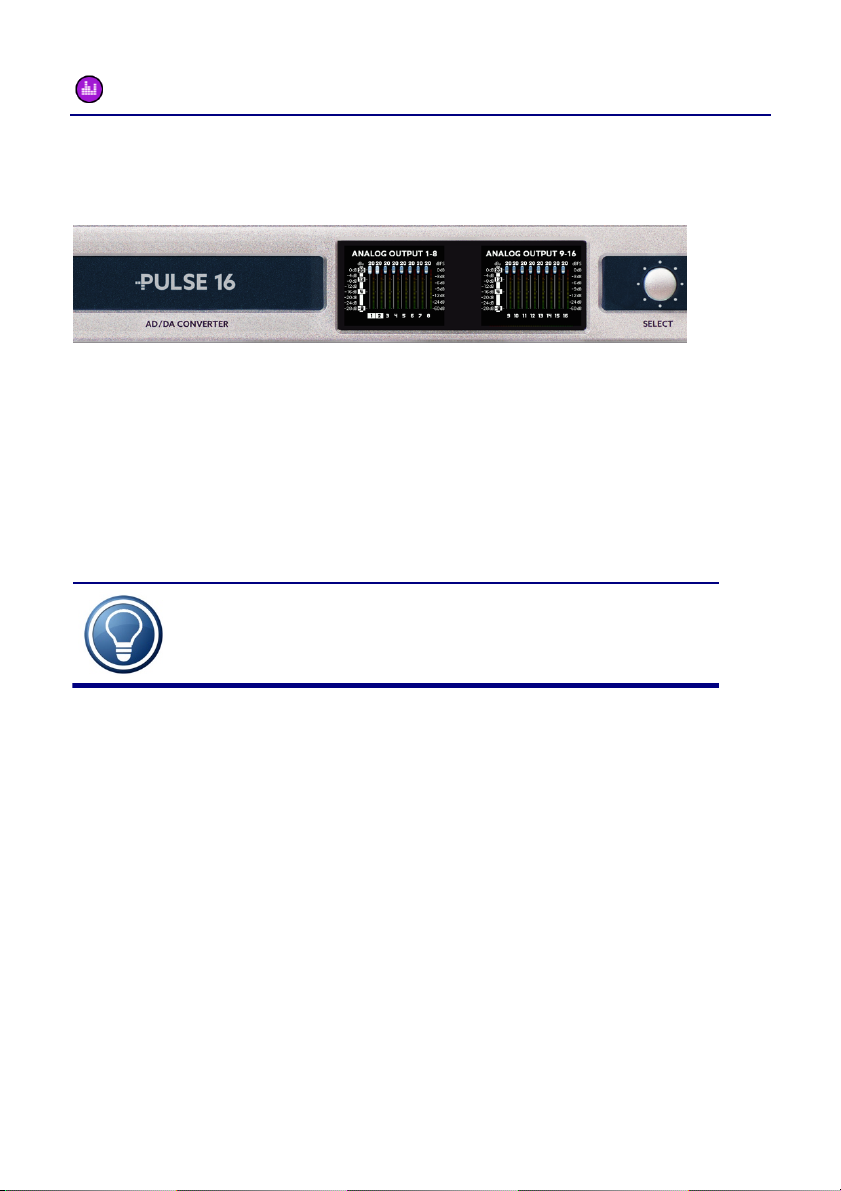
Main Menu – LEVELS (Outputs)
The LEVELS screen is similar to the GAINS screen described before.
Same as with the inputs also the outputs can be adjusted in 1dB steps
between -8dBu to +20dBu.
.
The dB scale on the right side shows the resolution of the metering
levels. This scale does not show the level value of the fader!
The number above the fader shows the maximum level in dBu, which
the output is able to give out. When the fader is set to 20 like shown in
the picture above, the output of a digital signal with 0dBFS will be
+20dBu on the analog output.
The value of -8dBu is chosen on purpose, because it’s
close to the level of analog consumer gear (-10dBV =
-7.78dBu)

Main Menu – ROUTING
The PULSE16 DX offers an intuitive routing matrix. This matrix is shown
as a grid inside the ROUTING menu. The inputs are shown in the
columns, while the rows represent the outputs. A solid square
between these lines indicates a connection. The routing is done in
channel blocks of eight channels.
To change the routing, please do the following:
• Choosing an output: Use the SELECT pot to select one block of
eight channels (one of the rows).
• Choosing an input: now press MENU to select an input for this
output. Use SELECT to select an input (one of the columns).
• Repeat this process as desired.
Keep the MENU button pressed longer to exit this menu.
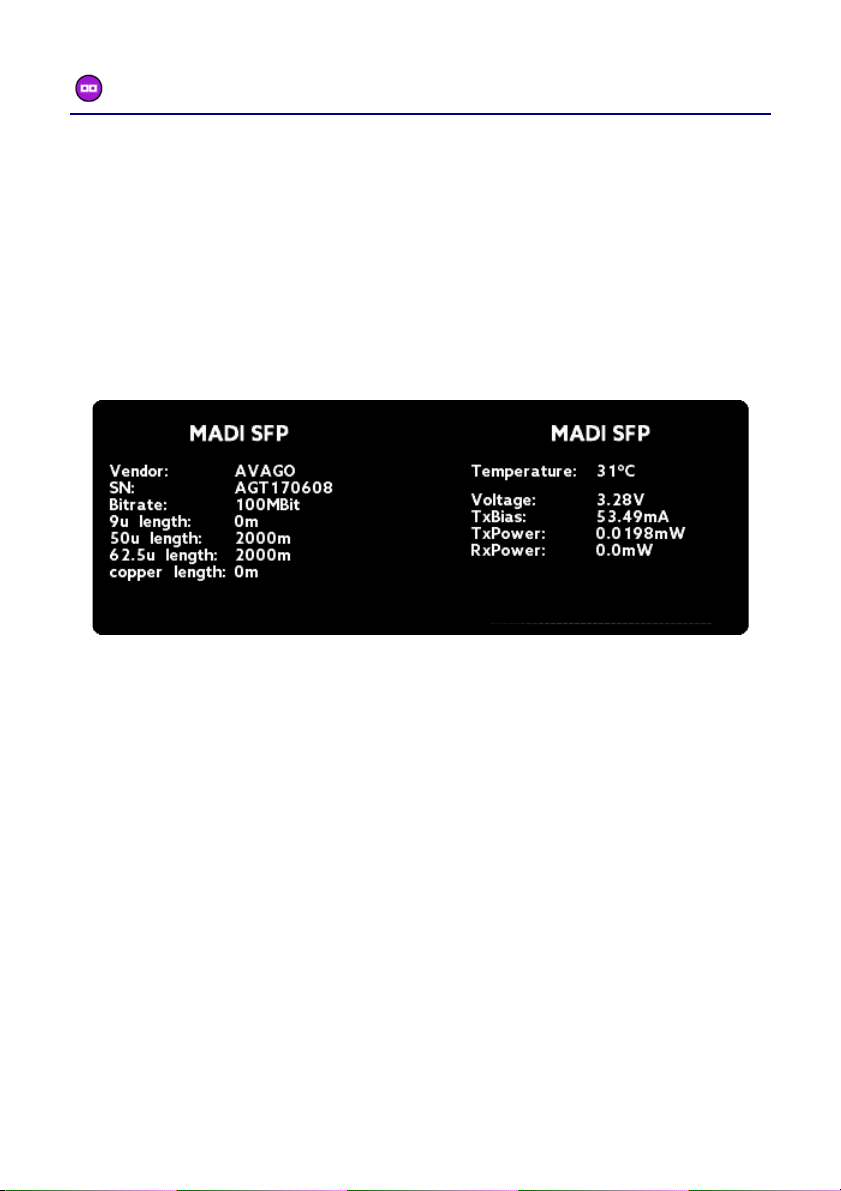
Main Menu – MADI SFP Menu
The PULSE16 DX is equipped with an optical MADI SFP module for the
MADI I/O connection. This module is removable and exchangable by
the user to meet changing criteria of demand. So the module can be
exchanged for a coaxial module or a optical module in single-mode
configuration by the user.
All SFP Modules can report their parameters of operation. We thought
it would be interesting to make this information available. So we did:
The information shown can be helpful for bug fixing or for educational
purposes.
The MADI SFP module is available as a single-mode and a multi-mode
version. Most devices on the market use the multi-mode standard. The
single-mode version is used for distances longer then 2km.
Please refer to the exact specifications of your other MADI devices for
more information. The default configuration of the SFP module is
multi-mode. For more information about the configuration of your
MADI interface please contact the manufacturer.

Main Menu – SETUP
In the SETUP menu the following settings can be done:
BNC Termination
The PULSE16 DX wordclock is terminated internally by default with a
75 ohms resistor. When daisy-chaining the wordclock of several units,
you should leave this option set to ON. If you’re using T-connectors for
connecting several units, set this option to OFF.
Keyclick
Let’s you switch the Keyclick sound on or off. Switching the sound off
can be advantageous in critical situations like e.g. editing the PULSE16
DX’s parameter inside a cave next to a grizzly bear in hibernation.
Brightness
Here you can set the brightness of the displays. In case the PULSE16 DX
is not operated the display will be dimmed after some seconds.
MADI 96k frame
When using the SMUX/2 mode, there exist two transmission standards
for MADI:
• 48k frame: Transmission is identical to the SMUX/1 mode,
except two channels are grouped to one channel, resulting in
32 channels.
• 96k frame: Instead of grouping channels, the channels are sent
directly, but using a shorter packet consisting of 32 channels.

Both modes transfer the same amount of channels (32), but the 96k
frame mode has the advantage, that the receiver can distinguish the
SMUX/1 and SMUX/2 modes, so it can switch automatically between
48kHz and 96kHz for example. 96k frame is the preferred setting if the
receiver can recognize it.
MADI short frame (On = 56 Ch, Off = 64 Ch format)
The most common MADI configuration is 64 channels (SMUX/2: 32
channels, SMUX/4: 16 channels). This uses the full bandwidth of the
MADI interface. When enabling the short frame option, the device will
send only 56 (SMUX/2: 28 channels, SMUX/4: 14 channels) instead of
64 channels. This option corresponds to an older standard, where the
bandwidth of the missing eight channels is used to change the speed of
the MADI signal within some percent up or down.
Delay Compensation
When connecting several PULSE16 DX units in daisy-chain the MADI
data will be routed thru the first unit to the second unit and so on. This
results in a small delay of the data on the second, third and fourth unit.
To compensate this delay you have to tell the PULSE16 DX which order
it is inside the MADI chain:
• Single: only one unit connected.
• 1 of 4: first device in the MADI chain
• 2 of 4: second device in the MADI chain
• 3 of 4: third device in the MADI chain
• 4 of 4: fourth device in the MADI chain
MIDI control
Here you can set from which port the PULSE16 DX should receive
remote commands:
• From the 5-pin-MIDI input only
• From the MIDI-over-MADI input only.
• From both sources.
Dante control messages are being sent in parallel to the MIDI port.
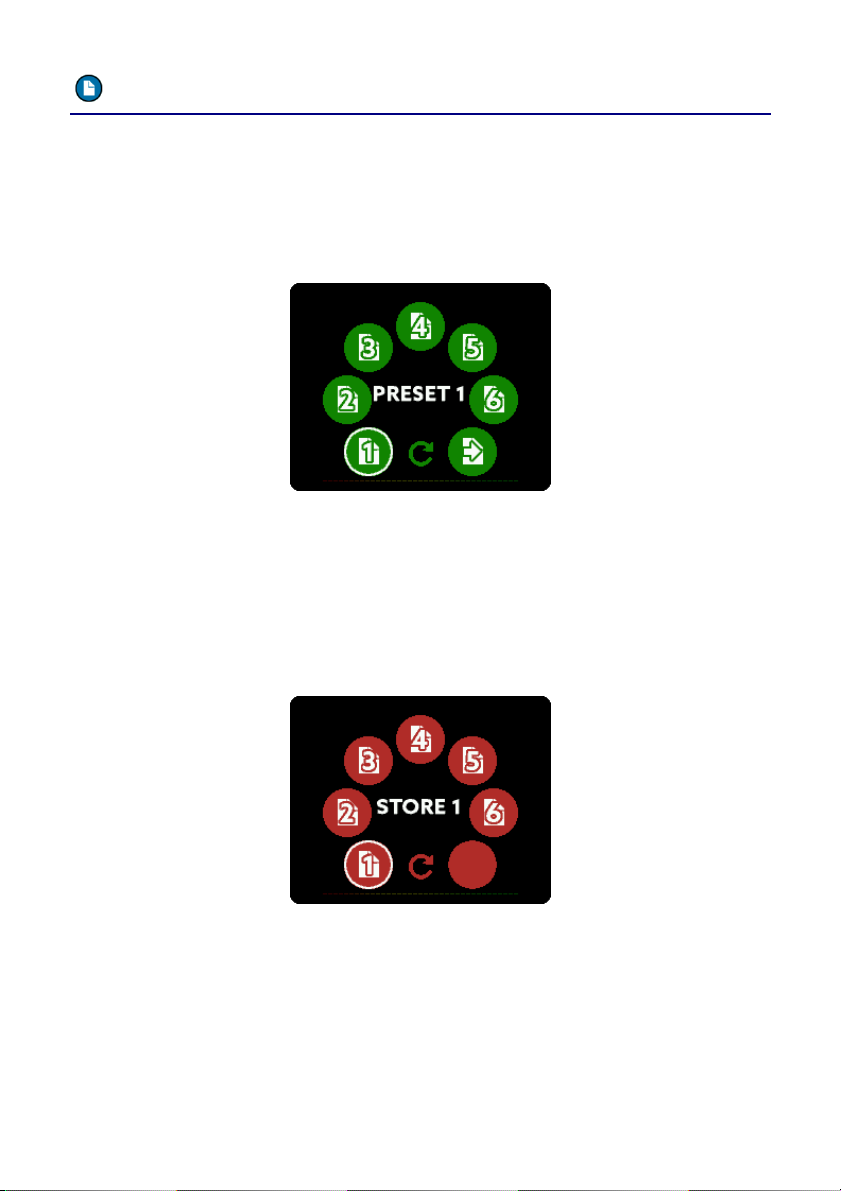
Main Menu – PRESET
The PULSE16 DX’s parameters GAINS, LEVELS and the routing can be
permanently stored in one of six preset slots. This lets you pre-
configure the PULSE16 DX before the gig and save you time later.
Inside the PRESET menu you can choose which preset you want to
load:
After selecting the desired preset by using the SELECT pot and MENU
to load it a second screen appears. This screen lets you choose what
should be loaded: The GAINS of the analog inputs, the LEVELS of the
analog outputs, the routing – or all three items.
To store a current setting into a preset slot, enter the STORE menu:
Inside this menu you can permanently store the current settings at one
of total six preset slots.

Locking the PULSE16 DX
The front panel (except the headphone screen) can be locked to avoid
maloperation or manipulation of the settings. To lock the PULSE16
DX’s front panel, enter the PIN that’s printed on the downside of the
unit:
After entering the correct PIN, keep the MENU button pressed for one
second. The device is locked now. Follow the same procedure to
unlock the device again.
The PIN of the PULSE16 DX is fixed and cannot be modified to avoid
abusive manipulation in sensitive environments.
We strongly recommend saving the PIN of your PULSE16 DX on
several safe places, for example as the last six digits of a cellular
phone book entry. There is no PIN-Reset shortcut for this device!
Locking the PULSE16 DX via a PIN Code:
A lost PIN Code can just be restored thru a complex
recovery procedure by the manufacturer. This
procedure is liable to pay costs. Keep your PIN code
stored at one or more safe places.
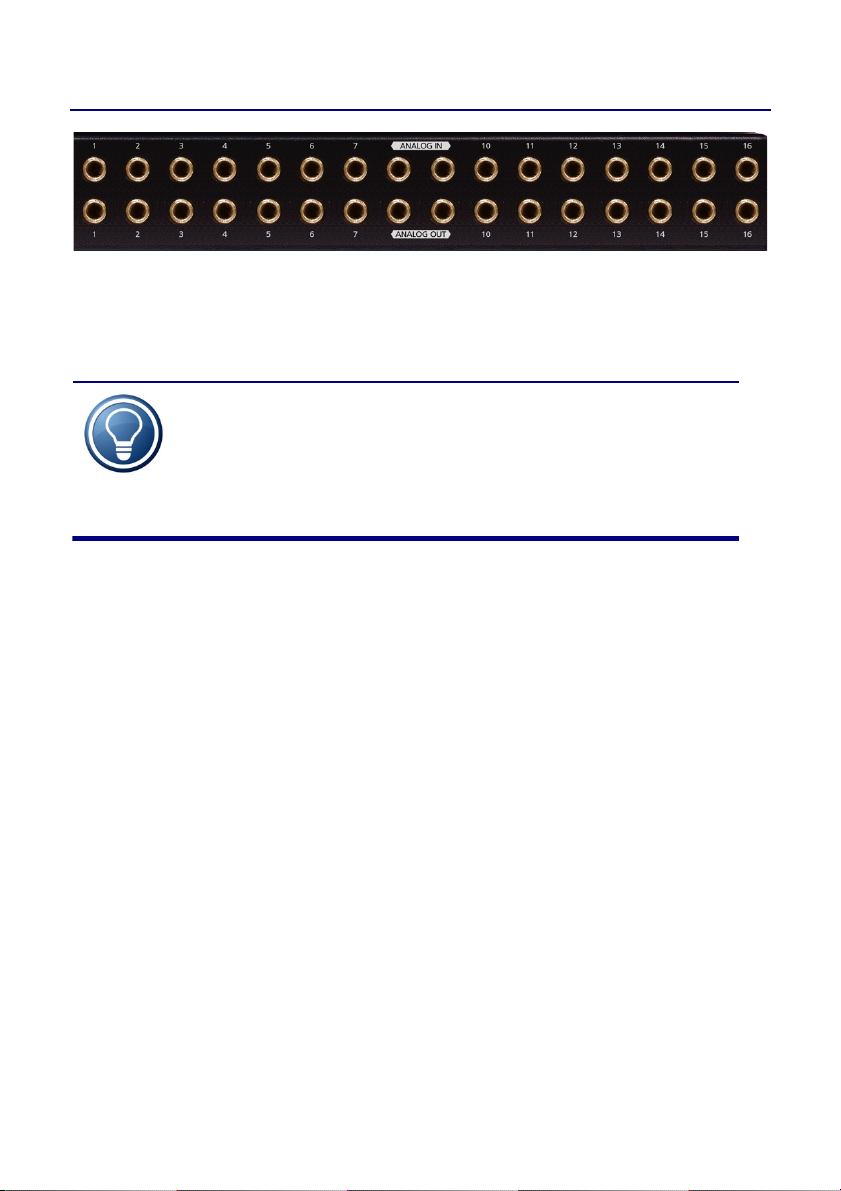
PULSE16 DX I/O’s – analog inputs and outputs
All analog inputs and output can be found on in balanced ¼” (6.3mm)
TRS jacks, and can be set independently to a level/sensivity between
-8dBu and +20dBu. All inputs and outputs are fully balanced.
The pinout of the TRS connections is:
Tip = hot, Ring = cold, Shield = ground.
When using balanced (TRS) cables, always make sure that all three
contacts are connected. When using TRS plugs with unbalanced
(2wire) cables, make sure that RING and SLEEVE are connected with
each other.
The reference levels on the analog side mean a value of
0dBFS on the digital side, when set to an input
sensitivity of +4dBu and feeding the input with a signal
level of +4dBu (1.22Vrms).
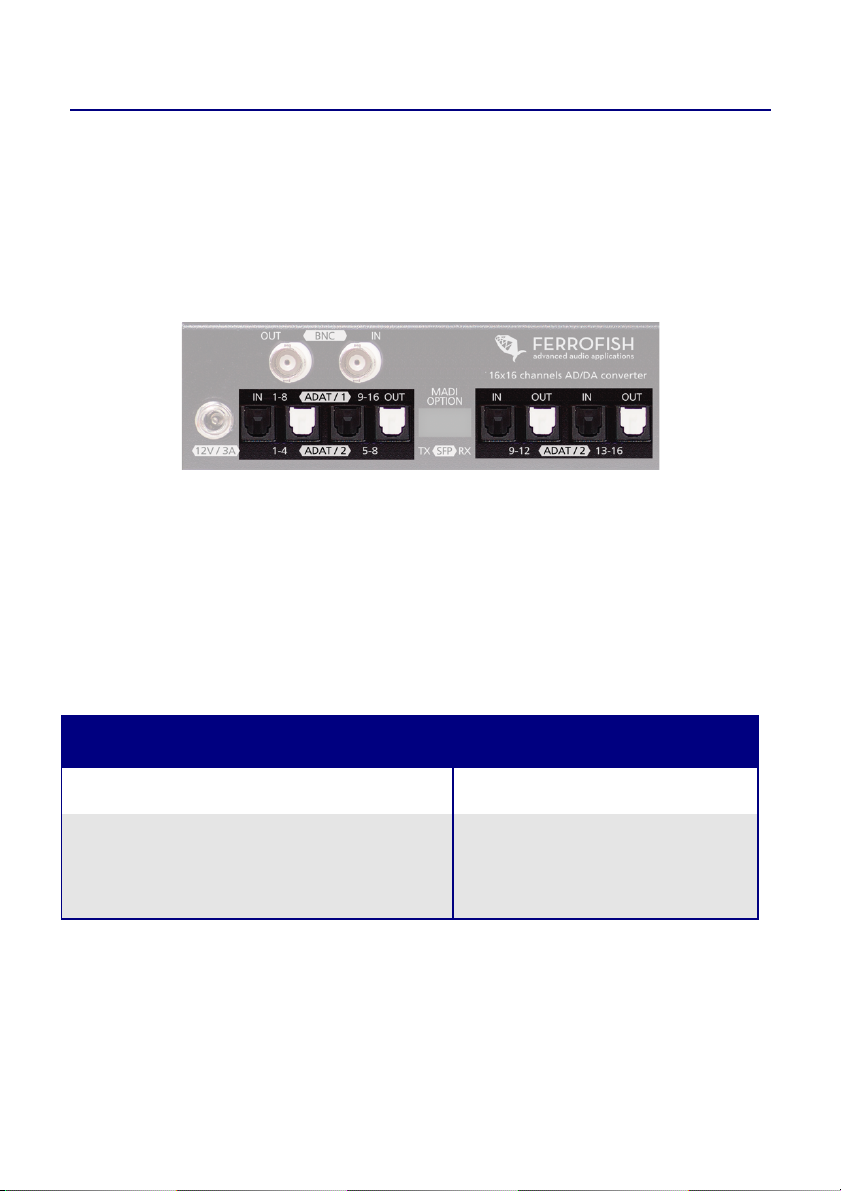
PULSE16 DX I/Os – ADAT
ADAT® is a digital multichannel interface standard by Alesis®. It can
transfer eight channels of audio data at 48kHz via an optical plastics
fibre. The maximum length of an ADAT connection is limited to 10
meters.
The PULSE16 DX has four pairs of ADAT I/O ports. The ports with white
doors are the outputs, the black ones are the inputs.
Each ADAT interface can transfer eight channels at SMUX/1. When
using SMUX/2 the channel count reduces to four. Since the PULSE16
DX is equipped with four ADAT interface In/Out pairs, transfer of all
analog 16 input and 16 output channels is still possible.
If SMUX/4 (up to 192kHz) is enabled only two channels are transferred
over a ADAT cable, resulting in 8 input and 8 output channels in total,
unsing the four interface pairs.
Frequency
ADAT channels in+output
32kHz, 44.1kHz, 48kHz (SMUX/1)
32+32
64kHz, 88.2kHz, 96kHz (SMUX/2)
16+16
128kHz, 176.4kHz, 192kHz (SMUX/4)
8+8

PULSE16 DX I/Os – MADI
MADI is a professional audio interface format which can transfer 64
channels over up to 2 kilometers in multi-mode. Connect several MADI
devices in series by putting them in a daisy chain. This means that you
connect the output of the first device to the input of the second
device. The output of the second device will be connected to the input
of the third device and so on. So, you can daisy-chain up to four units
to transmit 64 analog inputs and 64 outputs at 48kHz. The PULSE16 DX
features an optical MADI-SFP connector. To connect other MADI
devices, you can use a LC – SC cable (included).
When using sample rates higher than 48kHz the maximum number of
transferrable channels is reduced. The following chart shows the
amount of digital audio channels for a single MADI port:
The original MADI standard utilized a maximum channel count of 56
channels for a single MADI connection. These 56 digital channels allow
a sample rate variation of +/- 10%. These numbers are shown in
brackets in the chart. Today, using 64 channels is preferred, since rate
variations are not often used anymore. Your PULSE16 DX automatically
detects if 64 or 56 channels are received. Use the SETUP menu to
switch, if either 64 or 56 channels should be sent.
Frequency
MADI channels
32kHz, 44,1kHz, 48kHz (SMUX/1)
64 (56) channels
64kHz, 88,2kHz, 96kHz (SMUX/2)
32 (28) channels
128kHz, 176,4kHz, 192kHz (SMUX/4)
16 (14) channels

PULSE16 DX I/Os – BNC WORDCLOCK
Every digital system needs a clock frequency to work. This clock
frequency can either be generated by the system itself (master mode)
or it can be supplied externally (slave mode). There can be only one
master clock in a digital system. The number of slave devices is not
limited.
The PULSE16 DX can generate its own clock and share this clock with
other external devices via the BNC OUT connector or it can receive an
external clock from the BNC IN connector. Please use a coaxial cable
with an impedance of 75 ohms.
Wether the PULSE16 DX runs in Master or Slave mode can be set inside
the CLOCK settings menu.
For creating a rock-solid clock signal, the PULSE16 DX
uses a proprietary circuit for jitter reduction. All data
coming from MADI, ADAT and BNC is processed by
this jitter reduction stage. This guarantees the lowest
jitter on all digital channels.
Table of contents
Other Ferrofish Media Converter manuals

Ferrofish
Ferrofish PULSE 16 User manual

Ferrofish
Ferrofish Verto 32 User manual

Ferrofish
Ferrofish A32pro User manual

Ferrofish
Ferrofish A32 DANTE User manual

Ferrofish
Ferrofish A16 MK-II User manual

Ferrofish
Ferrofish Verto 32 User manual

Ferrofish
Ferrofish A16 AE User manual

Ferrofish
Ferrofish A32 DANTE User manual


