Festool CLEANTEX CT 36 E AC Installation instructions

en Original operating manual - Mobile dust extractors 6
CT 36 E AC HD
Festool GmbH
Wertstraße 20
D-73240 Wendlingen
+49 (0)7024/804-0
+49 (0)7024/804-20608
www.festool.com 717092_002

1
1b
1-7
1-6
1-8
1-10
1-5 1-4
1-3
1-2
1-1
1-11
2
1-13
1-14
1-15
2-1
2-2
2-3
2-1
2-4
2a
2b
1-12
AC
ACAC
01
1-9

3b
4
5 6
3a
AutoClean
or

1
2
3
9
1
2
3
SC FIS-CT36
8
12
3
7

11
ENS-CT36
1
2
3
10
12
4
3

Contents
1 Safety instructions.............................. 6
2 Technical data..................................... 6
3 Symbols............................................... 7
4 Machine features.................................7
5 Intended use........................................7
6 Operation.............................................7
7 Settings................................................8
8 Working............................................... 8
9 Service and maintenance....................9
10 Environment........................................ 9
1 Safety instructions
Warning! Read and observe all informa
tion and safety instructions. Ignoring warning
notes and instructions may lead to electric
shocks, fires and/or cause serious injury.
Keep all safety information and other instruc
tions in a safe place for future reference.
–The device is not intended for use by per
sons (including children) with limited
physical, sensory or mental ability or
without sufficient experience and/or
knowledge. Children should always be su
pervised to ensure that they do not play
with the device.
–Warning: machine may contain hazardous
dust. Only authorised qualified specialists
with suitable protective equipment may
perform maintenance, empty the container
and change the filter.
– Always operate with the filter system in
stalled!
–Risk of explosion and fire hazard: do not
extract sparks or hot dust, flammable or
explosive dust (e.g. magnesium, alumini
um, petrol, thinner, with the exception of
wood), aggressive fluids/solids (e.g. acid,
leach, solvent).
– Observe all national safety regulations as
well as the material manufacturer's speci
fications!
– Always use suitable protective equipment!
– If intact following a visual inspection, work
in a dry environment according to instruc
tions!
– Always use the socket on the machine for
the purpose specified!
– Check the plug and the cable regularly and
should either become damaged, in order to
avoid a hazard, have them replaced by an
authorised after-sales service workshop.
– Do not lift or transport using a crane hook
or lifting gear!
– The tool shall always be supplied via resid
ual current device with a rated residual
current of 30 mA or less.
2 Technical data
Mobile dust extractors
Power consumption 350 - 1200 W
Maximum appliance socket connected load AUS 1200 W
Max. suction capacity (air), turbine 234 m³/h (3900 l/min)
Max. vacuum, turbine 24000 Pa
Filter surface area 6318 cm²
Suction hose D 36 / 32 mm x 3.5 m - AS
Length of the net cable 7,5 m
Sound pressure level as per EN 60704-2-1 / Uncertainty K 71 dB(A) / 3 dB
Protection category IP X4
Container capacity 36 l
Dimensions L x W x H 673 x 365 x 522 mm
Weight 15 kg
English
6

3 Symbols
Warning of general danger
Risk of electric shock
Read the Operating Instructions/Notes!
Wear a dust mask.
Do not throw in the household waste.
4 Machine features
[1-1] Handle
[1-2] Locking clip
[1-3] Dust container
[1-4] Lever
[1-5] Brake
[1-6] Intake opening
[1-7] Module slot
[1-8] Appliance socket
[1-9] Electrical outlet module circuit
breaker
[1-10] Hose holder
[1-11] Accessories holder
[1-12] Switch
[1-13] Suction power adjuster
[1-14] Automatic cleaning
[1-15] Closing slide (ComfortClean)
The specified illustrations appear at the begin
ning of the Operating Instructions.
5 Intended use
Mobile dust extractor suitable for
– Extracting non-hazardous dust, dirt, sand
and chips,
– Extracting water,
– Increased loads during commercial use,
according to IEC/EN 60335-2-69.
The user is liable for improper or non-in
tended use.
6 Operation
WARNING
Unauthorised voltage or frequency!
Risk of accidents
► Observe the specifications on the ma
chine’s name plate.
► Observe country-specific regulations.
6.1 Initial operation
► Open the locking clips [2-2] and remove the
top section of the machine [2-1].
► Remove the accessory parts from the dirt
trap [2-3] and the packaging!
► If necessary, attach the closing slide [1-15]
to the intake opening [1-6] [3a], see Chap
ter 8.1 for more information.
► Insert the filter/disposal bag [8] + [10].
► Replace the top section [2-1] and close the
locking clips [2-2].
► Connect the suction hose to the intake
opening [1-6].
Installing the accessory box including the tube
holder
► Position the accessory box on the top sec
tion of the machine [2-1] and secure with
two screws [2-4].
When not using the tube holder, lift the latches,
tilt the tube holder back and remove [2 b].
An assembled suction tube with floor nozzle
can be inserted in the slot on the accessory box.
The adapter must be positioned correctly [2 a].
6.2 Connecting the mobile dust extractor
WARNING
Risk of injury from tools starting up unex
pectedly
► Before setting the switch to the "AUTO" or
"MAN" position, make sure that the con
nected tool is switched off.
The switch [1-12] serves as an on/off switch.
► Insert the plug into an earthed socket.
Pull the plug from the socket when the
machine is not in use and prior to main
tenance and cleaning work.
Switch position "0"
Appliance socket [1-9] is disconnected from the
power, mobile dust extractor is switched off.
English
7

"MAN" switch position
Appliance socket [1-9] is connected to the pow
er, the mobile dust extractor starts.
"Auto" switch position
Appliance socket [1-9] is connected to the pow
er, the mobile dust extractor starts when the
connected tool is switched on.
6.3 Connecting electric power tools
WARNING
Risk of injury
► Observe the maximum appliance socket
connected load (see chapter "Technical da
ta")
► Switch off the electric power tool.
► Connect the electric power tool to the appli
ance socket .
Electrical outlet module circuit breaker
If the maximum connected load at the electrical
outlet module of the power tool is exceeded, the
circuit breaker separates the electrical outlet
module from the voltage supply.
► Turn off the power tool using the switch.
► Wait approx. 20 seconds.
► Activate the circuit breaker [1-9].
► Turn the power tool back on.
7 Settings
7.1 Adjusting the suction power
► Use the rotary knob [1-13].
7.2 Applying the brake
► Raise the front of the dust extractor slightly.
► Push down the brake [1-5] until it engages
into position.
► Actuate the lever [1-4] to release.
7.3 Temperature cut-out
A temperature cut-out switches the mobile dust
extractor off when it reaches a critical tempera
ture to prevent overheating.
► A temperature cut-out switches the mobile
dust extractor off when it reaches a critical
temperature to prevent overheating.
► Switch off the mobile dust extractor, allow
to cool for about 5 minutes then switch on
again.
Not possible to switch on: contact
Festool service workshop.
7.4 Systainer depot
The surface of the mobile dust extractor dou
bles up as a surface for storing Systainers:
► Place the Systainer in the Systainer retain
er [3a].
► A Systainer adapter (accessory) must be at
tached to the top section using four screws
in order to obtain a secure connection [3b].
8 Working
8.1 AUTOClean - Cleaning the main filter
Only in conjunction with disposal bag.
Not suitable for wet extraction!
Automatic cleaning
Activate using the rotary knob [1-14].
Manual cleaning
Turn the switch [1-12] to the AC symbol.
Full manual cleaning [4]
► Cover the end of the nozzle or suction hose
with your hand or closing slide CT-VS
(497926).
► Turn the switch [1-12] to the AC symbol.
8.2 Extracting dry materials
CAUTION
Hazardous dust
Damage to the respiratory passage
► Always use a filter or disposal bag.
When extracting large quantities of oak
or beech wood dust or dust that exceeds
the permitted limit values, only extract from a
single machine (electric or air tool).
Observe the following when extracting dust
generated by operating electric power tools:
Ensure there is adequate ventilation! Observe
regional regulations!
Limit values: exhaust air max. 50% of the clear
air volume
Formula: room volume VR x air renewal rate LW
8.3 Extracting wet materials/liquids
Remove the filter or disposal bag!
Recommendation: use special wet filter
(NF-CT).
The dust extractor stops automatically when
the maximum level is reached.
After wet extraction, allow the main filter to dry!
English
8

CAUTION
Escaping foam and fluids
► Switch off and empty the machine immedi
ately.
8.4 After finishing work
► Clean the main filter automatically or man
ually (see Chapter 8.1 ).
► Switch off the mobile dust extractor and
pull out the mains plug.
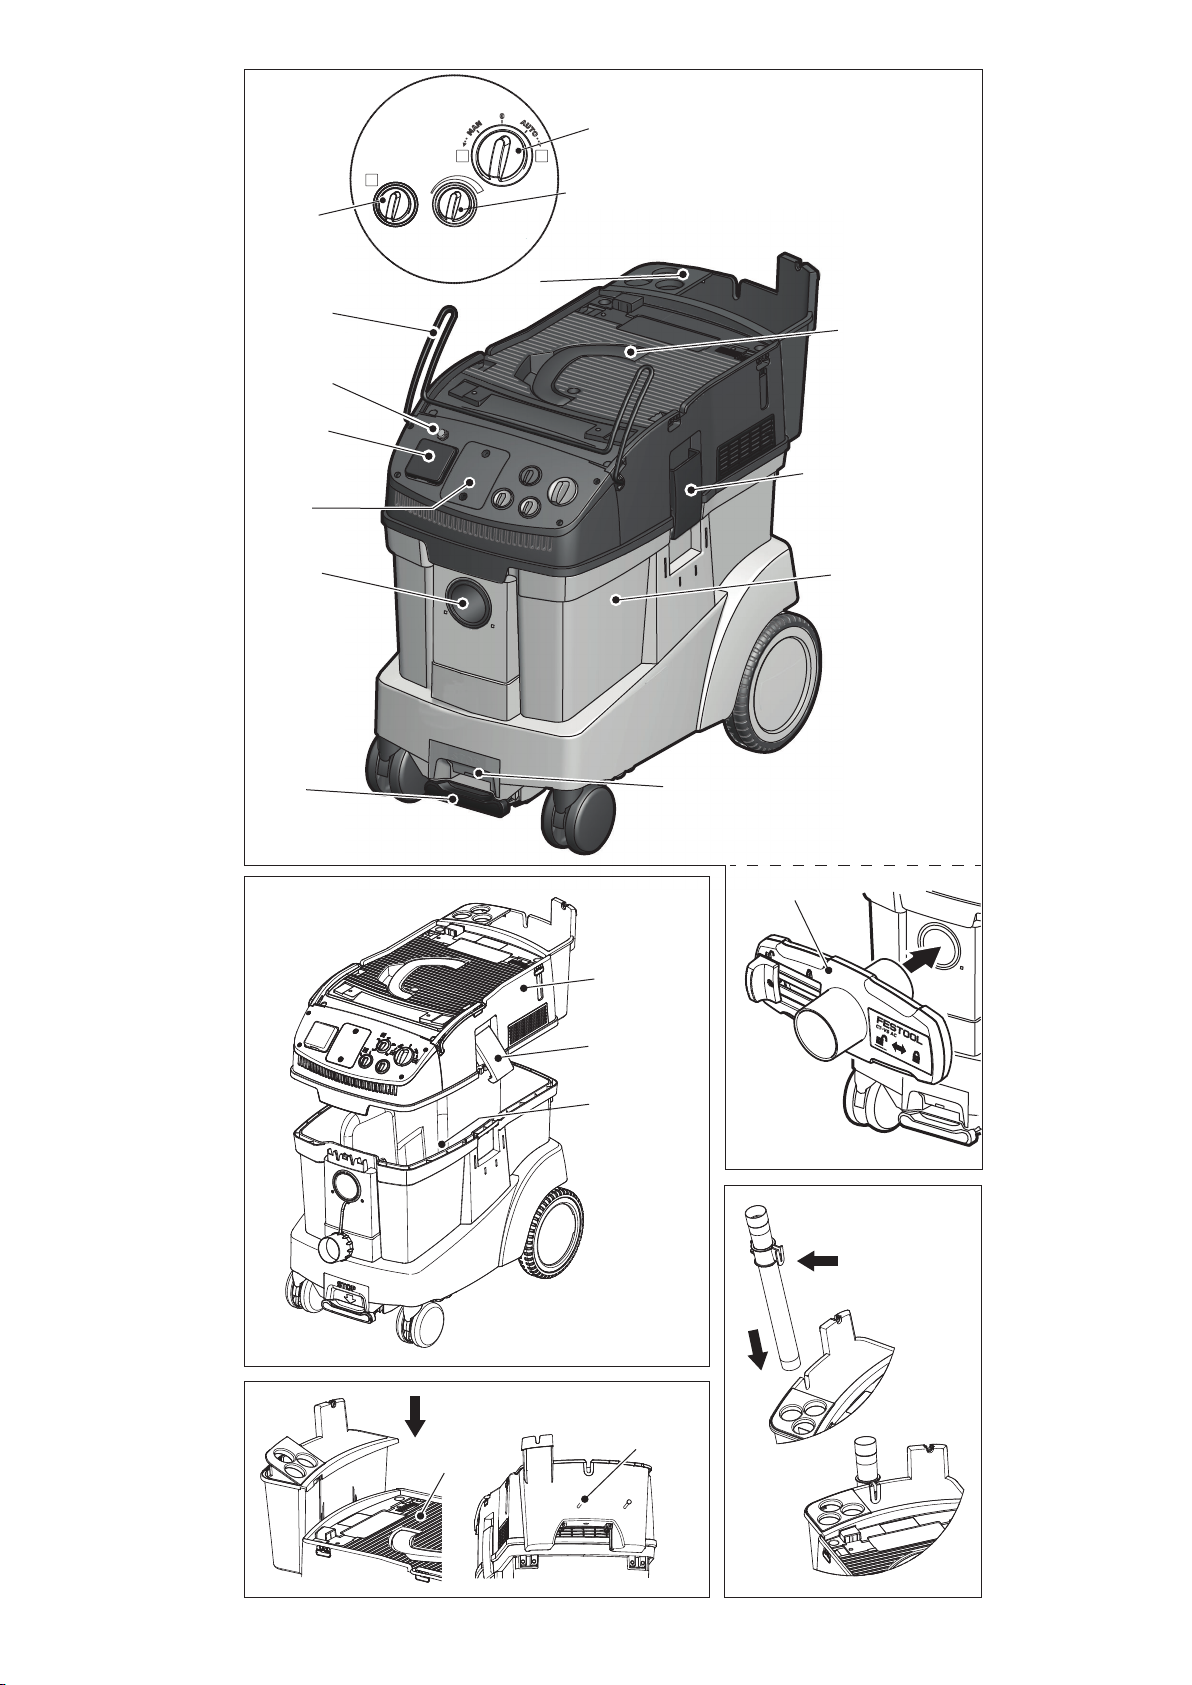
► Wind up the mains power cable, secure the
end of the cable in the slot [5].
► Empty the dirt trap.
► Place the mobile dust extractor in a dry
room inaccessible to unauthorised users.
► Fold up the hose holder [1-10].
► Wind the hose around the bracket on the
hose holder.
► Push the end of the hose over the bracket.
► Close the intake opening [1-6] with the
closing slide [1-15].
9 Service and maintenance
WARNING
Risk of injury, electric shock
► Always disconnect the mains plug from the
socket before performing maintenance
work on the machine!
► All maintenance and repair work which re
quires the motor housing to be opened
must only be carried out by an authorised
service workshop.
Customer service and repair only through
manufacturer or service workshops: Please
find the nearest address at: www.festool.com/
service
EKAT
1
235
4
Only use original Festool spare parts! Order No.
at: www.festool.com/service
Clean the level sensors regularly [6], check for
damage and empty the dirt trap [1-3].
Damaged safety devices and components must
be repaired or replaced in a recognised special
ist workshop, unless otherwise indicated in the
operating manual.
Observe the following instructions:
– The manufacturer or an instructed person
must perform a dust test at least once a
year to determine whether the filter is
damaged, the machine is sealed properly
and the monitoring features are functioning
correctly.
– Anything that cannot be cleaned must be
discarded in impermeable bags. Observe
applicable disposal regulations!
– For user servicing, the machine must be
dismantled, cleaned and serviced, as far as
is reasonably practicable, without causing
risk to the maintenance staff and others.
Suitable precautions include, decontamina
tion before dismantling, provision from lo
cal filtered exhaust ventilation where the
machine is dismantled, cleaning of the
maintenance area and suitable personal
protection.
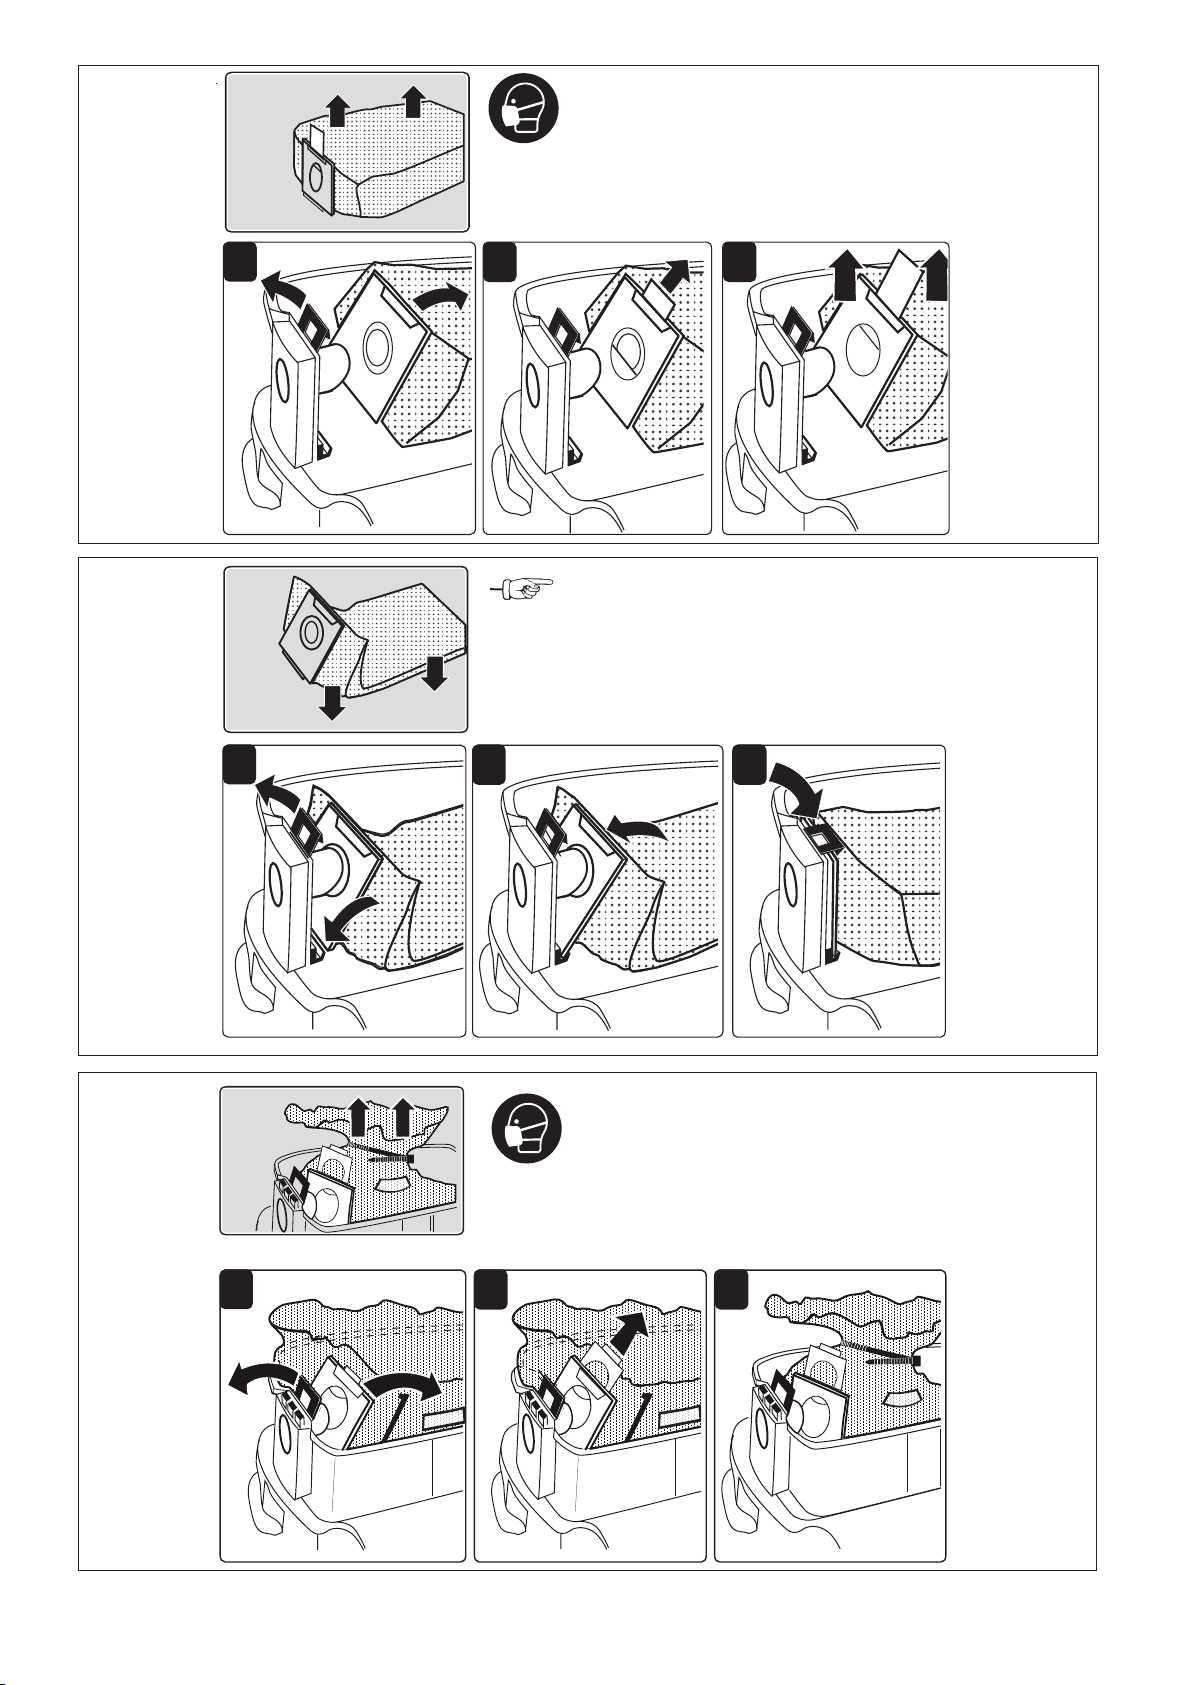
9.1 Filter bag / disposal bag / main filter
► Remove the filter bag [7].
► Insert the filter bag [8].
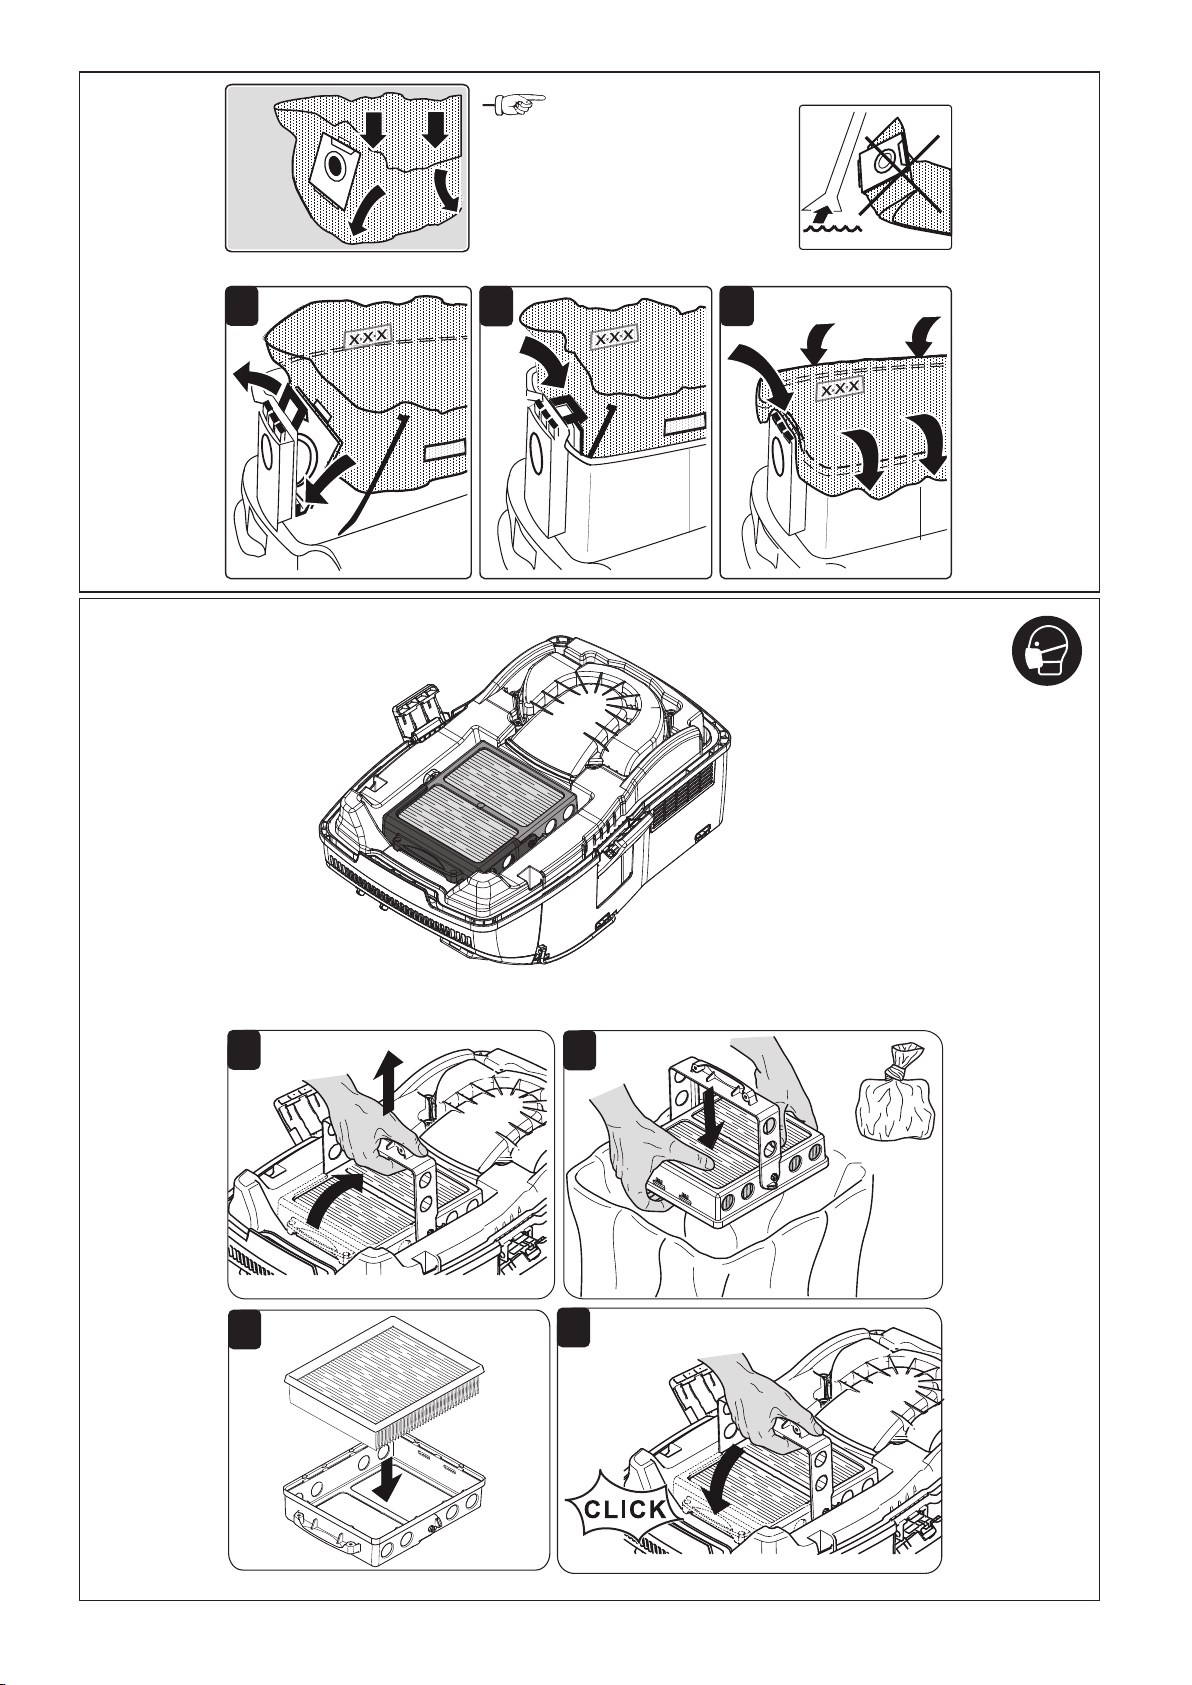
► Remove the disposal bag [9].
► Insert the disposal bag [10].
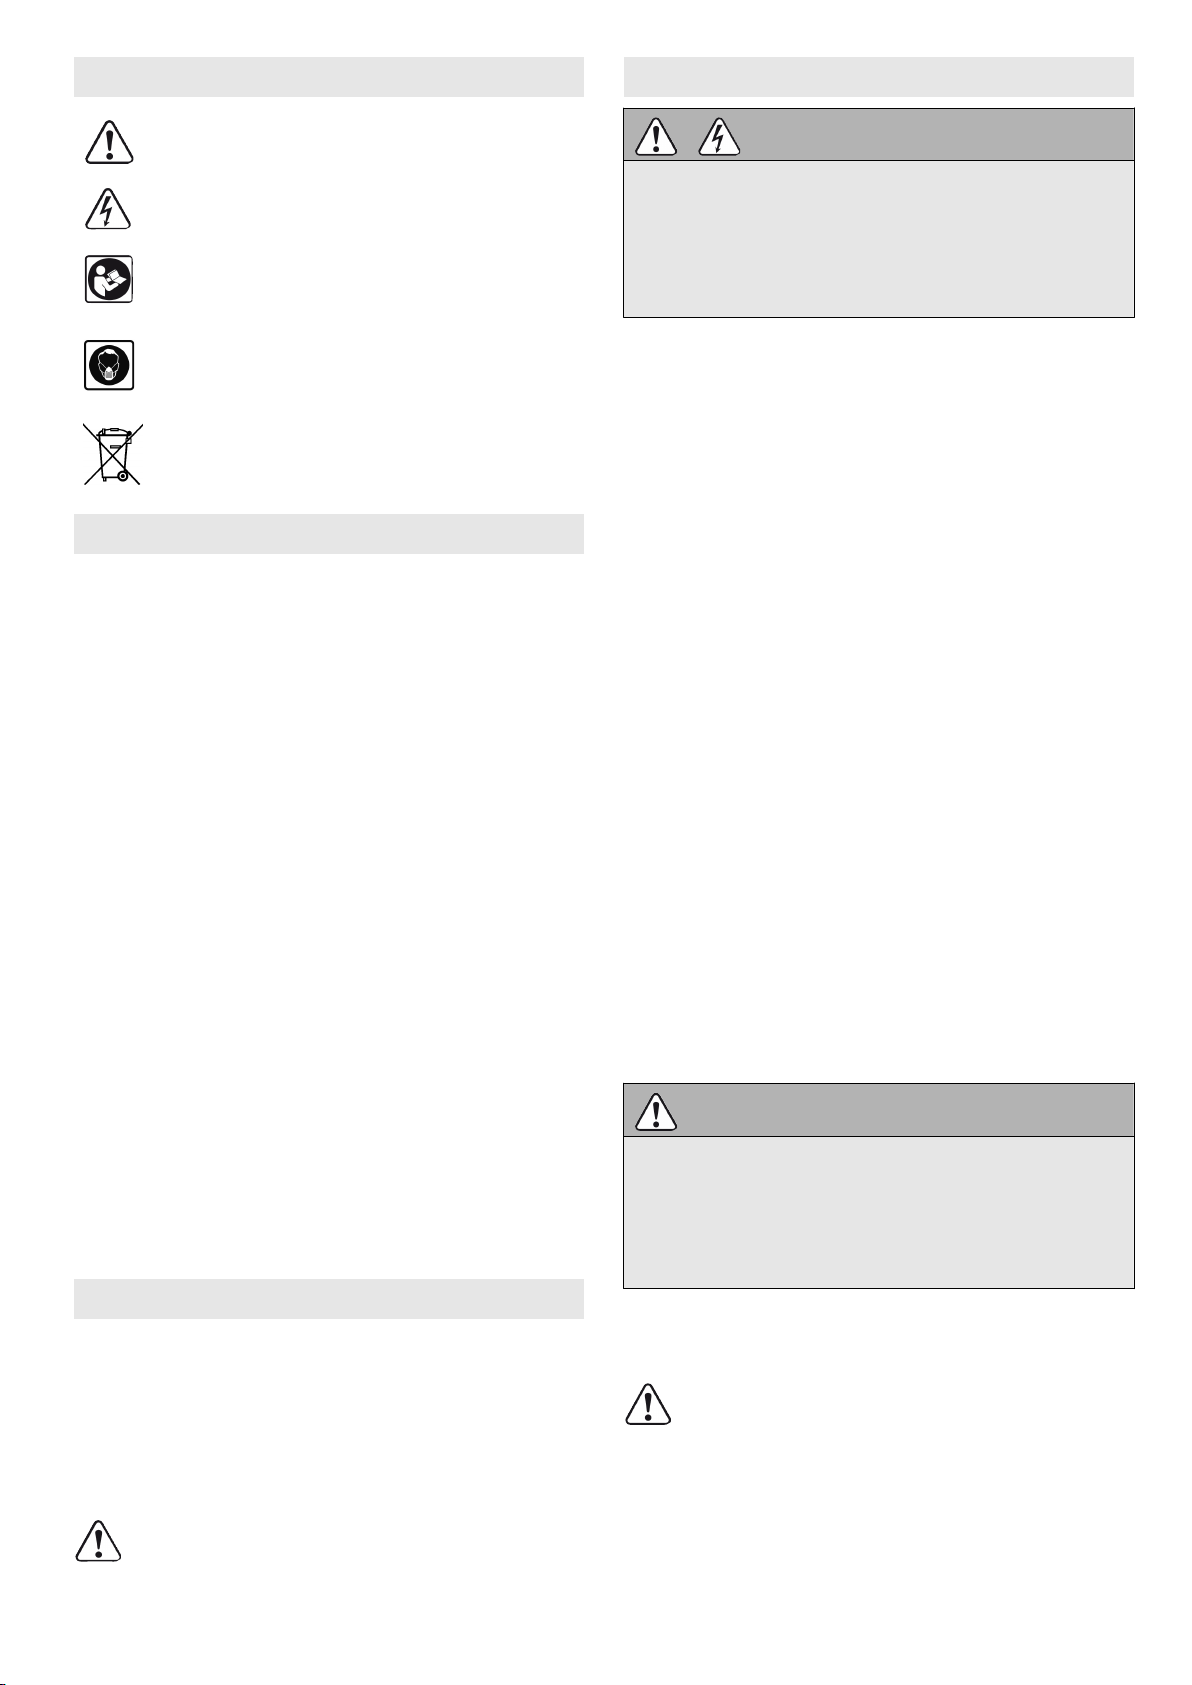
► Change the main filter [11].
Dispose of the used filter in accordance
with statutory regulations.
The order numbers for accessories,
filters and consumables can be found
in the Festool catalogue or on the in
ternet at www.festool.com.
10 Environment
Do not dispose of the tool in the house
hold waste!Recycle tools, accessories
and packaging. Observe applicable na
tional regulations.
EU only: In accordance with European Directive
2002/96/EC on waste electrical and electronic
equipment and implementation in national law,
used power tools must be collected separately
and handed in for environmentally friendly re
cycling.
Information on REACh: www.festool.com/reach
English
9
Other manuals for CLEANTEX CT 36 E AC
2
Table of contents
Other Festool Scrubber manuals
Popular Scrubber manuals by other brands

HAKO
HAKO Scrubmaster B 120 R operating manual

Cooper Tools
Cooper Tools Weller WFE 10 Operating instruction

ICE COBOTICS
ICE COBOTICS ICE USA i15B Operator's & parts manual

Nilfisk-Advance
Nilfisk-Advance Liberty SC50 manual

Tennant
Tennant T290 Operator's manual

Clarke
Clarke Scrubtec Boost 70 Operator's manual