Fetch TV Yes TV User manual

Quick Start Guide
IMM01887 1418547 Optus TV Fetch Gen 3 Quick Start Guide 220x220mm v6.indd 1 29/01/2016 6:43 pm
1
ETH1RESETDSL ETH2 ETH3 ETH4 PWR
21
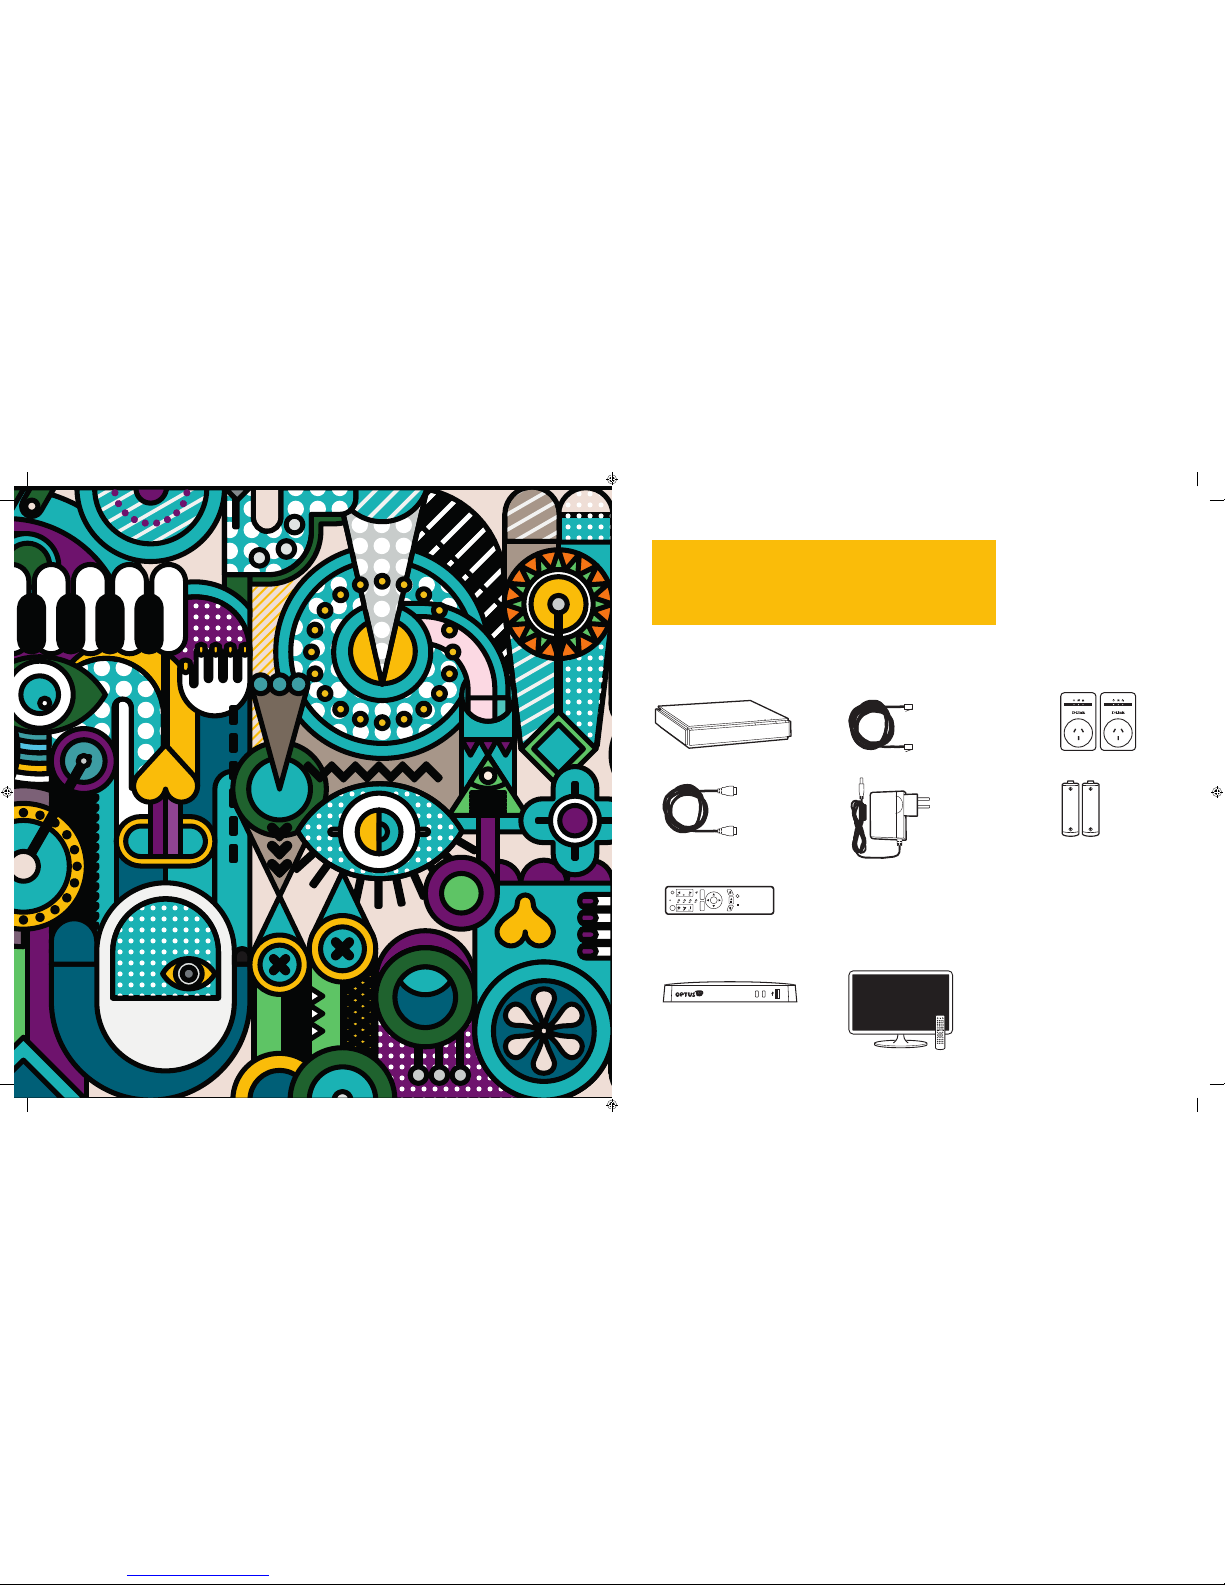
Make sure you have
these items handy
What we’ve sent you:
What you should already have:
A. Yes TV by Fetch box
J. Broadband Modem or Router
B. Ethernet Cable (3m)
(You'll receive 3 of these if you’ve ordered
a Power Line Adaptor – 1 x 3m & 2 x 1.5m)
K. TV and TV Remote
I. Activation Code
(We’ve previously sent this
to you via SMS or Email)
E. HDMI Cable (1.8m) F. Power Supply (1.5m) G. 2 x AAA Batteries
H. Yes TV Remote Control
C. Powerline Adaptors
(If you've ordered a pair)
Apps
Back
Text
Info
TV
Guide
Av
123 TV
Exit
Menu
R
IMM01887 1418547 Optus TV Fetch Gen 3 Quick Start Guide 220x220mm v6.indd 2-1 29/01/2016 6:43 pm

2 3
Your set-up checklist
ANTENNA
WALL SOCKET
INTERNE TANTENN A POWERUSBHDMIOPTICA L
12V DC
INTER NETANTEN NA POWE RUSBHDMIOPTIC AL
12V DC
(A)
(J)
(A)
(D)
(B)
To make sure you don’t get lost along the way, here’s
a checklist of the 3 main connections you’ll need to
make while setting up:
1Connect to your broadband modem
(via Ethernet cable or WiFi)
2Connect to your TV antenna
3Connect to your TV
Connecting to the internet
There are 3 different ways you can connect your
Yes TV box to the internet – that’s via Ethernet Cable
direct to your modem, using a pair of Power Line
Adaptors or WiFi. The best option for you depends
on the location of your broadband modem or router
in your home.
Top Tip: Using an Ethernet Cable or a pair
of Power Line Adaptors will help you get the
most out of your connection.
Option 1
USING ETHERNET CABLE
Recommended if your modem’s within 3 metres
of your TV.
1Grab the Ethernet Cable (B) and plug one end
into the port labelled ‘INTERNET’ on the back
of your Yes TV box (A).
2Plug the other end into a spare port on the
back of your broadband modem or router (J).
Step 1
Option 2
POWERLINE ADAPTORS (PLAs)
If your modem’s in a different room or more than
3 metres away from your TV.
What are Powerline Adaptors? They’re a pair of
devices that transmit high-speed data between two
power points in different parts of your home using
existing electrical wiring - super handy hey!
1If you already have a pair of PLAs continue onto
Step 2 (below). If you need a pair of PLAs just give
us a call on 1300 760 013 and we can arrange to
send a pair out to you for a small cost.
2Grab one of the PLAs (C) and plug it into the
power point nearest to your modem.
3Using the Ethernet Cable (B), plug one end into the
port on that PLA and the other end into a free port
on the back of your broadband modem or router (J).
4Grab the other PLA (C) and plug it into the power
point nearest to your TV (K) and Yes TV box (A).
5Finally, plug one end of the second Ethernet
Cable (B) into the PLA and the other end into
the port labelled ‘INTERNET’ on the back of your
Yes TV box (A).
Still need a hand? No problem.
Visit optus.com.au/yestv/plcinstall to download
our full PLA Setup Guide.
Option 3
WIFI
If you modem’s more than 3 metres away from your
TV and you have strong WiFi available.
If you’re going to connect using WiFi check out Step 6
of this guide after you’ve completed Steps 2, 3, 4 and
5. For now, continue onto Step 2.
INTERNE TANTENNA P OWERUSBHDMIOPTICAL
12V DC
(A)
(J)
(B) (B)
THE ROOM WITH YOUR MODEM THE ROOM WITH YOUR YES TV BOX AND TV
(C) (C)
INTERNET DELIVERED
THROUGH YOUR POWER LINES
IMM01887 1418547 Optus TV Fetch Gen 3 Quick Start Guide 220x220mm v6.indd 2-3 29/01/2016 6:43 pm

4 5
Plug in your antenna
1Unplug your existing TV Antenna Cable
from the back of your TV (K). Now plug
it into the port labelled ‘ANTENNA–IN’
on the back of your Yes TV box (A).
The other end stays connected to the
Antenna Socket in the wall.
Hook-up your TV
1Plug one end of the HDMI Cable (E)
into the port labelled ‘HDMI’ on the
back of your Yes TV box (A). Next,
plug the other end into a spare HDMI
port on your TV (K).
INTER NETANTEN NA POW ERUSBHDMIOPTIC AL
12V DC
(A)
(F)
WALL POWER POINT
(E)
(K)
INTERN ETANTENN A POWERUSBHDMIOPTICA L
12V DC
(A)
ANTENNA
WALL SOCKET
INTERNE TANTENN A POWERUSBHDMIOPTICA L
12V DC
INTER NETANTEN NA POWE RUSBHDMIOPTICAL
12V DC
(A)
(J)
(A)
(D)
(B)
Step 2
Step 3
INTERN ETANTENN A POWERUSBHDMIOPTICAL
12V DC
(A)
(F)
WALL POWER POINT
(E)
(K)
INTERNE TANTENNA P OWERUSBHDMIOPTICAL
12V DC
(A)
Power Up
YOUR YES TV BOX
1Plug the end of the Power Supply (F)
into the port labelled ‘POWER’ on the back
of your Yes TV box (A).
2Grab the end of the Power Supply (F)
and plug it into a power point. Switch the
power point ON.
YOUR YES TV REMOTE
1Put the 2x AAA batteries (G) into the back
of your Yes TV remote control (H).
Time to switch it on!
1Use your Yes TV remote (H) to turn on your
set top box (A).
2Switch on your TV (K) with your TV remote (K).
3Using your TV remote, press the ‘AV SELECT’,
‘SOURCE’ or ‘INPUT’ button (depending on your
TV) and select ‘HDMI 1’.
HANDY HINT: if you connected via Ethernet
cable or PLAs in Step 1 you’ll know when you’ve
found the correct input source when ‘PREPARING
SYSTEM PLEASE WAIT...’ followed by the Yes TV
by Fetch logo.
If you’re connecting via WiFi this will also appear
once you’re connected to the internet after
following the ‘GETTING WIFI CONNECTED’
steps on the next page.
Source
(K)
TV
HDMI 2
AV 1
AV 2
HDMI 1
Step 4
Step 5
IMM01887 1418547 Optus TV Fetch Gen 3 Quick Start Guide 220x220mm v6.indd 4-5 29/01/2016 6:43 pm

6 7
Follow the prompts and
you’re all set
GETTING WIFI CONNECTED
Your Yes TV box will now check to see whether it’s
connected to the internet. It’ll prompt you to connect
to WiFi if you haven’t already connected to the
internet via Ethernet Cable or PLAs in Step 1.
Here’s what to do if you need to connect your WiFi:
1Choose ‘WiFi Connection’ and follow the prompts.
2Select your home network from the list
of networks that are in range and confirm
the security settings.
3A prompt on screen will let you know once you’re
connected.
HEADS UP! Your TV screen may go blank a few
times (for up to two minutes) during set-up and
your Yes TV box will also reboot – this is all normal
so please don’t turn it off during this time.
FINAL ON-SCREEN SET-UP
1You’ll now be taken through the final set-up
stages on screen – it’ll take about 5 to 15 minutes
all up (depending on your broadband speed).
2During this time you’ll be prompted to enter your
Activation Code (I) that we’ve previously sent you
via email or SMS – so make sure to have it handy.
Can’t find your code? No problem, just visit
optus.com.au/activationcode
3You’ll also be prompted to set up a ‘Parental PIN’.
The default pin code is 0000 - to create your own
unique code just follow the prompts. You’ll also
need to use this code to purchase Movies and TV
shows so it’s a good one to remember.
HOW TO GET THE MOST FROM YOUR YES TV
Add these extra options to get the most out
of your new Yes TV box.
SET-UP UNIVERSAL REMOTE
The universal remote lets you operate your TV
and Yes TV box all in one! Here’s how:
1Go to the ‘MAIN MENU’ and select ‘MANAGE’
then ‘SETTINGS’ and then ‘REMOTE CONTROL’.
From here all you need to do is follow the
step-by-step instructions on screen.
2You’re all set!
DOWNLOAD THE YES TV BY FETCH APP
The Yes TV by fetch app lets you control your Yes TV
box using your tablet or mobile phone at home or
when you’re out and about. Features include:
Remote Record, watch selected content and use
your compatible device as a remote control.
Here’s how to get started:
1Visit the App Store or Google Play and install
the Yes TV by Fetch app on your phone or tablet.
2Once the app has finished downloading its time
to pair it with your Yes TV box. To do this grab
your Yes TV remote (H), go to the ‘MAIN MENU’
then to ‘MANAGE’, ‘SETTINGS’ then ‘MOBILE
& TABLET’ and follow the on-screen prompts.
3Now you can enjoy being in control of your
Yes TV service from your mobile at home
or when you’re out and about.
Step 6
Got any issues, problems
or head-scratchers?
We reckon you’ve been able to install your service
without any hitches. But if you need a little extra
help, have a read through our FAQs below or visit
optus.com.au/yestvbyfetch/userguide
If you still need a hand, feel free to give our
Technical Support Team a call on 133 937.
What if I have no picture on my TV?
Check that the TV is set to the correct input and
mode (Step 5) and that all cables are connected
securely. Alternatively, try connecting using different
cables if you have spares handy at home.
What if I have no internet connection?
Check your modem is working by testing a website
on your computer or other device that connects
to your internet at home and also check the Ethernet
Cable is securely connected.
If you’re connecting using WiFi make sure your
Yes TV box is within range of your WiFi network.
If using a pair of Powerline Adaptors, check
they’re installed correctly. Refer to your Powerline
Adaptors Quick Install Guide or access it from
optus.com.au/optustv/plcinstall
My Remote Control isn’t responding. What can I do?
Make sure you’re using it within 6 metres of your
Yes TV box as it won’t work beyond that. You can
also try changing the batteries in the remote.
Why have the channels not scanned?
Double check that one end of your Antenna Cable
is plugged into the ‘ANT–IN’ port on your Yes TV box
and the other end into the wall.
Then run another full channel scan by going to
‘MENU’ then to ‘MANAGE’, ‘SETTINGS’, ‘CHANNELS’
then to ‘FULL CHANNEL SCAN’.
What happens if my Yes TV box freezes?
Reboot it by turning the power off and on again.
This may require turning the power off at the power
point or unplugging the Power Cable from the box.
You’ll need to wait 30 seconds before turning the
power back on.
DO NOT TURN THE POWER OFF WHILE YOUR YES
BOX IS GOING THROUGH THE SET-UP PROCESS.
What if I don’t have a spare Ethernet port
on my modem?
You’ll need to unplug an existing device from your
modem to free up a port so you can plug-in the
Ethernet Cable for your Yes TV box.
And if I can’t find my activation code?
No problem. Visit optus.com.au/activationcode
Help and Support
IMM01887 1418547 Optus TV Fetch Gen 3 Quick Start Guide 220x220mm v6.indd 6-7 29/01/2016 6:43 pm

8
IMM01887 1418547 Optus TV Fetch Gen 3 Quick Start Guide 220x220mm v6.indd 8-9 29/01/2016 6:43 pm

IMM01887/1418547 (01/16)
IMM01887 1418547 Optus TV Fetch Gen 3 Quick Start Guide 220x220mm v6.indd 10 29/01/2016 6:43 pm
Table of contents
Other Fetch TV Set-top Box manuals

Fetch TV
Fetch TV iinet User manual

Fetch TV
Fetch TV My Media Hub User manual

Fetch TV
Fetch TV Gen 1 User manual

Fetch TV
Fetch TV Multiroom User manual

Fetch TV
Fetch TV Mini User manual

Fetch TV
Fetch TV Fetch Mini User manual

Fetch TV
Fetch TV Set Top Box User manual

Fetch TV
Fetch TV MIGHTY User manual

Fetch TV
Fetch TV SmartBox 8320HD User manual


