Fichet-Bauche ATRIUS User manual

ATRIUS
COFFRE FORT - SAFE - TRESOR -
CAJA FUERTE - CASSAFORTE -
COFRE FORTE - VÄRDESKÅP - SAFE
Manuel d’utilisation - User manual -
Gebrauchsanleitung - Manual de usuario -
Manuale Utente - Bruksanvisning -
Gebruiksaanwijzing

2
INDEX
FR FRANÇAIS page 1 5
EN ENGLISH page 11
DE DEUTSCH seite 17
ES ESPAÑOL página 23
IT ITALIANO pagina 29
SV SVENSKA side 35
NL NEDERLANDS pagina 41
3
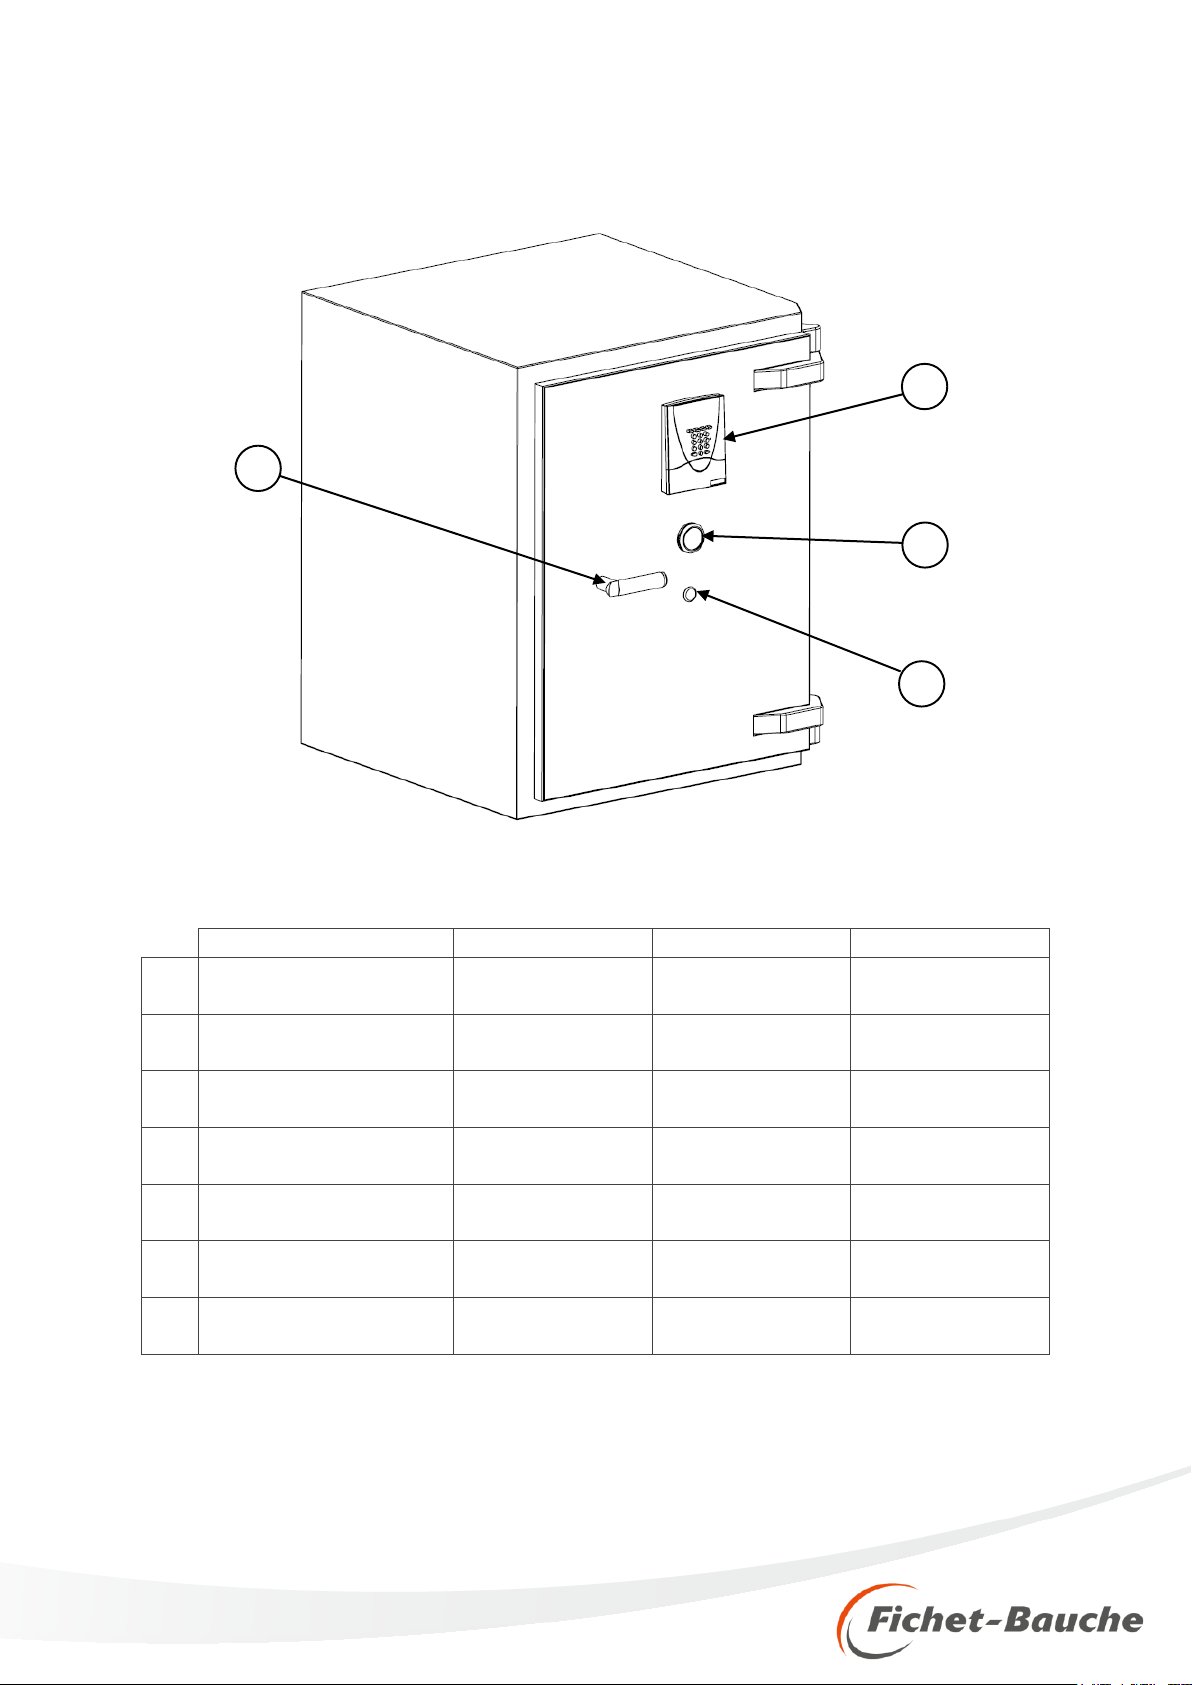
1
2
3
4
FR
Position du clavier (GSL, Nectra)
Serrrure principale
Deuxième serrrure
Poignée de manoeuvre
des pênes
EN
Keypad position (GSL, Nectra)
First lock position
Second lock position
Bolt operating handle
DE
Position tastatur (GSL, Nectra)
Position erstes schloss
Position zweiters schloss
Griff der
bolzenverriegelung
ES
Posición del teclado (GSL,
Nectra)
Cerradura principal
Cerradura secundaria
Maneta
IT
Posizione della tastiera (GSL,
Nectra)
Serratura principale
Serratura di controllo
Maniglia d’apertura
SV
Knappsatsen standpunkt (GSL,
Nectra)
Las 1
Las 2
Handtag som styr
kolvarna
NL
Keyboard positive (GSL, Nectra)
Eerste slot
Tweede slot
Bedieningshendel
4
2
3
1
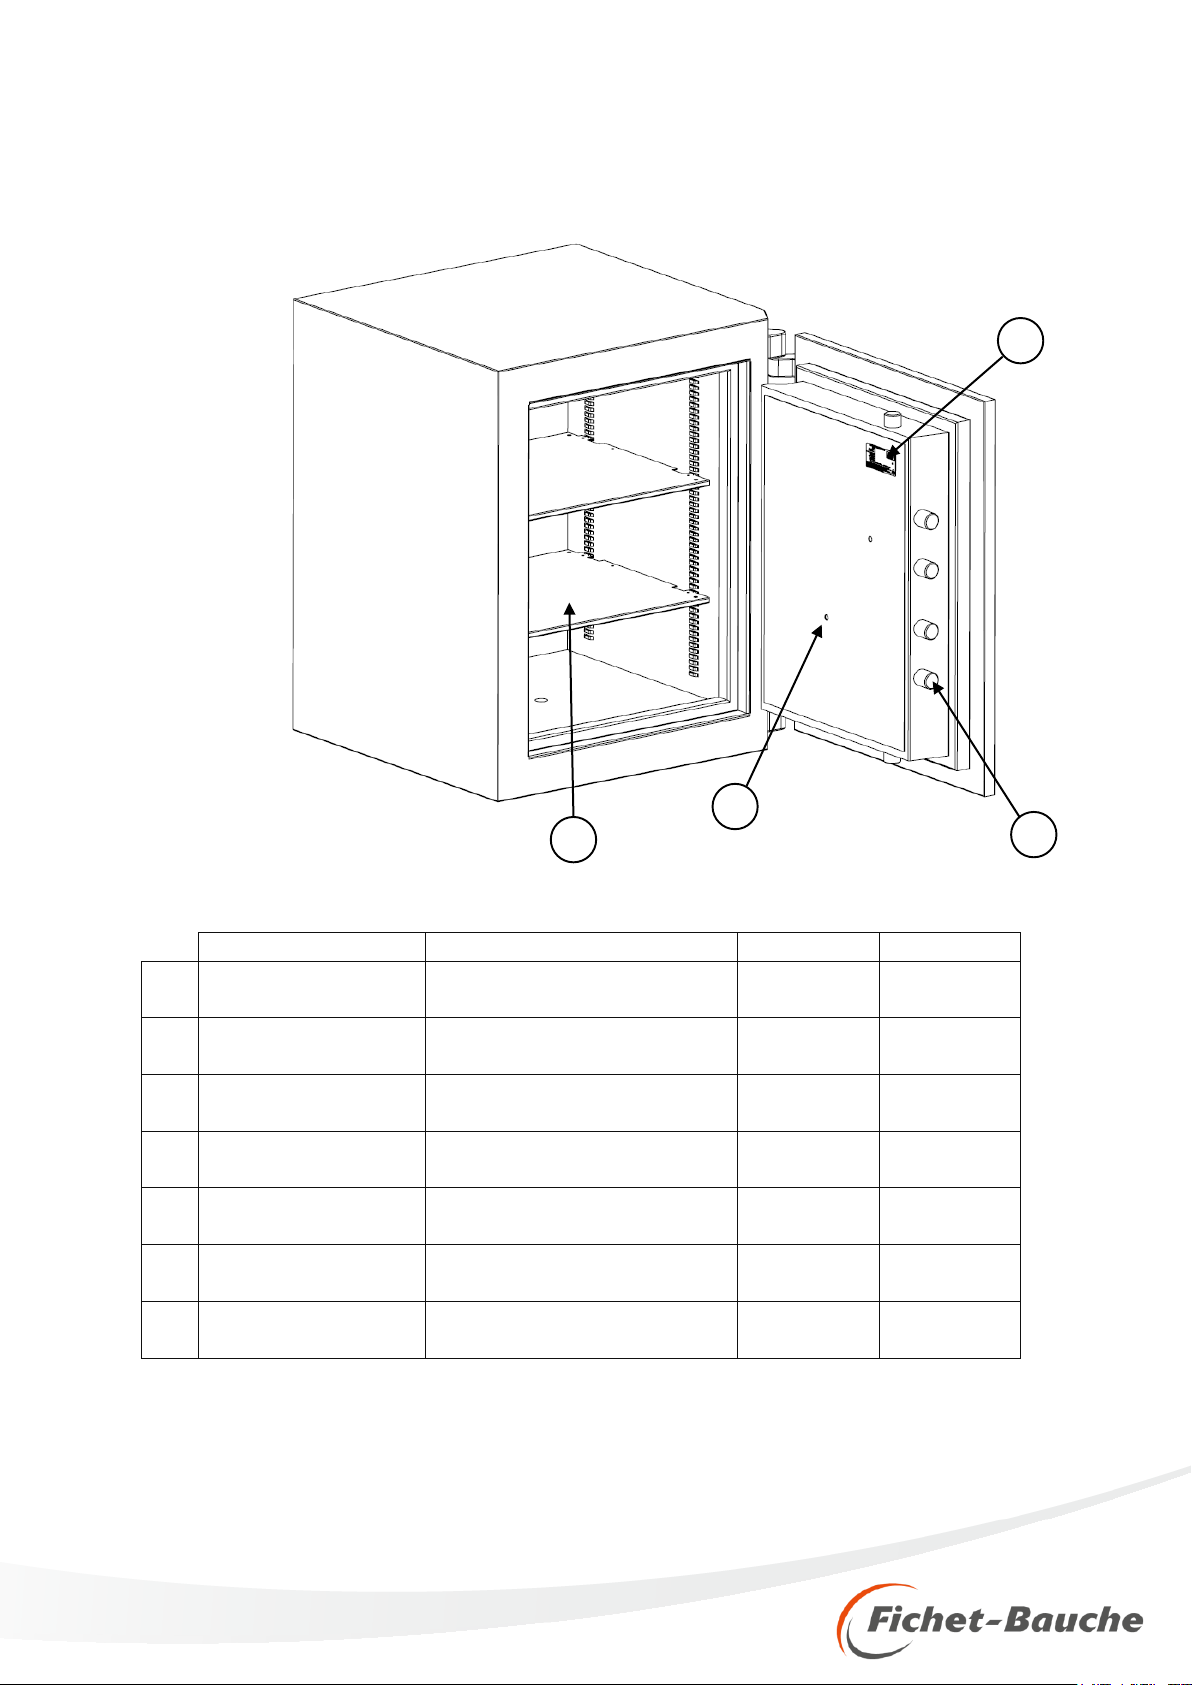
4
5
6
7
8
FR
Plaque d’identification
Accès au changement de mot
Pêne
Tablettes
EN
Registration plate
Visual acess to combination
counters
Bolt
Shelves
DE
Typenschild
Sichtoffnung auf
kombinationsmechanismus
Bolzen
Fachboden
ES
Placa de identicación
Acceso visual a los contadores de
combinación
Pestillo
Estantes
IT
Targhetta di certificazione
Foro cambio combinazione
Chiavistello
Ripiani
SV
Klassningsskylt
Visuell tillgang till kombinationslas
Kolv
Hyllor
NL
Registrtieplaat
Visuele toegang tot
combinatietellesrs
Grendel
Legborden
8
6
5
7

MANUEL D’UTILISATION
FR
EN
DE
ES
IT
SV
NL
5
COFFRE
ATRIUS
Manuel
d’utilisation
SOMMAIRE
DES
C
RIPTION DU PRODUIT
4
INSTALLATION
15
C
ERTIFI
C
ATION
16
C
ONSEILS DE SÉ
C
URITÉ
16
GARANTIE
17

MANUEL D’UTILISATION
6
Nous vous remercions de la confiance que vous nous avez témoignée en choisissant :
Nous savons que vous attendez de ce coffre qu’il vous apporte pleinement satisfaction en termes de
protection de vos valeurs, fiabilité et facilité d’utilisation.
Fort d’une expérience de plus d’un siècle dans le domaine de la sécurité, c’est en fonction de ces
exigences qu’il a été conçu avec le plus grand soin, la plus grande attention afin que vous lui
reconnaissiez ces qualités pendant de nombreuses années. Son utilisation est très simple.
Cependant, nous vous recommandons de lire attentivement cette notice. Bien installer et bien
connaître votre nouveau coffre, c’est non seulement éviter au départ une erreur susceptible de nuire
à la protection de vos Valeurs, mais c’est aussi vous familiariser avec les possibilités qu’il vous offre.
Nous souhaitons que la satisfaction que vous aurez dans son utilisation vous amène à choisir
d’autres produits de notre marque.
IMPORTANT :
Conservez précieusement la facture hors de votre coffre. Elle vous sera demandée pour tout
recours à la garantie ainsi que pour toute intervention en cas de perte des clés ou du code.
Si ce coffre devait être vendu ou transféré à une autre personne, assurez-vous que la présente
notice et la facture d’achat suivent le coffre, de telle sorte que le nouvel utilisateur puisse être
mis au courant du fonctionnement de celui-ci.
Pour assurer une protection optimale de vos valeurs, l’installation doit être effectuée par un
personnel qualifié.
Si votre coffre est équipé d’une serrure à clé, gardez une clé sur vous et rangez l’autre dans un
endroit sûr. Si votre coffre est équipé d’une serrure à combinaison (électronique ou mécanique),
veillez à changer régulièrement le code. Ne l’oubliez pas, ne l’écrivez pas sur cette notice ni
sur aucun document relatif à votre coffre ou rangé à proximité de ce dernier.
MANUEL D’UTILISATION
FR
EN
DE
ES
IT
SV
NL
7
INSTALLATION
POIDS DU COFFRE
Le poids du coffre ATRIUS est fonction de sa taille; il est indiqué sur la plaque label située sur le
foncet de la porte. Il est de la responsabilité du client de vérifier que le sol où doit être installé le
coffre supportera la charge correspondante à ce poids.
De plus, la norme EN 1143-1 stipule que tout coffer dont le poids est inférieur à 1000Kg doit être
fixé.
Si vous avez acheté un ATRIUS 14, 20 ou 30 en classe IV ou V, votre coffre est tinférieur à
1000kg ; il doit être fixé
FIXATION
Tous les coffres ATRIUS sont préparés pour être fixés au sol (1 point de fixation sur le dessous).
Les modèles 14, 20 et 30 sont livrés avec une cheville de fixation (M16 et rondelle).
Pour tout autre modèle, le kit de fixation est disponible en option.
SYSTEME DE DEPOT DFX
Si vous avez acheté un ATRIUS DFX (peu importe la taille et le poids), votre coffre doit être fixé
avec 4 chevilles de fixation afin de respecter les exigences de la norme EN 1143-2. Les 4
chevilles sont livrées avec le coffre.
RECOMMANDATIONS
Nous attirons votre attention sur le fait que seul un support en béton plein présentant une bonne
résistance à la coppression (> 250bar/25MPa) et d’épaiseur minimale 150mm permet une fixation
conforme.
De plus si le coffre est adossé à un mur, il est important de limiter au maximum le jeu entre le
mur et le coffre.
Si le coffre est positionné sur un socle, il peut être vissé au sol en utilisant un kit d’extension
(disponible en option).
METHODE DE
FIXATION
Percer le sol au diamètre de 24mm, avec un minimum de 105mm de profondeur.
Positionner votre coffre de façon à faire correspondre le point de fixation et le trou du sol
(Si nécessaire, installer le kit d’extension).
Insérer la cheville et visser avec une clé dynamométrique jusqu’à atteindre un couple compris
entre 120N.m et 200N.m.

MANUEL D’UTILISATION
8
CERTIFICATION
Votre coffre ATRIUS a été testé par un laboratoire ; il est conforme à la norme de résistance au
vol EN1143-1 (EN1143-2 pour les DFX); ces tests ont permis d’obtenir un certificat d’organisme
de certification international (A2P).
Le label A2P fixé sur le foncet de la porte atteste que l’ATRIUS a passé ces tests avec succès.
Cependant, sachez que: TOUTE MODIFICATION POSTERIEURE A
SA
FABRICATION
TELLE QUE
:
Echange d’une serrure principale par une serrure ne correspondant pas strictement aux
mêmes références
Remplacement d’une serrure principale par une serrure n’étant pas certifiée sur la gamme
ATRIUS.
Toute modification de construction (perçage de trous supplémentaires dans la caisse ou la
porte pour passage pneumatique, ventilation, fixation…).
Toute modification de la serrurerie qu’elle qu’en soit la nature ou l’importance.
OU TOUT EVENEMENT EXTERNE AFFECTANT L’INTEGRITE
DU
COFFRE, TEL
QUE:
Incendie,
Tentative d’effraction, forcage…
ENTRAINE LA PERTE IMMEDIATE DE LA CERTIFICATION DU
COFFRE
ET DES SES
CARACTERISTIQUES AU REGARD DE SES
GARANTIES D’ASSURANCES
Si vous pensez que votre coffre a été endommagé, nous
vous
conseillons de contacter
votre revendeur pour plus ample
information.
CONSEILS DE SECURITE
Si vous avez commandé un coffre équipé d’une serrure à combinaison mécanique ou
électronique, il est nécessaire de changer le code après mise en service du coffre. Il est
conseillé de renouveler cette opération au moins une fois par an.
Pour toute information concernant les serrures à combinaison mécanique ou électronique,
consulter le manuel de la serrure fourni avec votre coffre.
En cas de perte de clé d’une serrure à clé, il est fortement conseillé de remplacer la serrure
concernée.
MANUEL D’UTILISATION
FR
EN
DE
ES
IT
SV
NL
9
GARANTIE
Gunnebo apporte à toutes ses fabrications un soin extrême et multiplie les essais et contrôles
lors du montage.
Gunnebo fournit cependant sur le produit que vous venez d’acheter :
1 an de garantie contre tout défaut ou vice de fabrication à partir de la date d’installation (date
indiquée sur votre facture, sauf dans le cas où vous bénéficiez d'une extension de garantie)
Au cours de cette période, toute pièce défectueuse sera remplacée gratuitement.
La garantie ne couvre pas l’usure normale (piles…) ainsi que les détériorations liées à des
utilisations anormales du produit ou à des évènements externes (tentative d’effraction, incendie,
inondations) ou des modifications apportées par l’utilisateur sans l’accord express de Gunnebo.
En tout état de cause, la garantie ci-dessus n’annule pas les droits du consommateur et la
législation nationale de garantie en vigeur reste applicable.
UTILISATION DE LA GARANTIE
Si vous constatez un défaut de fonctionnement de votre coffre, contactez votre revendeur le plus
proche ou votre service après-vente Gunnebo le plus proche.

10

USER MANUAL
FR
EN
DE
ES
IT
SV
NL
11
ATRIUS SAFE
User
manual
CONTENTS
PRODU
C
T DES
C
RIPTION
4
INSTALLATION
7
SE
C
URITY BREA
C
H
8
SAFETY RE
C
OMMENDATIONS
8
WARRANTY
9
USER MANUAL
12
We would like to thank you for your loyalty to:
As a Fichet customer, you demand complete satisfaction from our safe in terms of safeguarding your
valuables, product reliability and ease of use.
For over a century, Fichet-Bauche has gained vast experience in the field of security. Your safe was
carefully and scrupulously designed in accordance with these demands so that you may benefit from
these quality features for many years to come.
The safe is very simple to use. However, we highly recommend that you read this instruction manual
attentively before installation. It is important to correctly install your new safe and be well acquainted
with the model in order to understand the possibilities that the safe offers as well as avoid any
potential errors liable to jeopardise the protection of your valuables. We hope that you will be fully
satisfied with your safe and continue to be loyal to our brand.
IMPORTANT:
It is essential that you keep the product invoice outside your safe. It will be required for all
warranty-related claims as well as the necessary interventionin the case of lost keys or
codes.
If this safe must be sold or transferred to another person, make sure that this instruction manual
and the product invoice are also given to the new user so that he or she may become properly
acquainted with its operating mode.
For the optimal protection of your valuables, the safe must be installed by qualified personnel.
If your safe is equipped with a key lock, keep one key within reach and leave the other in a safe
place. If your safe is equipped with an electronic or mechanical combination lock, change the
code on a regular basis. Do not forget the code; do not write it in this instruction manual nor
other documents pertaining to your safe. Do not place the code near the safe.

USER MANUAL
FR
EN
DE
ES
IT
SV
NL
13
INSTALLATION
SAFE WEIGHT
The weight of an ATRIUS safe is related to its size; it is indicated on the label plate located on
the door back plate. It is the customer’s responsibility to check that his floor will be able to stand
the floor load.
Moreover, the EN1143-1 specifies that safes which weighs under 1000kgs (2205 lbs) MUST be
fixed. If you have purchased an ATRIUS 14, 20 or 30 in any of the grades IV or V, the weight of
your safe is below 1000kgs (2205 lbs) and must therefore be fixed.
SAFE FIXING
All ATRIUS safes are prepared to be based fixed (one fixing holes on the bottom).
Models 14, 20 and 30 are delivered with one anchoring kit included (M16 bolt and washer).
For all others sizes, a fixing kit is available as an option.
DFX DEPOSIT SYSTEM
If you have purchase an ATRIUS DFX (regardless the size or the wheight), your safe must be
fixed with 4 anchors to meet the requirements of the EN1143-2.
The 4 anchoring kit are delivered with the safe.
RECOMMENDATIONS
PRIOR TO
FIXING
We would draw your attention to the fact that only a solid concrete support with high compression
strength (> 250 bar/25MPa/3626 PSA) and at least 150 mm (5,9 in) thick allows correct fixing.
Moreover, if the safe is backed against a wall, the clearance between the wall and the safe must
be kept to a minimum.
If the safe is raised on a plinth, it can be screwed on the floor using the extension kit (available as
an option)
FIXING
METHOD
Drill the floor with a 24 mm diameter hole, with a minimum of 105mm depth
Position your safe so that the fixing hole matches the floor holre
(If necessary insert the extension kit)
Insert the washer and the bolt and screw up with a dynamometer screw driver until you reach
a torque comprised between 120N.m (88 ft.lb) and 200N.m (148 ft.lb)

USER MANUAL
14
SECURITY BREACH
Your ATRIUS safe has undergone stringent tests in independent testing laboratories to comply
with the EN1143-1 burglary. It has been granted corresponding certificate by international
certification body (A2P).
A2P safety labels affixed in the door back plate is your guarantee that the ATRIUS safe has
successfully passed these testing.
However, you must be aware that: ANY MODIFICATIONS SUBSEQUENT
TO
MANUFACTURE, SUCH
AS:
Replacing an existing lock by a lock which does not carry the same reference or
Replacing an existing lock by another lock not certified for the ATRIUS range,
Any modification to the construction (fire seal removal, drilling extra holes through the body or
the door for compressed air feeding, ventilation, fixing…)
Any modifications to the rod assembly whatever the nature or extent,
OR ANY OTHER INCIDENT BREACHING THE SECURITY OF
YOUR
PRODUCT SUCH
AS:
Fire,
Attempt to break in, forcing…
RESULTS IN THE IMMEDIATE UNVALIDITY OF THE
SAFE’S
CERTIFICATION
AS A CONSEQUENCE, YOU MAY NOT BE
INSURED.
If you believe your safe has undergone any damage, we advise you
to
immediately
contact your usual retailer for further
advice.
SAFETY RECOMMENDATIONS
If you have ordered a safe with a mechanical or electronic combination, it is necessary to
change the combination code after commissioning of the safe. It is advised to renew this
operation at least once a year.
For detail on mechanical or electronic combination locks, refer to the specific lock user manual
included with your safe.
If your safe is equipped with a key lock and you lose a key, you are strongly advised to replace
the lock.

USER MANUAL
FR
EN
DE
ES
IT
SV
NL
15
WARRANTY
Gunnebo brings a high level of care and attention to all its products and conducts numerous
inspections during manufacturing.
Gunnebo however provides the following for the product you have just purchased:
1 year warranty against all defects or manufacturing errors (valid for from the date of
installation, the date indicated on your invoice is the reference date unless you have been
granted with a warranty extension)
During this period, you will be given free replacement of any part found to be defective.
The warranty does not cover usual wear (batteries...) and damages due to abnormal use of the
product or occurrences (attempted breaking, fire, flooding) or any changes made by the end user
without the express approval of Gunnebo.
In any case, the above warranty does not breach customers’rights and the national warranty
legislation remains applicable.
USE OF THE
WARRANTY
If you notice an operating default with your safe, contact your nearest retailer for advice or your
local Gunnebo after sales service department

16
GEBRAUCHSANLEITUNG
FR
EN
DE
ES
IT
SV
NL
17
TRESOR
ATRIUS
Gebr
auc
hsanleitung
INHALT
PRODUKTBESCHREIBUNG
4
INSTALLATION
23
SI
C
HERHEITSGRENZEN
24
HINWEISE ZUR SI
C
HERHEIT
24
GARANTIE
25
GEBRAUCHSANLEITUNG
18
Sie haben sich für ein Produkt von entschieden, und wir danken Ihnen für Ihr Vertrauen. Natürlich
erwarten.
Sie von diesem Geldschrank vollkommenen Schutz Ihrer Wertsachen, Zuverlässigkeit und eine
einfache Benutzung.
Unsere über 100-jährige Erfahrung im Bereich der Sicherheit hat uns bei der sorgfältigen und
präzisen Entwicklung dieses Geldschranks geholfen. Wir hoffen, daß er Ihnen lange Jahre gute
Dienste leistet.
Zwar ist dieser Geldschrank einfach zu bedienen, wir raten Ihnen dennoch, die vorliegende
Beschreibung genau zu lesen. Durch eine sorgfältige Installierung und genaue Kenntnis Ihres neuen
Geldschrankes können nicht nur Fehler vermieden werden, die Ihren Wertsachen schaden könnten,
sondern Sie können sich darüber hinaus mit sämtlichen Möglichkeiten, die Ihnen dieser Geldschrank
bietet, vertraut machen.
Wir hoffen, daß die Benutzung dieses Geldschrankes zu Ihrer vollen Zufriedenheit
ausfällt und daß Sie auch in Zukunft FICHET-BAUCHE wählen.
Wichtig :
Bewahren Sie Ihre Rechnung sorgfältig außerhalb des Geldschranks auf. Im Garantiefall sowie
bei verschiedenen Eingriffen (Verlust der Schlüssel oder des Codes) benötigen Sie diese.
Sollte dieser Geldschrank verkauft oder an eine andere Person weitergegeben werden, achten
Sie bitte darauf, daß die vorliegende Bedienungsanleitung und die Rechnung mitgegeben
werden, damit der neue Benutzer über die Funktionsweise des Geldschranks informiert ist.
Für einen optimalen Schutz Ihrer Wertsachen lassen Sie die Installierung bitte von qualifizierten
Fachkräften ausführen.
Ist Ihr Geldschrank mit einem Schloß ausgestattet, tragen Sie einen der Schlüssel bei sich und
bewahren Sie den anderen an einem sicheren Ort auf. Ist Ihr Geldschrank mit einem Schloß mit
(elektronischer oder mechanischer) Kombination ausgestattet, raten wir Ihnen, den Code
regelmäßig zu ändern. Vergessen Sie ihn nicht, notieren Sie ihn nicht auf dieser Beschreibung
bzw. Auf anderen Unterlagen zum Geldschrank und bewahren Sie ihn nicht in der Nähe des
Geldschranks auf.
GEBRAUCHSANLEITUNG
FR
EN
DE
ES
IT
SV
NL
19
INSTALLATION
GEWICHT DES TRESORS
Das Gewicht eines Tresors der Serie ATRIUS hängt von seiner Größe ab und ist auf dem
Typenschild an der Innenseite der Tür angegeben. Es obliegt dem Kunden zu überprüfen, ob die
Tragfähigkeit des Bodens, auf dem der Tresor aufgestellt werden soll, ausreichend dimensioniert
ist.
Die Norm EN1143-1 schreibt vor, dass Tresore mit einem Gewicht unter 1000 kg verankert
werden MÜSSEN.
Wenn Sie einen ATRIUS 14, 20 oder 30 der Kategorie IV oder V erworben haben, liegt das
Gewicht Ihres Tresors unter 1000 kg und muss folglich verankert werden.
VERANKERUNG DES TRESORS
Alle Tresore der Serie ATRIUS können sowohl am Boden (1 Befestigungspunkte) verankert
werden.
Die Modelle 14, 20 und 30 werden mit einem Verankerungskit (Bolzen M16 und Unterlegscheibe)
geliefert.
Für alle anderen Größen sind Verankerungskits als Option erhältlich.
BANKNOTEN-EINWURFSYSTEM DFX
Wenn Sie einen ATRIUS DFX erworben haben (unabhängig von Größe und Gewicht), ist ihr
Banknoten-Einwurfsystem mit 4 Ankern zu fixieren, um die Anforderungen der Norm EN 1143-2
zu erfüllen. Die 4 Anker werden zusammen mit dem Banknoten-Einwurfsystem geliefert.
HINWEISE VOR DER VERANKERUNG
Wir möchten darauf hinweisen, dass nur Unterlagen in Massivbetonbauweise mit hoher
Druckfestigkeit (> 250 bar/25MPa) und einer Dicke von mindestens 150 mm eine sachgemäße
Verankerung gewährleisten können.
Bei Aufstellung des Tresors an einer Wand muss der Abstand zwischen der Wand und
dem Tresor so gering wie möglich gehalten werden.
Wenn der Tresor auf einem Sockel aufgestellt werden soll, kommt entweder eine
Wandbefestigung in Frage (sofern die Wand dafür geeignet ist) oder eine Verankerung im Boden
unter Verwendung eines Erweiterungskits (als Option erhältlich).

GEBRAUCHSANLEITUNG
20
VORGEHENSWEISE BEI DER VERANKERUNG
Bohren Sie ein Loch mit einem Durchmesser von 24 mm und einer Tiefe von mindestens 105
mm in den Boden bzw. in die Wand.
Stellen Sie Ihren Safe so auf, dass die Bohrung des Befestigungspunkts über der Bohrung im
Boden bzw. in der Wand zu liegen kommt.
(Verwenden Sie nötigenfalls den Erweiterungskit).
Setzen Sie die Unterlegscheibe und den Bolzen ein und ziehen Sie ihn mit einem
Drehmoment-Schraubendreher und einem Moment im Bereich von 120 N.m bis 200 N.m fest
Other manuals for ATRIUS
1
Table of contents
Languages:
Other Fichet-Bauche Safe manuals


Popular Safe manuals by other brands


Clarke
Clarke STRONG-ARM CS800D Operation & maintenance instructions

RICHTER CZECH
RICHTER CZECH RS.20.LCD Instructions for use and installation

Eagle
Eagle T412E Usage and maintenance instructions

Science Museum
Science Museum 3823 quick guide

NavePoint
NavePoint Consumer Series owner's manual

Vecta
Vecta Personal Safe Operating and installation instructions