Fiem SMART Instruction manual
MANUALE D’USO PER L’INCUBATRICE
MOD. SMART
MANUAL FOR USE OF INCUBATOR
MOD. SMART
MANUEL D’UTILISATION DES INCUBATEUR
MOD. SMART
MANUAL DE USO PARA INCUBADORA
MOD. SMART
I
GB
F
E
IMPORTANTE: questo manuale é parte integrante della macchina e deve essere conservato dal cliente della macchina integro in ogni sua parte
IMPORTANT: this manual is an integral part of the machine and it must to be kept complete in each own part by the customer of the machine
IMPORTANT: ce manuel set partie intégrant de la machine et doit etre conservé, par le client de la machine, intègre dans chacune de ses parties
IMPORTANTE: este manual es parte integrante de la máquina y tiene que ser conservado por el cliente de la máquina íntegro en todas sus parte
22070 Guanzate - (Como) Italy - Via Galileo Galilei, 3
Tel. +39.031.976.672 - Fax +39.031.899.163
Costruita da:
Produced by:
Construit par:
Construida por:

MANUALE D’USO PER L’INCUBATRICE SMART
INDICE
1. INTRODUZIONE ..............................................................................................................................2
2. PRIMA DELL’USO ............................................................................................................................2
Sballaggio della macchina
Posizionamento, allacciamento e preparazione
Preparazione kit voltaggio automatico delle uova
Utilizzo e calibrazione
Umidificazione
Speratura
3. DESCRIZIONE...................................................................................................................................5
4. CONSIGLI UTILI................................................................................................................................5
5. CARATTERISTICHE TECNICHE ......................................................................................................6
Dati tecnici della macchina
Durata di incubazione dei vari soggetti
6. CURA E MANUTENZIONE ...............................................................................................................7
Come pulire l’incubatrice
7. GARANZIA.........................................................................................................................................7
Normativa di riferimento
Dichiarazione di Conformità del Costruttore
8. PRIMA DI RIVOLGERSI AL SERVIZIO ASSISTENZA.....................................................................9
9. SCHEMA ELETTRICO ......................................................................................................................9
1. INTRODUZIONE
L’incubatrice modello SMART è appositamente studiata per ottenere ottimali prestazioni in incubazione, con
un semplice funzionamento, permettendo inoltre il duplice utilizzo come allevatrice.
SMART, dunque è un prodotto che, pur nella sua semplicità di funzionamento, risponde alle particolari esigen-
ze del cliente, presentandosi come uno strumento che si avvale di scelte tecnologiche all’avanguardia e che
realizza una qualità ad altissimo livello. Basti pensare all’ottima qualità dei materiali plastici utilizzati, come l’abs
per la parte inferiore e il pvc trasparente per la parte superiore, che garantiscono ed assicurano leggerezza e
robustezza ed una perfetta visione interna; il termostato analogico in banda proporzionale con sonda di preci-
sione decimale, permette una sicura regolazione della temperatura, che può essere misurata con precisione
grazie al termometro in Fahrenhait (°F). Il riscaldamento è garantito da un cavo di resistenza protetto e rivesti-
to da gomma siliconica tipo “SILASTIC 5501. La scelta progettuale di costruire SMART interamente con mate-
riali plastici offre una completa garanzia contro la corrosione e permette una facile e completa pulizia con deter-
genti domestici. Pur essendo una macchina destinata ad utilizzo non professionale, durante la progettazione
non sono stati trascurati gli aspetti inerenti la sicurezza, che è sicuramente il punto forte della SMART.
2. PRIMA DELL’USO
Prima di dedicarsi alla vera e propria operatività è consigliabile considerare gli aspetti e le caratteristiche tec-
niche e di sicurezza garantite dal prodotto, valutandone le componenti e aiutandosi con il manuale per sco-
prirne gradualmente le potenzialità.
SBALLAGGIO DELLA MACCHINA
Estrarre l’incubatrice dalla scatola d’imballaggio e togliere i componenti della macchina ancorati con del nastro
adesivo all’interno della stessa.
Verificare che vi siano tutte le dotazioni elencate qui di seguito:
• n. 1 manuale d’uso;
• n. 1 termometro a mercurio (°F);
• n. 1 piano in rete supporto griglia;
• n. 1 griglia voltauova;
• kit voltauova già installato (scatola motoriduttore + staffa di fissaggio).
Se l’incubatrice è dotata di automatismo di voltaggio
2
I

IMPORTANTE: Si ricorda di verificare la corretta funzionalità del termometro, controllando che non presenti
spezzettature sulla colonnina del mercurio.
L’incubatrice è dotata inoltre di un cavo elettrico monofase (lungo circa 1,5 Mt.) con spina per l’allacciamento
a corrente 230V, 50-60 Hz.
Affissa posteriormente, la targhetta dati informa circa l’assorbimento e la potenza dell’incubatrice.
AVVERTENZE: Attenzione!
L’apparecchio deve essere collegato ad un impianto a norme dotato di terra di protezione.
Staccare l’apparecchio dalla presa prima di effettuare le operazioni di pulizia.
Se il cavo di alimentazione è danneggiato, esso deve essere sostituito dal costruttore o dal suo servizio assi-
stenza tecnica o comunque da una persona con qualifica similare, in modo da prevenire ogni rischio.
Il cordone di alimentazione non deve essere accessibile agli animali.
Svuotare le vaschette d’acqua prima di spostare l’apparecchio.
Non usare l’apparecchiatura se danneggiata.
POSIZIONAMENTO, ALLACCIAMENTO E PREPARAZIONE
Il locale ove verrà posta l’unità, dovrà essere sufficientemente aerato, asciutto e con temperatura
costante tra i 18-25 °C.
Collocare l’incubatrice su di un piano stabile non inclinato e possibilmente accanto ad una presa di corrente
facilmente accessibile.
Per l’alimentazione a rete utilizzare unicamente prese dotate di collegamento a terra.
AVVISO: Il costruttore declina ogni responsabilità nel caso di uso improprio, di collocazione impropria, di col-
legamento ad apparecchiature non autorizzate o di manomissione da parte di personale non autorizzato.
Inserire il termometro nell’apposito supporto posto al centro della griglia voltauova e regolare il bulbo dello
stesso sulla mezzaria delle uova.
Prima di dedicarsi all’utilizzo dell’unità, ricordarsi di effettuare un’accurata pulizia interna ed esterna della stes-
sa, come meglio indicato di seguito nel paragrafo n. 6.
PREPARAZIONE KIT VOLTAGGIO AUTOMATICO DELLE UOVA:
Il kit voltauova (motoriduttore con relative aste di trasmissione) permette alle uova di girare automaticamente per
mezzo di una traslazione della griglia interna che le fa rotolare, il movimento è lento e delicato; il motoriduttore è
alloggiato all’interno di un vano annesso alla base dell’incubatrice isolato e protetto da un coperchio di chiusura.
Collegare quindi la spina di alimentazione scatola motoriduttore alla presa di corrente e assicurarsi che le uova
vengano movimentate.
N.B. Facciamo notare che il motoriduttore compie un giro rotatorio di 360° in un’ora, che viene trasformato in
movimento traslato di 30 minuti avanti e altri 30 minuti in dietro.
Se l’incubatrice avesse il voltaggio delle uova semiautomatico, ricordarsi una volta al mattino e una volta alla
sera di spostare avanti o indietro manualmente la griglia voltauova impugnandola dall’apposita leva che è posi-
zionata all’interno del vano annesso alla base dell’incubatrice.
ATTENZIONE: All’interno del vano kit voltauova c’è corrente elettrica 220V, quindi prima di aprirlo per
qualsiasi controllo o manutenzione, verificare che la spina di alimentazione non sia collegata alla rete
elettrica.
UTILIZZO E CALIBRAZIONE
Per l’accensione della macchina collegare la spina all’alimentazione, e prima di inserire le uova riscaldare l’in-
cubatrice portando la temperatura di lavoro a 100°F1 (37.7°C). Raggiunta la temperatura corretta, posizionare
le uova sulla griglia.
3
)
1Ricordiamo che il locale dove verrà collocata l’incubatrice dovrà avere temperatura ambientale minima di 18°C e massima di 25-26°C; se
tali condizioni non verranno rispettate, l’incubatrice non manterrrà la temperatura di lavoro corretta.

ATTENZIONE: le uova devono essere incubate a partire dal terzo giorno dalla deposizione e non dopo
l’ottavo giorno; inoltre vanno conservate in un locale a temperatura tra i 14-16°C.
Nell’alloggiamento posto sopra l’unità trova collocazione il termostato elettronico che è impostato dalla fab-
brica, il led verde indica che l’incubatrice è alimentata da corrente, mentre il led rosso acceso o intermittente
indica l’attivazione del riscaldamento.
Raccomandiamo di fare sempre attenzione al termometro a mercurio, che dovrà segnare in modo preciso 100°F.
Se non dovesse raggiungere la temperatura di lavoro sopra indicata, si dovrà tarare il termostato come indi-
cato di seguito:
• modificare la temperatura (se necessario) utilizzando un cacciavite, agendo sulla vite di regolazione e por-
tando la freccia di riferimento -SET- in corrispondenza con il valore richiesto controllando la temperatura reale
interna sul termometro.
IMPORTANTE:
se risultassero inutili tutti i tentativi di taratura dell’apparecchio, non rimuovere assolutamente il termostato dal
suo alloggiamento per effettuare operazioni improprie e non autorizzate; contattare il costruttore per le even-
tuali riparazioni o sostituzioni.
Si consiglia di intercambiare la posizione delle uova almeno una volta alla settimana allo scopo di uniformare
maggiormente la temperatura interna.
Durante la fase di schiusa, gli ultimi due giorni, si dovrà disattivare il sistema di automatismo staccando
la spina di alimentazione del kit voltauova; a schiusa ultimata lasciare i pulcini all’interno dell’incubatrice una
giornata in modo tale che si possano asciugare e riposare.
In fine porre gli stessi sotto lampade calde infrarosse o nelle apposite allevatrici artificiali per almeno tre setti-
mane con temperatura di 35°C per la prima settimana.
UMIDITA’
E’ importante capire che non ci sono delle regole precise per la quantità d’acqua richiesta
nell’incubatrice dato che ciò è condizionato dai seguenti fattori:
- Umidità relativa nel locale d’incubazione (è condizionata dal tempo e dal clima locale, ad esempio sulle coste
di un lago!)
- Le specie delle uova incubate
- La porosità del guscio dell’uovo ( può variare da uovo a uovo!)
- Il periodo dell’anno (climi caldi significano alta umidità ambientale e uova deposte alla fine della stagione ten-
dono ad essere più porose)
La richiesta d’acqua nell’incubatrice può essere monitorata sia attraverso il calo del peso del singolo uovo o di
gruppi di uova (un uovo dovrebbe perdere il 13-15% del suo peso durante l’incubazione), sia attraverso la spe-
ratura ( la camera d’aria dovrebbe essere circa 1/3 dell’uovo al momento della schiusa)
UMIDIFICAZIONE
Per una corretta umidificazione durante la fase di incubazione, versare 1-2 cm di acqua tiepida sul fondo del-
l’incubatrice e riempirla nuovamente solo quando sarà totalmente evaporata.
SPECIE fase incubazione fase schiusa
Gallina – Faraona –Tacchino- 2 spazi 4 spazi
Fagiana – Pernice rossa - starna 1 spazio 4 spazi
Quaglia - Colíno 2 spazio 4 spazi
Oca - Anatra 1 spazio 4 spazi
Durante la fase di schiusa, quando i pulcini inizieranno a nascere versare acqua calda in tutti i quattro spazi al
fine di creare un’elevata umidificazione dell’aria.
Nelle schiuse successive potresti dover aumentare o diminuire la quantità di acqua, in relazione ai risultati avuti
nella prima schiusa, in caso di dubbi, è meglio mettere poca acqua che abbondare troppo – nella mag-
gior parte dei casi sono state perse uova più a causa dell’umidità data in eccesso che per qualsiasi altro
fattore! Si ricorda che la profondità dell’acqua non condiziona il tasso di umidità nell’incubatrice; è la superfi-
cie che conta!
4
2Si precisa che se il calo della camera d’aria risultasse maggiore dei riferimenti del disegno, occorrerà aumentare il grado di umidità, al con-
trario se risultasse minore sarà necessario diminuire l’umidità.
3La mancanza di corrente per tempi prolungati provoca seri danni alle uova in incubazione da pochi giorni, mentre si è osservato che a stadi
di crescita più avanzati dell’embrione, la sopportazione è maggiore.
SPERATURA
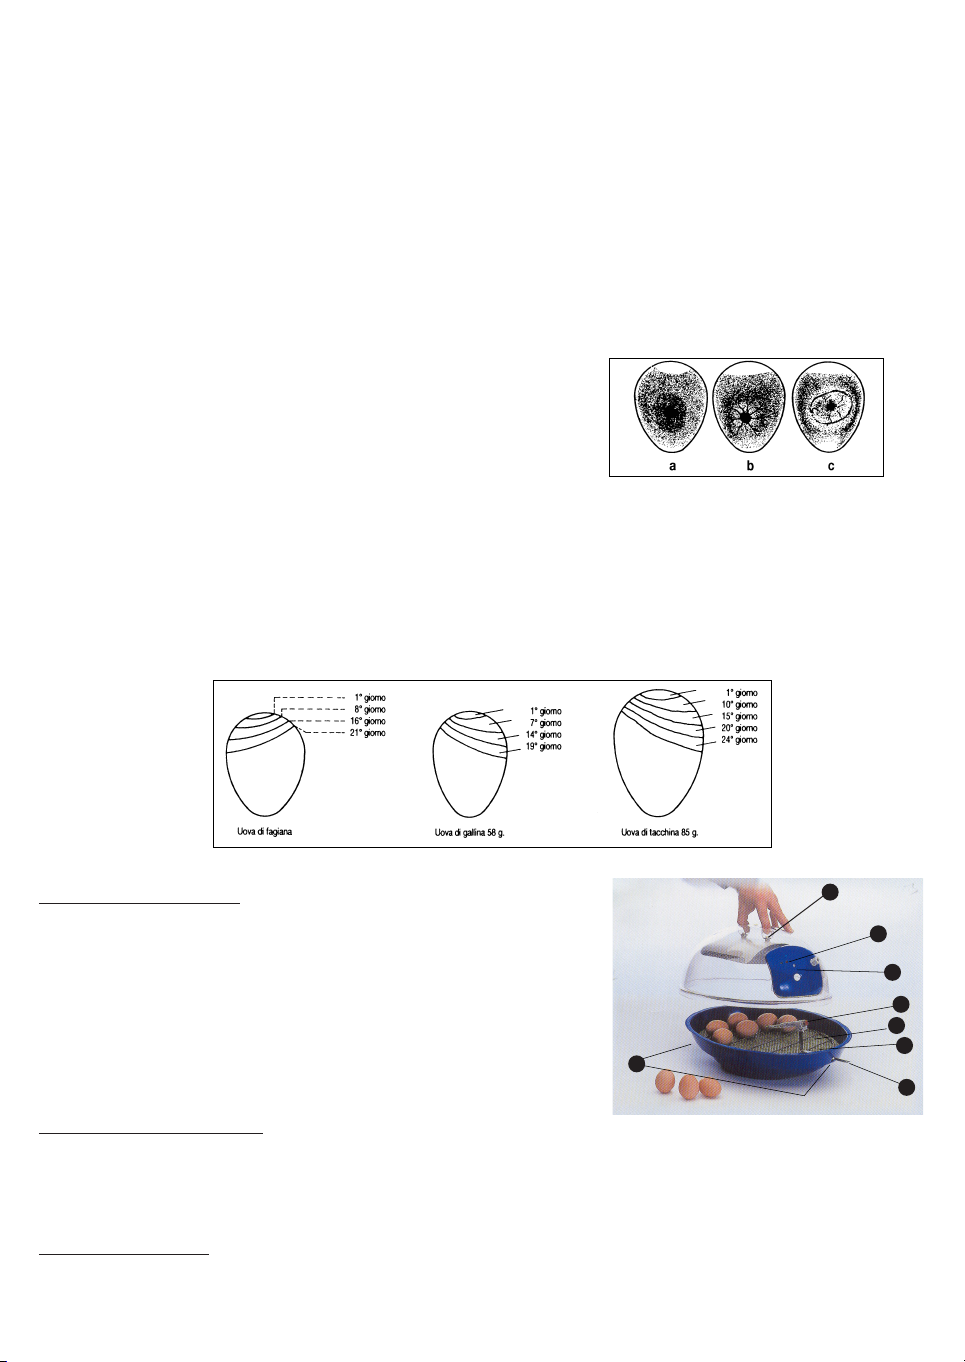
Dopo l’ottavo-decimo giorno di incubazione, è opportuno effettuare la speratura al fine di individuare ed elimi-
nare le eventuali uova non fecondate.
Posizionandosi in un locale oscuro ed osservando l’interno dell’uovo fecondato mediante uno sperauova, si
intravede l’embrione in sviluppo avente la forma di piccolo ragno rossiccio, costituito dal cuore e dalle picco-
le arterie che vi si dipartono (b); se si imprimesse all’uovo un leggero scuotimento si noterebbero chiaramente
delle oscillazioni ritmiche dell’embrione.
Al contrario un uovo non fecondato si presenta perfettamente trasparente, con un lieve oscuramento in corri-
spondenza del tuorlo (a).
Potrebbero rivelarsi dalla speratura di alcune uova macchie rossicce incollate alle pareti, oppure una macchia
centrale circondata da un o più cerchi concentrici; in tal caso trattandosi di embrioni “falsi” o morti, destinati
comunque alla putrefazione, si dovranno rigorosamente estrarre tali uova dall’incubatrice onde evitare perico-
lose infezioni a tutto il carico di incubazione.
a) Uovo non fecondato
b) Uovo con embrione in sviluppo
c) Uovo con embrione morto al 5°- 6° giorno di incubazione
Un controllo periodico delle uova in fase di sviluppo embrionale risulta necessario per garantire ottimali risul-
tati di schiusa.
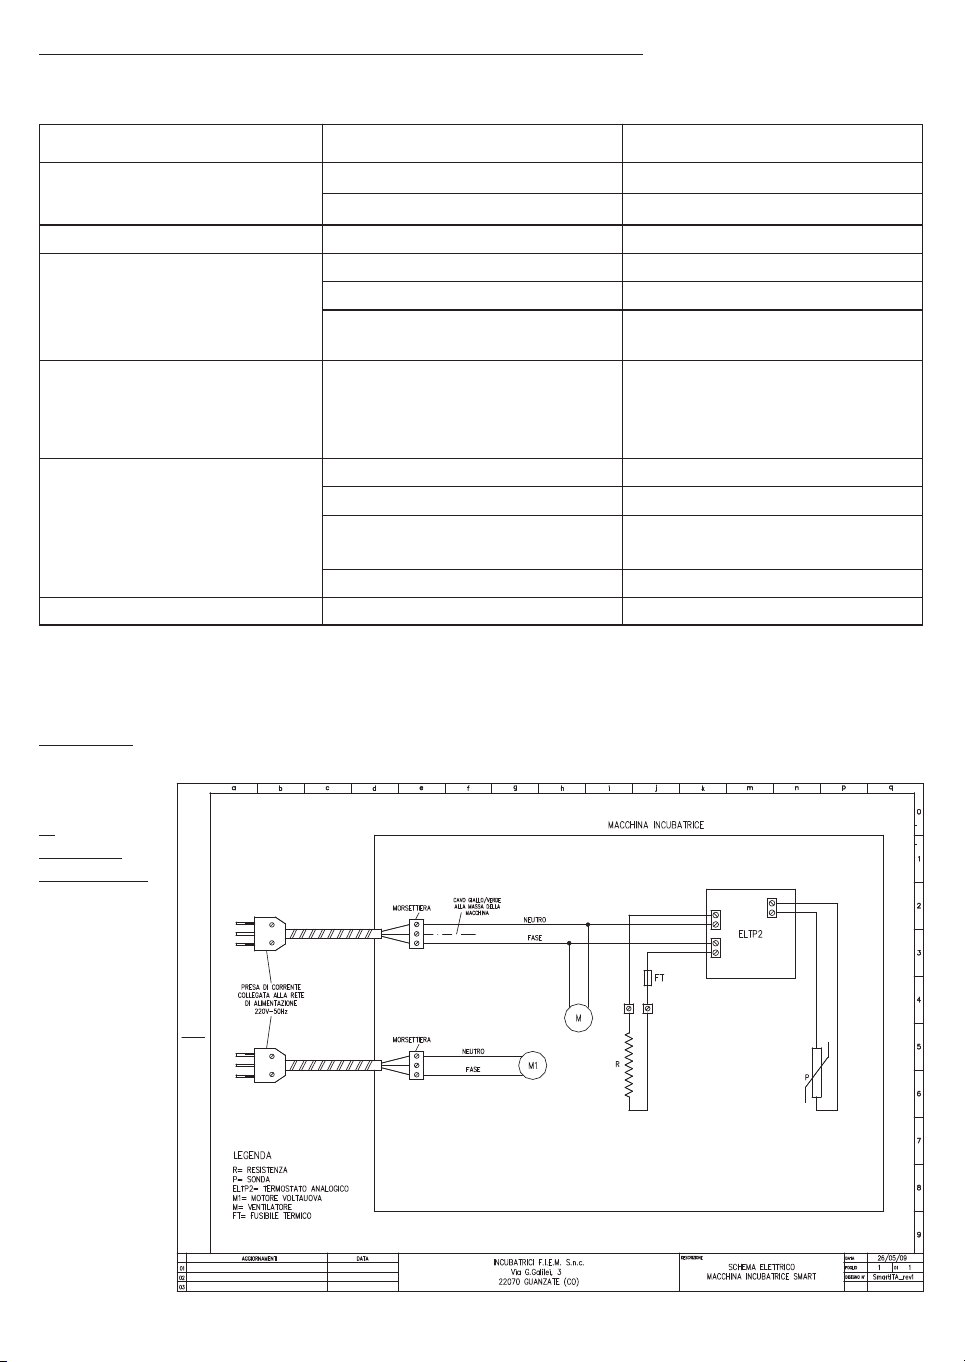
Infatti usando uno sperauova con sufficiente potenza, è possibile effettuare il controllo del calo della camera
d’aria. I disegni di seguito riportati illustrano i dati relativi alle uova di gallina, tacchina e di fagiana; se le
misurazioni di speratura corrispondono alle linee di disegno, lo sviluppo embrionale è corretto, quindi il grado
di umidità fornito all’incubatrice risulta esatto.
Qualora il calo della camera d’aria risultasse invece differente dagli esempi riportati nel disegno illustrativo,
occorre variare i valori di umidità relativi alla macchina.2
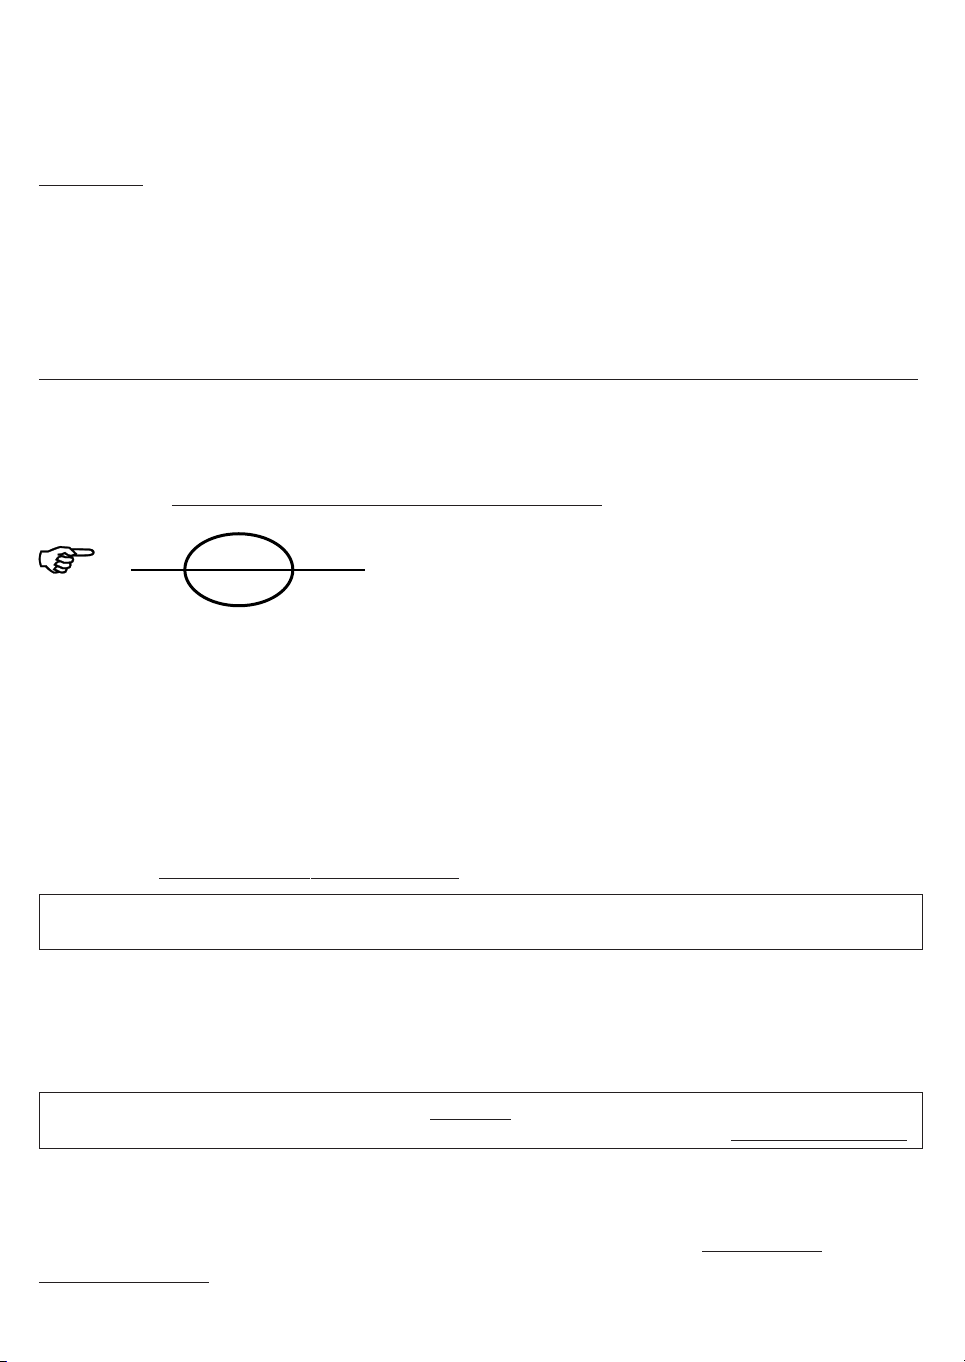
3. DESCRIZIONE
1Termostato analogico in banda proporzionale;
2Foro per calibrazione strumento;
3Termometro di lettura a mercurio (unità di misura ° F);
4Griglia volta-uova;
5Rete appoggio uova;
6Fori per aerazione;
7Corpo riscaldamento+ventilazione;
8Leva per voltaggio uova in manuale.
4. CONSIGLI UTILI
• Intercambiare la posizione delle uova almeno una volta alla settimana allo scopo di uniformare maggiormen-
te la temperatura interna.
• In mancanza di corrente elettrica per alcune ore durante il periodo di incubazione, inserire nella macchina
acqua calda e mantenerla in locale riscaldato.3
5
n
p
q
s
u
r
1
2
3
4
5
8
6
7

• Per le uova di palmipede, dopo 15 giorni di incubazione, si consiglia di bagnare le uova con acqua tiepida
nebulizzata (utilizzare appositi spruzzini igienizzati) e lasciarle raffreddare per circa 15 minuti prima di rimet-
tere il coperchio dell’incubatrice.
Questa operazione dovrà essere ripetuta ogni due giorni, fino al penultimo giorno di incubazione.
• Il locale dove verrà posizionata la macchina al fine di ovviare a problemi di infezioni batteriologiche, si dovrà
presentare rigorosamente in perfette condizioni igienico sanitarie e privo di condizioni di insalubrità.
• Riteniamo opportuno precisare che durante le operazioni di incubazione e soprattutto durante la schiusa si
presentano rischi relativi all’esposizione ad agenti biologici4, si consiglia di effettuare tutte le operazioni rela-
tive all’incubazione ed alla schiusa utilizzando idonei accorgimenti quali:
- dispositivi di protezione individuale specifici (guanti in lattice usa e getta, mascherine di protezione vie respi-
ratorie, camici usa e getta con relativi calzari);
- pulizia e disinfezione periodica dei locali adibiti ad incubazione;
- lavaggio accurato delle mani prima e dopo il contatto con parti organiche con saponegel ad ampio spettro
di azione biocida;
- evitare di somministrarsi cibi e bevande negli incubatoi o durante le operazioni di assistenza alla macchina.
•Sanità ed igiene dell’uovo
Per garantire la fecondità ed evitare contaminazioni in incubazione si consiglia durante la raccolta delle uova,
di seguire le indicazioni di seguito riportate:
- Raccogliere le uova giornalmente per evitare la loro contaminazione, le perdite per rottura e i danni da calo-
re nei periodi estivi o da congelamento durante l’inverno;
- Prima di inserire le uova nell’incubatrice premurarsi di pulirle con cura utilizzando un panno morbido ed inu-
midito con acqua tiepida;
- Conservare le uova in locali freschi con temperatura 14 – 16 °C;
- Le uova devono essere incubate a partire dal terzo giorno dalla deposizione e non dopo l’ottavo giorno.
- Per contrassegnare le uova usare solo matite, non utilizzare penne o pennarelli in quanto sono altamente tos-
sici per l’embrione.
5. CARATTERISTICHE TECNICHE
ALIMENTAZIONE ELETTRICA V/Hz 220 / 50
ASSORBIMENTO TOTALE Watt. 135/67
DIMENSIONI mm 400 x 325 x 260
PESO Kg 2,3
CAPACITÀ UOVA Gallina - Anatra - Tacchina 22-24
Fagiana - faraona 27
Starna - Quaglia 45
Pernice rossa 33
Oca 12
Si precisa che le capacità sopra riportate sono riferite a valori standardizzati di uova di medie dimensioni.
DURATA DI INCUBAZIONE DEI VARI SOGGETTI
SPECIE GIORNI SPECIE GIORNI
GALLINA 21 ANATRA COMUNE 27-28
QUAGLIA 16-17 ANATRA SELVATICA 25-26
TACCHINA 28 ANATRA MUTA 34-35
FARAONA 26 PERNICE 23-24
STARNA 23-24 FAGIANA 24-25
OCA 30 COLINO 22-23
6
4In particolare se la macchina verrà destinata all’utilizzo in ambienti lavorativi, si rende necessario effettuare valutazione rischio biologico
come previsto dal D. Lgs 626/94 integrato e modificato dal D. Lgs 81/08.

6. CURA E MANUTENZIONE
Per garantire un perfetto e duraturo funzionamento dell’apparecchio preoccuparsi di seguire le seguenti dispo-
sizioni:
• non esporre l’unità ad agenti atmosferici;
• non utilizzare la macchina in ambienti particolarmente caldi, umidi o freddi;
• effettuare lo spostamento e l’immagazzinamento evitando alla macchina urti o cadute, che risulterebbero
deleteri per un sicuro funzionamento della stessa;
• prima delle operazioni di pulizia staccare la spina dalla presa di alimentazione alla rete;
• non sottoporre il cavo di alimentazione a tensione quando si sposta l’unità;
IMPORTANTE: staccare la spina dalla presa agendo sulla spina stessa e non sul cavo di alimentazione; inol-
tre non utilizzare prolunghe inadatte e non a norma;
• per le operazioni di pulizia e disinfezione seguire attentamente le istruzioni riportate al paragrafo seguente.
COME PULIRE L’INCUBATRICE:
Per garantire una essenziale igiene durante l’incubazione si consiglia di pulire la macchina prima e dopo l’utilizzo;
passare quindi sull’apparecchio un panno inumidito e non usare sostanze volatili che possano danneggia-
re la superficie dell’unità quali solventi corrosivi, ed igienizzare l’unità utilizzando disinfettanti domestici leg-
geri come alcool.
AVVISO: dopo ogni operazione di pulizia e disinfezione mantenere in funzione la macchina per circa due ore
senza acqua, al fine di eliminare l’umidità accumulata durante l’incubazione e la pulizia, si assicurerà il corret-
to funzionamento al successivo utilizzo.
7. GARANZIA
La macchina è stata collaudata funzionalmente dal costruttore in ogni sua parte prima della consegna o della spe-
dizione
La garanzia del costruttore non comprende perciò danni causati da un trasporto della macchina effettuato non
correttamente, inoltre la garanzia non comprende eventuali danni agli impianti elettrici ed elettronici causati da un
non corretto allacciamento alla rete di alimentazione.
La garanzia comprende la sistemazione o la sostituzione di tutte le parti difettose riscontrate nei 24 mesi suc-
cessivi alla consegna della macchina al cliente (12 mesi a cura del produttore + 12 mesi a cura del venditore) ed
ha validità avvisando il costruttore non oltre l’ottavo giorno dal riscontro del malfunzionamento.
Dietro nostra richiesta e salvo eventuali diretti interventi, egli dovrà effettuare la spedizione in porto franco e nel-
l’imballo originale della merce ritenuta difettosa.
Tale garanzia è riferita ad eventuali difetti di fabbricazione ed è esclusa nel caso che i prodotti non siano stati usati
secondo le nostre prescrizioni e, in ogni caso, qualora siano stati manomessi, riparati o comunque non corretta-
mente utilizzati.
Nella garanzia è compresa tutta la consulenza tecnica telefonica; restando a carico del cliente tutte le spese di
spedizione alla F.I.E.M. S.n.c. delle parti da sostituire e quelle relative ad ogni intervento tecnico presso il cliente.
Non sono comunque mai compresi risarcimenti dovuti al fermo della macchina, o dei danni riportati alla
produzione.
Le riparazioni in garanzia dovranno essere effettuate da personale autorizzato dal costruttore, la non
ottemperanza a questa clausola comporta la cessazione della garanzia stessa.
NORMATIVA DI RIFERIMENTO
Questo prodotto soddisfa i requisiti essenziali di Compatibilità Elettromagnetica e di Sicurezza previsti dalle
Direttive:
•
2004/108/CE direttiva EMC
•
2006/95/CE direttiva Bassa Tensione
in quanto progettato in conformità alle prescrizioni delle seguenti Norme Armonizzate:
•
EN 55014-1 Ed. 2006
•
EN 61000-3-2 Ed. 2006
•
EN 61000-3-3 Ed. 1995 +A2:2005
•
EN 55014-2 Ed. 1997+A1:2001
•
EN 60335-2-71 Ed. 2003 +A1:2007
7

La conformità ai suddetti requisiti essenziali viene attestata mediante l’apposizione della Marcatura
su prodotto
La marcatura è stata introdotta nell’anno 1995.
Si richiama l'attenzione sulle seguenti azioni che possono compromettere la conformità oltre, naturalmente, le
caratteristiche del prodotto:
• errata alimentazione elettrica;
• errata installazione o uso errato o improprio o comunque difforme dalle avvertenze riportate sul manuale
d'uso fornito col prodotto;
• sostituzione di componenti o accessori originali con altri di tipo non approvato dal costruttore, o effettuata
da personale non autorizzato.
WARNING: THIS EQUIPMENT MUST BE EARTHED.
ATTENZIONE: QUESTA UNITÀ DEVE ESSERE CONNESSA A TERRA.
ATTENTION: CETTE UNITE DOIT ETRE MISE A LA TERRE.
ACHTUNG: DIESES GERAT MUSS EINEN ERDUNGSANSCHLUSS HABEN.
ATENCION: ESTE EQUIPO DEBE ESTAR CONECTADO A UNA TOMA DE TIERRA.
APPARATET MA KUN TILKOPLES JORDET STIKKONTACT. APPARATEN SKALL ANSLUTAS TILL JORDAT
NATUKKAT. LAITE ON LITTETTAVA SUKO-RASIAAN.
8
Dichiarazione di conformità (Declaration of Conformity)
Noi costruttori (We manufacturer)
F.I.E.M. snc di Luccini Tina & C.
Via Galileo Galilei 3 - 22070 Guanzate (CO)
dichiariamo che il prodotto (declare that the product)
INCUBATRICE VENTILATA PER UOVA
Art. SMART e SMART-V
rispetta i requisiti essenziali previsti dalle seguenti Direttive:
(complies with essential requirements provided by the following Directives:)
2004/108 EC EMC Directive
2006/95 EC LVD Directive
Norme applicate per la dichiarazione di conformità:
(Standard applied to declare the conformity:)
EN 55014-1 Ed.2006 Test report issued from: STN RDP 0945-10-EC
EN 61000-3-2 Ed.2006 Test report issued from: STN RDP 0945-10-EC
EN 61000-3-3 Ed.1995 +A2:2005 Test report issued from: STN RDP 0945-10-EC
EN 55014-2 Ed.1997+A1:2001 Test report issued from: STN RDP 0945-10-EC
EN 60335-3-71 Ed.2003 +A1:2007 Test report issued from: STN RDP 0947-10-SI
10
Date: Guanzate, 02/02/10
Manufacturer
Name: Tina Luccini
Signature:
: 76°C - 2A
8. PRIMA DI RIVOLGERSI AL SERVIZIO ASSISTENZA
Prima di richiedere l’intervento dell’assistenza tecnica, è opportuno controllare i seguenti guasti più comuni ed
intervenire conformemente.
PROBLEMA CAUSA SOLUZIONE
L’unità non funziona. Manca corrente. Controllare la spina.
Spina staccata. Inserire la spina
Temperatura di esercizio insufficiente Elemento riscaldante malfunzionante Contattare il costruttore
Termostato scalibrato Vedere istruzioni per la calibrazione
Termostato inattivo o malfunzionante Contattare il costruttore
Temperatura ambientale inferiore ai 18°C Collocare l’incubatrice in un locale
più caldo
Colonnina di mercurio del termometro Urti, cadute accidentali Provare ad esporre il termometro per
frammentata alcuni minuti a basse temperature
e successivamente sotto l’acqua calda,
altrimenti sostituire il Termometro
Kit voltauova non funziona Manca corrente. Controllare la spina.
Spina staccata. Inserire la spina
Braccetto motoriduttore non agganciato Agganciare braccetti all’interno
della scatola kit voltauova
Motoriduttore inattivo Contattare il costruttore
Aerazione forzata insufficiente Ventola non funzionante Contattare il costruttore
È severamente vietato ogni tentativo di riparazione della macchina, che non sia tra quelli indicati nella tabella
sopra riportata, contattare sempre il centro di assistenza presso il costruttore al
tel. 0039 031 / 97 66 72 ISND - fax. 031 / 89 91 63
www.fiem.it - e-mails: [email protected] o [email protected].
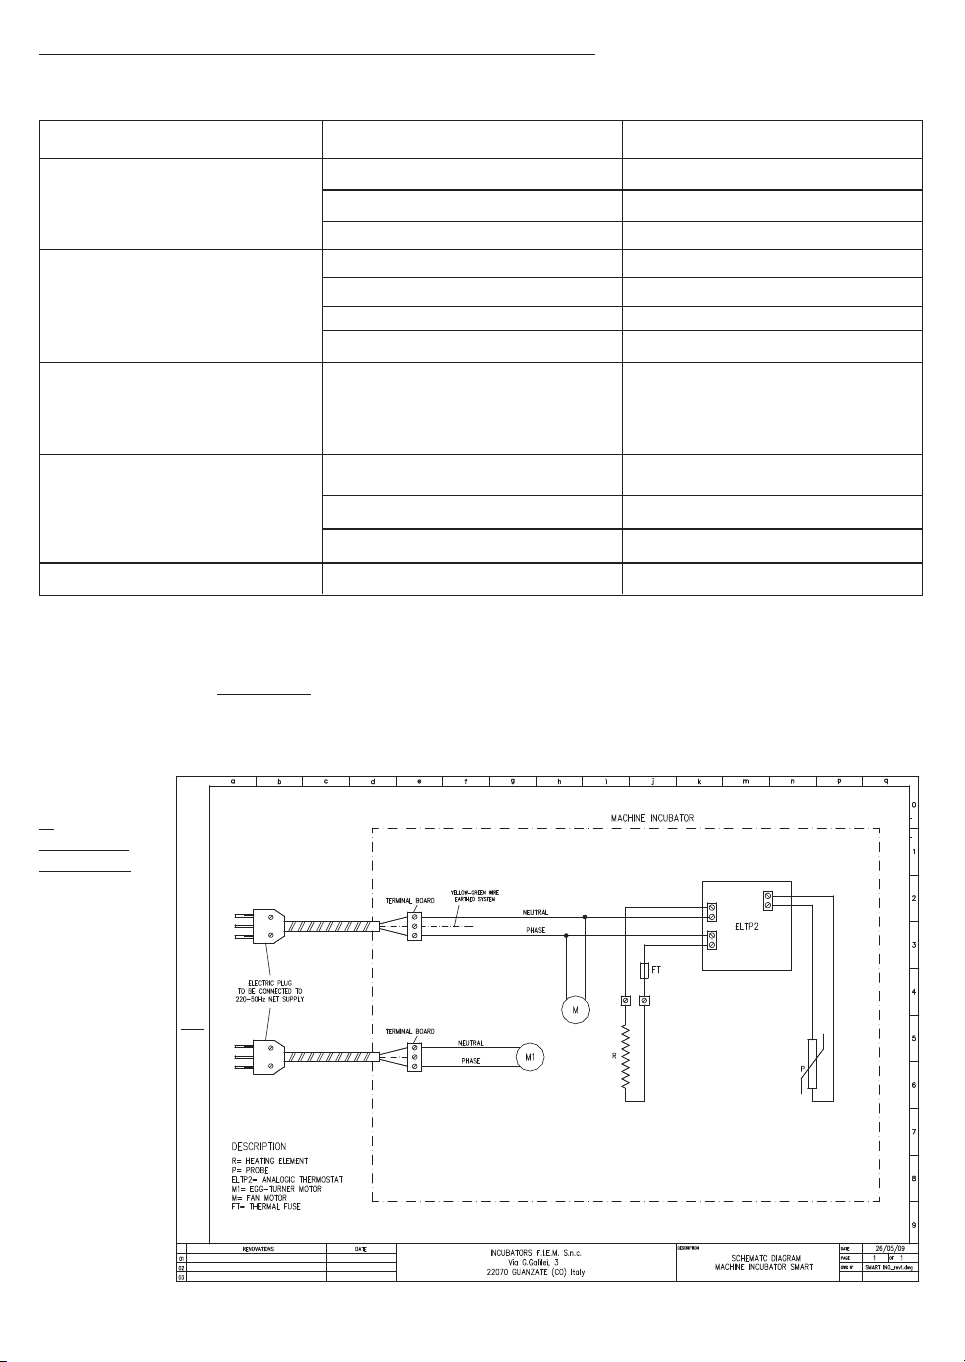
9.
SCHEMA
ELETTRICO
9

MANUAL FOR USE OF INCUBATOR MOD. SMART
INDEX
1. INTRODUCTION . . . . . . . . . . . . . . . . . . . . . . . . . . . . . . . . . . . . . . . . . . . . . . . . . . . . . . . . . . . . . . 10
2. BEFORE USE . . . . . . . . . . . . . . . . . . . . . . . . . . . . . . . . . . . . . . . . . . . . . . . . . . . . . . . . . . . . . . . . 10
Unpacking of the machine
Placing, connection and preparation
Automatic egg-turner kit connection
Use and calibration
Humidification
Eggs candling
3. DESCRIPTION . . . . . . . . . . . . . . . . . . . . . . . . . . . . . . . . . . . . . . . . . . . . . . . . . . . . . . . . . . . . . . . . 13
4. USEFUL SUGGESTIONS. . . . . . . . . . . . . . . . . . . . . . . . . . . . . . . . . . . . . . . . . . . . . . . . . . . . . . . . 13
5. TECHNICAL SPECIFICATIONS . . . . . . . . . . . . . . . . . . . . . . . . . . . . . . . . . . . . . . . . . . . . . . . . . . 14
Technical data of the incubator
Duration of incubation of the different species
6. CARE AND MAINTENANCE . . . . . . . . . . . . . . . . . . . . . . . . . . . . . . . . . . . . . . . . . . . . . . . . . . . . . 14
How to clean the incubator
Instructions for light bulb sostitution
7. GUARANTEE . . . . . . . . . . . . . . . . . . . . . . . . . . . . . . . . . . . . . . . . . . . . . . . . . . . . . . . . . . . . . . . . . 14
Normative of reference
Declaration of Conformity of the Builder
8. BEFORE TO ASK FOR SERVICE ASSISTANCE . . . . . . . . . . . . . . . . . . . . . . . . . . . . . . . . . . . . . 16
9. ELECTRIC DIAGRAM . . . . . . . . . . . . . . . . . . . . . . . . . . . . . . . . . . . . . . . . . . . . . . . . . . . . . . . . . . 16
1. INTRODUCTION
The incubator model SMART is studied in order to guarantee optimal performances into incubation by an easy
working and it allows to be used as brooder. Therefore SMART is a product that, also in its working simplicity,
answers the particular exigencies of the customer, purposing like a tool that avails itself of technological choi-
ces in the forefront and that realizes a top level quality. The cabinet is in plastic abs for the lower part and in
transparent pvc for upper one and it allows to see very well inside the machine and assure hardiness to the
machine; a proportional band thermostat with a probe of decimal precision permits a sure regulation of tem-
perature, that can be also measured with precision by the thermometer in Fahrenheit degrees (°F). The heating
is guaranteed from by a heating cable protected and covered by silicon rubber type “SILASTIC 5501. The choi-
ce to build incubator SMART entirely with plastic materials, gives a complete guarantee against corrosion and
assure an easy cleaning; the adopted solutions is a clear merit of the F.I.E.M.’s long experience., which since
long time has been manufacturing high quality.
Although this machine is for family use, during the planning, it has not been neglected appearances the aspects
related to the safety, which is surely the power point of the SMART.
2. BEFORE OF THE USE
Before of the use, it is suggested to consider the aspects, technical data and safety guaranteed by the pro-
duct, seeing the components and helping with the manual in order to discovery gradually the potentialities.
MACHINE UNPACKING
Take out the incubator from its cardboard box and remove the inside components which are anchored by the
adhesive ribbon.
Check there are all the components as follows:
• n. 1 instructions book;
• n. 1 thermometer (°F);
• n. 1 eggs wire net;
• n. 1 eggs turning grid;
• n. 1 automatic egg-turner kit ( if the machine is equipped).
10
GB
The incubator has a single-phase electric cable (of 1,5-2 mt. approx) with a plug to lacing to electric energy
230V, 50-60 Hz.
On the back side, the data label informs the absorption and the power of the incubator.
IMPORTANT: Remember to check the correct thermometer working, seeing that there is not interruption on
mercuric line.
WARNINGS:
The incubator must be connected to a net supply with earth connection.
Take off the electric plugs before cleaning operations.
If the electric cable with plug is damaged, it must be replaced by the manufacture or by Technical assistance
service or by authorized personal to be prevented any risks.
The electric cable with plug should not be accessible to the animals. Empty water basins before to move the
incubator. Do not use the incubator if damaged.
POSITIONING, LACING AND PREPARATION
The local where machine is placed, shall be enough aired and dry, at a constant temperature between 18-25 °C.1
Place the incubator on a plan surface not tilted and possibly near to an electric intake of easy access. For a
net supply, use only the electric plugs supplied with earth connection.
ADVICE: The builder declines every responsibility in case of any improper use or improper placement, connec-
tion to any authorized apparatus or tampering from not authorized personal.
Insert the thermometer into the plastic clip on top of the support of the eggs wire net, paying attention to do
not break it and regulate it with its bulb at the middle line of the eggs.
• Before using the machine, remember to clean carefully the machine inside and outside, as showed in para-
graph n° 6.
EGG-TURNING KIT ASSEMBLING:
The egg-turning kit allows the eggs to be turned automatically by a horizontal movement of the plastic grid pla-
ced on the wire net, this movement is slow and delicate. The egg-turner motor is placed inside plastic box atta-
ched lateral to the inferior part of the machine and it is insulated and protected by a plastic cover.
Connect the plug to an electric intake of easy access and make sure that moving starts; please note that egg-
turner motor does 1 rp clockwise direction of 360° per hour which is transformed in linear movement go and
back each of 30 minutes.
If the incubator is manual for turning eggs, remember to turn the eggs by the rod of the grid one time go and
one time back twice per day (morning and evening).
ATTENTION: Inside egg-turner plastic box there is electric tension 220/230V, so before to open the
box for any possible checking, make sure that plug is not connected to electric network.
USE AND CALIBRATION
For the switching on the machine connect the electric plug to the electric network and before to load the
eggs await for the incubator has reached the working temperature of 100°F(37,7°C). Positing gradually the
ready eggs for the incubation on the wire net, only when the incubator has reached the working temperatu-
re of 100°F.
Loading the eggs conserved not later then 7- 8 days and not earlier then 3 days from deposition -
before the incubation, the eggs must be conserved in a local with temperature between 14 – 16 °C.
On the upper part, it is placed the analogical thermostat, ( which has been set-up by the factory, when it is
working, the green led results light, the continuous or intermittent lighting of the red led points out the activa-
tion of the heating.
We recommend to pay attention to the mercuric thermometer, which has to mark 100°F (37,7°C), always in a
precise way.
11
)
1It is important to remind that the local conditions where the machine is placed (temperature, humidity and aeration) do not influence sen-
sibly on the temperature inside the unit while can condition not indifferently the inside humidity values.

If it had not to reach the working temperature above marked, the thermostat will be setted as follows:
• modify the temperature (if necessary) using a screw-driver, turn the screw SET in correspondence of the
requested value 100°F onto thermometer.
IMPORTANT:
if all the attempts of setting instrument result useless, do not remove it from its place absolutely to effect impro-
per and not authorized operations; contact the builder about the possible reparations or substitutions.
In order to guarantee to the eggs a constant and homogenous air flux, it is suggested to interchange the eggs
between themselves weekly.
Remember that two days before period hatcher it needs to disconnect automatic egg-turner kit by the elec-
tric plug.
When the hatching period (last 2 days) is finished, keep the chicks 1 days more in order they dry up and then
put into the electric poultry brooder or under infra-red lamp for almost 3 weeks; maintain a temperature of 35°C
for the first week.
HUMIDITY
It is important to understand that there can be no hard and fast rule for the amount of water required in an
incubator as all the following variables come into play:
- Ambient humidity in the room (affected by the weather and your local environment, eg.on the edge of a lake!)
- The species of the eggs
- The porosity of the eggshells (can vary from egg to egg!)
- The time of year (warm weather usually means high ambient humidity and eggs laid towards the end of the
season tend to be more porous)
Requirement for water in the incubator can be monitored by either weighing the eggs ( or batch of eggs), (an
egg should lose 13-15% of its weight during incubation) or by candling (the air space should be approx. 1/3
of the egg by the time it is due to hatch)
HUMIDIFICATION
For a correct humidification during the incubation time, fill some water (1-2 cm) on the bottom of the incuba-
tor and re-fill water only when the basin is empty.
SPECIE Incubation time Hatching time
Hen – Guinea fowl –Turkey- 2 spaces 4 spaces
Pheasant – Red leg - partridge 1 spaces 4 spaces
Quail – Bob white 2 spaces 4 spaces
Goose - Duck 1 spaces 4 spaces
During hatching period, when chicks will start to born, fill hot water into all four spaces on the bottom in order
to increase to the maximum level the humidity inside.
On subsequent hatches you may wish to increase or decrease the amount of water, depending on your fin-
dings with your first hatch, if in doubt, it is better to add too little water than to much - more eggs are lost
through too high humidity than any other single factor! Remember, the depth of water makes no differen-
ce to the humidity levels in the incubator; it is the surface area which counts!
EGGS CANDLING
At 8th - 10th day of incubation, it is advisable to candle the eggs in order to eliminate those which are infertile; this
operation must be done in a dark room. By observing the inside of a developing, fertile egg, using a suitable candling
lamp, it is possible to determine the embryo development which looks like a small reddish shape, composed of the
heart and small arteries which are radiating from it (Fig. b).If the egg is moved lightly, it is possible to see clearly the
rhythmic oscillations of the embryo.
On the contrary, an infertile egg appears completely transparent (clear), with a slight darkening where the yolk is. (a).
If during the candling operation, you find some eggs with a reddish spot stuck or attached to the shell, or a central
spot surrounded by one or more concentric hoops, or something nebulous crossing the inside; then in this case, the
embryos are either false or dead, and must be taken out of the incubator to prevent them contaminating other eggs
with bacteria by infection or explosion.
12

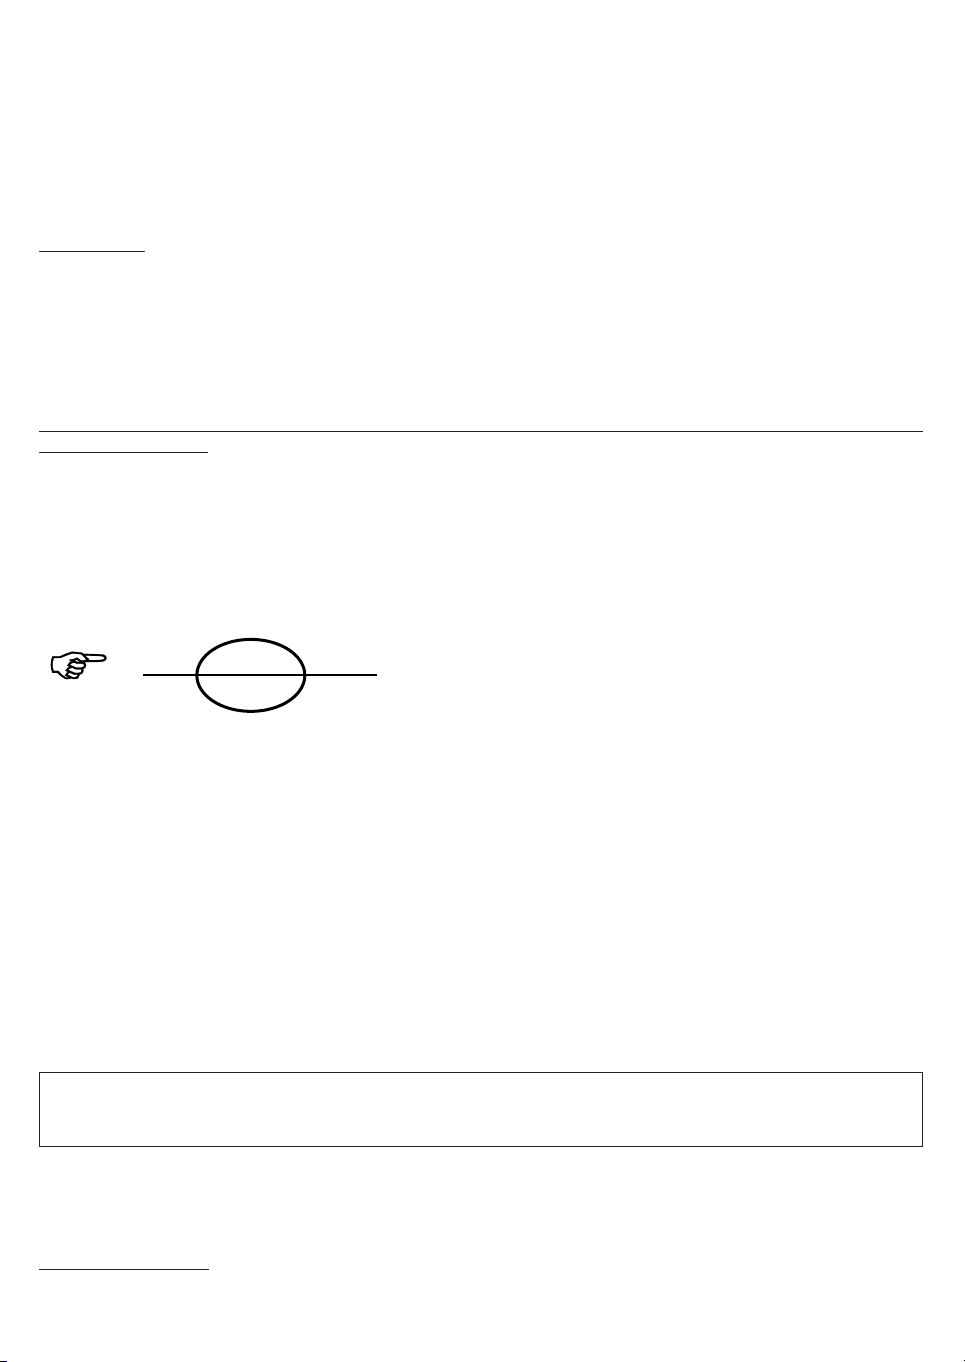
a) Infertile egg
b) Egg with normally developing embryo
c) Egg with dead embryo at 5th - 6th day of incubation
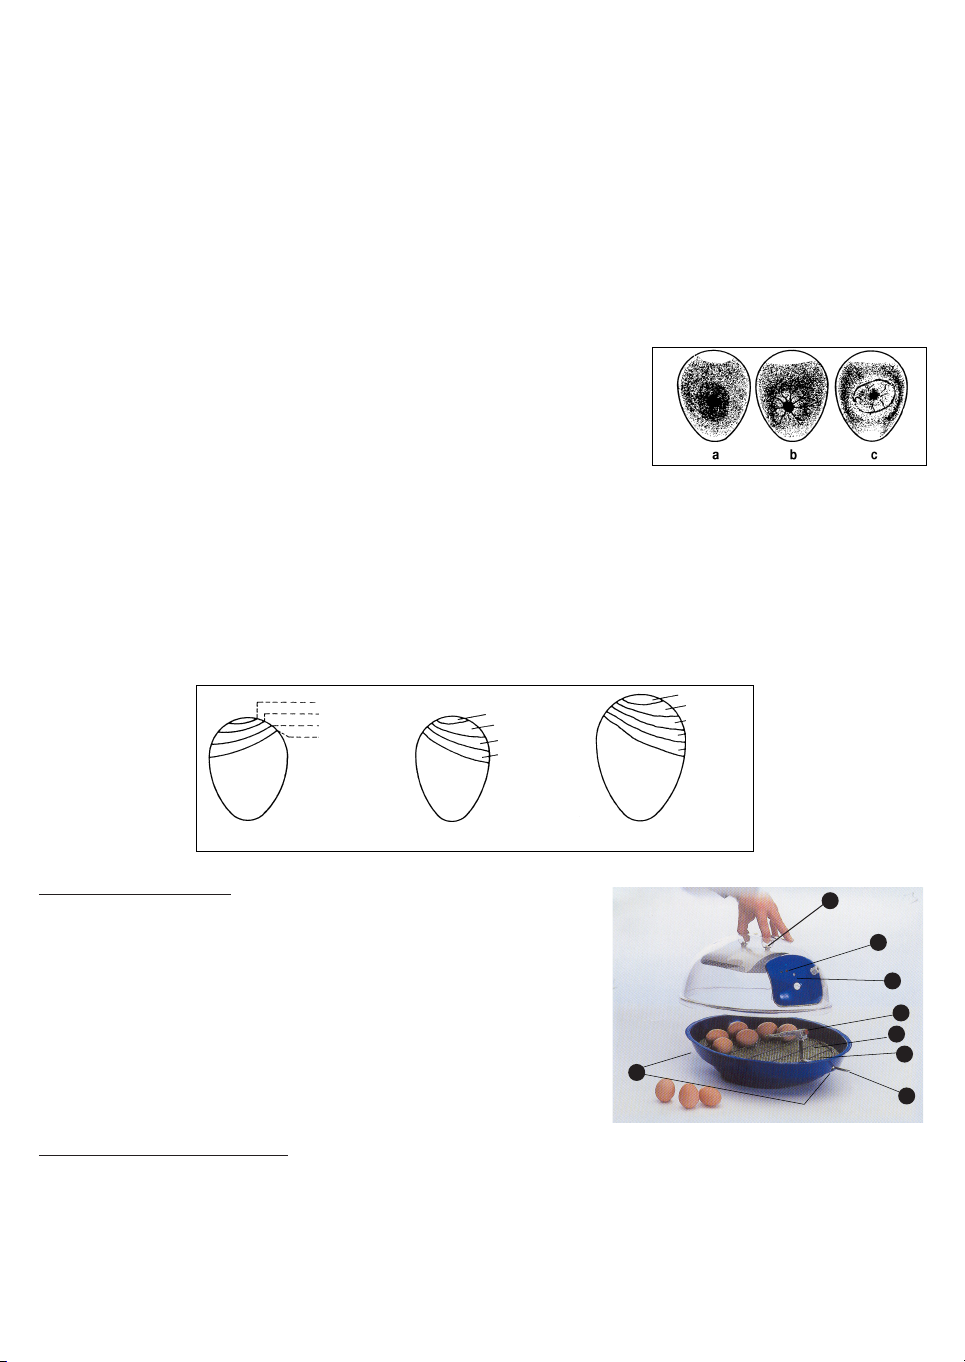
Periodic candling during embryonic development is necessary to ensure the best hatching results. Using a
good candling lamp, it is possible to check the growth of the air-space. The pictures shown herewith show the
air-space growth as related to hen, turkey, and pheasant eggs. If the air space measurements appear similar
to those shown in the picture, it means that the embryo is developing correctly, and that the amount of humi-
dity supplied in the machine is right. If the air space is not developing correctly,it means that it is necessary to
change the level of humidity supplied to the machine2.
3. DESCRIPTION
1Analogical thermostat in proportional band;
2Trimmer for calibration;
3Reading mercury thermometer (° F);
4Egg-turning wire net;
5Wire net on the bottom;
6Ventilation holes;
7heating + ventilation kit;
8Manual egg-turning rod
4. USEFUL SUGGESTIONS
• In lack of electric power for any hours during the period of incubation, introduce into the machine one or more
hermetic bags full of hot water, leaving the ventilation holes opened.
• Before to place the eggs into the incubator, let them rest at least for three days in a specific egg-basket (in
a vertical position with the air-chamber placed upwards), stocked in a cool room whose temperature is not
more than 14-16 °C.
• In order to guarantee to the eggs a constant and homogenous air flux, it is suggested to interchange the eggs
between themselves weekly.
• Regarding the eggs of palmipeds, it is suggested after 15 days of incubation, to take out them and spray with
lukewarm water (using a hygienic sprayer) and then to leave them cool out from the incubator for around 15 minutes.
This operation will be got again every two days till the penultimate day of incubation.
• The local where the machine will be placed should be rigorously in perfect hygienic sanitary conditions and
without conditions of unhealthiness in order to obviate to problems of bacteriological infections
· Healthiness and hygiene of the egg
For guarantee the fertility and avoid contaminations during incubation time, when you are picking up the eggs
it is suggested to follow the following indications:
- Pick up the eggs every day to avoid their contamination, the dribble for break-up and the damages becau-
se of heat in the summer time or because of freezing during the winter;
- Before fill incubator with eggs, clean them using a wet soft cloth.
- Wash the hands carefully before and then the collecting eggs using a soap-gel action;
-THE EGGS MUST BE CONSERVED NOT LATER THEN 7- 8 DAYS IN A LOCAL WITH TEMPERATURE
BETWEEN 14 – 16 °C
- Do not mark the eggs with coloured and toxic pens or pencils.
13
2It must be noted that when the air-space is smaller than shown in the table, it is necessary to increase the humidity value; when the air-
space is larger than shown in the table, the humidity must be increased.
Pheasant eggs Hen eggs Turkey eggs
1s
t
day
8th day
16th day
21th day
1s
t
day
7th day
14th day
19th day
1s
t
day
10th day
15th day
20th day
24th day
n
p
q
s
u
r
1
2
3
4
5
8
6
7
Pheasant egg Hen egg Turkey egg

5. TECHNICAL CHARACTERISTICS
POWER SUPPLY V/Hz 220 / 50
POWER CONSUMPTION Watt. 135/67
SIZES mm 400 x 325 x 260
NET WEIGHT Kg 2,3
EGGS CAPACITY Hen - Duck - Turkey 22-24
Pheasant – Guinea Fowl 27
Partridge – Quail 45
Red leg 33
Goose 12
Take note that the above capacities are refered to standard values of medium size eggs.
INCUBATION PERIOD OF THE DIFFERENT SPECIES
SPECIE DAYS SPECIE DAYS
HEN 21 PEKIN DUCK 27 - 28
QUAIL 16 - 17 WILD DUCK 25 - 26
TURKEY 28 BARBARY DUCK 34 - 35
GUINEA FOWL 26 RED LEG PARTRIDGE 23 - 24
PARTRIDGE 23 - 24 PHEASANT 24 - 25
GOOSE 30 BOB WHITE 22 - 23
6. CARE AND MAINTENANCE
To be guaranteed a perfect and durable working of the machine, observe the following dispositions:
• don’t expose the unity to atmospheric agents;
• don’t use the incubator in particularly hot, damps or cold locals;
• make the moving and the storage avoiding the bumps or falls, they would result deleterious for a sure
working of the same;
• before the cleaning operations take off the plug from the electric network;
• don’t strain the electric cable when the unity is moved;
IMPORTANT: take off the electric plug grasping the same and not straining the cable; besides don’t use unsui-
table extensions and not to safety rule;
• Regarding the cleaning and disinfection operations follow attentively the instructions herewith:
HOW TO CLEAN THE INCUBATOR:
In order to guarantee an essential hygiene during the incubation it is suggested to clean the incubator before
and after sing;
therefore pass a dampened cloth over the machine and don’t use any substances that could damage the sur-
face of the unity, so disinfect it using light disinfectants like alcohol.
Make the cleaning also on the bottom and by a sponge with a normal detergent of domestic use.
ATTENTION: DO NOT USE CORROSION DETERGENTS
NOTICE: after each cleaning and disinfection operation swicth on the machine for about two hours without
water, in order to eliminate the accumulated damp during the incubation and the cleaning, in this it will made
sure the correct working to the following using.
7. GUARANTEE
The machine is already tested by the builder in every its part before the delivery.
Therefore the builder does not assume any liability for damages direct or indirect caused during the transport,
including those to electric/electrical plants caused by an improper machine use or improper connection to the
electric power net. The guarantee includes repairs or replacement of all the parts that are found to be defective
in the 24 months following the delivery of the machine to the customer (12 months by the manufacturer + 12
months by the seller) and applies when the customer informs the manufacturer, no later than the eighth day from
when the fault occurred. This Guarantee is referred to possible defects in work-manship and it is excluded in any
case of improper use, improper placement and connection or in any case of tampering from not authorized per-
sonal. The guarantee includes all technical telephone support, but the customer is liable for all shipping costs
for sending all defective parts to be replaced to F.I.E.M. Snc and all technical call-out. The warranty does not
cover any indemnity due to machine stop or damages pertinent to hatchability (eggs not hatched).
All the reparations must be directly effected by the authorized personal by the builder; contrariarly, the
warranty stops.
14

Dichiarazione di conformità (Declaration of Conformity)
Noi costruttori (We manufacturer)
F.I.E.M. snc di Luccini Tina & C.
Via Galileo Galilei 3 - 22070 Guanzate (CO)
dichiariamo che il prodotto (declare that the product)
INCUBATRICE VENTILATA PER UOVA
Art. SMART e SMART-V
rispetta i requisiti essenziali previsti dalle seguenti Direttive:
(complies with essential requirements provided by the following Directives:)
2004/108 EC EMC Directive
2006/95 EC LVD Directive
Norme applicate per la dichiarazione di conformità:
(Standard applied to declare the conformity:)
EN 55014-1 Ed.2006 Test report issued from: STN RDP 0945-10-EC
EN 61000-3-2 Ed.2006 Test report issued from: STN RDP 0945-10-EC
EN 61000-3-3 Ed.1995 +A2:2005 Test report issued from: STN RDP 0945-10-EC
EN 55014-2 Ed.1997+A1:2001 Test report issued from: STN RDP 0945-10-EC
EN 60335-3-71 Ed.2003 +A1:2007 Test report issued from: STN RDP 0947-10-SI
10
Date: Guanzate, 02/02/10
Manufacturer
Name: Tina Luccini
Signature:
STANDARDS OF REFERENCE
This product conforms to the essential Electromagnetic and safety requirements foreseen by the following
directives: • 2004/108/CE of 15 December 2004
• 2006/95/CE of 12 December 2006
as designed in accordance with the requirements of the following Harmonized Standards
• EN 55014-1: 2006 • EN 55014-2: 1997+A1:2001
• EN 61000-3-2: 2006 • EN 61000-3-3: 1995+A1:2001+A2: 2005
• EN 60335-2-71:2003+A1:2007
The conformity to the above requirements is attested by marking on the product;
The mark has been introduced in 1995 year.
It is opportune underline the following actions that can predjudge the conformity and moreover the product
characteristics:
• uncorrect electric supply;
• uncorrect installation or uncorrect /improper use or not conform to the instructions reported into the instruc-
tion book supplied with machine;
• replacement of its components with those not conform or adopted by the builder, or replacement effected
by not authorized technical servic
•WARNING: THIS EQUIPMENT MUST BE EARTHED
15
: 76°C - 2A
8. BEFORE TO CALL FOR SERVICE ASSISTANCE
Before to call the technical assistance, it is suitable to check the followings failures more common and ope-
rate in conformity.
PROBLEM CAUSE SOLUTION
The machine does not work. Lack of power Check the plug
Disconnected plug connect the plug
Any of above points Contact the assistance service
Low working temperature Heating element bad working Contact the builder
Uncalibrated thermostat See the instruction for the calibration
Not or bad working thermostat Contact the builder
Room temperature under 18°C Place the incubator into a warm room
Thermometer mercury column Impacts, accidental drop Try to expose the thermometer for few
interrupted minutes to low temperatures and then
in cold water otherwise substitute it
Automatic egg-turner Lack of power Check the plug
device does not work Plug disconnected Put the plug into the socket
Egg-turner motor broken Contact the builder
Insufficient ventilation Fan Motor does not work Contact the builder
It is severely forbidden any attempt of reparation of the machine, which is not between those suitable in the
aboveshow table, contact always technical assistance at the factory to the tel. 0039 031 / 97 66 72 ISND
16
9.
ELECTRIC
DIAGRAM

MANUEL D’UTILISATION DES INCUBATEUR MOD. SMART
INDEX
1. INTRODUCTION . . . . . . . . . . . . . . . . . . . . . . . . . . . . . . . . . . . . . . . . . . . . . . . . . . . . . . . . . . . . . . 17
2. NOTIONS SUR L’UTILISATION . . . . . . . . . . . . . . . . . . . . . . . . . . . . . . . . . . . . . . . . . . . . . . . . . . 17
Déballage de la machine
Positionnement, raccordement et préparation
Prestation du kit retournement automatique des œufs
Utilisation et réglage
Humidité
Mirage
3. DESCRIPTION . . . . . . . . . . . . . . . . . . . . . . . . . . . . . . . . . . . . . . . . . . . . . . . . . . . . . . . . . . . . . . . . 20
4. CONSEILS UTILES . . . . . . . . . . . . . . . . . . . . . . . . . . . . . . . . . . . . . . . . . . . . . . . . . . . . . . . . . . . . 20
5. CARACTERISTIQUES TECHNIQUES . . . . . . . . . . . . . . . . . . . . . . . . . . . . . . . . . . . . . . . . . . . . . 21
Données techniques de la machine
Durée d’incubation des différents sujets
6. ENTRETIEN ET MAINTENANCE . . . . . . . . . . . . . . . . . . . . . . . . . . . . . . . . . . . . . . . . . . . . . . . . . 22
Comment nettoyer l’incubateur
7. GARANTIE . . . . . . . . . . . . . . . . . . . . . . . . . . . . . . . . . . . . . . . . . . . . . . . . . . . . . . . . . . . . . . . . . . . 22
Réglementation de référence
Déclaration de Conformité du Fabricant
8. AVANT DE S’ADRESSER AU SERVICE ASSISTANCE . . . . . . . . . . . . . . . . . . . . . . . . . . . . . . . . 24
9. SCHEMA ELECTRIQUE . . . . . . . . . . . . . . . . . . . . . . . . . . . . . . . . . . . . . . . . . . . . . . . . . . . . . . . . 24
1. INTRODUCTION
L’incubateur modèle SMART est spécialement étudié pour obtenir, avec un fonctionnement simple, des perfor-
mances d’incubation optimales tant avec une charge complète qu’avec de petits lots avec un cycle hebdomadai-
re. SMART est donc un produit qui, avec sa simplicité de fonctionnement, répond aux exigences particulières du
client, se présentant comme un appareil faisant appel à des choix technologiques à l’avant-garde et réalisant une
qualité de très haut niveau. La version garantissent une isolation parfaite et assurent robustesse à la machine et les
matériels utilisés sont de haute qualité (abs pour la partie inférieur et pvc transparent pour la partie supérieure). Le
thermorégulateur avec sonde de précision décimale permet une régulation sûre de la température, qui peut être
mesurée avec précision grâce au thermomètre en Fahrenheit (°F). Le chauffage est garanti par un câble de rési-
stance protégé et revêtu de caoutchouc de silicone type “ SILASTIC 5501 ”.
En outre cette machine est entièrement réalisée avec des matériaux traités qui permettent un nettoyage facile et
complet, et garantissent toujours une température constante à l’intérieur de la machine; les solutions adoptées
découlent de l’expérience pluriannuelle de FIEM., qui depuis des années met sur le marché des incubateurs de
haute qualité. Bien que s’agissant d’une machine destinée à un usage non professionnel, au cours de la concep-
tion, les aspects inhérents à la sécurité n’ont pas été négligés, ce qui constitue certainement le point fort de SMART.
2. NOTIONS SUR L’UTILISATION
Avant de se consacrer au véritable fonctionnement, il est conseillé d’examiner les aspects et les caractéristi-
ques techniques et de sécurité garanties par le produit, en évaluant les éléments et en s’aidant du manuel pour
en découvrir graduellement les potentialités.
DEBALLAGE DE LA MACHINE
Extraire l’incubateur de la caisse d’emballage, retirer les éléments de la machine fixés avec du ruban adhésif à
l’intérieur de celle-ci et vérifier la leur intégrité.
Vérifier la présence des éléments énumérés ci-après:
• 1 Manuel d’utilisation;
• 1 thermomètre à mercure (° F);
F
17
• 1 plan pour supporter la grille
• 1 grille tourne œufs
• 1 dispositif mécanique de retournement des œufs (optionnel)
Important: rappeler de vérifier la fonctionnalité du thermomètre qui ne devra pas présenter des cassures sur
la petite soutien a mercure
L’incubateur est en outre équipé d’un câble électrique monophasé (long environ 1 m) avec fiche pour le bran-
chement au courant 230V, 50-60 Hz.
La plaque signalétique, située à l’arrière, informe sur l’absorption et la puissance de l’incubateur.
ATTENTION: L’appareil doit être branché au réseau, conforme aux normes européennes, n’utilisant que des
prises munies de mise à la terre. Avant les opérations de nettoyage, débrancher la fiche de la prise de courant;
Si le câble d’alimentation présente des dommages, le remplacement du même devra être effectué par le fabri-
cant ou par un personnel autorisé par le fabricant afin d’éviter tous risques. Le câble d’alimentation ne doit pas
être accessible aux animaux. Avant de déplacer et emmagasiner la machine il faut vider les cuvettes en dota-
tion. N’utilisez pas l’appareil s’il présente des dommages.
POSITIONNEMENT, RACCORDEMENT ET PREPARATION
Le local, où l’unité sera installée, devra être suffisamment aéré, sec et avec une température constante com-
prise entre 18-25°C.1
Il faudra placer l’incubateur sur un plan stable, non incliné et si possible à proximité d’une prise de courant faci-
lement accessible.
Pour le branchement au réseau n’utiliser que des prises munies de mise à la terre.
NOTE: Le fabricant décline toute responsabilité en cas d’usage impropre, d’emplacement impropre, de rac-
cordement a des appareils non autorisés ou de modification par un personnel non autorisé.
Pour un correct montage de le thermomètre, afin que éviter des faciles ruptures, c’est nécessaire avant tout
insérer le garde dans le spécial place (visser avec soin). Régler le bulbe du thermomètre à demi de l’oeuf.
IMPORTANT: vérifier que le thermomètre n’a pas des fractionnements sur la colonne de mercure, dans le case
contraire contacter le producteur.
Avant de passer à l’utilisation de l’unité, il faut effectuer un nettoyage soigné intérieur et extérieur de celle-ci,
comme indiqué plus précisément ci-après au paragraphe n° 6.
PREPARATION DU KIT RETOURNEMENT AUTOMATIQUE DES ŒUFS
Le kit de retournement des oeufs permet de tourner les oeufs automatiquement par une translation de la gril-
le intérieure que leurs tournes, le mouvement est lent et délicat. Le moteur tourne œufs se trouve dans une
pièce placée à la base de la couveuse insulée et protégée par un couvercle. Brancher la fiche a l’alimentation
(case moteur tourne œufs), et verifer que les œufs seront tournée automatiquement.
Important: est très important de bien considérer que le moteur tourne œufs permet un tour complète de 360°
in un heure qui est transformée en mouvement en 30 minutes avant et, après 30 minutes, a l’ arrière
Si la couveuse est équipée avec tournement semi-automatique il faudra se rappeler une fois dans la matinée
et une fois dans la soirée de déplacer manuelment la grille avec la levier placée dans le fait exprès pièce
annexée a la base de la couveuse.
Attention: a l’intérieur du pièce ou est placée le moteur tourne œufs on a courant électrique 220/230V
et pour cette raison il faudra, avant de l’ouvrir pour chaque manutention, vérifier que la fiche de bran-
chement au courant soit disjoindrait.
UTILISATION ET REGLAGE
Pour mettre en marche la machine, brancher la fiche à l’alimentation, activer la machine en agissant sur l’in-
terrupteur général 0/I et, avant d’introduire les œufs, attendre que l’incubateur atteigne la température de fonc-
tionnement à 100°F (37,7°C).
18
1Il faut rappeler que les conditions du local où vous installerez l’incubateur (température, humidité et aération) n’influencent pas sensible-
ment la température intérieure de service, mais conditionnent considérablement la possibilité de maintenir constamment sous contrôle les
valeurs d’humidité internes.
)

19
Attention: les œufs doivent entre placée a l’intérieur de la couveuse a partir du toisieme jour après
la ponte de œufs et pas après le huitième. En tous les cas les œufs doivent être conserve à la tempé-
rature de 14-16° C.
Sur la couveuse il trouve collocation le thermostat ELTP2 que est réglé par la fabrique, quand le ELTP2 est ali-
mentée, le “led” vert -PWR- résulte allumé, l’allumage continu ou intermittent du “led” rouge -ON- indique la
mise en activité de le chauffage.
Se raccomander de faire toujours attention a le thermomètre à mercure qui devrait indiquer avec précision le
100°F, indiqué avec une affiche rouge sur l’échelle.
Si le thermomètre n’atteigne pas la température du travail, il faut à calibrer le thermostat comme suivant:
• modifier la température (si nécessaire) avec un tournevis, en agissant sur la vis de la régulation, et en por-
tissant la flèche du réfèrement –SET- en correspondance de la valeur demandée.
Quand la couveuse a rejoindrent la température correcte, introduire les tiroirs avec les oeufs déjà positionnée
correctement, pendant l’introduction des tiroirs il fait attention particulaire afin que introduire les petites cla-
vette de le tiroir correctement dans la barre de le retournement a oeufs, le système de retournement des oeufs
se activerait automatiquement avec la mise en marche de la couveuse2.
IMPORTANT:si toutes les tentatives d’étalonnage de l’appareil devaient s’avérer inutiles, ne retirer sous aucun pré-
texte le thermorégulateur de son logement pour effectuer des opérations impropres et non autorisées; contac-
ter le fabricant pour les réparations ou remplacements éventuels.
Il est conseille de changer la position des oeufs a l’intérieur de la couveuse une fois par semaine afin de uni
former bien plus la température. Pendant la phase de éclosion, les dernières deux jours, on devra débran-
cher la fiche de alimentation du système de tournement. Quand l’éclosion est complet on devra laisser les
poussins a l’intérieur de la couveuse une journée pour permettre de s’essuyer et reposer.
Enfin placer les poussins dans les spéciales lampes infrarouges ou dans une éleveuse artificielle pour aux
moins trois semaines. (Pendant la première semaine la température devra être de 35°C)
HUMIDITE’
Il est important de comprendre qu'il ne peut y avoir aucune règle précise pour la quantité d'eau exigée dans
un incubateur parce-que les variables suivantes entrent en jeu:
- Humidité ambiante dans la chambre (affecté par le temps et votre environnement local).
- L'espèce des œufs
- La porosité de la coquille de l'œuf (peut varier selon les différents types d'œufs)
- La saison (Un environnement chaud comporte d'habitude une haute humidité ambiante et les œufs en pon-
daison vers la fin de la saison ont tendance à être plus poreux)
L'exigence d'eau dans l'incubateur peut être contrôlée en pesant les œufs (un œuf devra être libre du 13-15 %
de son poids pendant l'incubation) ou en effectuant le mirage (la descente de la chambre à air devra être
approximativement de 1/3 de l'œuf).
HUMIDITE’
Pour une correcte humidification pendant la phase de incubation il faudra verser 1-2 cm de eau tiède dans la
base de la couveuse et la remplir de nouveau seulement quand la même sera totalement évaporée.
SPECIE fase incubazione fase schiusa
Poule – Pintade - Dinde 2 espaces 4 espaces
Faisan – Pedrix rouge - Pedrix 1 espace 4 espaces
Caille - Colín 2 espaces 4 espaces
Oie – Canard 1 espace 4 espaces
Pendant la phase de éclosion, verser de l’eau tiède dans tous les quatre cuvettes afin de procurer beaucoup
de humidité.
Pour les éclosions subséquentes vous pourrez augmenter ou diminuer la quantité d'eau selon vos découver-
tes avec votre première éclosion. Si vous avez des incertitudes, il est meilleur d'ajouter peu d'eau que trop -
plusieurs œufs ne sont pas pondues par l’excès humidité (l’excès d’humidité est une des causes plus con-
sidérables des mal-réussites des éclosions).
Souvenez-vous, la profondeur d'eau ne fait aucune différence pour les niveaux d'humidité dans l'incubateur;
c'est la superficie qui compte!
2il est précisé que si la descente de la chambre a air est plus grande que les références du dessin, il faudra augmenter le degré d’humi-
dité; au contraire, si elle est inférieure, il sera nécessaire de diminuer l’humidité
20
MIRAGE
Après le huitième dixième jour d’incubation, il est opportun d’effectuer le mirage afin d’identifier et éliminer les
œufs éventuellement non fécondés.
En se mettant dans un local obscur et en observant l’intérieur de l’œuf fécondé, à l’aide d’un mire-œufs, on
entrevoit l’embryon en développement, ayant la forme d’une petite araignée rougeâtre, constitué du cœur et
des petites artères qui se dispersent (b); si l’on secoue légèrement l’œuf, on note clairement des oscillations
rythmiques de l’embryon.
Au contraire, un œuf non fécondé se présente parfaitement transparent, avec un léger assombrissement en
correspondance du jaune (a).
Grâce au mirage, sur certains œufs, pourraient être détectées des taches rougeâtres collées aux parois, ou
bien une tache centrale entourée d’un ou plusieurs cercles concentriques; dans ce cas, s’agissant d’embryons
“ faux ” ou morts, destinés en tout cas à la putréfaction, il faudra absolument les extraire de l’incubateur afin
d’éviter de dangereuses infections à toute la charge d’incubation.
a) œuf non fécondé
b) œuf avec embryon en développement
c) œuf avec embryon mort au 5ème – 6ème jour d’incubation
Un contrôle périodique des œufs en phase de développement embryonnaire est nécessaire pour garantir d’ex-
cellents résultats d’éclosion.
En effet, en utilisant un mire-œufs avec une puissance suffisante, il est possible d’effectuer le contrôle de la
descente de la chambre à air. Les dessins rapportés ci-après illustrent les données relatives aux œufs de poule,
dinde et faisane; si les mesures de mirage correspondent aux lignes du dessin, le développement embryon-
naire est correct, le degré d’humidité fourni à l’incubateur est donc exact.
Si en revanche la descente de la chambre à air diffère des exemples rapportés dans
Le dessin illustratif, il faut modifier les valeurs d’humidité relatives à la machine3.
3 DESCRIPTION
1Thermorégulateur Mod. ELTP 2;
2Vis de régulation;
3Thermomètre avec lecture à mercure (unité de mesure ° F);
4Grille porte œufs;
5Filet d’appui des oeufs;
6Trous d’aération;
7Groupe chauffage;
8Barre pour le retournement des oeufs en manuel.
4. CONSEILS UTILES
• En l’absence de courant électrique pendant quelques heures, au cours de la période d’incubation, introdui-
re dans la machine une ou plusieurs bouillotte hermétiques remplies d’eau chaude et maintenir la porte
fermée.
3La coupure de courant prolongée provoque de sérieux dommages aux œufs en incubation depuis peu de jours, tandis que nous avons
observé que, à des stades de croissance plus avancés de l’embryon, la résistance est plus grande.
1e
r
jour
8ème jour
16ème jour
21ème jour
1e
r
jour
7ème jour
14ème jour
19ème jour
1er jour
10ème jour
15ème jour
20ème jour
24ème jour
œufs de
p
oule 58 œufs de dinde 85
œufs de faisane
n
p
q
s
u
r
1
2
3
4
5
8
6
7
Other manuals for SMART
1
This manual suits for next models
1
Table of contents
Languages:
Other Fiem Accessories manuals


