Fiem COSMO Instruction manual

MANUALE D’USO PER LE INCUBATRICI
MOD. COSMO, COSMO EVO & COSMO ML
MANUAL FOR USE OF INCUBATORS
MOD. COSMO, COSMO EVO & COSMO ML
MANUEL D’UTILISATION DES INCUBATEURS
MOD. COSMO, COSMO EVO & COSMO ML
MANUAL DE USO PARA INCUBADORAS
MOD. COSMO, COSMO EVO & COSMO ML
BETRIEBSHANDBUCH DER BRUTMASCHINEN
MOD. COSMO, COSMO EVO & COSMO ML
I
GB
F
E
DE
IMPORTANTE: questo manuale é parte integrante della macchina e deve essere conservato dal cliente della macchina integro in ogni sua parte
IMPORTANT: this manual is an integral part of the machine and it must be kept complete in each own part by the customer of the machine
IMPORTANT: ce manuel est partie intégrant de la machine et doit etre conservé, par le client de la machine, intègre dans chacune de ses parties
IMPORTANTE: este manual es parte integrante de la máquina y tiene que ser conservado por el cliente de la máquina íntegro en todas sus parte
WICHTIG: Das vorliegende Handbuch ist integraler Bestandteil der Maschine und muss vom Kunden vollständig aufbewahrt werden
22070 Guanzate - (Como) Italy - Via Galileo Galilei, 3
Tel. +39.031.976.672 - Fax +39.031.899.163
Costruita da:
Produced by:
Construit par:
Construida por:
Hergestellt von:

Montaggio incubatrice / Incubator assembling
Assemblage couveuse / Montaje incubadora........... Pagina 3
Italiano
Mod. Cosmo, Cosmo Evo & Cosmo ML
manuale d’uso per le incubatrici ............................ Pagina 5
English
Mod. Cosmo, Cosmo Evo & Cosmo ML
manual for use of incubators................................. Pagina 14
Français
Mod. Cosmo, Cosmo Evo & Cosmo ML
manuel d’utilisation des incubateurs....................... Pagina 23
Español
Mod. Cosmo, Cosmo Evo & Cosmo ML
manual de uso para incubadoras........................... Pagina 32
Deutsch
Mod. Cosmo, Cosmo Evo & Cosmo ML
Betriebshandbuch für die Brutmaschinen................ Seite 41
2
3
2
3
4
1
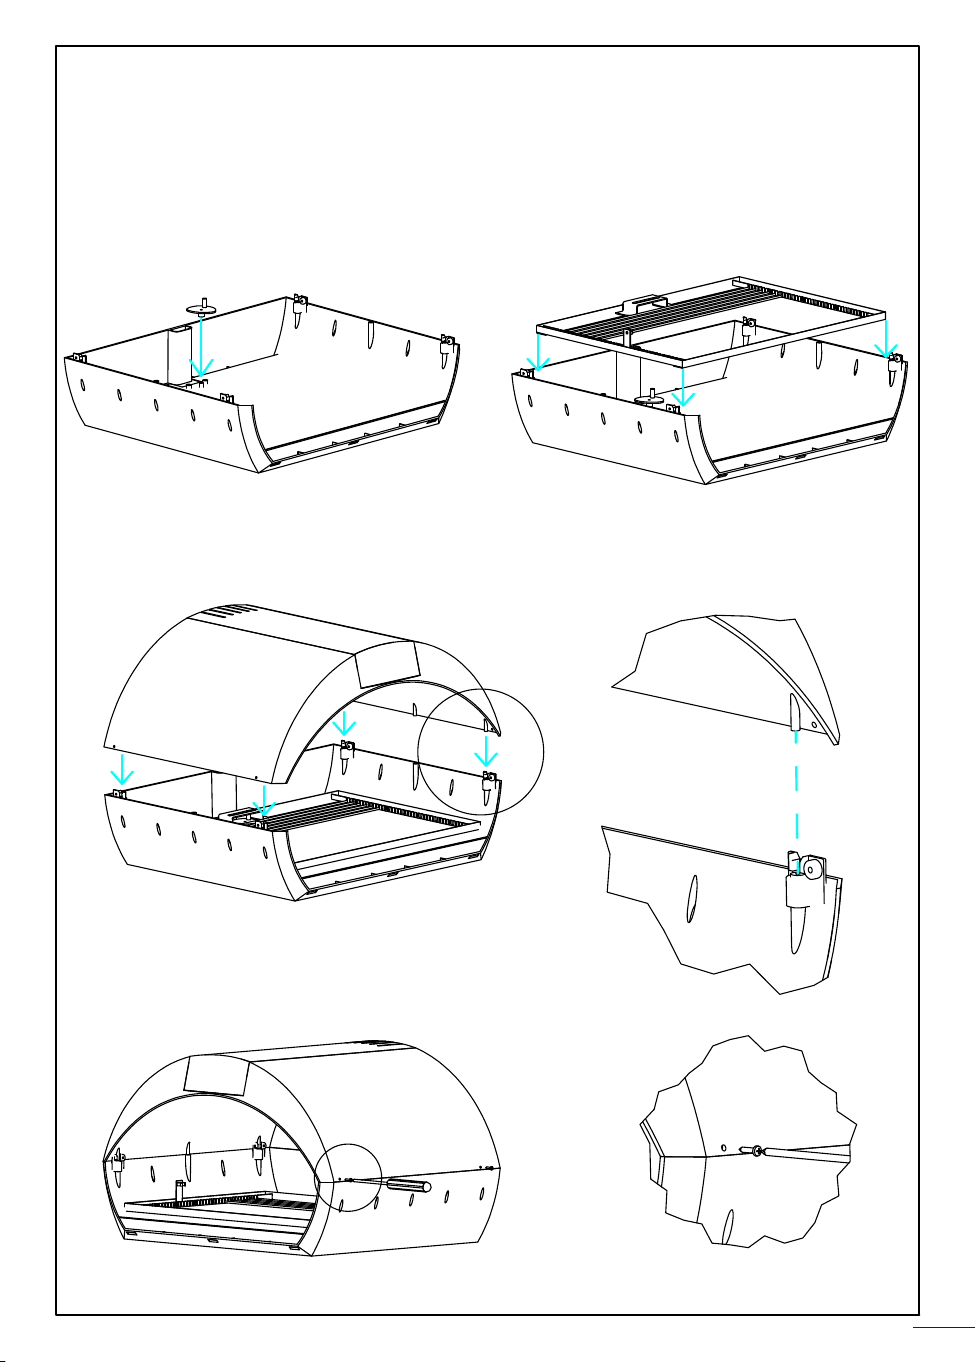
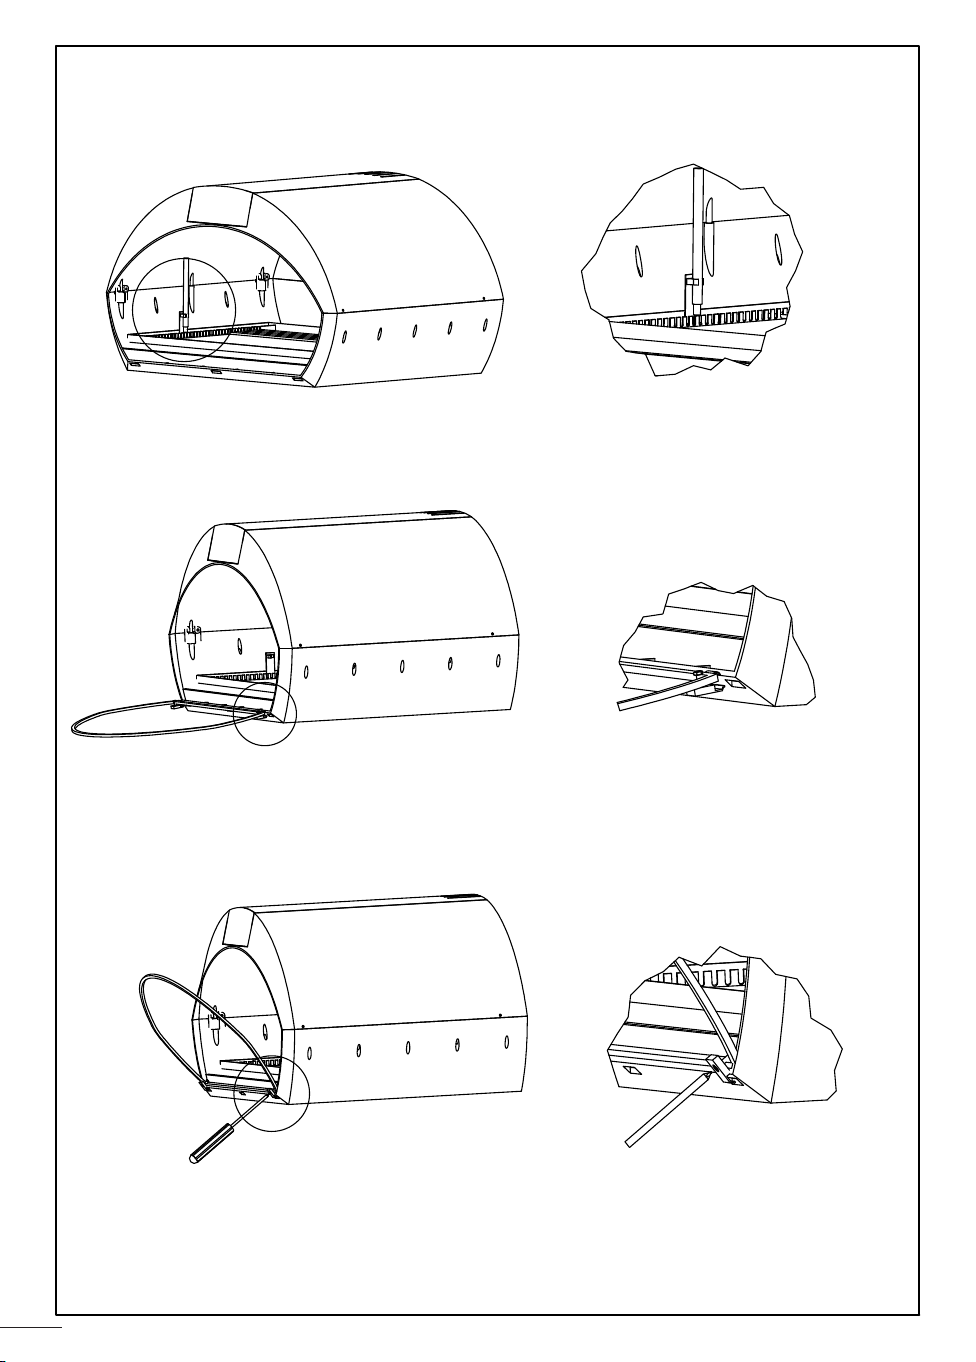
MONTAGGIO INCUBATRICE COSMO
COSMO INCUBATOR ASSEMBLING
ASSEMBLAGE COUVEUSE COSMO
MONTAJE INCUBADORA COSMO
MONTAGGIO INCUBATRICE COSMO
COSMO INCUBATOR ASSEMBLING
ASSEMBLAGE COUVEUSE COSMO
MONTAJE INCUBADORA COSMO
MONTAGE DER BRUTMASCHINE COSMO
4
5
6
7

MANUALE D’USO PER LE INCUBATRICI MOD. COSMO, COSMO EVO & COSMO ML
Cosmo rappresenta, a pieno titolo, la nuova frontiera dell’incubazione presentandosi come un apparecchio studiato in ogni minimo
dettaglio al fine di realizzare l’eccellenza nelle performance associata ad un design unico ed esclusivo. Il frutto dell’esperienza
che F.I.E.M., in anni di devote ricerche e studi approfonditi sulle tecniche di incubazione, ha maturato ed applicato sul campo.
PRIMA DELL’USO: Prima di dedicarsi alla vera e propria operatività è consigliabile considerare gli aspetti e le caratteristi-
che tecniche e di sicurezza garantite dal prodotto, valutandone le componenti e aiutandosi con il manuale per scoprirne
gradualmente le potenzialità.
ATTENZIONE: L’apparecchio può essere utilizzato da bambini di età non inferiore a 8 anni e da persone con ridotte capacità
fisiche, sensoriali o mentali, o prive di esperienza o della necessaria conoscenza, purché sotto sorveglianza oppure dopo che
le stesse abbiano ricevuto istruzioni relative all’uso sicuro dell’apparecchio e alla comprensione dei pericoli ad esso inerenti.
I bambini non devono giocare con l’apparecchio. La pulizia e la manutenzione destinata ad essere effettuata dall’utilizzatore
non deve essere effettuata da bambini senza sorveglianza. Se il cavo di alimentazione è danneggiato, esso deve essere
sostituito dal costruttore o dal suo servizio assistenza tecnica o comunque da una persona con qualifica similare, in modo
da prevenire ogni rischio.
INFORMAZIONI PER L’UTENTE: Corretto smaltimento del prodotto (Applicabile nei paesi dell’Unione Europea e in quelli
con sistema di raccolta differenziata) Il marchio riportato sul prodotto o sulla sua documentazione indica che il prodotto
non deve essere smaltito con altri rifiuti domestici al termine del ciclo di vita. Per evitare eventuali danni all’ambiente o alla
salute causati dall’inopportuno smaltimento dei rifiuti, si invita l’utente a separare questo prodotto da altri tipi di rifiuti e di
riciclarlo in maniera responsabile per favorire il riutilizzo sostenibile delle risorse materiali. Gli utenti domestici sono invitati a
contattare il rivenditore presso il quale è stato acquistato il prodotto o l’ufficio locale preposto per tutte le informazioni relative
alla raccolta differenziata e al riciclaggio per questo tipo di prodotto. Gli utenti aziendali sono invitati a contattare il proprio
fornitore a verificare i termini e le condizioni del contratto di acquisto. Questo prodotto non deve essere smaltito unitamente
ad altri rifiuti commerciali.
AVVERTENZE: Attenzione! L’apparecchio deve essere collegato ad un impianto a norme dotato di terra di protezione.
Staccare l’apparecchio dalla presa prima di effettuare le operazioni di pulizia.
- Non sottoporre il cavo di alimentazione a sollecitazioni meccaniche quando si sposta l’unità.
- Non immagazzinare sostanze esplosive o bombolette spray nella macchina, né generatori aerosol contenenti propellenti
infiammabile.
- Questa macchina è stata progetta per l’uso in stanze non soggette a regolamentazione antiesplosione; il suo uso è
ammesso solo in locali che assentono ad atmosfera normale.
- Il cordone di alimentazione non deve essere accessibile agli animali.
- Svuotare le vaschette d’acqua prima di spostare l’apparecchio.
- Non usare l’apparecchiatura se danneggiata.
- L’apparecchio non è appropriato per un’installazione in un’area dove potrebbe essere usato un getto di acqua.
- È vietato lavare la macchina con getto d’acqua pressurizzata.
AVVERTENZA: TUTTE LE RIPARAZIONI DEVONO ESSERE EFFETTUATE SOLO DA PERSONALE ADEGUATAMENTE QUALIFICATO
SBALLAGGIO DELLA MACCHINA: Estrarre l’incubatrice dalla scatola d’imballaggio e togliere i componenti della macchina
ancorati con del nastro adesivo all’interno della stessa. Verificare che vi siano tutte le dotazioni elencate qui di seguito:
• n. 1 griglia volta uova + n. 12 inserti metallici; • n. 1 piano di appoggio uova in rete stirata;
• n. 1 igrometro a capello (solo per versione Analogica); • n. 1 termometro ad alcol (°F);
• n. 1 manuale d’uso
L’incubatrice è dotata inoltre di un cavo elettrico monofase (lungo circa 2 mt.) con spina per l’allacciamento a corrente
220-240V, 50/60Hz. Affissa posteriormente la targhetta dati, informa circa l’assorbimento, la potenza dell’incubatrice, la data
di produzione ed il numero di matricola.
IMPORTANTE: Si ricorda di verificare la corretta funzionalità del termometro ad alcol controllando che non presenti spez-
zettature sulla colonnina dell’alcol.
ATTENZIONE: A seguito direttiva CE rif. Sostanze ritenute pericolose per la salute con-
tenute in apparecchiature elettrice e non, ci siamo visti costretti ad intercambiare il mer-
curio contenuto nei ns. termometri/igrometri con alcol colorato, essendo fisicamente
l’alcol più leggero è più soggetto a frammentazioni in alcuni casi anche poco visibili per
via della decolorazioni, i termometri ad alcol risultano meno affidabile. Chiediamo dun-
que ai ns. clienti di prestare la massima attenzione prima dell’utilizzo verificando la corretta funzionalità, controllando
dunque che non presentino spezzettature sulla colonnina dell’alcol e durante i periodi di inutilizzo dell’incubatrice,
chiediamo di stoccare gli stessi in posizione verticale con temperatura ambientale tra i 10-30°C.
POSIZIONAMENTO, ALLACCIAMENTO E PREPARAZIONE
Il locale ove verrà posta l’unità, dovrà essere sufficientemente aerato, asciutto e con temperatura costante tra i 17-23 °C.
Collocare l’incubatrice su di un piano stabile non inclinato e possibilmente accanto ad una presa di corrente facilmente
accessibile. Per l’alimentazione a rete utilizzare unicamente prese dotate di collegamento a terra.
AVVISO: Il costruttore declina ogni responsabilità nel caso di uso improprio, di collocazione impropria, di collegamento ad
apparecchiature non autorizzate o di manomissione da parte di personale non autorizzato.
1. Prima di dedicarsi all’utilizzo dell’unità, ricordarsi di effettuare un’accurata pulizia interna ed esterna della stessa, come
meglio indicato avanti nel relativo paragrafo.
2. Per un corretto montaggio del termometro, onde evitare facili rotture dello stesso, occorre prima di tutto inserirlo nell’ap-
posita sede posta sul lato sinistro della griglia volta-uova, regolando il bulbo a metà altezza dell’uovo.
I
5

3. Attivare il dispositivo di voltaggio uova automatico, agganciando la staffa della griglia
volta-uova al perno cilindrico di metallo del motoriduttore collocato sul dischetto di
plastica grigio ed inserire la spina specifica del voltaggio uova.
Se la macchina HA IL VOLTAGGIO MANUALE, sarà necessario girare
le uova una volta al mattino e una volta alla sera agendo manualmente sulla leva
della griglia volta-uova (mattina tutto avanti - sera tutto indietro).
4. L’umidificazione naturale a superficie avviene tramite apposite vaschette modulari incorporate nella valva inferiore della
macchina con pratico sistema di riempimento dall’esterno.
5. I modelli EVO e MINILED con la centralina digitale, in grado di effettuare la lettura dell’umidità espressa in UR% (range
20-99%) e su richiesta opzionale, possono essere equipaggiati di uscita per eventuale collegamento ad un umidificatore
ad ultrasuoni esterno. Quest’ultima soluzione costituisce un modernissimo sistema di umidificazione automatica a rego-
lazione digitale.
6. Per la versione analogica: posizionare l’igrometro a capello in dotazione nell’apposito supporto metallico, nella parte
frontale destra della griglia volta-uova, predisposto per l’alloggiamento dello stesso.
7. Calibrazione dell’igrometro a capello: al fine di permettere una precisa lettura dell’umidità all’interno dell’incubatrice é
molto importante effettuare, all’inizio di ogni incubata, la calibrazione dell’igrometro a capello. Questa semplice opera-
zione si realizza avvolgendo l’igrometro in un panno bagnato con acqua calda e ben strizzato per circa 10 min.,
in questa condizione l’igrometro dovrà indicare un’umidità relativa compresa tra 95-98%; se così non dovesse essere,
le eventuali imprecisioni dovranno essere corrette agendo sulle vite di regolazione con un piccolo cacciavite. La vite di
regolazione è visibile attraverso un piccolo foro posto sul retro dell’igrometro a capello.
Solo quando la macchina avrà raggiunto la temperatura di lavoro potrete posizionare le uova orizzontalmente (sdraiate)
tra gli appositi inserti della griglia volta-uova, facendo attenzione di lasciare il giusto agio così che le uova possano rotolare
appoggiando sul piano in rete. La speciale griglia amovibile ad inserti regolabili permette di ospitare uova dalle dimensioni
più disparate ai fini dell’incubazione simultanea di diverse specie.
ATTENZIONE: la corretta temperatura di lavoro per il modello Cosmo dovrà essere 99,7°F (37,7°C).
UTILIZZO E CALIBRAZIONE
Per l’accensione della macchina collegare la spina all’alimentazione, attivare la macchina agendo sull’interruttore
generale 0/I e prima di inserire le uova attendere che l’incubatrice abbia raggiunto la temperatura di lavoro.
Nello speciale vano conglobato nella valva superiore trova collocazione il termostato elettronico analogico (LCD retroil-
luminato per la versione EVO
e digitale per versione MINILED
– le istruzioni per la calibrazione sono contenute nel para-
grafo seguente) che è impostato dalla fabbrica, quando è alimentato, il led verde -PWR- risulta acceso, l’accensione
continua o intermittente del led rosso -ON-, indica l’attivazione del riscaldamento.
Raccomandiamo di fare sempre attenzione al termometro ad alcol, che dovrà segnare in modo preciso 99,7°F. Se non
si dovesse raggiungere la temperatura di lavoro sopra indicata, si dovrà tarare il termostato come indicato a seguito:
• modificare la temperatura (se necessario) utilizzando un cacciavite, agendo sulla vite di regolazione e portando la
freccia di riferimento -SET- in corrispondenza del valore richiesto;
importante: qualora risultasse impossibile la taratura dell’apparecchio, non rimuovere assolutamente il termostato dal
suo alloggiamento per effettuare operazioni improprie e non autorizzate; contattare il costruttore per le eventuali ripa-
razioni o sostituzioni.
L’illuminazione interna della macchina è garantita da una lampadina ad incandescenza attivabile dall’interruttore posto
sul quadro di comando; ricordarsi però di spegnere sempre la luce durante il funzionamento.
Si rammenta che due giorni prima della schiusa si dovrà disattivare il sistema di voltaggio automatico delle uova
togliendo tutti gli inserti di separazioni all’interno della griglia voltauova.
Nel caso abbiate scelto la macchina CON VOLTAGGIO MANUALE, sarà necessario girare le uova una volta al
mattino e una volta alla sera agendo manualmente sulla leva della griglia volta-uova.
PER MODELLI EQUIPAGGIATI CON CENTRALINA LCD MULTIFUNZIONI
Lo strumento permette di controllare con algoritmo PID o ON/OFF la temperatura e in modalità ON/OFF l’umidità
di incubazione. All’accensione, apparirà per qualche istante sul display la versione del Software. Sulla schermata di
lavoro principale è possibile vedere la temperatura e l’umidità relativa corrente, e quelle impostate come target. E’
possibile inoltre controllare la velocità della ventola impostata.
DESCRIZIONE FUNZIONI: In caso di errore di lettura della sonda o del sensore di
umidità, al posto del valore letto verranno visualizzati degli
asterischi (**). Lo strumento ha due menu di impostazione
parametri, uno per l’utente, dove è possibile programmare
le funzioni basilari, e uno definito “tecnico” che permette la
configurazione dello strumento.
Menu Utente - Premendo il tasto ‘Set’, si accede al menu
“Utente”, dove è possibile impostare la temperatura di
lavoro del PID, la temperatura di allarme, e la percentuale
di umidità da mantenere durante il periodo di incubazione.
E’ possibile scorrere in sequenza tutti i parametri premendo
il tasto ‘Set’, La modifica del parametro visualizzato avviene
attraverso i tasti e. Per confermare la variazione del
parametro, premere il tasto ‘Set’. La scheda uscirà automa-
ticamente dalla menù di programmazione, se non vengono
premuti tasti per un tempo superiore a 25 sec. circa.
Modalità
(calendario)
6
¾0$18$/('¶8623(5/¶,1&8%$75,&(02'&2602&2602(92
&RVPRUDSSUHVHQWD D SLHQR WLWROR OD QXRYD IURQWLHUD GHOO¶LQFXED]LRQH SUHVHQWDQGRVL FRPHXQ
DSSDUHFFKLRVWXGLDWR LQ RJQL PLQLPRGHWWDJOLR DO ILQH GL UHDOL]]DUH O¶HFFHOOHQ]D QHOOH SHUIRUPDQFH
DVVRFLDWDDGXQGHVLJQXQLFRHGHVFOXVLYR
,OIUXWWRGHOO¶HVSHULHQ]DFKH),(0LQDQQLGLGHYRWHULFHUFKHHVWXGLDSSURIRQGLWLVXOOHWHFQLFKH
GLLQFXED]LRQHKDPDWXUDWRHGDSSOLFDWRVXOFDPSR
35,0$'(//¶862
3ULPD GL GHGLFDUVL DOOD YHUDHSURSULD RSHUDWLYLWj q FRQVLJOLDELOH FRQVLGHUDUH JOL DVSHWWLHOH
FDUDWWHULVWLFKH WHFQLFKHHGL VLFXUH]]D JDUDQWLWH GDO SURGRWWRYDOXWDQGRQH OH FRPSRQHQWL H
DLXWDQGRVLFRQLOPDQXDOHSHUVFRSULUQHJUDGXDOPHQWHOHSRWHQ]LDOLWj
6%$//$**,2'(//$0$&&+,1$
(VWUDUUH O¶LQFXEDWULFHGDOOD VFDWROD G¶LPEDOODJJLR H WRJOLHUH LFRPSRQHQWL GHOODPDFFKLQD DQFRUDWL
FRQGHOQDVWURDGHVLYRDOO¶LQWHUQRGHOODVWHVVD
9HULILFDUHFKHYLVLDQRWXWWHOHGRWD]LRQLHOHQFDWHTXLGLVHJXLWR
•QJULJOLDYROWDXRYDDGLQVHUWLUHJRODELOL
•QSLDQRGLDSSRJJLRXRYDLQUHWHVWLUDWD
•QLJURPHWURDFDSHOOR
•QWHUPRPHWURDGDOFRO)
•QPDQXDOHG¶XVR
/¶LQFXEDWULFHqGRWDWD LQROWUH GL XQFDYR HOHWWULFR PRQRIDVH OXQJR FLUFDPWFRQ VSLQD SHU
O¶DOODFFLDPHQWRDFRUUHQWH9+]
$IILVVDSRVWHULRUPHQWHODWDUJKHWWDGDWLLQIRUPDFLUFDO¶DVVRUELPHQWRODSRWHQ]DGHOO¶LQFXEDWULFHOD
GDWDGLSURGX]LRQHHGLOQXPHURGLPDWULFROD
,03257$17(6LULFRUGDGLYHULILFDUHODFRUUHWWDIXQ]LRQDOLWjGHOWHUPRPHWURDGDOFROFRQWUROODQGR
FKHQRQSUHVHQWLVSH]]HWWDWXUHVXOODFRORQQLQDGHO¶DOFRO
326,=,21$0(172$//$&&,$0(172(35(3$5$=,21(
,OORFDOHRYHYHUUjSRVWDO¶XQLWjGRYUjHVVHUHVXIILFLHQWHPHQWHDHUDWRDVFLXWWRHFRQWHPSHUDWXUD
FRVWDQWHWUDL&
&ROORFDUHOLQFXEDWULFHVXGLXQSLDQRVWDELOHQRQLQFOLQDWRHSRVVLELOPHQWHDFFDQWRDGXQDSUHVDGL
FRUUHQWHIDFLOPHQWHDFFHVVLELOH
3HUODOLPHQWD]LRQHDUHWHXWLOL]]DUHXQLFDPHQWHSUHVHGRWDWHGLFROOHJDPHQWRDWHUUD
$99,62 ,OFRVWUXWWRUH GHFOLQD RJQL UHVSRQVDELOLWj QHO FDVRGL XVR LPSURSULR GLFROORFD]LRQH
LPSURSULDGL FROOHJDPHQWR DG DSSDUHFFKLDWXUH QRQ DXWRUL]]DWHRGL PDQRPLVVLRQHGD SDUWHGL
SHUVRQDOHQRQDXWRUL]]DWR
3ULPD GL GHGLFDUVLDOO¶XWLOL]]R GHOO¶XQLWjULFRUGDUVL GL HIIHWWXDUH XQ¶DFFXUDWD SXOL]LD LQWHUQDHG
HVWHUQDGHOODVWHVVDFRPHPHJOLRLQGLFDWRDYDQWLQHOUHODWLYRSDUDJUDIR
3HU XQ FRUUHWWRPRQWDJJLR GHO WHUPRPHWUR RQGH HYLWDUH IDFLOL URWWXUH GHOORVWHVVR RFFRUUH
SULPD GL WXWWR LQVHULUOR QHOO¶DSSRVLWD VHGH SRVWDVXO ODWR VLQLVWURGHOOD JULJOLD YROWDXRYD H
VLQFHUDUVLFKHLOEXOERGHOORVWHVVRVLDSRVL]LRQDWRLQFRUULVSRQGHQ]DGHOODPH]]DULDGHOO¶XRYR
)

LISTA PARAMETRI MENU UTENTE
• Unit Misura temp [°C,°F] (default °C) Impostazione unità di misura gradi Celsius o Fahrenheit.
• T. incubazione (default 37.7) Questo parametro determina la temperatura che lo strumento deve mantenere
durante il periodo di incubazione. Il range di valori impostabili in questo campo è
limitato dai parametri “Temp.inc.min.” e “Temp.inc.max.” riportati nel menu tecnico.
• Temp. allarme (default 38.5) Se la temperatura rilevata dallo strumento raggiunge quella impostata in questo
parametro, verrà eccitato il relè di emergenza per segnalare un’anomalia. L’uscita
resterà attiva fino a quando la temperatura non scenderà sotto il valore imposta-
to - “Ist.temp.allarm.”. Il range di valori impostabili in questo campo è limitato dai
parametri “Temp.alarm.min.” e “Temp.alarm.max.” riportati nel menu tecnico.
• Umidità incubaz. (default 47) Questo parametro permette di impostare l’umidità relativa da mantenere durante il
periodo di incubazione. Il range di valori impostabili in questo campo è limitato dai
parametri “Umidità min.” e “Umidità max.” riportati nel menu tecnico.
Impostazione velocità ventola
Premere pulsante ‘ventola’ per entrare nella schermate di impostazione velocità ventola, cambiare dato attraverso i
tasti e, e quindi confermare premendo nuovamente il tasto ‘ventola’.
V3 Velocità massima (modalità incubazione)
V2 Velocità intermedia (modalità schiusa)
V1 Velocità minima da non utilizzarsi
Menu Tecnico - Premendo contemporaneamente i tasti e, si accederà al menu “Tecnico”.
E’ possibile scorrere in sequenza tutti i parametri premendo il tasto ‘Set’, La modifica del parametro visualizzato
avviene attraverso i tasti e. Per confermare la variazione del parametro, premere il tasto ‘Set’.
La scheda uscirà automaticamente dalla menù di programmazione, se non vengono premuti tasti per un tempo
superiore a 25 sec. circa.
Lista Parametri menu Tecnico
• Unit Misura temp [°C,°F] (default °C) Impostazione unità di misura gradi Celsius o Fahrenheit.
• Temp. inc. min. [5,0 .. 75,0] (default 25.0) Permette di limitare il valore minimo impostabile nel parametro
Temperatura di incubazione del Menu utente.
• Ist. temp. inc. / Inc. temp. hyst. [0,1 .. 5,0] (default 0.1)
Permette di impostare il valore di isteresi del controllo temperatura ON/OFF.
Esempio: Set=37.7 Val= 35.0 Hist=0.2 - L’uscita che comanda la resi-
stenza è ON e commuta in OFF al raggiungimento della temperatura
di incubazione impostata (Set=37.7). Quando la temperatura scende al
valore di Set-Hist - 37.5, l’uscita commuterà nuovamente in ON.
• Temp. inc. max. [5,0 .. 75,0] (default 40.0) Permette di limitare il valore massimo impostabile nel parametro
Temperatura di incubazione del Menu utente.
• Temp. allarm. min. [5,0 .. 75,0] (default 30.0) Permette di limitare il valore minimo impostabile nel parametro
Temperatura di allarme del Menu utente.
• Temp. allarm. max. [5,0 .. 75,0] (default 40.0) Permette di limitare il valore massimo impostabile nel parametro
Temperatura di allarme del Menu utente.
• Ist. temp. allarm. [0,1 .. 5,0] (default 0.1) Permette di impostare l’isteresi della temperatura di allarme.
• Calib sonda temp [-5,0 .. +5,0] (default 0.0) Permette di calibrare il valore di temperatura letto dalla sonda.
• Umidita’ min. [10 .. 90] (default 40) Permette di limitare il valore minimo impostabile nel parametro Umidità di
incubazione del Menu utente.
• Umidità max/Humidity maxnimum [10 .. 99] (default 65) Permette di limitare il valore massimo impostabile nel parametro Umidità
di incubazione del Menu utente.
• Ist. Umidità / Humidity hyst. [1 .. 20] (default 1) Permette di impostare l’isteresi della regolazione di umidità.
•
Calib sonda umid / Cal.humid. probe
[-30 .. +30] (default 0) Permette di calibrare il valore di umidità letto dal sensore
• Lingua / Language [0 .. 1] (default 0)
Permette impostare la lingua dei messaggi che appaiono sul display (Ita/ Ing)
• Tipo di ventola / Type of fan [1 .. 4] (default 1) Permette di impostare il tipo di ventola comandata dallo strumento:
Codice motoventilatore Modello incubatrice
1 MG50-MG70-MG100-MG140
2 MG244
3 MG500-432-576-720-MG400H
• Param. di default VENT.per reset /
Default param. VENT.to reset Impostazione parametri di default
Premere il tasto VENTOLA vengono impostati tutti i parametri di default
• Modalita’ buzzer / Buzzer Mode [0 .. 2] (default 2)
Permette di impostare la modalità di funzionamento del buzzer.
0 = Buzzer disattivato
1 = Buzzer attivo alla pressione dei tasti
2 = Buzzer attivo alla pressione dei tasti e in caso di allarme per alta temperatura
Termostato FIEM-LCD - FUNZIONE CALENDARIO
Se uno o più cicli di incubazione sono attivo, sul display comparirà, oltre ai dati di temperatura e umidità, lo stato del
ciclo che è iniziato da un periodo di giorni maggiore.
7
Val xx.x°C yy% V CyZ XXXd YYh z
Z = Numero ciclo visualizzato
XXX = Numero di giorni interi trascorsi da inizio ciclo
YY = Numero di ore dell’ultimo giorno non completo
Premendo il tasto ‘P’, si accede al menu di gestione cicli. Su display compariranno indicazioni diverse in funzione
dello stato del ciclo. Se il ciclo non è attivo.
Ciclo: Z ---d --h
SET=Inizio Ciclo (Z = Numero ciclo visualizzato)
Se il ciclo è attivo Ciclo:Z XXXd YYh
SET= Fine Ciclo_
Premendo più volte il tasto ‘P’ è possibile scorrere i 4 cicli di incubazione. Premendo il tasto ‘SET’ è possibile avvia-
re o fermare il ciclo di incubazione visualizzato. E’ possibile “forzare” la visualizzazione di uno specifico ciclo, sulla
schermata di lavoro (quindi non il ciclo iniziato da più tempo) premendo il tasto ‘P’ fino a raggiungere il ciclo da
visualizzare, e lasciando che lo strumento vada in Timeout (circa 30 Sec).
Per modelli equipaggiati di TERMOSTATO MINILED FIEM
1. Panoramica prodotto
2. Funzione tasti Cambio modalità visualizzazione e variazione dei parametri TEMPERATURA/UMIDITA’
Impostazione valori di riferimento temperatura e umidità di esercizio
Cambio modalità visualizzazione e variazione dei parametri TEMPERATURA/UMIDITA’
+ Menù tecnico per i parametri di calibrazione, unità di misura
+ In fase di accensione, Menù test per l’impostazione del tipo di controllo di temperatura
3. Descrizione del funzionamento
Il MINILED è in grado di controllare con algoritmo ON-OFF o PID la temperatura e in modalità ON-OFF l’umidità di
incubazione. All’accensione, apparirà per qualche istante sul display un messaggio di benvenuto seguito dalla ver-
sione firmware della scheda. MINILED proporrà quindi la visualizzazione della temperatura e premendo un tasto SU
o GIU’ l’umidità relativa corrente.
Premendo il tasto SET si accede ai valori di riferimento di temperatura e umidità impostati.
In caso di guasto ai sensori di umidità o di temperatura, o nel caso uno di essi non sia collegato, nella relativa modalità
di visualizzazione verrà visualizzato il messaggio ERR e il relativo pilotaggio viene inibito.
MINILED ha inoltre due menù di configurazione, uno per l’utente dove è possibile personalizzare le funzioni basilari,
e uno tecnico che permette la configurazione e la taratura della lettura delle sonde.
4. Impostazioni utente
Dopo aver acceso MINILED premendo il tasto comincia a lampeggiare il LED ROSSO vicino all’icona della tem-
peratura ed il display mostra la temperatura di riferimento. A questo punto premendo i tasti o è possibile
modificare la temperatura di lavoro.
• T. incubazione [5 .. 75] (default 30.0) - Questo parametro determina la temperatura che lo strumento deve mantenere
durante il periodo di incubazione. Il range di valori impostabili è compreso tra 5 e 75 °C o equivalenti.
Per salvare il valore di temperatura impostata e passare quindi alla visualizzazione dell’umidità premere nuovamente
il tasto . A questo punto comincia a lampeggiare il LED VERDE vicino all’icona dell’umidità e viene visualizzata
la percentuale di umidità da mantenere durante il periodo di incubazione. Per modificare il parametro dell’umidità
procedere tramite i tasti o .
• Umidità incubazione [10 .. 99] (default 40) - Questo parametro permette di impostare l’umidità relativa da mante-
nere durante il periodo di incubazione. Il range di valori impostabili in questo campo è compreso tra 10% e 99%. Al
termine della modifica dei valori MINILED uscirà automaticamente dal menù dimodifica se non si premono tasti per
15 secondi salvando il valore mostrato sul display.
5. Impostazioni menù tecnico
Premendo contemporaneamente i tasti + si accede al menù tecnico. E’ possibile scorrere in sequenza tutti i
parametri premendo il tasto , la modifica del parametro visualizzato avviene attraverso i tasti e .
Per confermare la variazione del parametro, premere il tasto . MINILED uscirà automaticamente dal menù di pro-
grammazione,se non vengono premuti tasti per un tempo superiore a 15 secondi.
Elenco dei parametri che è possibile visualizzare premendo il tasto .
• Unit [C,F] (default °C) Impostazione unità di misura gradi Celsius o Fahrenheit
• t.CAL [-3,0 .. +3,0 °C] (default 0,0 – step di 0,1 °C)
t.CAL [-5,4 .. +5,4 F] (default 0,0 – step di 0,1 F)
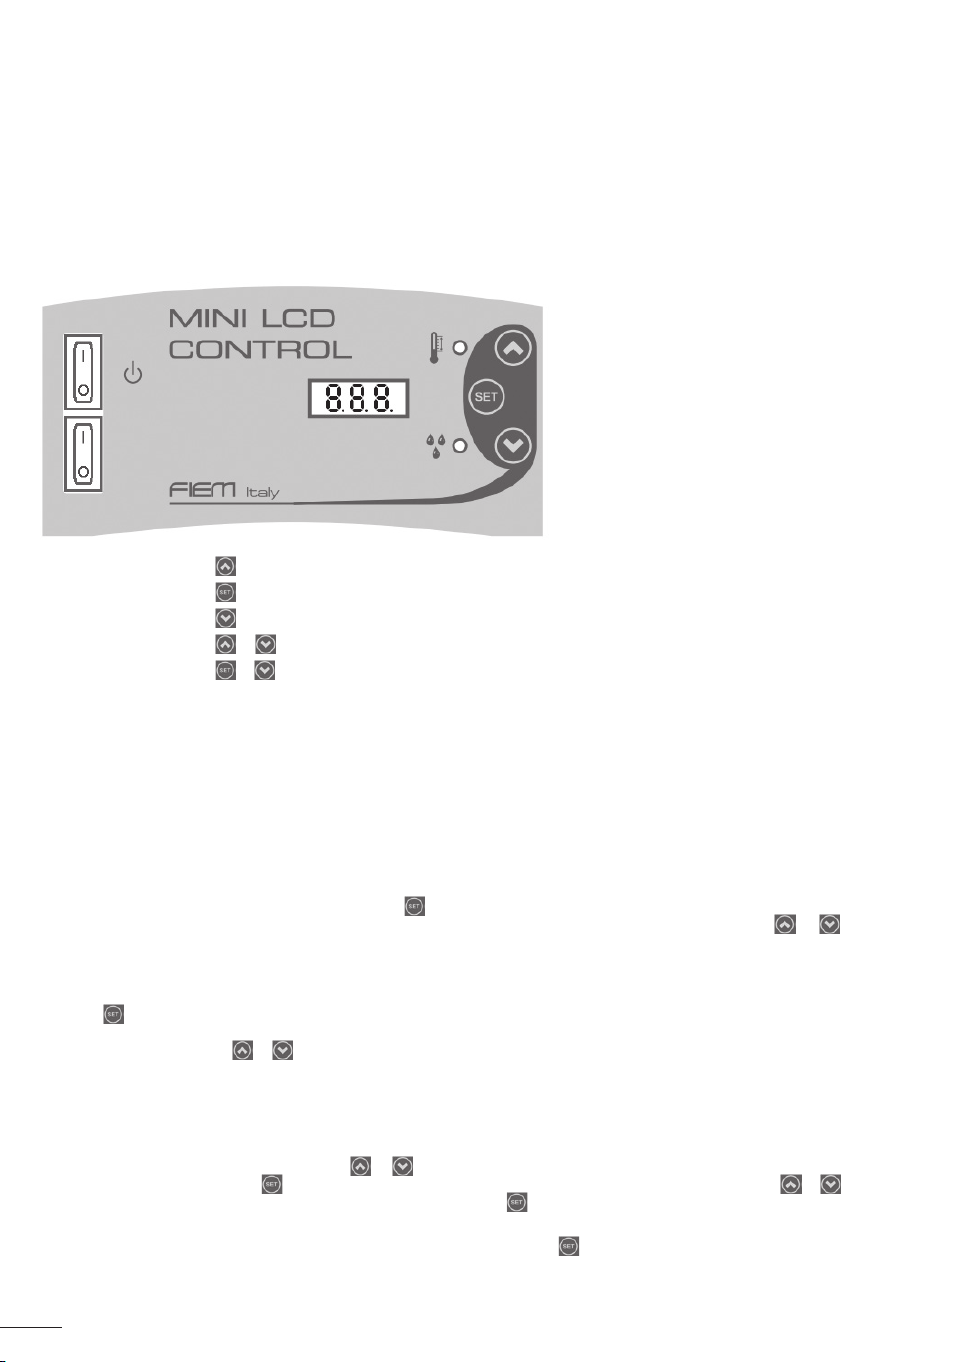
A. Interruttore di accensione
B. Interruttore della luce
C. Display 3 cifre con punti di separazione decimali
D. Indicatore visualizzazione temperatura
E. Indicatore visualizzazione umidità
F. Tasto di selezione <freccia su>
visualizzazione temperatura con accensione spia punto D
G. Tasto di impostazione
H. Tasto di selezione <freccia giù>
visualizzazione umidità con accensione spia punto E
A
B
G
E
F
D
C
H
8

Permette di calibrare il valore di temperatura letto dalla sonda, in gradi Celsius o Fahrenheit in base all’impostazione
dell’unità di misura assegnata al punto precedente.
• H.Cal [-5 .. +5] (default 0 – step di 1%) Permette di calibrare il valore di umidità letto dal sensore
6. Selezione modalità di controllo temperatura
Premendo all’accensione contemporaneamente i tasti e è possibile accedere al menù di modifica dei parametri
di selezione della modalità di controllo della temperatura.
• Controllo [PID,v ON-OFF] (default PID) permette di selezionare il tipo di controllo della temperatura.
• PID = Controllo PID
• ON-OFF= Controllo ON-OFF
7. Schema di connessione
Descrizione dei collegamenti:
A =Morsetto di alimentazione (_ ATTENZIONE _)
B = Morsetto di pilotaggio umidificatore
(_ ATTENZIONE _)
C = Morsetto di pilotaggio resistenza
di riscaldamento (_ ATTENZIONE _)
D =Sonda dell’igrometro
E = Sonda del termometro
Avvertenza: assicurarsi di aver tolto l’alimentazione prima
di effettuare qualsiasi operazione di collegamento.
TABELLA PRATICA DI CONVERSIONE DALLA TEMPERATURA DAI GRADI FAHRENHEIT (°F) AI GRADI CELSIUS (°C).
°F °C °F °C °F °C °F °C °F °C
80 26,7 86 30,0 92 33,3 97 36,1 101 38,3
81 27,2 87 30,6 93 33,9 98 36,7 102 38,9
82 27,8 88 31,1 94 34,4 98,6 37,0 102,2 39,0
83 28,3 89 31,7 95 35,0 99 37,2 103 39,4
84 28,9 90 32,2 96 35,6 100 37,8 104 40,0
85 29,4 91 32,8 96,8 36,0 100,4 38,0 105 40,6
Facciamo osservare che 1°F è uguale a 0,56 °C, mentre 1°C è uguale a 1,8 °F
UMIDITA’
L’umidificazione manuale naturale a superficie avviene tramite apposite vaschette modulari incorporate nella valva inferiore
della macchina con pratico sistema di riempimento dall’esterno. Il mod. COSMO EVO/MINILED con umidificazione automatica
(opzione su richiesta in fase di acquisto), è equipaggiato di uscita per eventuale collegamento ad un umidificatore ad ultrasuoni
esterno che permette di regolare l’umidificazione in automatico tramite la centralina lcd.
E’ molto importante comprendere che non ci può essere alcuna regola precisa e tassativa riguardo alla quantità d’acqua da
immettere all’interno dell’incubatrice in quanto le variabili a seguito illustrate possono influenzare il livello di umidità:
• Umidità ambientale all’interno della camera d’incubazione (condizionata dalle condizioni climatiche e dall’ambiente locale);
• La specie incubata;
• La porosità del guscio dell’uovo (può variare a seconda dei diversi tipi di uova);
• La stagione (un clima caldo comporta abitualmente un’alta umidità ambientale e le uova deposte alla fine della stagione
hanno la tendenza ad essere più porose).
La necessità d’acqua all’interno dell’incubatrice può essere controllata pesando le uova (un uovo dovrà perdere il 13-15%
del suo peso durante l’incubazione) od effettuando la speratura (il calo della camera d’aria dovrà corrispondere a circa 1/3
dell’uovo). Per le schiuse susseguenti potrete altresì gestire l’umidificazione e quindi aumentare o diminuire la quantità d’ac-
qua a seconda dei risultati ottenuti per la vostra prima schiusa. Se avete delle incertezze, la scelta migliore è senza dubbio
l’aggiunta di poca acqua piuttosto che di troppa – la maggior parte delle schiuse mal riuscite é dovuta all’eccesso di umidità
(l’eccesso di umidità è una tra le cause più rilevanti che determinano degli esiti negativi o comunque non soddisfacenti nelle
schiuse). Bisogna ricordare che la profondità dell’acqua all’interno della vaschetta non fa alcuna differenza ai fini dell’umidi-
ficazione all’interno dell’incubatrice; é la superficie che conta!
TABELLA INDICATIVA DEI VALORI MEDI DI UMIDITÀ
SPECIE INCUBAZIONE SCHIUSA
GALLINA RAZZA LEGGERA 82°F = 47% 88°F = 62%
GALLINA RAZZA PESANTE (BROILER) 84°F = 52% 88°F = 62%
FAGIANA - STARNA - QUAGLIA PERNICE ROSSA 78-80°F = 38-43% 86-88°F = 56-62%
TACCHINA - FARAONA 82-84°F = 47-52% 88°F = 62%
OCA - ANATRA (MUTA/SELVATICA PEKINO KAKI KAMPBELL) 78-80°F = 38-43% 88°F = 62%
STRUZZO (CAMELUS) 70-74°F = 25-30% 78-80°F = 38-43%
Per regolare il tasso di umidità all’interno dell’incubatrice occorre considerare che aumentando lo specchio d’acqua si incre-
menta l’umidificazione e viceversa, diminuendo la superficie dell’acqua si avrà un abbassamento dell’umidità.
MONTAGGIO UMIDIFICATORE E CONNESSIONE UMIDITA’ AUTOMATICA PER MODELLI FORNITI DI
UMIDIFICAZIONE AUTOMATICA (opzione)
L’umidificazione dell’aria all’interno dell’incubatrice viene effettuata da uno strumento (umidificatore/nebulizzatore ad
ultrasuoni) che, per mezzo di vibrazioni ad alta frequenza scompone le molecole d’acqua, producendo vapore freddo.
9

MONTAGGIO E PREPARAZIONE DEL NEBULIZZATORE AD ULTRASUONI: Togliere il nebulizzatore dalla scatola,
posizionarlo su di una superficie piana a fianco dell’incubatrice. Rimuovere il serbatoio, riempirlo con acqua e ripo-
sizionarlo sopra la relativa base dell’umidificatore. Montare il tubo immissione vapore sull’umidificatore inserendo la
parte con il supporto plastico sulla colonna di uscita del vapore dell’umidificatore e introducendo, per almeno 2-3
cm, la parte opposta del tubo nella rispettiva serranda dedicata sull’incubatrice.
MESSA IN FUNZIONE: Innestare la spina di alimentazione dell’umidificatore alla relativa presa che esce posterior-
mente dal quadro comando e accendere l’umidificatore dall’apposito interruttore ON/OFF posto sul retro dello stes-
so. Regolare l’intensità del flusso immissione vapore tramite la relativa manopola posta sul frontale comando dell’u-
midificatore; generalmente è sufficiente mantenere regolata la manopola al 60/70% dell’escursione totale, qualora
non si dovesse raggiungere la percentuale di umidità desiderata, portare la manopola al massimo. Il nebulizzatore è
pilotato dalla centralina LCD di comando dell’incubatrice, quindi dopo aver eseguito tutte le operazioni sopraindicate
di connessione, impostare sul display il valore di umidità desiderato così che alla richiesta di umidificazione dell’aria,
il nebulizzatore si attiverà automaticamente.
IMPORTANTE:
• L’umidificatore deve essere scollegato da qualunque presa di corrente in fase di riempimento del serbatoio, in fase
di spostamento e in fase di pulizia
• L’umidificatore non va utilizzato senza acqua, se sprovvisto di acqua spegnetelo
• Non immettere nel serbatoio nessun altro liquido al di fuori dell’acqua, non aggiungete medicinali e non coprire
nessuna apertura
• Non utilizzare all’esterno.
SPERATURA
Dopo l’ottavo-decimo giorno di incubazione, è opportuno effettuare la speratura al fine di individuare ed eliminare le even-
tuali uova non fecondate. Posizionandosi in un locale oscuro ed osservando l’interno dell’uovo fecondato mediante uno
sperauova, si intravede l’embrione in sviluppo avente la forma di piccolo ragno rossiccio, costituito dal cuore e dalle piccole
arterie che vi si dipartono (b); se si imprimesse all’uovo un leggero scuotimento si noterebbero chiaramente delle oscillazioni
ritmiche dell’embrione. Al contrario un uovo non fecondato si presenta perfettamente trasparente, con un lieve oscuramento
in corrispondenza del tuorlo (a). Potrebbero rivelarsi dalla speratura di alcune uova macchie rossicce incollate alle pareti,
oppure una macchia centrale circondata da un o più cerchi concentrici; in tal caso trattandosi di embrioni “falsi” o morti,
destinati comunque alla putrefazione, si dovranno rigorosamente estrarre tali uova dall’incubatrice onde evitare pericolose
infezioni a tutto il carico di incubazione.
a) Uovo non fecondato
b) Uovo con embrione in sviluppo
c) Uovo con embrione morto al 5°- 6° giorno di incubazione
Un controllo periodico delle uova in fase di sviluppo embrionale risulta neces-
sario per garantire ottimali risultati di schiusa.
Infatti usando uno spera-uova con sufficiente potenza, è possibile effettuare il controllo del calo della camera d’aria. I disegni
di seguito riportati illustrano i dati relativi alle uova di gallina, tacchina e di fagiana; se le misurazioni di speratura corrispon-
dono alle linee di disegno, lo sviluppo embrionale è corretto, quindi il grado di umidità fornito all’incubatrice risulta esatto.
Qualora il calo della camera d’aria risultasse invece diffe-
rente dagli esempi riportati nel disegno illustrativo, occorre
variare i valori di umidità relativi alla macchina.
1
DESCRIZIONE
63(5$785$
'RSR O¶RWWDYRGHFLPR JLRUQR GL LQFXED]LRQHqRSSRUWXQR HIIHWWXDUH OD VSHUDWXUD DO ILQH GL
LQGLYLGXDUHHGHOLPLQDUHOHHYHQWXDOLXRYDQRQIHFRQGDWH
3RVL]LRQDQGRVL LQ XQ ORFDOH RVFXUR HG RVVHUYDQGR O¶LQWHUQR GHOO¶XRYR IHFRQGDWR PHGLDQWH XQR
VSHUDXRYDVLLQWUDYHGHO¶HPEULRQHLQVYLOXSSRDYHQWHODIRUPDGLSLFFRORUDJQRURVVLFFLRFRVWLWXLWR
GDO FXRUH H GDOOH SLFFROHDUWHULHFKH YLVL GLSDUWRQR EVH VL LPSULPHVVH DOO¶XRYR XQ OHJJHUR
VFXRWLPHQWRVLQRWHUHEEHURFKLDUDPHQWHGHOOHRVFLOOD]LRQLULWPLFKHGHOO¶HPEULRQH
$OFRQWUDULR XQ XRYR QRQ IHFRQGDWR VLSUHVHQWD SHUIHWWDPHQWH WUDVSDUHQWHFRQ XQ OLHYH
RVFXUDPHQWRLQFRUULVSRQGHQ]DGHOWXRUORD
3RWUHEEHURULYHODUVL GDOODVSHUDWXUD GLDOFXQH XRYDPDFFKLHURVVLFFHLQFROODWH DOOH SDUHWLRSSXUH
XQDPDFFKLDFHQWUDOHFLUFRQGDWDGDXQRSLFHUFKLFRQFHQWULFLLQWDOFDVRWUDWWDQGRVLGLHPEULRQL
³IDOVL´RPRUWLGHVWLQDWLFRPXQTXHDOOD SXWUHID]LRQHVLGRYUDQQRULJRURVDPHQWHHVWUDUUHWDOLXRYD
GDOO¶LQFXEDWULFHRQGHHYLWDUHSHULFRORVHLQIH]LRQLDWXWWRLOFDULFRGLLQFXED]LRQH
D 8RYRQRQIHFRQGDWR
E8RYRFRQHPEULRQHLQVYLOXSSR
F 8RYRFRQHPEULRQHPRUWRDOJLRUQRGLLQFXED]LRQH
8Q FRQWUROOR SHULRGLFR GHOOH XRYD LQ IDVHGL VYLOXSSR HPEULRQDOH ULVXOWD QHFHVVDULR SHUJDUDQWLUH
RWWLPDOLULVXOWDWLGLVFKLXVD
,QIDWWLXVDQGR XQR VSHUDXRYDFRQ VXIILFLHQWHSRWHQ]DqSRVVLELOH HIIHWWXDUH LO FRQWUROOR GHO FDOR
GHOODFDPHUDG¶DULD,GLVHJQLGLVHJXLWRULSRUWDWLLOOXVWUDQRLGDWLUHODWLYLDOOHXRYDGLJDOOLQDWDFFKLQD
H GL IDJLDQDVH OH PLVXUD]LRQL GLVSHUDWXUD FRUULVSRQGRQR DOOHOLQHH GL GLVHJQROR VYLOXSSR
HPEULRQDOHqFRUUHWWRTXLQGLLOJUDGRGLXPLGLWjIRUQLWRDOO¶LQFXEDWULFHULVXOWDHVDWWR
4XDORUD LO FDOR GHOODFDPHUD G¶DULD ULVXOWDVVHLQYHFH GLIIHUHQWH GDJOL HVHPSL ULSRUWDWL QHO GLVHJQR
LOOXVWUDWLYRRFFRUUHYDULDUHLYDORULGLXPLGLWjUHODWLYLDOODPDFFKLQD
6LSUHFLVDFKHVH LO FDORGHOOD FDPHUDG¶DULD ULVXOWDVVHPDJJLRUHGHLULIHULPHQWL GHO GLVHJQR RFFRUUHUj DXPHQWDUHLO
JUDGRGLXPLGLWjDOFRQWUDULRVHULVXOWDVVHPLQRUHVDUjQHFHVVDULRGLPLQXLUHO¶XPLGLWj
63(5$785$
'RSR O¶RWWDYRGHFLPR JLRUQR GL LQFXED]LRQHqRSSRUWXQR HIIHWWXDUH OD VSHUDWXUD DO ILQH GL
LQGLYLGXDUHHGHOLPLQDUHOHHYHQWXDOLXRYDQRQIHFRQGDWH
3RVL]LRQDQGRVL LQ XQ ORFDOH RVFXUR HG RVVHUYDQGR O¶LQWHUQR GHOO¶XRYR IHFRQGDWR PHGLDQWH XQR
VSHUDXRYDVLLQWUDYHGHO¶HPEULRQHLQVYLOXSSRDYHQWHODIRUPDGLSLFFRORUDJQRURVVLFFLRFRVWLWXLWR
GDO FXRUH H GDOOH SLFFROHDUWHULHFKH YLVL GLSDUWRQR EVH VL LPSULPHVVH DOO¶XRYR XQ OHJJHUR
VFXRWLPHQWRVLQRWHUHEEHURFKLDUDPHQWHGHOOHRVFLOOD]LRQLULWPLFKHGHOO¶HPEULRQH
$OFRQWUDULR XQ XRYR QRQ IHFRQGDWR VLSUHVHQWD SHUIHWWDPHQWH WUDVSDUHQWHFRQ XQ OLHYH
RVFXUDPHQWRLQFRUULVSRQGHQ]DGHOWXRUORD
3RWUHEEHURULYHODUVLGDOODVSHUDWXUDGL DOFXQH XRYDPDFFKLH URVVLFFH LQFROODWH DOOH SDUHWLRSSXUH
XQDPDFFKLDFHQWUDOHFLUFRQGDWDGDXQRSLFHUFKLFRQFHQWULFLLQWDOFDVRWUDWWDQGRVLGLHPEULRQL
³IDOVL´RPRUWLGHVWLQDWLFRPXQTXHDOODSXWUHID]LRQHVLGRYUDQQRULJRURVDPHQWHHVWUDUUHWDOLXRYD
GDOO¶LQFXEDWULFHRQGHHYLWDUHSHULFRORVHLQIH]LRQLDWXWWRLOFDULFRGLLQFXED]LRQH
D 8RYRQRQIHFRQGDWR
E8RYRFRQHPEULRQHLQVYLOXSSR
F 8RYRFRQHPEULRQHPRUWRDOJLRUQRGLLQFXED]LRQH
8Q FRQWUROOR SHULRGLFR GHOOH XRYD LQ IDVHGL VYLOXSSR HPEULRQDOH ULVXOWD QHFHVVDULR SHUJDUDQWLUH
RWWLPDOLULVXOWDWLGLVFKLXVD
,QIDWWLXVDQGR XQR VSHUDXRYDFRQ VXIILFLHQWHSRWHQ]DqSRVVLELOH HIIHWWXDUH LO FRQWUROOR GHO FDOR
GHOODFDPHUDG¶DULD,GLVHJQLGLVHJXLWRULSRUWDWLLOOXVWUDQRLGDWLUHODWLYLDOOHXRYDGLJDOOLQDWDFFKLQD
H GL IDJLDQDVH OH PLVXUD]LRQL GLVSHUDWXUD FRUULVSRQGRQR DOOHOLQHH GL GLVHJQROR VYLOXSSR
HPEULRQDOHqFRUUHWWRTXLQGLLOJUDGRGLXPLGLWjIRUQLWRDOO¶LQFXEDWULFHULVXOWDHVDWWR
4XDORUD LO FDOR GHOODFDPHUD G¶DULD ULVXOWDVVHLQYHFH GLIIHUHQWH GDJOL HVHPSL ULSRUWDWL QHO GLVHJQR
LOOXVWUDWLYRRFFRUUHYDULDUHLYDORULGLXPLGLWjUHODWLYLDOODPDFFKLQD
6LSUHFLVDFKHVH LO FDORGHOOD FDPHUDG¶DULD ULVXOWDVVHPDJJLRUHGHLULIHULPHQWL GHO GLVHJQR RFFRUUHUj DXPHQWDUHLO
JUDGRGLXPLGLWjDOFRQWUDULRVHULVXOWDVVHPLQRUHVDUjQHFHVVDULRGLPLQXLUHO¶XPLGLWj
'(6&5,=,21(
TXDGURFRPDQGR&RVPR(YR
WHUPRPHWURDGDOFRRO)
TXDGURFRPDQGR&RVPR
DQDORJLFD
VRQGDWHUPRUHJRODWRUH
IRURGLDHUD]LRQH VRQGDLJURPHWURVRORSHU&RVPR(YR
UHWHSURWH]LRQHYHQWROD
PRWRUHYHQWROD
LJURPHWURDFDSHOOR FDYRUHVLVWHQ]DLQVLOLFRQH
PRWRULGXWWRUHYROWDXRYD
SXOVDQWLDFFHQVLRQHPDFFKLQDHLOOXPLQD]LRQH
LQWHUQD
JULJOLDYROWDXRYDDGLQVHUWL
UHJRODELOL
SRUWDWUDVSDUHQWH
UHWHGLIRQGR ODPSDGLQD
1 quadro comando Cosmo Evo
2 quadro comando Cosmo analogica
3 foro di aerazione
4 rete protezione ventola
5 igrometro a capello (solo nella versione analogica)
6 motoriduttore volta-uova
7 griglia volta-uova ad inserti regolabili
8 rete di fondo
9 vasche umidità modulari
10 termometro ad alcol (°F)
11 sensore termoregolatore
12 Sensore umidità (versione ML ed EVO)
13 motoventilatore
14 cavo riscaldante in silicone
15 pulsanti accensione macchina e illuminazione interna
16 porta trasparente
17 lampadina
1 Si precisa che se il calo della camera d’aria risultasse maggiore dei riferimenti del disegno occorrerà aumentare il grado di umidità, al contrario se
risultasse minore sarà necessario diminuire l’umidità.
10

CONSIGLI UTILI
• In mancanza di corrente elettrica per alcune ore durante il periodo di incubazione, inserire nella macchina una o più borse
ermetiche di acqua calda e mantenere lo sportello chiuso.
2
• Per le uova di palmipede, dopo 15 giorni di incubazione, si consiglia di bagnare le uova con acqua tiepida nebulizzata
(utilizzare appositi spruzzini igienizzati) e lasciarle raffreddare fuori dall’incubatrice per circa 15 minuti.
Questa operazione dovrà essere ripetuta ogni due giorni, fino al penultimo giorno di incubazione.
• Il locale dove verrà posizionata la macchina al fine di ovviare a problemi di infezioni batteriologiche, si dovrà presentare
rigorosamente in perfette condizioni igienico sanitarie e privo di condizioni di insalubrità.
• Riteniamo opportuno precisare che durante le operazioni di incubazione e soprattutto durante la schiusa si presentano
rischi relativi all’esposizione ad agenti biologici, si consiglia di effettuare tutte le operazioni relative all’incubazione ed alla
schiusa utilizzando idonei accorgimenti quali:
- dispositivi di protezione individuale specifici (guanti in lattice usa e getta, mascherine di protezione vie respiratorie,
camici usa e getta con relativi calzari);
- pulizia e disinfezione periodica dei locali adibiti ad incubazione;
- lavaggio accurato delle mani prima e dopo il contatto con parti organiche con saponegel ad ampio spettro di azione
biocida;
- evitare di somministrarsi cibi e bevande negli incubatoi o durante le operazioni di assistenza alla macchina.
• Sanità ed igiene dell’uovo
Per garantire la fertilità ed evitare contaminazioni in incubazione occorre procedurare una corretta gestione delle uova da
incubare, a tale scopo si consiglia:
Raccolta delle uova:
- Raccogliere le uova giornalmente per evitare la loro contaminazione, le perdite per rottura e danni da calore nei periodi
estivi;
- Conservare le uova in locali freschi con temperatura 14 – 16 °C;
- Lavare accuratamente le mani prima e dopo la raccolta delle uova con un saponegel ad ampio spettro di azione biocida;
- usare solo matite per contrassegnare le uova
ATTENZIONE: le uova devono essere incubate a partire dal terzo giorno dalla deposizione e non dopo l’ottavo giorno.
CARATTERISTICHE TECNICHE
ALIMENTAZIONE ELETTRICA V/Hz 220-240V 50/60Hz
ASSORBIMENTO TOTALE Watt. 252+1,5
DIMENSIONI mm 640 x 530 x 400
PESO Kg 9,8
CAPACITÀ UOVA Gallina - Anatra - Germano 70-72
Fagiana 96-104
Starna - Quaglia 150-180
Tacchina - Anatra 62-64
Oca 30-36
DURATA DI INCUBAZIONE DEI VARI SOGGETTI
SPECIE GIORNI SPECIE GIORNI
GALLINA 21 ANATRA COMUNE 27-28
QUAGLIA 16-17 ANATRA SELVATICA 25-26
TACCHINA 28 ANATRA MUTA 34-35
FARAONA 26 PERNICE 23-24
STARNA 23-24 FAGIANA 24-25
OCA 30 COLINO 22-23
STRUZZO (CAMELUS) 42
CURA E MANUTENZIONE:
Per garantire un perfetto e duraturo funzionamento dell’apparecchio preoccuparsi di seguire le seguenti disposizioni:
• non esporre l’unità ad agenti atmosferici;
• non utilizzare la macchina in ambienti particolarmente caldi, umidi o freddi;
• effettuare lo spostamento e l’immagazzinamento evitando alla macchina urti o cadute, che risulterebbero deleteri per un
sicuro funzionamento della stessa;
• prima delle operazioni di pulizia staccare la spina dalla presa di alimentazione alla rete;
• non sottoporre il cavo di alimentazione a tensione quando si sposta l’unità
IMPORTANTE: staccare la spina dalla presa agendo sulla spina stessa e non sul cavo di alimentazione; inoltre non utilizzare
prolunghe inadatte e non a norma;
• per le operazioni di pulizia e disinfezione seguire attentamente le istruzioni riportate alla pagina seguente
2La mancanza di corrente per tempi prolungati provoca seri danni alle uova in incubazione da pochi giorni, mentre si è osservato che a stadi di crescita
più avanzati dell’embrione, la sopportazione è maggiore.
11

COME PULIRE L’INCUBATRICE:
Per garantire una essenziale igiene durante l’incubazione si consiglia di pulire la macchina prima e dopo l’utilizzo;passare
quindi sull’apparecchio un panno inumidito e non usare sostanze volatili che possano danneggiare la superficie dell’unità,
ed igienizzare l’unità utilizzando disinfettanti leggeri come alcol.
Effettuare la pulizia anche sul fondo e lavare le vaschette con una spugna e del normale detergente di uso domestico.
avviso: dopo ogni operazione di pulizia e disinfezione mantenere in funzione la macchina (lasciare lo sportello semichiuso)
per circa due ore senza acqua all’interno delle bacinelle, al fine di eliminare l’umidità accumulata durante l’incubazione e la
pulizia, si assicurerà il corretto funzionamento al successivo utilizzo.
DISINFEZIONE con GLUTARSAN: a fine incubazione, dopo aver effettuato la pulizia, si consiglia la disinfezione interna
dell’incubatrice o della schiusa con il prodotto Glutarsan, disinfettante con azione battericida, lieviticida e virucida in partico-
lare per il controllo di virus come l’influenza aviaria tipica dei polli. Potete richiederlo direttamente a Fiem che lo ha testato
sulle proprie incubatrici ed ha curato la realizzazione di una piccola confezione con flaconcino da 100 ml per l’utilizzo occa-
sionale.
ISTRUZIONI OPERATIVE PER LA SOSTITUZIONE DELLA LAMPADINA:
Per la sostituzione della lampadina operare come segue:
a) Acquistare solo lampadine piccole a pera da 15 W con attacco E14, oppure lampadine a led da 4 W - 220V (consigliata);
b) Ricordarsi sempre di spegnere la macchina e staccare il cavo di alimentazione dalla presa di corrente, e lasciare
raffreddare la lampadina onde evitare pericoli di ustioni;
c) Utilizzando un cacciavite a stella, svitare le viti di ancoraggio interne;
d) Sfilare la rete dagli incastri e piegandola sufficientemente toglierla dalla macchina;
e) Svitare in senso antiorario la lampadina guasta (fare attenzione alle lampadine scoppiate e/o rotte, che potrebbero provo-
care tagli o abrasioni);
f) Inserire quindi la lampadina nuova, avvitandola con cura in senso orario;
g) Riposizionare poi la rete di protezione, avvitando con cura le viti di cui sopra
GARANZIA
La macchina è stata collaudata funzionalmente dal costruttore in ogni sua parte prima della consegna o della spedizione. La
garanzia del costruttore non comprende perciò danni causati da un trasporto della macchina effettuato non correttamente,
inoltre la garanzia non comprende eventuali danni agli impianti elettrici ed elettronici causati da un non corretto allacciamento
alla rete di alimentazione. La garanzia comprende la sistemazione o la sostituzione di tutte le parti difettose riscontrate nei
24 mesi (12 mesi a cura del costruttore + 12 mesi a cura del venditore) successivi alla consegna della macchina al cliente,
ed ha validità avvisando il costruttore non oltre l’ottavo giorno dal riscontro del malfunzionamento.
Dietro nostra richiesta e salvo eventuali diretti interventi, egli dovrà effettuare la spedizione in porto franco e nell’imballo
originale della merce ritenuta difettosa. Tale garanzia è riferita ad eventuali difetti di fabbricazione ed è esclusa nel caso
che i prodotti non siano stati usati secondo le nostre prescrizioni e, in ogni caso, qualora siano stati manomessi, riparati o
comunque non correttamente utilizzati.
Nella garanzia è compresa tutta la consulenza tecnica telefonica; restando a carico del cliente tutte le spese di spedizione
alla F.I.E.M. srl delle parti da sostituire e quelle relative ad ogni intervento tecnico presso il cliente.
Non sono comunque mai compresi risarcimenti dovuti al fermo della macchina, o dei danni riportati alla produzione.
Le riparazioni in garanzia dovranno essere effettuate da personale autorizzato dal costruttore, la non ottemperanza
a questa clausola comporta la cessazione della garanzia stessa.
NORMATIVA DI RIFERIMENTO
Questo prodotto soddisfa i requisiti essenziali di Compatibilità Elettromagnetica e di Sicurezza previsti dalle Direttive:
• 2014/30/UE direttiva EMC
• 2014/35/UE direttiva Bassa Tensione in quanto progettato in conformità alle prescrizioni delle seguenti Norme Armonizzate:
• EN 55014-1:2006 + A1:2009 + A2:2011 • EN 61000-3-3:2013
• EN 55014-2: 2015
• EN 61000-3-2:2014
La conformità ai suddetti requisiti essenziali viene attestata mediante l’opposizione della Marcatura su prodotto
La marcatura è stata introdotta nell’anno 1995.
Si richiama l’attenzione sulle seguenti azioni che possono compromettere la conformità oltre, naturalmente, le caratteristiche
dei prodotto:
• errata alimentazione elettrica;
• errata installazione o uso errato o improprio o comunque difforme dalle avvertenze riportate sul manuale d’uso fornito coi
prodotto;
• sostituzione di componenti o accessori originali con altri di tipo non approvato dal costruttore, o effettuata da personale
non autorizzato.
WARNING: THIS EQUIPMENT MUST BE EARTHED.
ATTENZIONE: QUESTA UNITA’ DEVE ESSERE CONNESSA A TERRA.
ATTENTION: CETTE UNITE DOIT ETRE MISE A LA TERRE.
12
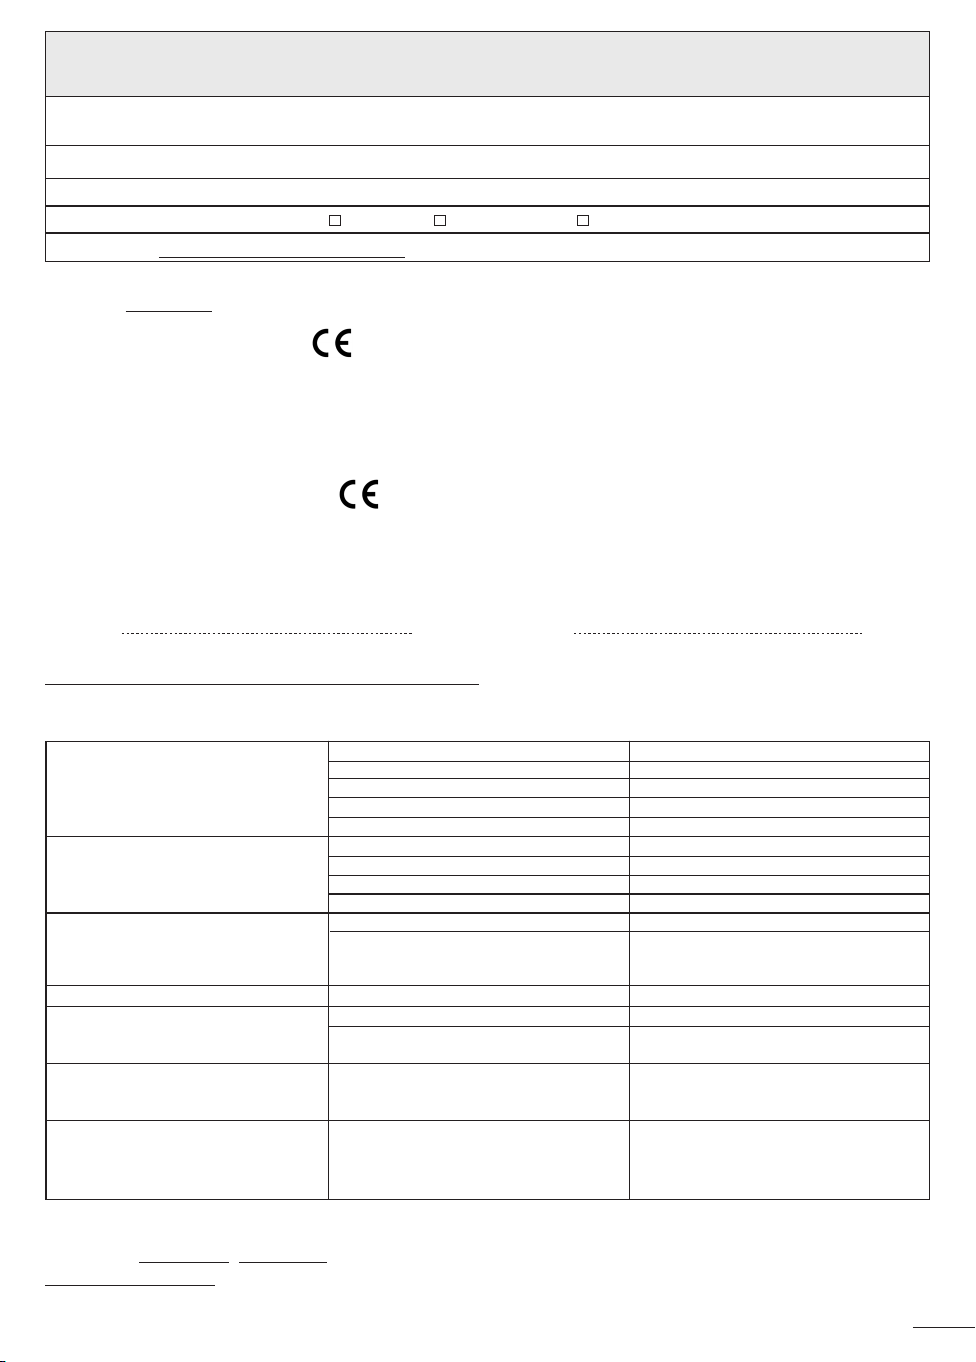
DICHIARAZIONE DI CONFORMITA’
Ai sensi dell’Allegato lI, parte1 sez. A del DL 17/2010/CE
IL FABBRICANTE Incubatrici F.I.E.M. srl
Via Galileo Galilei, 3 - 22070 Guanzate (Como) - Italia
DICHIARA CHE
LA MACCHINA Incubatrice
MODELLO COSMO COSMO EVO COSMO ML
MATRICOLA
È PROGETTATA E REALIZZATA IN CONFORMITÀ AI REQUISITI ESSENZIALI DI SICUREZZA E SALUTE DEL
D.M. 17 del 17 Gennaio 2010 - ALLEGATO I. (attuazione della Direttiva Macchine 2006/42/CE)
La targhetta metallica con il marchio applicata alla macchina è parte integrante della stessa; sulla targa sono riportate
le informazioni specifiche nella Direttiva Macchine
LE SEGUENTI NORME ARMONIZZATE SONO STATE UTILIZZATE PER LA CORRETTA IMPLEMENTAZIONE DEI
REQUISITI ESSENZIALI DI SICUREZZA E SALUTE DELL’ALLEGATO I
EN 55014-1:2006 + A1:2009 + A2:2011
EN 55014-2: 2015
EN 61000-3-2:2014
EN 61000-3-3:2013
Persona autorizzate alla costituzione del fascicolo tecnico: Lara Ceriani
Guanzate il Dichiarante
PRIMA DI RIVOLGERSI AL SERVIZIO DI ASSISTENZA:
è opportuno controllare i seguenti guasti più comuni ed intervenire conformemente.
PROBLEMA CAUSA SOLUZIONE
L’unità non funziona Manca corrente. Controllare la spina
Spina staccata. Inserire la spina
Interruttore generale “0/I” su posizione “0” Posizionare l’interruttore su “I”
Nessuno dei punti sopra indicati Contattare il servizio assistenza
Temperatura di esercizio insufficiente Elemento riscaldante malfunzionante Contattare il costruttore
Termostato starato Vedere istruzioni per la taratura
Termostato inattivo o mal funzionante Contattare il costruttore
Sportello aperto Chiudere lo sportello
Dispositivo volta-uova non funzionante Motoriduttore guasto Contattare il costruttore
Griglia volta-uova non connessa Controllare la connessione della staffa
della griglia volta-uova con il perno
del moto-riduttore.
Aerazione forzata insufficiente Ventola non funzionante3Contattare il costruttore
Illuminazione interna non funzionante Interruttore su posizione “0” Posizionare l’interruttore su “I”
Lampadina bruciata Sostituire la lampadina come indicato
nel relativo paragrafo
Colonnina dell’alcol del termometro Urti, cadute accidentali Provare ad esporre il termometro per alcuni
frammentata minuti a basse temperature
altrimenti sostituire il termometro
Igrometro a capello starato Igrometro a capello starato Seguire le istruzioni relative alla taratura
o mal funzionante dell’igrometro a capello nel paragrafo
(rif. modello con termostato analogico) “Posizionamento, allacciamento,
preparazione”
È severamente vietato ogni tentativo di riparazione della macchina, che non sia tra quelli indicati nella tabella sopra
riportata, contattare sempre il centro di assistenza presso il costruttore al no. tel. 031 / 97 66 72 isdn, fax. 031 / 89 91
3Il funzionamento della ventola dovrà essere controllato visivamente, il malfunzionamento della stessa potrebbe compromettere i risultati ottenibili
dall’incubazione.
13

MANUAL FOR USE OF INCUBATORS MOD. COSMO, COSMO EVO & COSMO ML
Cosmo represents, in any way, the new incubation frontier as each detail of this appliance has been conceived to ensure
excellent performance together with a unique and exclusive design. It results from F.I.E.M. experience, reached and applied
on field in years of dedicated research and drilled-down studies on incubation technique.
WARNING: This appliance can be used by children aged from 8 years and above and persons with reduced physical, sen-
sory or mental capabilities or lack of experience and knowledge if they have been given supervision or instruction concerning
use of the appliance in a safe way and understand the hazards involved. Children shall not play with the appliance. Cleaning
and user maintenance shall not be made by children without supervision. If the supply cord is damaged, it must be replaced
by the manufacturer, its service agent or similarly qualified persons in order to avoid a hazard.
INFORMATION TO THE USERS: Under Legislative Decree 25 September 2007, no.185 and art. 13, Legislative Decree 25
July 2005, no.151 “Implementation of Directives 2002/95/EC, 2002/96/EC and 2003/108/EC, regarding the reduction of use of
hazardous substances in electrical and electronic equipment as well as waste disposal”. The barred waste container symbol
on the equipment means that the product, at the end of its service life, must be disposed of separately from the other types
of waste. The user must therefore convey the equipment, at the end of its service life, to the appropriate separate collection
centres for electronic/electro technical waste products or return it to the dealer when purchasing a new equivalent equipment.
The appropriate separate collection and the following sending of the used equipment to recycling, treatment and eco-friendly
disposal will help avoid negative effects on the environment as well as on health along with an easier recycling of the materials
forming the equipment. Any unauthorized disposal of the product by the user will imply the enforcement of the administrative
sanctions as set out in Legislative Decree no. 22/1997 (article 50 and following articles, Legislative Decree no. 22/1997).
BEFORE USE: Before using the incubator, it is recommended to study the Instruction Manual, especially the technical and
safety data aspects, in order to gain an understanding of the components and the potential operation of the machine.
WARNING: ALL REPAIRS SHALL BE CARRIED OUT ONLY BY A SUITABLY QUALIFIED PERSON
MACHINE UNPACKING: Take the incubator out of its cardboard box and remove the internal components which are
secured by the adhesive tape and check that they are intact.
Check the following components are included:
• 1 no. adjustable egg-turning grid + 12 no. metal inserts; • 1 no. mesh shelf; • 1 no. °F alcohol thermometer;
• 1 no. Instruction Book; • 1 no. dial hair hygrometer (only for analogue version);
The incubator is supplied with a single phase electric cable (approx. 2 mt.) with a plug for the electric connection 220-240V,
50/60Hz. On the back of the machine, the data plate gives full details regarding the voltage, power requirements, registration
number and production date.
IMPORTANT: Remember to check thermometer is working correctly, examining that there are no breaks in the line of alcohol.
IMPORTANT NOTICE In order to comply with the latest CE specifications
in terms of human safety from dangerous materials contained on electric
and non electric equipments we have been obliged to conform our mercury
thermometers/hygrometers to the actual rules via the replacement of the
now forbidden mercury with colored alcohol. Being this last one physically
more volatile and subject to fragmentations, sometimes invisible because of
his discoloration, the result is that the new thermometers are less reliable.
Consequently we ask our esteem customers & distributors to pay the max-
imum attention before using our thermometers, examining that there are no
gaps visible in the alcohol/liquid and while storing caring them to be positioned vertically. The adequate room temperature
for storing our thermometers is comprised between 10°C to 30°C.
POSITIONING AND PREPARATION: The area where the machine is placed should be well ventilated and dry, at a constant
temperature between 17-23 °C. Place the incubator on a flat, level surface and near to an electric socket for easy access.
Use only the electric plugs supplied, with earth connection.
PLEASE NOTE: The manufacturer declines every responsibility in case of any improper use or improper placement, connec-
tion to any unauthorized apparatus or tampering from unauthorized personnel.
1. Before using the machine, remember to clean it carefully inside and outside, as shown in the relative paragraph.
2. Insert the thermometer into its clip on the left side of the egg turning grid
and adjust it so that its bulb is level with the centre line of the eggs.
3. In order to activate the automatic turning of eggs ensure that the peg on the turner
motor is inserted into the metal stirrup connected to the egg grid and connect the
specific egg-turning plug into the electric power.
4. Natural surface humidification is performed by modular basins built into the machine lower valve by an easy-to-use exter-
nal filling system.
5. On the new developed EVO and MINILED Version the LCD electronic control unit can perform the digital reading of
humidity expressed in UR% (range 20-90%) and, if connected to an external ultrasound humidifier, it is a super-modern
digitally-regulated automatic humidification system.
6. For analogue version: insert the dial hair hygrometer into its metal support on the right frontal size.
7. Synthetic hair hygrometer regeneration: in order to enable an exact humidity reading it’s important at each incubation
start to regenerate the dial hair hygrometer. A simple regeneration is possible by wrapping the device in a wet hot for
about 10-15 minutes. After this time the hygrometer must indicate a relative humidity of max. 95 – 98%. Deviations can
be corrected by turning the adjusting screw with a small screw driver. The adjusting screw is visible through a small hole
in the back of the housing.
¾0$18$/('¶8623(5/¶,1&8%$75,&(02'&2602&2602(92
&RVPRUDSSUHVHQWD D SLHQR WLWROR OD QXRYD IURQWLHUD GHOO¶LQFXED]LRQH SUHVHQWDQGRVL FRPHXQ
DSSDUHFFKLRVWXGLDWR LQ RJQL PLQLPRGHWWDJOLR DO ILQH GL UHDOL]]DUH O¶HFFHOOHQ]D QHOOH SHUIRUPDQFH
DVVRFLDWDDGXQGHVLJQXQLFRHGHVFOXVLYR
,OIUXWWRGHOO¶HVSHULHQ]DFKH),(0LQDQQLGLGHYRWHULFHUFKHHVWXGLDSSURIRQGLWLVXOOHWHFQLFKH
GLLQFXED]LRQHKDPDWXUDWRHGDSSOLFDWRVXOFDPSR
35,0$'(//¶862
3ULPD GL GHGLFDUVL DOOD YHUDHSURSULD RSHUDWLYLWj q FRQVLJOLDELOH FRQVLGHUDUH JOL DVSHWWLHOH
FDUDWWHULVWLFKH WHFQLFKHHGL VLFXUH]]D JDUDQWLWH GDO SURGRWWRYDOXWDQGRQH OH FRPSRQHQWL H
DLXWDQGRVLFRQLOPDQXDOHSHUVFRSULUQHJUDGXDOPHQWHOHSRWHQ]LDOLWj
6%$//$**,2'(//$0$&&+,1$
(VWUDUUH O¶LQFXEDWULFHGDOOD VFDWROD G¶LPEDOODJJLR H WRJOLHUH LFRPSRQHQWL GHOODPDFFKLQD DQFRUDWL
FRQGHOQDVWURDGHVLYRDOO¶LQWHUQRGHOODVWHVVD
9HULILFDUHFKHYLVLDQRWXWWHOHGRWD]LRQLHOHQFDWHTXLGLVHJXLWR
•QJULJOLDYROWDXRYDDGLQVHUWLUHJRODELOL
•QSLDQRGLDSSRJJLRXRYDLQUHWHVWLUDWD
•QLJURPHWURDFDSHOOR
•QWHUPRPHWURDGDOFRO)
•QPDQXDOHG¶XVR
/¶LQFXEDWULFHqGRWDWD LQROWUH GL XQFDYR HOHWWULFR PRQRIDVH OXQJR FLUFDPWFRQ VSLQD SHU
O¶DOODFFLDPHQWRDFRUUHQWH9+]
$IILVVDSRVWHULRUPHQWHODWDUJKHWWDGDWLLQIRUPDFLUFDO¶DVVRUELPHQWRODSRWHQ]DGHOO¶LQFXEDWULFHOD
GDWDGLSURGX]LRQHHGLOQXPHURGLPDWULFROD
,03257$17(6LULFRUGDGLYHULILFDUHODFRUUHWWDIXQ]LRQDOLWjGHOWHUPRPHWURDGDOFROFRQWUROODQGR
FKHQRQSUHVHQWLVSH]]HWWDWXUHVXOODFRORQQLQDGHO¶DOFRO
326,=,21$0(172$//$&&,$0(172(35(3$5$=,21(
,OORFDOHRYHYHUUjSRVWDO¶XQLWjGRYUjHVVHUHVXIILFLHQWHPHQWHDHUDWRDVFLXWWRHFRQWHPSHUDWXUD
FRVWDQWHWUDL&
&ROORFDUHOLQFXEDWULFHVXGLXQSLDQRVWDELOHQRQLQFOLQDWRHSRVVLELOPHQWHDFFDQWRDGXQDSUHVDGL
FRUUHQWHIDFLOPHQWHDFFHVVLELOH
3HUODOLPHQWD]LRQHDUHWHXWLOL]]DUHXQLFDPHQWHSUHVHGRWDWHGLFROOHJDPHQWRDWHUUD
$99,62 ,OFRVWUXWWRUH GHFOLQD RJQL UHVSRQVDELOLWj QHO FDVRGL XVR LPSURSULR GLFROORFD]LRQH
LPSURSULDGL FROOHJDPHQWR DG DSSDUHFFKLDWXUH QRQ DXWRUL]]DWHRGL PDQRPLVVLRQHGD SDUWHGL
SHUVRQDOHQRQDXWRUL]]DWR
3ULPD GL GHGLFDUVLDOO¶XWLOL]]R GHOO¶XQLWjULFRUGDUVL GL HIIHWWXDUH XQ¶DFFXUDWD SXOL]LD LQWHUQDHG
HVWHUQDGHOODVWHVVDFRPHPHJOLRLQGLFDWRDYDQWLQHOUHODWLYRSDUDJUDIR
3HU XQ FRUUHWWRPRQWDJJLR GHO WHUPRPHWUR RQGH HYLWDUH IDFLOL URWWXUH GHOORVWHVVR RFFRUUH
SULPD GL WXWWR LQVHULUOR QHOO¶DSSRVLWD VHGH SRVWDVXO ODWR VLQLVWURGHOOD JULJOLD YROWDXRYD H
VLQFHUDUVLFKHLOEXOERGHOORVWHVVRVLDSRVL]LRQDWRLQFRUULVSRQGHQ]DGHOODPH]]DULDGHOO¶XRYR
)
GB
14

Once the machine has reached the working temperature place the eggs lying on the wire mesh in horizontal position,
between the rods of the adjustable egg-turning grid. When partially loaded of eggs check them to be closely positioned in
the middle of the turning grid to get the best possible movement of the same by proper egg weight distribution on the turning
grid. To accommodate eggs of different sizes the Cosmo’s removable turning grid is supplied with dividers which the user
can position to suit their eggs.
ATTENTION: the correct working temperature for Cosmo model is fixed to 99,7°F (corresponding to 37,7°C).
USE AND CALIBRATION: Plug the incubator into the electric power and allow the machine to run at the correct temperature
before setting the eggs. The analogue thermostat (LCD for the EVO version and MINILED version - see instructions for the
calibration on the next paragraph), placed on the top valve, has been set-up by the factory and indicates when the machine
is working (the led power results lighted). The continuous or intermittent lighting of the led – ON – points out the heating acti-
vation. Check that the set temperature on the thermostat dial agrees with the reading on the alcohol thermometer inside the
incubator. If necessary, adjust the set temperature slightly by using a screwdriver in the central white screw on the thermostat
box until the thermometer reads 99,7°F. It’s important to check the temperature on the thermometer in the incubator.
IMPORTANT: if all instrument setting attempts result useless, do not remove absolutely the thermostat from its place to
effect any improper or not authorized operation, just contact the builder for a possible reparation or substitution.
The inside lighting of the machine is by an incandescent lamp activated by the switch placed on the control panel; remember
to switch off the light while the machine is in operation.
Remember to turn the eggs twice per days, morning and evening, by the key on metal turning grids, if the machine were
supplied with manual egg-turner.
Remind that on the hatching period (last two days) it will be necessary to stop the automatic turning of eggs simply taking
away the metal inserts. It’s not necessary to remove the full egg grid by the machine.
FIEM LCD CONTROL PANEL
The new FIEM LCD control system provide a range of useful and easy-to-use extra features like temperature and humidity
control by proportional, integrative and derivate system (PID) or ON/OFF and temperature alarms.
When switched on the control system displays for some seconds the software version.
The electronic control unit with backlit LCD will show at the same time the operating temperature & humidity set up by the
user along with the effective values of temperature and relative humidity measured by the probes.
Ventilation intensity is fully and digitally adjustable according to the different incubation phases.
DESCRIPTION:
In case of any error on temperature or humidity reading two asterisks (**) will appear on the display.
The electronic instrument has two setting parameters menus; the first one allows the user to adjust the main functions
where possible and the technical one allows the instrument configuration.
User menu
The operating temperature of the PID system, the high temperature alarm limit and the relative humidity can be easily adju-
sted entering into the user menu by pressing the SET key. It’s possible to view all parameters by pressing the SET key and
to change the setting, by pressing the keys “INCREASE” e “DECREASE” and confirming with SET.
If no keys are pressed for 25 seconds or longer, the electronic instrument will go out automatically from program menu.
User List Parameters menu
• Unit measur temp. [°C,°F] (default °C) Setting units of measurement degrees Celsius / Fahrenheit
• Incubation temp. (default 37.7) This parameter determinates the temperature that the instrument must be maintained
during incubation period. The range of the values that can to be setted in this scale
is definited by the parameters “Inc.temp.min.” and “Inc.temp.max.” showed in the
technical menu.
• Alarm temperatur (default 38.5) If the read temperature by the instrument reaches the setted one in this parameter, it
will be switched on the acustic buzzer alarm in order to report a fault.
This out will remain on until the temperature does not decrease under the setted value
–“Ist.temp.allarm.”.
Mode
(Calendary)
Fan speed
set value
Increase
Relative humidity
reading
Temperature
reading
Master
switch
Light
switch
Temperature set
point
Relative
humidity
set point
Decrease
Parameters
selection
Speed fan
regulation
15

The range of values that can to be setted in this scale is definited by the parameters
“Temp.alarm.min.” e “Temp.alarm.max.” showed in the technical menu.
• Incubation humid (default 47) This parameter allows to set the relative humidity to be maintained during incubation
period. The range of setting values in this scale is definited by the parameters “Min.
Humidity” and “Max.humidity” showed in the technical menu.
Speed fan regulation (ref. mod. MG 140/200 rural)
Press the “Fan” key to enter the fan speed set up page, choose the set value 1,2 or 3 by the keys and and confirm
pressing again the key “Fan”.
Speed 1 = lower fan speed suggested for breeding live animals in the first week of life.
Speed 2 = medium fan speed suggested for hatching period (last 2 days)
Speed 3 = maximum speed suggested during incubation period
Technical menu
Pressing simultaneously both keys +, you will access the “Technical menu”.
To view a set value press the “ SET key and, if required, change it by using the keys and and memorize by “set”.
The electronic instrument will automatically exit the programming menu if no keys are pressed for longer than 25 Sec.
Technical menu parameters list
• Unit Misura temp [°C,°F] (default °C) Celsius / Fahrenheit degrees instrument setting
• Inc. temp. min. [5,0 .. 75,0] (default 25.0) Used to limit the minimum acceptable temperature value in the “incuba-
tion parameter” on the User Menu
• Ist. temp. inc. / [0,1 .. 5,0] (default 0.1) Used to set up hysteresis (accuracy) of working temperature
Inc. temp. hyst.
• Inc. temp. max. [5,0 .. 75,0] (default 40.0) Used to limit the maximum acceptable temperature value in the “incuba-
tion” parameter” on the User Menu
• Alarm temp. min. [5,0 .. 75,0] (default 30.0) Used to limit the minimum acceptable value in the parameter “alarm
temperature” on the User Menu
• Alarm temp. max. [5,0 .. 75,0] (default 40.0) Used to limit the maximum acceptable value in the parameter “alarm
temperature” on the User Menu
• Alarm temp.hyst. [0,1 .. 5,0] (default 0.1) Used to set up with the maximum accuracy the alarm temperature hyste-
resis
• Calib temp.probe [-5,0 .. +5,0] (default 0.0) Used to calibrate the temperature value detected by the probe
• Humidity minimum [10 .. 90] (default 40) Used to limit the minimum acceptable value in the parameter “incubation
humidity” on the User Menu
• Humidity maximum [10 .. 99] (default 65) Used to limit the maximum acceptable value in the parameter “incuba-
tion humidity” on the User Menu
• Humidity hyst. [1 .. 20] (default 1) Used to set up with the maximum accuracy the humidity regulation
hysteresis
• Cal.humid. probe [-30 .. +30] (default 0) Used to calibrate the humidity value detected by the probe
• Language [0 .. 1] (default 0) Used to select the languages shown on the display (Italian / English)
• Default parameter VENT. to reset Setting of default parameters/Pressing the FAN button all default parameters are set
• Type of fan [1 .. 4] (default 1) Used to set up the fan motor type controlled by the instrument
Fan motor type Incubator model
1 MG50-MG70-MG100-MG140
2 MG244
3 MG500-432-576-720-MG400H
• Buzzer Mode [0 .. 2] (default 2) Used to set up the buzzer operating mode.
0 = Buzzer off
1 = Buzzer on for pressing the keys
2 = Buzzer on when pressing keys and in case of high temperature alarm
LCD THERMOSTAT INCUBATION CALENDARY
Once one or more hatching cycles calendars are activated, the display will show, further than temperature and humidity
values, the counting of the total number of days & hours spent from the begin of the first hatching cycle.
Pressing the “P” button you will accede to the hatching cycles programming
menu. The display will show different indications according to the state of
the running incubation cycle. If the cycle is not activated
Ciclo: Z ---d --h
SET=Inizio Ciclo (Z = number of the visualized cycle)
If the cycle is activated Ciclo:Z XXXd YYh
SET= Fine Ciclo_
By repeatedly pressing the ‘P’ button you will run through the 4 incubation cycles. Pressing the ‘SET’ button you can start
or stop the cycle of incubation displayed. It will be possible to “force” the display of a particular cycle, including those
active on the working screen (so not only the cycle started by longer) by pressing the’ P ‘ key until you reach the cycle to
be displayed, and letting the tool go to time-out (about 30 Sec).
16

For the models equipped with FIEM MINILED THERMOSTAT
1. Product overview
2. Key functions Shows the inside temperature
Setting temperature and humidity reference values
Shows the inside humidity
+ Technical menu for the calibration parameters, measurement units
+ During start-up, menu for setting the type of temperature control
3. Functionality description
MINILED is able to control with ON-OFF method or PID algorithm the temperature (see paragraph 7) and with mode
ON-OFF the incubation humidity.
At power on, a welcome message will appear briefly followed by firmware version of the board.
MINILED will prompt the current temperature and by pressing the arrow UP or DOWN the relative humidity.
By pressing the SET button you can modify the temperature and humidity value already set.
In case temperature or humidity probe fail, or in case one of them isn’t connected, in the relative visual mode will prompt
ERR and the output will not controlled.
MINILED has in addition two different menus, one for the user, where you can customize the basic functions, and one
technical that permit to setup the machine and adjust the probe.
During start-up, menu for setting the type of temperature control.
4. User setup
After you turn-on MINILED by pressing the button, RED LED
close to temperature icon start blinking and display show the
reference temperature.
Now by pressing or you can change the set temperature.
• T. incubazione [5 .. 75] (default 30.0)
This parameter define the temperature that the machine must be maintened during the incubation period. The range of
values you can set is between 5 and 75 °C or equivalent in F.
You can save the value by pressing the button, display will show the humidity value.
Now the GREEN LED close to humidity icon start blinking and display show the humidity percentage to be observed For
modify the humidity parameter pressing or button.
• Umidità incubazione [10 .. 99] (default 40)
This parameter allows you to set the relative humidity to be maintained during the incubation period. The range of values
that can be set in this field is between 10% and 99%.
After editing the values MINILED automatically exits the edit menu if no buttons are pressed for 15 seconds by saving the
value shown.
5. Technical setup
By simultaneously pressing and you enter the technical menu. Its possible to read all parameters in sequence by
pressing , button, the modify of the parameter occur by pressing and .
To confirm the modify of the value press again .
MINILED will exit automatically after 15 seconds if no keys are pressed by saving the value shown.
List of parameters showed by pressing button
• Unit [C,F] (default °C) - Setting the temperature units Celsius or Fahrenheit
• t.CAL [-3,0 .. +3,0 °C] (default 0,0 – step di 0,1 °C)
t.CAL [-5,4 .. +5,4 F] (default 0,0 – step di 0,1 F) - It allows to calibrate the temperature read by the probe, in Celsius or
Fahrenheit depending on the setting assigned at the previus point.
• H.Cal [-5 .. +5] (default 0 – step di 1%) - It allows to calibrate the humidity value read by the probe.
A. Power switch
B. Light switch
C. 3 digits display with dot separation value
D. temperature LED
E. humidity LED
F. selection button <arrow up> (temperature display)
G. setting button
H. selection button <arrow down> (humidity display)
A
B
G
E
F
D
C
H
17

6. Control mode temperature
By pressing simultaneously and you can access a special menu for change the mode of control temperature.
• Controllo [PID,v ON-OFF] (default PID) Allow you to select the type of temperature control.
• PID = Control PID
• ON-OFF= Control ON-OFF
7. CONNECTION DIAGRAM
Descrizione dei collegamenti:
A = Power supply terminal block ( ELECTRIC SHOCK )
B = Power output humidifier terminal block ( ELECTRIC SHOCK )
C = Power output heater ( ELECTRIC SHOCK )
D = Hygrometer probe
E = Temperature probe
Warning: disconnect power supply before attempting and performing any conn.
HUMIDITY
Natural surface humidification is performed by modular basins built into the machine lower valve by an easy-to-use external
filling system. On the new developed EVO Version the LCD electronic control unit can perform the digital reading of humidity
expressed in UR% (range 20-90%) and if the machine is equipped with predisposition for automatic humidity,(option to be
requested during purchase), it is possible to connect an external ultrasound humidifier, it is a super-modern digitally-regulated
automatic humidification system. It is important to understand that there can be no hard and fast rule for the amount of water
required in an incubator as the following variables come into play:
• Ambient humidity in the room (affected by the weather and your local environment).
• The species of the eggs
• The porosity of the eggshells (can vary from egg to egg)
• The time of year (warm weather usually means high ambient humidity and eggs laid towards the end of the season tend
to be more porous)
Requirement for water in the incubator can be monitored by either weighing the eggs (an egg should loose 13-15% of its
weight during incubation) or by candling (the air space should be approx. 1/3 of the egg by the time it is due to hatch). On
subsequent hatches you may wish to increase or decrease the amount of water, depending on your findings with your first
hatch. If in doubt, it is better to add too little water than too much – more eggs are lost through too high humidity
than any other single factor! Remember, the depth of water makes no difference to the humidity levels in the incubator;
it’s the surface area which counts!
LOAD EGGS STORED NOT MORE THAN 7-8 DAYS AND NOT LESS THAN 3 DAYS FROM LYING. BeFore
inCUBation, tHe eGGs mUst Be storeD in a LoCation WitH temperatUre BetWeen 14-16 °C.
In order to regulate the humidity level inside the machine it is important to remind that enlarging the water surface humidity
% increases and contrarily reducing the water surface area humidity decreases.
APPROX. HUMIDITY VALUES WHEN OPERATING AT 37.7°C (100°F) DRY BULB TEMPERATURE
TYPE INCUBATION HATCHING
HEN LIGHT BREED (LAYER) 82°F = 47% 88°F = 62%
HEN HEAVY BREED (BROILER) 84°F = 52% 88°F = 62%
PHEASANT - PARTRIDGE - QUAIL - RED LEG PARTRIDGE 78-80°F = 38-43% 86-88°F = 56-62%
TURKEY - GUINEA FOWL 82-84°F = 47-52% 88°F = 62%
GOOSE - DUCK (MALLARD, PEKIN, KHAKI CAMPBELL, WILD) 78-80°F = 38-43% 88°F = 62%
OSTRICH (CAMELUS) 70-74°F = 25-30% 78-80°F = 38-43%
EGG-CANDLING
At 8th - 10th day of incubation, it is advisable to candle the eggs in order to eliminate those which are infertile; this oper-
ation must be done in a dark room. By observing the inside of a developing, fertile egg, using a suitable candling lamp, it
is possible to determine the embryo development which looks like a small reddish shape, composed of the heart and small
arteries which are radiating from it (Fig. b). If the egg is moved lightly, it is possible to see clearly the rhythmic oscillations of
the embryo. On the contrary, an infertile egg appears completely transparent (clear), with a slight darkening where the yolk
is. (a). If during the candling operation, you find some eggs with a reddish spot stuck or attached to the shell, or a central
spot surrounded by one or more concentric hoops, or something nebulous crossing the inside; then in this case, the embryos
are either false or dead, and must be taken out of the incubator to prevent them contaminating other eggs with bacteria by
infection or explosion.
INDICATIVE CONVERSION TABLE FROM FAHRENHEIT DEGREES (°F) TO CELSIUS (°C).
°F °C °F °C °F °C °F °C °F °C
80 26,7 86 30,0 92 33,3 97 36,1 101 38,3
81 27,2 87 30,6 93 33,9 98 36,7 102 38,9
82 27,8 88 31,1 94 34,4 98,6 37,0 102,2 39,0
83 28,3 89 31,7 95 35,0 99 37,2 103 39,4
84 28,9 90 32,2 96 35,6 100 37,8 104 40,0
85 29,4 91 32,8 96,8 36,0 100,4 38,0 105 40,6
Take note that 1°F is equal to 0.56 °C, while 1°C is equal to 1.8 °F.
18

a) Infertile egg
b) Egg with normally developing embryo
c) Egg with dead embryo at 5th - 6th day of incubation
Periodic candling during embryonic development is
necessary to ensure the best hatching results. Using a
good candling lamp, it is possible to check the growth
of the air-space. The pictures shown herewith show
the air-space growth as related to hen, turkey, and
pheasant eggs. If the air space measurements appear
similar to those shown in the picture, it means that the
embryo is developing correctly, and that the amount
of humidity supplied in the machine is right. If the air
space is not developing correctly, it means that it is
necessary to change the level of humidity supplied to
the machine.
1
DESCRIPTION
HELPFUL SUGGESTIONS
• In case of power failure for some hours during the incubation time, place one hot water bottle or similar container into the
machine and keep the door closed
2
.
• For waterfowl eggs, after 15 days of incubation, it is suggested that the eggs should be taken out of the incubator and
sprayed with tepid water (using a suitable hygienic sprayer) and leave them to cool for about 15 minutes outside the
machine. This operation should be repeated every two days, till the penultimate day of incubation.
• It’s recommended that the incubator room should be clean and hygienic, in order to obviate any bacteriological infection.
• It should be remembered that during incubation and hatching there is a constant risk of bacterial contamination and the
following precautions are therefore recommended:
- Use of personal protective clothing (i.e.: disposable plastic gloves, protective respiratory mask);
- Regular cleaning and disinfection of incubation rooms;
- Careful cleaning of hands before and after the contact with organic parts using antibacterial gel soap.
- Avoid eating or serving food and drink in the incubation room or during the operation of the machine.
(These suggestions are extremely important in order to afford maximum protection to both eggs and operator)
GHYHORSLQJIHUWLOH HJJXVLQJ D VXLWDEOH FDQGOLQJ ODPSLW LVSRVVLEOH WRGHWHUPLQH WKH HPEU\R
GHYHORSPHQWZKLFKORRNVOLNHDVPDOOUHGGLVKVKDSHFRPSRVHGRIWKHKHDUWDQGVPDOODUWHULHV
ZKLFK DUH UDGLDWLQJ IURPLW )LJE,I WKH HJJ LVPRYHG OLJKWO\LW LV SRVVLEOH WRVHH FOHDUO\ WKH
UK\WKPLFRVFLOODWLRQVRIWKHHPEU\R
2QWKHFRQWUDU\DQLQIHUWLOHHJJDSSHDUVFRPSOHWHO\WUDQVSDUHQWFOHDUZLWKDVOLJKWGDUNHQLQJ
ZKHUHWKH\RONLVD
,IGXULQJWKHFDQGOLQJRSHUDWLRQ\RXILQGVRPHHJJVZLWKDUHGGLVKVSRWVWXFNRUDWWDFKHGWRWKH
VKHOORU D FHQWUDO VSRWVXUURXQGHG E\ RQH RUPRUH FRQFHQWULF KRRSV RUVRPHWKLQJ QHEXORXV
FURVVLQJWKHLQVLGHWKHQLQWKLVFDVHWKHHPEU\RVDUHHLWKHUIDOVHRUGHDGDQGPXVWEHWDNHQ
RXWRI WKH LQFXEDWRUWR SUHYHQWWKHPFRQWDPLQDWLQJ RWKHU HJJVZLWK EDFWHULD E\ LQIHFWLRQ RU
H[SORVLRQ
D,QIHUWLOHHJJ
E(JJZLWKQRUPDOO\GHYHORSLQJHPEU\R
F(JJZLWKGHDGHPEU\RDWWKWKGD\RILQFXEDWLRQ
3HULRGLFFDQGOLQJ GXULQJ HPEU\RQLF GHYHORSPHQWLV QHFHVVDU\ WRHQVXUH WKH EHVW KDWFKLQJ
UHVXOWV8VLQJ D JRRG FDQGOLQJ ODPSLW LV SRVVLEOH WRFKHFN WKH JURZWK RIWKH DLUVSDFH7KH
SLFWXUHV VKRZQ KHUHZLWK VKRZ WKH DLUVSDFH JURZWK DVUHODWHGWR KHQWXUNH\ DQG SKHDVDQW
HJJV,IWKHDLUVSDFHPHDVXUHPHQWVDSSHDUVLPLODUWRWKRVHVKRZQLQWKHSLFWXUHLWPHDQVWKDW
WKHHPEU\RLVGHYHORSLQJFRUUHFWO\DQGWKDWWKHDPRXQWRIKXPLGLW\VXSSOLHGLQWKHPDFKLQHLV
ULJKW
,IWKHDLUVSDFHLVQRWGHYHORSLQJFRUUHFWO\LWPHDQVWKDWLWLVQHFHVVDU\WRFKDQJHWKHOHYHORI
KXPLGLW\VXSSOLHGWRWKHPDFKLQH
'(6&5,37,21
,WPXVWEHQRWHGWKDWZKHQWKHDLUVSDFHLVVPDOOHUWKDQVKRZQLQWKHWDEOHLWLVQHFHVVDU\WRGHFUHDVHWKHKXPLGLW\YDOXH
ZKHQWKHDLUVSDFHLVODUJHUWKDQVKRZQLQWKHWDEOHWKHKXPLGLW\PXVWEHLQFUHDVHG
V
W
GD\
WKGD\
WKGD\
WKGD
\
V
W
GD\
WKGD\
WKGD\
WKGD
\
V
W
GD\
WKGD\
WKGD\
WKGD\
WK
GD\
3KHDVDQWHJJ KHQHJJ WXUNH\HJJ
GHYHORSLQJIHUWLOH HJJXVLQJ D VXLWDEOH FDQGOLQJ ODPSLWLVSRVVLEOH WR GHWHUPLQH WKH HPEU\R
GHYHORSPHQWZKLFKORRNVOLNHDVPDOOUHGGLVKVKDSHFRPSRVHGRIWKHKHDUWDQGVPDOODUWHULHV
ZKLFK DUH UDGLDWLQJ IURPLW )LJE,I WKH HJJ LVPRYHG OLJKWO\LW LV SRVVLEOH WRVHH FOHDUO\ WKH
UK\WKPLFRVFLOODWLRQVRIWKHHPEU\R
2QWKHFRQWUDU\DQLQIHUWLOHHJJDSSHDUVFRPSOHWHO\WUDQVSDUHQWFOHDUZLWKDVOLJKWGDUNHQLQJ
ZKHUHWKH\RONLVD
,IGXULQJWKHFDQGOLQJRSHUDWLRQ\RXILQGVRPHHJJVZLWKDUHGGLVKVSRWVWXFNRUDWWDFKHGWRWKH
VKHOORU D FHQWUDO VSRWVXUURXQGHG E\ RQH RUPRUH FRQFHQWULF KRRSV RUVRPHWKLQJ QHEXORXV
FURVVLQJWKHLQVLGHWKHQLQWKLVFDVHWKHHPEU\RVDUHHLWKHUIDOVHRUGHDGDQGPXVWEHWDNHQ
RXWRI WKH LQFXEDWRUWR SUHYHQWWKHPFRQWDPLQDWLQJ RWKHU HJJVZLWK EDFWHULD E\ LQIHFWLRQ RU
H[SORVLRQ
D,QIHUWLOHHJJ
E(JJZLWKQRUPDOO\GHYHORSLQJHPEU\R
F(JJZLWKGHDGHPEU\RDWWKWKGD\RILQFXEDWLRQ
3HULRGLFFDQGOLQJ GXULQJ HPEU\RQLF GHYHORSPHQWLV QHFHVVDU\ WRHQVXUH WKH EHVW KDWFKLQJ
UHVXOWV8VLQJ D JRRG FDQGOLQJ ODPSLW LV SRVVLEOH WRFKHFN WKH JURZWK RIWKH DLUVSDFH7KH
SLFWXUHV VKRZQ KHUHZLWK VKRZ WKH DLUVSDFH JURZWK DVUHODWHGWR KHQWXUNH\ DQG SKHDVDQW
HJJV,IWKHDLUVSDFHPHDVXUHPHQWVDSSHDUVLPLODUWRWKRVHVKRZQLQWKHSLFWXUHLWPHDQVWKDW
WKHHPEU\RLVGHYHORSLQJFRUUHFWO\DQGWKDWWKHDPRXQWRIKXPLGLW\VXSSOLHGLQWKHPDFKLQHLV
ULJKW
,IWKHDLUVSDFHLVQRWGHYHORSLQJFRUUHFWO\LWPHDQVWKDWLWLVQHFHVVDU\WRFKDQJHWKHOHYHORI
KXPLGLW\VXSSOLHGWRWKHPDFKLQH
'(6&5,37,21
,WPXVWEHQRWHGWKDWZKHQWKHDLUVSDFHLVVPDOOHUWKDQVKRZQLQWKHWDEOHLWLVQHFHVVDU\WRGHFUHDVHWKHKXPLGLW\YDOXH
ZKHQWKHDLUVSDFHLVODUJHUWKDQVKRZQLQWKHWDEOHWKHKXPLGLW\PXVWEHLQFUHDVHG
V
W
GD\
WKGD\
WKGD\
WKGD
\
V
W
GD\
WKGD\
WKGD\
WKGD
\
V
W
GD\
WKGD\
WKGD\
WKGD\
WK
GD\
3KHDVDQWHJJ KHQHJJ WXUNH\HJJ
'(6&5,=,21(
TXDGURFRPDQGR&RVPR(YR
WHUPRPHWURDGDOFRRO)
TXDGURFRPDQGR&RVPR
DQDORJLFD
VRQGDWHUPRUHJRODWRUH
IRURGLDHUD]LRQH VRQGDLJURPHWURVRORSHU&RVPR(YR
UHWHSURWH]LRQHYHQWROD
PRWRUHYHQWROD
LJURPHWURDFDSHOOR FDYRUHVLVWHQ]DLQVLOLFRQH
PRWRULGXWWRUHYROWDXRYD
SXOVDQWLDFFHQVLRQHPDFFKLQDHLOOXPLQD]LRQH
LQWHUQD
JULJOLDYROWDXRYDDGLQVHUWL
UHJRODELOL
SRUWDWUDVSDUHQWH
UHWHGLIRQGR ODPSDGLQD
1 LCD control panel (mod. EVO)
2 Analogue control panel
3 Exhaust hole
4 Protection wire-net
5 Dial hair hygrometer for analogue version
6 Egg turning motor
7 Adjustable egg turning grid
8 Wire-net floor
9 Modular humidification basins
10 Alcohol thermometer (°F)
11 Temperature sensor
12 Humidity sensor (mod.EVO +MINILED)
13 Fan motor
14 Silicon heating cable
15 Main switch & light switch
16 Transparent door
17 Lighting lamp
1It must be noted that when the air-space is smaller than shown in the table, it is necessary to decrease the humidity value; when the
air-space is larger than shown in the table, the humidity must be increased.
2The lack of power for an extended time causes more serious damage to eggs which are only a few days into incubation than to those which
are more advanced, when the embryo is stronger and more resilient.
19

Egg health and hygiene
To maximise fertility and to avoid contamination during the incubation period, please follow the directions below when col-
lecting eggs:
- Collect the eggs daily to avoid contamination or loss from breakage or damage, caused by hot or cold temperatures (winter
and summer periods).
- Clean hands before and after egg collection with anti-bacterial soap.
- LOAD EGGS STORED NOT MORE THAN 7- 8 DAYS AND NOT LESS THAN 3 DAYS FROM LYING.
- BEFORE INCUBATION, THE EGGS MUST BE STORED IN A SPECIFIC EGG-BASKET (IN VERTICAL POSITION WITH THE
AIR-SPACE FACED UPWARDS) WITH TEMPERATURE BETWEEN 14 – 16 °C.
- Do not mark the eggs with felt-tip pens – use only pencil
MODEL “COSMO”
POWER SUPPLY V/Hz 220-240V 50/60Hz
POWER CONSUMPTION Watt. 252+1,5
DIMENSIONS mm 640 x 530 x 400
NET WEIGHT Kg 9,8
EGGS CAPACITY Hen - Mallard 70-72
Pheasant 96-104
Partridge - Quail 150-180
Turkey - Duck 62-64
Goose 30-36
INCUBATION PERIOD OF THE DIFFERENT SPECIES
SPECIE DAYS SPECIE DAYS
HEN 21 PEKIN DUCK 27-28
QUAIL 16-17 WILD DUCK 25-26
TURKEY 28 BARBARY DUCK 34-35
GUINEA FOWL 26 RED LEG 23-24
PARTRIDGE 23-24 PHEASANT 24-25
GOOSE 30 BOB WHITE 22-23
OSTRICH (CAMELUS) 42
CARE AND MAINTENANCE
In order to achieve the best operation and longest life of the machine, follow the following precautions:
• do not expose the machine to outdoor elements
• do not place machine in hot, wet or cold rooms;
• avoid bad handling during moving that can cause breakages inside the machine and affect its working;
• disconnect the power plug before cleaning the machine;
• Do not accidentally pull out the power cable when moving the machine.
IMPORTANT: take out the plug from the socket by holding the plug and not the power cable; use only a mains power socket
or surge-protected extension lead.
• for cleaning and disinfection please follow the advice as follows:
HOW TO CLEAN THE INCUBATOR:
For a good hygiene during the incubation, it is recommended to clean the machine before and after its use;
Use a wet cloth on the machine with a light disinfectant; do not use solvents that can damage the machine cabinet;
Clean the base of the machine with a normal domestic detergent.
DISINFECTION with GLUTARSAN: at the end of incubation, after cleaning, it is recommended to proceed to an accurate
disinfection of the internal parts of incubators and hatchers with Glutarsan, a disinfectant with bactericidal, yeasticidal and
virucidal action particularly indicated to prevent common diseases in poultry species such as avian flu. You can request it
directly to FIEM Incubators company which successfully tested it on its own incubators and took care of creating a small
100 ml package with vial for occasional use.
ADVICE: after cleaning the machine, please keep it working without eggs & water for at least two hours (with the door
semi-closed), in order to dry the humidity which has accumulated during the incubation period... This will ensure the correct
machine operation for the next use.
INSTRUCTIONS FOR LIGHT BULB REPLACEMENT:
a) Buy small bulb only (pear shape) of 15W with an E14 screw fitting or led light of 3-5W (220V);
b) Remember to switch off the machine and disconnect the power cable from the current socket and leave the lamp
cooling in order to avoid any scalding;
c) Use a star screwdriver and unscrew the screw;
d) Take out the wire mesh on the bottom of the machine;
e) Unscrew the broken lamp in anti-clockwise direction (be careful with those exploded or broken);
f) insert the new lamp, screwing it carefully in clockwise direction;
g) Put the mesh back again inside, screwing carefully the screw.
20
Other manuals for COSMO
1
This manual suits for next models
2
Table of contents
Languages:
Other Fiem Accessories manuals


