Final Evangelion 2020 EVATW01 User manual
S N E X T C o., L t d.
3 -12 - 7 Kitakase, Sa i wai- ku,
Kawasak i - shi, Kan a gawa
212 - 00 5 7, J apan
User's Manual
取扱説明書
使用说明书
SS S M L LL
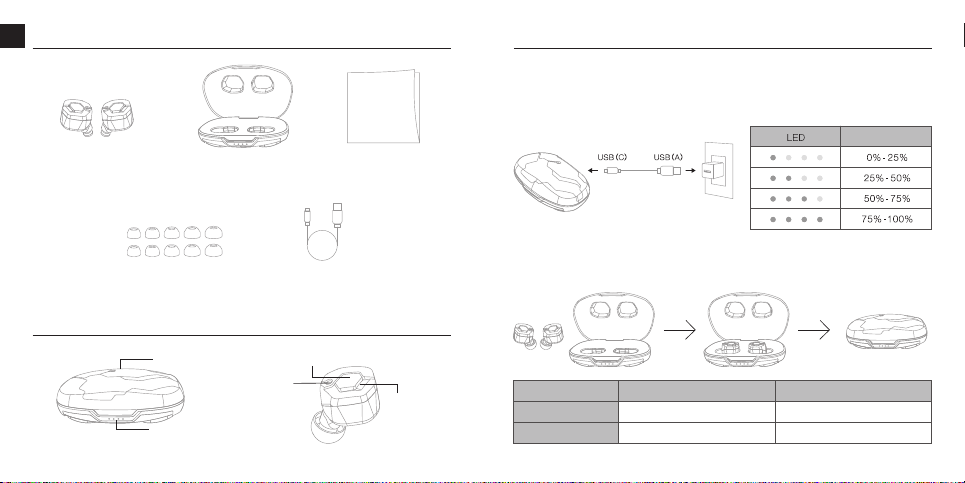
5 size ear tips
(designed for truly wireless earphones)
USB Type-C
charging cable
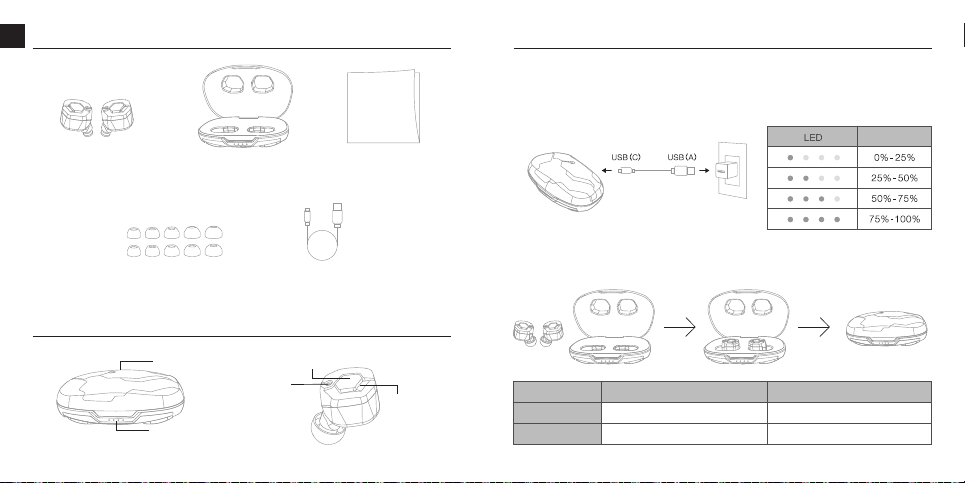
All LEDs light up
White LED flashes
Orange LED turns off
Orange LED lights up
Package contents Power / Charging
Part name
Multifunction Button
(MFB)
Microphone
Main units Charging case User’s manual
(warranty card included)
Charging the earphones:
Insert the earphone units into the charging case and they will begin to charge.
Charging the charging case:
Connect the accessory USB charging cable (C) connector to the USB port on the charging case
and connect the USB (A) connector to an electrical appliance or adapter with the same shape of
connector and the internal battery within the charging case will begin to charge. While charging,
the LED indicator light will flash.
Battery Remaining
Charging
Charging completed
Charging the charging case Charging the earphones
USB Port
LED Indicator
LED Indicator
2 3
EN
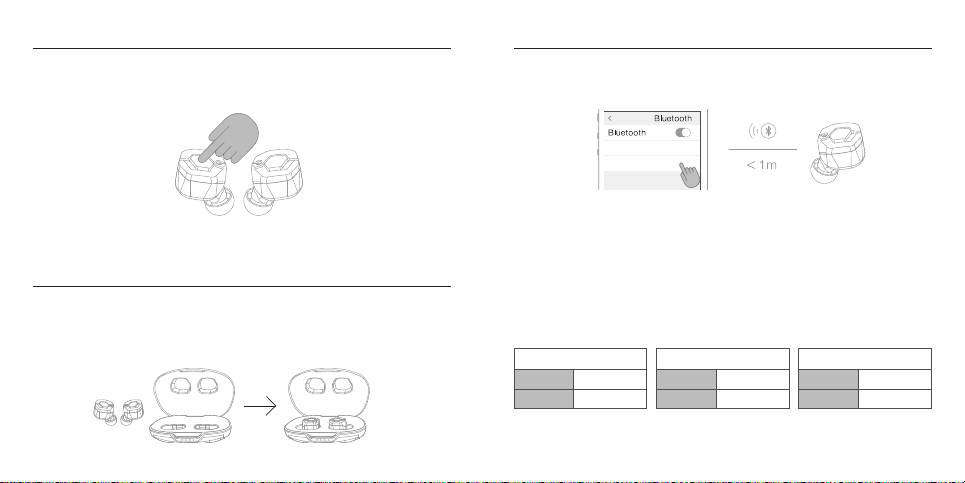
EVATW01_L
EVATW01
EVATW01_R
Connected
Not connected
EVATW02_L
EVATW02
EVATW02_R
Connected
Not connected
EVATW06_L
EVATW06
EVATW06_R
Connected
Not connected
EVATW01_L
※1
* If Connected is displayed for either side, pairing has succeeded.
* The side for which connected is displayed is the parent earphone.
Turning on the earphones
Turning off the earphones
Performing device pairing
After charging, remove the earphones from the charging case and the power will automatically
switch ON. (When the LED indicator lights up for 1 second, the power is ON.)
When the power is OFF, press the MFB button one time to switch the power ON.
To connect to your smartphone or other device initially, it is necessary to perform pairing.
For devices which have already completed pairing, a connection will automatically be established
the next time the power is switched ON.
Continuously press the MFB button for about 3 seconds until two types of beep sound emanate,
and the power will switch OFF.
When the charging case is adequately charged, returning the earphones to the charging case
will automatically switch the power OFF and charging will begin.
Device
Setting
The first time the earphones are used:
1. Remove the left and right earphones from the charging case, and they will automatically be in
pairing mode. (The LED indicator at left flashes between orange and white.)
2. Switch the Bluetooth function on the smartphone or other device ON and select [EVATW01_L] *1
once it appears on the display.
3. A [Bluetooth pairing request] from the other side earphone will appear on the display, so please
select [pairing] or [OK]. (The display varies depending on the smartphone or other device to
which it is connected.) When the following appears on the display of the device being
connected, left/right pairing has been completed.
*1: In the case of EVATW02, [EVATW02_L], in the case of EVATW06, [EVATW06_L] will be displayed.
4 5
When pairing has not been successfully completed (Reset Method):
1. Insert the left and right earphones into an adequately charged charging case and press the MFB
button on both sides simultaneously for 10 or more seconds and the LED indicator will first turn
off, then light up in orange.
To reestablish pairing or to perform pairing with a second or later device:
1. Remove the earphones from the charging case and the LED indicator will light up white for 1
second as the power automatically switches ON.
2. Press the MFB button on one side of the earphones to switch to pairing mode. (LED indicator
flashes between orange and white.)
3. Switch the Bluetooth function on the smartphone or other device ON, and select either
[EVATW01_L] or [EVATW01_R] *2 once it appears on the display.
4. A[Bluetooth Pairing Request] from the other side earphone will appear on the display, so please
select [Pairing] or [OK]. (Varies depending on the smartphone or other device to which it is
being connected.) Left and right pairing has been completed when any of the messages below
have been displayed.
*2: In the case of EVATW02,either [EVATW02_L] or [EVATW02_R]; in the case of EVATW06, either
[EVATW06_L] or [EVATW06_R] is displayed.
* If Connected is displayed for either side, pairing has succeeded.
* The side for which connected is displayed is the parent earphone.
* Before performing pairing with a new device, please disconnect the device to which it has
already been paired or switch the Bluetooth function OFF on the device to which it has
already been paired.
Music
Incoming Calls
Siri/
Google Assistant
Playback
Pause
Next Track
Previous Track
Raise Sound Volume
Lower Sound Volume
Receive Call
End Call
Refuse Call
Initialize
Press Once
Press Once
Press Once
Press Once or insert into charging case
Press Twice
Press Twice (Parent earphone, only while music is stopped)*
* Depending on the device to which connected, this function may not be available.
Press until beep sound
emanates once, then release
Press until beep sound
emanates once, then release
Press Twice
Press Twice
2. Next, remove the left and right earphones, and the LED indicator will flash white as pairing is
performed between the left and right earphones.
3. After a certain amount of time, the earphones will automatically switch to pairing mode with the
smartphone or other device. In this situation, the reset has been completed. Once the reset has
been completed, please attempt another pairing operation.
Performing device pairing Performing device pairing
Operation of the MFB Button
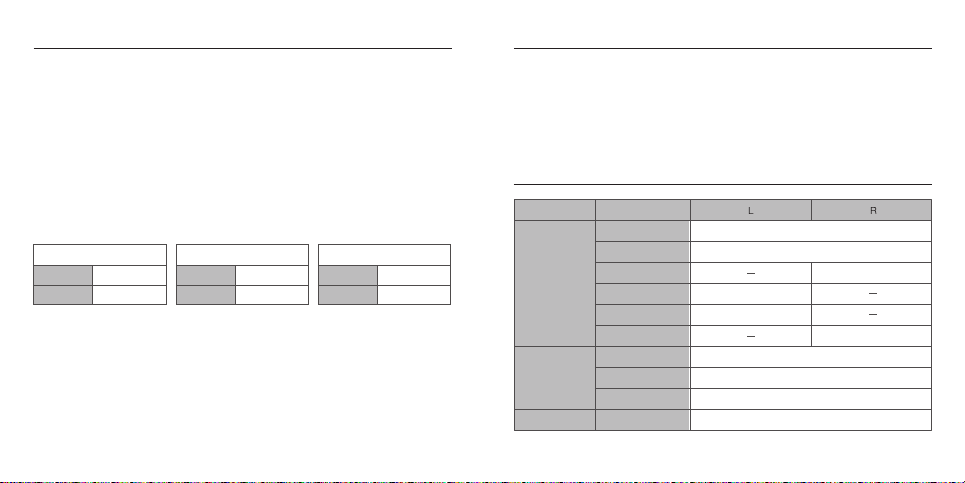
EVATW01_L
EVATW01
EVATW01_R
Connected
Not connected
EVATW02_L
EVATW02
EVATW02_R
Connected
Not connected
EVATW06_L
EVATW06
EVATW06_R
Connected
Not connected
6 7

Situation in which Voice Guidance is provided Japanese English
When power to the earphones is switched ON
When power to the earphones is switched OFF
When pairing mode is initiated
When pairing has been successfully completed
When pairing is complete
and usage becomes possible
When pairing has been disconnected
Shisutemu kidoushimasu
Shisutemu shuryoshimasu
Shinkuro kaishishimasu
Shinkuro kanryoshimashita
Setsuzoku saremashita
Kaijo saremashita
Entry system start
Entry system over
Pairing start
Pairing all green
System connected
System disconnected
Changing voice guidance language (Japanese/ English):
1. Please disconnect pairing of this product to smartphone or other devices.
2. After removing the left and right earphones from the charging case, pressing the MFB button
on either side earphone continuously for 15 seconds until 4 types of beep sound emanate
switches the language of the voice guidance. Once switching the voice guidance on
one side has been completed, the other side will automatically switch as well.
Voice guidance
About the ear tips
Points of Caution
When bass is difficult to hear and high range sound jars the ear, there is a possibility that the ear
tip fit is not appropriate. In order to enjoy music in accordance with the design of the earphone,
it is important that the ear tip fits properly and there is a means of sealing the ear canal. In order
to achieve the proper fit, please try the following method:
·Please try various sizes, not just M size.
·In case of small ears, please try not just S and SS size, conversely try larger sizes as well.
·
Even if the size of the ear canal is the same, the left and right ears may be different, so please
also try different sizes for left and right.
·There is a risk of permanent hearing loss from extended use at excessive sound volumes.
Please do not exceed 40 hours use per week at a sound volume of 80 dB(A) or 5 hours per
week at a volume of 89 dB(A).
·To avoid electromagnetic interference, please refrain from use in places in which the use of
electronic devices is prohibited.
·If you are using a pacemaker or other electronic medical device, please consult your physician
before using this product.
·
This product contains small parts that may be hazardous to children, so please store in a place
that is out of the reach of children.
·Please do not subject to strong shocks or apply excessive force. Damage from abnormal use is
not covered by the warranty. To prevent damage, please store the earphones inside the case in
an appropriate location.
·Causing damage to the circuits may result in fire or electrical shock, so please do not attempt
to disassemble this product.
·Please keep this product away from water or other liquids that may cause shorts or other
damage.
·Please do not attempt to repair this product yourself as unauthorized attempts at repair may
void the product warranty.
·Never use earphones when operating a bicycle, automobile, motorcycle or other motor vehicle
as this is a cause of traffic accidents and there is a risk of serious consequences. Even when
not driving, please do not use at railroad crossings, traffic intersections and other environments
where there is a danger in the inability to hear surrounding sounds.
·This product may be damaged if it is placed in locations where the environment is subject to
excessive direct sunlight, humidity, dust and other contaminants.
8 9
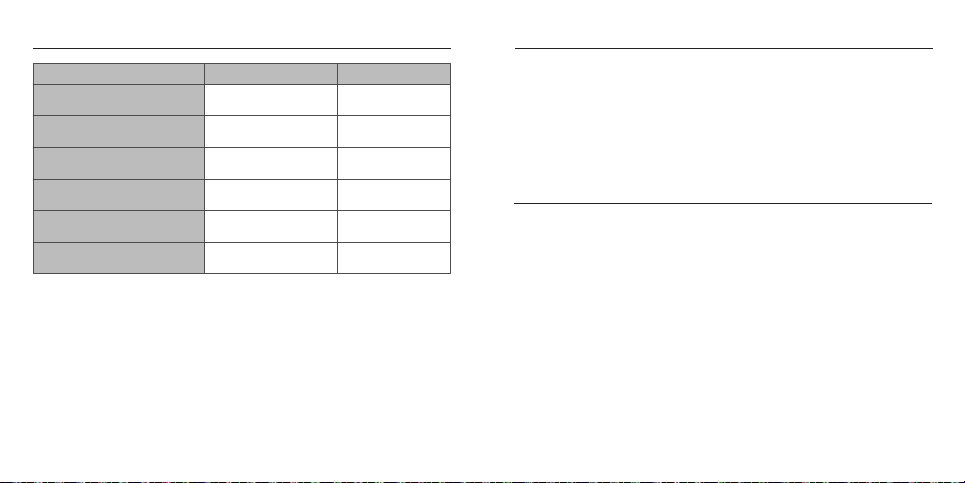
Troubleshooting: When you think, “Is it broken?” Troubleshooting: When you think, “Is it broken?”
Earphone batteries
are depleted.
MFB has not been
pressed for
adequate time.
(Immediately after
purchasing)
Battery charge is low.
Earphones will
not turn ON.
Earphones will
not turn OFF.
Problem RemedyCause
Please place the earphones in the charging case
and charge them. (In case the charge in the
charging case has run out, first charge the charging
case.) Please refer to “Power / Charging” on P.3
regarding the method for charging.
An error has occurred
due to improper
operation.
In some cases, performing a reset operation may fix
the problem. Please refer to “When pairing has not
been successfully completed (Reset Method)” on
P.6 regarding the reset method.
MFB has not been
pressed for
adequate time.
Please press the MFB button long enough for the
earphone to turn OFF. Please refer to “Turning off
the earphones” on P.4 regarding the method for
turning the earphones OFF.
Please press the MFB button long enough for the
earphone to turn ON. Please refer to “Turning on the
earphones” on P.4 regarding the method for turning
the earphones ON.
For safety of transportation from overseas, laws and
regulations do not allow the internal battery to be fully
charged at the time of shipping. For that reason,
voltage may fall below the level required for
operation at the time the customer opens the
package. Fully charging the battery before use may
relieve this inconvenience. Please refer to
“Power / Charging” on P.3 regarding the method for
charging. Using ear tips other
than those included
as accessories.
Metal contact on
earphone is not
touching the pins
on the charging case.
Charging case
battery charge is low.
Earphones will
not turn OFF.
Earphones
cannot be
charged.
Problem RemedyCause
When ear tips other than those included as accessories
are used, there are cases in which they may interfere
with the charging case and make satisfactory
charging impossible. Please check to see whether
proper charging is possible using original ear tips.
Charging case
battery charge is low.
In some cases, the battery remaining in the charging
case drops before you notice. After once charging
the charging case, place the earphones in the
charging case and check that the LED indicator
illuminates. Please refer to “Power / Charging” on P.3
regarding the method for charging.
Using ear tips other
than an accessory.
When ear tips other than those included as
accessories are used, there are cases in which they
may interfere with the charging case and make
satisfactory charging impossible. Please check to
see whether proper charging is possible using
original ear tips.
Please check that there is adequate contact between
the metal contacts and the pins on the charging
case.
In some cases, the battery remaining in the charging
case drops before you notice. After once charging
the charging case, place the earphones in the
charging case and check that the LED indicator
illuminates. Please refer to “Power / Charging” on P.3
regarding the method for charging.
10 11
12 13
(Once pairing has
been performed)
Has automatically
been connected to
a previously
connected device.
Earphones are not
in the pairing mode.
Earphones
cannot be
detected/
paired.
While playing
music, sound
(connection) is
interrupted.
Problem RemedyCause
Please try performing the pairing operation again
after having deleted the pairing information from a
previously paired device.
Receives interference
from external factor,
and an impact
on the connection
status results.
Bluetooth communicates using the 2.4GHz band.
This band is used by other wireless standards such
as Wi-Fi, etc., and so there is a possibility of
receiving interference.
Moreover, this 2.4GHz band does not penetrate
liquids. There is impact from humidity and rain, and
the human body also contains liquid, so there are
individual differences in connectivity. Furthermore, it
depends on the specifications of smart phones and
other devices.
For that reason, switching OFF unused
Wi-Fi/Bluetooth settings on surrounding devices, etc.
is a countermeasure.
While outside, there is a possibility that moving a
smartphone from inside a bag to a breast pocket,
etc. or otherwise reducing the distance between
devices may improve the connection status.
In some cases, performing a reset operation may fix
the problem. Please refer to “Performing device
pairing (When pairing has not been successfully
completed (reset method))” on P.6.
The battery of one side
of the earphones
has depleted.
The output of the USB
adapter being used
for charging is low.
The left/right earphone
pairing has been
released.
Sound only
comes out
from one side.
In case it takes
time to charge
Battery
consumption
is fast for
one side of the
earphones only.
Problem RemedyCause
Please place the earphones in an adequately charged
charging case and charge the earphones. Please refer
to “Power/Charging” on P.3 regarding the method for
charging.
Based on the design
specification, one side
is the parent and the
other side is the child,
so the burden between
left and right is
different.
Under the specification for Bluetooth earphones,
communication generally takes place with one side
as the parent and the other as the child.
As such, the child only communicates with the
parent, but the parent communicates with the
smartphone or other device and communicates with
the child as well, and so there is a difference in the
level of burden borne by the left and right earphone.
As a result, a difference in the battery consumption
between the left and right may occur.
In case you are using the USB port on a PC, etc.,
there are cases in which the output is low and it may
take more time to charge than the publicly listed value.
As such, please use a 5V/1A USB adapter when
charging this product.
In some cases, performing a reset operation may fix
the problem. Please refer to “Performing device
pairing (When pairing has not been successfully
completed (reset method))” on P.6.
Troubleshooting: When you think, “Is it broken?” Troubleshooting: When you think, “Is it broken?”

* There is a possibility of a change in the specification, so please check our website for the
latest user’s manual.
Gently remove any build-up from the mesh filter with the tip of a toothpick. Please take care to
ensure that no foreign particles fall inside when doing so.
Maintenance Contacting us
Warranty and after service
The warranty for this product is valid for 1 year from the day of purchase. During the warranty period,
we will repair the product based on the provisions below. The warranty is only valid in the country in
which the product was purchased. Please contact the store you purchased the product from regarding
questions pertaining to repairs. For products purchased outside your country of residence and for
support after the warranty period, please contact us using the Contact Form on our website.
1. During the warranty period, we will repair the product free of charge if the product failed even
though it was used in accordance with the instructions in the user's manual and the point of
caution sections.
2. In the following cases, repairs to the product will be subject to a fee even during the warranty period:
(1) The necessary documentation noted in the warranty card is not complete.
(2) The product is identified to be modified, disassembled, or repaired by a third party or customer
other than our company or our authorized organizations.
(3) The earphones were subjected to a strong impact or were allowed to get wet. Product failure
resulting from an excessive use of force on the product.
(4) Failure of the product or damage caused as a result of fire, earthquake, storm or flood damage,
lightning strike or other natural disaster.
(5) Repair of scratches on the surface of the housing or repair of the housing itself.
Please contact us regarding inquiries using the Contact Form on our website:
www.snext-final.com
S N E X T C o., L t d.
3 -12 - 7 Kitakase, Sa i wai- ku, Kawasaki- shi,
Kanagawa 212 - 00 5 7, J apan
This card is necessary in the event that the warranty is utilized. Please store
this card along with a receipt or other documentation showing the date of purchase
in a safe place to be produced in the event that the warranty is utilized.
Please refer to the manual for the provisions of the warranty.
14 15
SS S M L LL
イヤーピース
5
サイズ
(ワイヤレス専用仕様)
全ての
LED
が点灯
白い
LED
が点滅
オレンジの
LED
が消灯
オレンジの
LED
が点灯
16 17
The warranty for this product is valid for 1 year from the day of purchase. During the warranty period,
we will repair the product based on the provisions below. The warranty is only valid in the country in
which the product was purchased. Please contact the store you purchased the product from regarding
questions pertaining to repairs. For products purchased outside your country of residence and for
support after the warranty period, please contact us using the Contact Form on our website.
1. During the warranty period, we will repair the product free of charge if the product failed even
though it was used in accordance with the instructions in the user's manual and the point of
caution sections.
2. In the following cases, repairs to the product will be subject to a fee even during the warranty period:
(1) The necessary documentation noted in the warranty card is not complete.
(2) The product is identified to be modified, disassembled, or repaired by a third party or customer
other than our company or our authorized organizations.
(3) The earphones were subjected to a strong impact or were allowed to get wet. Product failure
resulting from an excessive use of force on the product.
(4) Failure of the product or damage caused as a result of fire, earthquake, storm or flood damage,
lightning strike or other natural disaster.
(5) Repair of scratches on the surface of the housing or repair of the housing itself.
JP

1. 充電ケースから左右のイヤホンを取り出すと、自動的にペアリングモードになります。(左側のLED
インジケーターがオレンジ・白に交互点滅します 。)
2.
スマートホン
等の機器のBluetooth 機能を
ON
にし、画面に「EVATW01_L」
※
1が表示されたら選択
します。
3. 画面にもう片方のイヤホンの「Bluetoothペアリングの要求」のポップアップが表示されますので、
「ペアリング」もしくは「OK」を選択します。(接続するスマートホン等の機器によって表示が異なり
ます。)接続する機器の画面に、下記のように表示されましたら左右のペアリングは完了です。
EVATW01_L
EVATW01の場合
EVATW01_R
接続済
未接続
EVATW02_L
EVATW02の場合
EVATW02_R
接続済
未接続
EVATW06_L
EVATW06の場合
EVATW06_R
接続済
未接続
EVATW01_L ※1
※1
:EVATW02の場合は「EVATW02_L」、
EVATW06の場合は「EVATW06_L」と表示されます。
※どちらかに接続済と表示されればペアリング成功です。
※接続済と表示される側が親イヤホンです。
MFBボタンを約 3秒間、
2種類の電子音が鳴るまで押し続けると、電源がOFFになります。
充電後、イヤホンを充電ケースから取り出すと、自動的に電源がON になります。(LEDインジケーター
が白く1秒点灯すると電源がON になっています 。)
電源がOFFになっている場合、
MFBボタンを1回押 すと電源が ONになります。
充電ケースの充電量が十分な場合、イヤホンを充電ケースに戻すと、自動で電源が OFFになり、充電が
開始されます。
18 19
お手持ちのスマートホン等の機器と初めて接続する場合は、
ペアリング
を行なう必要があります。
ペアリ
ング
が完了した機器同士は、次回から
イヤホン
の電源をONするだけで自動的に接続できます。

ペアリングがうまくいかなかった場合(リセット方法):
1. 電池残量が十分な充電ケースに左右のイヤホンを入れた状態で両側のイヤホンのMFBボタンを同時
に10 秒以上長押しすると、
LEDインジケーターが一度消灯した後にオレンジの色に点灯します。
2. その後、左右のイヤホンをケースから取り出すと、
LEDインジケーターが白色に点滅して左右のイヤ
ホン同士のペアリングが行われます。
1. 充電ケースからイヤホンを取り出すと、
LEDインジケーターが白く1秒点灯して、電源は自動的に
ON になります。
2. 片側のイヤホンの MFBボタンを 2回押すと、ペアリングモードに移行します。(LEDインジケーター
がオレンジ・白に交互点滅します。)
3. スマートホン等の機器のBluetooth機能をON にし、画面に「EVATW01_L
」もしくは「EVATW01_R」
※
2のどちらかが表示されたら選択します。
4. 画面にもう片方のイヤホンの「Bluetoothペアリングの要求」のポップアップが表示されますので、
「ペアリング」もしくは「OK」を選択します。(接続するスマートホン等の機器によって表示が異なり
ます。)接続する機器の画面に、下記のように表示されましたら左右のペアリングは完了です。
※2:EVATW02の場合は「EVATW02_L」もしくは「EVATW02_R」、
EVATW06の場合は
「EVATW06_L」もしくは「EVATW06_R」と表示されます。
EVATW01_L
EVATW01の場合
EVATW01_R
接続済
未接続
EVATW02_L
EVATW02の場合
EVATW02_R
接続済
未接続
EVATW06_L
EVATW06の場合
EVATW06_R
接続済
未接続
※どちらかに接続済と表示されればペアリング成功です。
※接続済と表示される側が親イヤホンです。
※新しいデバイスとのペアリングを行う前に、既にペアリングされているデバイスとの接続をお切り
いただくか、既にペアリングされているデバイスの Bluetooth機能をOFFにしてください。
音楽
着信
Siri /
Google
アシスタント
再生
一時停止
次の曲へ
前の曲へ
音量を上げる
音量を下げる
着信受話
通話終了
着信拒否
起動する
1
回押す
1
回押す
1
回押す
1
回押す、または充電ケースに入れる
2回押す
2回押す
(親イヤホン・音楽停止状態のみ)※
※接続する機器によっては、機能しない場合があります。
電子音が1回鳴るまで
長押ししてから離す
2回押す
2回押す
電子音が1回鳴るまで
長押ししてから離す
3. 一定時間経つと自動的にスマートホン等の機器とのペアリングモードに移行します。LEDインジケー
ターはオレンジと白に交互点滅します。この状態でリセットが完了です。
リセット完了後、再度ペアリング操作をお試しください。
20 21
音声ガイダンスが流れる場面 日本語 英語
イヤホンの電源を
ON
にした時
イヤホンの電源を
OFF
にした時
ペアリングモードにした時
ペアリングが成功した時
ペアリングが完了し、使用可能状態になった時
ペアリングが解除された時
システム起動します
システム終了します
シンクロ開始します
シンクロ完了しました
接続されました
解除されました
Entry system start
Entry system over
Pairing start
Pairing all green
System connected
System disconnected
音声ガイダンスの言語(日本語/ 英語)を切り替える場合:
1. スマートホン等の機器から本製品のペアリング状態を解除してください。
2. 充電ケースから取り出した状態で左右のどちらかのイヤホンのMFBボタンを4種類の効果音が鳴り
終わるまで離さず15 秒間長押しすると音声ガイダンスの言語が切り替わります。
片側の音声ガイダンスの切替が完了すると、もう片方のイヤホンも自動的に切り替わります。
音声ガイダンス
ショートや故障の原因となりますので、水などの液体に濡らさないでください。
22 23

イヤホン
の電池切れ
MFBボタン
を十分な
時間押していない
(ご購入直後の場合)
電池残量が少ない
イヤホン
の電源が
ON
にならない
イヤホン
の電源が
OFF
にならない
問題点 対処法原因
イヤホン
を
充電ケース
に入れて充電してくださ
い。(
充電ケース
も充電切れの場合、まずは
充電ケ
ース
を充電してください)
充電方法については、
P.17
の「充電する」をご確
認ください。
誤操作のためエラーが
発生している
リセット操作を行なうことで改善する場合がござ
います。
リセット方法 については、
P.20
の「リセット方法」
をご確認ください。
MFBボタン
を十分な
時間押していない
MFBボタン
を電源が
OFF
になるまで長押しして
ください。
電源を
OFF
にする方法については、
P.18
の「電源
を
OFF
する」をご確認ください。
MFBボタン
を電源が
ON
になるまで長押ししてく
ださい。
電源を
ON
にする方法については、
P.18
の「電源
を
ON
する」をご確認ください。
内蔵バッテリーは、海外からの輸送の安全のため、
法令に基づき工場出荷時にフル充電にすることが
できません。そのため、お客様が開封された際に
動作に必要な電圧を下回ることがございます。
ご使用の前にフル充電してください。
充電方法については、
P.17
の「充電する」をご確認
ください。
付属品以外のイヤー
ピースを使用している
イヤホン
の金属接点が
充電ケースのピンと
接触していない
充電ケース
の
電池残量が少ない
イヤホン
の電源が
OF F
にならない
イヤホンが
充電できない
付属品以外のイヤーピースをご使用の場合、
充電
ケース
に干渉して充電が満足にできない場合がご
ざいますので、付属品のイヤーピースで正常に充
電が出来るかご確認ください。
充電ケースの
電池残量が少ない
気付かないうちに
充電ケース
の電池残量が少なく
なっている場合がございます。
充電ケース
を一度
充電した後に、
イヤホン
をケースに収納して
LED
インジケーター
が点灯するかご確認ください。
充電方法については、
P.17
の「充電する」をご確
認ください。
付属品以外のイヤー
ピースを使用している
付属品以外の
イヤーピース
をご使用の場合、
充電
ケース
に干渉して充電が満足にできない場合がご
ざいますので、付属品の
イヤーピース
で正常に充
電が出来るかご確認ください。
金属接点と充電ケースのピンとの接触具合が十分
であることをご確認ください。
気付かないうちに
充電ケース
の電池残量が少なく
なっている場合がございます。
充電ケース
を一度
充電した後に、
イヤホン
をケースに収納して
LED
インジケーター
が点灯するかご確認ください。
充電方法については、
P.17
の「充電する」をご確
認ください。
問題点 対処法原因
24 25
故障かな
?
と思ったら 故障かな
?
と思ったら

外的要因により干渉を
受け、接続状況に
影響が出ている。
イヤホン
が
ペアリング
状態にならない
イヤホン
の検索
/
ペアリング
が
できない
音楽再生中に
音(接続)が
途切れる
以前
ペアリング
された機器の
ペアリング
情報を
削除してから、再度
ペアリング
操作を行なってくだ
さい。
Bluetooth
は、
2.4 G Hz
の帯域を使って通信を行
なっております。
この帯域は、
Wi-Fi
などさまざまな無線規格で使わ
れておりますので、それらの干渉を受ける可能性が
ございます。
また、この
2.4GHz
帯は水分を貫通しません。湿度
や雨天による影響や、人体も水分ですので、接続性
に個人差がございます。
さらにスマートホン等の
機器のスペックにも依存いたします。
そのため、ご自宅では周囲の使用していない
Wi-Fi
/Bluetooth
の設定を
OFF
にする等が対策です。
外出中であれば、鞄のスマートホン等を胸ポケット
に移動させる等、機器同士の距離を近づけること
で接続状況が改善される可能性がございます。
リセット操作を行なうことで改善する場合がござ
います。
リセット方法 については、
P.20
の「リセット方法」
をご確認ください。
リセット操作を行なうことで改善する場合がござ
います。
リセット方法 については、
P.20
の「リセット方法」
をご確認ください。
片側の
イヤホン
の電池が切れている
充電に使用している
USB
アダプターの
出力が低い
左右間の
イヤホン
の
ペアリングが
解除されている
片側しか
音が出ない
充電に時間が
掛かる
イヤホンの
片側だけ
電池消費が早い
電池残量が十分な充電ケースに
イヤホン
を収納
して
イヤホン
本体を充電してください。
充電方法については、
P.17
の「充電する」をご確
認ください。
仕様上、片方が親機、
もう一方が子機となり、
左右間で負荷が異なる
Bluetooth
イヤホンはその仕様上、一般的に片側
が親機、もう一方が子機となり通信を行ないます。
そのため、子機側の
イヤホン
は親機との通信のみ
行ないますが、親機側はスマートホン等の機器に
加え、子機側のイヤホンとも通信を行なうため、左
右で掛かる負荷量に違いが生じます。それにより、
左右間で電池消費に差が生じる場合がございます。
PC
等の
USB
ポートをご使用いただいている場合、
出力が低く、公称値よりも充電に時間が掛かる場
合がございます。
そのため、本製品を充電される際には、
5V/1A
の
USB
アダプターをご使用ください。
(一度
ペアリング
を
行なった場合)
以前接続した機器に
自動的に接続されている
問題点 対処法原因 問題点 対処法原因
26 27
故障かな
?
と思ったら 故障かな
?
と思ったら

※仕様変更の可能性がございますので、最新の取扱説明書は弊社WEBサイト「DOWNLOAD」ページ
をご確認ください。
www.snext-final.com
このカードは保証をお受けになる際に必要になります。
レシート等、
購入日を証明するものと一緒に保管し、保証を受けられる際はご提示ください。
保証規定はマニュアルをご参照ください。
メッシュフィルターに付着したゴミは、爪楊枝の先端にゴミを付着させる形でやさしく取り除い
てくだ
さい
。内部にゴミが落下しないように、気をつけて作業し
てください
。
28 29
本製品の保証期間はお買い上げ日より1年間です。保証期間中は以下の保証規定に基づき修理致します。
保証はご購入頂いた国でのみ有効です。修理のお申込は弊社WEBサイトの「CONTACT」ページの「修
理申込フォーム」より行なって
ください
。居住国以外の国でご購入の場合や保証期間後のサポートについ
ては、弊社 WEBサイトの「CONTACT」ページの「
お問い合わせフォーム
」よりお問い合わせ
ください
。
1.
保証期間内に、取扱説明書に記載の警告、注意書きに従った使用状態で故障した場合には、
無償修理
させていただきます。
2.
保証期間内でも次の場合には、有償で修理させていただきます。
(1) 保証書に記載の必要書類が揃っていない場合。
(2) 弊社および弊社が指定する機関以外の第三者やお客様により改造、分解、修理がなされた場合。
(3) 強い衝撃を与えたり、水に濡らした場合。無理な力がかかるような状況下で起こった故障。
(4) 火災、地震、風水害、落雷、その他天変地異などによる故障。
(5) 筐体表面の傷の修理、筐体自体の修理。
SS S M L LL
耳胶 5 种尺寸
(无线耳机专用规格)
C型USB
充电用电线
全部的LED灯闪烁
白色 LED灯闪烁
橙色 LED灯熄灭
橙色 LED灯亮起
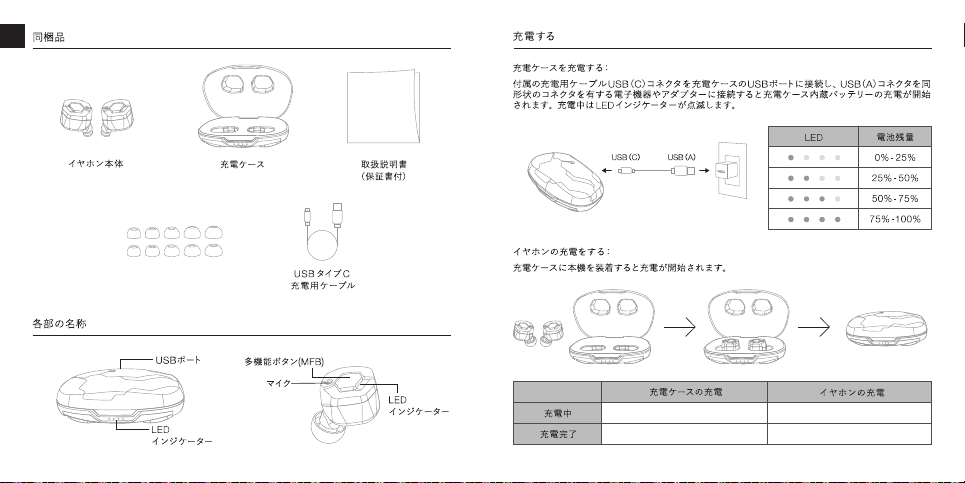
內容物 充电方式
各部位名称
USB连接埠
LED指示灯
LED指示灯
多功能键 (MFB)
麦克风
耳机本体 充电盒 使用说明书
(附保证书)
对耳机进行充电:
将耳机本体安置在充电盒中专属位置上,即可进行充电。
电池残余量
充电中
充满电
充电盒的充电状态 耳机的充电状态
对充电盒进行充电:
将配件的充电用电线USB-C型连接头与充电盒上的USB-C型插槽接上,然后再将电线另一端的
USB-A型连接头与含USB-A型插槽的充电器或转换器连接后,即可为充电盒内的电池进行充电。
充电中LED指示灯会闪烁显示。
30 31
CH
本製品の保証期間はお買い上げ日より1年間です。保証期間中は以下の保証規定に基づき修理致します。
保証はご購入頂いた国でのみ有効です。修理のお申込は弊社WEBサイトの「CONTACT」ページの「修
理申込フォーム」より行なって
ください
。居住国以外の国でご購入の場合や保証期間後のサポートについ
ては、弊社 WEBサイトの「CONTACT」ページの「
お問い合わせフォーム
」よりお問い合わせ
ください
。
1.
保証期間内に、取扱説明書に記載の警告、注意書きに従った使用状態で故障した場合には、
無償修理
させていただきます。
2.
保証期間内でも次の場合には、有償で修理させていただきます。
(1) 保証書に記載の必要書類が揃っていない場合。
(2) 弊社および弊社が指定する機関以外の第三者やお客様により改造、分解、修理がなされた場合。
(3) 強い衝撃を与えたり、水に濡らした場合。無理な力がかかるような状況下で起こった故障。
(4) 火災、地震、風水害、落雷、その他天変地異などによる故障。
(5) 筐体表面の傷の修理、筐体自体の修理。

初次使用本机时:
1.从充电盒中将左右耳机取出,耳机会自动切换成连线配对模式。(左边的LED
指示灯会呈现橙色及
白色信号交相闪烁的状态。)
2.将智能手机或待接机器的蓝牙功能开启,从选单中选取「EVATW01_L」
※1 的名称选项。
3.画面会跳出另一边耳机「要求蓝牙连线配对」的讯息,此时选取「连线」或「OK」的选项。(根据待
连线智能手机或机器的机型不同,会有不同的描述内容。)待连线机器的画面有显示以下的情况,
表示左右连线配对完成。
※1:EVATW02 的机型会显示「EVATW02_L」,EVATW06 的机型会显示「EVATW06_L」。
EVATW01_L
EVATW01的情况
EVATW01_R
连线完成
未连线
连线完成
未连线
连线完成
未连线
EVATW02_L
EVATW02的情况
EVATW02_R
EVATW06_L
EVATW06的情况
EVATW06_R
EVATW01_L ※1
※左右任一边显示连线完成即表示成功连线配对。
※显示连线完成的单边耳机为主耳机。
MFB 多功能键持续长按约 3 秒,直到 2次电子提示音效响起为止,电源即被关闭。
充电盒仍有电量的情况下,将耳机本体放回充电盒专属位置后,会自动切断电源进入充电模式。
启动耳机
关闭耳机
进行连线配对
充电后将耳机本体从充电盒中取出,耳机本体会自动启动电源。 ( 白 色LED指示灯长亮约 1 秒即表示
电源已经启动。)
关机状态中的耳机可以通过按压MFB多功能键1次来进行重启。
手边的智能手机或其它待连线机器在初次连线状況下需要连线配対。一旦完成连线配对的机器产品,
当下次耳机电源启动时会自动与先前已连线产品进行连线。
装置
32 33
设定

连线配对不成功时(重置方法):
1. 将左右无线蓝牙耳机置入电池残余量足够的充电盒中,两边耳机的MFB多功能键同时长按约10 秒
以上,直到 LED指示灯一度熄灭后亮起橙色灯为止。
连线配对重置的情况·第 2 台机器进行连线配对的情况:
1. 从充电盒中取出耳机本体后,白色 LED 指示灯会长亮约 1 秒并自动启动电源。
2. 连按单边无线耳机的 MFB 多功能键 2 次,即切入连线配对模式。 (LED 指示灯会呈现橙色及白色
信号交相闪烁的状态。)
3. 将智能手机或待接机器的蓝牙功能开启,从选单中选取「EVATW01_L」或「EVATW01_R」
※2
依所持的机种选取适当的选项。
4. 画面会跳出另一边耳机「要求蓝牙连线配对」的讯息,此时选取「连线」或「OK」的选项。 (根据待
连线智能手机或机器的机型不同,会有不同的描述内容。)待连线机器的画面有显示以下的情况,
表示左右完成连线配对。
※2:EVATW02的机种是显示「EVATW02_L」或「EVATW02_R」,EVATW06的机种是显示
「EVATW06_L」或「EVATW06_R」。
※任一边显示连线完成即表示成功连线配对。
※显示连线完成的单边耳机为主耳机。
※新装置进行连线配对前,请解除现有装置的连线或将已经连线配对成功的装置蓝牙功能部分进行关闭。
音乐
来电
Siri/
Google
语音助理
播放
暂停
下一曲
上一曲
音量上升
音量下降
接听来电
结束通话
拒接来电
启动
按 1 次
按 1 次
按 1 次
按 1 次或直接放回充电盒
连按2次
连按 2次(仅限于主耳机·非音乐模式状态)
※
※因连线机种而异,有可能不支援该项功能。
长按直到听到电子
提示音效响起才放开
连按2次
连按2次
长按直到听到电子
提示音效响起才放开
进行连线配对 进行连线配对
MFB多功能键的操作
2. 之后,将左右耳机从充电盒中取出,耳机的白色LED指示灯在闪烁的同时,耳机会自动进行左右
连线配对。
3. 一定时间后会自动切换成与智能手机或待连接线机器进行连线配对模式。 LED 指示灯会呈现橙色
及白色交相闪烁的状态。此时表示重置作业完成。重置完成后,请再度进行连线配对的操作。
34 35
EVATW01_L
EVATW01的情况
EVATW01_R
连线完成
未连线
连线完成
未连线
连线完成
未连线
EVATW02_L
EVATW02的情况
EVATW02_R
EVATW06_L
EVATW06的情况
EVATW06_R
语音提示播放的时机 日文 英文
耳机电源开启时
耳机电源关闭时
进入连线配对模式时
完成连线配对时
完成连线配对、使用可能状态下
连线配对解除时
システム起動します
Shisutemu kidoushimasu
システム終了します
Shisutemu shuryoshimasu
シンクロ開始します
Shinkuro kaishishimasu
シンクロ完了しました
Shinkuro kanryoshimashita
接続されました
Setsuzoku saremashita
解除されました
Kaijo saremashita
Entry system start
Entry system over
Pairing start
Pairing all green
System connected
System disconnected
语音提示声道(日文 / 英文) 的切换方式:
1. 请解除智能手机等机器与本产品的连线状态。
2. 在耳机从充电盒中取出的状态,左右边耳机任一方的MFB多功能键长按至 4 种音效响完为止, 大約
15秒左右,即完成语音提示声道的切换。一边的语音提示声道切换完成后,另一边耳机会自行切换。
语音提示 关于耳胶
注意事项
如果有发现低音的呈现不良或高音剌耳的情况,这有可能是耳胶的着装不适当所引起。为了能愉快的
体验耳机本身所设计的音质,耳胶的正确的着装,以及选择能维持耳道内密闭装态的耳胶尺寸十分
重要。为了达到以上条件最佳的情况,请参考下面的调整方式。
·请多尝试各种尺寸,不要只用 M 尺寸。
· 耳孔比较小的情况,请不要只尝试使用 S 或 SS 尺寸,相反的较大尺寸的耳胶也可以尝试使用看看。
·同一个人也是可能有左右耳道尺寸不对称的情况,所以请尝试看看在左右耳使用不同尺寸的耳胶。
·长时间过大音量下使用,有可能会造成永久性的听觉受损。 80 dB(A)的音量使用情况下建议每周请
不要超过 40 小时,89 dB(A)的音量使用情况下建议每周请不要超过 5 小时。
·为了防范电磁波所造成的影响,电子仪器使用禁止的区域,请不要使用。
·心律调节器等电子医疗仪器佩戴使用中的人,使用本产品前请先与医生讨论及确认。
·本产品体积较小,为了防范对儿童可能造成的危险,请保管于儿童无法触及的地方。
·请避免让产品承受强力的冲击或不当外力的负荷。被认定为不正常使用下所产生的损坏,产品将丧失
保修。为了避免破损,请将耳机妥善保存于充电盒内规划的位置中。
·请不要分解本产品,以避免因电路故障所引起的火灾或触电问题。
·请注意不要让产品受潮或沾到水及液体,以避免短路或故障的发生。
·请不要尝试自行修理本产品。不当修理的情况下,有可能造成产品保修失效。
·在驾驶自行车,汽机车等交通工具时,绝对避免同时使用耳机产品,以防范造成交通方面等相关事故
发生的严重后果。即使在非驾驶的情况下,也请不要在听不到周围环境声音而容易导致危险的地方
使用,如平交道或十字路口等。
·为了避免造成产品的故障,请不要将产品保存于阳光直射,湿气重或尘埃多的环境下。
36 37

简易状况对应指南 简易状况对应指南
38 39
耳机电池没电
MFB多功能键按
压时间不够长
(产品购入第一次
使用时 )
产品内含电力不足
耳机电源
无法开启
耳机电源
无法关闭
请将耳机放入充电盒中进行充电。(充电盒电源用尽
的情况,请先将充电盒充电。)
关于充电方式,请参阅使用说明书第 31页的「充电
方式」内容。
错误操作所引发的
故障情况
有可能经由进行重置设定使问题得以改善。
关于重置设定的方法,请参阅使用说明书第34页「 连
线配对不成功时(重置方法)」的内容。
MFB多功能键按
压时间不够长
请长按MFB多功能键直到电源关闭为止。
关于电源的关闭方式,请参阅使用说明书第 32 页的
「关闭耳机」内容。
请长按MFB多功能键直到电源开启为止。
关于电源的开启方式,请参阅使用说明书第 32 页的
「启动耳机」内容。
内藏电池的产品,为了能确保海外运输上的安全性,
基于法条规定,不能在满电的状态下进行运送。
为此,在客人产品开封时,产品内电池含量有可能会
低于产品作动所需的电量。使用前如果先将产品充满
电后再使用,則有可能让该问题得以解决。
关于充电方式,请参阅使用说明书第 31页的「充电方
式」内容。
使用(配件/原厂)
以外的耳胶
耳机的金属充电端子
与充电盒中的充电
顶针无法接触
充电盒内的电池
电量不足
耳机电源
无法关闭
耳机无法充电
使用 ( 配件 /原厂 ) 以外的耳胶时,充电盒的充电功能
可能会受到阻扰,有可能造成充电不足的情况。请将
耳胶更换成(配件/原厂) 产品后,再确认是否能正
常充电。
充电盒的电池
电量不足
这很有可能是在不自觉的情况下将电源使用怠尽所
造成的。请对充电盒进行充电后,将耳机放回充电盒,
同时确认LED指示灯是否会亮起。
关于充电方法,请参阅使用说明书第 31页的「充电
方式」内容。
使用(配件/原厂)
以外的耳胶
使用(配件/原厂) 以外的耳胶时,充电盒的充电功能
可能会受到阻扰,有可能造成充电不足的情况。请将
耳胶更换成(配件/原厂) 产品后,再确认是否能正常
充电。
请确认耳机金属充电端子与充电盒中的充电顶针接
触情况是否稳合。
这很有可能是在不自觉的情况下将电源使用怠尽所
造成的。请对充电盒进行充电后,将耳机放回充电盒,
同时确认LED指示灯是否会亮起。
关于充电方法,请参阅使用说明书第 31页的「充电方
式」内容。
状况
对应方式
原因状况
对应方式
原因
This manual suits for next models
2
Other Final Headphones manuals


