Firefly parents User manual

User Guide for Parents

TABLE OF CONTENTS
SAFETY INFORMATION . . . . . . . . . . . . . . . . . . . . . . . . . . . . . . . . . . . . . . . . . . .1
Network Services . . . . . . . . . . . . . . . . . . . . . . . . . . . . . . . . . . . . . . . . . . . . .1
Charger and Enhancements . . . . . . . . . . . . . . . . . . . . . . . . . . . . . . . . . . . . .1
MEET THE FIREFLY™ PHONE . . . . . . . . . . . . . . . . . . . . . . . . . . . . . . . . . . . . . .2
PREPARE THE PHONE FOR USE . . . . . . . . . . . . . . . . . . . . . . . . . . . . . . . . . . . .3
Install a SIM Card . . . . . . . . . . . . . . . . . . . . . . . . . . . . . . . . . . . . . . . . . . . .3
Charge the Battery . . . . . . . . . . . . . . . . . . . . . . . . . . . . . . . . . . . . . . . . . . . .4
GETTING STARTED . . . . . . . . . . . . . . . . . . . . . . . . . . . . . . . . . . . . . . . . . . . . . .5
Power On and Off . . . . . . . . . . . . . . . . . . . . . . . . . . . . . . . . . . . . . . . . . . . .5
Display . . . . . . . . . . . . . . . . . . . . . . . . . . . . . . . . . . . . . . . . . . . . . . . . . . . . .5
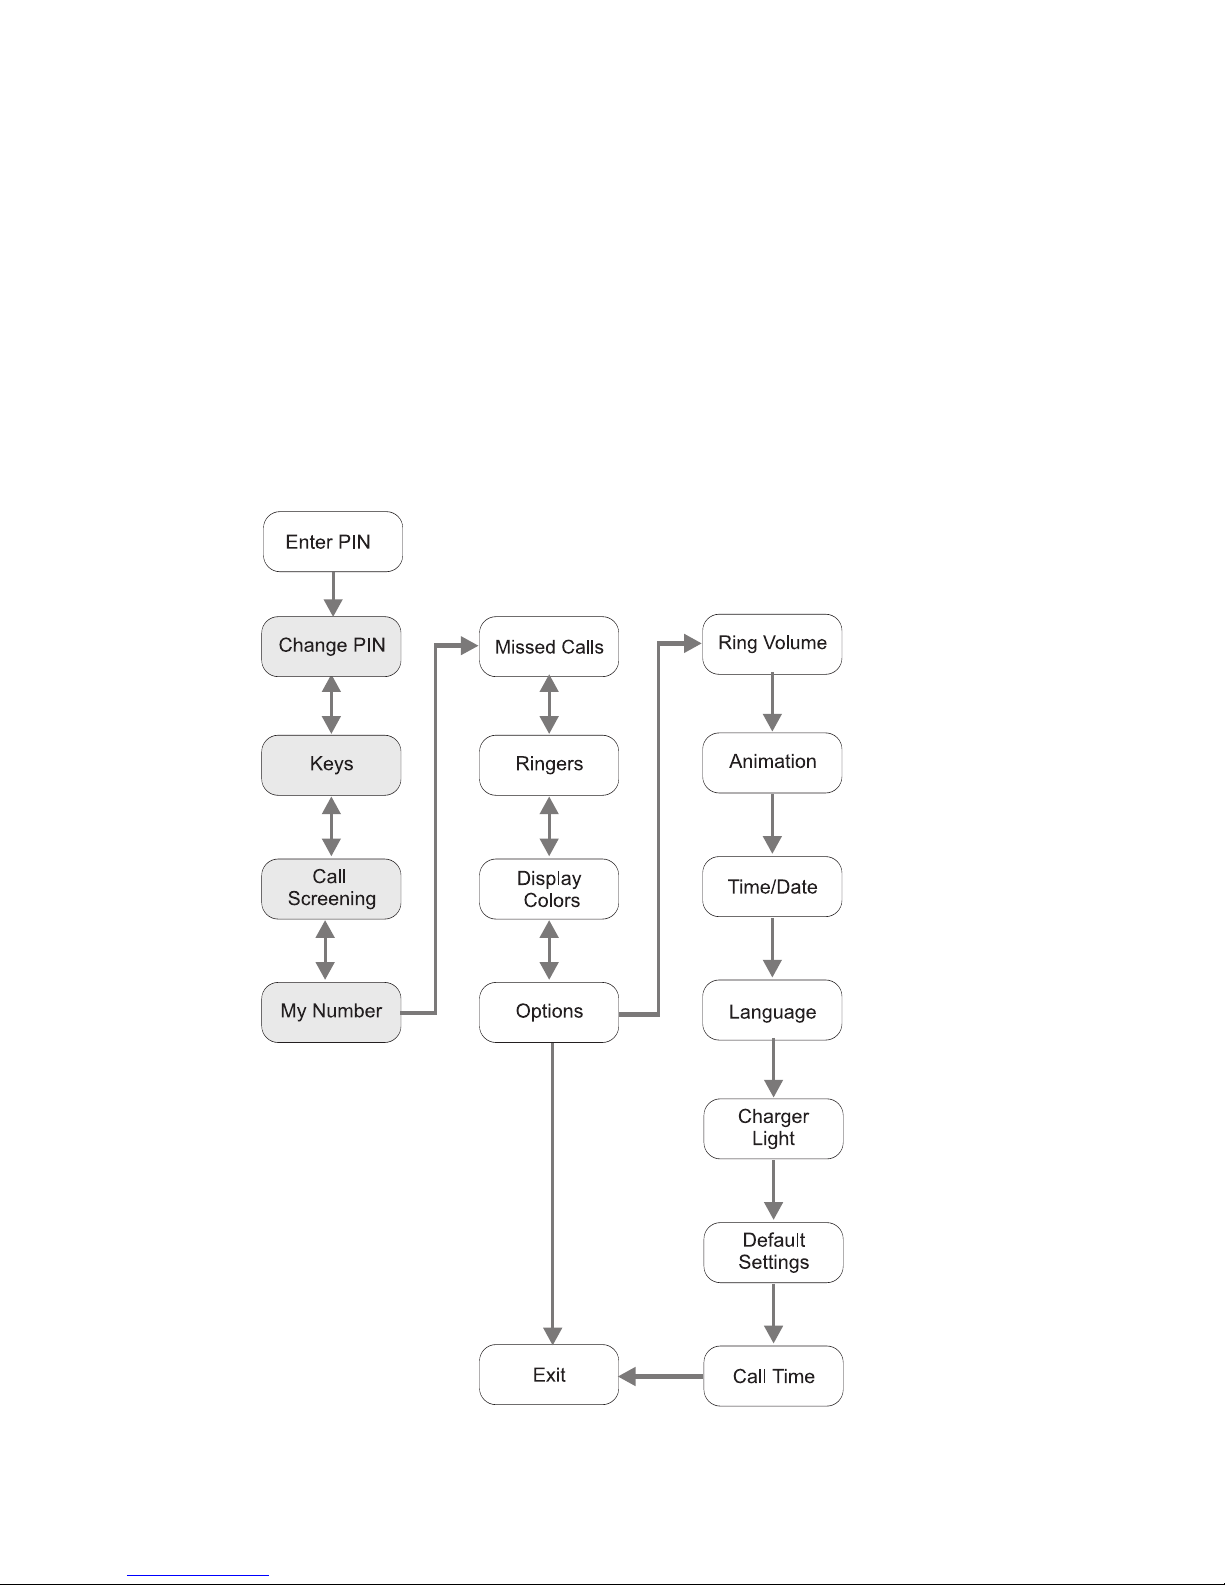
MENUS . . . . . . . . . . . . . . . . . . . . . . . . . . . . . . . . . . . . . . . . . . . . . . . . . . . . . . .6
Menu Choices . . . . . . . . . . . . . . . . . . . . . . . . . . . . . . . . . . . . . . . . . . . . . . .8
Using the Menus . . . . . . . . . . . . . . . . . . . . . . . . . . . . . . . . . . . . . . . . . . . . .9
SETTING UP THE PHONE . . . . . . . . . . . . . . . . . . . . . . . . . . . . . . . . . . . . . . . .10
Set the Time and Date . . . . . . . . . . . . . . . . . . . . . . . . . . . . . . . . . . . . . . . .10
Set Up the Call Keys . . . . . . . . . . . . . . . . . . . . . . . . . . . . . . . . . . . . . . . . .11
Load Call Key Numbers from the SIM . . . . . . . . . . . . . . . . . . . . . . . . . . . .14
Call Screening . . . . . . . . . . . . . . . . . . . . . . . . . . . . . . . . . . . . . . . . . . . . . .14
CUSTOMIZING THE PHONE . . . . . . . . . . . . . . . . . . . . . . . . . . . . . . . . . . . . . .15
Set the Ring Tones . . . . . . . . . . . . . . . . . . . . . . . . . . . . . . . . . . . . . . . . . . .15
Select Display Colors . . . . . . . . . . . . . . . . . . . . . . . . . . . . . . . . . . . . . . . . .15
Select an Animation . . . . . . . . . . . . . . . . . . . . . . . . . . . . . . . . . . . . . . . . . .16
Change the Charger Lights . . . . . . . . . . . . . . . . . . . . . . . . . . . . . . . . . . . . .16
USING THE PHONE . . . . . . . . . . . . . . . . . . . . . . . . . . . . . . . . . . . . . . . . . . . . .17
Make a Call . . . . . . . . . . . . . . . . . . . . . . . . . . . . . . . . . . . . . . . . . . . . . . . .17
Make an Emergency Call . . . . . . . . . . . . . . . . . . . . . . . . . . . . . . . . . . . . . .17
Answer a Call . . . . . . . . . . . . . . . . . . . . . . . . . . . . . . . . . . . . . . . . . . . . . . .18
Answer a Call with a Waiting Call . . . . . . . . . . . . . . . . . . . . . . . . . . . . . . . .18
Send Numbers During a Call . . . . . . . . . . . . . . . . . . . . . . . . . . . . . . . . . . .18
Adjust the Volume . . . . . . . . . . . . . . . . . . . . . . . . . . . . . . . . . . . . . . . . . . .19
View the Missed Calls List . . . . . . . . . . . . . . . . . . . . . . . . . . . . . . . . . . . . .19
View the Call Timer . . . . . . . . . . . . . . . . . . . . . . . . . . . . . . . . . . . . . . . . . .19
Firefly Fireworks™ display and other lights . . . . . . . . . . . . . . . . . . . . . . . . .20
Attach the Backpack Clip . . . . . . . . . . . . . . . . . . . . . . . . . . . . . . . . . . . . . .20

HELP YOUR CHILD USE THEIR PHONE . . . . . . . . . . . . . . . . . . . . . . . . . . . . .21
MAINTENANCE AND TROUBLESHOOTING . . . . . . . . . . . . . . . . . . . . . . . . . . .21
Cleaning the phone . . . . . . . . . . . . . . . . . . . . . . . . . . . . . . . . . . . . . . . . . .21
Use the Manual Reset Option . . . . . . . . . . . . . . . . . . . . . . . . . . . . . . . . . .21
FIREFLY ONE-YEAR LIMITED WARRANTY . . . . . . . . . . . . . . . . . . . . . . . . . . . .22
FCC NOTICE AND SAR STATEMENT . . . . . . . . . . . . . . . . . . . . . . . . . . . . . . . .25
U.S. FOOD AND DRUG ADMINISTRATION
CONSUMER UPDATE ON MOBILE PHONES . . . . . . . . . . . . . . . . . . . . . . . . . .27
Copyright ©2006 Firefly Mobile, Inc.
Firefly and Firefly Fireworks are the exclusive trademarks of Firefly Mobile, Inc.
For more information visit www.fireflymobile.com.
Screen images are simulated. Actual screen images may
vary between service providers.
Printed in USA
84-0001-005

SAFETY INFORMATION
Read and follow these guidelines. Not following these guidelines may be dangerous
or illegal. Read the complete guide for more information.
Power up (turn on) safely. Use this phone only where wireless phones
are permitted.
Interference. All wireless phones may be susceptible to interference,
which could affect performance.
Turn off in hospitals. Follow any restrictions. Wireless devices can cause
interference with medical equipment.
Turn off in aircraft. Wireless devices can cause interference in aircraft.
Qualified service. Only qualified technicians may repair this product.
Water resistance. This phone is not waterproof. Keep it dry.
Emergency calls. Make sure the phone is turned on and in service. Press
and hold the emergency call button until Emergency Call or Call 112
appears in the display. Press to complete the call.
When using the features in this device, obey all laws and respect privacy and
legitimate rights of others.
Network Services
To use this handset, you must obtain service from a wireless service provider. Your
service provider may provide additional instructions for using network services on
this phone. Some networks may have limitations that affect how you can use
wireless services. Please ensure that voicemail is not included on your account as
the Firefly phone does not support this functionality.
Charger and Enhancements
This handset uses an internal, rechargeable lithium-ion battery. When you
disconnect a power cord, grasp and pull the plug, not the cord. For availability of
approved chargers and enhancements, please check with your dealer.
Warning! Use only chargers and accessories approved by the manufacturer
for use with this phone. Use of any other types will invalidate the warranty
and may be dangerous.
1

MEET THE FIREFLY PHONE
Your new Firefly wireless phone is designed for kids. It is easy to use. Just press a
couple of buttons to place a call. There is no need to remember numbers or dial.
The special Phone Book makes this possible. It can hold up to 20 pre-programmed
numbers. Use the parental control options to limit incoming and outgoing calls to
the numbers in the Phone Book.
1Earpiece. Hold to ear when using the
phone.
2Display. View status and menu
information.
3911 Assistance Button. Press and hold to
activate the emergency call function.
Emergency Call or Call 112 appears on
the display.
4End Key. Press to end a call. Press and
hold to turn the phone on or off.
5Phone Book Call Key. Press to view and
call up to 20 pre-programmed numbers.
6Dad Call Key. Press to call a pre-
programmed number.
7Microphone. Hold near mouth when using
the phone.
8Mom Call Key. Press to call a pre-
programmed number.
9Send Key. Press to answer or make a call.
Press and hold to see the menus.
10 Volume Down Button. Press to decrease
earpiece or ring volume.
11 Firefly Fireworks™ Display Button. Press
to start the Firefly Fireworks™ display.
12 Volume Up Button. Press to increase
earpiece or ring volume.
13 Charger Port. For charger cable.
14 Headset Port. Plug your headset in here.
15 Accessory Hook. Use to attach phone
accessories.
12
11
10
8
7
6
5
4
3
2
1
9
13
15 14
2

PREPARE THE PHONE FOR USE
This phone requires a SIM card and a charged battery for operation.
Install a SIM Card
Your phone may already have a SIM card installed. If not, you must install a SIM
card before setting up your phone. The SIM card (provided by your network service
provider) contains the phone number for your phone and provides access to
network service options.
Note: Contact your network
service provider if you have
problems with the SIM card or
questions about your service.
1. Turn your phone off. Using
your thumb, push up and hold
the release button at the top of
the back shell.
a. Use your fingers to pull the
back shell off.
2. Turn the phone upside-down.
Push the and keys with
your thumbs and pull the front
shell off with your fingers.
a. Be sure your fingers don’t
cover the tabs on the
bottom of the front shell.
3. Pull the front shell off.
4. Slide the SIM card under the
metal clip. Be sure the cut
corner is lower left and the
gold contacts of the SIM card
are face down.*
5. Replace the front shell.
Move the keypad into
place, if needed.
6. Replace the back shell. Press
the front and back shells together.
3
11a
3
22a
* Call Keys and Call Screening will only work if the SIM card is installed in a Firefly phone.
4
5 6

Charge the Battery
It will take about 2 hours to charge the internal battery for the first time. While
charging, the tail lights flash and Charging appears on the display. The battery icon
will indicate that the phone is charging.
To charge the battery:
1. Connect the charger to a standard AC
wall outlet.
2. Plug the charger cable into the phone’s
battery port.
Note: After the initial charge, recharge the
battery when the battery icon in the display
reads low.
Warning! Always use the charger supplied with your phone or one approved
by the manufacturer. Other chargers may damage the phone and will void
the warranty.
4
Charger
cable

GETTING STARTED
After the SIM card is installed and the battery is charged, you are ready to begin
the setup process.
Power On and Off
To turn on your phone, press and hold for
several seconds. The lights go on and the display
activates. The phone will attempt to locate the
wireless service.
Note: If the phone is not in a service area, No
Network appears on the display.
To turn off your phone, press and hold for
several seconds. The display goes blank and the
lights go off.
Display
The display area is activated when the phone is on and provides information about:
• Your wireless service.
• Signal strength.
• Battery status.
• Name and number of incoming/outgoing calls.
• Menu options and selections.
1. Indicates signal strength.
Strong signal
Weak signal
2. Indicates battery strength.
Full charge
Partial charge
Low charge, recharge battery
3. Text area.
5
Network
8:00 SAT SEP 17
132
Press and
hold to turn
phone on or
off.

MENUS
Use the menus to customize your phone and make it more fun for your child to
use. For example, using the menus you or your child can:
• Change the Firefly Fireworks™ display animation.
• Select display colors and ring tones.
• Select a language for the display text.
In addition, several PIN-protected, parental control menus allow you to manage
incoming and outgoing calls for your child.
To prepare the phone for use, complete the set-up tasks described in this section.
Gray = PIN-protected menu
6

Each menu controls a special operation or feature.
MENU OPERATION/FEATURE
Enter PIN Enter your PIN to access the PIN-protected menus.
*Change PIN Set up a unique PIN.
*Keys Assign names and telephone numbers to the Call Keys.
*Call Screening Turn Call Screening on or off.
*My Number See the phone number of your phone.
Missed Calls See a list of unanswered calls.
Ringers Select and assign special ring tones for each Call Key.
Display Colors Change the background color of the display.
Options Set/select the following options:
Ring Volume Set the default ring volume.
Animation Select the animation option for the display.
Time/Date Set the time and date.
Language Select the language used for display
messages.
Charger Light Turn the tail lights on or off when charging
the battery.
Default Settings Restore the phone to its original factory
settings.
Call Time** View the total cumulative call time of your
phone.
Exit Return to normal operation.
*Indicates a PIN-protected menu.
** The amount of network connection time you track on your timer may not equal the amount
of time for which you are billed by your service provider. For billing information, please
contact your service provider directly.
7

Menu Choices
In the menus, the , , and keys are used to select the menu choices on
the bottom line of the display. Press the menu key below the menu choice to
perform the task.
MENU CHOICE PRESS THE MENU KEY TO:
<<––Scroll to previous item.
––>>Scroll to next item.
BACK Return to previous menu.
CANCEL Cancel the current selection.
COLOR View the next display color.
EDIT Change/modify time, date, name, or number.
EXIT Close the menus and return to normal operation.
KEY Select the next Call Key.
LOAD Load a name and number from the SIM card.
MORE View additional options.
NEXT View next screen or menu.
NO Reject current setting/selection.
OK Accept current or selected setting/selection.
OPTION View the next Option menu.
RING Play the next ring tone choice.
SAVE Apply current setting/selection.
SWITCH Switch between options.
YES Accept current setting/selection.
Note: Not all menu choices are available in each menu.
8
Time/Date
BACK OK OPTION
Menu Name or Menu Option
Menu Choices

Using the Menus
When you access the menus, you will be prompted to
enter a 4-digit PIN. If you skip the PIN, you will see only
the menus that are not PIN-protected. If you enter a PIN,
you will see all the menus.
To access the menus:
1. Press and hold until you see Enter PIN.
2. Press SKIP to access the menus that are not
PIN-protected.
3. Use BACK and NEXT to move through the menus. Use
OK to select options.
4. To exit the menus, continue to press NEXT until you see
the Exit screen, then press EXIT.
To access the PIN-protected menus:
1. Press and hold until you see Enter PIN.
2. Press ENTER.
3. Enter your PIN. {default PIN = 1 2 3 4}
a. Press –> to scroll to the first number and press
OK. An asterisk (*) appears on the top line.
b. Scroll to the next number and press OK. Repeat
until you have entered the PIN.
c. The screen will automatically scroll to Done. Press
OK. If the PIN is accepted, you will see Change PIN.
4. Press YES to change the PIN number. (Press NO to
go to the next menu without changing the PIN.)
a. Scroll to the number and press OK. An asterisk (*)
appears on the top line.
b. Scroll to the next number and press OK. Repeat
until you have entered the PIN. Make sure there
are 4 asterisks (****) on the top line.
c. The screen will automatically scroll to Done. Press
OK. Saved indicates the new PIN was accepted.
Note: If you change the default PIN, remember to
save a copy of the new PIN in a secure place.
5. Press YES to change the PIN again or press NO to move to the next menu.
6. Use BACK and NEXT to move through the menus. Use OK to select options.
9
Done Del 0 1 2
<– OK –>
Enter PIN
ENTER SKIP
****
Done Del 0 1 2
<– OK –>

SETTING UP THE PHONE
Before using the phone, you should:
• Set the time and date if not automatically set by your service provider.
• Set up the Mom, Dad, and Phone Book keys.*
• Turn Call Screening ON (optional).*
Note: When Call Screening is ON, the phone only accepts calls from numbers in the
Mom, Dad, and Phone Book keys. When Call Screening is OFF, the phone accepts
all incoming calls.
Set the Time and Date
Most service providers automatically set the time and date for the phone. If your
time and date are not correct, follow these steps:
1. Scroll through the menus until you see Options.
Press OK.
2. Press OPTION until you see Time/Date. Press OK.
3. Press EDIT to see the date options:
a. Press <– and –> to scroll to the current year, then
press OK.
b. Scroll to the current month. Press OK.
c. Scroll to today's date. Press OK.
d. Scroll to Done. Press OK.
e. Check the date. Press EDIT if you need to change
the date.
f. Press OK to save the date.
4. Press EDIT to see the time options:
a. Scroll to the current hour. Press OK.
b. Scroll to the current minute. Press OK.
c. Scroll to am or pm and press OK. Scroll to Done
and press OK.
d. Check the time. Press EDIT if you need to change
the time.
e. Press OK to save the time.
5. Press BACK to return to the Options menu, then press NEXT until you see EXIT.
6. Press EXIT to exit the menus and return to the normal display.
10
Date:
2005/12/04
BACK OK EDIT
Options
BACK OK NEXT
Time/Date
BACK OK OPTION
* Call Keys and Call Screening will only work if the SIM card is installed in a Firefly phone.

Set Up the Call Keys
There are 3 Call Keys:*
• Two speed dial keys, and . Each calls a single
number. By default, these keys are called Mom and Dad.
• The key is used to access up to 20 names and numbers.
Use the PIN-protected Keys menu to change the names and
numbers assigned to the three Call Keys.
To set up the and Call Keys:
1. Press and hold to access the menus. Enter your PIN.
2. Scroll through the menus to Keys. Press OK. A Call Key name appears on the display.
3. Press OK to select this Call Key. (Press KEY again to select another Call Key.)
4. View the Call Key’s current number on the display screen.
5. Press EDIT to change that number (or press OK to keep it).
6. Press DEL to erase the current phone number, then
press EDIT to add a new number.
a. Press <- and -> to scroll to the first digit of the
number, then press OK. The digit appears on the top line.
b. Scroll to the next digit and press OK. Repeat until the entire number is on
the top line.
Tip: Scroll to Del and press OK to delete a digit.
c. Scroll to Done and press OK. The number is displayed. Press OK to save this number.
7. The Call Key name will appear on the display.
8. Press EDIT to change that name (or press OK to keep it).
9. Press DEL to erase the current name, then press EDIT to add a new name.
a. Press <- and -> to scroll to the fi rst letter of the new name, then press OK.
The letter appears on the top line.
Tip: Scroll to Del and press OK to delete a letter.
b. Scroll to the next letter and press OK. Repeat until the entire name is on
the top line.
c. Scroll to Done and press OK. The name is displayed. Press OK to save the
name and return to the Keys menu.
10. Repeat steps 3-11 to set up the other Call Key.
11. Press BACK to return to the Keys menu, then press NEXT until you see EXIT.
12. Press EXIT to exit the menus and return to the normal display.
11
Keys
BACK OK NEXT

To set up the Phone Book key:
The Phone Book can hold a maximum of 20 names and numbers. Setting up the
names and numbers in the Phone Book is similar to setting up the Mom and
Dad keys.
Use the PIN-protected Keys menu to add, change, and delete names and numbers
in the Phone Book.
•Add. Enter names/numbers.
•Edit. Modify names/numbers already in the Phone Book.
•Delete. Remove names and numbers from the Phone Book.
To add a name/number to the Phone Book:
1. Press and hold to access the menus. Enter your PIN.
2. Scroll to Keys and press OK. Press KEY until you see
Phone Book. Press OK.
3. You will see Add. Press OK.
a. Press EDIT to add a name.
b. Use <– and –> to scroll to a letter and press OK
to put it on the top line.
Tip: Scroll to Del and press OK to delete a letter.
c. Scroll to the next letter and press OK. Repeat until the entire name is on the
top line of the display.
d. Scroll to Done and press OK. The name will appear on the display. Press OK
to save the name.
e. Press EDIT to enter the number.
f. Scroll to the desired digit and press OK to put the digit on the top line.
g. Scroll to the next digit and press OK. Repeat until the entire number is on the
top line.
h. Scroll to Done and press OK.
i. Press OK to confirm.
4. Press OK to enter another name/number and repeat step 3.
5. Press BACK to return to the Keys menu, then press NEXT until you see EXIT.
6. Press EXIT to exit the menus and return to the normal display.
12
Phone Book
BACK OK KEY

To edit the Phone Book:
1. Press and hold to access the menus. Enter your PIN.
2. Scroll to Keys and press OK. Press KEY until you see Phone Book and press OK.
3. Press OPTION until you see Edit, then press OK.
a. Press -> to scroll to the name and number you
want to edit and press EDIT to select.
b. Press EDIT again to confirm or press OK to leave
the name unchanged. (Skip to Step f.)
c. Use <– and –> to scroll to a letter and press OK to put it on the top line.
Tip: Scroll to Del and press OK to delete a letter.
d. Scroll to the next letter and press OK. Repeat until the entire name is on the
top line of the display.
e. Scroll to Done and press OK. Press OK again to confirm. The number will
appear on the display.
f. Press EDIT to change the number or press OK to leave the number unchanged.
g. Scroll to the desired digit and press OK to put the digit on the top line.
h. Scroll to the next digit and press OK. Repeat until the entire number is on
the top line.
i. Scroll to Done and press OK.
j. Press OK to confirm.
4. Press OK to enter another name/number and repeat step 3.
5. Press BACK to return to the Keys menu, then press NEXT until you see EXIT.
6. Press EXIT to exit the menus and return to the normal display.
To delete a name/number from the Phone Book:
1. Press and hold to access the menus. Enter your PIN.
2. Scroll to Keys and press OK. Press KEY until you see Phone Book and press OK.
3. Press OPTION until you see Delete. Press OK.
4. Use –> to scroll to the name/number you want to delete.
5. Press DEL to delete the Phone Book entry. Press
YES to confirm that you want to delete this Phone
Book entry.
6. Press BACK to return to the Keys menu, then press
NEXT until you see EXIT.
7. Press Exit to exit the menus and return to the normal display.
13
Name
Number
BACK EDIT –>
Name
Number
BACK DEL –>

Load Call Key Numbers from the SIM
Note: Your SIM card can be pre-programmed with names and numbers from
any GSM cellular handset. These names and numbers can then be loaded into the
and Call Keys on your Firefly phone.*
1. Press and hold to access the menus. Enter your PIN.
2. Scroll through the menus to Keys. Press OK.
3. Press KEY to scroll to the or Call Key and press OK.
4. Press LOAD.
a. Press –> to scroll through the names and numbers on the SIM.
b. Press OK when you see the desired name and number.
c. Press OK to save the name/number.
Tip: Press EDIT if you need to change the number.
d. Press OK again to confirm the name/number and finally to return to Keys.
5. Repeat steps 3 and 4 to load another name and number.
Call Screening
When Call Screening is OFF, the phone will accept all incoming calls. When Call
Screening is ON, the phone will accept calls only from the names/numbers assigned
to the Call Keys and in the Phone Book. The default setting for Call Screening is OFF.
After you activate the Call Screening option, test it to make sure it is working
properly before giving the phone to your child.*
To turn Call Screening on or off:
1. Press and hold to access the menus. Enter your PIN.
2. Scroll through the menus to Call Screening. Press OK.
3. Press SWITCH to toggle between Call Screen ON and Call Screen OFF.
4. Press OK to accept the setting.
To test Call Screening, call your phone from two different phones:
• Call from a phone that is listed in the Phone Book. Your phone should ring.
• Call from a phone that is not in the Phone Book. Your phone should not ring.
If Call Screening is not working:
• Check the Phone Book to make sure the number of the "approved phone" is
in the Phone Book.
• Check the Call Screening menu to make sure the Call Screening is ON.
14
* Call Keys and Call Screening will only work if the SIM card is installed in a Firefly phone.

CUSTOMIZING THE PHONE
You have finished the basic setup and the phone is ready to use. However, you may
also want to set/select other features, including:
• Set ring tones for each Call Key.
• Set display colors for each Call Key.
• Select an animation that will run during the Firefly Fireworks™ display.
Set the Ring Tones
To assign a special ring tone to a Call Key:
1. Scroll through the menus until you see Ringers. Press OK.
2. Press KEY until you see the Call Key you want. Press OK.
3. Listen to the first ring tone. Press RING to hear
another ring tone. Press OK to assign the ring tone to
the Call Key. Saved appears on the display and you
will return to the Ringers menu.
4. Repeat steps 2 and 3 to assign a ring tone to each
Call Key.
5. Press BACK to return to the Ringers menu, then press
NEXT until you see EXIT.
6. Press EXIT to exit the menus and return to the normal display.
Select Display Colors
To assign a background display color to a Call Key:
1. Scroll through the menus until you see Display Colors.
Press OK.
2. Press KEY until you see the Call Key you want. Press OK.
3. Look at the display color. Press COLOR to see more
choices. Press OK to assign the color to the Call Key.
Saved appears on the Display and you will return to
the Display Colors menu.
4. Repeat to assign a display color to another key.
5. Press BACK to return to the Display Colors menu, then
press NEXT until you see EXIT.
6. Press EXIT to exit the menus and return to the normal display.
15
Ringers
BACK OK NEXT
Genie
BACK OK RING
Display Colors
BACK OK NEXT
Turf
BACK OK COLOR

Select an Animation
The animation you select will play during the Firefly Fireworks™ display.
To select an animation:
1. Scroll through the menus until you see Options. Press OK.
2. Press OPTION until you see Animation. Press OK.
3. Press MORE until you see the animation name you
want, then press OK. Saved will appear on the
display and you will return to the Animation menu.
4. Press BACK to return to the Animation menu, then
press NEXT until you see EXIT.
5. Press EXIT to exit the menus and return to the normal display.
Change the Charger Lights
To turn the tail lights on or off while the battery is charging:
1. Scroll through the menus until you see Options. Press OK.
2. Press OPTION until you see Charger Light. Press OK.
3. Press SWITCH to turn the lights on or off, then press OK to save the setting
4. Press BACK to return to the Options menu, then press NEXT until you see EXIT.
5. Press EXIT to exit the menus and return to the normal display.
16
Soccer
BACK OK MORE

USING THE PHONE
Now that you have set-up and customized the phone, it's time to use it for the first time.
Make a Call
To make a call using or :
1. Press or .
2. Check the name on the display.
Note: If it is not correct, you need to reprogram
this key.
3. Press to place the call.
4. Press to end the call.
To make a call using the
Phone Book:
1. Press .
2. Use <– and –> to scroll to the name/number
you want to call. Press OK. The name will
appear on the display.
3. Press to place the call.
4. Press to end the call.
Make an Emergency Call
1. Press and hold the 911 assistance button for
3 seconds. Release the button when you see
Emergency Call or Call 112 on the display.
Note: Do NOT complete the call unless this is an
actual emergency. 112 is the international
emergency telephone number for GSM mobile
networks. In the United States, dialing 112 on a
mobile phone is the same as dialing 911.
2. Press to complete the call.
3. Press to end the call.
17
1
3
2
1
4
3
2
3
1
2
4
Table of contents
Other Firefly Cell Phone manuals