FirstBuild ZVC48DCB1 User manual

INSTRUCTIONS
USE & CARE
MANUAL
INSTALLATION
ZVC48DCB1/ZVC48DCSS1
FirstBuild.com
Designer Hood Duct Cover

Safety Information
BEFORE YOU BEGIN
IMPORTANT - Save these instructions
for local inspector’s use.
Read these instructions completely and carefully.
IMPORTANT - Observe all governing
codes and ordinances.
Note to Installer - Be sure to leave these
instructions with the Consumer.
Note to Consumer - Keep these instructions
for future reference.
Skill level - Installation of this vent hood duct
cover requires basic mechanical skills.
Proper installation of this vent hood duct cover is
the responsibility of the installer. Product failure due
to improper installation is not covered under the
warranty. See Warranty section for more information.
Due to the weight and size of these vent hood covers
and to reduce the risk of personal injury or damage to
the product, TWO PEOPLE ARE REQUIRED FOR
INSTALLATION OF THIS PRODUCT.
TO REDUCE THE RISK OF FIRE,
ELECTRICAL SHOCK OR INJURY TO PERSONS,
OBSERVE THE FOLLOWING:
Installation work must be done by qualified person(s)
in accordance with all applicable standards, including
fire-rated construction.
When cutting or drilling into walls or ceilings, do not
damage electrical wiring or other hidden utilites.
TO REDUCE THE RISK OF FIRE, ONLY USE METAL
DUCTWORK BEHIND THIS DUCT COVER.
FirstBuild.com 2R2

Installation Instructions
Contents
Safety Information.................................................2
Product Dimenions................................................3
Additional Parts Provided......................................3
Tools & Materials Required...................................3
Drawing the Centerline..........................................4
Installation Clearances..........................................4
Advanced Planning ..............................................4
Unboxing...............................................................4
Locating the Mounting Plate..................................5
Fastening the Mounting Plate................................6
Fastening the Duct Cover......................................6
Cleaning Your Duct Cover.....................................6
Limited Warranty....................................................7
Product Dimensions
Tools & Materials Required
Additional Parts Provided
These parts are included with the duct cover. Some
fasteners may come assembled on product.
(Not supplied)
FirstBuild.com 3R2
13 ¹/16”14 ¹/16”
QTY: 4 medium pan
head Phillips screws
for securing the
mounting plate
to the wall.
QTY: 4 small shallow
T20 Torx screws
for securing the duct
cover to the
mounting plate.
Custom
Height
8” - 42”
Duct Cover
Mounting Plate
Safety Glasses
Safety Gloves Tape Measure
Pencil Level
T20 Torx screwdriver
Electric or battery operated drill with
Phillips driver
Step ladder

This vent hood duct cover should only be installed above a 48” Monogram Designer Vent Hood. The duct cover shall
be spaced off of the top of the vent hood by a minimum of 1/4” to avoid the transfer of vibrations that may cause
unwanted noises.
FirstBuild.com
Remove sleeve Lift productRemove top cap
Make sure to wear safety glasses and safety gloves before unboxing or using tools.
4R2
Installation Instructions
Adequate structural support must be provided to properly attach the mounting plate to the wall. Fastening into
studs is encouraged. If studs are not available near the installation location, use appropriate drywall anchors
(not included) to ensure that the mounting plate is properly fastened into the wall.
Installation Clearances
Wall Framing for Adequate Support
Advanced Planning
Unboxing
1/4” MIN.
Ceiling
Duct
Duct Cover
Remove strapping
Ceiling
FirstBuild.com 5R2
Installation Instructions
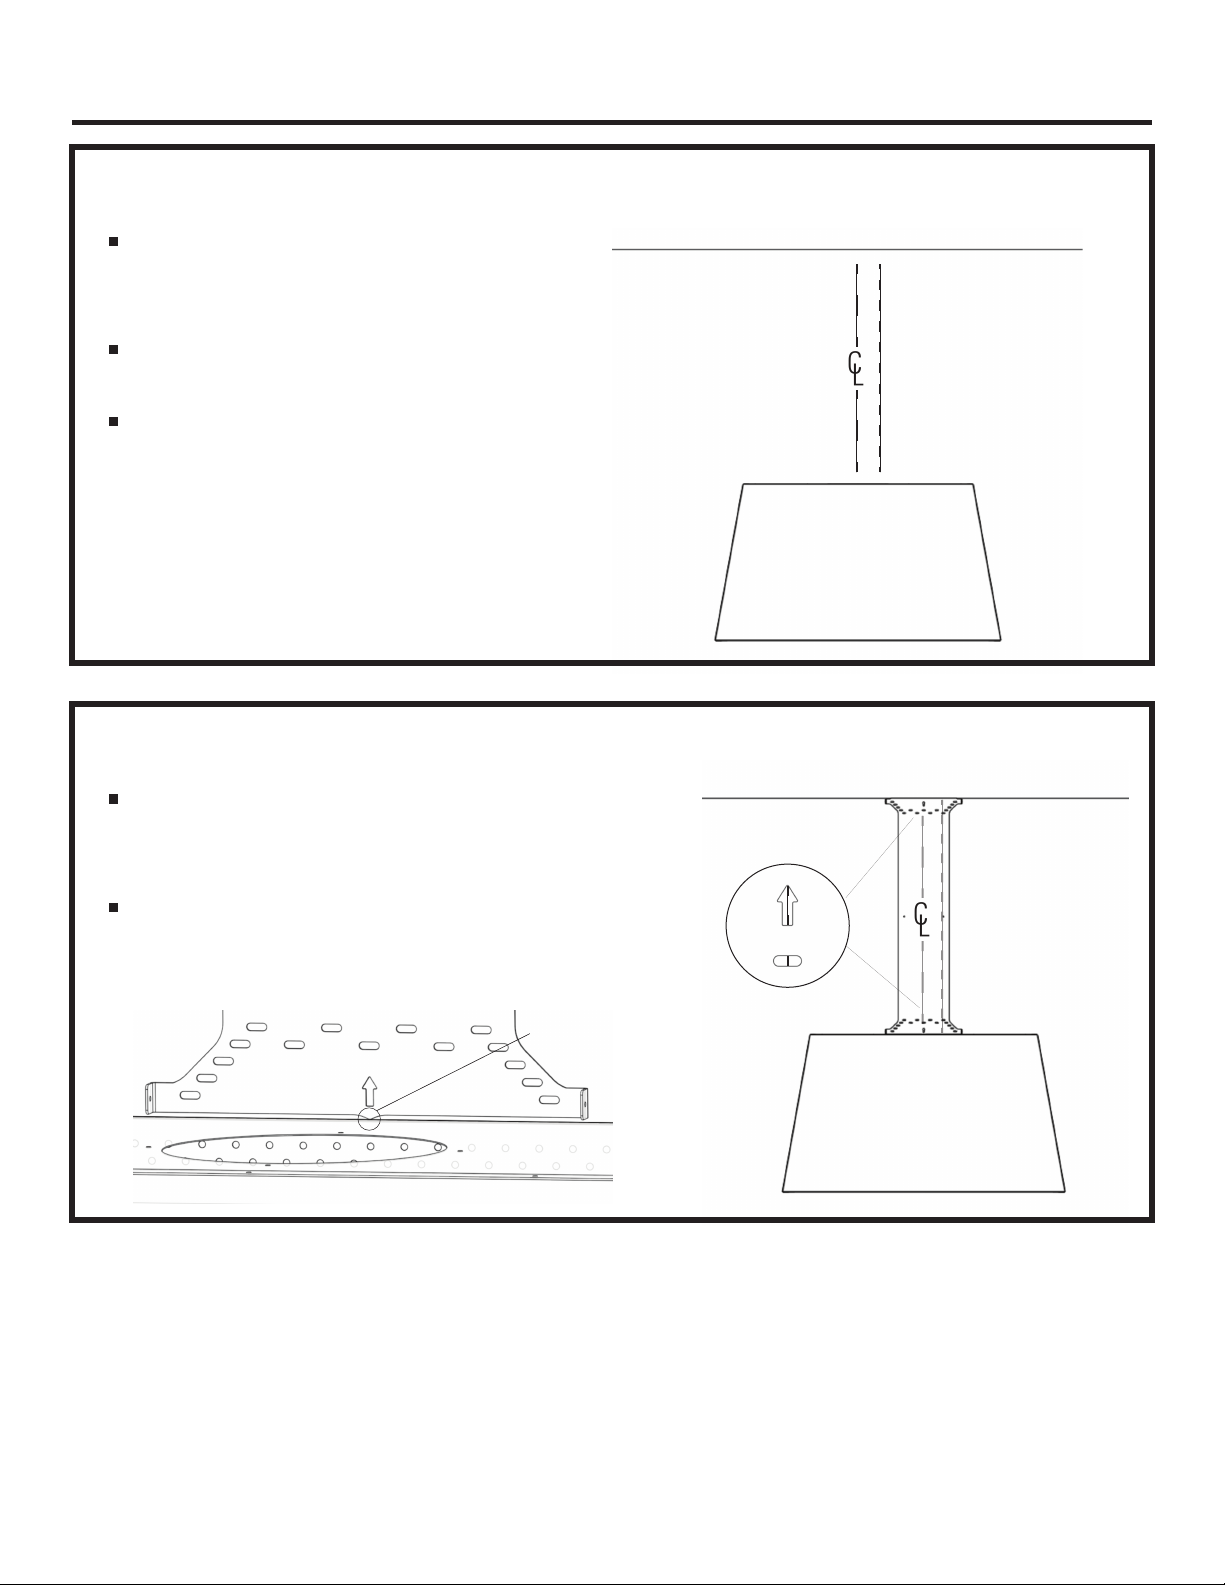
Step 1: Determine centerline location
Mark the location of any studs located within 6”
of the centerline.
Use a level to draw a vertical centerline.
Draw the line from the top of the vent hood
to the ceiling.
The vent hood should be installed in the desired
final location before proceeding to the next step.
Ceiling
Step 2: Locate the mounting plate
Confirm that the built-in 1/4” spacer on the bottom of the
mounting plate is at or above the top of the vent hood. Push
up the mounting plate against the ceiling.
Place the mounting plate against the wall.
Align the tips of the arrows on top and bottom
of the mounting plate with the centerline.
Stud
1/4” spacer

FirstBuild.com 6R2
Installation Instructions
Use the included fasteners to attach the mounting
plate to the wall. Drive four (4) medium pan head
screws into studs where available, using an electric
drill. Predrill where necessary.
Step 3: Fasten the mounting plate
Use appropriate drywall anchoring hardware where studs
are not available.
Step 4: Fasten the duct cover
Place the duct cover around the mounting plate. Lift up
the duct cover or use shims underneath to lift the
duct up 1/4” to align the holes.
Use the included (4) shallow T20 Torx screws to
attach the duct cover to the mounting plate in
all four corners.
Do not over tighten the screws.
Caring for your Duct Cover
Use an approved stainless steel polish or cleaner or warm, soapy water to wipe down your duct cover.
Cleaning your duct cover
Do not use abrasive pads, chemicals, or other cleaning methods that can damage the finish.
Always wipe in the direction of the grain.

Limited Warranty Information
FirstBuild.com 7R2
For the period of 1 year from the date of the original purchase: If the duct cover fails due to a defect in materials or work-
manship, during the limited one-year warranty, FirstBuild will either repair your product, replace your product with a new or
remanufactured product, or refund the purchase price of the product at FirstBuild’s sole discretion.
What FirstBuild Will Not Cover:
▪ Service trips to your home.
▪ Improper installation, delivery or maintenance.
▪ Failure of the product if it is abused, misused, or used for other than the intended purpose or used commercially.
▪ Damage caused after delivery.
▪ Damage to the product caused by accident, fire, floods or acts of God.
▪ Incidental or consequential damage caused by possible defects with this appliance.
▪ Labor and other charges to install and/or remove the product.
EXCLUSION OF IMPLIED WARRANTIES
Your sole and exclusive remedies are product exchange or refund as provided in this Limited Warranty. Any implied
warranties, including the implied warranties of merchantability or fitness for a particular purpose, are limited to one year or
the shortest period allowed by law.
This limited warranty is extended to the original purchaser for products purchased for home use within the USA. In Alaska
and Hawaii, the limited warranty does not include the costs of shipping units.Some states do not allow the exclusion or
limitation of incidental or consequential damages. This limited warranty gives you specific legal rights, and you may also
have other rights which vary from state to state. To know what your legal rights are, consult your local or state consumer
affairs office or your state’s Attorney General.
Warrantor: FirstBuild, Louisville, KY 40208
Consumer Support
Proof of the original purchase date is needed to obtain service under the warranty.
This manual suits for next models
1
Table of contents


