Fisher DE39 User manual

d e v e l o p i n g s o l u t i o n s
*09005076* BA_EN_DE39 Rev.B 03/19
*09005076*
Table of contents
1Safety Instructions
2Application Purpose
3Description of the Product and Functional Description
4Installation and Assembly
5Commissioning
6Maintenance and Repeat Tests
7Transport
8Service
9Accessories
10 Disposal
11 Technical data
12 Dimensional drawings
13 Order Codes
14 Manufacturer's Declarations and Certificates
1 Safety Instructions
1.1 General
This operating manual contains instruc-
tions fundamental to the installation,
operation and maintenance of the de-
vice that must be observed uncondi-
tionally. It must be read by the assembler, operator
and the specialized personnel in charge of the de-
vice before it is installed and put into operation.
This operating manual is part of the product and
must be kept close by where it is easily accessible
to the responsible specialized personnel.
The subsequent sections, in particular the instruc-
tions on assembly, commissioning and mainte-
nance, contain important safety instructions, non-
observance of which can endanger persons, ani-
mals, the environment and physical objects.
1.2 Personnel Qualification
The device may only be installed and commis-
sioned by specialized personnel familiar with the in-
stallation, commissioning and operation of this
product.
Specialized personnel are persons who can assess
the work they have been assigned and recognize
potential dangers by virtue of their specialized train-
ing, their skills and experience and their knowledge
of the relevant standards.
1.3 Risks due to Non-Observance of Safe-
ty Instructions
Non-observance of these safety instructions, the in-
tended use of the device or the limit values given in
the technical specifications can be hazardous or
cause harm to persons, the environment or the sys-
tem itself.
The manufacturer will not be liable for damage
claims if this should happen.
1.4 Safety Instructions for the Operating
Company and the Operator
The safety instructions on correct operation of the
device must be observed. The operating company
must make them available to the installation,
maintenance, inspection and operating personnel.
Dangers arising from electrical components, energy
discharged by the medium, escaping medium and
incorrect installation of the device must be eliminat-
ed. For more information, please see the applicable
national and international regulations.
In Germany these are the DIN, EN, accident pre-
vention regulations (UVV) and - for industry-specific
individual applications - also in the industry guide-
lines issued by the DVWG, Ex, GL, etc. as well as
VDE and local EVUs.
Operating Manual
DE39
Digital differential pressure transmitter
With internal pressure sensors

2 | 12 Page
1.5 Unauthorised Modification
Modifications of or other technical alterations to the
device by the customer are not permitted. This also
applies to replacement parts. Any modifications / al-
terations required must be carried out by Fischer
Mess- und Regeltechnik GmbH only.
1.6 Inadmissible Modes of Operation
The operational safety of this device can only be
guaranteed if it is used as intended. The device
model must be suitable for the medium used in the
system. The limit values given in the technical data
may not be exceeded.
1.7 Safe working practices for mainte-
nance and installation work
The safety instructions given in this operating man-
ual, any nationally applicable regulations on acci-
dent prevention and any of the operating company's
internal work, operating and safety guidelines must
be observed.
The operating company is responsible for ensuring
that all required maintenance, inspection and instal-
lation work is carried out by qualified specialized
personnel.
1.8 Pictogram explanation
WARNING!
… indicates a potentially dangerous
situation, non-observance of which
could endanger persons, animals, the
environment or objects.
INFORMATION!
… highlights important information ef-
ficient and smooth operation.
TIP!
… indicates recommendations that are
not specifically necessary in certain
situations but which could be useful.
2 Application Purpose
Transmitter with analogue output and display, and
switching unit for differential pressure for liquid and
gaseous media.
3 Description of the Product and Func-
tional Description
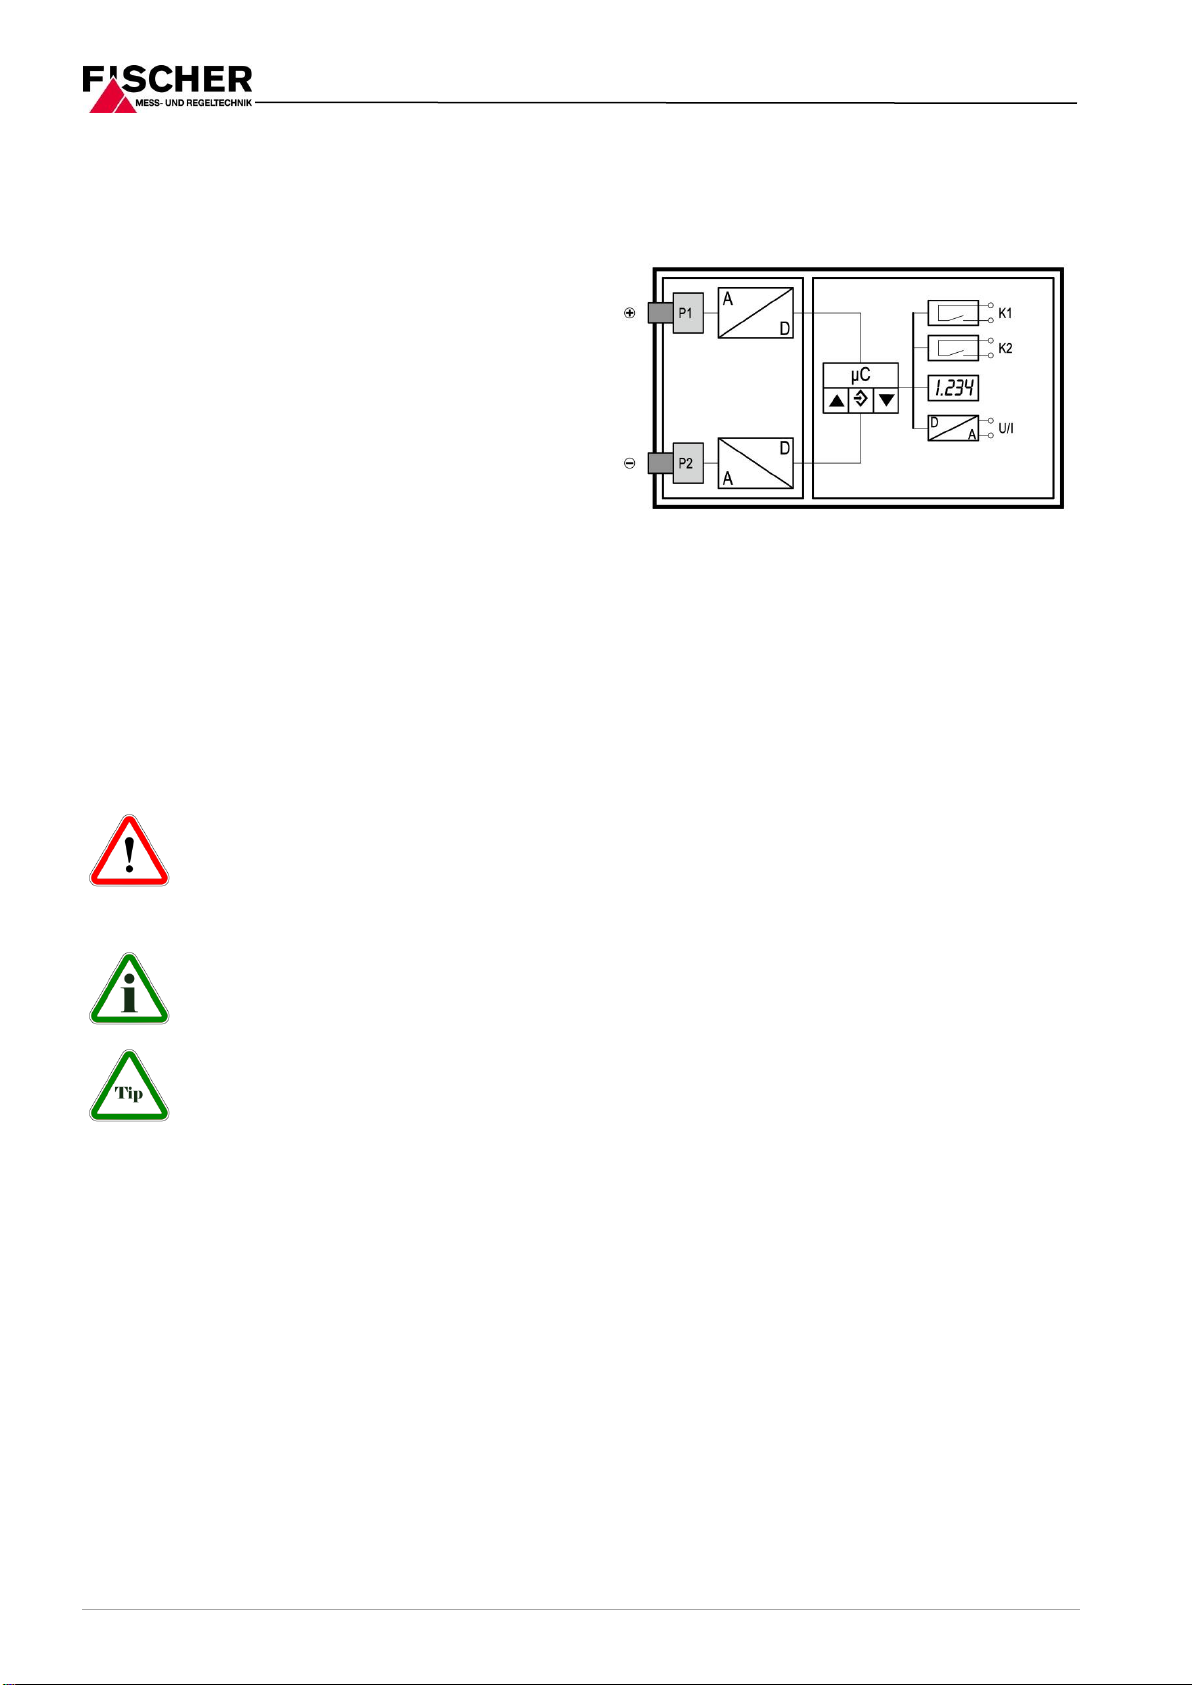
3.1 Function Diagram
3.2 Design and mode of operation
The unit is based on an electronic analysis switch
that analyses the measuring signals from two inte-
grated pressure sensors. The signals of the pres-
sure sensors can be displayed separately for test-
ing.
The integrated pressure sensors work with ceramic
pressure measuring cells. The signals are digital-
ised and made available to the analysis unit for fur-
ther processing.
The main task is to calculate the differential pres-
sure that can be displayed and analysed. The anal-
ysis allows the configuration of two independent
switching points and the provision of an output sig-
nal that is proportional to the differential pressure.
The rated pressures of the integrated sensors and
the differential pressure measuring range are set
ex-works and shown on the type plate. The differen-
tial pressure measuring range can be spread 10:1.
4 Installation and Assembly
The device is designed for installation onto flat as-
sembly plates. For screw connection to the assem-
bly plate, the device features four assembly bores
on its back, which can be used for Ø 3.5 mm tap-
ping screws.
Optionally, the device can be supplied with a wall
mounting plate (see order code).
The casing protection class IP65 is only guaranteed
if a suitable connection cable is used.
If the device is intended for outdoor use, we rec-
ommend permanently protecting the membrane
keypad against UV radiation and using a suitable
enclosure or at least the erection of a sufficiently
dimensioned canopy as a protection measure
against constant rain or snow.

3 | 12 Page
4.1 Process connection
•By authorized and qualified specialized person-
nel only.
•The pipes need to be depressurized when the
device is being connected.
•Appropriate steps must be taken to protect the
device from pressure surges.
•Check the suitability of the device for the media
to be measured.
•Maximum pressures must be observed.
•Check that the pressure connections do not
leak before commissioning.
The pressure sensing lines need to be kept as short
as possible and installed without sharp bends to
avoid interfering delay times.
The pressure connections are marked with (+) and
(-) symbols on the device. For differential pressure
measurements, the higher pressure is connected to
the (+) side and the lower pressure to the (-) side of
the device.
4.2 Electronic connection
•By authorized and qualified specialized person-
nel only.
•The electrical connection of the device shall be
performed according to relevant VDE and local
electricity board regulations.
•Disconnect the system from the mains before
connecting the device.
•Add a fuse adapted to the energy requirements.
4.2.1 3 wire connection
4.2.2 Socket assignment
Pin
Signal name
Cable col-
our
1
Supply
+Ub
brown
2
Delivery
-Sig
white
3
Supply
-Ub
blue
4
Delivery
+Sig
black
5
n.c.
A
Coding
B
Bridge
4.2.3 Switching outputs
Pin
Signal name
Cable col-
our
1
Switch output 1
SP1
brown
2
Switch output 2
SP2
white
3
Switch output 2
SP2
blue
4
Switch output 1
SP1
black
A
Coding
5 Commissioning
All electrical supply, operating and measuring lines,
and the pressure connections must have been cor-
rectly installed before commissioning. All supply
lines are arranged so that there are no mechanical
forces acting on the device.
Check that the pressure connections do not leak
before commissioning.
5.1 Display
Pos
Designation
1
Display function
2
Status display of the switching outputs
3
Measured Value Display
4
Measuring value unit
5
Keyboard
The 3½ digit LED display shows the current differ-
ential pressure in normal mode. The symbols P1
and P2 on the left next to the display are backlit de-
pending on the selected display function (see
5.3.2.).
Output
0/4…20 mA
0…10V
DE39
Supply
+Ub
-Ub
+Ub
- Ub/ -Sig
+Sig

4 | 12 Page
The selected measuring unit is backlit to the right of
the display. Two light diodes above the dis-
play symbolise the status of the switching outputs
(LED shines = switch is closed).
When configuring the parameters, the display either
shows the respective menu point or the associated
parameter value. The device continues to work
whilst the parameters are being set; apart from two
exceptions, the changes come into effect immedi-
ately.
The exceptions are a change in the switching times
- the previously valid time must run down - and a
change in the support point table (see 5.3.8). In this
case, all output signals and switching statuses are
frozen until the changes have been completed.
Please note that for a 3½ digit display, only num-
bers between -1999 and +1999 can be shown.
5.2 Operating keys
The operating keys have the following function:
ÿ
Page down menu
Reduce value
û
Enter key
þ
Page up menu
Increase value
By using the middle ûkey on the membrane key-
pad you can access the parameter menu (setting
mode). The reading now shows the text ESc.
Press the right button þto move upwards in the
menu and select a large range of parameters.
Press the left button ÿto move downwards in the
menu, return to the parameters by pressing esc.
Press the middle key ûto call up a parameter.
You can set the parameter value using the keys ÿ
and þ.
To confirm a set parameter value, press the key û.
All set parameters are only saved when the user
leaves the parameter menu via esc.
5.3 Parameters
For commissioning there is a multitude of setting
options for optimum adaptation of the device to the
measuring point and task at hand. This section co-
vers these options step by step.
Depending on the current device model, some
menu items may not be available. For instance, all
characteristic curve functions are hidden in the
menu if the device does not have a signal output.
The device can also be completely configured easi-
ly on the PC via a Transmitter PC Interface EU03.
Here, all parameters are directly visible and acces-
sible. Also, the entire configuration can be loaded,
saved and documented in a printout. For more in-
formation about this program, please refer to the
documentation on the Transmitter PC Interface.
5.3.1 Selecting the pressure unit
First select the required pressure measuring unit.
The currently valid unit is backlit on the right next to
the display. To make the settings, press the middle
button ûand then search for the parameter EIN via
the right button þ. Then press ûagain and change
the display value via þor ÿ. After selection, save
the value with ûand EIN appears again in the dis-
play.
Then leave the configuration mode. Press ÿuntil
ESc appears and then û. The pressure currently
measured is now shown. The correct pressure unit
should be backlit to the right of this figure.
The display range is restricted to ±1999.
Therefore, it may not be possible to se-
lect all defined pressure units in some
cases.
5.3.2 Display setting
In DE39 the differential pressure is calculated by
subtracting two relative pressures P1 and P2. In
some cases it is helpful if these values can be
viewed separately. You can select the display value
with the dSP parameter.
Parameter
dSP = 0
shows the relative pressure P1
(Symbol P1 shines)
dSP = 1
shows the relative pressure P2
(Symbol P2 shines)
dSP = 2
shows the differential pressure at P1-P2
(Symbols P1 and P2 shine).
This value is the default value
5.3.3 Zero-point control and adjustment
Because the differential pressure can be blanketed
by static pressures due to the arrangement of the
two external pressure sensors, the differential pres-
sure when the system is in an idle state is not al-
ways zero.
The current differential pressure can be set to zero
via the menu item -0-.
The value saved in this parameter is subtracted
from the measured differential pressure, i.e. the
static differential pressure is eliminated. The display
now shows zero.
5.3.4 Damping and zero-point stabilising
If there are unsteady pressure readings at this point
of time or during operation, you can use parameters
DAM and NP to stabilise the reading (and the output
signal).
The effect of the DAM parameter corresponds to a
capillary throttle. However it only impacts on the

5 | 12 Page
display, output signal and switching points, not on
the load cell itself. This parameter can be used to
set the response time to pressure jumps. The value
range comprises 0,0 s to 100,0 s.
But with maximum damping, it will take
more than 2 minutes for the reading al-
so to reach zero after a pressure jump
from nominal pressure (100 %) to zero!
In many cases, unsteady readings are not a prob-
lem during normal operating mode, but this is not
true for the idle state, i.e. if zero (differential) pres-
sure is expected.
This is the purpose of the parameter NP. Its value
defines a measuring range around zero. Within this
range the measuring value is set to zero.
Example:
A value of 0,08 bar is entered for NP. In this case, all
pressures that lie within the range -0,08 bar to
+0,08 bar are set to zero. Zero only disappears
from the display when the pressure exceeds these
tolerances. The pressure value and display howev-
er do not correspond exactly. They only correspond
again at twice the value, i.e. from 0,16 bar.
5.3.5 Setting the output signal
The transmitter output signal primarily depends on
the sensed pressure. However, you have the option
of adjusting the output signal to a large extent to
suit your requirements.
However the basic measuring range (in-
dicated on the type label) and the type of
output signal (voltage / current) are not
variable.
Parameters MA (start of measuring range) and ME
(End of measuring range) define the two pressures
between which the output signal will change at all.
Both values are adjustable across the entire basic
measuring range. The set values always refer to
pressure (in the relevant measuring unit) and are
converted when the measuring unit is changed.
The assigned signal values for MA and ME are invari-
able (type label, e.g. 0…10 V or 4…20 mA).
If MA is smaller than ME this is referred ´to as a rising
characteristic curve. The output signal grows as the
pressure increases.
If ME is smaller than MA, this is a decreasing char-
acteristic curve and the output signal decreases
with the falling pressure.
The difference of the two values MA and ME must be
at least 10% of the basic measuring range. The de-
vice cannot accommodate larger spreads. You
cannot leave the menu if the range definitions are
incorrect.
Example:
The following applies for a basic measuring range
of 0…6 bar : me –ma 0,6 bar.
5.3.6 Output signal limits (Namur)
Independent of the pressure, the three parameters
oG1, oG2 and oEr define the tolerances for the output
currents or voltages that cannot be exceeded or
undercut.
These tolerances take priority over the
range defined by the MA and ME. They
primarily serve to stop error messages in
the downstream systems caused by brief
overstepping of measuring ranges.
The oG1 parameter defines the tolerance for the min-
imum output signal. The output signal cannot un-
dercut this value. Usually this parameter only
makes sense for devices with an output signal of
4..20 mA because in these devices a value below
3,8 mA is often evaluated as an error signal.
The parameter OG2 defines the limit value for the
maximum output signal. The output signal may not
exceed this value. This parameter can be used for
all outputs (voltage and current) to limit the maxi-
mum value of e.g. 10.2 V.
The value for the error signal is defined via the oer
parameter. The value defined with oEr is issued as
an output signal if the device recognises an internal
error and can no longer work correctly; however,
not all possible errors and defects can be recog-
nised by the device.
If you set oG1 = OG2 = 0, the output signal will no
longer be checked for limits.
If oG1 is set to the maximum value (11 V
or 21 mA), the output signal can be ad-
justed as required from zero to the max-
imum value regardless of the pressure
via OG2. It is not necessary to quit the menu item,
the output is followed immediately. You can then
operate the device as a signal transducer and
therefore simply check other signal processing.
5.3.7 Characteristic curve function F
In some applications, measuring pressure is an in-
direct unit for the actual measuring variable. Flow
measurements via a panel or determining the filling
level by means of hydrostatic pressure measure-
ments are two typical examples of this. In these
cases, you might want to change the output signal
of the transmitter to a non-linear characteristic
curve so that the following analysis receives a sig-
nal that is linear-proportional to the actual measur-
ing variable (e.g. volume in m³ or volume flow cm³/s
etc.)

6 | 12 Page
The parameter Fallows you to select between the
following variants:
F
0
linear characteristic curve (standard)
1
square rooted characteristic curve
2
flat cylindrical tank
3...30
Support point table with 3 to 30 pairs of values
Whenever you change the value from F, the pro-
gram creates a new table. All previous values in the
table are rejected and replaced with new linear en-
tries.
The tables of type F = 0 to F = 2 are not visible. In-
ternal values are used here to calculate the table.
These values are invariable.
At F= 3...30 you can only influence the interim val-
ues 1..28. You only have access to the start and
end values via the parameters MA and ME.
When the parameters MA and ME are
changed, the table is deleted and F = 0
is set.
At the start of the measuring range (MA), 0% of the
output signal (e.g. 0 mA) is issued.
At the end of the measuring range (ME), 100% of the
output signal (e.g. 20 mA) is issued.
5.3.8 Menu jump LIN
If the value of Fis greater than or equal to 3, there
is a submenu LIn. here you can access all table val-
ues apart from the table start (MA) and end (ME).
This submenu has its own entry and exit point that
is shown with End. The table is only saved if you re-
turn to the main menu at this point, i.e. if you
change to the parameter LIN again via the key û.
If the table is not structured correctly, an error mes-
sage Err will appear here and you cannot quit the
submenu.
The table comprises 3…30 value pairs. For devices
with a power output, the first value pair is {I02|P02}
1
.
The first value I02 defines the level of the output
signal. The second value P02 determines the pres-
sure at which the output signal is issued.
Followed by the pairs of values {I03|P03} ... {I29|P29}.
Entering or changing values in the table via the
membrane keypad is tiresome and prone to errors.
This is only intended as an emergency solution in
case access to the PC adapter is not possible.
The table is correct if the following applies for all
signal values: the following value is greater or equal
to the previous value. For the pressure values, the
following applies either greater than (increasing
characteristic curve) or smaller than (decreasing
characteristic curve). A transition from increasing to
decreasing characteristic curve or vice versa is not
allowed.
5.3.9 Switch points
The two switch outputs are configured by four
parameters respectively.
The function of the switching output is deter-
mined by the parameters R1A, R1E, R1D and R1F.
The function of the switching output is deter-
mined by the parameters R2A, R2E, R2D and R2F.
R1A defines the deactivation point, R1E defines the
activation point from switch output 1. The values
are set in the valid measuring unit (shown on the
right).
Together, the two parameters R1A and R1E deter-
mine the switch function of switch output 1:
If R1A is smaller than R1E, the output switches on if
the measured value exceeds R1E. It is only switched
off again if the measured value R1A is undercut (hys-
teresis function).
If R1A = R1E, the output switches on if the measured
value exceeds R1E and off if the measured value un-
dercuts R1A.
If R1A is larger than R1E, the output switches on if R1E
< measured value < R1A applies (window function).
Both parameters can be set independently over the
entire range.
If the measuring unit is switched over, the switching
points are converted accordingly. Rounding errors
may cause deviations in the last position.
R1D allows the reaction of the switch output 1 to be
delayed by between 0.0 and 100.0 s. This value
applies equally for switching on and off.
1
At a voltage output {u02|P02} ... {u29|P29}.
Differential pressure input
Output current

7 | 12 Page
R1F reverses the function of the switch output. If the
value = 1, the switch output works as an NO con-
tact, if the value = 2, the switch output works as an
NC contact.
5.3.10 Password
The last menu item -P- is used to enter a password.
A value between 001 and 999 can be selected for
the password. The value 000 cancels the password
function.
If a password has been issued, the text PAS appears
after ESc and û, and you need to enter the correct
value using ûand þ,ÿ. You will only arrive at all
other menu items after doing this.
In the event of an error, the display will jump back
to the start of the menu ESc.
If the password is forgotten, it can only
be reset by the manufacturer or over-
written via the PC adapter.
5.3.11 Display options
The parameter D0 enables the reading to settle if
the measuring value fluctuates heavily. This filter
function is similar to the dAM function, but only im-
pacts on the reading not on the output signal.
d0
-2
Display off, LED switching point off
-1
Display off, LED switching point on
0
Display on, LED switching point on
1…100
Display attenuation
5.3.12 Reset to default
The res function allows all settings to be reset to
standard values. The standard values can only be
specified with the PC Software "FernPara".
5.3.13 Free unit
If the device is designed for a "free" third unit
(membrane symbol: ), the display can be scaled
infinitely using the parameters MAF, MEF and dPF.
The measuring range defined by the parameters MA
and ME is converted to MAF and MEF. This also takes
into account the table function ( F). The value of dPF
determines the position of a decimal point.
5.4 Parameter overview
After switching on the device, it will briefly indicate
the software version number and before entering
the normal operating mode. By using the middle û
key on the membrane keypad you can access the
parameter menu. The reading now shows the text
ESc. By using the right þkey, you can choose the
parameters from the following list one by one:
Note:
Depending on the device model, individ-
ual parameters may not be available if
the device does not have this feature.
PAS
Enter password
(only appears if the password is active),
value range 000...999
000 = deactivated
-0-
Nulling
The input difference
dsp
Display value
Selection of the displayed measured
value
DAM
Attenuation
(Jump response time T90) , value
range 0.0..100.0s
d0
Display options
Value range -2...0...100.
-2 = Display off, LED Switch point off
-1 = Display off, LED Switch point on
0 = Display on, LED Switch point on
1...100 Display attenuation
R1A
Switch-off point
From switching output
R1E
Switch-on point
From switching output
R1D
Switching delay
from switch output
Value range 0.0 to 100.0s. This value
applies equally for switching on and off.
R1F
Switching function
From switching output
Values range 1,2
1 = Switching output as NO contact, 2 =
Switching output as NC contact
R2A
Switch-off point
From switching output
R2E
Switch-on point
From switching output
R2D
Switching delay
from switch output
Value range 0.0 to 100.0s. This value
applies equally for switching on and off.
R2F
Switching function
from switch output
Value range 1,2
1 = switch output as NO contact,
2 = switch output as NC contact

8 | 12 Page
ON
Measuring range unit
Value range 1,2,3
The selection is backlit on the right next
to the display. Not all basic measuring
ranges allow random switchover. The
respective unit size can only be selected
if the basic measuring range of the de-
vice can be shown sensibly.
MA
Start of measuring range
The measuring value is set in that the
output signal is minimal.
(e.g.: 0V, 0mA or 4mA).
ME
End of measuring range
The measuring value is set in that the
output signal is maximum.
(e.g.: 10V, or 20mA).
nP
Zero-point stabilising
Value range 0 to ⅓ of the basic measur-
ing range. The value is symmetrical
around the real zero-point.
dpf
Free unit
Decimal point position
maf
Free unit
Start of measuring range (display)
mef
Free unit
End of measuring range (display)
F
Characteristic curve function
Value range 0...30
0 = linear,
1 = square rooted,
2 = flat cylindrical tank
3..30 = table
lIn
Menu jump
Submenu table processing
If F < 3 this menu item is faded out.
oG1
Limit value
Minimum output signal
OG2
Limit value
Maximum output signal
OEr
Error signal
Output signal in error case
res
Reset
all parameters to standard values (speci-
fication of the standard values per PC)
-P-
Password setting
Value range 000 to 999
Value 000 does not hold password pro-
tection.
6 Maintenance and Repeat Tests
The instrument is maintenance-free. We recom-
mend the following regular inspection to guarantee
reliable operation and a long service life:
•Check the function in combination with down-
stream components.
•Check the leak-tightness of the pressure con-
nection lines.
•Check the electrical connections.
The exact test cycles need to be adapted to the op-
erating and environmental conditions. In combina-
tion with other devices, the operating instructions
for the other devices also need to be observed.
7 Transport
The measuring device must be protected against
impacts. It should be transported in the original
packaging or a suitable transport container.
8 Service
All damaged or faulty devices must be sent directly
to our repair department. Please coordinate all
shipments with our sales department.
Warning
Process media residues in and
on dismantled devices can be a hazard
to people, animals and the environment.
Take adequate preventive measures. If
required, the devices must be cleaned thoroughly.
Return the device in the original packaging or a
suitable transport container.
9 Accessories
•Transmitter PC Interface EU03
•Various connection cables for power supply
and switch outputs.
10 Disposal
Incorrect disposal may pose a risk to the environ-
ment.
Please help to protect the environ-
ment by always disposing of the work
pieces and packaging materials in
compliance with the valid national
waste and recycling guidelines or re-
use them.

9 | 12 Page
11 Technical data
Basic measuring range 2
0…
bar
6
10
16
25
40
Static operating pressure
max.
bar
6
10
16
25
40
Bursting pressure
bar
25
25
50
100
100
Characteristic curve de-
viation*
max.
%FS
< 2.5
typ.
%FS
< 1.0
Tk span°°)
max.
%FS/10K
< 0.3
typ.
%FS/10K
< 0.1
Tk zero-point °°)
max.
%FS/10K
< 0.4
typ.
%FS/10K
< 0.15
°) : Characteristic curve deviation (non-linearity and hysteresis) at 25°C and rated voltage,
Basic measuring range (Characteristic curve linear, not spread)
○○) : in terms of the basic measuring range (characteristic line linear, not spread)
General points
Admissible ambient temperature
-10 … 70 °C
Admissible media temperature
-10 ... 80 °C
Admissible storage temperature
-20 … 70 °C
Enclosure protection class
IP 65 acc. to DIN EN 60529
Electrical data
Rated Voltage
24 V AC/DC
Admissible operating voltage Ub
12 … 32 V AC/DC
Power consumption
approx. 2 W (VA)
Electrical connection type
Three-wire
Characteristic curve
linear, square rooted, flat cylindrical tank 3 … 30 support points
Output signal
0/4…20 mA
0…10 V
Admissible apparent ohmic
resistance
Ub≤ 26 V : RL≤ (Ub- 4 V) / 0,02 A
Ub< 26 V : RL≤ 1100 Ω
Ub< 15 V : RL≥ 10 kΩ
Ub≥ 15 V : RL≥ 2 kΩ
Switch contacts
2 pot.-free relay contacts
2 pot.-free semiconductor switches (MOSFET)
Type
1-pin activator
1-pin activator
Function (can be programmed)
Open contact (NO) / break contact
(NC)
Open contact (NO) / break contact (NC)
Switching voltage
32 V AC/DC
3…32 V AC/DC
Switching current
2 A
0.25 A
Switching output
64 W (VA)
8 W (VA)
Activation resistance
---
≤ 4 Ω
Display
3.5 character LED
Ports
Process connection
Inner thread G 1/8, cutting ring screw connections for 6 or 8 mm pipes
electr. connection
2 x round plug connector M12
Connector 1 for supply and analogue output signal (5-pin, male)
Connector 2 for switching contacts (4-pin, male)
Materials
Housing
Polyamide PA 6.6 (GL-version: Lexan Resin 940A)
Media-contacting material
Stainless steel 1.4404, FKM, ceramics (Al2O3, 96%)
Stainless steel 1.4571 or brass
Assembly
Bore-holes on the reverse side for attachment of the assembly panels
or wall mounting by means of assembly plate
If the device is intended for outdoor use, we recommend permanently protecting the
membrane keypad against UV radiation and using a suitable enclosure or at least the erection
of a sufficiently dimensioned canopy as a protection measure against constant rain or snow.
2
The effective measuring range is the basic measuring range and the set spread (max. 10:1). Therefore, the smallest possible measuring
range for the 6 bar basic measuring range is: 0 ...0.6 bar

10 | 12 Page
11.1 Programming
Via membrane keypad with menu-controlled operation or transmitter PC Interface EU03 (accessories), can be locked with a password
Setting parameters
Offset
Nulling of the input differential pressure
Pressure display
P1, P2, ΔP (1)
Attenuation
0,0...100,0s (jump response time 10/90%) for signal output, separate also for display
Switching output
Switch-off point, switch-on point, response time (0...100s), function (NC / NO contact)
Measuring range unit
bar, mbar, % (2)
Start / end of measuring range
can be set anywhere within the basic measuring range (3)
Zero-point stabilising
0…⅓ basic measuring range(4)
Implementation of characteristic
curve
linear, square rooted, flat cylindrical tank, 3...30 support points
Password
001 ... 999 (000 = no password protection)
(1): Pressure display P1 and P2 only serve inspection purposes. All configuration parameters refer to ΔP.
(2): Other measuring range units are available on request.
(3): Maximum effective spread 10:1. The output signal, the display range % and the free unit are influenced.
(4): Measuring values (±⅓basic measuring range around zero) are set to zero (e.g. to suppress creeping quantities).
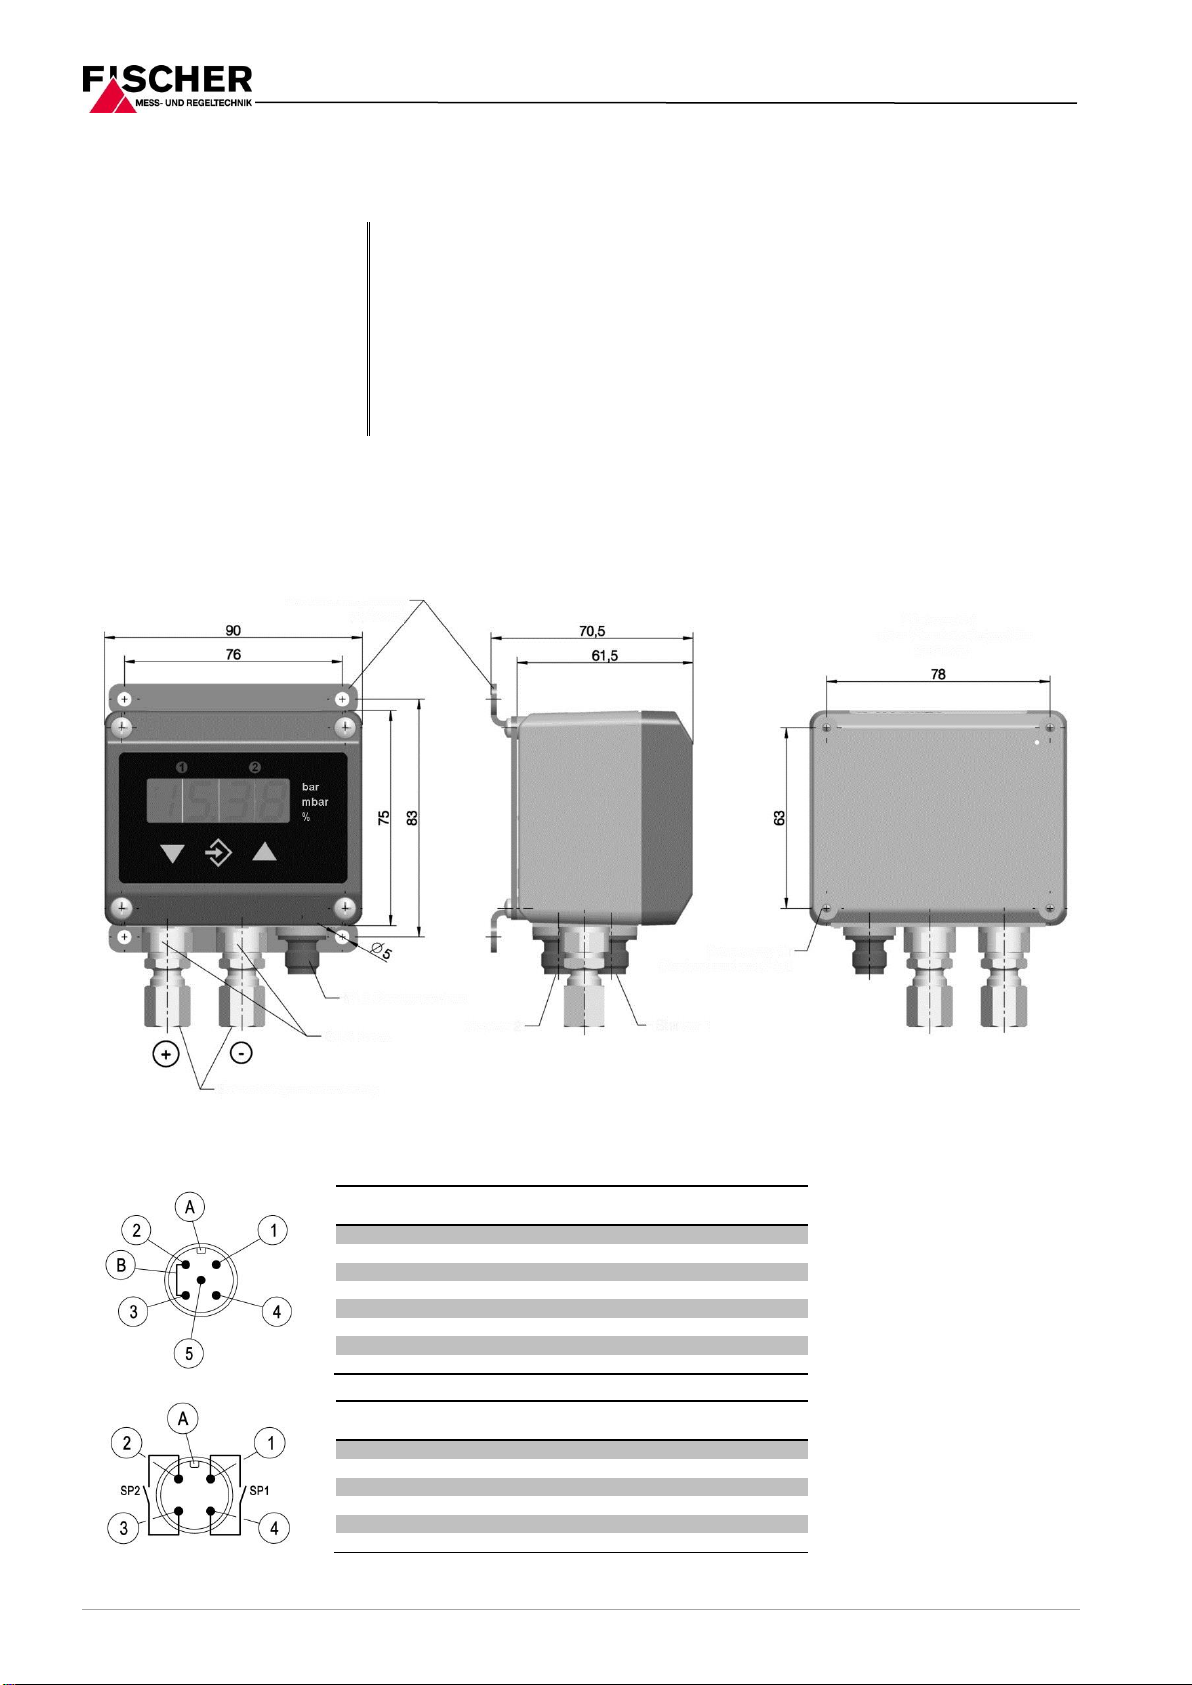
12 Dimensional drawings
12.1 Electrical connection
Pin
Signal name
Cable col-
our
1
Supply
+Ub
brown
2
Delivery
-Sig
white
3
Supply
-Ub
blue
4
Delivery
+Sig
black
5
n.c.
A
Coding
B
Bridge
Pin
Signal name
Cable col-
our
1
Switch output 1
SP1
brown
2
Switch output 2
SP2
white
3
Switch output 2
SP2
blue
4
Switch output 1
SP1
black
A
Coding
(all dimensions in mm unless otherwise specified)
Connector 1
Borehole for
Tapping screws Ø3.5
Rear view
Without wall mounting plate
Wall mounting plate
M12 plug connection
Connector 2
Cutting ring screw connection
for 6 or 8 mm pipe
G1/8 inner

11 | 12 Page
13 Order Codes
Digital differential pressure transmitter,
with 3 ½-digit LED display
DE39
V
K
K
C
Measuring ranges
0… 6 bar ...................................................................>
0
6
0…10 bar ...................................................................>
0
7
0…16 bar ...................................................................>
0
8
0…25 bar ...................................................................>
0
9
0…40 bar ...................................................................>
1
0
Design of the measuring system
Chromium nickel steel 1.4404 ................................................. >
V
Approval variants
Standard model..............................................................................>
0
Pressure connection
Inner thread G 1/8................................................................................>
0
0
Cutting ring screw connection made of 1.4571 for 6 mm pipe...............>
2
4
Cutting ring screw connection made of 1.4571 for 8 mm pipe...............>
2
5
Cutting ring screw connection in brass for 6 mm pipe...........................>
2
8
Cutting ring screw connection in brass for 8 mm pipe...........................>
2
9
Electrical output signal
without analogue electrical output signal ..........................................................>
0
0 - 20 mA 3-wire ........................................................................................>
A
0 - 10 V DC 3-wire .........................................................................................>
C
4 - 20 mA 3-wire ........................................................................................>
P
Operating voltage
24 V DC/AC (12 - 32 V DC/AC).............................................................................. >
K
Measuring unit
bar, mbar, %..................................................................................................................>
K
Measured value display / contact elements
3 1/2 digit LED measuring range display with two potential-free relay contacts....................>
3
3 1/2 digit LED measuring range display with two potential-free semi wire switches............>
6
Electrical connection
M12 plug connection.................................................................................................................>
C
Assembly option
Standard (attachment boreholes on rear side)................................................................................. >
0
Wall mounting ................................................................................................................................. >
W
13.1 Accessories
Purchase or-
der number
Designation
No. of
Poles
Usage
Length
06401993
Connection cable with M12 connector
4-pole
for switching outputs
2 m
06401994
Connection cable with M12 connector
4-pole
for switching outputs
5 m
06401995
Connection cable with M12 connector
5-pole
for supply / signal
2 m
06401996
Connection cable with M12 connector
5-pole
for supply / signal
5 m
04005144
Wall mounting set
EU03F300
Transmitter PC interface with PC software

Technische Änderungen vorbehalten • Subject to change without notice • Changements techniques sous réserve
Fischer Mess- und Regeltechnik GmbH • Bielefelder Str. 37a • D-32107 Bad Salzuflen • Tel. +49 5222 9740 • Fax +49 5222 7170
eMail: [email protected] • www.fischermesstechnik.de
14 Manufacturer's Declarations and Certificates
Table of contents
Other Fisher Transmitter manuals