FishHunter FishHunter User manual

USER MANUAL

The Fishhunter
Thank you for purchasing a FishHunter.
This quick start guide will tell you the main things
you need to know to start using our product.
If you would like more information you can also go directly to our website
where we have videos and additional content.
www.fi shhunter.com
FISHHUNTER.COM

The Fishhunter
FISHHUNTER.COM
A military grade fishfinder
Engineered with military grade technology, FishHunter is a
powerful fishfinder for Apple and Android phones and tablets.
The fishfinder floats on the top of the water and tracks water
temperature, depth and fish locations.
The FishHunter fishfinder connects to your smartphone/tablet via
Bluetooth by using our free APP, so you don’t need to have a cell
tower connection to use your new fishfinder.
Using our Free app, you will also have the ability to access and store
critical fishing info like you’re favorite fishing spots, your catch
details, share with friends and enter one of our many free contests.
You can download our free app from the either the Google Play store
for android users or the Apple App store for IOS users.

Charging Your FishHunter
FISHHUNTER.COM
Using your new FishHunter can be easy
you just need to charge it up!
Step 1: Connect the fishfinder to the charging base
Step 2: Connect USB cable to the charging base
Step 3: Connect USB cord into the charger
Step 4: Check to see 2 charging lights are on.
Step 5: Download app to smartphone/tablet
Step 6: Pair your charged fishfinder with phone/Tablet.
Step 7: Turn on your fishfinder using the app

Charging Your FishHunter
Step 1: Connecting the fi shfi nder and the charging base
FISHHUNTER.COM
Charging Your FishHunter
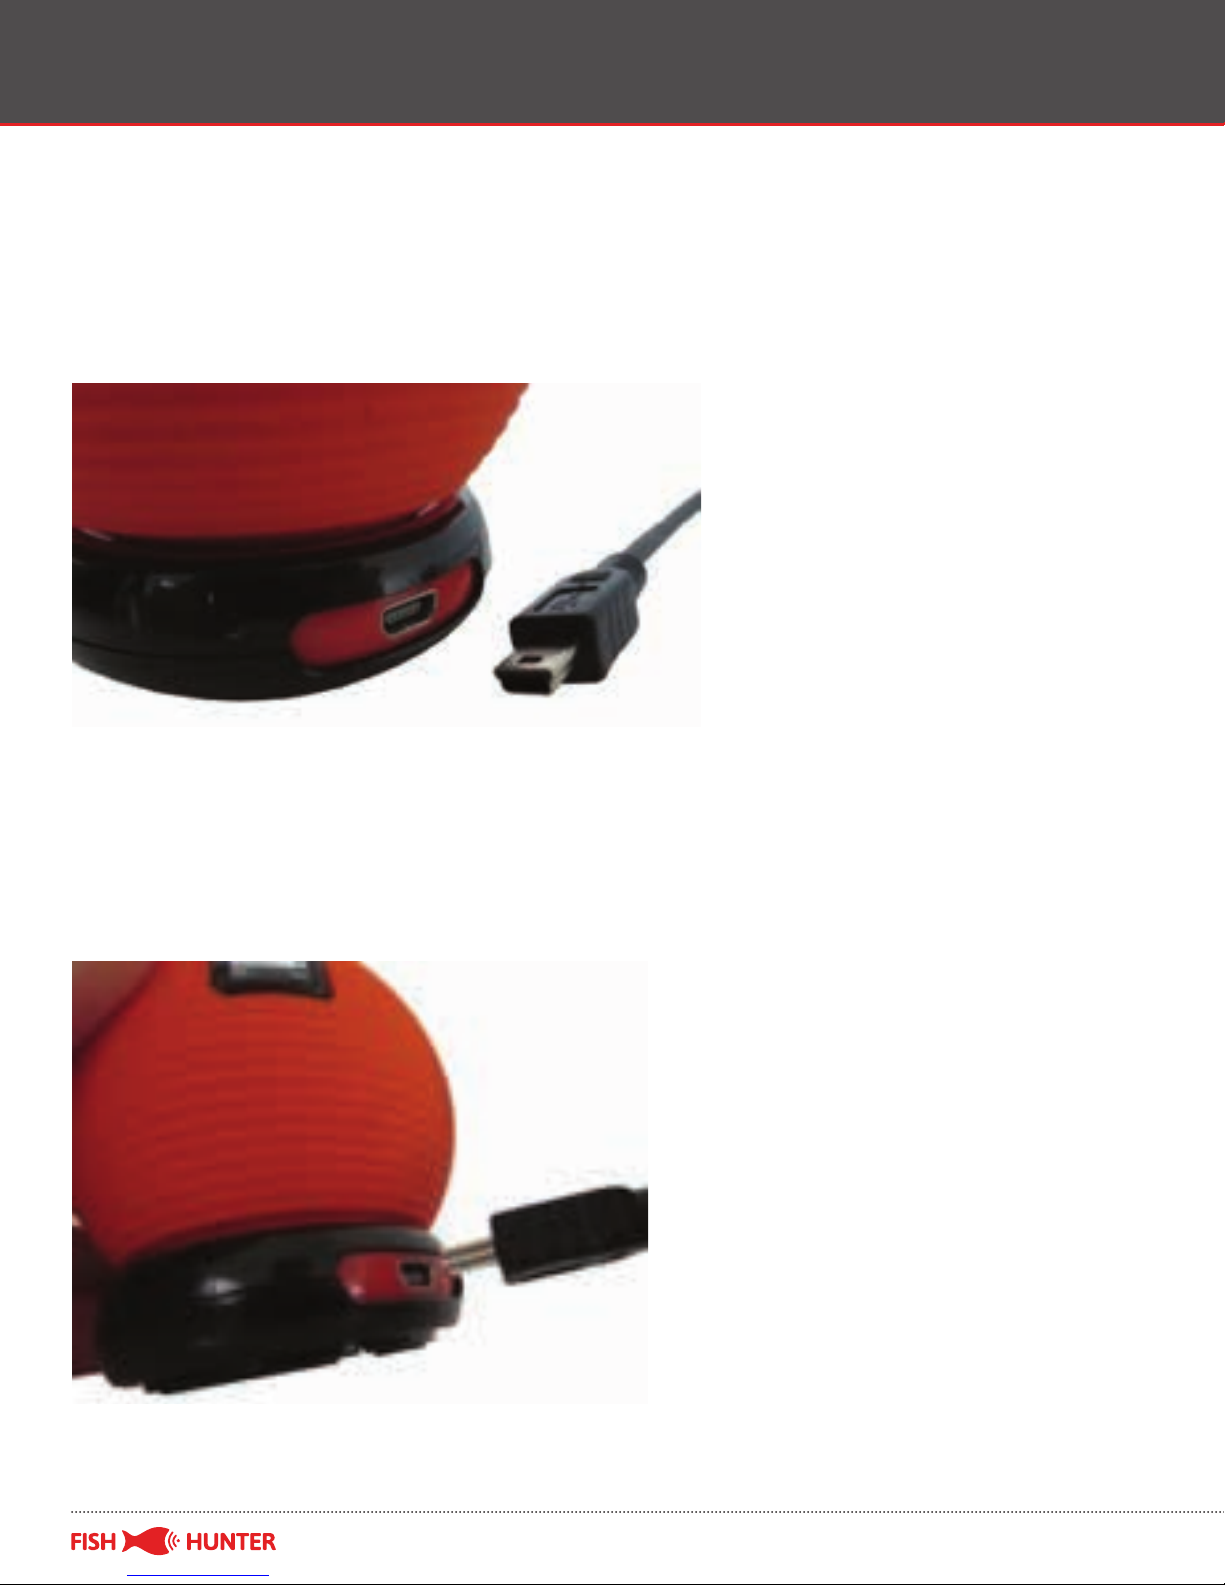
Step 2: Connecting the USB Cable to the charging base
The connection between USB-mini cable and the charging base is
shown below:
Connect the charging base and USB cord by inserting the cord into
the opening on the charging base as shown below:
FISHHUNTER.COM
Charging Your FishHunter
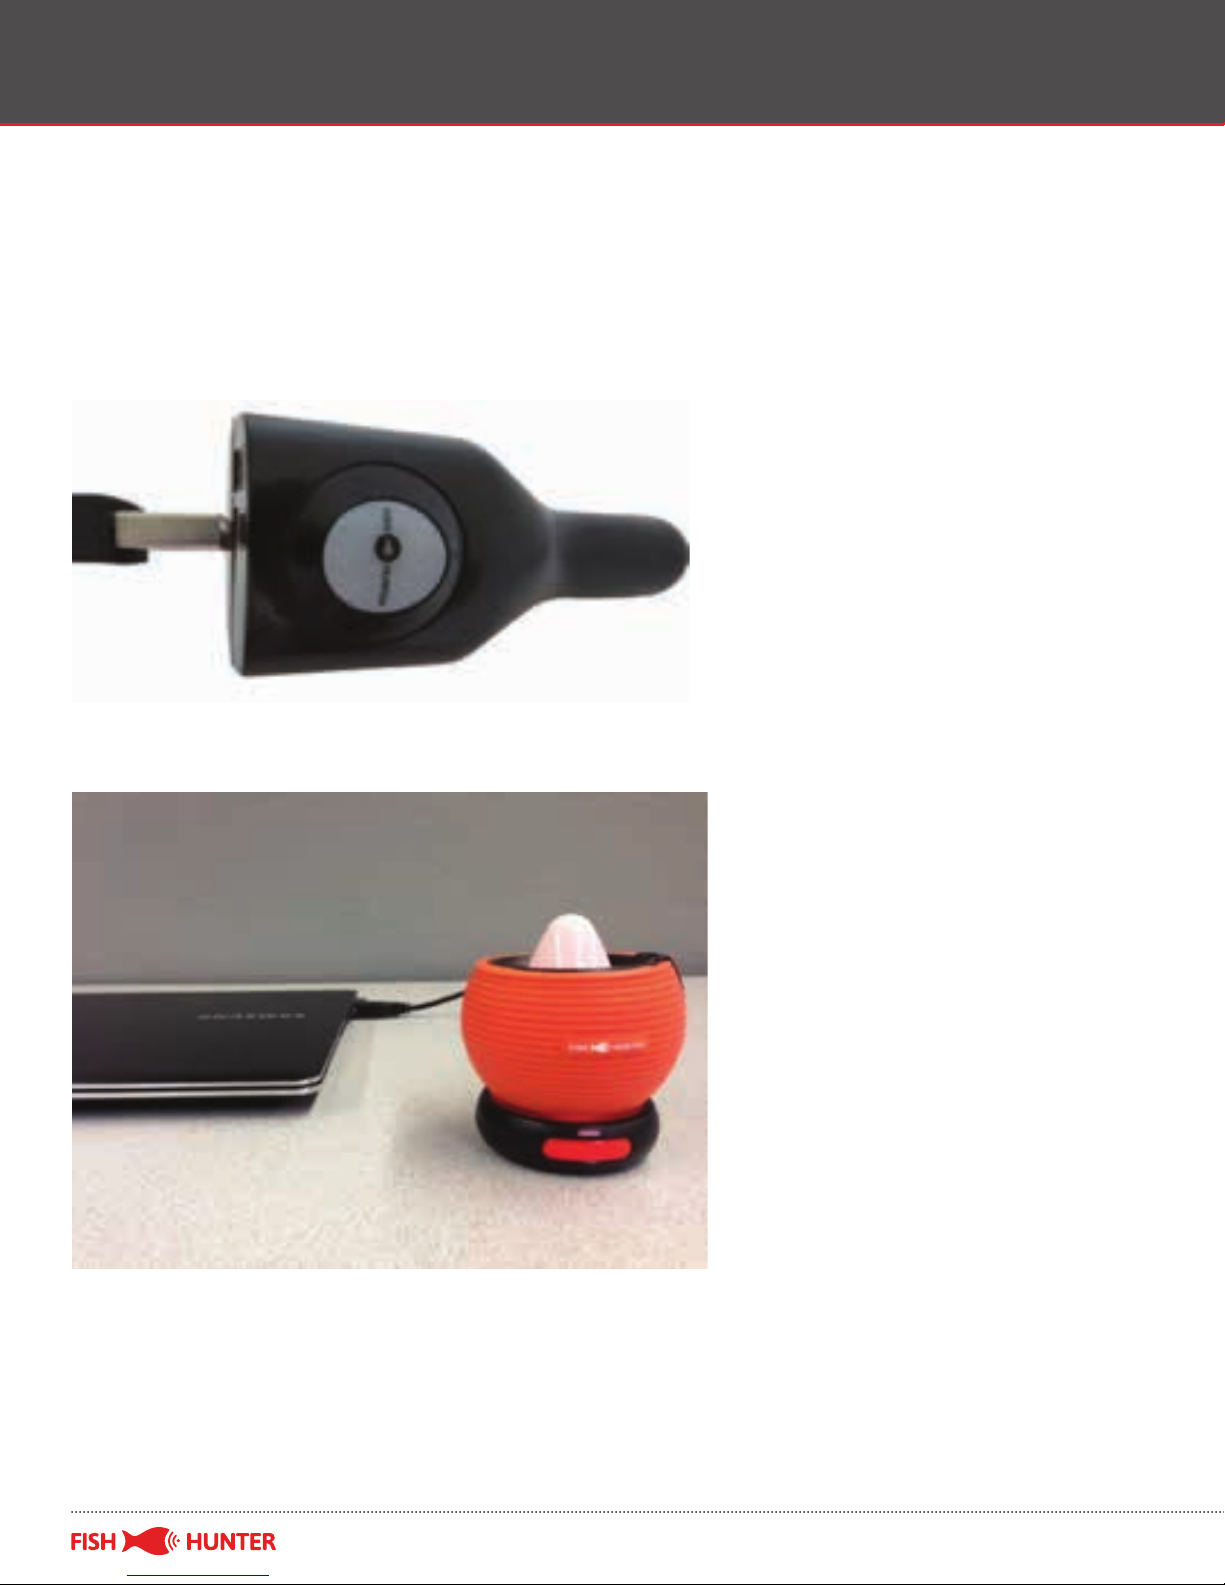
Step 3: Connect USB cord into the charger
Connect the other end of the USB cord to the computer or a
USB charger.
FISHHUNTER.COM
Charging Your FishHunter
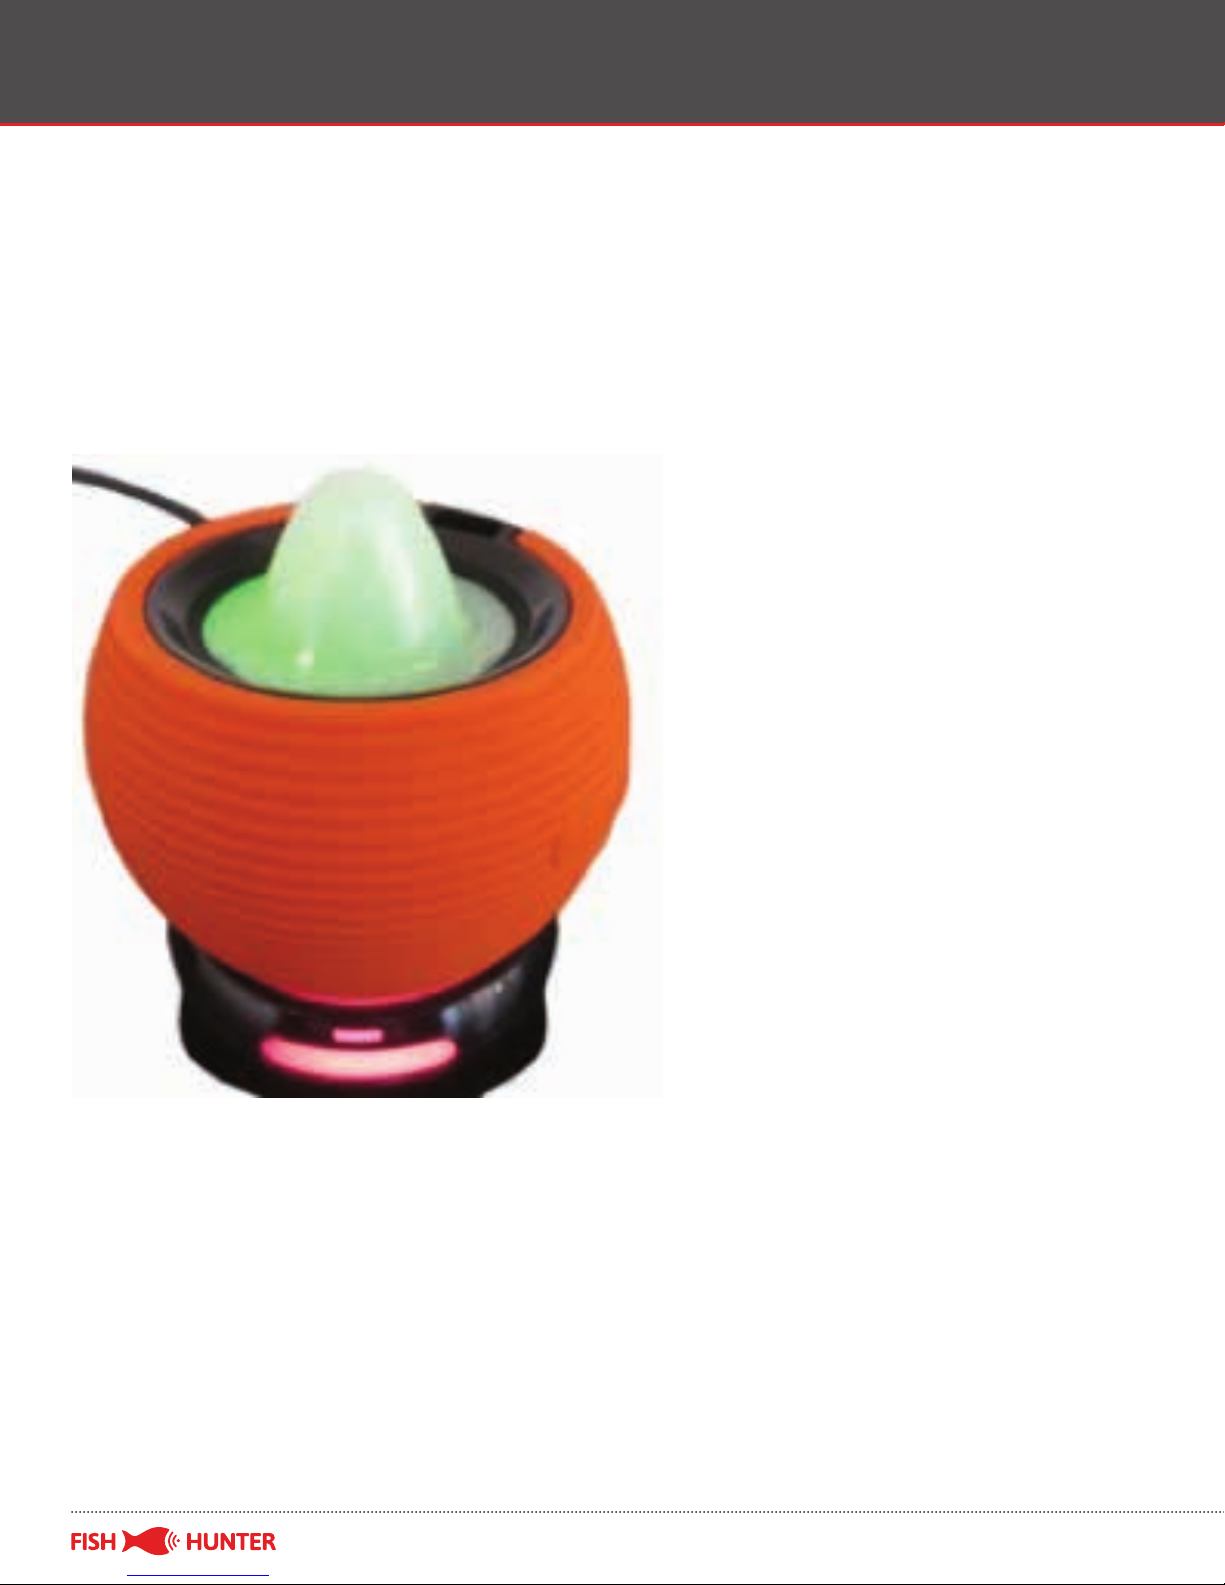
Step 4: Check to see both charging lights are on
You will notice that a red light appears on the charging base
which means that the base has power and is ready to charge
the fi shfi nder.
FISHHUNTER.COM

Charging Your FishHunter
When the fi shfi nder is attached to the charging base, the body will
lit up yellow while charging is in progress. This light will turn green
when the charging is complete.
Step 5. Download the “FishHunter Pro” app to your
smartphone/tablet
FISHHUNTER.COM

Bluetooth Pair with App
Step 6. Bluetooth pair the app with fishfinder
Important reminders:
• It takes about 2 hours to fully charge your FishHunter fishfinder.
• Your fishfinder body does not operate in air; it only works when
it is placed on the water surface. Please deploy it in water before
you begin the following Bluetooth connection process.
• Your fishfinder connects to your mobile device using Bluetooth
connection. The fishfinder broadcasts a signal that your phone
will pick up and connect with.
Step 1: Ensure your fishfinder is fully charged by following the
charging instructions above.
Step 2: Place your fishfinder into water. You will see that the
fishfinder’s red lights are blinking fast and eventually stay lit to
indicate that the fishfinder is “waking up.” If the red light is not on,
the fishfinder is OFF.
FISHHUNTER.COM

Bluetooth Pair with App
Step 1: Open the FishHunter app. If this is the fi rst time you have
opened the app, you will need to login. Please login.
If you have already logged in, then please go to the bottom menu
and select sonar by pressing on the fi sh icon labeled “Sonar”
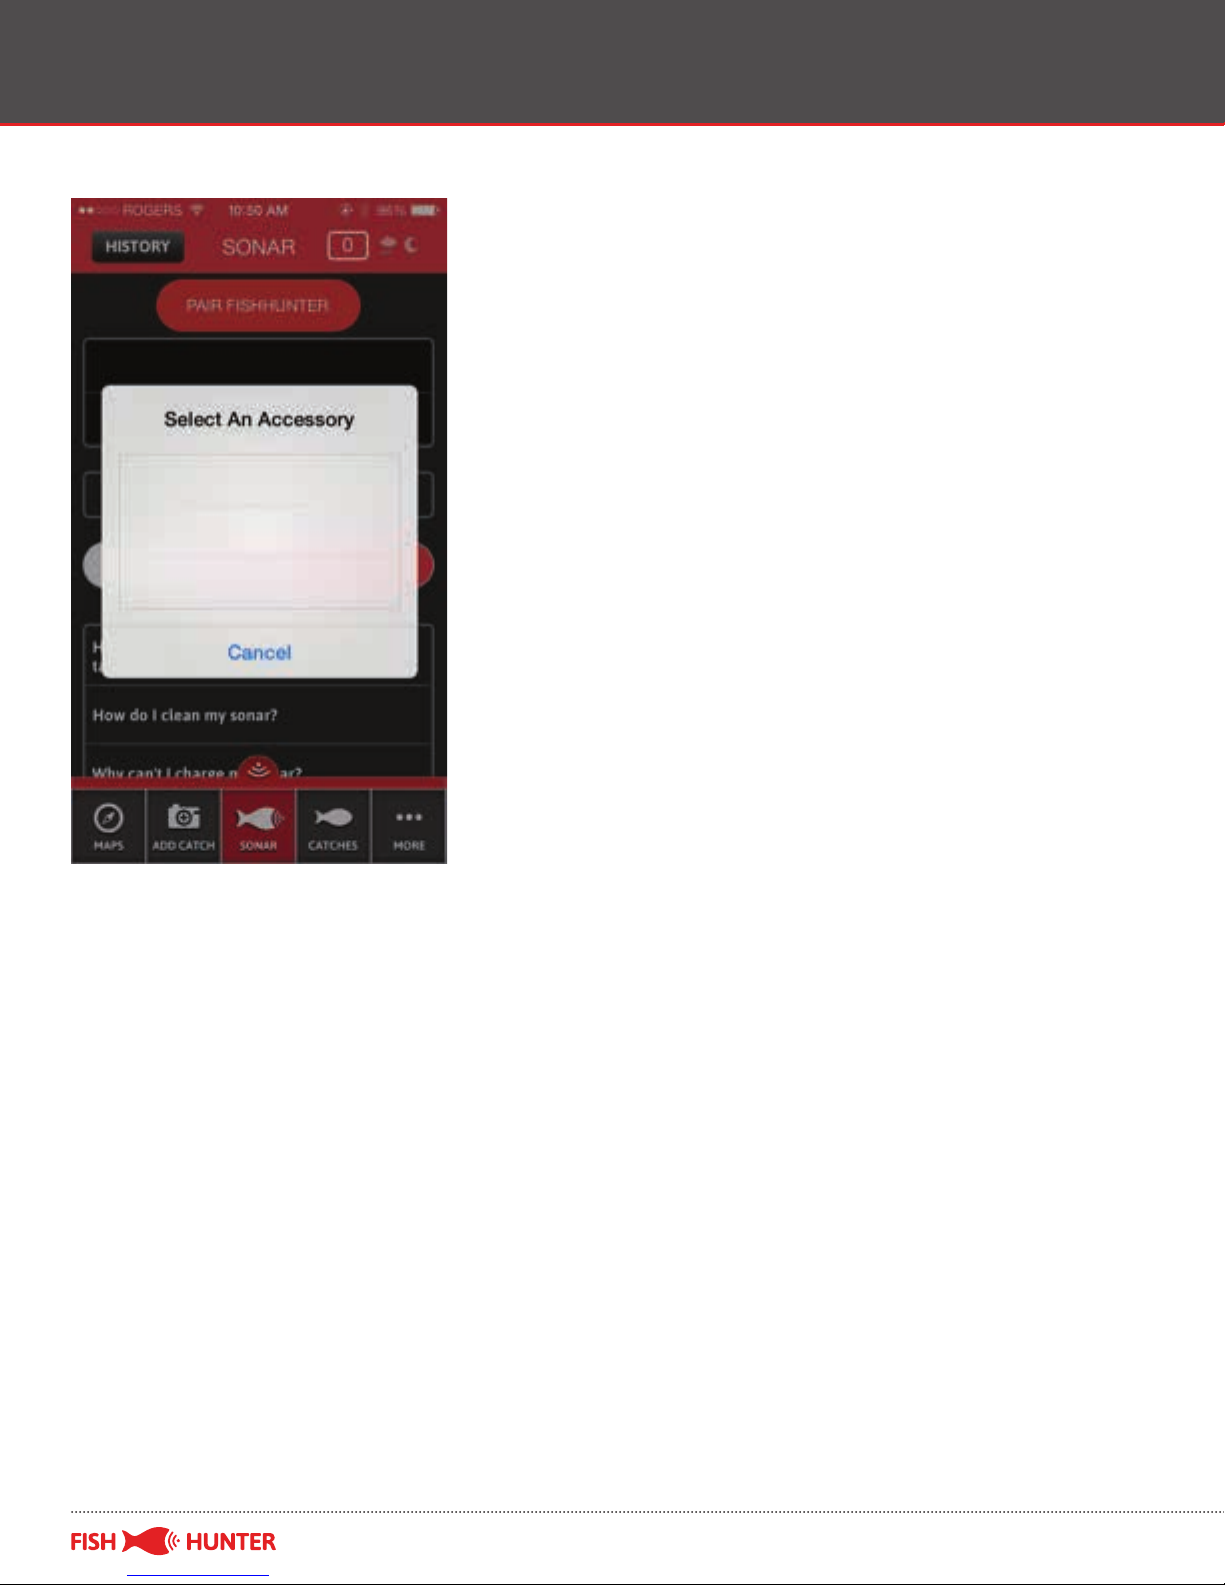
Step 4: Select the “PAIR FISHHUNTER” option. Please note that the
app may prompt you to turn on your Bluetooth. You should do so
before you continue this process.
FISHHUNTER.COM
Bluetooth Pair with App
FISHHUNTER.COM
Bluetooth Pair with App
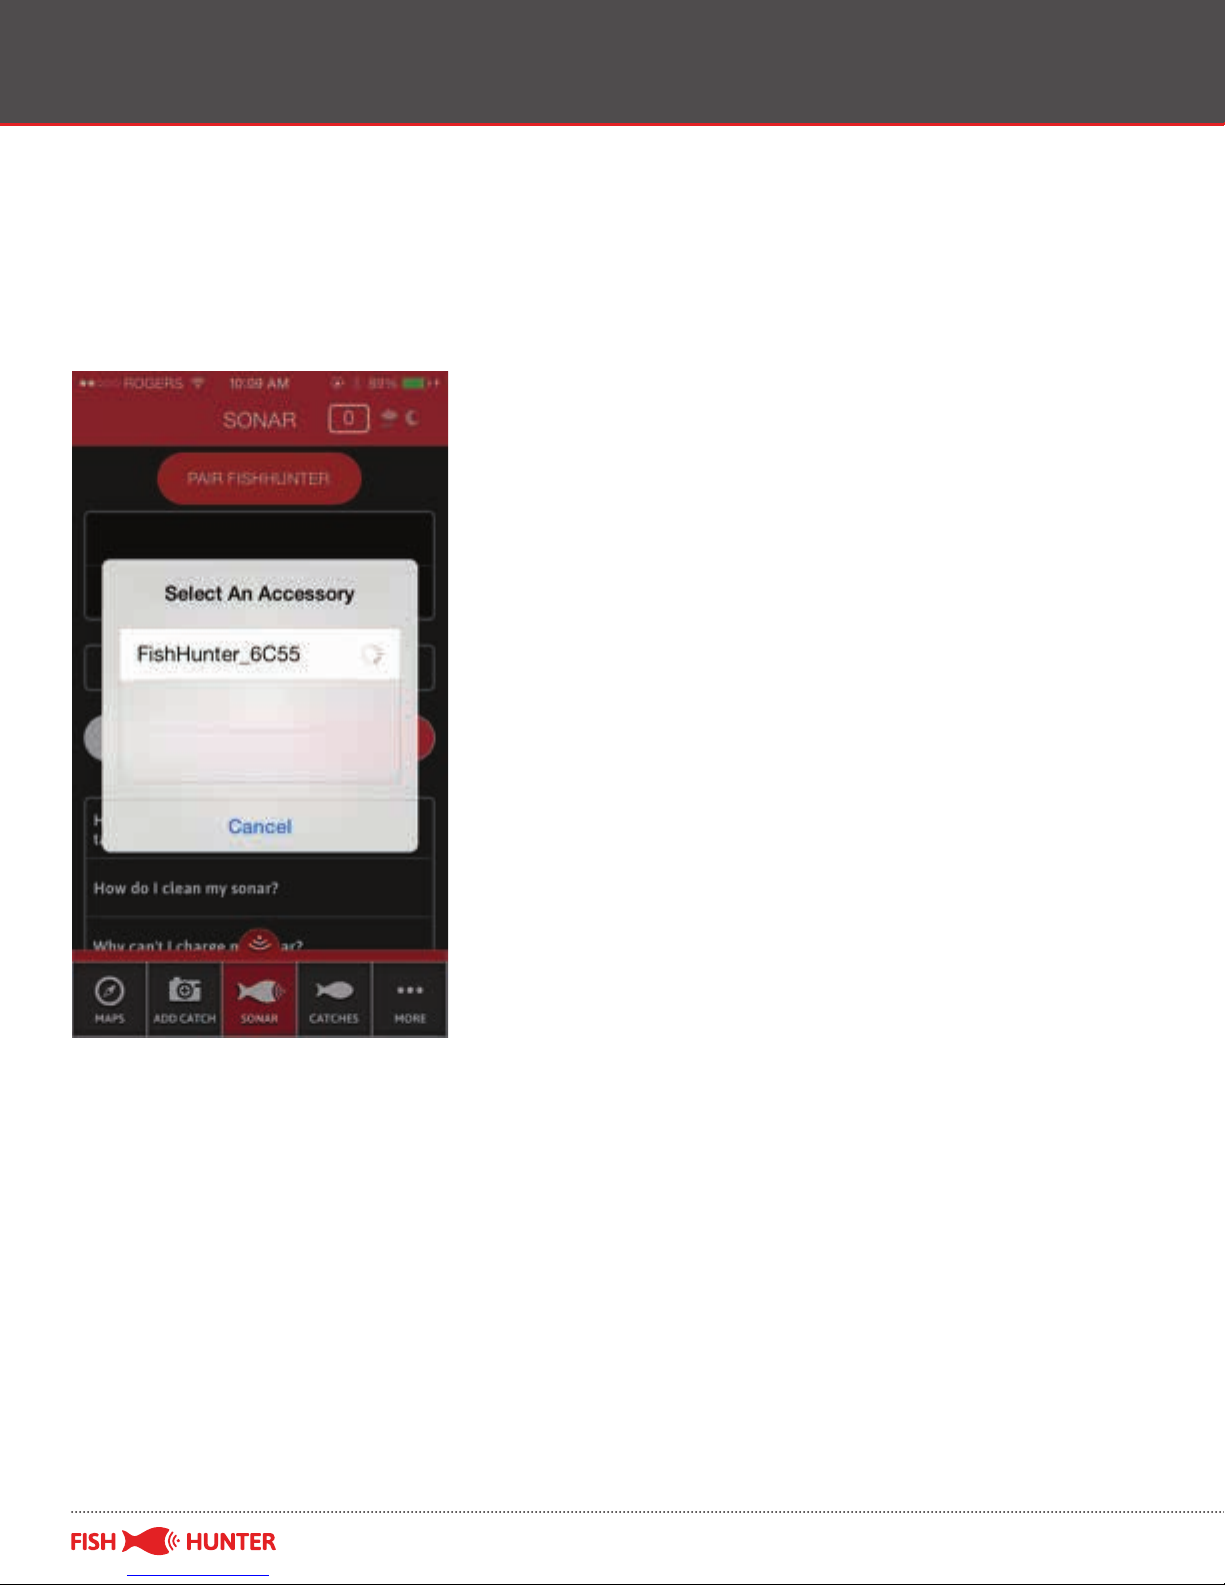
Step 5: The app will scan for available FishHunter fi shfi nders within
blue tooth range. This step may have to be repeated a few times
depending on your phone or tablet.
FISHHUNTER.COM

Bluetooth Pair with App
Once your phone fi nds the FishHunter, it will populate the app
with the device name and number. Select your FishHunter
hardware by pressing on the screen where you see the name listed.
After the pairing is complete your FishHunter will appear on the
“PAIR SONARS” list.
FISHHUNTER.COM
Bluetooth Pair with App
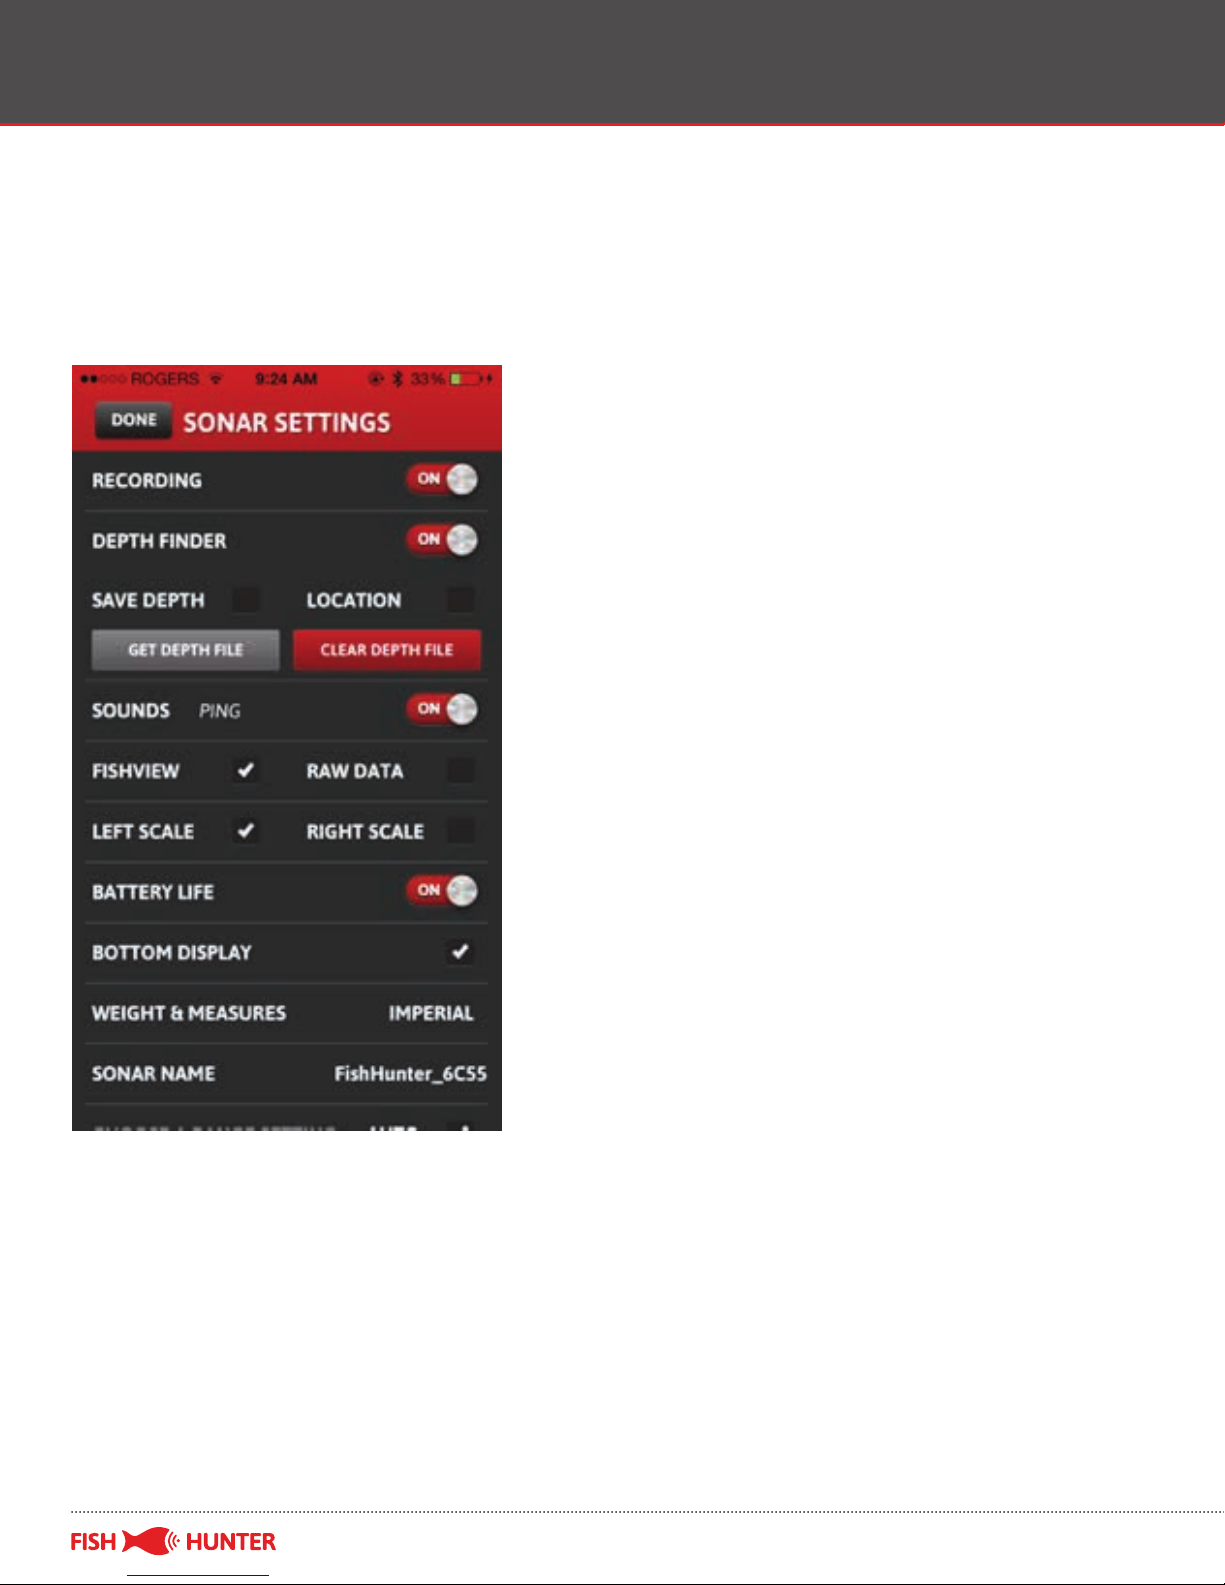
Step 6: Click on your fi shfi nder name and our app will open the
“SONAR SETTINGS” screen. The “Sonar Settings” screen will allow
you to change the settings to your preference.
FISHHUNTER.COM

Understanding the Display – Raw
FISHHUNTER.COM

Understanding the Display – Raw
How to read raw view screen?
When Reading sonar data output you are generally interpreting
color variations. In simple terms, the fishfinder will display more
dense material with darker colors.
We have provided you with a sample screen on the left here that
shows the surface, the water body, a small “disturbance/object”
in the center of the screen and the bottom contour.
1. Ultrasound transmission line. On the screen, this would be
considered the water surface.
2. BLUE - The color blue means that there is nothing (no object)
there to reflect sound and therefore is a light color.
3. GREEN - All colors except blue (such as green, yellow or red)
indicate that there is something in that space. Darker the color
the more dense the material the fishfinder is picking up.
4. This shows the variation of color which indicates a variation
of the density of the material being seen. In this case it is the
bottom of the water.
FISHHUNTER.COM
Understanding the Display – Raw
How to read fi shview screen:
FISHHUNTER.COM

Understanding the Display – Raw
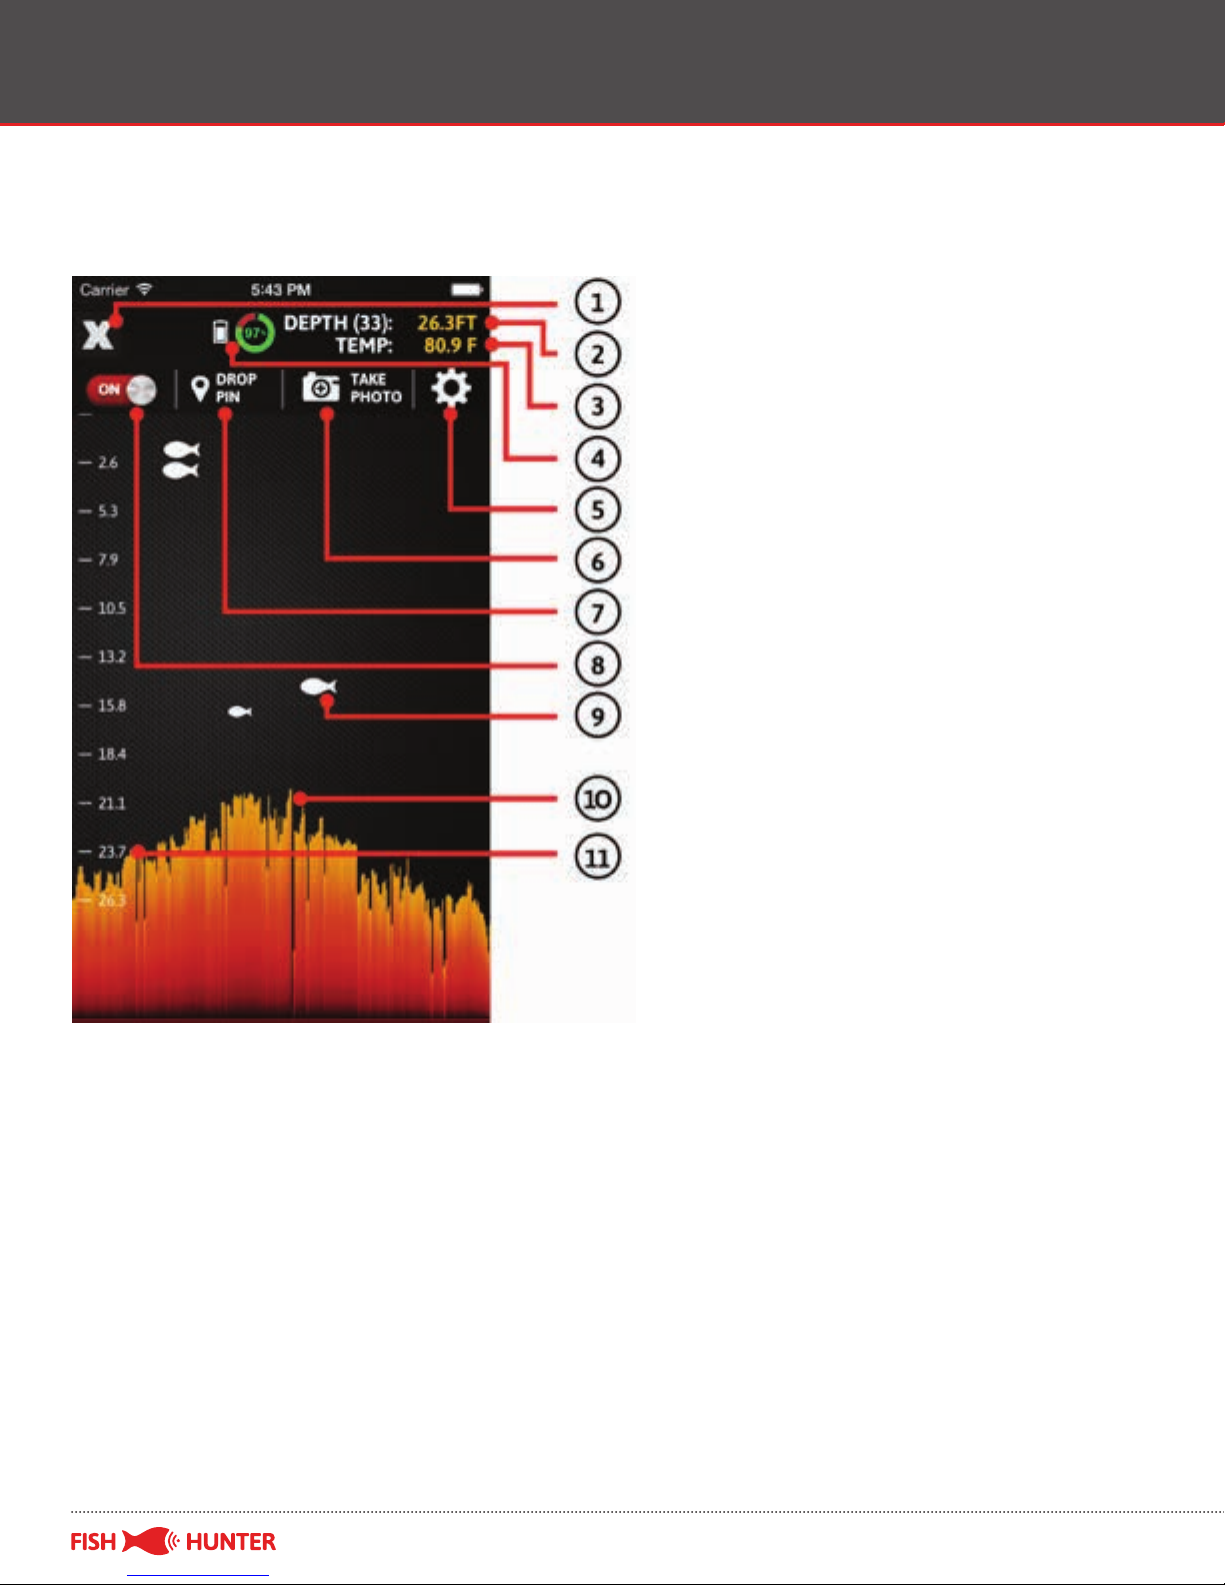
1. The “X” button lets you go back to the previous screen
(iOS device only).
2. This indicates the water depth.
3. This indicates the water temperature.
4. This shows the battery life of the fishfinder.
5. Clicking on this button allows you to adjust recording, depth,
sounds, left scale/right scale, raw data/fishview mode, battery
life indicator, bottom display, and unit of measurement settings.
6. The “Take Photo” option allows you to take a screenshot of the
sonar data on the screen.
7. The “Drop Pin” button allows you to drop a pin on the map.
8. The “ON” button indicates that the fishfinder has been turned
on. Click on it to turn it off.
9. The fish symbol means that there could potentially be a fish
in the indicated area.
10. This area indicates the mapped bottom of the water body.
11. This ruler helps you determine the depth of each fish.
FISHHUNTER.COM

FishHunter Fishfinder Care
Please operate this device where the temperature is between
-30ºC and 40º C (-22ºF to 104º F). Extreme low or high temperature
conditions might temporarily shorten battery life or cause the
device to alter its behavior to regulate its temperature.
Store the device where the temperature is between -5ºC and
30º C (23ºF to 86º F). Don’t leave the device in your car, because
temperature in parked cars can exceed this range.
Taking Care of the fishfinder:
1. After retrieving the fishfinder from the water, simply pull up
the rubber skin with your hands/fingers so that it is back to its
original place. Since the fishfinder is wet, it should be easy to
pull the skin up.
2. Next, rinse the fishfinder with fresh water (especially if the
fishfinder has been deployed in salty water).
3. Make sure the 3 tiny stainless steel pads on the bottom of the
fishfinder are completely clean and shiny, and do not have any
salt residues on them.
4. Dry the fishfinder completely with a dry towel before charging
or putting it in storage.
FISHHUNTER.COM
Other manuals for FishHunter
1
Table of contents
Other FishHunter Fish Finder manuals


Popular Fish Finder manuals by other brands


Lowrance
Lowrance HDS Carbon quick start guide

Simrad
Simrad ES70 - DOWNLOAD AND INSTALLATION REV B datasheet

Standart Horizon
Standart Horizon FF525 installation manual

Norcross
Norcross ML100TDR ML100R ML100DR ML100tr instruction manual

Lowrance
Lowrance M68C IceMachine Installation and operation instructions

Furuno
Furuno FCV-1900/B/G installation manual