manuals.online logo
Brands
  1. Home
  2. •
  3. Brands
  4. •
  5. Fishmaster
  6. •
  7. Fishing Equipment
  8. •
  9. Fishmaster Pro Series User manual

Fishmaster Pro Series User manual

Other manuals for Pro Series

1

Other Fishmaster Fishing Equipment manuals

Fishmaster Casting Platform User manual

Fishmaster

Fishmaster Casting Platform User manual

Fishmaster Original Leaning Post User manual

Fishmaster

Fishmaster Original Leaning Post User manual

Fishmaster Pro Series Quick start guide

Fishmaster

Fishmaster Pro Series Quick start guide

Fishmaster Casting Platform Quick start guide

Fishmaster

Fishmaster Casting Platform Quick start guide

Fishmaster Original T-Top User manual

Fishmaster

Fishmaster Original T-Top User manual

Popular Fishing Equipment manuals by other brands

Kongsberg Simrad SY50 installation manual

Kongsberg

Kongsberg Simrad SY50 installation manual

Jiffy Pro4 Lite Operating manual/parts guide

Jiffy

Jiffy Pro4 Lite Operating manual/parts guide

FLAJZAR FISHTRON CatFish TX3 Instructions for operation and use

FLAJZAR

FLAJZAR FISHTRON CatFish TX3 Instructions for operation and use

Milwaukee 2873-20 Operator's manual

Milwaukee

Milwaukee 2873-20 Operator's manual

Cannon Magnum 5 ST owner's manual

Cannon

Cannon Magnum 5 ST owner's manual

Marcum Technologies PanCam operating instructions

Marcum Technologies

Marcum Technologies PanCam operating instructions

Harmony SlideTrax 8023061 installation instructions

Harmony

Harmony SlideTrax 8023061 installation instructions

Quantum Baitcast Reel owner's manual

Quantum

Quantum Baitcast Reel owner's manual

MINN KOTA i-Pilot quick start guide

MINN KOTA

MINN KOTA i-Pilot quick start guide

Ronco Pocket Fisherman instruction sheet

Ronco

Ronco Pocket Fisherman instruction sheet

Jiffy 4G LITE Operating manual/parts guide

Jiffy

Jiffy 4G LITE Operating manual/parts guide

Daiwa TanacomBull 1000 operating manual

Daiwa

Daiwa TanacomBull 1000 operating manual

Husqvarna 159LEB Operator's manual

Husqvarna

Husqvarna 159LEB Operator's manual

Eskimo HC40Q8 Operator's manual

Eskimo

Eskimo HC40Q8 Operator's manual

LOOP Q REEL Series manual

LOOP

LOOP Q REEL Series manual

Cannon Mag 20 Dt/Hs owner's manual

Cannon

Cannon Mag 20 Dt/Hs owner's manual

STRIKEMASTER 35CC LITE owner's manual

STRIKEMASTER

STRIKEMASTER 35CC LITE owner's manual

EcoNet Eco-Popper quick start guide

EcoNet

EcoNet Eco-Popper quick start guide

manuals.online logo
manuals.online logoBrands
  • About & Mission
  • Contact us
  • Privacy Policy
  • Terms and Conditions

Copyright 2025 Manuals.Online. All Rights Reserved.

Do you have questions? Call us @ 877.777.8693 Monday – Friday, 8am-5pm EST
2020 Fishmaster All Rights Reserved 2640 Byington Solway Rd, Knoxville, TN 37931 877.777.8693 fishmaster.com
cDES-212
REV 1.0
(1) Leg Base (R)
(1) Leg Base (L)
(1) Seat Platform
(1) Foot Rest
(2) Seat Hinge Bracket
(1) Seat Cushion
(6) M10 x 22 Panhead Bolts
(6) 1.5" x 1/4" Deck Screws
(4) M10 x 45 Bolts
(4) M6 x 20 Button Head Bolts
(2) M8 Shoulder Bolts
(2) M10 Shoulder Bolts
(1) Snap Screw
(4) M6 Washers
(2) Roll Pins
(2) Allen Wrench
(1) Grease Packet
• Blue painter’s tape
• Black permanent marker
• Tape measure
• Cordless drill with 1/8" bit
• 45° chamfer bit
• Metric allen wrench set
• Phillips head screwdriver
• Rubber mallet
• Tube of 3M 5200
Marine Adhesive
• Thread Lock
Medium Strength
B. Deluxe Backrest Option:
(1) Backrest Frame
(1) Backrest Upholstery
(3) Stainless Steel Cup Holders
(4) M6 Washers
(4) M6 x 55 Shoulder Bolts
Verify all parts are included
before you begin.
Patent Pending
Gather additional necessary
tools and materials:
Also included if you purchased
A. Standard Grab Bar Option:
(1) Grab Bar
Pro Series Leaning Post Included Hardware Identification
1
4x
4x
6x
6x
2x
2x
1x
2x
4x
4x
PRO SERIES LEANING POST
INSTALLATION MANUAL
M10 x 22
M8
SHOULDER
BOLT M10
SHOULDER
BOLT
M6 x 20
M6
M10 x 45
Roll Pins
M6 x 36
Snap Screw
M6 x 55
1.5" x 1/4"
CAUTION:If you are unfamiliar with your boat’s construction,
please seek professional advice before installing the leaning post.
As you plan to install the Fishmaster Pro Series Leaning Post,
keep in mind that drilling into the deck of the boat is needed in
order to safely secure the leaning post to the boat.
For added assistance when installing the leaning post, please
consider watching the installation video at: fishmaster.com
Or call us at 877-777-8693
!
TM
Do you have questions? Call us @ 877.777.8693 Monday – Friday, 8am-5pm EST
2020 Fishmaster All Rights Reserved 2640 Byington Solway Rd, Knoxville, TN 37931 877.777.8693 fishmaster.com
cDES-212
REV 1.0
STEP 2: Install the Pro Series Leaning Post Foot Rest to Leaning Post Assembly
1. Insert foot rest with notch
cutout (as shown) positioned
down - this allows for foot rest
to swing up once assembled.
2. Secure foot rest to Leaning
Post assembly using two M10
Shoulder Bolts with 6mm allen
wrench. Tighten firmly.
3. Gently tap the Roll Pins into
the small holes beneath the
bolt-holes on each side of
the Leaning Post foot rest
using a rubber mallet.
STEP 1: Install the Pro Series Leaning Post Seat Platform to Leg Bases
1. Position leg bases with foot rest attachment
aligned and facing each other.
2. Place seat platform on top of leg bases while
aligning holes on the top of the leg bases.
3. Secure platform to leg bases with 6 M10 x 22
bolts from the underside of the leg bases with
6mm allen wrench. Tighten firmly.
2
Do you have questions? Call us @ 877.777.8693 Monday – Friday, 8am-5pm EST
2020 Fishmaster All Rights Reserved 2640 Byington Solway Rd, Knoxville, TN 37931 877.777.8693 fishmaster.com
cDES-212
REV 1.0
STEP 3: Install the Pro Series Leaning Post Seat Hinge Brackets to Seat Cushion
1. Place seat platform
upside down on
firm surface.
2. Position both seat hinge
brackets in position as
shown.
Ensure that the faces of
the brackets are parallel
to outside padding of the
seat.
3. Insert M6 x 20 bolt into
each location with only
a few turns just to get
each started.
4. After all four bolts are
in position, tighten each
bolts firmly with 6mm
allen wrench.
STEP 4: Install the Pro Series Leaning Post Seat Cushion to Leaning Post Assembly
STEP 5: Install the Pro Series Leaning Post Snap Screw to Leaning Post Assembly
1. Position seat cushion on leaning post
assembly by aligning tabs on seat with
slots in assembly (highlighted in red on
inset drawing).
2. Secure with 2 M8 Shoulder Bolts with
6mm allen wrench. Tighten firmly.
1. Keep your leaning post seat
secured by installing the included
seat strap screw to the back of the
leaning post frame. Use a permanent
marker to mark the location where
the buckle at the end of the seat strap
comes in contact with the leaning
post frame. Drill a pilot hole with a
1/8" drill bit and screw in the snap
screw – the seat strap can now be
secured until you need to lift it up.
3
PRO TIP:
Alternate between
screwing down each
bolt to create an
even pressure on
the bracket.
Do you have questions? Call us @ 877.777.8693 Monday – Friday, 8am-5pm EST
2020 Fishmaster All Rights Reserved 2640 Byington Solway Rd, Knoxville, TN 37931 877.777.8693 fishmaster.com
cDES-212
REV 1.0
STEP 6 DELUXE: Install the Pro Series Leaning Post backrest Frame to Backrest Upholstery
1. Place backrest frame on top of
backrest upholstery while lining up
bolt holes.
2. Insert M6 x 55 bolt through M6 washer
and into each location with only a few
turns of bolt to get each bolt started.
3. After all four bolts are in position,
tighten each bolt firmly with 6mm
allen wrench.
4. Insert three cupholders into the
cupholder inserts on frame back
assembly. (This step is not shown.)
Grab Bar Option
Deluxe Backrest Option
STEP 6 STANDARD: Install the Pro Series Leaning Post Grab Bar to Leaning Post Assembly
We recommend two
people for this step.
1. While holding grab
bar in position,
(make certain that
the grab bar is
leaning towards
the back of the
assembly) insert
M10 x 45 bolt in each
location with only a
few turns of bolt to
get each bolt started.
2. After all four bolts
are in position,
tighten each bolt
firmly with 10mm
allen wrench.
NOTE: If you purchased
the upgraded backrest, go
to Step 6 Deluxe.
4
!
Do you have questions? Call us @ 877.777.8693 Monday – Friday, 8am-5pm EST
2020 Fishmaster All Rights Reserved 2640 Byington Solway Rd, Knoxville, TN 37931 877.777.8693 fishmaster.com
cDES-212
REV 1.0
STEP 7 DELUXE: Install the Pro Series Leaning Post Backrest Assembly to Leaning Post Assembly
We recommend two people
for this step.
1. While holding the
backrest in position,
insert M10 x 45 bolt in
each location with only
a few turns of bolt to
get each bolt started.
2. After all four bolts are
in position, tighten each
bolt firmly with 10mm
allen wrench.
Deluxe Backrest Option
Want to Upgrade Your Pro Series
Leaning Post?
The Pro Series Leaning Post can be
upgraded with a Deluxe Backrest
featuring four rod holders and
three cup holders.
Upgrade @ fishmaster.com
5
!
Do you have questions? Call us @ 877.777.8693 Monday – Friday, 8am-5pm EST
2020 Fishmaster All Rights Reserved 2640 Byington Solway Rd, Knoxville, TN 37931 877.777.8693 fishmaster.com
cDES-212
REV 1.0
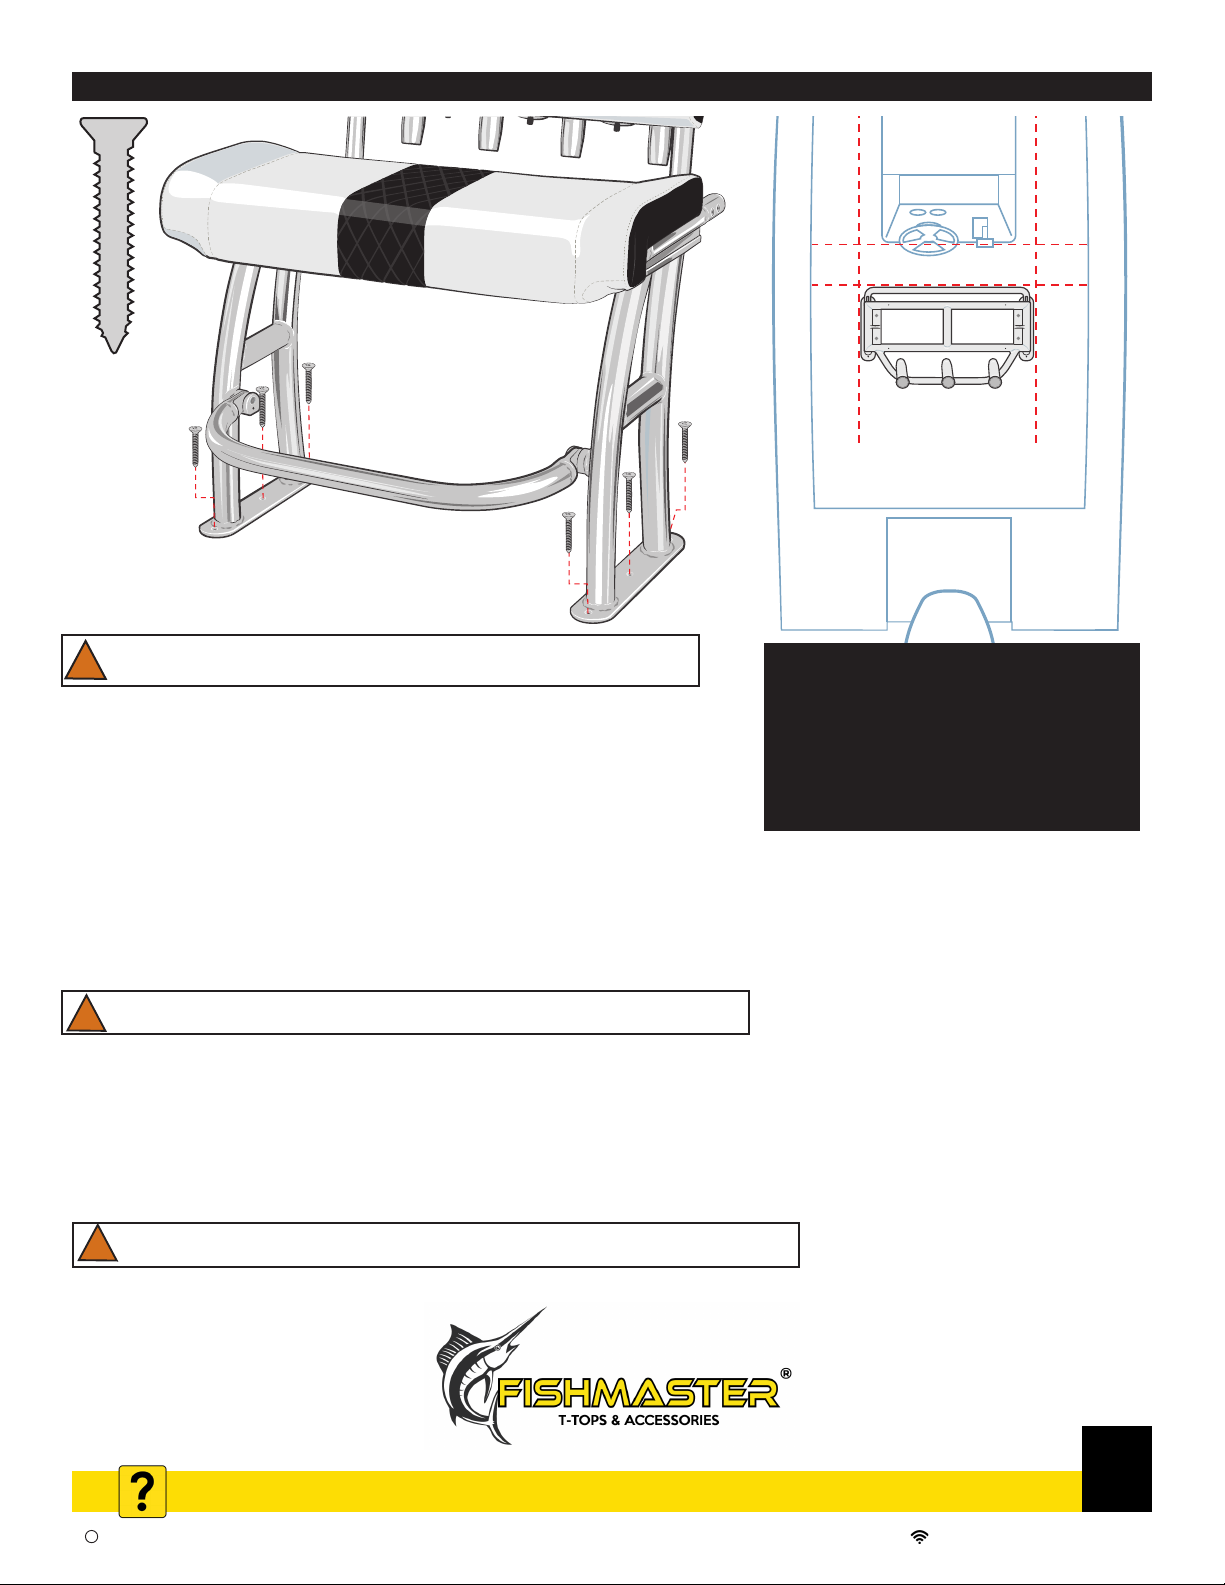
STEP 8: Install the Pro Series Leaning Post Seat Assembly to Boat
6
CAUTION: If you are unfamiliar with your boat’s construction,
please seek professional advice before drilling holes.
1. Locate the fuel tank, steering cables, and other critical boat
components to ensure their safety when drilling.
2. Measure from the rear of your center console to the aft of your boat
and place a tape line as a guide for where the front of the base plates
will be mounted. Leaning posts are commonly installed at 15" to 20"
back from the console, but this can be adjusted for your own comfort
and specific boat requirements.
3. Position your leaning post on the deck and measure from the outside of each screw hole in the base plate to
the side walls of your boat. This will help ensure the leaning post is centered on the deck of the boat and facing
straight towards the bow.
4. Once in position, use a permanent marker to mark the screw hole positions on both leaning post base plates.
5. At each marked location, drill in reverse approximately 3/8" deep through the gel coat. Switch the drill to its
standard rotation and finish drilling the hole through the deck.
CAUTION: Starting each hole with your drill in reverse is necessary
to prevent spider cracking of the gel coat finish.
6. Once all holes are drilled, use a 45° chamfer bit with the drill in reverse to countersink the screw holes.
7. Drill one of the provided deck screws into each hole and remove it to thread the holes.
8. Use 3M 5200 Marine Adhesive in each of the screw holes as well as on the bottom of the base plate for added
strength and durability.
9. Carefully set the leaning post on the prepared mounting surface –
matching up the newly drilled holes in the deck of the boat with those in the leaning post base plates.
10. Install the six deck screws to complete your installation.
Pro Tip: We recommend positioning
the leaning post so that there is adequate
standing room with the footrest in the
down position.
This will ensure comfort for both
the captain and any accompanying
passengers who wish to sit atop
the leaning post.
!
!
!CAUTION: Before using your leaning post, allow time for the adhesive to
cure to the 3M recommendations.
TM