FLEMING TOP9INHD User manual

9’INLINE PASTURE TOPPER
STANDARD & HEAVY DUTY
Operators Manual & Parts List
Fleming Agri-Products Ltd
Newbuildings Industrial Estate
Newbuildings
Northern Ireland
BT47 2SX
Tel: (028) 7134 2637
Fax: (028) 7134 4735
Email:info@fleming-agri.co.uk
‘Quality, Strength & Personal Service’

This manual is provided to assist you in getting the best results from your machine and ensure that you do so safely. If
you have any queries about the use of the machine contact your dealer before use.
This topper has been designed to be easy to operate while also providing class-leading performance. The dual heavy-
duty rotors with swinging blade system allow the topper to withstand the excessive pressures of wet conditions and to
absorb small impacts without effecting performance.
The cutting height is adjustable in convenient steps from the minimum depth of 30mm to a maximum depth of 120mm.
The depth is easily adjusted by altering the position of the skids which are positioned at each side of the topper. These
skids ensure that the topper provides a uniform cut without grounding while on undulating pastures.
This topper will successfully operate in wet conditions and on heavy pasture such as rushes, however it is unsuitable for
topping set-aside. While this topper is primarily designed for agricultural use it performs excellently when used for top-
ping playing fields or other local authority areas.
1.1 FUNDAMENTAL PRECAUTIONS
On delivery, your dealer gave you an explanation of the operation and maintenance of this Fleming topper. Please read
and understand these operating instructions before operating the machine for the first time. It is essential that you ob-
serve all safety instructions.
Incorrect use or mishandling of the machine can endanger:
Life and Limb of the operator, other persons or animals standing within the vicinity of the machine.
The machine and other material assets of the owner or third persons.
The performance of the machine.
Anyone who is involved in the commissioning, operation or maintenance of the topper must read and understand the
following instructions very carefully and observe them at all times.
NEVER DISTRACT ANYONE WHO IS USING A MACHINE.
A SAFE DISTANCE OF AT LEAST 30M MUST BE OBSERVED BY ANY PERSON OR ANIMAL WITHIN THE VICINI-
TY OF THE TOPPER.
1.2 AUTHORISED OPERATORS
Youths under the age of 16 must not operate this implement. The owner of the machine must provide the operator with
the operating instructions and make sure they have read and understood them. Only then may the topper be put into
operation.
The owner must ensure that only authorised persons operate/work on this machine. He is responsible for keeping any
third persons or animals out of the working area of the topper.

1.3 GENERAL SAFETY AND ACCIDENT PREVENTION REGULATIONS
Ensure the implement is correctly and securely attached to the operating vehicle 3-point linkage using the lift arm pins
and locking lynch pins provided.
NEVER attach to a tractor which would be rendered unstable when the implement is operated at its full capacity. Take
note of the maximum load permissible on the linkage. The weights of both models are given in the table below.
Extra care must be taken as the implement can cause instability due to the projection out the rear of the tractor.
WARNING extra care must be taken to avoid a traffic accident went transporting this implement on the road as it pro-
jects past the side of the tractor.
Take extra care when operating machinery on sloping ground. NEVER operate on ground on which there is a risk of
the tractor becoming unstable.
When detaching the implement from the tractor always ensure that it is stable and is safely positioned on a level sur-
face.
CAUTION extra care must be taken when detaching the implement from the tractor to ensure that the A frame does not
fall and injure the operator.
WARNING: The attaching and detaching of the implement to a tractor must be carried out by only one operator. There
should not be any other people in the vicinity of the implement or in the tractor.
Before operation make yourself familiar with all elements and controls of the machine as well as their functions.
Under NO Circumstances should anyone attempt to use the topper or the three point linkage as a means of personal
transport. It is designed as a specialist purpose farm implement and is unsuitable for the safe transportation of passen-
gers. To avoid personal injury do not allow hands or limbs to enter the area between the hitch and main body.
NEVER allow children to play on or around tractors and machinery.
Operators should not wear loose fitting clothing when working close to PTO driven equipment. Keep long hair tied back.
NEVER be in the vicinity of a rotating PTO shaft.
ALWAYS disengage the PTO before dismounting from the tractor.
NEVER operate the topper unless all safety guards are fitted and are firmly in position. ALWAYS ensure that all guards
and covers are replaced after carrying out maintenance or adjustments.
ALWAYS disengage the PTO shaft, apply the hand brake, stop the tractor and remove the key before carrying out any
maintenance or adjustments to the topper. The blades continue to rotate for some time after the tractor is stopped.
ALWAYS ensure that the blades have totally stopped moving before approaching the topper.
NEVER attempt to adjust the topper skids without the topper being in a stable and safe position and ensure that it is
suitably supported.
Take extra care when carrying out maintenance and adjustments as this is when most farm accidents occur
ENSURE the PTO shaft is the correct length to suit the tractor
ALWAYS ensure that the PTO tubes and universal joints have sufficient grease
Regularly check the PTO shaft and guard for damage and replace if any damage is found
ALWAYS use M10 x 50mm shear bolts with a rating of 8.8 on the knuckle joint. Standard bolts or shear bolts with a
rating greater than 8.8 may cause undue stress to the topper and risk life and limb.
NEVER attempt to move this implement manually.
Model Weight
TOP9INHD 502kg
TOP9IN 494kg

1.4 GENERAL OPERATING INSTRUCTIONS
This is a tractor mounted implement. Attempts should not be made to attach the topper to any other type of vehicle. If the
topper is to be transported on a trailer then it should be securely attached using suitable restraints
Never use incorrectly sized lift arm or top link pins when attaching the topper. Ensure top link has sufficient adjustment to
facilitate correct setting of the topper.
Fit the topper to the three point linkage in the normal way. Ensure that the PTO is correctly connected before use.
ENSURE the restraining chains on the PTO cover are attached to the hole provided on the fixed guard and on the tractor
PTO guard.
Adjust the topping height by removing the 4 bolts on each skid and set to the required height. Only adjust the height
when the topper is in the topping position and is on stable ground. ENSURE TRACTOR IS STOPPED, THE BLADES
HAVE STOPPED MOVING AND THE TOPPPER IS SUFFICIENTLY SUPPORTED.
Ensure the working area is clear of stones or anything which may cause damage to the topper or increase the danger to
life and limb.
With the PTO shaft and all safety guards in place it is safe to start topping.
Begin to operate at a low RPM and gradually increase to 540 RPM before starting to move forward.
1.5 INITIAL ASSEMBLY
Remove all components from the bag which was attached to the machine on delivery.
Slacken the bolts which attach the A-frame to the frame of the topper, reposition the A-frame into a vertical position and
retighten the bolts.
Attach the chain to the to the eyes on the back of the A-frame and on the rear of the topper using the D-shackles provid-
ed.
1.6 MAINTENANCE
As a rule, disengage the driving system and stop the engine prior to carrying out maintenance, servicing, cleaning or re-
pair work. ALWAYS remove the ignition key.
Prop the topper with appropriate supports and ensure the blades have stopped moving before carrying out any mainte-
nance.
The manufacturer will not be responsible for any damages or injuries caused by unauthorised repair, alterations or mis-
handling of the product.
Maintain product with care checking regularly for damage that would affect the safe operation of the implement.
ALWAYS use genuine Fleming parts.
Check the oil level in gearboxes before operating and at regular intervals. Oil should be at the level of the bung on the
side of the centre gearbox and 10mm below the bung on the side of the other gearboxes.
Change oil after first 50 hours and every 500 hours after. Correct oil quantity is 0.8 litre
CAUTION The gearboxes may become hot during use. Allow time for the housing and the oil to cool sufficiently before
carrying any maintenance.
To ensure that all the sludge's and contaminants are removed during an oil change, the oil should still be warm when it is
drained.
Use SAE 90 Gear Oil.
Fill oil by removing plugs at top and side of gearbox.
Grease PTO shaft tubes, universal joints and all other greasing points (marked with a sticker) daily.
Check holding bolts on gearbox after every 5 hours of use and tighten if necessary for the first 20 hours and periodically
afterwards.
Regularly check that blades are kept sharp and free from damage. Replace if any damage is apparent.
When replacing the blades ensure only the correct FLEMING blades are used. Blades should be replaced in pairs to
ensure that the rotor remains balanced. ALWAYS replace the blade bolts with new genuine Fleming bolts when the
blades are changed.
The bolts which attach the blades should be tightened fully and then slacked off until the blade is free to rotate.
ALWAYS ensure all warning stickers are kept clean and in good condition, replacing where necessary.
CAUTION paintwork may be damaged if high powered washers are used when cleaning the topper.
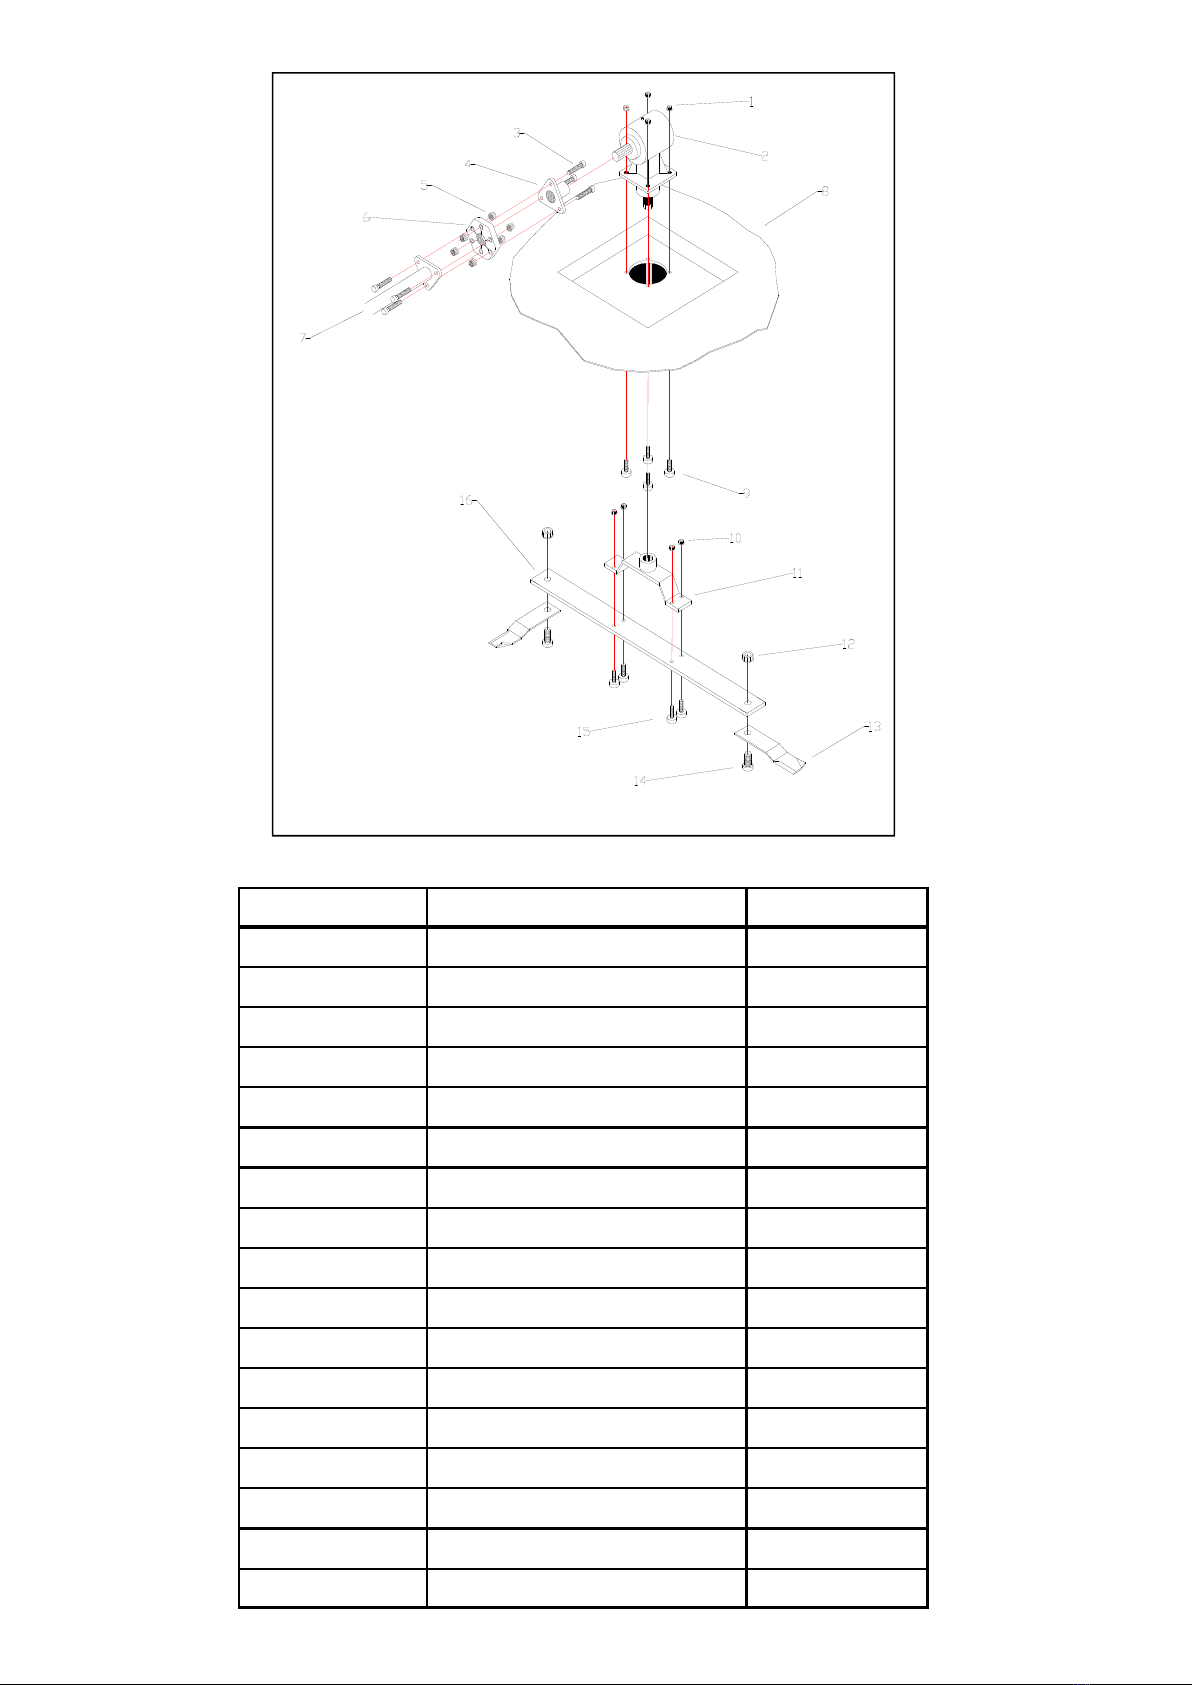
ITEM DESCRIPTION QYT
1M16 LOCKNUT
2GEARBOX
3M12 X 80 BOLT
4PROFILED TRIPOD
5M12 LOCKNUT
6RUBBER DOUGHNUT
7DRIVESHAFT
8MAIN CHASSIS
9M16 X 50 BOLT
10 M14 LOCKNUT
11 CARRIER HOUSING BUSHING
12 M24 LOCKNUT
13 LEFT HAND FLAIL
13 RIGHT HAND FLAIL
14 M24 X 50 BOLT
15 M14 X 50 BOLT
16 FLAIL CARRIER (750mm)

ITEM DESCRIPTION QYT
1M10 X 30 BOLT 2
212mm GALV WASHER 2
3M12 X 30 BOLT 8
4M12 LOCKNUT 8
5SKID 2
6M12 X 30 BOLT 8
7M12 NUT 8
8RIGHT HAND FLAIL 1
9LEFT HAND FLAIL 1
10 GEARBOX GUARD 1
11 A FRAME 1
12 GUARD 1
13 M20 X 50 BOLT 2
14 M20 LOCKNUT 2
15 T-GEARBOX 1
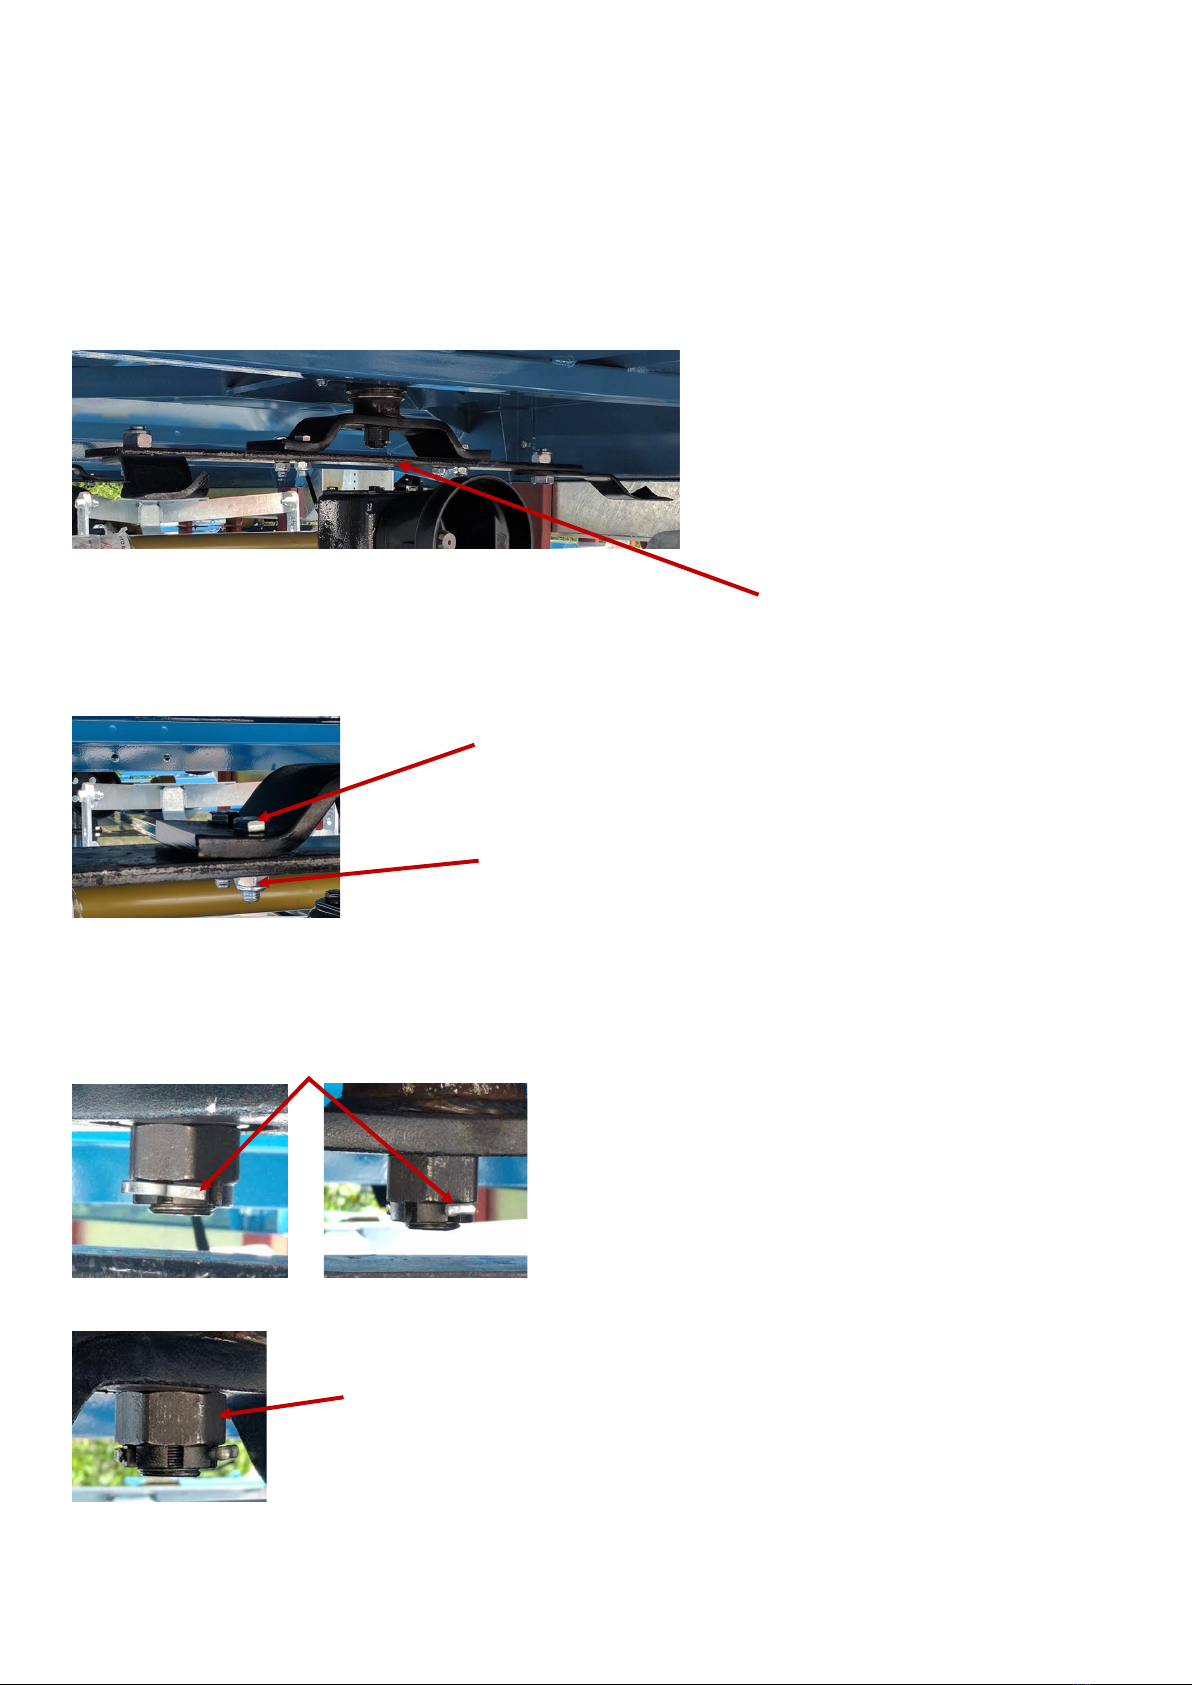
Rotor maintenance
The rotor should be checked after the first 10 hours, the first 50 hours, and the first 100 hours of use.
The rotor should then be checked periodically to ensure it has remained tight.
1) Ensure PTO is turned off completely.
Remove key from ignition.
2) To access the topper castle nut, remove the rotor bar.
Remove M14x50 bolts from rotor bar/rotor bar holder assembly. Rotor bar
You can now take the rotor bar off its holder. Place the rotor bar aside.
Do NOT remove blades from the rotor bar.
3) You now have access to the Topper castle nut, with the split pin.
Remove split pin from gear box shaft/ topper castle nut assembly.
Split pin
4) When split pin is removed, tighten the castle nut.
After the Topper castle nut is tightened, replace the split pin.
Secure the rotor bar back in place with the M14x50 bolts, and M14 Nylock.
M14x50 Bolt
M14 Nylock
Topper castle nut

DECLARATION OF CONFORMITY
CONFORMING TO EC Machinery Directive 2006/42/EC.
We:
Fleming Agri-Products Ltd
Newbuildings Industrial Estate
Newbuildings
Northern Ireland
BT47 2SX
Declare in sole responsibility, that the product
Type: TOP9IN 9’ Inline Topper
TOP9INHD 9’ Inline HEAVY DUTY Topper
to which this certificate applies, conforms to the basic safety
and health requirements of the EC Machinery Directive 2006/42/EC,
and the Transposed Harmonised Standards:
BS EN 4254-12 (2012)
BS EN 4254-1 (2015)
Jonathan Lecky
Production Director
This manual suits for next models
1
Table of contents
Other FLEMING Farm Equipment manuals

Popular Farm Equipment manuals by other brands

Schaffert
Schaffert Rebounder Mounting instructions

Stocks AG
Stocks AG Fan Jet Pro Plus 65 Original Operating Manual and parts list

Cumberland
Cumberland Integra Feed-Link Installation and operation manual

BROWN
BROWN BDHP-1250 Owner's/operator's manual

Molon
Molon BCS operating instructions

Vaderstad
Vaderstad Rapid Series instructions


