FlexPro EEH/18 User manual

Water to water heating system
User's manual
EEH/18
Single compressor system:
PCB revision: 248053
LCD revision: 248055
P2/Total14
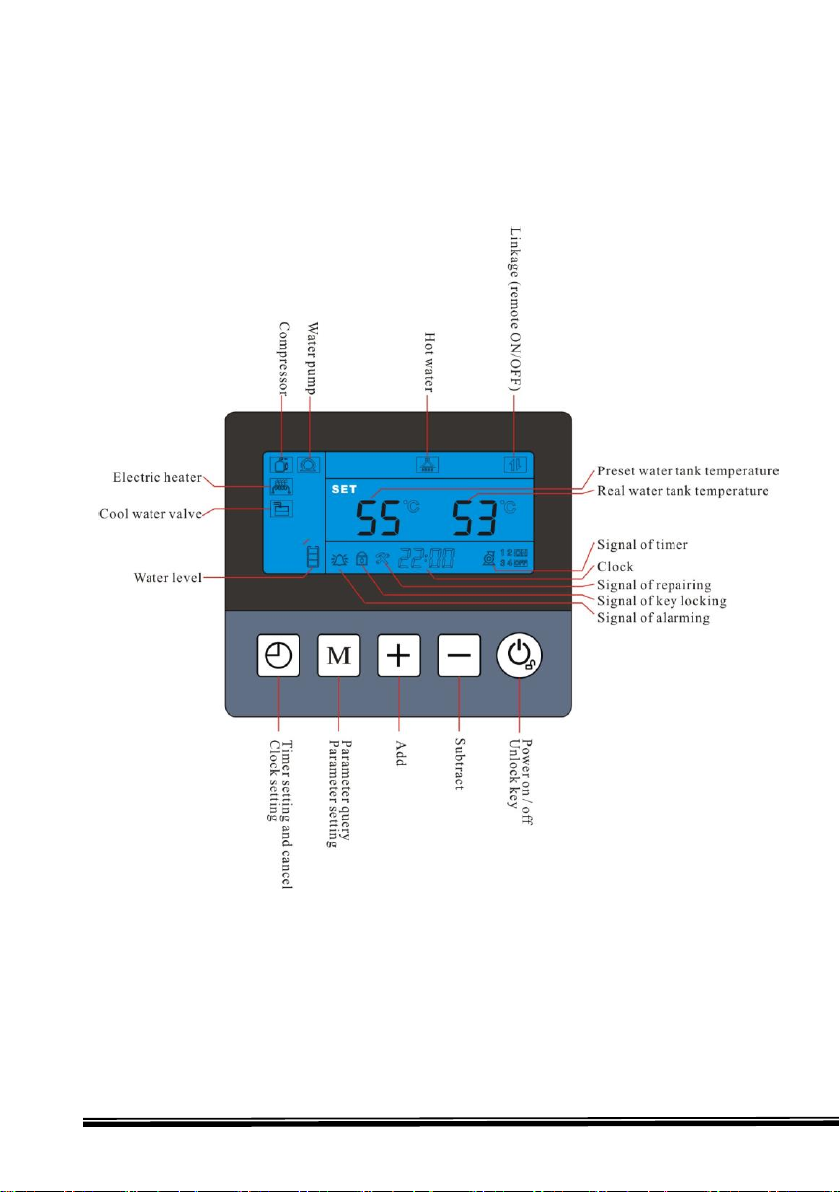
Part 1: Operating panel introduction
1. Display interface
This is for only hot water working mode.
P3/Total14
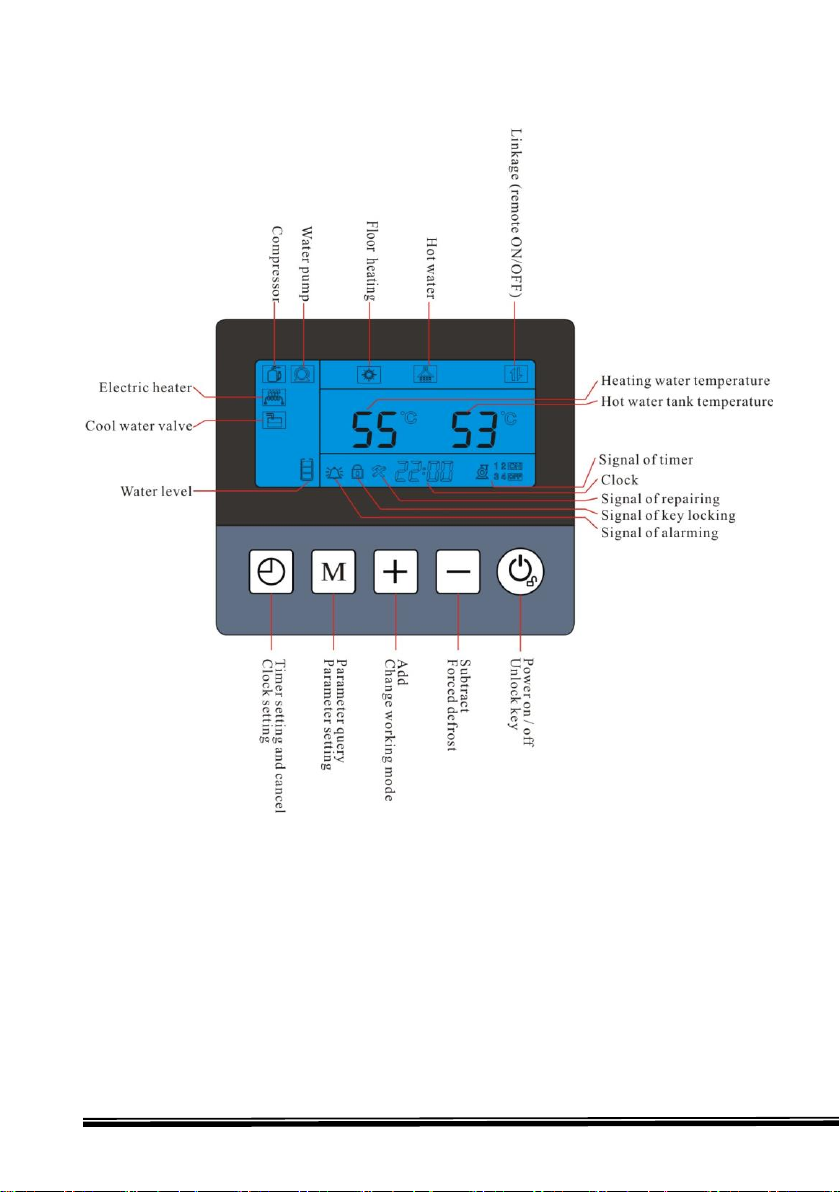
This is for hot water + heating working mode (optional).

P4/Total14
↓↓↓↓↓
Clock M + - power
2.1 “Power”button
●Under unlock state, press this button for 1second, can turn on and turn
off heat pump.
●Under other state, press this button, can return main interface.
●Under locking state, press this button for 5 seconds, can unlock buttons.
2.2 “M”button
●Under main interface, press this button, can query the working status
parameters
●Under hot water + heating mode, press this button, can switch between
the two presetting temp.
2.3 “+”and “-“button
●Open previous, next page of parameters to query and change the value
●Combine with “M”button, can query each parameter and set
●Under power on state, press “+”and “-“button, can set current
working mode water temperature
2.4 “clock”button
●Press this button for 10seconds, enter clock setting interface
●Press this button, can enter timer of ON/OFF setting, combine
“+”and “-“button, can set the timer of group 1 and group 2 timers
2. Buttons function
setting.

P5/Total14
3. Operating
3.1 Parameters query and setting
①Working status parameters query
How to enter? Under main interface, press “M”button, can enter
working status parameters query interface.
Working status parameters (table 1)
Code Meaning
No code Water tank temp
A1 Evaporating temperature
A2 Inlet gas temperature of
compressor
A3 Outlet gas temperature of
compressor
A4 Ambient air temperature
A5 Outlet water temperature
of using side
A6 Floor heating water temp
A7 Outlet water temperature
of source side
A8 Compressor current
A9 Reserved
A10 Reserved
C1 Reserved
E1~E6 History error code
Remarks: A6 sensor is installed on the using side heat exchanger inlet water pipe
inside heat pump by factory.

P6/Total14
Error code (table2)
Error code Meaning
Er01 Wrong phase error
Er02 Lack phase error
Er03 Water flow switch error of using side
Er05 Outlet gas pressure of compressor is too high error
Er06 Inlet gas pressure of compressor is too low error
Er09 Communication error
Er11 Time limit for locking heat pump reached
Er12 Outlet gas temp of compressor too high error
Er15 Water tank temp sensor error
Er16 Evaporating temp sensor error
Er18 Outlet gas temp sensor of compressor error
Er21 Ambient air temp sensor error
Er22 Floor heating water temp sensor error
Er27 Outlet water temp sensor error of using side
Er29 Inlet gas temp sensor of compressor error
Er35 Compressor current too high error
Er38 Outlet water temp too low error of source side
Er39 Water flow error of source side
Er41 Outlet water temp sensor error of source side
Er42 Outlet water temp too high error of source side
Er45 Outlet water temp too high error of using side

P7/Total14
②User parameters query and setting (both ON and OFF state can set)
How to enter?
◆Under main interface, press “M”for 3seconds, enter user parameter
query interface, then press “+”and “-“button , can query L2 to L9
value
◆Under user parameter query interface, press “M”button, enter setting
interface, press “+”and “-“button, to set the value of current
parameter, press “M”button again, return query interface.
◆Under user parameters query interface and setting interface, if there
is not operation for 30seconds constantly, system will quit user
parameter query or setting interface automatically, and return
to main interface, press “power”button can return main interface too.
User parameters query and setting (table 3)
Code Meaning Setting
range Factory
setting
L1 Hot water temp drop
for compressor
restart setting
2℃
~15℃ 5℃
L2 Hot water tank
temp setting 30℃
~F1 55℃
L3 Floor heating water
temp drop for
compressor restart
2℃
~15℃ 5℃
L4 Floor heating 20-55°C 45℃
L5 Ambient air
temperature below
which electric heater
-25℃
~25℃5℃

P8/Total14
is allowed to start
L6 Reserved
L7 Reserved
L8 Compressor current 0~40A
0(0:
will not
detect
current)
L9 Reserved
3.2 Other operation
①Clock setting
◆At main interface, press “clock”button for 5 seconds, enter clock
setting interface
◆At clock interface, press “clock” button, then “hour”flash, press
“+”or “-”button,can set hour.
◆After finish setting hour, press “clock” button, then “minute”flash,
now press “+”or“-”button,can set minute.
◆After finish setting minute, press “clock” button, to confirm clock
setting, and back to main interface.
◆At clock setting interface, if there is not operation within 30seconds,
system will confirm clock setting and back to main interface
automatically.
◆At clock setting interface, press “power”button, can confirm current
clock setting and back to main interface.
②Timer setting and cancelling (ON/OFF timer)
◆At main interface, press “clock”button, enter timer group setting.
Now press “+” or“-”button, can switch timer groups, there are 3groups
ON/OFF timer.

P9/Total14
◆When group 1 ON timer flashing, press “clock”button, enter group 1
ON timer “hour”setting interface, “hour”flash, then press
“+”or“-”button,then can set “hour”for group 1 ON timer.
◆After finish setting “hour”, press “clock”button, then “minute”flash,
then press “+”or“-”button,can set “minute”for group 1 timer.
◆After finish setting group 1 ON timer “minute”, press “clock”button,
enter group 1 OFF timer setting, same way like ON timer setting..
◆After finish setting group 1 ON/OFF timer, press “clock”button,
confirm group 1 setting, and enter group 2 ON/OFF timer setting, same
way like group 1 setting.
◆At timer interface, if there is not operation within 30seconds, then
confirm current timer setting, and back to main interface (this setting
can be remembered if electricity is cut off)
◆At timer interface, press “clock”button, confirm current timer
setting, and back to main interface.
◆Other groups ON/OFF timer setting are same way like group1.
◆How to cancel timer?
At timer interface, press “clock” button for 5seconds, when the ON and
OFF signal disappear, then press “power” button to confirm, can cancel
current group ON/OFF timer.
③Lock keys and unlock keys
◆At locking state, press “power”button for 3seconds, buzzer will give
a voice of “Di”, keys will be locked.
◆If there is not operation within 60seconds constantly, will lock keys
automatically.

P10/Total14
④Remove history error code
At the interface of query history error code, press “power”and “M”
button together for 5seconds, can remove all the history error code.
⑤One-click restore function
Under power off status, press “power”and “-“button together for
5seconds, can restore factory setting.
⑥Change working mode
Press “+”button for 5sec, can change working mode. Working mode
includes hot water mode, hot water + heating mode.
Table of contents
Popular Heater manuals by other brands

oventrop
oventrop Regucor Series quick start guide

Blaze King
Blaze King CLARITY CL2118.IPI.1 Operation & installation manual

ELMEKO
ELMEKO ML 150 Installation and operating manual

BN Thermic
BN Thermic 830T instructions

KING
KING K Series Installation, operation & maintenance instructions

Empire Comfort Systems
Empire Comfort Systems RH-50-5 Installation instructions and owner's manual


Empire Heating Systems
Empire Heating Systems WCC65 Installation and owner's instructions

Wetekom
Wetekom 92 86 43 Original instructions

Desa
Desa SPC170-F owner's manual

Watlow
Watlow Watrod Electric Tubular Heaters Specifications

Haverland
Haverland ECO-DRY GPS Series Instruction & installation manual

Stelpro
Stelpro ASILVC2060 Series user guide