manuals.online logo
Brands
  1. Home
  2. •
  3. Brands
  4. •
  5. IRSAP
  6. •
  7. Heater
  8. •
  9. IRSAP The Radiator Company Ovali User manual

IRSAP The Radiator Company Ovali User manual

Materials Aluminium
Connections ow and return.
Test pressure 9 Bar
Testing authority EN442
Maximum operating pressure 6 Bar
Maximum working temperature 90 ºC
Packaging Polystyrene Protection in cardboard box
1
2
”
The Radiator Company
Units 13 - 14 Charlwoods Road
East Grinstead
West Sussex
RH19 2HU
All products must be inspected once removed from the packaging and The Radiator Company
notified within 28 days of delivery of any scratches, blemishes or other damage.
The Radiator Company will then replace the radiator.
Imperfect radiators should therefore not be fitted and The Radiator Company will not accept
responsibility for replacement of scratched or damaged radiators once they have been fitted.
This includes any consequential loss or cost of fitting.
If The Radiator Company are not notified within 28 days of the date on the signed delivery
note then it will be deemed that The Radiator Company have fully complied with its
obligations and claims will not be considered.
Failure to comply with any of the above may invalidate any claims.
We recommend that after you check the product on delivery that it is stored in its packaging
to prevent damage prior to installation. The Radiator Company cannot accept responsibility
for items damaged after delivery.
Terms & Conditions
Guarantees & Liabilities
As we are not the manufacturers of this product we will take all reasonable endeavours to make
over to you the benet of any warranty or guarantee given by the manufacturer, which is usually
ve years on most of our range. (Copies of specic guarantees for any of our products are
available on request).
The guarantees in all cases are subject to the products being installed in accordance with British
and or European standards as well as these tting instructions. The guarantees in all cases are
restricted to the free of charge replacement or repair of the failed product only. Our liability will
under no circumstances extend beyond the repair or replacement of the product supplied by us.
Claims for either labour in replacement or damage to property are not admissible. Any goods
that are returned, in the event of a problem, will belong to The Radiator Company.
Technical Specications
This bold aluminium radiator has Low Water Content and
excellent thermal properties making the Ovali both cost
effective and beautiful.
Please read these instructions and terms and conditions
carefully prior to installation. Failure to do so may invalidate the
warranty
Ovali
Fittings Instructions
5
Y
e
a
r
G
u
a
r
a
n
t
e
e
Y
e
a
r
G
u
a
r
a
n
t
e
e
THE
RADIATOR
COMPANY
OVA_IR_1.0
PLEASE NOTE: To reduce the possibility of noise caused by rapid heating and cooling
of aluminium radiators; adequate capacity for expansion must be provided within
the overall heating system. Systems using micro bore pipework must have adequate
pressure and flow rates for the number and style of radiators on the system.
If you have any questions please contact us: 01342 302250, www.theradiatorcompany.co.uk A brand of , Italy’s leading manufacturer of design led radiators
Unpack & Inspect
1
You should have:
• 1 Radiator
• 1 Airvent (pre-tted) (B)
• 1 Blanking Plug (pre-tted) (C)
• 1 Diverter (pre-tted) (D)
• 4 Bracket Caps (L)
• 4 Bracket Screws (I)
• 4 Brackets (H)
• 4 Support Plates (G)
• 8 Wall Plugs and Screws (F+E)
Contents
2
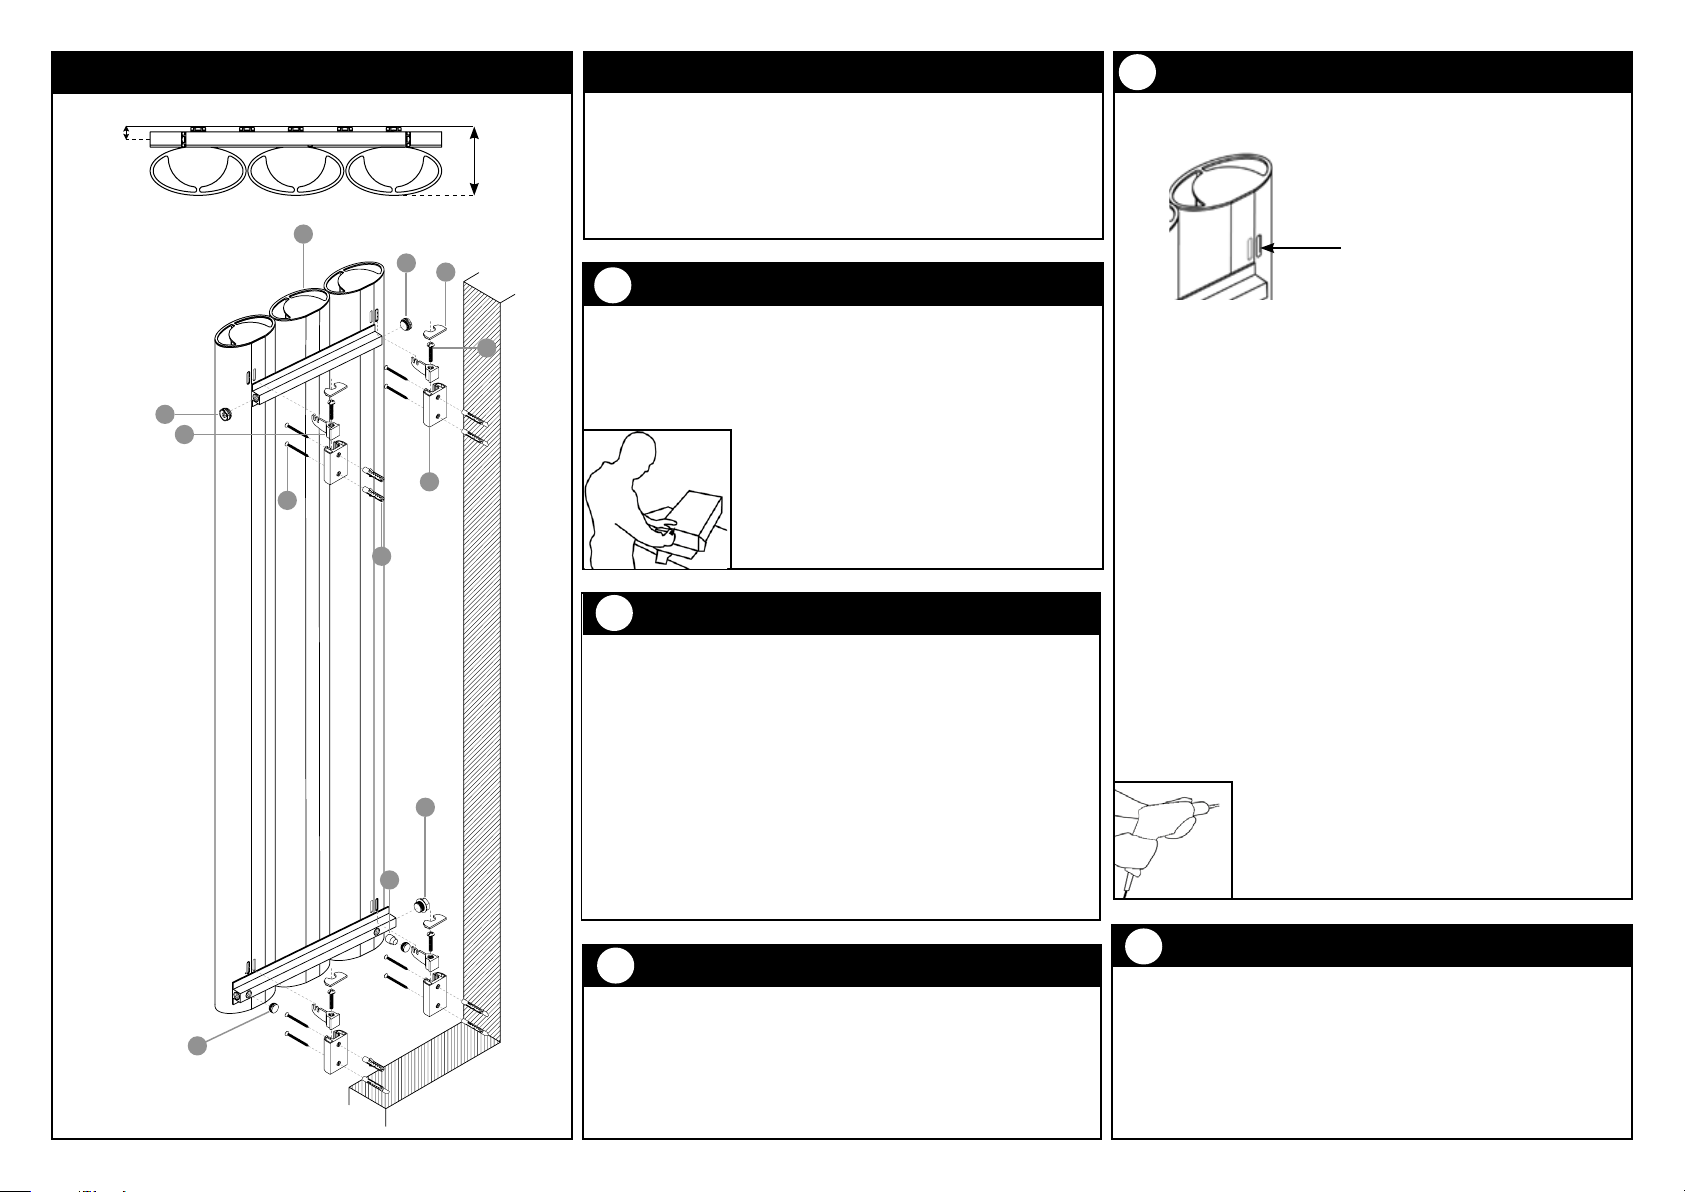
Mark and Fix Brackets
4
Diagrams of Ovali
The Radiator Company prides itself on selecting products from
manufacturers who exercise tight quality control measures. We only
select models with excellent standards of welding and brazing, as well
as high quality nishes. All of our products are well packaged and
should reach you in perfect condition. Just in case however, we offer
a minimum 5-year no quibble guarantee for all
radiators and towel rails.
The Radiator Company must be notied of any
shortages or damage within 28 days of delivery.
For further information please see terms and
conditions on back page.
PLEASE NOTE :
It is essential that all brackets are level to ensure a
vertical alignment for connecting the pipework.
Pipe Centres
Pipe centres left to right
Pipe centres from wall
Depth from wall
Commission
5
Please Note:
In accordance with Part L1 2006 of the Building Regulations and
BS7593:1992 code of practice for the treatment of hot water and
central heating systems, we strongly recommend flushing the heating
system post installation of new radiators and then adding the correct
quantity and type of inhibitor for use with your radiator and system
to prevent corrosion. Damage caused to systems not protected by
a suitable inhibitor will not be covered by manufacturer’s guarantee.
Width + Valves
36mm
124mm
36
124
1. The airvent “B” and the blanking plug “C” are already tted on
the radiator.
2. The Diverter “D” and blanking plug “C” are already installed
on the lower collector in the radiator. Please Note: The diverter is
identied by the Yellow Cap “M”. If you would like to move change
the position of the Diverter please see section ‘3’.
3. Accurately mark bracket holes on the wall using a tape measure
and
spirit level. (Height of the radiator from oor : minimum 100mm)
4. Drill 8mm diameter holes to a minimum depth of 50 mm,
and insert wall plugs “E”.
5. Place the support plates “G” on the wall in line with the wall plugs
and secure using screws “F”
6. Insert the brackets “H” into the support plates “G”, and secure
and level with screws “I”. Fit the bracket closing cap “L” on top.
7. Hang the radiator on the rst space of the brackets (please see
diagram above) and ensure the radiator is level using a spirit level.
Please refer to diagrams opposite when following steps below:
You will need:
• Tape measure
• Electric drill and bits
• Spirit level
• Flathead screwdriver
• Crosshead screwdriver
Please Note: The wall plugs and screws supplied will not be
suitable for all wall types. Please ensure suitable wall plugs and
screws are used.
Identifying the Diverter
3
The pre-tted diverter is marked with a yellow cap on the left hand side
of the bottom collector. If the diverter needs to moved, rstly unscrew
the diverter “D” on the left hand side, and the blanking plug “C” on the
right hand side of the bottom collector. (Please see diagram opposite)
Swap these round so that the Diverter “D” is now on the right hand side,
and the Blanking Plug “C” is on the left, then screw in securely.
A
c
D
c
M
E
F
G
L
b
H
I
Place brackets on the outside
holes for maximum support

Other IRSAP Heater manuals

IRSAP 1095M0518 User manual

IRSAP

IRSAP 1095M0518 User manual

IRSAP Step E 775 User manual

IRSAP

IRSAP Step E 775 User manual

IRSAP KART User manual

IRSAP

IRSAP KART User manual

IRSAP SOUL DX 1054 User manual

IRSAP

IRSAP SOUL DX 1054 User manual

IRSAP VELA 700 User manual

IRSAP

IRSAP VELA 700 User manual

IRSAP THE RADIATOR COMPANY Athena User manual

IRSAP

IRSAP THE RADIATOR COMPANY Athena User manual

IRSAP 715M0421 User manual

IRSAP

IRSAP 715M0421 User manual

IRSAP The Radiator Company Ottimo User manual

IRSAP

IRSAP The Radiator Company Ottimo User manual

IRSAP TESI User manual

IRSAP

IRSAP TESI User manual

IRSAP BELLA 550 User manual

IRSAP

IRSAP BELLA 550 User manual

IRSAP THE RADIATOR COMPANY Ceres User manual

IRSAP

IRSAP THE RADIATOR COMPANY Ceres User manual

IRSAP Supplies4Heat SHERWOOD User manual

IRSAP

IRSAP Supplies4Heat SHERWOOD User manual

IRSAP The Radiator Company Ancona User manual

IRSAP

IRSAP The Radiator Company Ancona User manual

IRSAP 987M1220 User manual

IRSAP

IRSAP 987M1220 User manual

IRSAP TESI3 EH-600-8 User manual

IRSAP

IRSAP TESI3 EH-600-8 User manual

IRSAP Radiator Company Kura User manual

IRSAP

IRSAP Radiator Company Kura User manual

IRSAP ARES Series User manual

IRSAP

IRSAP ARES Series User manual

IRSAP JAZZ User manual

IRSAP

IRSAP JAZZ User manual

IRSAP FLECHE AIR 944 User manual

IRSAP

IRSAP FLECHE AIR 944 User manual

IRSAP THE RADIATOR COMPANY Sebino User manual

IRSAP

IRSAP THE RADIATOR COMPANY Sebino User manual

IRSAP RELAX RENOVA User manual

IRSAP

IRSAP RELAX RENOVA User manual

IRSAP 471M0918 User manual

IRSAP

IRSAP 471M0918 User manual

IRSAP RELAX HYBRID REHM092A Service manual

IRSAP

IRSAP RELAX HYBRID REHM092A Service manual

IRSAP The Radiator Company Lupin Electric User manual

IRSAP

IRSAP The Radiator Company Lupin Electric User manual

Popular Heater manuals by other brands

Seeburg GL16 dp 1000 user manual

Seeburg

Seeburg GL16 dp 1000 user manual

flowair ELIS C W 100 Operation manual

flowair

flowair ELIS C W 100 Operation manual

Sunbeam 9100020009040 owner's guide

Sunbeam

Sunbeam 9100020009040 owner's guide

Heatstore DYNAMIC HSDR500T Installation and operating instructions for manual and remote control options

Heatstore

Heatstore DYNAMIC HSDR500T Installation and operating instructions for manual and remote control options

Olimpia splendid Caldo Relax Instructions for use and maintenance

Olimpia splendid

Olimpia splendid Caldo Relax Instructions for use and maintenance

Rointe KYROS KTI030SE 3 Series instruction manual

Rointe

Rointe KYROS KTI030SE 3 Series instruction manual

ORIGO FH9513 instruction manual

ORIGO

ORIGO FH9513 instruction manual

Vornado Vortex Heater VH2 user guide

Vornado

Vornado Vortex Heater VH2 user guide

EWT PF120 NT manual

EWT

EWT PF120 NT manual

NARVI Stonet 6kW Installation and instruction manual

NARVI

NARVI Stonet 6kW Installation and instruction manual

Nertpow CH010 instruction manual

Nertpow

Nertpow CH010 instruction manual

Coopers of Stortford F908 Instructions for use

Coopers of Stortford

Coopers of Stortford F908 Instructions for use

Dimplex R23DH Series quick start guide

Dimplex

Dimplex R23DH Series quick start guide

Rowenta SPRINTO SILENCE manual

Rowenta

Rowenta SPRINTO SILENCE manual

Kenwood EW7307K Instructions for use

Kenwood

Kenwood EW7307K Instructions for use

LEMAN LOCSE300 instruction manual

LEMAN

LEMAN LOCSE300 instruction manual

Winterwarm WWFH20 instruction manual

Winterwarm

Winterwarm WWFH20 instruction manual

Adax NEO H Series manual

Adax

Adax NEO H Series manual

manuals.online logo
manuals.online logoBrands
  • About & Mission
  • Contact us
  • Privacy Policy
  • Terms and Conditions

Copyright 2025 Manuals.Online. All Rights Reserved.