Flight Dental Systems Clave 23+ User manual

1 Clave 23+ Instruction Manual v1.4
Clave 23+
Instruction Manual
Steam Sterilizer
Distributed by

2 Clave 23+ Instruction Manual v1.4
Thank you for choosing our steam sterilizer.
Prior to operating this device, please read the instruction manual carefully and follow all
installation instructions.
Regular maintenance:
If this symbol appears on the screen when the device is powered on or if it shows E88
on the sterilization report, please contact your dealer or local service company for a maintenance
service. This device requires regular maintenance. A symbol or error code E88 will be
displayed after 1 year of use or after a certain number of cycles, whichever comes first. This is
programmed into the maintenance screen.
The Clave 23+ is the same as a Clave 23 except it has a built in compressor that speeds up the
drying process. It also has a bacteria filter that requires replacement approximately every 3
months.
Use only distilled water with this device.
Do not re-use the used water from this machine.
Power on the unit with the door open. This will allow the unit to get a initial zero pressure
reading. The machine may not start a cycle and only beep when the start button is pressed if it
has a non-zero pressure reading on powering up.

3 Clave 23+ Instruction Manual v1.4
Table of Contents
Clave 23+ Quick Guide…………………………………………………………………… 4
1. General…………………………………………………………………………….. 5
2. Technical specifications…………………..……………………………………….. 6
3. Package contents………………………………………………………………....... 6
4. Installation…………………………………………………………………………. 7
5. Operation……………………………………………………………………………7
5.1 Setup………………………………………………………………………….... 7
5.2 Preparation of sterilization materials…………………………………………...8
5.3 Selecting the sterilization program…………………………………………….. 8
5.4 Running the sterilization program……………………………………………... 9
5.5 Basic set………………………………………………………………………...10
5.6 Record of the cycle…………………………………………………………….. 10
6. Advanced settings…………………………………………………………………. 11
7. Maintenance…………..…………………………………………………………… 14
8. Error codes……………….…………………………………………………………16
9. Transportation and storage………………………………………………………… 17
10. Safety devices……………………………………………………………………… 17
Appendix
1. Water properties and characteristics………………………………………………. 18
2. Diagrams of the sterilization programs……………………………………………. 19
3. Wiring diagram……………………………………………………………………. 21
4. Hydraulic diagram………………………………………………………………… 22
5. Warranty…………………………………………………………………………… 23
6. Contact Information……………………………………………………………….. 24

4 Clave 23+ Instruction Manual v1.4
Clave 23 + Quick Guide
Set the Time and Date
1. Power on, wait, and then press Select. Press the Down button and highlight ‘Basic Set’.
Enter ‘Basic Set’ by pressing Select.
2. Select item to change by pressing Select.
3. Adjust numbers by pressing Up and Down buttons. The time is a 24 hr. Clock.
4. Press Select at the last number to save and exit that menu. The Counter cannot be
changed in this screen.
5. Power off.
Retrieve Record on USB Stick
1. Power on, wait, and then press Select. Press Down button and highlight ‘Report’. Enter
‘Report’ by pressing Select. A list of the last 20 cycles will be accessible. Insert a USB
stick correctly into the USB connector.
2. Use the Up and Down keys to highlight the record you want. Press Select. If a printer is
connected, it will also print a copy of that report. Wait at least 10 seconds for the report to
be transferred to the USB stick. Repeat the procedure (highlight and select) for any other
records to be transferred to the USB stick.
Checking Maintenance Screen
1. Hold the Up and Down buttons while powering on. Let go when you enter the interface.
Scroll to ‘Maintenance’ and highlight it. Press Select button. On a new install, use the
select button to change the ‘End’ date to 1 yr in the future. Change the cycle count to the
expected cycle count for a year or 1000. Use the up/down buttons to change the values.
When finished, press the select button and power off. E88 or ‘wrench’ icon will come up
when either value is reached. Don’t make changes on a unit already in use for a while.
Changing Drying Time
1. Power on while pressing and holding the Select button for 5 seconds. This will enter the
advanced settings mode.
2. Press the Select button to select Parameter. Press Select button to enter the menu.
Highlight the program you want to change. Press Select button to move to the drying
time. Use the up/down buttons to change the drying time. Press the Select button to save
and return to the earlier menu. It is not recommended to change the default holding time.
5 Clave 23+ Instruction Manual v1.4
1. General
The steam sterilizer described in this manual is intended for the sterilization of instruments and
tools in the medical, dental, beauty, veterinarian and tattoo fields. It is a fully automatic steam
sterilizer with 134 °C and 121 °C sterilization temperatures. This sterilizer is in compliance with
the European Directive 93/42/CEE, Health Canada, ISO 13485, ETL, CSA and it has been
produced in accordance with the EN 13060.
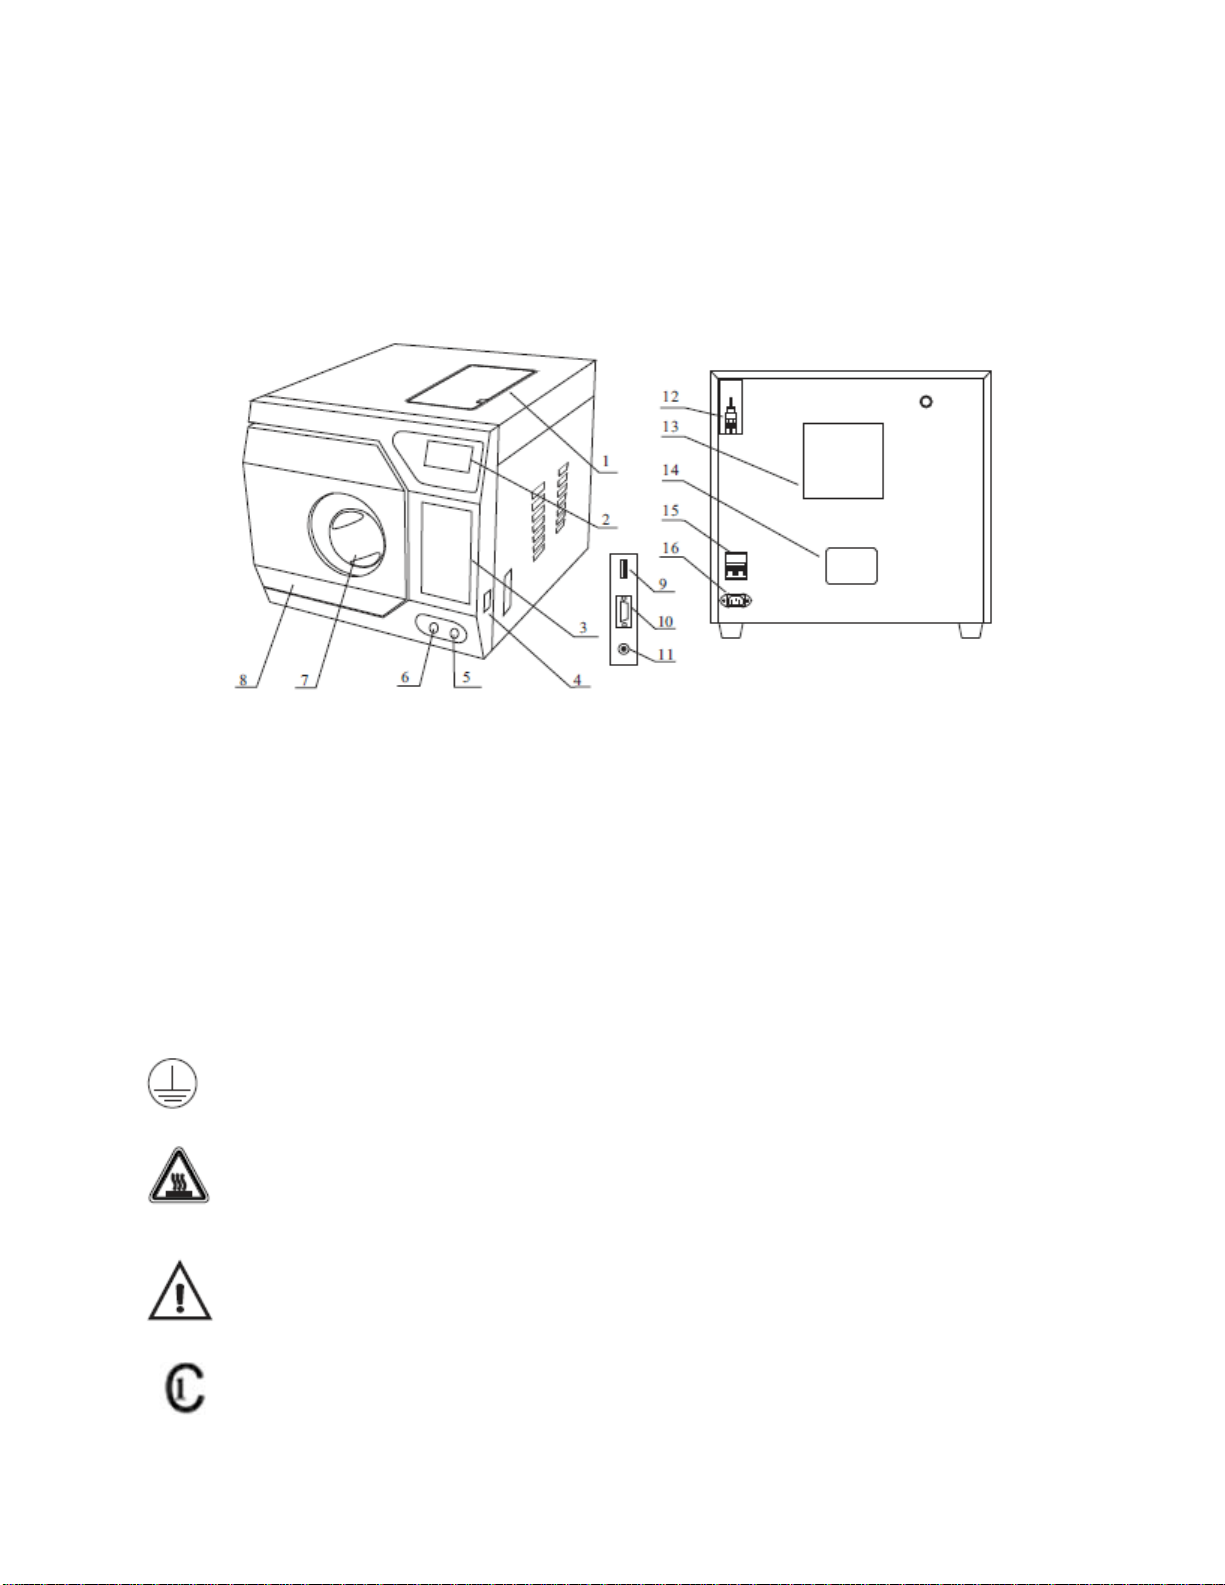
1. Distilled water tank 9. USB port
2. LCD screen 10. Printer data port
3. Control panel 11. Printer power jack
4. Power switch 12. Safety valve
5. Distilled water tank drain port 13. Condenser exhaust
6. Used water tank drain port 14. Rating plate
7. Door handle 15. Circuit breaker
8. Door 16. Power socket
Security Notice
For safe operation, please pay close attention to the warning symbols below which can be found
throughout this manual. Please read carefully and understand the contents of this manual prior to
operating this instrument.
Protective conductor terminal
This symbol is for grounding protection inside the machine.
HOT SURFACE
This symbol is visible on the front of the panel after opening the door and on the rear
enclosure near the exhaust outlet of the fan.
Important safety information.
This symbol is used to draw the attention of the reader to particularly important notions
for operator safety.
This product has been tested to the requirements of CAN/CSA-C22.2 No. 61010-1,
second edition, including Amendment 1.
6 Clave 23+ Instruction Manual v1.4
2. Technical Specifications
Item Parameter
Chamber Φ247mm x 450mm (9.72” x 23.6”)
Rated Voltage 110 VAC 60 Hz
Circuit breaker F20A
Nominal power 1600VA
Sterilization 121 °C / 134 °C
Capacity of the distilled water tank ~ 2.5 L (water at maximum level)
~ 0.5 L (water at minimum level)
Operation temperature 5 °C ~ 40 °C
Exterior dimensions
480mm (W) x 445mm (H) x 700mm (D)
18.9” (W) x 17.5” (H) x 27.6” (D)
Net weight 50kg. (110.2 lbs)
Noise level < 70db
Relative humidity Maximum 80%, non-condensing
Atmospheric pressure 76kPa ~ 106kPa
3. Package Contents
No. Item Quantity
1 Steam sterilizer 1
2 Instrument tray 4
3 Instrument tray rack 1
4 Instrument tray handle 1
5 Door adjustment tool 1
6 Draining hose 2
7 Instruction manual 1
8 Door seal 1
9 USB Drive 1
10 Power cord 1
11 ‘O’ Ring kit 1

7 Clave 23+ Instruction Manual v1.4
4. Installation
* Ensure that the sterilizer is installed with 10cm (4”) ventilation space on all sides of the
sterilizer and 20cm (8”) on the top. The clearance required to open the door is 40cm (16”).
* The sterilizer should be placed on a level work table.
* Do not cover or block the door or any ventilation areas on the sterilizer.
* Do not install the sterilizer near a sink or in a location where it is likely to be splashed with
water.
* Do not install the sterilizer near a heat source.
5. Operation
5.1 Setup
5.1.1 Open the door and remove all of the inner contents.
5.1.2 Connect the power cord to an outlet of the appropriate voltage.
5.1.3 Power on. The switch is located on the right side of the cover. After turning on the
machine, the LCD screen will turn on and show the door position, water level, working
program, date, time, etc.
Distilled water tank requires water.
Used water tank is full.
Printer is disconnected if it is blinking.
Door locked.
Notice: Before using the sterilizer or when the low water level icon blinks, fill the
distilled water tank with distilled water.
The LCD screen will go into sleep mode if a button has not been touched for some time.
You can exit the sleep mode on the screen by touching any button.

8 Clave 23+ Instruction Manual v1.4
5.1.4 Filling the distilled water tank
Open the cover and fill the tank with distilled water. When you hear the beep signal, it
means that the water level has reached the maximum level. The icon will be
displayed. Please stop filling immediately.
The water level should not exceed this port.
5.2 Preparation of Sterilization Materials
For the most effective sterilization and to preserve the instrument and tools, please follow
the suggestions below:
* Arrange the instruments of different materials on different trays or with at least 3cm of
space between them.
* Always insert a sterilization paper or cloth between the tray and instrument to avoid
direct contact between the different materials.
* Arrange the containers (glasses, cups, test-tubes, etc) on one side or in an inverted
position to avoid water pooling.
* Don’t stack the trays one above the other or put them in direct contact with the walls of
the sterilization chamber.
* Always use the instrument tray handle.
* Wrap the instruments one by one or, if more tools have to be set in the same bag, verify
that these are made of the same material.
* Don’t use metallic clips, pins, or other similar things as this jeopardizes the
maintenance of the sterilizer.
* Don’t overload the trays over the stated limit (see Appendix 2).
5.3 Selecting the Sterilization Program
5.3.1 LCD: The panel displays the cycle temperature,
pressure, error code, sterilization state and program.
5.3.2 Select button . Select an item and save an adjustment.
5.3.3 UP button . Press UP button to select a program or
adjust and setup the parameter.
5.3.4 DOWN button . Press DOWN button to select a
program or adjust and setup the parameter.
5.3.5 Start button . Press this button to start the sterilization
cycle. To stop a cycle, press and hold this button for 5 seconds.
5.3.6 SET button. Not used.
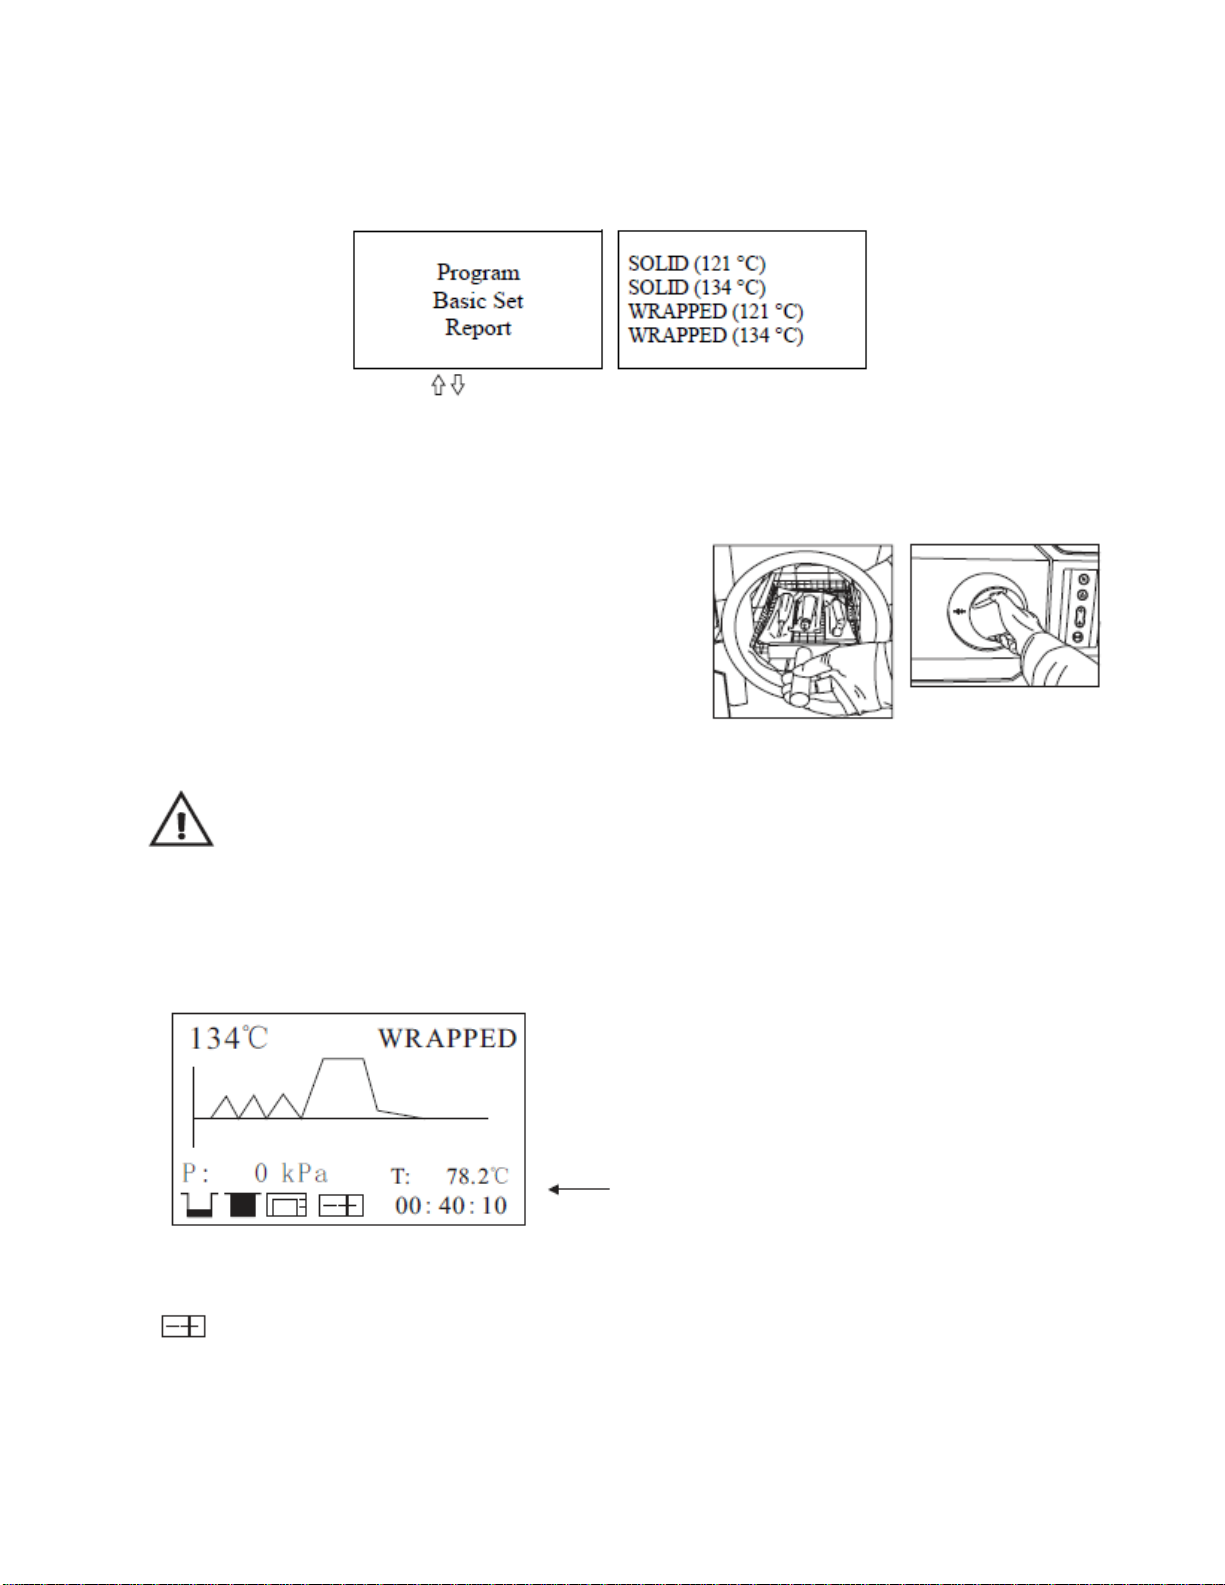
9 Clave 23+ Instruction Manual v1.4
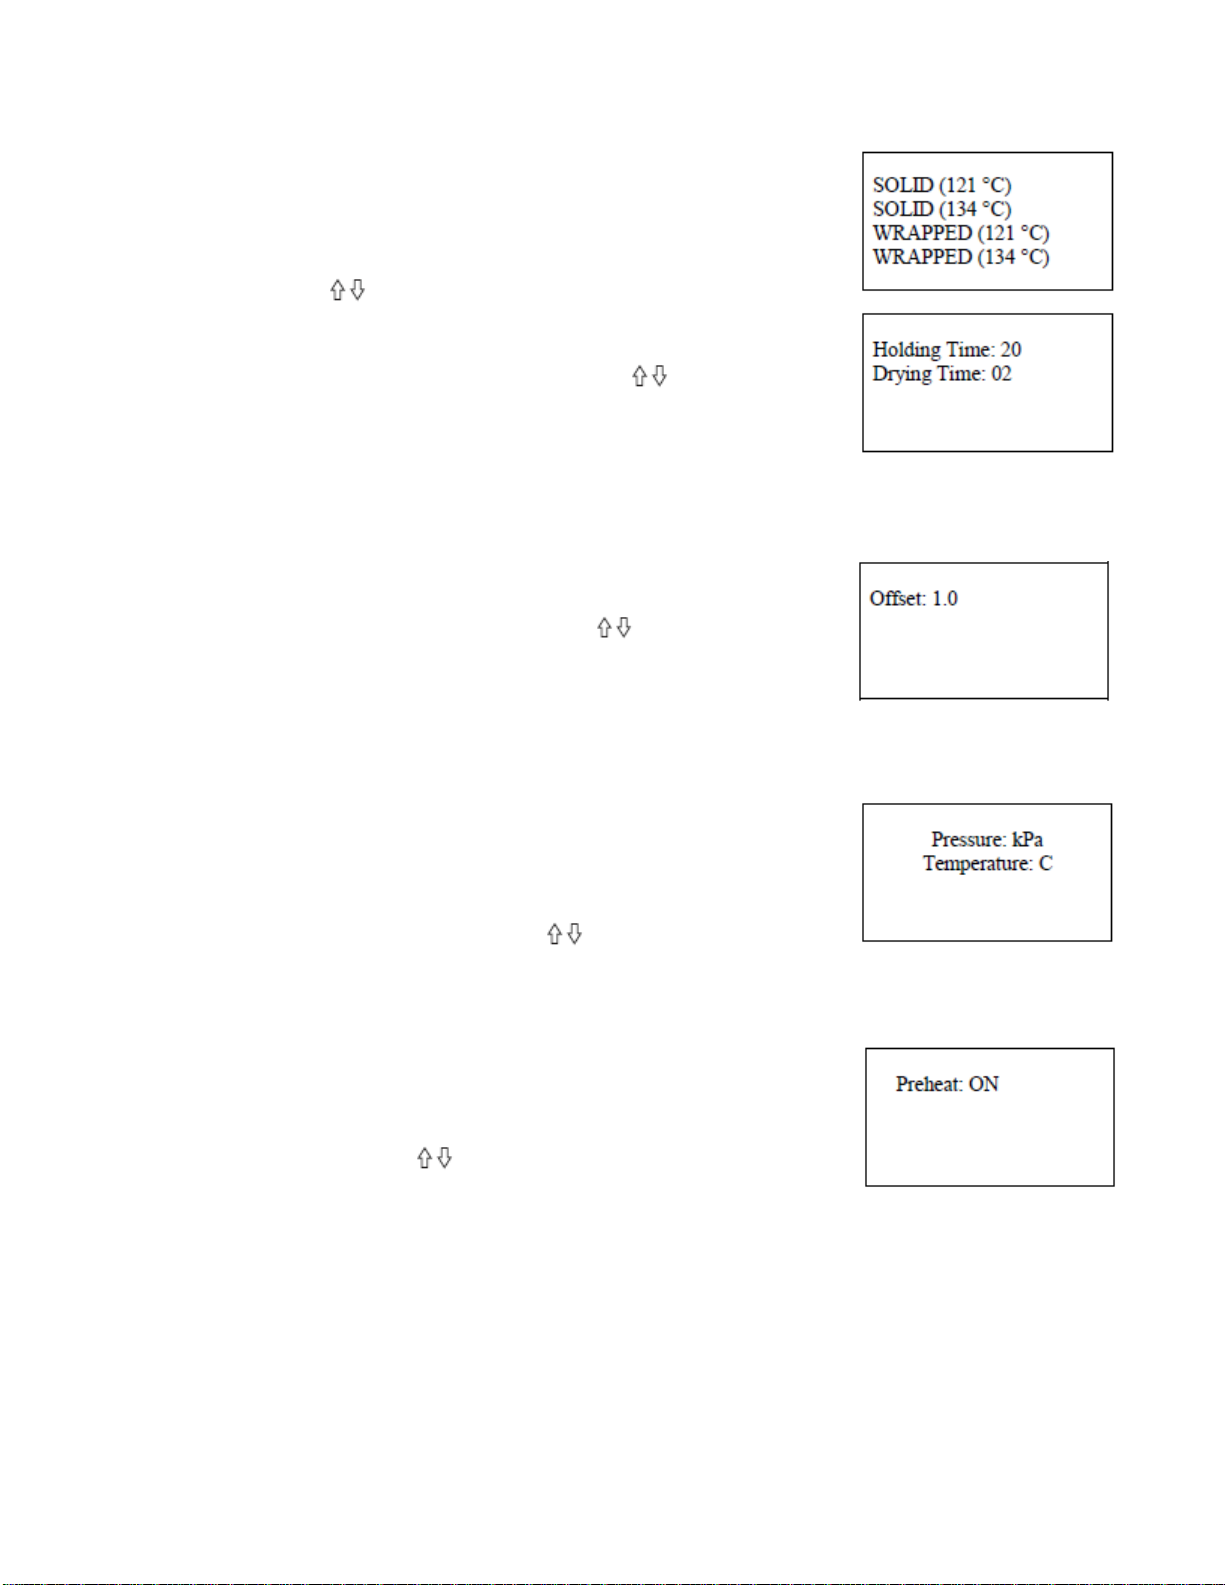
5.3.7 Select the program. You will see the available sterilization programs: Press
SELECT button, enter menu then select the ‘Program’.
Select the program by button and confirm it by pressing SELECT. If you don’t want
to select a program, you may press START to exit.
Notice: All buttons will be locked for the initial 10 seconds after powering up for system
initialization.
5.4 Running the Sterilization Program.
After selecting the program, the materials to be
sterilized can now be placed on the tray and
placed inside the chamber using the tray handle.
5.4.1 After the instruments are loaded, you may
close and lock the door by turning the door handle clockwise until it stops.
Caution: You must turn the door handle to the maximum position, otherwise the alarm
On the machine will sound and prevent the cycle from starting.
5.4.2 Starting the sterilization program
Press the Start button on the machine and it will start the cycle automatically. It will take
30 ~ 75 minutes (see appendix 2).
Total time or count down until completion
Caution: When you press the Start button but the door has not been fully closed, you will see the
blinking on the screen. A cycle cannot be started until you close the door completely.
Once the door is completely closed, press the Start button again.
10 Clave 23+ Instruction Manual v1.4
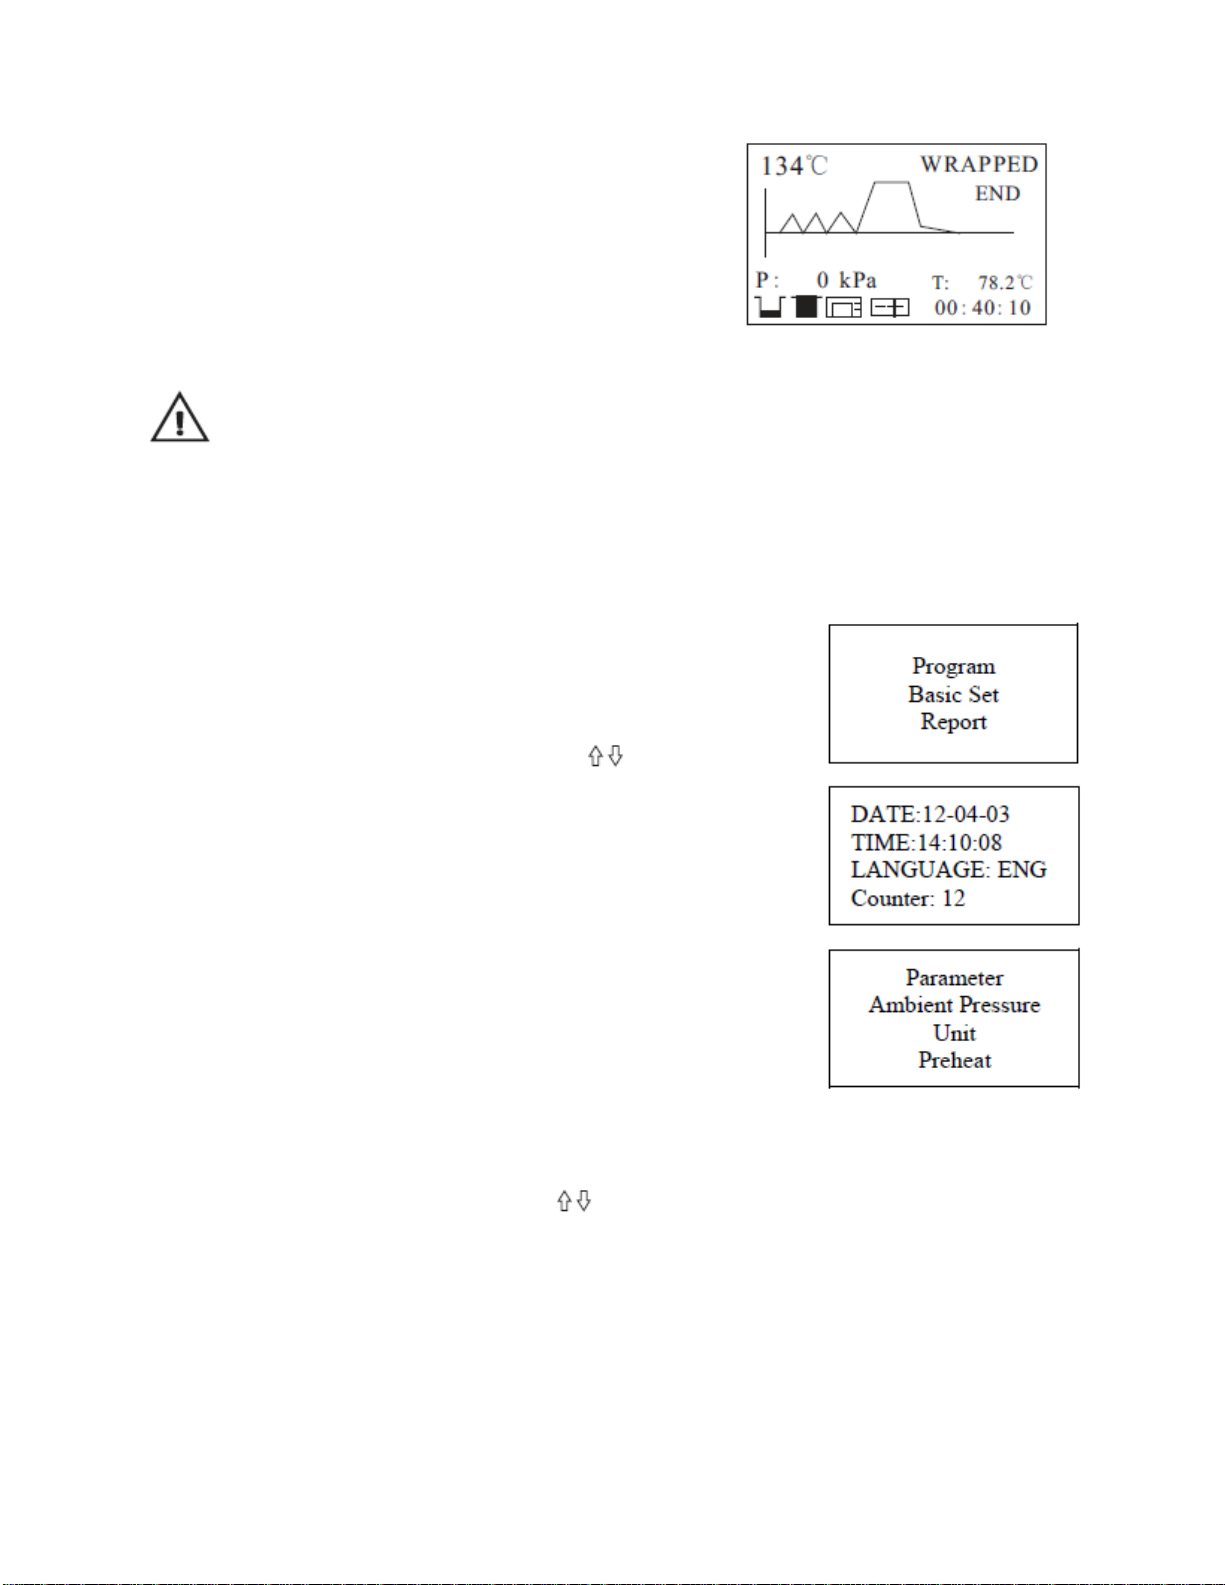
5.4.3 Sterilization Cycle Completion
After the cycle is complete, the printer will be
activated and print out a report of the cycle (if the
optional printer has been connected) and save the
report on the USB drive (optional).
Caution: Always use the tray handle to load or unload the trays from the sterilizer in
order to avoid injury or burning.
Notice: If you need to interrupt a cycle and remove materials urgently, you may hold the START
button for 5 seconds after completing the holding time to skip the dry cycle. This will result in
the program skipping directly to the last step and eliminating the drying stage. After one minute,
the cycle will end, or set the drying time to N. It will skip the drying stage.
5.5 Basic Set
5.5.1 Highlight the “Basic Set” and press the SELECT
button.
5.5.2 Select the item by pressing SELECT button.
5.5.3 Adjust the value by pressing the buttons.
5.5.4 After you finish adjusting the parameters, press the
select button to save and return to the above menu.
5.5.5 Press the START button to cancel and exit.
5.5.6 The “Counter” counts the number of cycles. It cannot
be changed.
CHN Chinese ENG English DEU German
ESP Spanish PL Polish FR French
HUN Magyar ROM Romanian NL Dutch
LTU Lithuanian LAT Latvian ITA Italian
CZE Czech
5.6 Record of the Cycle
5.6.1 Select “Report”. You will see a list of records.
5.6.2 Select the record by pressing buttons.
5.6.3 Press the SELECT button and the information will be sent to the printer and USB
port.
5.6.4 The machine has an internal memory to save the last 20 cycles.
5.6.5 Press START button to exit.
11 Clave 23+ Instruction Manual v1.4
6. Advanced Settings
6.1 Entering the Advanced Settings Function
6.1.1 Power the machine on while holding the SELECT button
for 5 seconds. This will enter into the advanced setting mode.
6.1.2 Press button to select a program. Press SELECT
button to enter the menu.
6.1.3 Select the item by pressing the SELECT button.
6.1.4 Adjust the parameter by pressing the button.
6.1.5 Holding time is 1 ~ 59 minutes.
Drying time is N-1-59 minutes. The N means there is no
vacuum state after the holding time.
6.1.6 After you finish adjusting the parameters, press the SELECT button to save and
return to the previous menu. Press the START button to cancel and exit.
6.2 Ambient Pressure
6.2.1 Select the “Ambient Pressure”.
6.2.2 Adjust the parameter by pressing button. Press the
SELECT button to save. Press START button to cancel and exit.
6.2.3 The value is 0 ~ 2. If the machine can’t enter the holding
time and is located in a high altitude location that is above 2km,
then you will need to adjust the ambient pressure.
6.3 Unit of Measure
6.3.1 Select the “Unit” to adjust the unit of temperature and
pressure.
6.3.2 Press SELECT button to enter the menu.
6.3.3 Select the unit by pressing SELECT button.
6.3.4 Change the unit by pressing button.
Pressure: kPa / bar / psi; Temperature: °C / °F
6.3.5 Press the SELECT button to save. Press START button to cancel and exit.
6.4 Preheat
6.4.1 Select “Preheat” to adjust preheat option.
6.4.2 Press SELECT button to enter the menu.
6.4.3 If you don’t want to preheat before starting the cycle, set
the value to OFF by button.
6.4.4 Press the SELECT button to save. Press START button to
cancel and exit.
12 Clave 23+ Instruction Manual v1.4
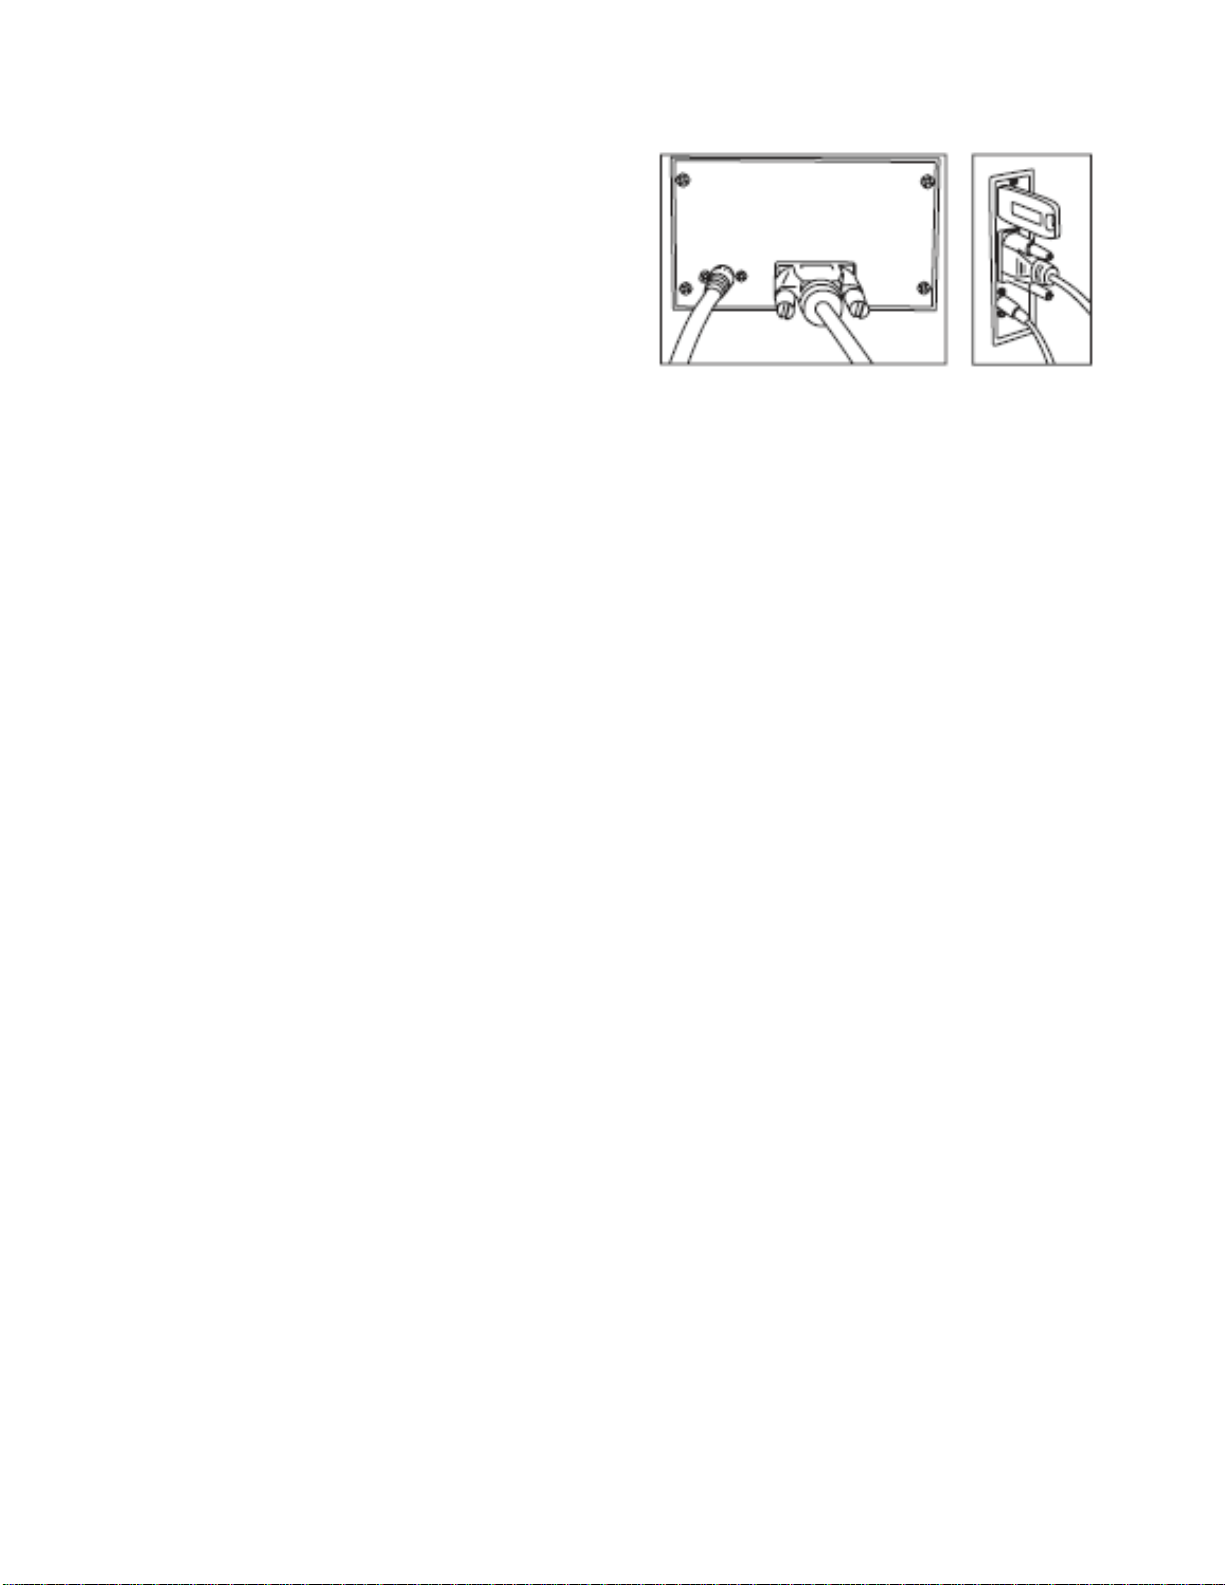
6.5 Printer (Optional)
6.5.1 Connect the printer data cable.
6.5.2 Connect the printer power cable.
6.6 USB Drive (Optional)
A USB drive can be used as a method of storing
the sterilization cycle report. To do so, insert the
USB drive in the slot on the right side panel. The
information will be automatically recorded to the USB drive after the cycle has completed. The
name of the file is determined by the serial number of the machine and the cycle number. For
example: The serial number is E00001. The cycle number is 00012. The file name on the USB
drive is 01001200.txt. The first 2 numbers represent the machine serial number. The middle 4
numbers represent the cycle number. The last 2 numbers represent the error code. 00 is no error,
01 is E01….
13 Clave 23+ Instruction Manual v1.4
When viewing printed data records, refer to the diagram below:
============================ ===============================
Program: WRAPPED Program: WRAPPED
Temperature: 134C Temperature: 134C
Pressure: 206.0 kPa Pressure: 206.0 kPa
Drying Time: 02Min Drying Time: 30Min
Holding Time: 6.0Min Holding Time: 6.0Min
-------------------------------- --------------------------------
Time Temp. Pressure Time Temp. Pressure
Start 13:21:41 025.0C Start 15:02:41 023.4C
T1: 13:27:40 074.8C 051.0kPa T1: 15:08:12 072.8C 051.1kPa
T2: 13:27:57 070.0C 009.7kPa T2: 15:08:31 068.6C 009.7kPa
T3: 13:31:09 088.6C 051.3kPa T3: 15:11:30 086.8C 050.5kPa
T4: 13:31:31 084.0C 009.7kPa T4: 15:11:50 083.5C 009.9kPa
T5: 13:35:42 109.8C 102.7kPa T5: 15:15:50 108.2C 101.1kPa
T6: 13:36:22 098.8C 009.9kPa T6: 15:16:30 097.2C 009.7kPa
TS: 134.8C 222.5kPa TS: 000.0C 000.0kPa
Max. Temperature:135.3C Max. Temperature:000.0C
Min. Temperature:134.2C Min. Temperature:000.0C
Max. Pressure:226.2kPa Max. Pressure:000.0kPa
Min. Pressure:218.8kPa Min. Pressure:000.0kPa
T7: 13:44:40 134.3C 218.9kPa T7: 15:16:00 000.0C 000.0kPa
T8: 13:50:39 134.6C 223.1kPa T8: 00:00:00 000.0C 000.0kPa
End 13:53:48 099.0C End 15:22:17 116.8C 083.4kPa
-------------------------------- --------------------------------
Cycle No.: 00001 Cycle No.: 00009
Ster. Value: Success Ster. Value: Failure E20
Date: 2018-06-04 Date: 2018-06-05
SN:E00001 SN:E00001
Operator: Operator:
v 2N08231C v 2N08232C
================================ ===============================
14 Clave 23+ Instruction Manual v1.4
7. Maintenance
Frequency Maintenance operation
Daily
Clean the door seal
Clean the external surface
Drain the used water tank
Weekly Clean the distilled water tank (drain tank)
Clean the sterilization chamber
Monthly Clean the filter in the chamber and tank
Every 3 months Replace the bacteria filter
Every 6 ~ 12 months Replace the door seal
7.1 Clean the distilled water tank every week with isopropyl alcohol or a medical
disinfectant. Drain unused water.
7.2 Clean the chamber weekly.
7.2.1 Remove all trays and the tray rack from the chamber.
7.2.2 Clean the chamber with a smooth cloth saturated with distilled water.
7.2.3 Apply the same procedure to the trays and rack.
7.3 Clean the door seal.
7.3.1 Clean the door seal weekly with a smooth cloth saturated with distilled water.

15 Clave 23+ Instruction Manual v1.4
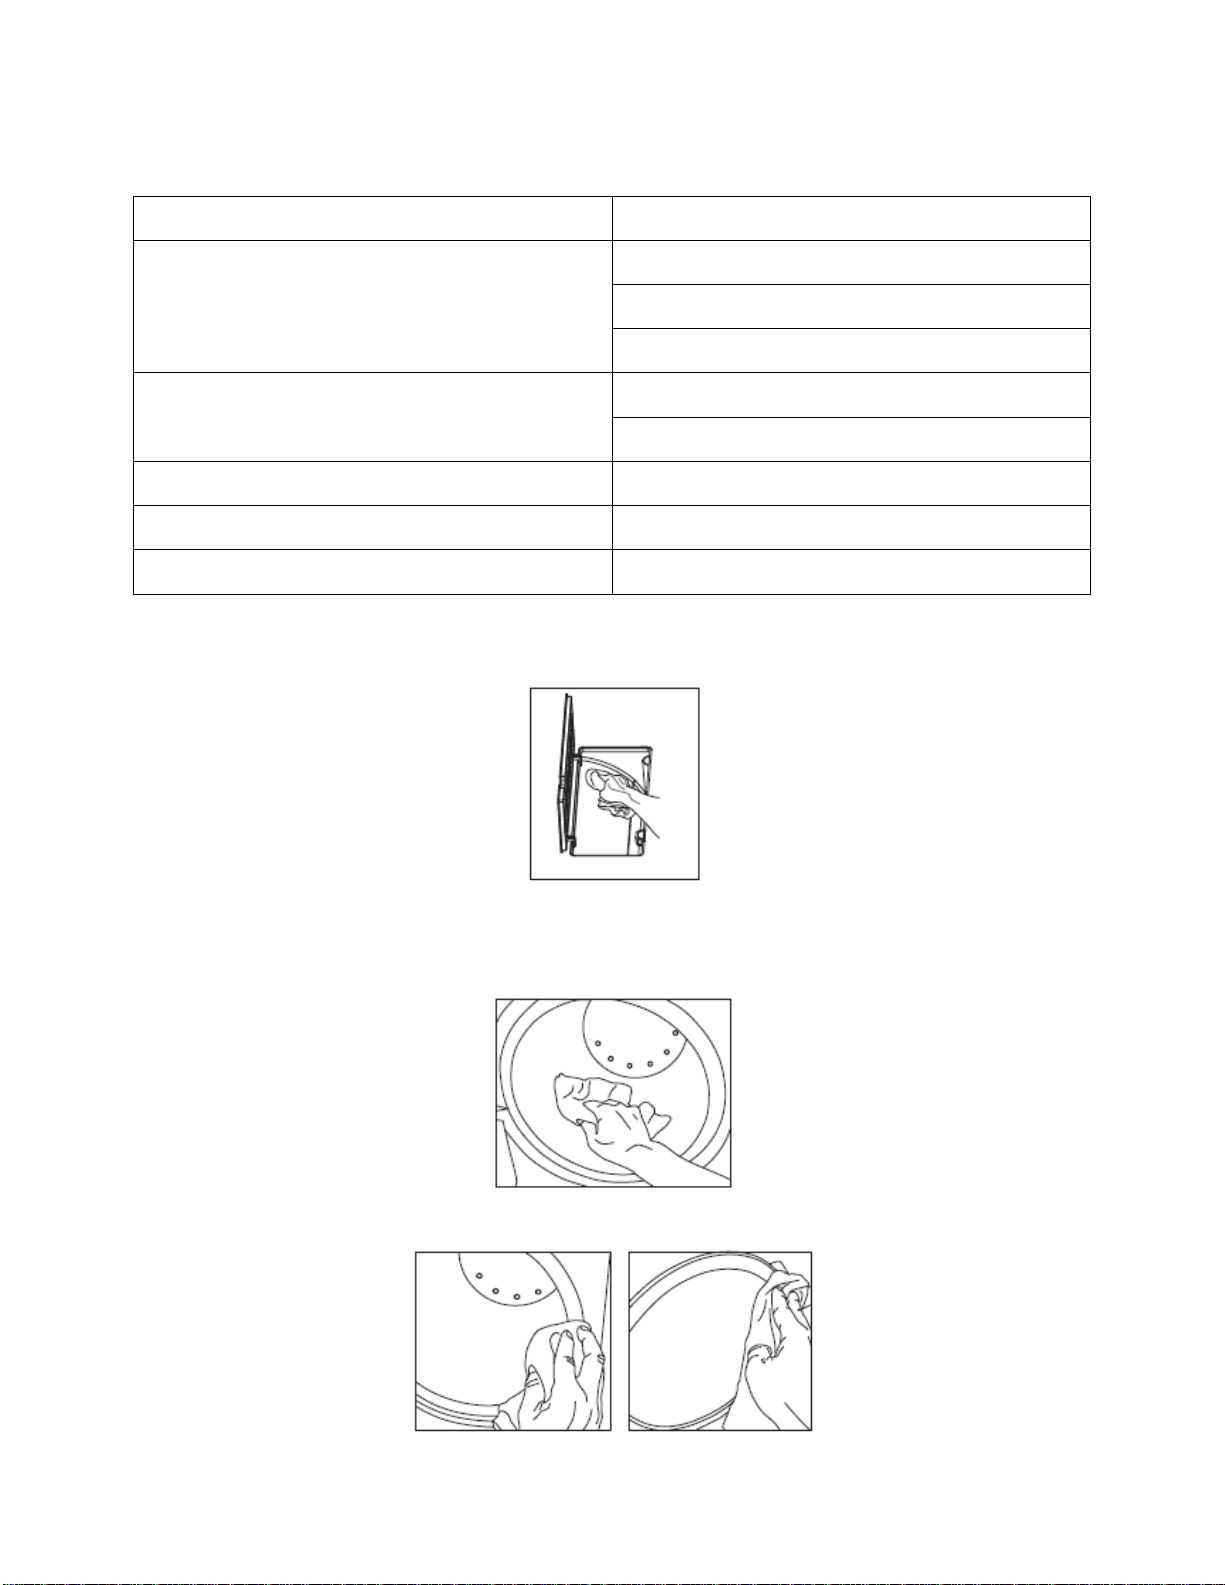
7.4 Door adjustment
Under normal circumstances, the chamber door does not require adjustments. However, if the
seal fails (resulting in steam leaking from the front of the chamber), you may use the spanner
tool to tighten the door seal.
7.4.1 Open the door.
7.4.2 Insert the spanner tool in the gap beneath the plastic cover. Use the spanner to grip the
adjusting nut (Fig. 1). Turn the nut counter clockwise as in the figure below (Fig. 2). This will
tighten the sealing plate.
7.4.3 Turn the nut until the sealing plate is tight. If the door knob is too tight, you may also turn
the nut clockwise to loosen it.
Caution: Never adjust the chamber door while the door is closed.
7.5 Replacement of the door seal
7.5.1 Open the chamber door.
7.5.2 Remove the door seal ring carefully by hand.
7.5.3 Clean the door seal ring carefully with a smooth cloth saturated with distilled water.
7.5.4 Moisten the new seal with medicinal disinfectant or isopropyl alcohol or distilled water.
7.5.5 Insert the new door seal and press in sequence as follows:
Caution: Please insure the chamber and the door have cooled prior to replacing the
door seal.

16 Clave 23+ Instruction Manual v1.4
7.6 The Drain Valve
8. Error Codes (Press and hold the select button for 5 seconds to clear error)
Code Description Proposed Solution
E01
Steam generator temperature is
too high
Power off. Wait 5 minutes. Power on & run a new
cycle. Contact dealer if error returns.
E02
Inner chamber temperature is
higher than 140 °C
Power off. Wait 5 minutes. Power on & run a new
cycle. Contact dealer if error returns.
E03
Outer chamber temperature is
higher than 160 °C
Power off. Wait 5 minutes. Power on & run a new
cycle. Contact dealer if error returns.
E04
Takes too long to reach holding
time
Power off. Wait 5 minutes. Power on & run a new
cycle. Contact dealer if error returns.
E05 Over pressure inside chamber,
unable to release
Power off. Wait 5 minutes. Power on & run a new
cycle. Contact dealer if error returns. On a Plus
version, replace V1 if error occurs at 8 minutes.
E06 Door lock fault
Make sure you have turned the door handle to the
maximum position. Check the door switch.
E09
Pressure leak, takes too long to
reach pressure and temperature
Check if the distilled water tank is empty. Check
for leaks. Contact dealer if error returns.
E10 Door lock problem
Try again. Open and close the door. Contact dealer
if error returns.
E11
Steam generator element not
heating
Power off. Wait 5 minutes. Power on & run a new
cycle. Contact dealer if error returns.
E12 Chamber element not heating
Power off. Wait 5 minutes. Power on & run a new
cycle. Contact dealer if error returns.
E20
Program cycle was ended
manually
Power off, wait, and power back on.
E21 Failure to enter the holding time
Power off. Wait 5 minutes. Power on & run a new
cycle. Contact dealer if error returns.
E24
Pressure leak, lower than 30kPa
when the temperature is 120 °C
Power off. Wait 5 minutes. Power on & run a new
cycle. Contact dealer if error returns.
E34
Plus version only, back pressure
too high at the drying phase
Power off. Contact dealer. Clean or replace V1.

17 Clave 23+ Instruction Manual v1.4
E88
Maintenance request from the
machine
Contact dealer or service company and have a
maintenance done.
9. Transportation and Storage
1. Turn off the sterilizer before transportation or storage. Pull out the plug. Let the
machine cool down.
2. Drain the distilled water tank and the used water tank.
3. Conditions for transportation and storage:
Temperature: -20 °C ~ +55 °C (all water must be removed if below 0 °C)
Relative humidity: ≤85%
Atmospheric pressure: 50kPa ~ 106kPa.
4. If shipped, the unit must be strapped to a pallet. Do not ship in the box alone.
10. Safety Devices
1. Circuit breaker: Protects the sterilizer against possible failures and damage to the internal
components.
Action: Interruption of the power supply. Requires a manual reset. If it trips again, contact a
service person.
2. Thermal cutouts on the main transformer windings: Protection against possible short
circuit and overheating of the main transformer winding.
Action: Interruption of the power to the transformer. Contact a service person.
3. Safety valve: Protection against possible sterilization over pressure.
Action: Releases steam and restores pressure inside the chamber to a safe level.
4. Safety micro-switch for the door status: Informs the user if the door is incorrectly closed.
Action: Signal indicates that the door is not closed properly.
5. Thermal switch on chamber heating elements. Protection against possible overheating of
the chamber.
Action: Interruption of the power supply to the chamber elements. Resets when it cools.
6. Thermal switch on steam generator heating elements. Protection against possible
overheating of the steam generator.
Action: Interruption of the power supply to the steam generator element. Resets when it cools.
7. Door safety lock. Protection against accidental opening of the door.
Action: Prevents accidental opening of the door during a sterilization cycle.
8. Self-leveling pressure system: Pressure system adjusts to a neutral pressure level in case of a
manual cycle interruption, alarm or power loss.
Action: Automatic restoration of the atmospheric pressure inside the chamber.

18 Clave 23+ Instruction Manual v1.4
Appendix 1
Water Properties / Characteristics
Description Feed Water Condensate
Evaporate residue ≤ 10mg/L ≤ 1.0mg/kg.
Silicon dioxide (SiO2) ≤1mg/L ≤0.1mg/kg
Iron ≤0.2mg/L ≤0.1mg/kg.
Cadmium ≤0.005mg/L ≤0.05mg/kg
Lead ≤0.05mg/L ≤0.1mg/kg.
Rest of heavy metals ≤0.1mg/L ≤0.1mg/kg.
Chloride ≤2mg/L ≤0.1mg/kg
Phosphates ≤0.5mg/L ≤0.1mg/kg.
Conductivity ≤15µs/cm ≤3µs/cm
PH Value 5 ~ 7.5 5 ~ 7
Appearance Colorless, clean Colorless, clean
Hardness ≤0.02mmol/L ≤0.02mmol/L

19 Clave 23+ Instruction Manual v1.4
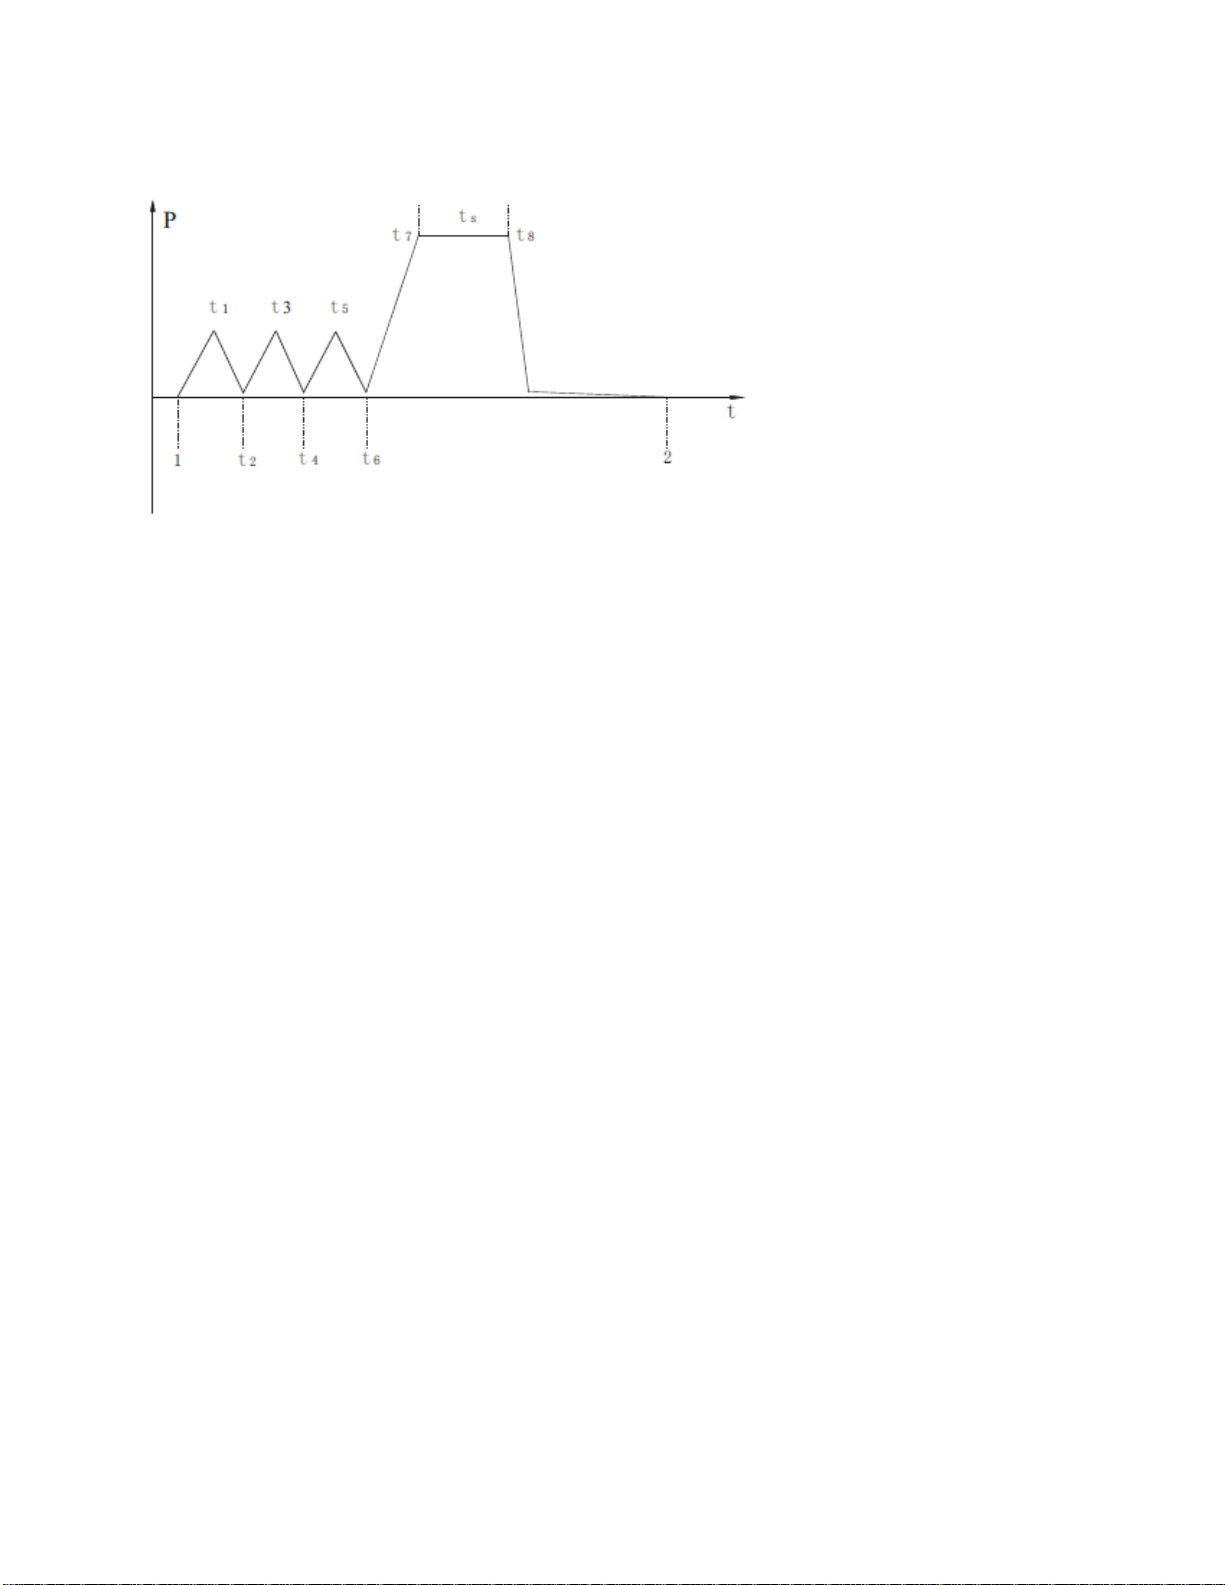
Appendix 2
Diagrams of the sterilization programs
Programs Temp
°C Pressure
kPa Holding
time
Total
time
(min) Type Max.
load
(kg)
Max.
load
per tray
(kg)
Unwrapped
134 210 4 25~45 Unwrapped solid
material 5.00 1.50
121 110 20 30~60
Liquid 134 210 10 35~60 Liquid 1.20 0.40
Plastic 121 110 30 35~65 Plastic
Wrapped
134 210 6 35~65
Wrapped solid
material
5.00 1.50
121 110 20 35~55
Single wrapped solid
or hollow material
4.00 1.20
Textile
134
121
210
110
8
30
45~65
50~75
Unwrapped porous
material
1.25 0.40
Single wrapped
porous material
1.10 0.30
Dual wrapped porous
material
0.75 0.25
Single wrapped
hollow material
4.00 1.25
Dual wrapped solid
and hollow material
2.00 0.60
Prion 134 210 18 50~75
Unwrapped porous
material
1.25 0.40
Single wrapped
porous material
1.10 0.30
Dual wrapped porous
material
0.75 0.25
Single wrapped
hollow material
4.00 1.25
Dual wrapped solid
and hollow material
2.00 0.60
Drying
(optional)
-- -- -- 1~20 -- -- --
The time required for the sterilizer to be ready for routine use after the power is switched on is
less than 5 minutes.
The maximum temperature of the 134 °C sterilization cycle is 137 °C.
The maximum temperature of the 121 °C sterilization cycle is 124 °C.

20 Clave 23+ Instruction Manual v1.4
Table of contents
Other Flight Dental Systems Laboratory Equipment manuals


