Biobase BK-DH2000 User manual

Hybridization System
BK-DH2000
User Manual
BIOBASE GROUP
Version 2019.10

1
Foreword
Thank you for purchasing our Products: Hybridization Instrument. This Manual for users contains
function and operation of the Instrument. In order to use the instrument properly, please read this
manual carefully before using the Instrument.
Opening Check
Please check the Instrument and Appendix with the packing list when you first open the instrument
packing case. If you find there is something wrong with the Instrument and the Appendix, do contact
the vendor or the producer.

2
Content
Foreword................................................................................................................................................ 1
Content................................................................................................................................................... 2
Safety Warnings and Guidelines............................................................................................................ 3
1. Important operation information of the security......................................................................... 3
2. Safety...........................................................................................................................................3
3. The maintenance of Instrument...................................................................................................4
Chapter 1 Introduction.........................................................................................................................5
1. Introduction................................................................................................................................. 5
2. Normal Operation Condition.......................................................................................................5
3. Parameters and performance....................................................................................................... 5
Chapter 2 Preparations........................................................................................................................ 7
1. Structure Description...................................................................................................................7
2. Humidity sponge installation.......................................................................................................8
Chapter 3 Operation Guide..................................................................................................................9
1. Starting up and system load.........................................................................................................9
2. Main menu...................................................................................................................................9
3. Program list menu..................................................................................................................... 10
4. Program Edit/Run Menu........................................................................................................... 10
5. Parameter setting menu............................................................................................................. 11
6. Program name edit menu...........................................................................................................12
7. System configuration menu.......................................................................................................13
8. Calibration menu....................................................................................................................... 13
Chapter 4 Considerations.................................................................................................................. 15
Chapter 5 Fault Analysis and Processing..........................................................................................16

3
Safety Warnings and Guidelines
1. Important operation information of the security
Before using the instrument, user need have a complete understanding how to operate it safety.
Before running the instrument, please read this manual carefully.
Forbid anyone to operate the instrument before reading the manual.
If operate not in accordance with the tips on the manual ,the heat generated by the instrument at
runtime may cause severe burns, and electric shock accident. Please read the following safety tips
and guidance, and implementation of all precautions.
2. Safety
When operation, maintenance and repair of this instrument, it must subject to the following basic
safety precautions. if you don't abide by the warnings pointed in the manual , may affect the
protection and intended use scope of the instrument.
The instrument is for indoor use.
Before operating this equipment please read this manual carefully, otherwise it may cause
personal injury.
Only in the aspect of how to use electrical equipment installation trained qualified inspection
personnel to operate the equipment.
Operators do not attempt to open or repair equipment, doing so will make you lose the
warranty qualification, also may be limited by electric shock. If you need repair, please contact our
company. In order to avoid electric shock accident, the instrument input power cord must be reliable
grounding. This instrument uses three core grounding plug, of which the third feet for grounding,
which should be used with grounding type power socket.
Before connecting the power supply, ensure the power supply voltage and the instrument
voltage required the same. And make sure that the power outlet rated load no less than the instrument
requirements.
If the power cord damaged, replace it according to the same type and specifications. Don’t
press anything on the power cord when it be used, don't put the power cord in place where people
often walk.
When insert the power cord plug, must hand-hold the plug and ensure that the plug is completely
inserted into the socket, when pull out the plug, must hand-hold the plug as well and don't pull the
power cord.
The instrument should be put in lower humidity and less dust and away from water and
avoid direct sunshine and strong light, indoor should be well ventilated, no corrosive gas or strong
magnetic field interference, away from heat, stoves and other heat sources. Don't take equipment in

4
wet or dusty places.
In order to avoid temperature overheating ,do not block or cover the holes on the instrument. when
several equipment be used at the same time, the more the distance between each instrument shall be
not less than 30 cm.
Shutting off the power when stop working. unplugging the plug and using soft cloth or
plastic cover to prevent dust from entering the instrument when long time no use.
When happened as following listed cases, it should be pulled the power socket immediately
and contact the supplier or trained maintenance personnel:
The instrument comes into contact with liquid;
The instrument gets soaked or burned;
The instrument emits an abnormal sound or smell;
The instrument is dropped or the outer shell damaged;
The instrument functions abnormally.
Instrument functions have obvious changes.
3. The maintenance of Instrument
The instrument shall be cleaned regularly use a soft cloth with a small amount of anhydrous alcohol
cleaning heating plate, ensure good heat conductivity and avoid pollution.

5
Chapter 1 Introduction
1. Introduction
BK-DH2000 can be setting constant temperature, time and etc. Instead of manual operation
experiment, the accuracy of experiment is higher and result is more reliable than traditional manual
experiment. Hybridization and degeneration can be operated at same time, which reduces
experimental procedure and improves efficiency and accuracy of operation.
Features:
This instrument is adopted FISH processing step, which can reduce a lot of manual operating
time and avoid the damage of reagent.
Full touch screen operation, simple interface.
Auto resume to run after power failure.
Auto cooling after running over.
Auto preheating.
High precise temperature control, low fluctuation.
Deal with 12 slides.
Support 105 custom programs stored functions.
Three operation modes: Integrated denaturation & hybridization, hybridization, multi-step
operation.
2. Normal Operation Condition
Ambient temperature:0C35C
Relative humidity:≤70%
Power supply:AC 220V (optional)
3. Parameters and performance
Project
Parameters
Temperature control range
RT+5℃~100℃
Temperature set range
0℃~100℃
Time range
1min~99h59min
Accuracy of temperature
≤±1℃
Uniformity temperature
≤±1℃
Heating time
≤2min(from 37℃ to 95℃)
Cooling time
≤6min(from 95℃ to 45℃)
Capacity
12
Power
350W
Input voltage
220V/50-60Hz

6
Fuse
250V 3A Ф5×20
Dimension(mm)
440x220x120
Weight(kg)
4.5

7
Chapter 2 Preparations
1. Structure Description
Slide heating plate
Power switch
Cooling fan
Humidity sponge
mounting groove
Touch screen
Power connector
Fuse

8
2. Humidity sponge installation
a) Before each experiment, need to add 30ml of purified water to each sponge.
b) Then install sponges into sponge mounting groove. Please make sure the humidity sponges place
flat.

9
Chapter 3 Operation Guide
1. Starting up and system load
Plug the instrument into a properly grounded outlet, and turn on the power switch on the rear of the
instrument. The touch screen shows system self-testing and loading menu. During the process, please
be patient, the system will automatically enter the operating menu.
2. Main menu
After system testing and loading, it enters into the main menu. Select a operation mode in the
program list menu.
Denat&Hyb:Press Denat&Hyb mode to choose the editing or running program.
Hyb Only:Press Hyb Only mode to choose the editing or running program.
Multi-Step:Press Multi-Step mode to choose the editing or running program.
OPTION:Press system set menu to set key sound, calibration, preheating function, auto resume to
run.
Beside the red thermometer, it displays the real-time temperature of heating platform.

10
3. Program list menu
A: Return button: Return to the upper menu
B: Edit/Load button: Selected program is loaded, run or edit the program
C: Delete button: Clear the selected program, and restore to default value.
D/E: Select program
F: Program list
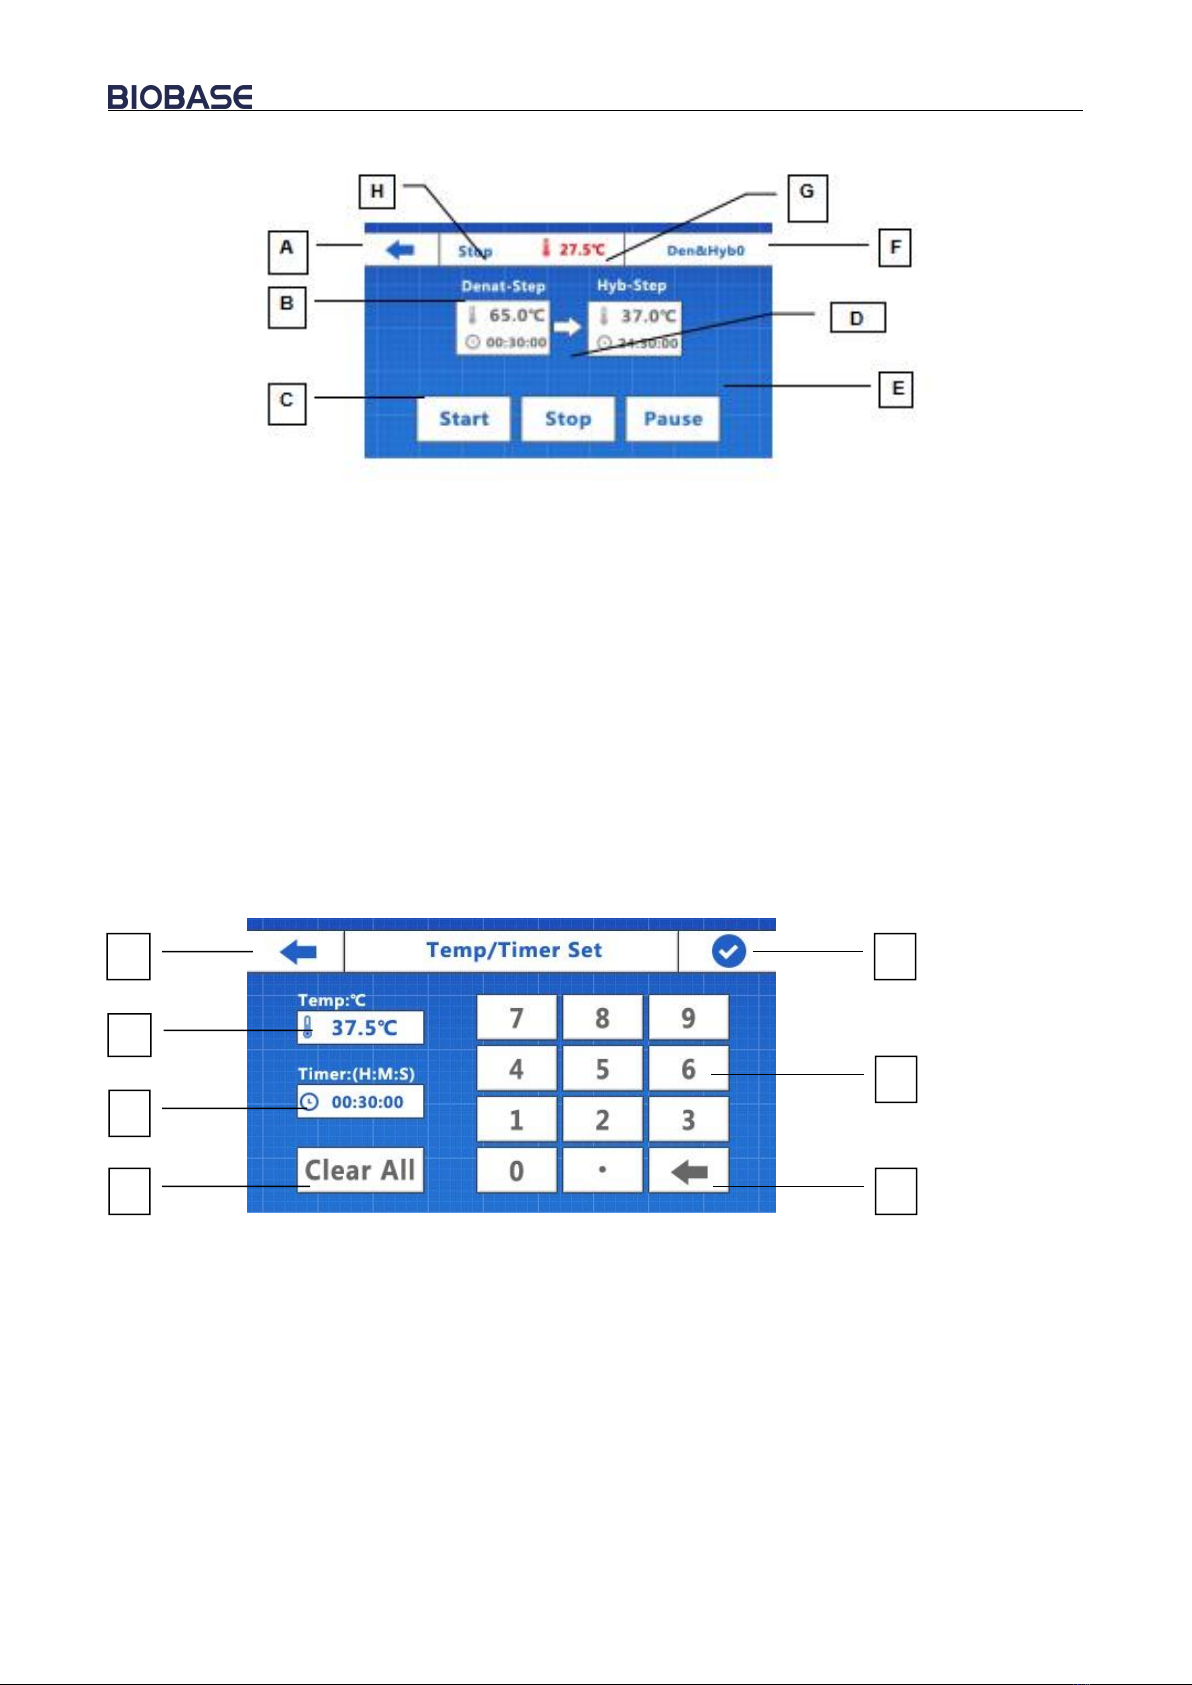
4. Program Edit/Run Menu
In this Menu user can edit or run selected program.
Hyb Only Mode
Multi-Step Mode
Den&Hyb mode
A
D
E
B
C
F
11
A: Return button: Return to the upper menu. No save the revised parameters.
B: Parameters display/edit button: Press this button to edit parameters (temperature and timing
value).
C: Start --Press this button to start program run.
D: Stop--Press this button to Stop running program(This button only valid in the status of programs
running)
E. Pause: If the program is running and starts the countdown, click this button, the program will
pause the countdown. However, the platform temperature will remain in current temperature.
F. Program name: Press this button to edit program name.
G. Platform temperature: It shows the real-time temperature of platform.
H. System Status: It shows the current status--Running, Stop, Pause.
5. Parameter setting menu
In this menu, the user set the temperature and timing of the program.
A: Return button--Return to the upper menu. No save the revised parameters.
B: Temperature--Click the button to enter temperature value through the keypad.
C: Timing--Click the button to enter timing value through the keypad. Time format (hour: minute:
second).
D: Clear ALL--Click Clear temperature value.
If the temperature value is blank, the program runs automatically skip this step.
E: Delete--Click to delete entered parameters.
F: Keypad--Used to enter temperature value and time value.
G: Save--Click to Save current parameters and automatically return to the previous menu.
A
B
C
D
G
E
F

12
6. Program name edit menu
In this menu, user can edit the program name.
A: Return button--Return to the upper menu. No save the revised parameters.
B: A/a—Upper/lower case letter switch key.
C: numeric keypad--Click it to switch to numeric keypad.
D: alphanumeric keyboard--Click it to switch to alphabetic keyboard.
E: delete button--Click it to delete input characters.
G: Save button--Click it to save current program name and return to the previous menu.
Alphabetic keyboard
A
B
C
F
E
numeric keyboard
D
13
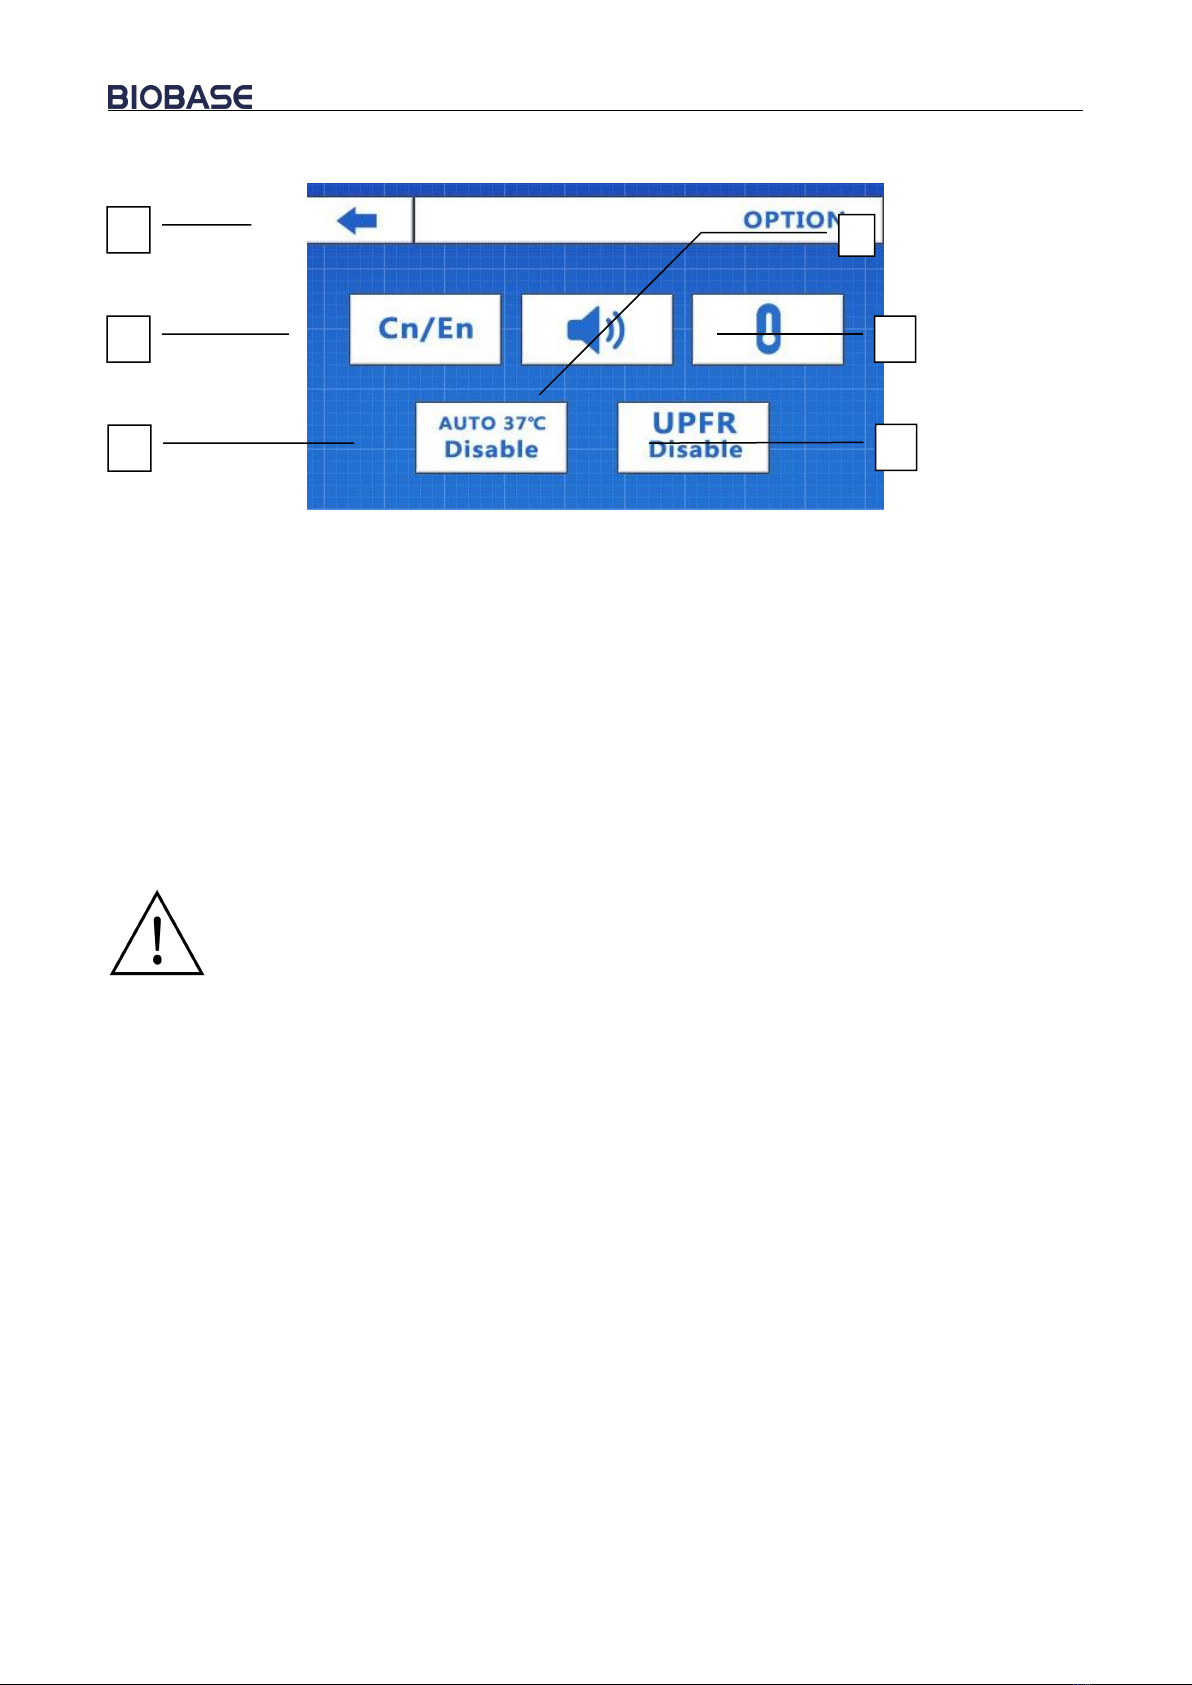
7. System configuration menu
A: Return button--Return to the upper menu.
B: Menu Language--Switching system menu language (Chinese/English).
C: Auto 37℃*-- Enable/Disable preheating function.
D: UPFR*--Enable/Disable UPFR(Auto resume to run after power failure).
E: Temperature calibration*--Click it to start temperature calibration.
F: Button sound—Enable/Disable the button sound.
Auto 37℃:
If enable, the platform temperature is constant at 37℃(except in the running state).
If disable, after finishing each program, the system will turn on the fan, cooling the heating platform.
* UPFR:
If enable, the instrument will auto resume to run the unfinished program after unexpected power
failure.
* Calibration:
If the temperature deviation is very big, the user can use this function to re-calibrate the
instrument.
8. Calibration menu
If the temperature deviation is very big, the user can use this function to re-calibrate the
instrument.
Preparations before calibration:
1. Thermometer accuracy:≤±0.2℃.
2. Room temperature:≤30℃.
3. Need to add 30ml of purified water to each sponge.
4. The thermometer attached to the surface of heating platform. (Note: Thermometer and heating
platform should contact completely, add the appropriate amount of paraffin oil between these two, to
ensure thermal efficiency). After installing a thermometer, close the cover.
5. The calibration process takes approximately one hour. During the process, to ensure that the
instrument can not be accidentally broken.
If unexpected power outages during the calibration process, all data of this calibration is invalid.
A
B
C
D
E
F

14
6. Go to System Option menu, click temperature calibration button to start temperature calibration.
A: Return button--Exit temperature calibration, all data of this calibration is invalid.
B: Temperature calibration point: It is calibrated temperature point (4 default calibration points:
40/60/80/100℃).
C: Real-time temperature value: real-time temperature value of heating platform.
In the heating process, please be patient. When the temperature is constant, the system will
automatically enter the calibration correction mode.
A: Starting next calibration point--confirm and save the current temperature correction value, and
then go to the next temperature calibration point.
B: Calibration correction-
C: Calibration correction+
D: Correction value--show the actual temperature value after correction.
In the subsequent calibration point repeats the above steps to complete the calibration. After
temperature calibration, system will exit the calibration mode automatically.
Calibration warming
A
C
A
D
C
B
B
Calibration correction

15
Chapter 4 Considerations
During running, do not move the instrument.
During use, stay away from an external heat source to ensure the accuracy of temperature
control,.
After use, turn the power off. After cooling for 30 minutes, erase the legacy of water vapor
around the heating platform with a dry clean soft cloth. Place the instrument in a dry and
ventilated place.
Humidity sponge is made of high-temperature sponge. No need to replace under normal
circumstances.
High voltage inside the instrument without permission is prohibited disassemble repair!

16
Chapter 5 Fault Analysis and Processing
Phenomenon
Processing Procedure
No response after power-on
No connection of power(a)
No response after power-on
Broken fuse(b)
No response after power-on
Broken switch(c)
The actual and displayed temperatures are quite different
Broken sensor(c)
No heating/Cooling
Broken temp control system(c)
Press invalid
Touch screen failure(c)
System error: Platform Temp Error!
Sensor failure(c)
System error: Platform ADC Lost!
Sensor initialize failure(c)
System error: Platform ADC Error
Error of sensor data(c)
a) Check connection of power.
b) Exchange fuse, then reboot instrument. If this problem is not solved, please contact supplier.
c) Reboot instrument. If this problem is not solved, please contact supplier.

BIOBASE GROUP
2# building, No.9 Gangxing Road, High-tech Zone, Jinan City, Shandong Province,
China
Tel: +86-531-81219803/01
Fax: +86-531-81219804
Inquiry: expo[email protected]
Complaints: custom[email protected]
Web: www.biobase.cc/www.meihuatrade.com / www.biobase.com
Table of contents
Other Biobase Laboratory Equipment manuals

Biobase
Biobase BSC-3FA2-NA User manual

Biobase
Biobase BSC-2FA2-HA User manual

Biobase
Biobase BKQ-B Series User manual

Biobase
Biobase BBS-V1300 User manual

Biobase
Biobase BSC-4FA2-HA User manual

Biobase
Biobase BSC-4FA2-GL User manual

Biobase
Biobase BFG Series User manual

Biobase
Biobase BCI-I User manual

Biobase
Biobase BBS-V800 User manual

Biobase
Biobase BK-HS32 User manual


Popular Laboratory Equipment manuals by other brands


Thermo Scientific
Thermo Scientific CTS Xenon user guide

Koehler
Koehler KV4000 Operation and instruction manual

Insphero
Insphero GravityTRAP product manual

Macherey-Nagel
Macherey-Nagel NANOCOLOR Advance quick start guide

dental X
dental X dxp DOMINA PLUS B Operator's manual

Easypix
Easypix SteriBox SB1 user manual


