LAMS Melissa User manual

27/05/2021
SERRE - GEWÄCHSHAUS - GREENHOUSE
MÉLISSA 4,90 M2
MÉLISSA 4,90 M2 (A)
Double porte en façade
Doppeltür an der Vorderwand
Double door on the front
MÉLISSA 4,90 M2 (B)
Une porte de chaque côté
Eine Tür an jeder Seite
One door on each side
Positionnement des portes en façade ou sur les côtés
Aufstellung der Türen an der Vorderwand oder an den Seiten
Positioning the doors on the front or on the sides
1,20 m
1,70 m
2,55 m
1,90 m
2,27 m
6 cm
1,73 m
2,55 m
1,90 m
2,27 m
6 cm
1,73 m
1,70 m
0,60 m

2
Site internet : www.sav-doviris.com
NOTICE DE MONTAGE
SERVICE CLIENTS
• Merci de lire ces instructions attentivement avant de commencer le montage de la serre.
• Merci de vous assurer que toutes les pièces mentionnées sur cette notice sont présentes dans le
• Merci de suivre les étapes dans l’ordre indiqué par la notice.
• Veuillez conserver soigneusement ce manuel de montage pour une consultation ultérieure.
• Veuillez porter gants, chaussures et lunettes de protection pour le montage de la serre.
• Respectez les conseils de sécurité des outils que vous utilisez pour ce montage.
• En cas d’intempéries (pluie, vent, orage…), ne montez pas votre serre.
• La serre doit être montée par 2 personnes.
• Les sachets plastiques et les petits composants sont à tenir hors de portée des enfants. Eloignez les
enfants de la zone de montage.
source électrique.
• Tout appareil produisant de la chaleur ne doit pas être stocké dans la serre (barbecue, chalumeau, …).
• Attention, ne pas monter sur le toit : risque de chute et de blessures graves.
• En cas de forte chute de neige ne pas laisser la neige s’accumuler sur le toit.
• Pour nettoyer votre serre, utilisez de l’eau claire savonneuse.
• N’utilisez surtout pas d’acétone, des nettoyants abrasifs ou autres détergents spéciaux pour
nettoyer les panneaux.
• Graissez régulièrement le rail de porte.
• Dégagez le toit de la neige et des feuilles.
CONSEILS DE SÉCURITÉ
IMPORTANT
CONSEILS D’ENTRETIEN

3
MONTAGEANLEITUNG
KUNDENSERVICE
• Bitte lesen Sie diese Anleitung sorgfältig durch, bevor Sie mit der Montage beginnen.
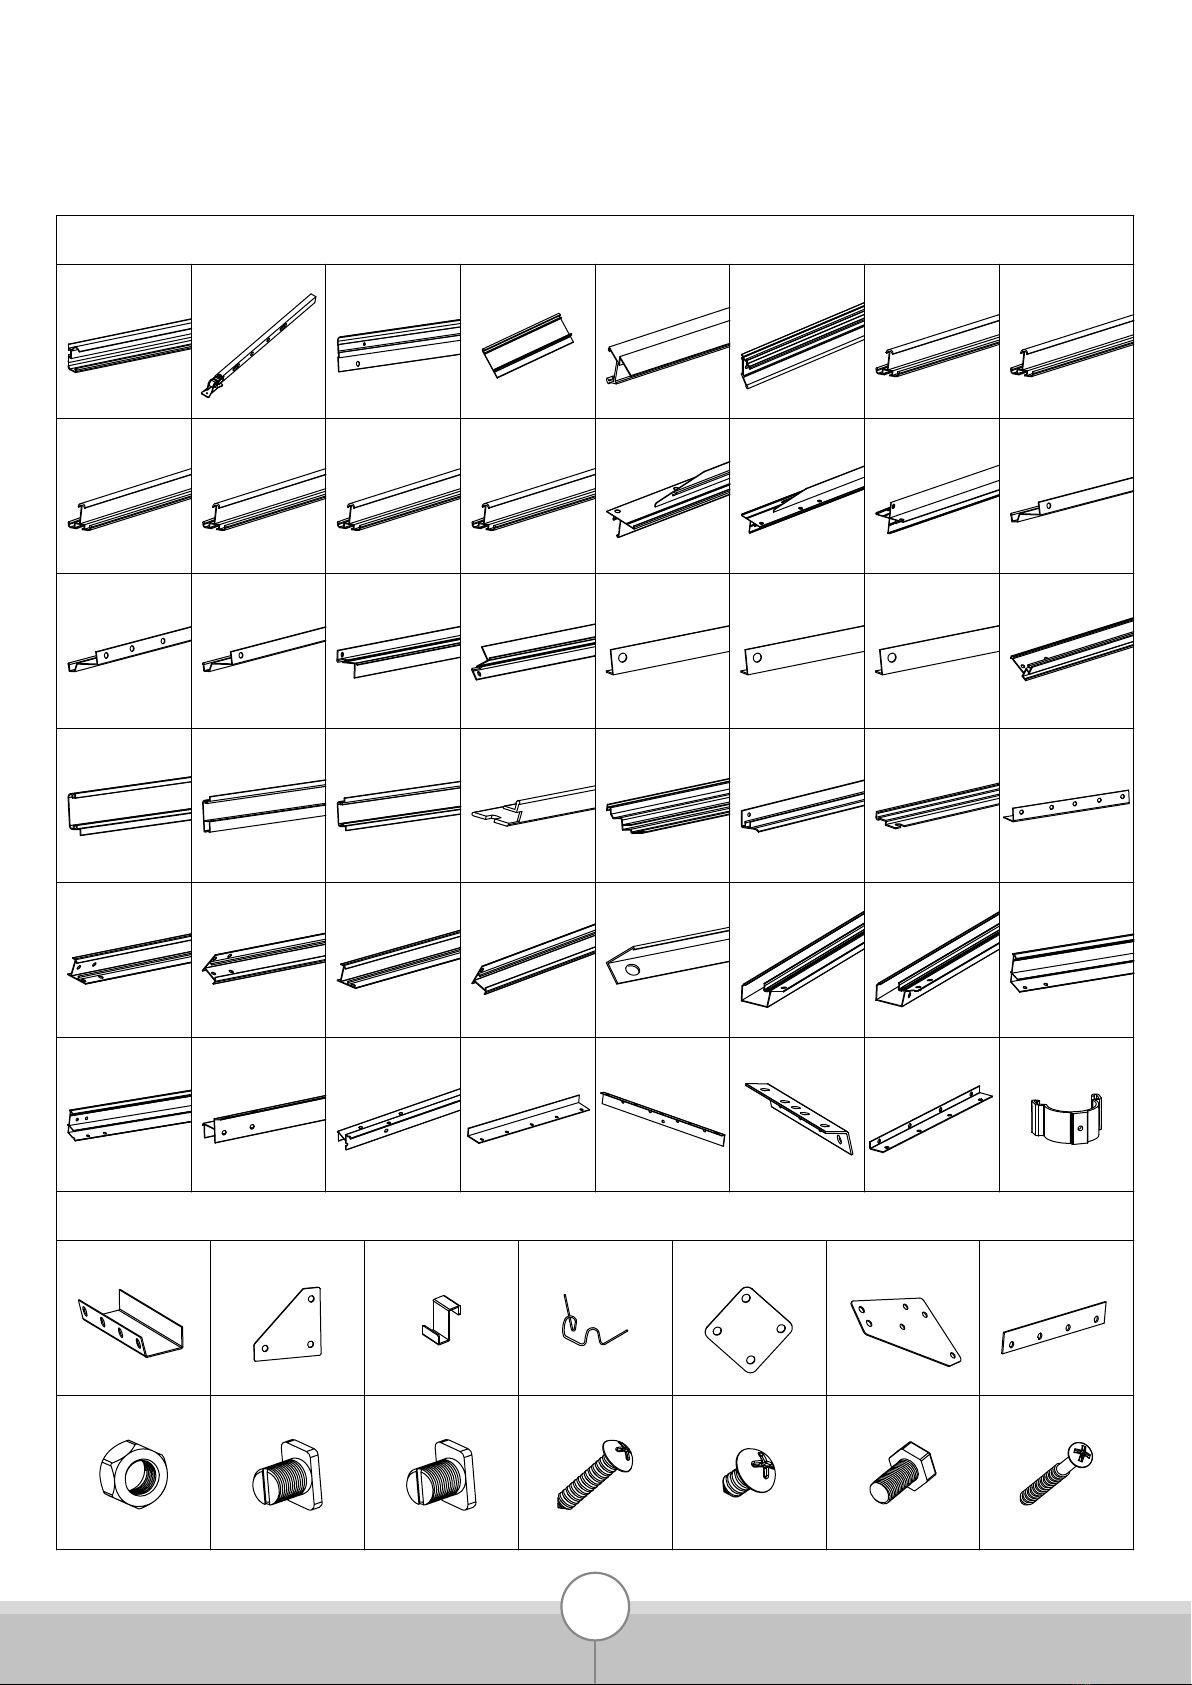
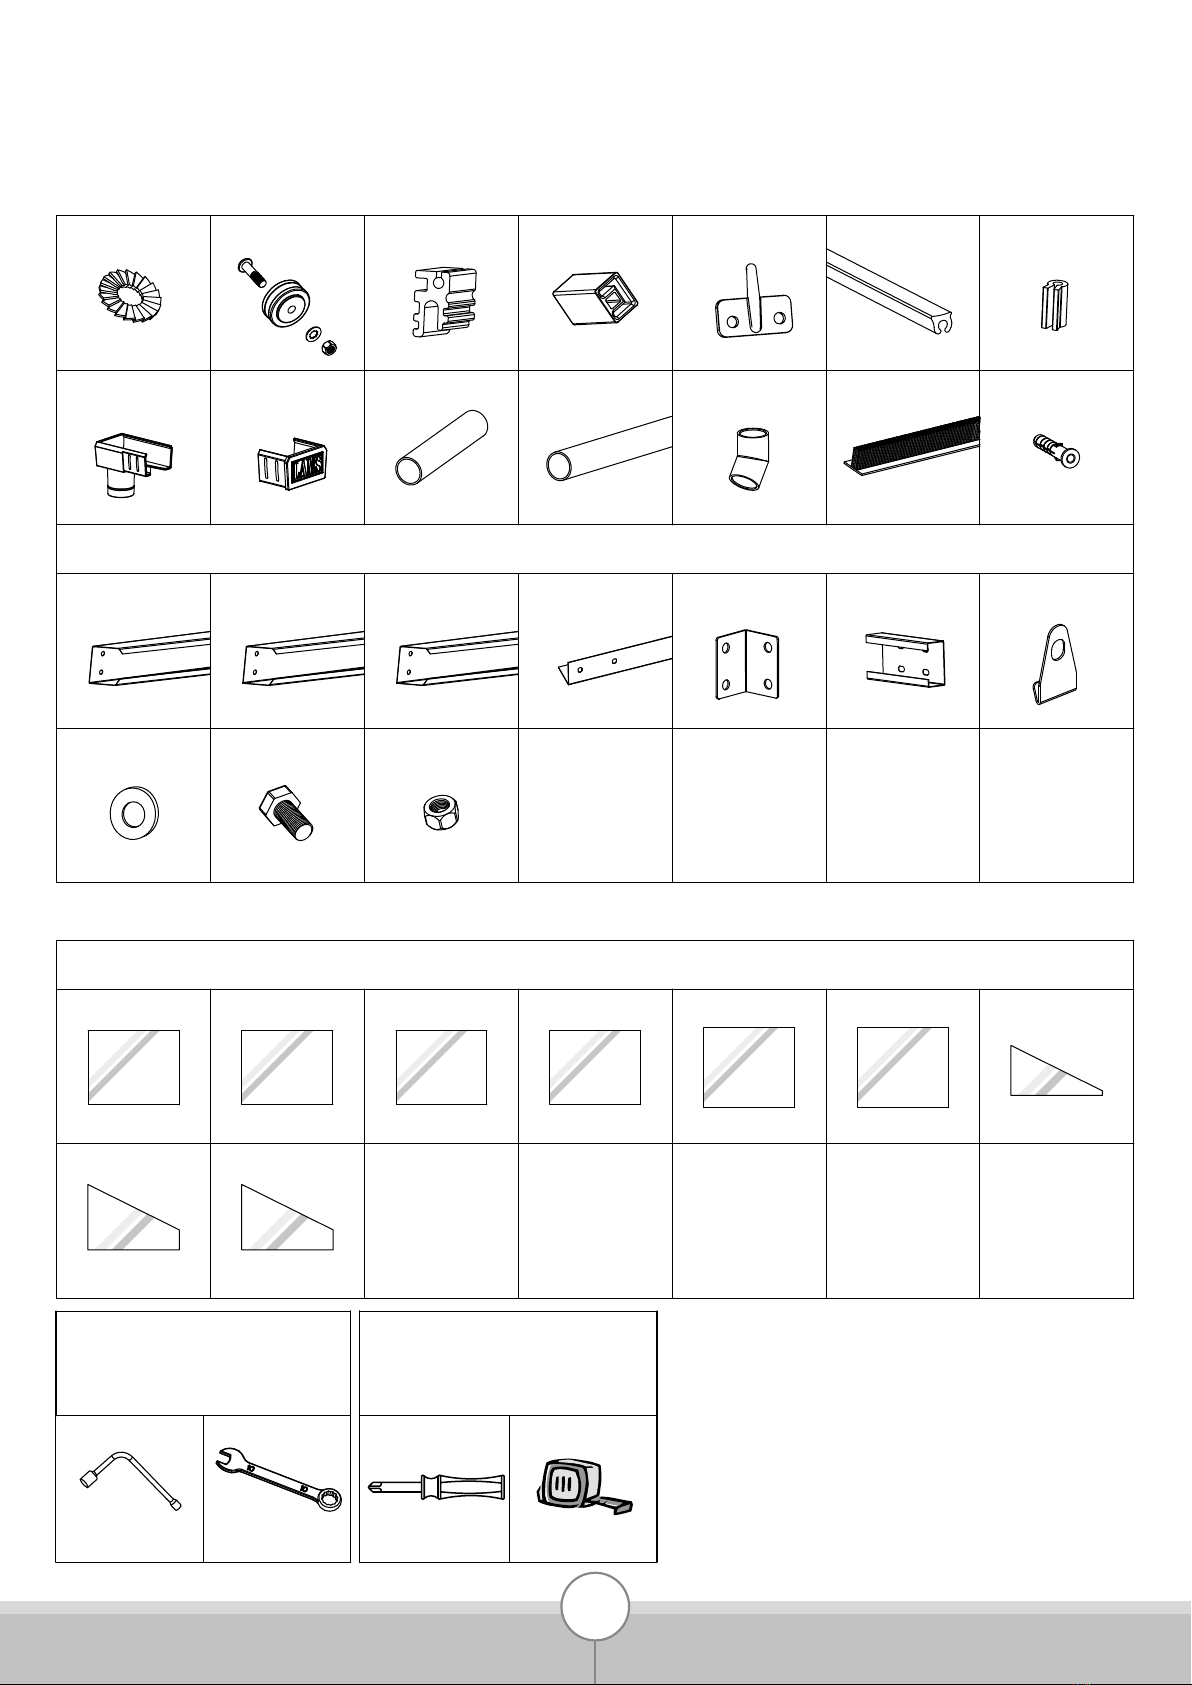
• Bitte stellen Sie sicher, dass alle in dieser Anleitung aufgeführten Einzelteile im Karton vorhanden
• Bitte folgen Sie den Schritten in der im Handbuch angegebenen Reihenfolge.
• Bewahren Sie diese Anleitung für späteres Nachschlagen sorgfältig auf.
• Bitte tragen Sie bei der Montage des Gewächshauses Handschuhe, Schuhe und Schutzbrille.
• Beachten Sie die Sicherheitshinweise der Werkzeuge, die Sie für diese Montage verwenden.
• Stellen Sie Ihr Gewächshaus nicht bei schlechtem Wetter (Regen, Wind, Gewitter…) auf.
• Das Gewächshaus muss von 2 Personen zusammengebaut werden.
• Die Plastiktüten und Kleinteile sollten außerhalb der Reichweite von Kindern aufbewahrt werden.
• Aluminium ist ein elektrisch leitfähiges Metall, halten Sie die Aluminiumprole von allen
•
Wärmeerzeugenden Geräte (Grill, Brenner, …) dürfen im Gewächshaus nicht gelagert werden.
• Stellen Sie sicher, dass es keine Netze (Wasser, Strom oder Gas) unter dem Installationsort gibt.
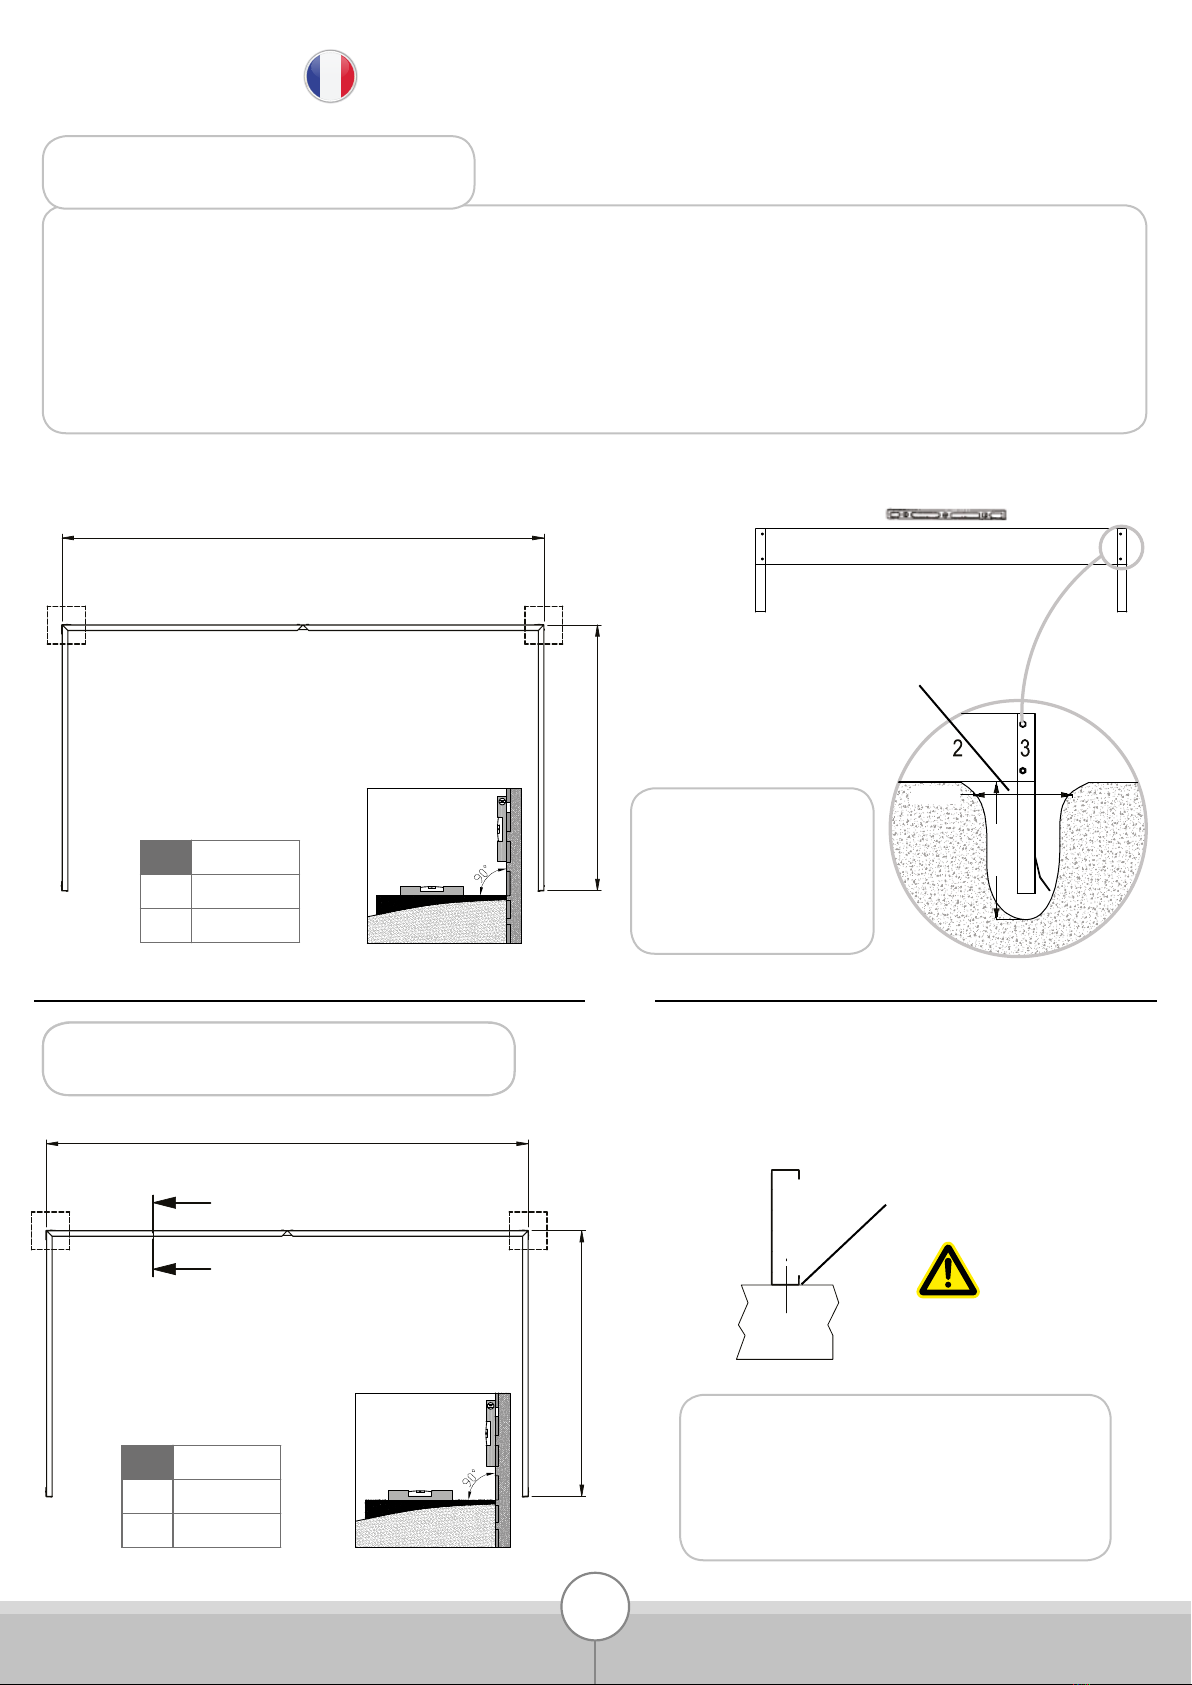
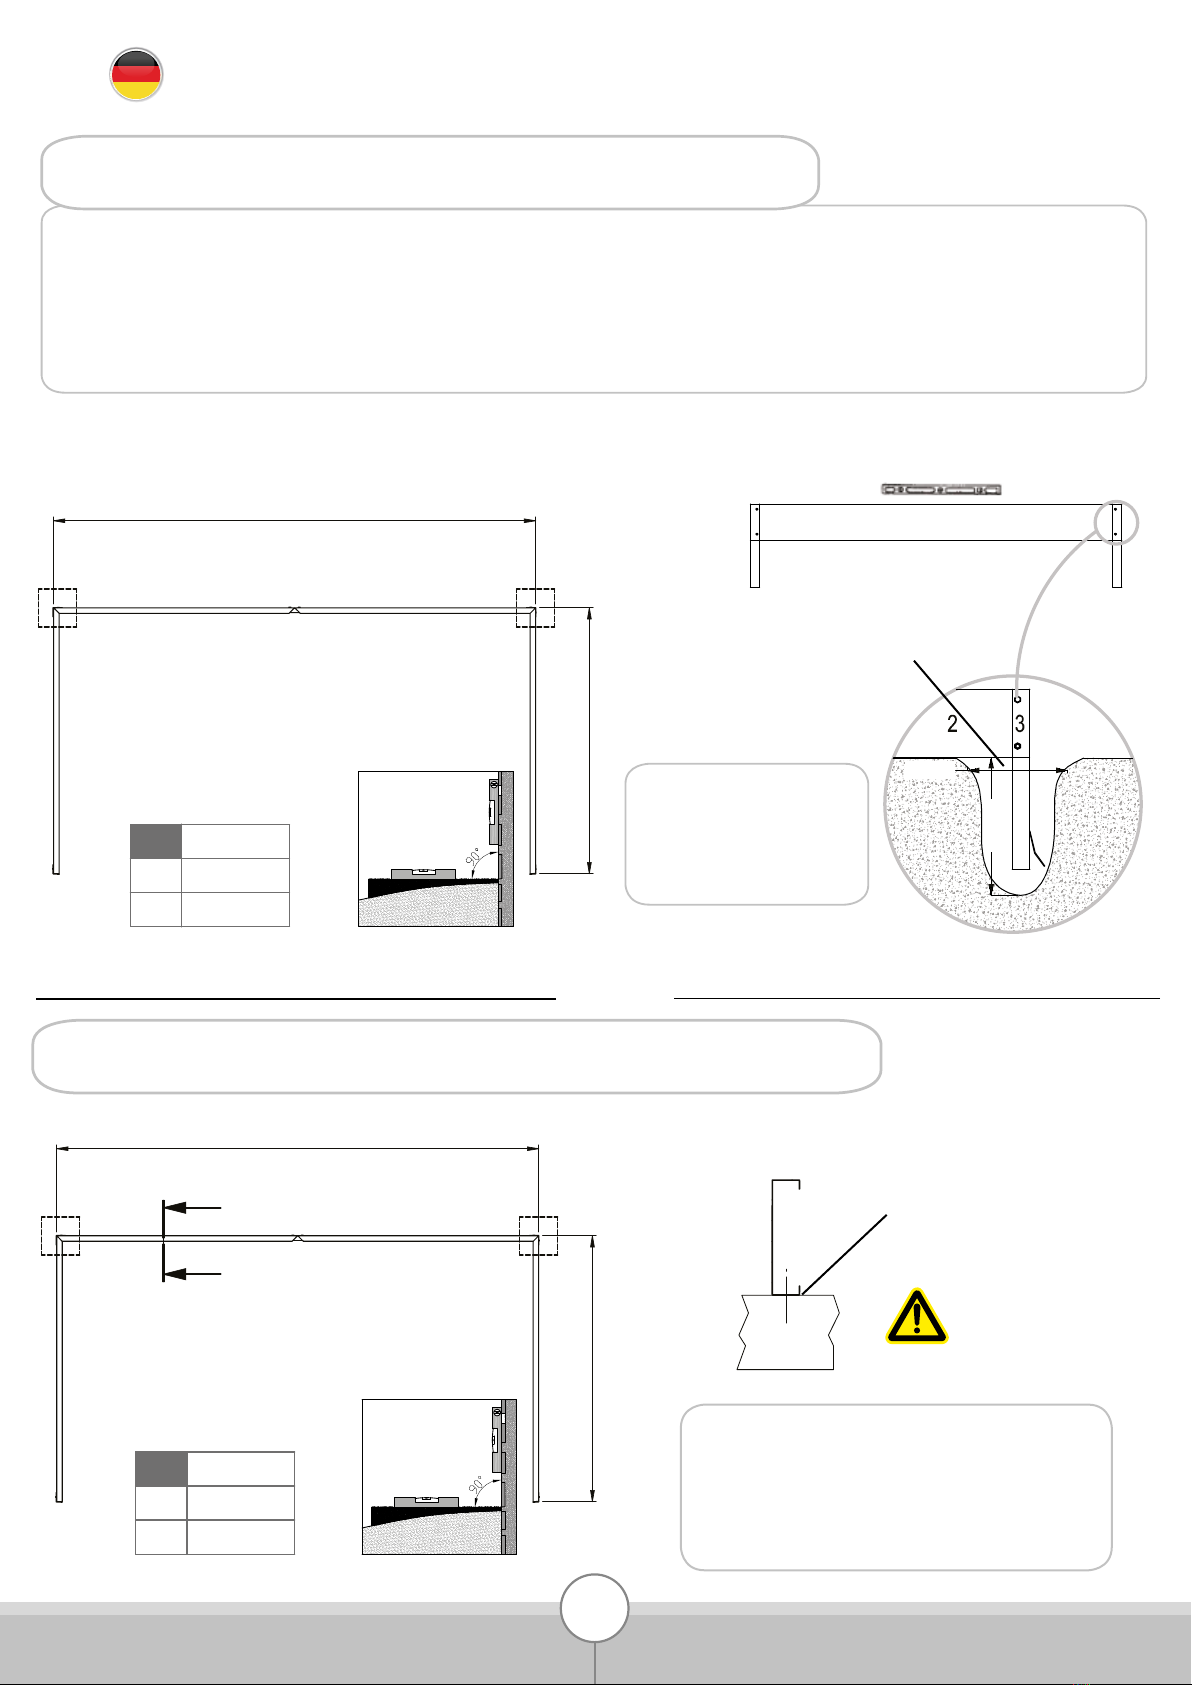
• Das Gewächshaus muss auf einem horizontalen und ebenen, nicht dem Wind ausgesetzten Boden
• Achtung, nicht auf das Dach steigen: Sturz- und schwere Verletzungsgefahr.
• Bei starkem Schneefall den Schnee nicht auf dem Dach ansammeln lassen.
• Verwenden Sie zur Reinigung Ihres Gewächshauses klares Seifenwasser.
•
Verwenden Sie kein Aceton, Scheuermittel oder andere Reinigungsmittel zum Reinigen der Platten.
• Regelmäßig die Türschiene schmieren.
• Räumen Sie das Dach frei von Schnee und Laub.
SICHERHEITSHINWEISE
WICHTIG
PFLEGEHINWEISE
sind und prüfen Sie die Mengen.
Halten Sie die Kinder vom Montagebereich fern.
elektrischen Quellen fern.
aufgstellt und befestigt werden.

4
Website : www.sav-doviris.com
ASSEMBLY INSTRUCTIONS
CUSTOMER SERVICE
• Please read these instructions carefully before starting to assemble the greenhouse.
• Please ensure that all the components mentioned in this instruction are present in the box and
• Please follow the steps in the order indicated by the manual.
• Please keep this assembly instruction in a safe place for future reference.
• Please wear gloves, shoes and safety goggles when assembling the greenhouse.
• Follow the safety instructions of the tools you use for this assembly.
• In case of bad weather (rain, wind, thunderstorm, ...), do not set up your greenhouse.
• The greenhouse must be assembled by 2 people.
• Plastic bags and small components should be kept out of reach of children. Keep children away from
the assembling area.
• Aluminium is a metal with electrical conductivity, keep aluminium proles away from any electrical
• Not all heat-producing appliances (barbecue, torch, ...) can be stored in the greenhouse.
• The greenhouse must be positioned and xed on a horizontal and even ground, not exposed to wind.
• Check the abscence of networks (water, electricty, gas) underneath the installation site of the greenhouse.
• Beware, do not climb on the roof : risk of fall and serious injuries.
• To clean your greenhouse, use clear soapy water.
• Do not use acetone, abrasive cleaners or other special detergents to clean the panels.
• Grease the door rail regularly.
• Clear the roof of snow and leaves.
SAFETY WARNINGS
IMPORTANT
MAINTENANCE TIPS
check the quantities.
• In case of heavy snowfall, do not allow snow to accumulate on the roof.
source.

5
SERRE - GEWÄCHSHAUS - GREENHOUSE
MÉLISSA 4,90 M
RÉFÉRENCES - ARTIKELNUMMERN - CODES :
NUMÉRO DE TRAÇABILITÉ - RÜCKVERFOLGBARKEITSNUMMER - TRACEABILITY NUMBER
2021.10
ALUMINIUM : 788711
RAL 7016 : 794632

6
PETITS COMPOSANTS - KLEINTEILE - SMALL COMPONENTS
1002 x 143
W025 x 6W007 x 214 W016 x 4 W022 x 2W003 x 6W002 x 1 W006 x 54
27021 x 1
L:2031.5 mm
10001 x 2
L:1257 mm
15001 x 1
L:270 mm
18001 x 2
L:612 mm
25024 x 7
L:1670 mm
25025 x 1
L:160 mm
25026 x 1
L:160 mm
25027 x 1
L:315 mm
25028 x 1
L:315 mm
25029 x 3
L:2009 mm
20001 x 1
L:100 mm
21004 x 1
L:1630mm
22004 x 1
L:1630 mm
35001 x 2
L:621 mm
27022 x 1
L:2031.5 mm
27025 x 2
L:1670 mm
30003 x 1
L:610 mm
30006 x 2
L:1860.5 mm
30007 x 1
L:1874 mm
32005 x 1
L:1857.5 mm
32006 x 1
L:1857.5 mm
33003 x 2
L:619 mm
33004 x 4
L:619 mm
33027 x 4
L:1759 mm
34007 x 4
L:1630 mm
36001 x 2
L:621 mm
52003 x 1
L:619.5 mm
52004 x 1
L:1864.5 mm
53001 x 1
L:400 mm
53002 x 1
L:400 mm
54001 x 1
L:160 mm
55001 x 1
L:320mm
37001 x 4
L:621 mm
39001 x 1
L:634 mm
40001 x 1
L:602 mm
41001 x 2
L:518 mm
42001 x 1
L:602 mm
46001 x 1
L:250 mm
48007 x 1
L:1690 mm
48005 x 1
L:450.5 mm
48006 x 1
L:450.5 mm
48008 x 1
L:1690 mm
49001 x 3
L:1918 mm
51003 x 1
L:619.5 mm
50004 x 1
L:1864.5 mm
50003 x 1
L:619.5 mm
51005 x 1
L:1864.5 mm
58001 x 2
L:18 mm
1001 x 171
M6 M6 x 12 mm
1003 x 24
M6 x 8 mm
1005 x 8 1013 x 171004 x 32
M3.5 x 16 mm M3.5 x 6 mm M6 x 50 mm
1012 x 4
M6 x 5 mm
Colis - Paket - Parcel 1 & 2
PROFILÉS ALUMINIUM - ALUMINIUMPROFILE - ALUMINIUM PROFILES
NOMENCLATURE - STÜCKLISTE - BILL OF MATERIALS

7
BASE ET VISSERIE - FUNDAMENTRAHMEN UND SCHRAUBEN - GREENHOUSE BASE AND SCREWS
31 x 2
610 x 162/10 mm
33 x 2
610 x 472/320 mm
32 x 2
610 x 317/165 mm
28 x 24
610 x 561 mm
21 x 3
610 x 554 mm
5 x 1
600 x 544 mm
1 x 4
610 x 610 mm
29 x 2
610 x 248 mm
30 x 12
610 x 503 mm
L:1450 mm M10 x 50mm
1894 x 60 x 30mm
D007 x 1
650 x 60 x 30mm
D008 x 1
1900 x 60 x 30mm
D020 x 2 D011 x 2 D013 x 4 D014 x 1
2027 x 1 2028 x 3 2030 x 17
W008 x 14
Ø 6
1008 x 16
M6 x 12mm
1009 x 16
M6
1010 x 16
2026 x 1
2004 x 1
2022 x 1 2023 x 1
2006 x 63m 2018 x 22005 x 2
2029 x 4
L:125 mm
2002 x 42001 x 41015 x 2
Ø 6
L:1630 mm
NOMENCLATURE - STÜCKLISTE - BILL OF MATERIALS
VERRES - GLÄSER - GLAZING
Colis - Paket - Parcel 3/3
5 m
M6/10 mm
NON INCLUS
NICHT VORHANDEN
NOT INCLUDED
M6/10 mm
OUTILS INCLUS
VORHANDENES WERKZEUG
TOOLS INCLUDED

8
3
1010 x 16
1009 x 16
1008 x 16
D014 x 1
D008 x 1
D007 x 1
D020 x 2
D011 x 2
D013 x 4
2
A
B
30
1010
1010
D013
1009
1008
D013
1008
1009
D007
D008
D020
D020
D011
D011
3
2
1
1.1 1.2 1009
D014
1010
1008
A
B
1900 mm
2544 mm
4,90 m²
W008
Plots béton / Punktfundament / Point foundation : D013 + D011.
Dalle ou pourtour béton / Streifenfundament / Concrete slab or frame : D013.
MONTAGE BASE - MONTAGE FUNDAMENTRAHMEN - BASE ASSEMBLING
Il est impératif que la base soit montée de niveau.
Es ist zwingend erforderlich, dass der Fundamentrahmen auf einem ebenen Untergrund montiert wird.
It is imperative that the greenhouse base is leveled.

A
B
1900 mm
2544 mm
4,90 m²
A
B
1900 mm
2544 mm
4,90 m²
2544
1922
b
a
2544
1922
A A
b
a
9
FIXATION DE LA BASE AU SOL
• Positionner la base à l’endroit voulu, de niveau sur un sol damé.
FIXATION EN PLEINE TERRE
604 521
Niveau 0 - sol fini
OU
450 mm
300 mm
FIXATION SUR DALLE BÉTON
450 mm
300 mm
Remplissage terre
ou béton
Il est vivement conseillé
de remplir les trous
de béton pour une
meilleure tenue au sol.
604 521
Niveau 0 - sol fini
2544
1922
A A
Il est laissé à votre libre choix et décision,
l’utilisation des xations adéquats selon les
supports que vous décidez d’utiliser (pourtour
bois, parpaings, plaques ciment, ...).
Fixation par chevilles à
l’intérieur de la base
Visseries et chevilles
de xation non
fournies
Détail A-A
• Repérer l’emplacement des pattes de scellement suivant le schéma ci-dessous.
• Marquer un carré de 300 x 300 mm autour des pattes de scellement et creuser sur une profondeur
de 450 mm.
• Placer la base, la mettre de niveau et remplir les trous de béton.

2544
1922
b
a
2544
1922
A A
b
a
ODER
Schrauben und
Befestigungsdübel
nicht im Lieferumfang
enthalten
10
BEFESTIGUNG DES FUNDAMENTRAHMENS AM BODEN
• Stellen Sie den Fundamentrahmen an der gewünschten Stelle, auf einem ebenen Boden.
BEFESTIGUNG AUF ERDBODEN (Punktfundament)
BEFESTIGUNG AUF BETONDECKE (Streifenfundament)
450 mm
300 mm
Erde oder Betonfüllung
Es wird dringend empfohlen,
die Löcher mit Beton zu füllen,
um einen besseren Halt auf
dem Boden zu gewährleisten.
604 521
Niveau 0 - sol fini
2544
1922
A A
Es bleibt Ihrer freien Wahl und Entscheidung
überlassen, die geeigneten Befestigungsmittel
entsprechend der von Ihnen gewählten Träger
(Holzumrandung, Bausteine, Zementplatten,…)
zu verwenden.
Dübelbefestigung im Inneren
des Fundamentrahmens
Detail A-A
A
B
1900 mm
2544 mm
4,90 m²
A
B
1900 mm
2544 mm
4,90 m²
• Finden Sie die Stelle der Ankerbeine gemäß dem untenstehenden Schema.
• Markieren Sie ein 300 x 300 mm Quadrat um die Ankerbeine herum und graben Sie 450 mm tief.
• Den Fundamentrahmen platzieren, nivellieren und die Löcher mit Beton füllen.

2544
1922
b
a
2544
1922
A A
b
a
11
FIXING THE GREENHOUSE BASE TO THE GROUND
FIXING ON SOIL (POINT FOUNDATION)
604 521
Niveau 0 - sol fini
OR
450 mm
300 mm
FIXING ON CONCRETE SLAB
450 mm
300 mm
Earth or concrete lling
It is strongly recommended
to ll the holes with concrete
for a better hold on the ground.
604 521
Niveau 0 - sol fini
2544
1922
A A
It remains to your free choice and decision to
use the suitable fastening means according to
the supports you chose (wood border, building
stones, cement plates etc.)
Rawplug fastening inside
the greenhouse base
Screws and rawplugs
not provided
Detail A-A
A
B
1900 mm
2544 mm
4,90 m²
A
B
1900 mm
2544 mm
4,90 m²
• Position the greenhouse base in the desired location at a level position.
• Locate the base legs as shown bellow.
• Mark a 300 x 300 mm square around the base legs and dig 450 mm deep.
• Place the greenhouse base, level it and ll the holes with concrete.

12
Mise en place des vis 1002 et 1003 dans les rainures en forme de T des prolés aluminium :
Entrez la tête de vis dans la rainure du prolé et tournez à 90° an qu'elle ne puisse pas sortir du
prolé. Assemblez la/les pièce(s) nécessaire(s) et serrez l'écrou.
Verwendung der Schrauben 1002 und 1003 in den t-förmigen Nuten der Aluminiumprole :
Schraubenkopf in die Prolnut stecken und diesen um 90° drehen, damit er nicht aus dem Prol
herauskommt. Bauen Sie das/die benötigte(n) Einzelteil(e) zusammen und ziehen Sie die
Schraubenmuttern an.
Principle of use of screws 1002 and 1003 in the T-shaped grooves of the aluminium proles :
Enter the screw head into the groove of the prole and turn the screw head at 90° so that it cannot
exit the prole. Assemble the required part(s) and tighten the screw nut.
1
3
2
4
VIS 1002 & 1003 - SCHRAUBEN 1002 & 1003 - SCREWS 1002 & 1003

13
3.3
3.2
3.1
2.2
2.1
1.3
1.2
1.1
W003
55001
1002
1002
1002
53002
1001
1002
1001
1001
1001
1002
1002
1001
1001
33027
33027
25024 25024
27025 27025
52003 52004
1
23
3
33027
33027
25024 2502425024
27025 27025
52003 52004
1
2
1002 x 201001 x 20W003 x 252004 x 1 53002 x 1 55001 x 152003 x 1
33027 x 2
27025 x 2
25024 x 2
1002 x 211001 x 21W003 x 252004 x 1 53002 x 1 55001 x 152003 x 1
33027 x 2
27025 x 2
25024 x 3
FACE AVANT - VORDERWAND - FRONT WALL
Mélissa
4,90 m2 (A) Double porte en façade - Doppeltür an der Vorderwand
Double door on the front
Mélissa
4,90 m2 (B) Une porte de chaque côté - Eine Tür an jeder Seite
One door on each side

14
1.2
1.3
2
1.1
3
4
1001
1001
46001
1001
1002
1002
1001
1001
1002
1002
3000730003
33004
33004
33004
21
34
3000730003
33004
21
34
1002 x 141001 x 1430003 x 1 46001 x 133004 x 230007 x 1
1002 x 151001 x 1530003 x 1 46001 x 133004 x 230007 x 1
1002
FACE AVANT - VORDERWAND - FRONT WALL
Mélissa
4,90 m2 (A) Double porte en façade - Doppeltür an der Vorderwand
Double door on the front
Mélissa
4,90 m2 (B) Une porte de chaque côté - Eine Tür an jeder Seite
One door on each side

15
5 4.2
4.1
3.2
3.1
2.2
2.3
2.1
1
1003 x 141002 x 181001 x 32W022 x 2W003 x 2 W025 x 448008 x 1
48007 x 1
48005 x 130006 x 2
48006 x 1
27022 x 127021x 1
1002
1001
1002
1001
1002
1001
1001
1003
1003
W025
W025
W022
1001
1001
1002
1001
1002
1001
1002
W003
5
2
1
27022
48008
48006
27021
48007
48005
30006
30006
4
3
5
2
1
27022
48008
48006
27021
48007
48005
30006
30006
4
3
1003 x 141002 x 181001 x 32W022 x 2
W003 x 2
W025 x 4
48008 x 1
48007 x 1
48005 x 130006 x 2
48006 x 1
27022 x 127021x 1
ASSEMBLAGE DES PAROIS
ZUSAMMENBAU DER WÄNDE
ASSEMBLING THE WALLS
Mélissa
4,90 m2 (A) Double porte en façade - Doppeltür an der Vorderwand
Double door on the front
Mélissa
4,90 m2 (B) Une porte de chaque côté - Eine Tür an jeder Seite
One door on each side

16
MONTAGE RENFORTS DE PIGNONS
MONTAGE DER QUERSTREBEN
INSTALLING THE CROSSBEAMS
3.4
3.1
2.2
2.1
1
1003 x 11002 x 121001 x 1332006 x 1 32005 x 110001 x 2
1001
1002
1001
1001
1002
1002
10001
2
3
32006
32005 10001
1
1002 x 61001 x 632006 x 1 32005 x 1
232006
32005
1
3.5 1003
1001
10001 10001
52004
3.2
10001 10001
52004
3.3
Mélissa
4,90 m2 (A) Double porte en façade - Doppeltür an der Vorderwand
Double door on the front
Mélissa
4,90 m2 (B) Une porte de chaque côté - Eine Tür an jeder Seite
One door on each side
Mélissa
4,90 m2 (B)
Mélissa
4,90 m2 (A)

17
50003
50004
51005
51003
4
3
51005
51003
3
2
1
4.3
4.2 3.2
3.1
2.2
1.3
1.2
1.1
1002
1002
1001
50003
W002
54001
1001
50004
4.1
2.1
1001
1001 53001
1001
1001
1001 W003
1002
1002
1002
W025
W025
1002
1002
1002 x 24
1001 x 24W003 x 2W002 x 1 W025 x 2
53001 x 1 54001 x 150004 x 1
50003 x 1
50003
50004
4
2
1
1002 x 241001 x 24W003 x 2W002 x 1 W025 x 253001 x 1 54001 x 1
51005 x 1
50004 x 1
50003 x 1
51003 x 1
51005 x 151003 x 1
Mélissa
4,90 m2 (A) Double porte en façade - Doppeltür an der Vorderwand
Double door on the front
Mélissa
4,90 m2 (B) Une porte de chaque côté - Eine Tür an jeder Seite
One door on each side
MONTAGE GOUTTIÈRE ET FAÎTIÈRE
MONTAGE REGENRINNE UND FIRST
INSTALLING GUTTER AND RIDGE
Mélissa
4,90 m2 (B)

18
MONTAGE DES PROFILÉS DE PAROIS
MONTAGE DER SEITENPROFILE
ASSEMBLING THE SIDE PROFILES
25024
25024
25027
25025
25026
25028
33027
33027
31
2
1002 x 261001 x 2633027 x 225028 x 125027 x 125026 x 1
25025 x 1
25024 x 4
W016 x 4
25024
25024
25027
25025
25026
25028
33027
33027
31
2
1002 x 261001 x 2633027 x 225028 x 125027 x 125026 x 1
25025 x 1
25024 x 4
W016 x 4
1002
2.2
2.1
1
3.1
3.2
3.3
3.4
1002
1002
1002
W016
1001
1001
1001
1001
Mélissa
4,90 m2 (A) Double porte en façade - Doppeltür an der Vorderwand
Double door on the front
Mélissa
4,90 m2 (B) Une porte de chaque côté - Eine Tür an jeder Seite
One door on each side
Mélissa
4,90 m2 (B)
Mélissa
4,90 m2 (A)

19
MONTAGE RENFORTS DE PIGNONS
MONTAGE DER QUERSTREBEN
INSTALLING THE CROSSBEAMS
33003
33003
33004
33004
1
2
1002 x 101001 x 1033004 x 233003 x 2
33003
33003
33004
33004
1
2
1002 x 101001 x 1033004 x 233003 x 2
33003
33003
33004
33004
1
2
1002 x 101001 x 1033004 x 233003 x 2
1002
1002
1
2
1001
1001
Mélissa
4,90 m2 (A) Double porte en façade - Doppeltür an der Vorderwand
Double door on the front
Mélissa
4,90 m2 (B) Une porte de chaque côté - Eine Tür an jeder Seite
One door on each side
Mélissa
4,90 m2 (B)
Mélissa
4,90 m2 (A)

20
49001
39001
25029
5
4
3
12
49001
39001
25029
5
4
3
12
49001
39001
25029
5
4
3
12
1002 x 15
1001 x 15
39001 x 1
25029 x 3
49001 x 3
1002 x 151001 x 1539001 x 125029 x 3 49001 x 3
1001
49001
49001
1001
2.1
1.3
1.2
1.1
2.2
3.1
3.2
4.14.25.15.2
1002
25029
49001
1002
1001
1001
1002
25029
1002
25029
1002
1001
49001
25029
39001
MONTAGE DES PROFILÉS DE TOITURE
MONTAGE DER DACHPROFILE
ASSEMBLING THE ROOF PROFILES
Mélissa
4,90 m2 (A) Double porte en façade - Doppeltür an der Vorderwand
Double door on the front
Mélissa
4,90 m2 (B) Une porte de chaque côté - Eine Tür an jeder Seite
One door on each side
Mélissa
4,90 m2 (A)
Other manuals for Melissa
1
This manual suits for next models
2
Table of contents
Other LAMS Greenhouse Kit manuals

LAMS
LAMS ALOE User manual

LAMS
LAMS CARVI 8,10 M2 User manual

LAMS
LAMS MELISSA 3,30 User manual

LAMS
LAMS Melissa User manual

LAMS
LAMS Allium User manual

LAMS
LAMS CARVI 8,10 User manual

LAMS
LAMS SERRE LUXIA ADOSSEE User manual

LAMS
LAMS Laurus 9,70 M2 User manual

LAMS
LAMS ALLIUM 4,90 User manual

LAMS
LAMS LAURUS 784817 User manual
Popular Greenhouse Kit manuals by other brands

Sproutwell
Sproutwell REGATTA Assembly instructions

Outsunny
Outsunny 845-421V03 Assembly & instruction manual

Vitavia
Vitavia GAIA JUMBO Assembly instructions

Black Orchid
Black Orchid Hydro-Box Assembly & instruction manual

Halls Greenhouses
Halls Greenhouses Magnum 108 Assembly instructions

Dancover
Dancover HGSA1010 manual