Fly Dragon FDXD-6R-16L User manual

FDXD-6R-16L SPRAYING DRONE
User Manual
2017.0
6

© 2017 Fly Dragon Drone Tech All Rights Reserved.
2
Searching for Keywords
Search for keywords such as “battery” and “install” to find a topic. If you are using Adobe
Acrobat Reader to read this document, press Ctrl+F on Windows or Command+F on Mac to
begin a search.
Navigating to a Topic
View a complete list of topics in the table of contents. Click on a topic to navigate to that
section.
Printing this Document
This document supports high resolution printing.

© 2017 Fly Dragon Drone Tech All Rights Reserved.
3
Information
Read the battery’s safety guidelines and take ne
c
essary precautions when handling the batteries
to ensure your own safety. FLY DRAGON assumes no liability for damage(s) or injuries incurred
directly or indirectly from using batteries improperly.
Using This Manual
Legend
Important Hints and tips Reference
Before Flight
The following tutorials and manuals have been produced to help you get the most out of your FDXD-
6R-16L.
1. In the Box
2. Disclaimer and Safety Guidelines
3. Quick Start Guide
4. User Manual
Check all of the included parts listed In the Box document and read the Disclaimer and Safety
Guidelines before
flight.
Complete
the
assembly
and learn the
basic operations
with the help of
the
Quick Start Guide and the video tutorial on the official website
.
Refer to
the
User Manual for more
comprehensive information.
Watch Video Tutorial
Please watch the tutorial video below to learn how to install the FDXD-6R-
16L correctly:
http://www.dronefromchina.com/list-4-
11.html
DownloadAssistant Software
Download the FDXD-6R-16L Assistant and Ground station software
http://www.dronefromchina.com/Documents

© 2017 Fly Dragon Drone Tech All Rights Reserved.
4
FDXD-6R-16L User Manual
About The Drone Sprayer
1. Pesticide Usage
•
Pesticides are poisonous and can pose serious risks
to human safety. Use them in strict accordance with
their
specifications.
•
Residue on the equipment caused by splashes or
spills when pouring and mixing the pesticide can
irritate your skin. Be sure to clean the equipment after
mixing.
•
Use clean water to mix the pesticide to avoid
blocking
The strainer. Clear any blockages before using the equipment.
FDXD-6R-16L Drone
sprayer is NOT a toy and
is to be used by trained
pilots only.
Note that ‘Safety at a Glance’
only
provides
a quick
overview
of
the
safety tips.
Make sure you read
an
d
understand the remaining sections of
this
document.

© 2017 Fly Dragon Drone Tech All Rights Reserved.
5
FDXD-6R-16L User Manual
•
Wear protective clothing to prevent direct body contact with the pesticide. Always rinse your
hands and skin after handling pesticides. Clean the aircraft and remote controller after
applying the pesticide.
•
Effective use of pesticides relies on pesticide density, spray rate, spray distance, aircraft speed,
and wind speed and wind direction. Consider all factors when using pesticides, but NEVER
compromise the safety of people, animals and the environment in doing so.
•
DO NOTcontaminate rivers and sources of drinking water.
2. Environmental Considerations
•
Always flyat
locations
that are clear of building and other
obstacles.
•
DO NOT fly
above
or near large crowds
.
•
Avoid flying at
altitudes above
50
m.
•
Be very careful when flying over 2,000 m
above sea level.
•
Fly in moderate weather conditions with temperatures between 0°to 40°C.
3. Pre-flight Checklist
•
Remotecontroller and aircraft batteries are fully
charged.
•
Landinggear
and spray
tank are firmlyin
place.
•
All
screws
are firmly
tightened.
•
Propellers
and frame arms are
unfolded,
and arm
sleeves
are
firmly
tightened.
•
Propellers
are in
good condition
and firmly
tightened.
•
Thereis nothing obstructing the motors.
•
Spraying system is without any blockage and works properly.
•Compass
is
calibrated
at every new flight
location.
4. Operation
•
Stayaway from the rotating propellers and motors.
•
The takeoff weight must not
exceed
37.5 kg (taking off at
sea level).
•
Maintain line of sight of your aircraft at all times.
•
NEVER stop the motors mid-flight.
•
DO NOT
answer incoming
calls during flight.
•
DO NOT fly
under
the
influence
of
alcohols
or
drugs.
•
During the Return-to-Homeprocedure, you can adjust the altitude to avoid obstacles.
•
In the instance of a Low Battery Warning, land the aircraft at a safe location.
•
Always keep your hands on the remote controller so long as the motor is still spinning. Power
off the aircraft before turning off the remote controller after landing.
5.
Maintenance
and
Upkeep
•
DO NOT use aged, chipped or broken propellers.
•
Removeor empty the spray tank during transportation or when not in use to avoid damaging
the landing gear.
•
Recommended storage temperature (empty spray tank): between -20°and 40°C.
•
Clean the aircraft immediately after spraying.
•Inspect
the aircraft every 100 flights or after flying for over 20
hours.
•
Formore maintenance guidelines, refer to the Product Care section in Disclaimer and Safety
Guidelines.
6.
Observe
Local Laws and
Regulations
•
DO NOT flyin the No Fly
Zones.
•
TheNo FlyZone is not a replacement for local government regulations or good judgment.
•
Avoid flying in
areas
where rescue
teams
are actively using the
airspace.

© 2017 Fly Dragon Drone Tech All Rights Reserved.
6
FDXD-6R-16L User Manual
50m
Fly in Open Areas Calibrate the
Compass Strong GPS
Signal Maintain Line
of Sight Fly Below (50 m)
Avoid flying over or near obstacles
, crowds,
high
voltage
power lines or
bodies
of
water.
DO NOT flynear strong electromagnetic sources such as power lines and base stations as it may affect the onboard
compass.
≥
8m/s
DO NOT use the aircraft in
adverse weather conditions such as
rain
(precipitation
rate
exceeding
25 mm in 12 hours), wind
speeds exceeding
8 m/s, fog, snow, and lightning
.
No Fly
Zone
Stay away from the rotating
© 2017 Fly Dragon Drone Tech All Rights Reserved.
7
FDXD-6R-16L User Manual
Profile
Introduction
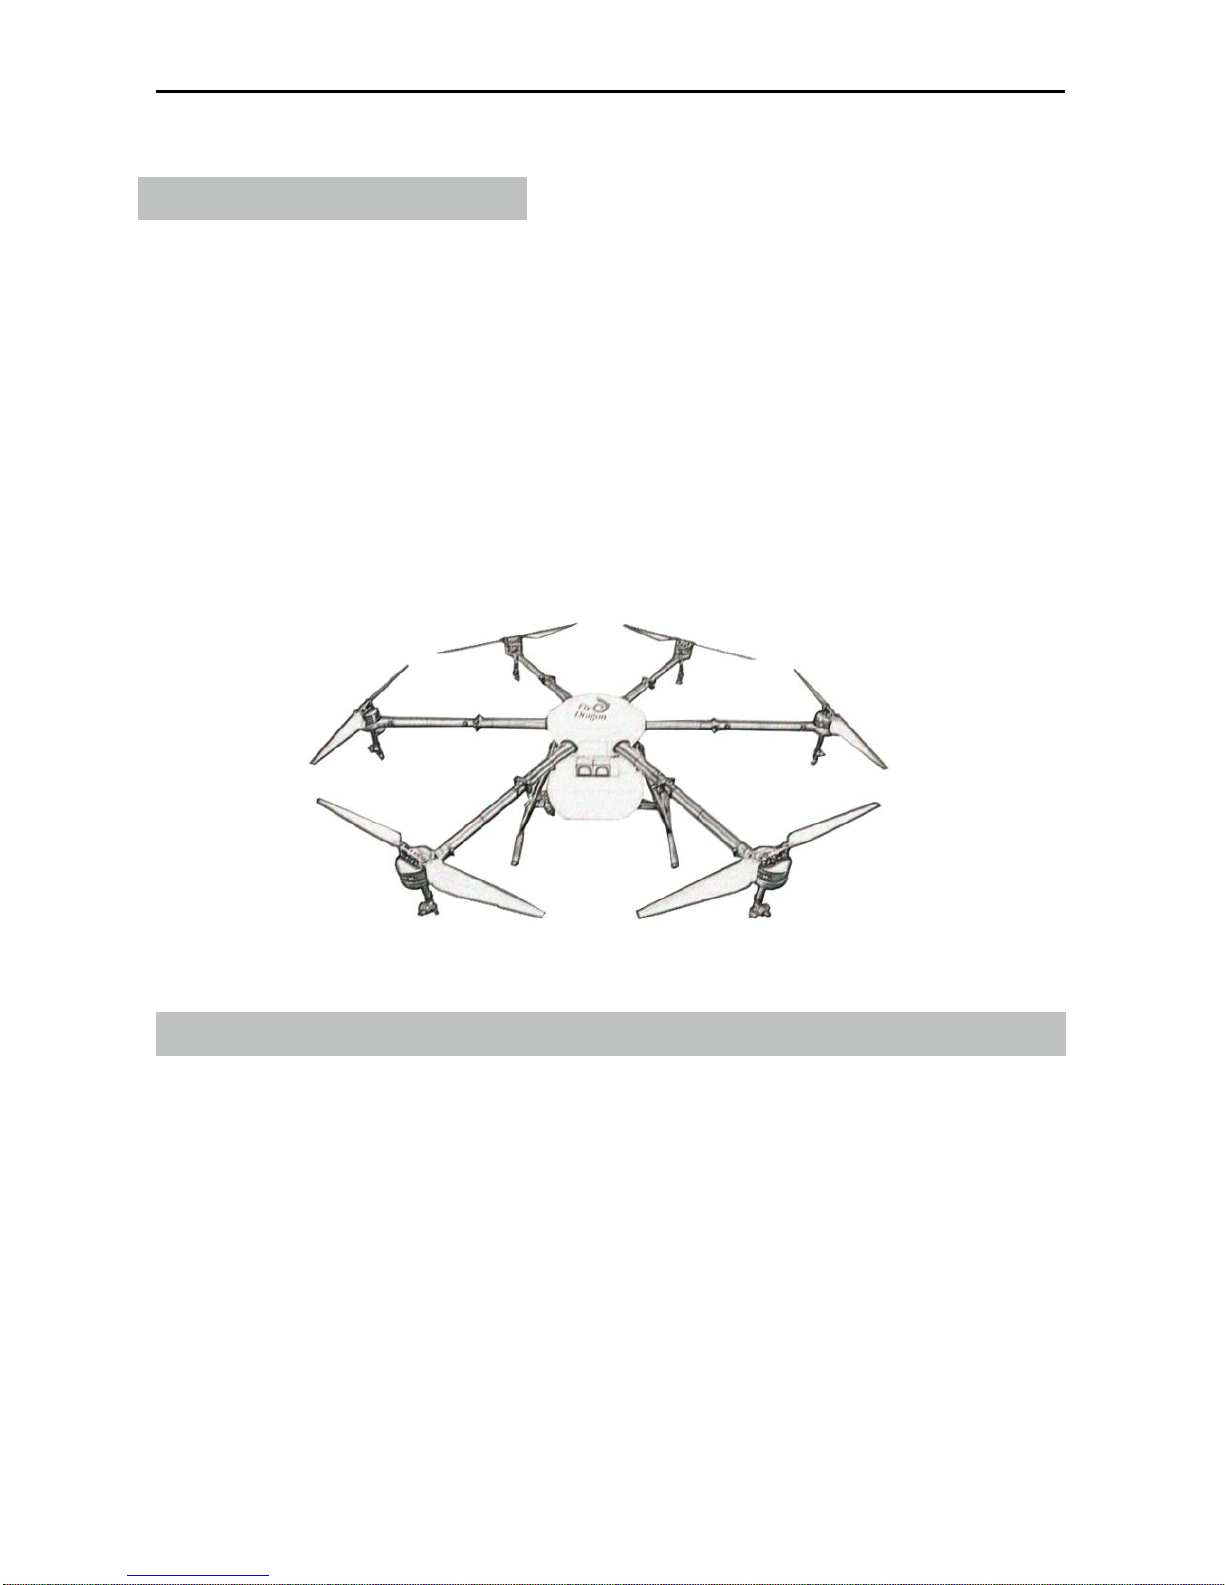
The FDXD-6R-16L is a battery-powered multirotor aircraft designed for agricultural applications in variety
of environments and terrains, including terraces, fields, forests and orchards. It is dust-proof, water-proof
(IP43 protection rating) and made of anti-corrosive materials, allowing it to be rinsed clean.
The FDXD-6R-16L includes T1-A industry-leading flight control system and three useful Operation
Modes: Smart, Manual. A microwave radar underneath the aircraft makes the FDXD-6R-16L uniquely
versatile across different terrains and the combined Altitude Stabilization System automatically maintains
the aircraft’s height above plants to ensure optimal spraying.
The remote controller features a Spraying Status Panel decorated with intuitive icons and a range of
controls for navigation, mode and spraying. While the FDXD-6R-16L does all the hard work in the fields,
you keep full control over it in the palm of your hands.
Feature Highlights
The FDXD-6R-16L provides three useful Operation Modes: Smart, Manual Mode. In Smart Operation
Mode, the aircraft will travel along a pre-planned route and spray liquid payload. Users can set the
operation gap, flying speed and other parameters. The FDXD-6R-16L can cover an area of 7-10 acres
per hour. In Manual Operation Mode, users can start and stop spraying manually and also adjust the
spray rate. The spraying system includes a spray tank, sprinklers and other accessories. The four
sprinklers placed on the aircraft’s two sides provide well-distributed spraying and great coverage.
1. Foldable frame, easy to transport
2. Intelligent flight with autopilot
3. Intelligent flight memory, record break-point
4. Adjustable spray flow rate
5. Adjustable altitude and fly speed
6. Fail-safe, auto fly when out of control
7. Low voltage warning and auto return to base
8. Empty tank warning and auto return to base
9. Terrain following with MMW radar
10. Digital fence
11. Software(ground station and manage platform)
12. Add obstacles
13. Multi-way charger
© 2017 Fly Dragon Drone Tech All Rights Reserved.
8
FDXD-6R-16L User Manual
Overview
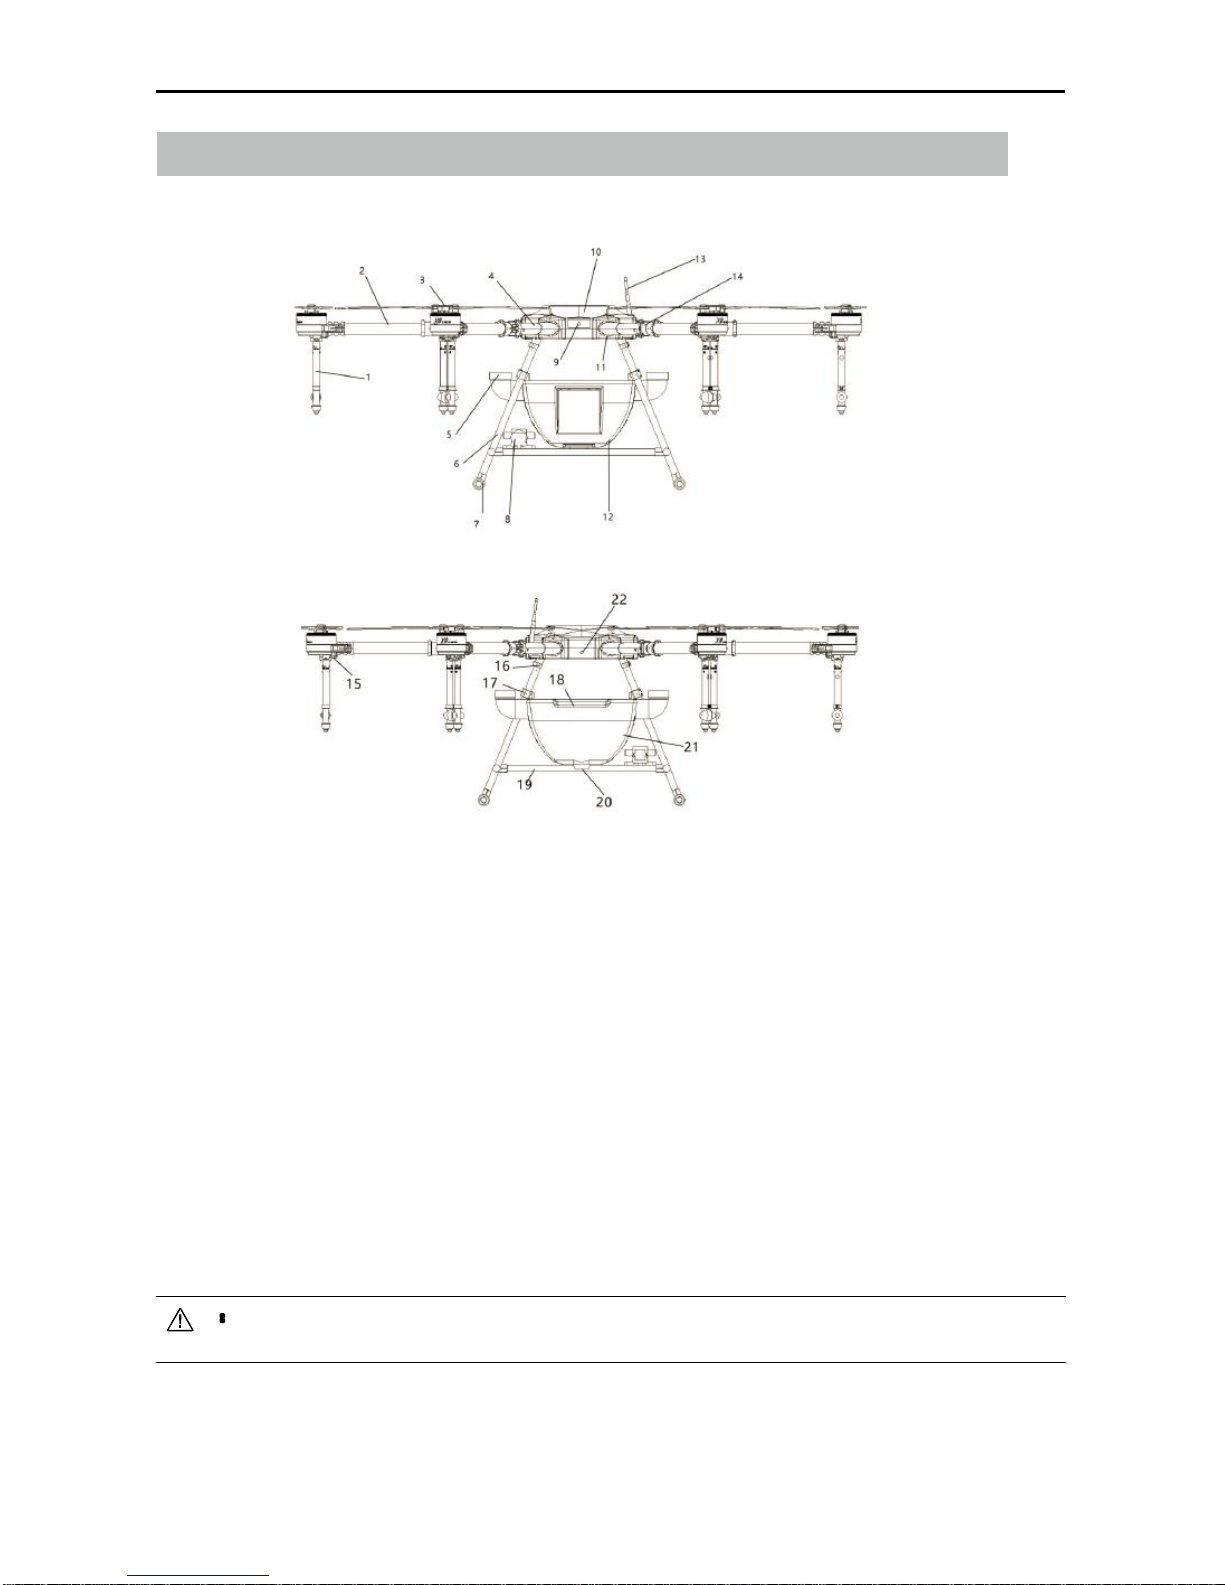
Aircraft
[1] Propellers
[2]L
FrameArms
[3] Motors
[4]
S
Frame Arms
[5]
Cap
[6] Frame
[7]
Nonrattling
[8] Pump Motor
[9] Wire Outlet
[10] Shell
[11] Watertightness
[12] liquid level sensor
[13] Data transmission
[14] Foldable
[15] LED Light
[16]
Frame installer
[17] Connector of Tank
[18] Battery installer
[19] Radar installation
[20] Outlet of tank
[21] Liquid tank
DO NOT obstruct the GPSmodule located at the center of the aircraft, as this will reduce
the
GPS
signal strength.

© 2017 Fly Dragon Drone Tech All Rights Reserved.
9
FDXD-6R-16L User Manual
Remote Controller

© 2017 Fly Dragon Drone Tech All Rights Reserved.
10
FDXD-6R-16L User Manual
Name Type
SA 3-stage Switch
SB 3-stage Switch
SC 3-stage Switch
SD 3-stage Switch
LD Self-centering Dial
RD Thumb-slide Dial
Name Type
S1 Self-resetting Button
S2 Self-locking Button
S3 Self-locking Button
S4 Self-resetting Button
S5 Self-resetting Button
S6 Self-resetting Button

FDXD-6R-16L User Manual
Flight Controller
Introduction
T1-A is a professional flight controller combining main functions of agricultural UAV in
current market, it can be installed on a variety of model structures, it has the functions as
follows:
Intelligent mode
Dose detection
Resume spray function
Precision spraying
Support 10 types of multi-rotor platform
Low Voltage Protection
Fail safe and Go Home
Protection for motor failure or broken airscrew blade (apply to hex-rotors drone or
above)
In The Box
Warranty
card×1,
Main controller
×
1,PMU
×
1, GPS/Compass
×
1,
LIU×1, DCU×1,
GPS
Bracket
×
1, Servo
Cable×8, Micro-USB
×
1,AV
cable×1,
3MAdhesive Tape.
Symbol Description
Universal Symbol
Symbol
Significance
Description
Attention
This mark represents potential risk, if ignore it, may result in
equipment damage, loss of data or other unpredictable
consequences.
Intruction
Starting with this mark is the additional information of the body
and the emphasis and supplement on the body.

FDXD-6R-16L User Manual
LED Symbol
Symbol
Description
(N)
It means yellow LED indicator flashes N times;
{ }(N)
It means yellow and purple LED indicator flash N times;
(∞)
It means yellow LED indicator continuously flashes;
(N)
It means yellow LED indicator is continuously on for N seconds.
FDXD-6R-16L User Manual
1 Assembly& Configuration
1.1Hardware Installment
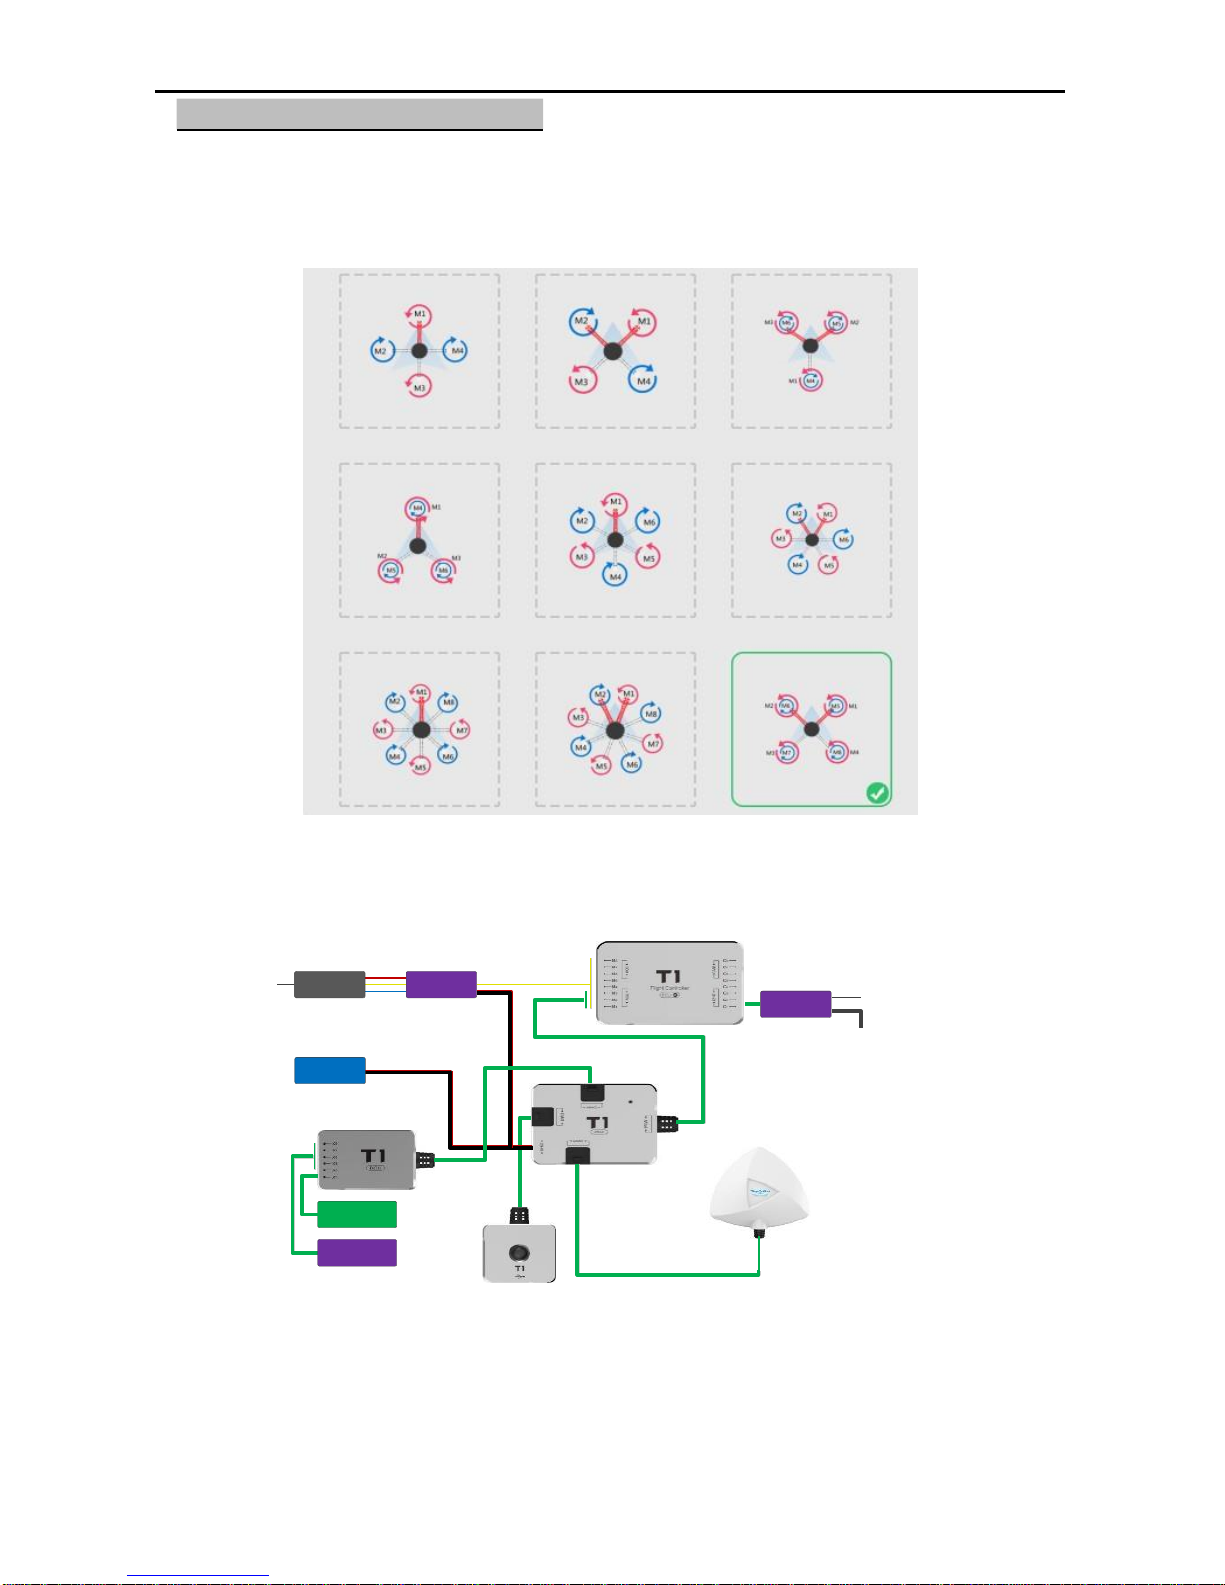
Step1. Confirm multi-rotor type, forward direction and rotation direction of the
motor/propeller.
Figure 1-1 Confirm multi-rotor type
Step2. Install the controller unit, connect ever
Figure 1-2 Hardware connection diagram

FDXD-6R-16L User Manual
Installation Specification
Main controller module installation
Installation position requirements
The TopXGun logo should be facing the sky, with the orientation arrow pointing directly
to the nose direction, please mount it on a central place in board center of aircraft.
Port connection
Connection of ESC: Connect M1~M8 to ESC, T1-Asupports up to eight motors
at most (ESC
signal wire is down and earth wire is up )
If use ESC which owns the function of BEC output, the red power output line
in the middle of the BEC should be cut off.
Connection of receiver: SBus and PPM receiver can be connected directly
to C1. PWM receiver should be connected to C1~C8 on flight controller. The
receiver should have at least six channels for realizing built-in advanced functions
of flight controller.(Recommended to use servo cable of flight controller includes
to connect flight controller and the receiver.)
If you have matched DTU (data transmission unit), please connect it to COM port
on MC, it is recommended that you complete fixation after wiring.
PMU module installation
Please do not mount it on any other electronic device, choose a ventilated place for cooling.
Make sure the three CAN ports are convenient for connecting during installation.
Three ports of PMU module have same definition
GPS/COMPASS module installation
When installing the top side should be facing up, with the orientation arrow pointing directly to
the nose direction, mount it on the bracket horizontally. Connect it to any one of the CAN ports
of PMU. It is recommended to use bracket included in package, otherwise, please make sure it
is nonmagnetic.
The module built-in magnetic compass as magnetic sensitive equipment,
please pay attention to keep it away from the motor, ESC, power battery and
etc. when install and use.
FDXD-6R-16L User Manual
LIU module installation
Mount in a good place to make sure the LIU is visible during flying, don't cover the USB port,
connect it to any one of the CAN ports of PMU with the enclosed 3M adhesive tape.
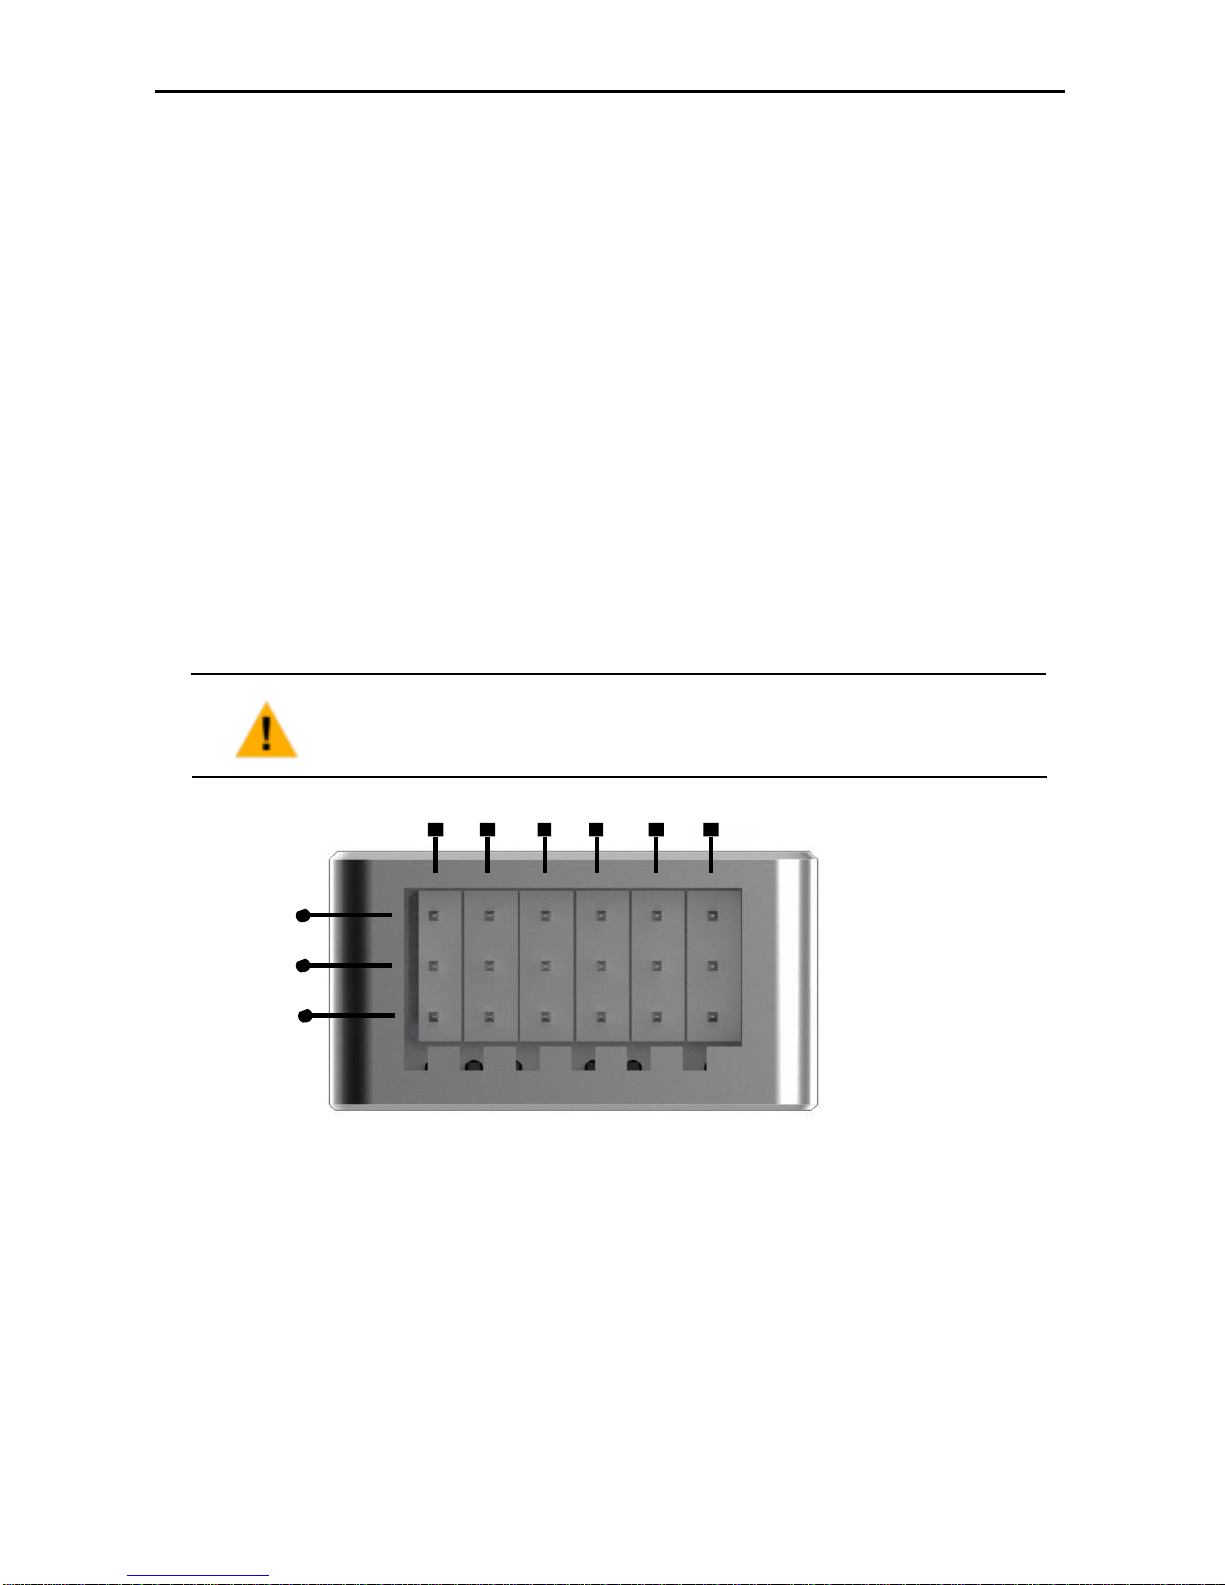
DCU module installation
Installation position requirements
Choose the appropriate position on aricraft board and connect it to any one of the CAN ports
of PMU.
Port connection
X1 port is connected to liquid level sensor, X2~X6 port is connected to pump output, the
instruction as below:
When access to ESC of water pump, if use ESC which owns the function of
BEC output, the red power output line in the middle of the BEC should be cut
off.
X6
X5
X4 X3 X2 X1
GND
+5V
Signal input
Figure 1-3 DCU InstallationInstruction
1.2Installation & Test

FDXD-6R-16L User Manual
Preparation before installation and debugging
T1-Aflight controller supports PC, Mobile phone to adjust parameters
If you do the configuration on phone, you only have to install phone app and
buy Bluetooth module, no need to install any driver.
If you do the configuration on PC, it must meet below demands
support windows system Windows XP/7/8/10
PC has connected to Internet.
Install latest software used to adjust parameters (It may need to install drive
program)
Install and test steps
Herefollows the instructionof parametersettingsteps,taking theadjustable parametersoftware
settings as example. You can see details of setting method according to the inner specification
of adjustable parameter software.
Step1. Use USB cable to connect flight controller and PC.
PC will automatically detect flight control and connection.
When using a USB to connect flight controller and PC, it must be given flight
control power.
Step2. Choose the type of aircraft.

FDXD-6R-16L User Manual
Figure 1-4 choose the type of aircraft
(1) The direction of the red arrow indicates rotating clockwise (view from the top).
(2) The direction of the blue arrow indicates rotating anticlockwise (view from the top).
(3) To coaxial propellers: red propeller is at Top; blue propeller is at Bottom.
Step3. Choose the type of receiver and calibrate it.
FDXD-6R-16L User Manual
1. Choose the type of receiver that you have installed, reboot MC after selection.
2. Setup a new fixed wing model on transmitter, choose a three position switch for
CH5, and choose a two position or three position switch for CH6.
3. Click the “START CALIBRATION “button, and move all of the sticks throughout
their complete range several times, then click the “FINISH CALIBRATION”
button.
Remote control only unlock after the correct calibration, please check the
channel direction is correct or not:
turn the aileron stick to right, the roll cursor slides to right;
turn the rudder to right, the yaw cursor slides to right;
pull the elevator stick, the pitch cursor slides to right;
push the throttle stick, the throttle cursor slides to right;
4. Flip the CH5, CH6 stick, check if the position on software matches with the control
mode.
If the receiver type is not SBus, you need to do as follow:
1. Set the end point of CH5 to 30%~70%
2. Set the rudder angle in the range of normal mode.
You can verify the Fail-Safe setting by shutting down the transmitter, the control mode will
Automatically jump to red „Fail-Safe‟ area.

FDXD-6R-16L User Manual
Figure 1-5 remote control/receiver channel Settings
Step4. Gain setting.
1. Choose the axle base of aircraft which you are using,for your better flying
experience,some parameters have been set automatically according to the axle
base of aircraft.
2. You can adjust flying gain in “GainAdjustment”.
3. You can setup the gain manually until you confirm the best flying gain.

FDXD-6R-16L User Manual
Figure 1-6 Gain setting
Step5. Low-voltage protection setting.
If you do not want to use this function, you can turn it off, then the aircraft will only alarm
with LED blinking when the battery is low.The first level protection has yellow LED
blinking, the second level protection has red LED blinking.
If the low-voltage protection is turned on, the aircraft will return automatically during first
level protection, during second level protection the aircraft will land automatically.No matter the
auto-return or land in stand point, you can switch CH5 mode twice to terminate low-
voltage protection at any time .If the low-voltage protection is triggered, you are unable to
switch to any kind of flight mode except for attitude mode and returning mode and landing
mode.
Table of contents
Other Fly Dragon Drone manuals


