manuals.online logo
Brands
  1. Home
  2. •
  3. Brands
  4. •
  5. Flycam
  6. •
  7. Camera Accessories
  8. •
  9. Flycam FLCM-JR User manual

Flycam FLCM-JR User manual

Junior Camera Stabilizer
(FLCM-JR)
Instruction Manual
Flycam Junior Camera
Stabilizer (FLCM-JR)
2
Subject Page
Forward 3
Introducon 4
Assembling 5-9
Balancing 10-13
Warranty 14
At Flycam, our goal is to ensure 100% Customer Sasfacon in all that we do.
We back our sales with a 1 year warranty from the date of purchase and work hard
to resolve any problems in the unlikely event one should arise.
With our commitment to connuous improvement and your Feedback, building on
our reputaon of providing aordable, quality products is
PRIORITY #1.
Table of Contents
3
Dear Client,
On behalf of all the people that work so hard to provide you with the most
up-to-date, exible and cost-ecient producon gear, we would like to welcome
you into the Flycam family.
By purchasing your Flycam Junior DSLR Camera Stabilizer, you have just joined a
host of designers, engineers, machinists, assembly, customer service and oce sta
that take great pride in all that they do. Our mantra of connuous improvement has
been the guiding principle of how we conduct our business since day one.
Once you have the opportunity to experience your Flycam Junior DSLR Camera
Stabilizer, we hope you will agree that we cra quality products at a compeve
price. Products designed to meet and exceed the standards of today’s real
producon world.
Standards set by our valued clients and standards we strive to maintain.
With Best Wishes,
Flycam Team
Welcome To Flycam!
4
Our Flycam Junior stabilizer has been specically designed to enable operators to
achieve a high level of arsc freedom in shot selecon in both video and slls
formats. In order to master the capabilies of your Junior, please read the following
set up and operaon guide. Remember to acquaint yourself with your Flycam
Junior by praccing proper use. Once mastered, your Flycam Junior will become an
indispensible producon tool for shooters from amateur to professionals alike.
Head, Mid & Boom Plate
Quick Release plate
Base Plaorm with 16 weight
disks
Accessories
Introducon
Please inspect the contents of your shipped package to ensure you have received
everything that is listed below.
What’s In The Box
Central Post
5
HEAD ASSEMBLY
 Head Plate
 Mid Plate
 Boom Plate
These three individual pieces are shipped as one assembled unit.
‘V’ SHAPED ADAPTORS INCLUDED IN HARDWARE KIT
Note: Included in the hardware package are two dier-
ent sized V-shaped adaptors used to aach the cam-
era to the head plate. Choose the one that is suitable
for your camera. A locking pin located at the front of
the adaptor prevents camera rotaon on the head.
Note: The threaded stud is located in the center of the
base plate for aach it with central post.
The boom of the interior central post has a threaded
slot that matches the pin located mid base on the
plaorm. To aach the two, simply thread them
together and ghten to ensure a slip free connecon.
Alignment should end up with the central post being
perpendicular to the base plaorm. This will make
camera balancing and operaon much easier.
Head Plate Boom Plate
Mid Plate
CENTRAL POST
Warning: The Gimbaled control unit, handle and yoke
have been factory set for opmum performance.
Do not aempt to adjust them.
ATTACHING CENTRAL POST TO BASE PLATFORM
6
 Loosen the 2x allen bolts at boom of the camera plate and align the holes with the top of
the central post. Reghten the allen bolts securing the head to the stalk.
 Remove the Head plate from the
3-piece head assembly in preparaon
to aach it to your camera. You will
note a number of mounng holes that
can be used to adapt to various
cameras.
 Center the head plate on the camera and ghten the allen bolt with the help of screw driver.
Align the camera center of balance to the mid plate and secure the head plate and camera to
the mid plate.
Aaching The Head Plate to Central Post
7
 Aer proper alignment, ghten the 2x
Knobs to secure the camera.
 The many slots located on the head plate and boom plate allow you to easily adjust the X
& Y axis for perfect balance. Once achieved, ghten the knobs to secure. Further ‘ne
tuning’ will probably be required.
Head Plate X adjustment
Head Plate Y adjustment
8
YO U R F LYC AM J UNI O R F U LLY AS S E MB L E D
Adding Weights and Posioning for Proper Balance
Connuing the assembly and balance requirements to make your ycam Junior fully funconal
you will note that the base plaorm has a provision to mount the balance weights in their cups
via a slot found on both sides of the post.
The purpose of the counter weight system is to match the low end of the stabilizer to the weight
of the camera and accessories at the high/top end with the gimbaled handle as the pivot point in
between. The heavier the camera and accessories, the more weights are required to achieve
proper balance. Generally as you add weight to one side of the central post, an equal amount has
to be added to the other side to maintain horizontal balance. However if you are using an oset
conguraon such as a ip out viewnder or o center accessories, extra weights might be
needed on the opposite side of the post to counter act and maintain proper balance.
Total weight xed to the base plaorm should be equal to the weight of your camera plus the
head and any accessories.
Horizontal adjustment on the base plaorm is made by loosening the retaining screws and
moving the mounted cups closer to or further away from the stalk and then reghtening. You will
probably need to adjust and re adjust the horizontal posion to achieve opmum performance/
personal preference.
NOTE: When adding weight in the cups, use the supplied foam spacers as silencers to prevent
metal to metal washer noise.
9
VERTICAL STALK ADJUSTMENT
The up and down (vercal) posion of the
telescopic central post is adjusted by
loosening the control located at the base,
raising or lowering the stalk to the desired
locaon and then reghtening the vercal
control. Do not over-ghten this control.
BALANCING YOUR FLYCAM JUNIOR
Before beginning the balancing process check the following
 Camera is securely aached to head plate.
 Lens cap has been removed and secured.
 Telescoping clamp has been ghtened.
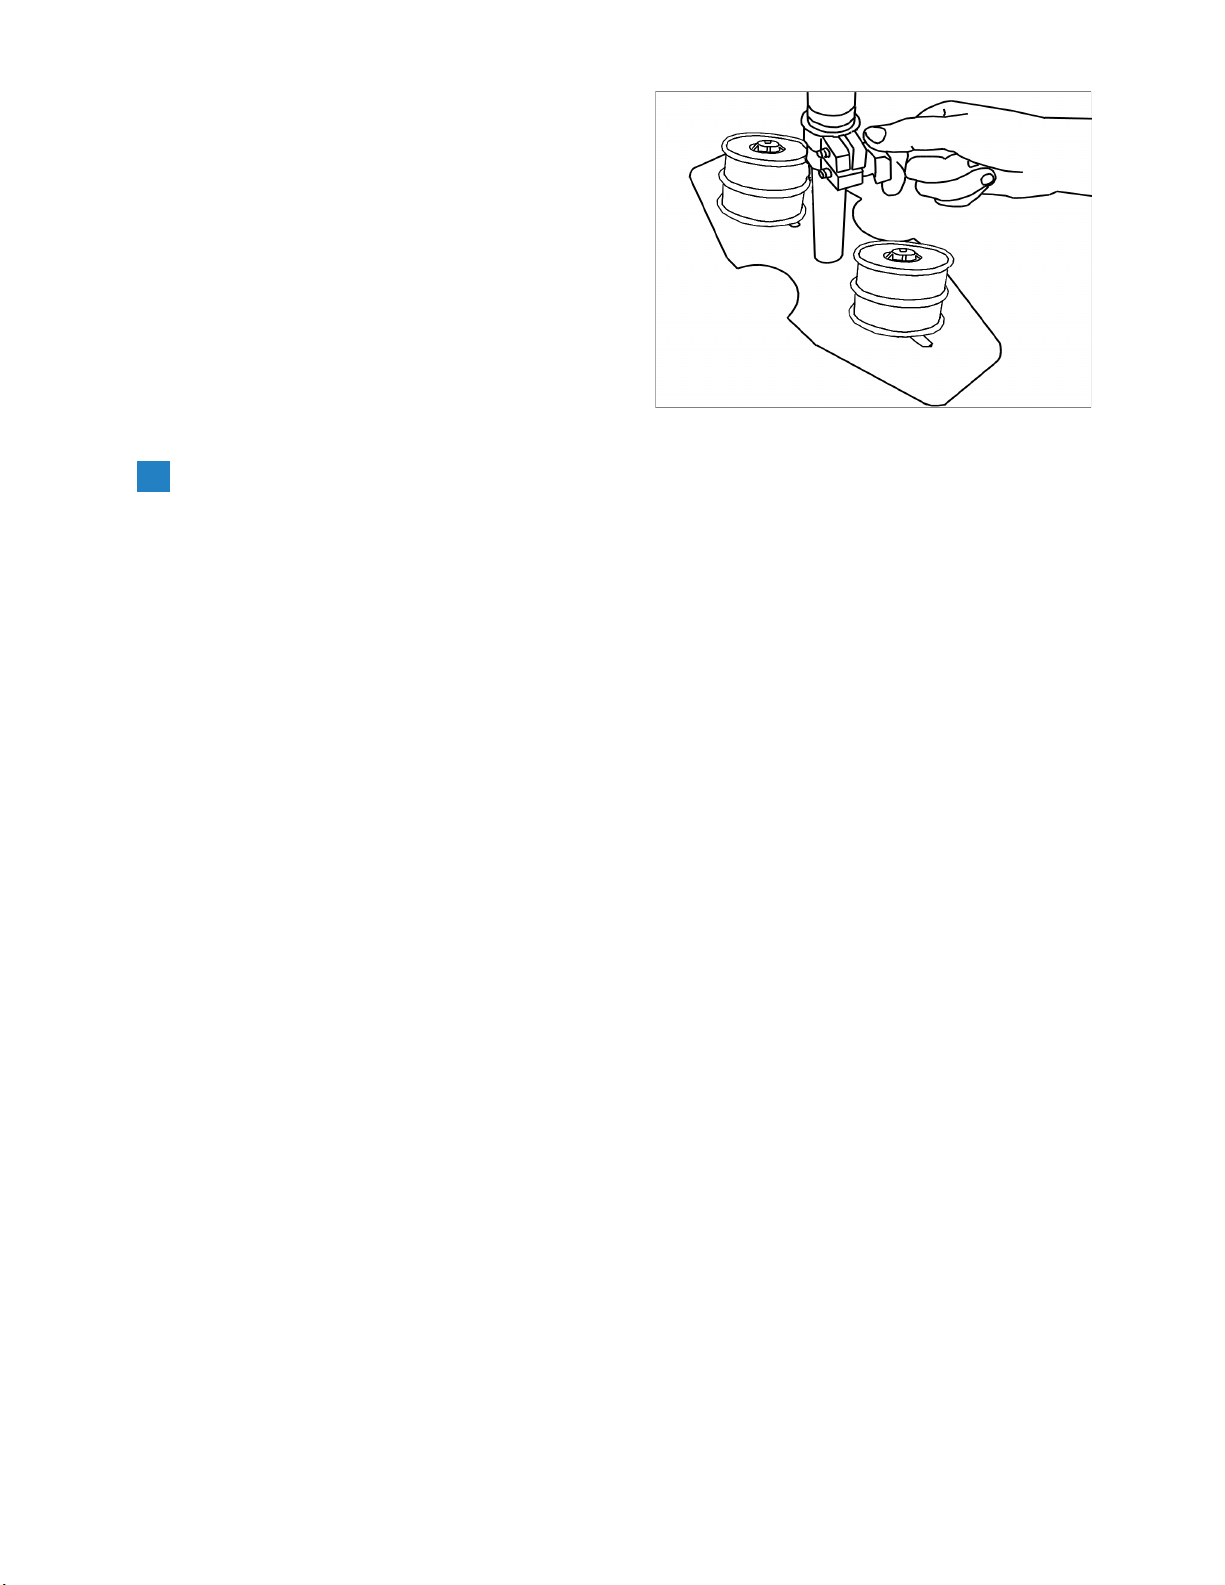
 Weight discs are added successfully.
 All screws are ghtened securely.
 Baery, all accessories and cables should be secured.
Balancing the Horizontal axis
When your ycam junior is properly assembled, you can start the test and setup of the
horizontal balance. Horizontal balance allows the camera to remain level during operaon with
the central post in a vercal posion unless o axis framing is desired.
When tesng for horizontal balance start from a at and level surface like a table. This will allow
the ycam junior to hang freely as you hold it. If your ycam junior is correctly balanced on its
horizontal axis, then it will be both level & upright, with the central post in a perfect vercal
posion.
Warning: If you do not have enough weight on the base plaorm the enre ycam could ip
upside down. Should this movement start to happen be ready to catch the stalk before a
complete 180 occurs. This type of unwanted movement requires more weight to be added to the
base with addional weight discs.
Another way to accomplish horizontal balance is to move the center of gravity of the camera by
re-bolng the camera to a dierent area of the Head and Mid Plate, either front to back or side
to side.
Should the ycam junior be front heavy, loosen the screws on the sides of the head plate and
gently slide the head plate back unl opmum balance is achieved.
Tilng to the back means the load is tail heavy requiring the plate to be adjusted forward on the
head.
10
Always secure the screws aer any adjustments.
If you cannot achieve front to back axis balance with this method, then try remounng your
camera to a dierent hole on the head plate. Having achieved horizontal balance for the front to
back axis, ghten the screws on the Head Plate.
If the ycam junior leans to the right, then loosen the screws on the boom of the boom plate
and then gently slide the Mid Plate to the le. If it leans to the le from the operator’s point of
view, then adjust the Mid Plate to the right. A bit at a me unl balance is achieved.
Secure all parts aer adjustments are made.
It may be necessary to recongure front to back adjustments once correct side-to-side
ne-tuning has been accomplished.
Another opon to consider is moving the counter weight cups back & forth on the base plaorm
by sliding them either closer to or further away from the Center Post via the built in base slots.
Make sure to ghten the cups down should you move them.
Balancing the Vercal Axis
The sled should be ed up to the docking adapter of your stand or similar so that you can start
the fore & a balancing adjustments by centering the camcorder over the central post. To do this
 Loosen the side screws of the head plate and the boom screws of the boom plate.
 Look at the ycam junior from the side. If the camcorder lens is pped up or down, move the
camcorder forward or backwards unl the center of balance is situated over the central
post.
 Then, look at the ycam junior from the front. If the post is not vercal, adjust the boom
plate unl the center post is vercal.
 You can also adjust the weight cups closer to & further away from the sled as per the
requirement ll the post is straight up and down.
Note: The stability of the ycam junior depends on it being slightly boom heavy. If it is top
heavy, it will lt more. If boom heavy, it will be sluggish and hard to aim.
Slightly boom heavy, it will be both stable and easier to control.
Check the vercal balance by using this drop me test
11
A DROP TIME OF 2 - 2.5 SECONDS IS PREFERRED.
Note: Recheck the balance by looking at the sled. If necessary, use the side screws and the boom
plate screws to make required adjustments.
Balancing Review
Proper system balance can only be achieved once your camera is set up with the appropriate
accessories ready for shoong. This means baeries, lenses, media cards, LCD viewnder/
monitor, quick release plate, on-cam lights, and all the gear you will use for your recording
session.
 Remove the top plate of the ycam and line up your camera so that its center of gravity is
as close to the center of the plate as possible (basically hold the camera in your hand unl it
feels balanced both le and right as well as forward and back).
 Find the hole in the plate that is as close to the threaded tripod mount on your camera as
possible (while you are sll holding your camera's center of gravity to the center of the
plate). Aach your camera (or quick release mount if you have one). Tighten it down so it
won't accidentally rotate.
 Re-aach the top plate to the ycam. Center it, but don't worry about geng it absolutely
perfect yet.
 Remove most of the weights from the base plaorm, but leave one on each side.
 Insert the center post as far as it will go and ghten so it won't slide out.
 Hold the handle normally and turn the ycam Junior so that it is horizontal to the ground.
Let go of the stalk while keeping a rm grip on the handle and count how long it takes to
return to vercal again. You should be able to count a good, "One-one thousand, two-one
thousand", before it rights itself. With only two lile weights it might take considerably
longer.
 Make sure that everything is ght and posion yourself behind the stand.
 Grasp the center post near the base and move the center post from vercal to horizontal.
 Hold it there. Be sure that it will not hit the stand when you drop the center post and put
your free hand to catch the center post when it drops.
 Count how many seconds it will take to fall to vercal. Try using a stopwatch.
 If the drop me is less then 2 seconds, it is too boom heavy. You need to move the boom
mass closer to the post.
 If the drop me is more than two seconds, it is top heavy.
12
 Add one pair of weights at a me and repeat the "horizontal to vercal" test unl it falls at
the correct rate. It will probably not be perfect.
 You'll get one that's too slow and then you'll add a pair and it will fall too fast. When that
happens, take o the last pair of weights that you added.
 Tighten down the weights so they don't slide around.
 To get the count perfect, slightly lower the center post that aaches the base plaorm
with the weights unl you get the "one-one thousand, two one thousand" count to the
vercal posion.
 Fine-tune the le-right, forward-backward balance. You will have to go back and forth
between the two direcons to get the balance just right. Loosen the screw sets that allow
the sled to move le and right. Adjust the top plate so that it is centered and ghten down
the screws like you would a re slowly and alternang side to side.
 Repeat for "forward-backward" balancing.
 Check to see if your camera is sing level. If not, repeat the necessary steps unl it does.
 Pracce walking/movements ensuring your body moon is not transmied to your hands
and then the ycam and camera.
When handling your junior one hand holds onto the handle while the other is used to gently
guide the camera in the direcon you wish to shoot and frame the shot.
For normal shoong, hold the handle in the middle.
For shots that require framing the camera up, down or sideways, hold the handle rmly at the
boom.
This will allow the “yoke” part of the gimbal to rotate without hing your hand or knuckles.
HOLDING FLYCAM JUNIOR
13
Maintenance
Bearing Maintenance
The main bearing on your ycam junior is aached to the central post about two inches from
the top. It is of metal construcon and parally enclosed by the bearing assembly.
If aer a period of me your bearings don’t turn smoothly, lubricate with a minimum of light
machine oil. Light lubricang oil can also be used on the Yoke and Handle Bearings. Be sure to
keep oil away from your camera & clean up any over spill.
CLEANING
Do not use solvents or harsh cleaners of any kind on your ycam junior. If the unit becomes
dirty, use a damp so cloth or sponge and a mild detergent to gently clean external parts.
STORAGE
 Should you need to store your ycam junior for a long period of me then place the unit
upright in a dry or low to normal humidity area whenever possible. If you are unable to
nd this kind of environment then we suggest you store the unit in an airght plasc
container or bag.
 Standing the unit upright is preferred as it alleviates stress on the system.
Note: The ycam junior doesn’t work under water, nor is it waterproof. Avoid direct exposure to
rain, water spray or any other harsh environment. Also the bearings are not sand/grit proof and
need to be kept free of these contaminants. Avoid geng dirt or sand in them.
Pracce makes perfect - Walking the line
 Using masking or gaers tape, create a cross mark on a
at and even wall. The mark becomes your framing
center. On the oor leading up to the cross mark, lay a
straight tape line of about 20 feet. Pracce walking the
line, while keeping the cross mark center framed and in
focus. With a bit of eort, dramac uid like
movements will become second nature and provide
producon value to all your set ups.
Pracce this simple exercise to master your ycam junior with professional results.
14
FLYCAM JUNIOR CAMERA STABILIZER
ALL DRESSED UP AND READY TO GO!
(SHOWN WITH OPTIONAL ACCESSORIES)
WARRANTY
We oer a one year warranty for our products from the date of purchase.
We will repair or replace your product, free of charge, in the event of a defect in materials or
crasmanship obtained during normal use or handling based on the user manual. Please note
that we will not cover any shipping costs for returning the product to us. If any VAT or import
dues are applied to the return, we will also charge these costs to the customer.
The warranty does not include, by the way of example, damage caused by products that we do
not supply or from mishandling in transit, accident, misuse, neglect, lack of care of the product ,
or service by anyone other than our company.
We are not liable for incidental or consequenal damages resulng from the use of the unit or
occurring due to any breach of this warranty.
Replacement parts of the product will be provided at nominal cost (covering the cost price of the
replacement parts only) to the customers aer the Warranty Period has expired. We will cover
the complete cost of sending replacement parts within the warranty period. Aer that, Nominal
cost of the product & Actual shipping cost will be charged.
Do not send the unit to us without rst geng a response and geng the approval to send back
the item.
In case of any kind of dissasfacon, we urge you to Contact us immediately and we shall do our
Best to help you out. For any other assistance you can reach us via email.
For any other assistance you can reach us via email.

Other Flycam Camera Accessories manuals

Flycam Flowline Series User manual

Flycam

Flycam Flowline Series User manual

Flycam Vista-II User manual

Flycam

Flycam Vista-II User manual

Flycam buddy flcm-bdy User manual

Flycam

Flycam buddy flcm-bdy User manual

Flycam 5000 PRO User manual

Flycam

Flycam 5000 PRO User manual

Flycam 5000 User manual

Flycam

Flycam 5000 User manual

Flycam Vista-I User manual

Flycam

Flycam Vista-I User manual

Flycam Yoko Steady Stabilizer Support User manual

Flycam

Flycam Yoko Steady Stabilizer Support User manual

Flycam HD-3000 User manual

Flycam

Flycam HD-3000 User manual

Flycam Flowline B-FLCM-FLN-FM User manual

Flycam

Flycam Flowline B-FLCM-FLN-FM User manual

Flycam Flowline Master User manual

Flycam

Flycam Flowline Master User manual

Flycam Flowline B-FLCM-FLN User manual

Flycam

Flycam Flowline B-FLCM-FLN User manual

Flycam FLCMHD-3-QT User manual

Flycam

Flycam FLCMHD-3-QT User manual

Flycam FLCM-FLN-TC User manual

Flycam

Flycam FLCM-FLN-TC User manual

Flycam Flycam 5000 FLCM-5000-Q User manual

Flycam

Flycam Flycam 5000 FLCM-5000-Q User manual

Flycam CMFT-AV User manual

Flycam

Flycam CMFT-AV User manual

Flycam FLCM-PLA-EA User manual

Flycam

Flycam FLCM-PLA-EA User manual

Flycam FLCM-FLN User manual

Flycam

Flycam FLCM-FLN User manual

Flycam FLCM-EDGE-V1 User manual

Flycam

Flycam FLCM-EDGE-V1 User manual

Flycam FLCM-NANO-QR User manual

Flycam

Flycam FLCM-NANO-QR User manual

Flycam Galaxy User manual

Flycam

Flycam Galaxy User manual

Flycam HD-5000 User manual

Flycam

Flycam HD-5000 User manual

Flycam FLCM-AB User manual

Flycam

Flycam FLCM-AB User manual

Flycam FLCM-FLN-CH User manual

Flycam

Flycam FLCM-FLN-CH User manual

Flycam DSLR-NANO-QR-BL User manual

Flycam

Flycam DSLR-NANO-QR-BL User manual

Popular Camera Accessories manuals by other brands

Samsung SHG-120 installation manual

Samsung

Samsung SHG-120 installation manual

Kaiser Fototechnik Tiltall BS-38 operating instructions

Kaiser Fototechnik

Kaiser Fototechnik Tiltall BS-38 operating instructions

Petzl ACCU DUO E65 manual

Petzl

Petzl ACCU DUO E65 manual

Westcott 1888 Setup instructions

Westcott

Westcott 1888 Setup instructions

FreeVision Vilta user manual

FreeVision

FreeVision Vilta user manual

Olympus VF-3 instructions

Olympus

Olympus VF-3 instructions

TBK vision TBK-CFP5/240SH EXT installation instructions

TBK vision

TBK vision TBK-CFP5/240SH EXT installation instructions

Nikon MC-DC1 instruction manual

Nikon

Nikon MC-DC1 instruction manual

Digital Watchdog DWC-WMJUNCW quick start guide

Digital Watchdog

Digital Watchdog DWC-WMJUNCW quick start guide

Panasonic WV-CW7S operating instructions

Panasonic

Panasonic WV-CW7S operating instructions

Bosch GBA 36 V Professional 6.0Ah Hw-D Original instructions

Bosch

Bosch GBA 36 V Professional 6.0Ah Hw-D Original instructions

American Dynamics LIRC0308CS owner's manual

American Dynamics

American Dynamics LIRC0308CS owner's manual

Hama SpotLight Smart 80 operating instructions

Hama

Hama SpotLight Smart 80 operating instructions

PASCO PS-3224 Replacement instructions

PASCO

PASCO PS-3224 Replacement instructions

Aquatica Digital Pro Digital 20062 operating manual

Aquatica Digital

Aquatica Digital Pro Digital 20062 operating manual

Nikon MD-4 instruction manual

Nikon

Nikon MD-4 instruction manual

Manfrotto MKBFR1A4B-BH user manual

Manfrotto

Manfrotto MKBFR1A4B-BH user manual

Sanyo CR23500SE Specifications

Sanyo

Sanyo CR23500SE Specifications

manuals.online logo
manuals.online logoBrands
  • About & Mission
  • Contact us
  • Privacy Policy
  • Terms and Conditions

Copyright 2025 Manuals.Online. All Rights Reserved.