FM Marin Gobius 4 Waste User manual

D
G
I
n
FM Marin
Ljungåsvä
g
302 91 H
a
Sweden
B
e
Q
u
I
n
ocument rel
e
obius, W
a
n
stallatio
n
AB
g
en 2
a
lmstad
e
fore you b
e
1. Pleas
e
1 con
t
for t
h
instr
u
2. Dete
r
place
3. Dete
r
batte
r
u
ick install
a
A
ttac
h
Conn
e
Start
G
Chan
g
Calib
r
Cont
r
T
est
a
Plug i
n
stalling th
e
1. Deci
d
instal
l
You
m
stand
a
2. We s
u
to pla
shoul
d
temp
l
3. Use t
h
4. Conn
conn
e
corre
c
descr
i
5. If yo
u
Wem
a
the c
o
e
ase 3.97,
A
p
a
ste Hold
i
n
Guide
e
gin
e
make sure
t
rol uni
t
(0
9
h
e control u
n
u
ction on h
o
r
mine the b
e
the sensors
r
mine the b
e
r
y 12/24 V
o
a
tion
h
the senso
r
e
ct all parts
G
obius
g
e the defa
u
r
ate when t
h
r
ol the new
s
a
nd run Go
b
n to extern
a
e
panel and
d
e where to
p
l
ed in your
h
m
ay increas
e
a
rd PC net
w
u
ggest that
y
ce the cabl
e
d
be at leas
t
l
ate at page
5
h
e pre-attac
h
ect the pan
e
e
ct the cabl
e
c
tly to the b
i
bed on the
u
want to co
a
, Faria or
o
o
ntrol unit t
o
ril 2014
i
ng Tanks
that no par
t
9
1427), 1 3
M
n
it, cables,
w
o
w to attach
e
st places (
¼
and where
t
e
st way to s
a
o
lts.
r
s to the tan
u
lt settings
h
e tank is e
m
s
ettings
b
ius
a
l instrume
n
connectin
g
p
lace the G
o
h
ead/show
e
e
the length
w
ork Cat 5
c
y
ou make a
s
e
from the p
t
4 mm x 22
5
.
h
ed adhesi
v
e
l and the s
e
e
s to the bat
t
attery
(
+
i
s
w
control uni
t
nnect Gobi
u
o
thers, you s
o
gether wit
h
, version
3
P
h
E-
m
w
w
t
is missing.
M
cleaning t
o
w
arranty sta
t
the sensors
¼
-, ½- and
¾
t
o place the
a
fely access
e
k
m
pt
y
n
t , lamp or
b
g
the syste
m
o
bius panel
.
e
r or near y
o
of the pane
l
c
able.
s
mall rectan
anel to the
c
mm. Pleas
e
v
e to fasten
t
e
nsors to th
e
t
ery. Make
s
w
hite and
–
t
. Please see
u
s to an ext
hould use t
h
h
the enclos
3
.0
h
one +46 31
-
m
ail info@f
m
w
w.fmmarin.se
(3 sensors,
o
wel, 1 Velc
t
ement and
i
.
¾
-level) on
y
panel.
e
lectricity f
r
b
uzzer
m
.
It can for
i
o
ur waste h
o
l
cable up t
o
gle hole wh
e
c
ontrol unit
.
e
see the en
c
t
he panel to
e
control u
n
s
ure to con
n
–
i
s black), a
s
the illustra
t
ernal displa
y
h
e analogue
ed cable.
-
65 01 70
m
marin.se
1 panel,
ro fastenin
g
i
nstallation
y
our tank t
o
r
om your
i
nstance be
o
lding tank.
o
50 m
w
ith
e
re you wa
n
.
The hole
c
losed hole
the wall.
n
it. Then
n
ect + and
–
s
also
t
ion at page
y
from VD
O
output on
g
o
a
n
t
–
5.
O
,

W
o
x
el
e
c
o
h
o
c
o
A
t
S
t
s
e
la
t
c
a
K
t
h
C
o
(
a
C
o
T
h
(I
f
u
si
m
F
i
T
m
I
f
c
o
la
m
F
o
Y
I
f
y
se
r
c
h
C
h
G
r
e
b
e
c
h
d
o
wi
p
a
Y
p
a
t
h
y
o
y
o
W
e recomme
x
idation, on
e
ctronics o
f
o
ntrol unit
d
o
w
t
o make
o
nnect your
t
taching th
e
t
art by readi
n
e
nsors to th
e
t
est news.
T
a
lculate the
r
K
eep in min
d
h
erefore mu
s
o
ntrol of se
a
nd possibl
e
o
nnect the
C
h
en as Gob
i
f Gobius d
o
u
nction con
t
m
ultaneous
l
i
nally the r
e
his means
m
ay move o
n
f
there shou
l
o
nnection o
r
m
p on the
p
o
r further i
n
ou must a
c
fy
ou suspect t
h
r
vice by email
,
h
arge.
h
ange of d
e
G
obius is ma
e
quirements
.
e
tween mea
s
h
oice. You
w
o
cumentati
o
i
ll need to c
a
ge 7.
ou change t
a
nel. Gobiu
s
h
e table on
p
o
u have ma
d
o
u want.
nd that you
the plugs t
h
f
the produ
c
d
o not resis
t
Gobius wa
t
Gobius via
e
sensors t
o
n
g through
e
tank on le
v
T
here is also
r
ight levels
t
d
that the se
n
s
t be handl
e
nsors and
p
e
change o
f
C
ontrol Un
i
i
us
i
s starti
n
o
esn’t start
p
t
rol of the s
e
l
y with the
b
e
d, yellow
a
that Gobi
u
n
to the ne
x
l
d be a pro
b
r
with the s
e
p
anel showi
n
n
formation,
c
t on this b
e
h
at the system
,
support@f
m
e
fault settin
de to be op
t
.
There are
d
s
urings and
w
ill find the
o
n. If these
a
hange the
m
he settings
b
s
automatic
a
p
age 7. Rele
a
d
e a new set
put a layer
h
at are con
n
c
t are protec
t
water. Plea
t
erproof. F
u
a 500 mA
f
o
the tank
the green
d
v
els ¼, ½ a
n
Tank Calc
u
t
o put the s
e
n
sors are se
n
e
d carefully.
p
anel befor
e
f
default se
t
i
t to the po
w
n
g all lamps
a
p
ress the
e
nsors is ca
r
b
lue lamp.
a
nd green
l
u
s has not
y
x
t step.
b
lem with o
n
e
nsor itself,
n
g a steady
l
please see t
h
e
fore proc
e
does not func
t
m
marin.s
e
or b
y
gs
t
imized for
y
d
ifferences
i
connecting
default sett
i
a
re not in a
c
m
. You will f
i
b
y pressing
a
lly flicks th
r
a
se the butt
o
ting. Repea
t
2
of Vaseline
,
n
ected to th
e
ted from d
a
se contact
F
u
rthermore,
f
use.
d
ocument b
e
n
d ¾. Pleas
e
u
lator for m
a
e
nsors on t
h
n
sitive to p
h
e
calibrati
n
t
tings)
w
er source
a
a
re lit, one
a
button on
t
r
ried out an
d
l
amp will s
h
y
et been ca
l
n
e of the se
n
this is illust
r
l
ight togeth
e
h
e “table o
f
e
eding wit
h
t
ion correctly,
p
y
phone. The
s
y
our uniqu
e
i
n tank mat
e
an extra ga
u
i
ngs of Go
b
c
cordance
w
i
nd the avai
l
and holdin
g
r
ough the a
l
o
n when yo
u
t
this until y
o
,
which pre
v
e
control u
n
a
mp. The se
n
F
M Marin f
o
we recom
m
e
fore attach
i
e
visit
w
ww
.
a
king its eas
h
e tank wall.
h
ysical shoc
k
n
g the tank
a
nd turn the
a
fter anothe
r
t
he panel).
A
d
each lamp
h
ow a stea
d
l
ibrated an
d
n
sors, either
r
ated by the
e
r with the
b
f
lights” at p
h
the instal
l
p
lease contact
s
upport servic
e
e
tank and y
o
e
rial, appro
p
u
ge alternat
i
b
ius on page
w
ith your re
q
l
able option
g
the but
t
l
ternatives
a
u
r choice is
o
u have ma
d
v
ents
n
it. The
n
sors and t
h
o
r advise on
m
end that yo
u
i
ng the
.
gobius.se f
o
ier for you
t
k
and
power on.
r
, once.
A
fter this a
will flash
d
y light.
d
that you
with the
respondin
g
b
lue lamp.
age 6.
l
ation.
our support
e
is f
r
ee of
o
ur
p
riate interv
a
i
ve of your
7 of this
q
uirements
y
s in the tabl
t
on on the
a
s presented
shown. Th
e
d
e the chan
g
h
e
u
o
r
t
o
g
a
l
y
ou
l
e on
in
e
reby
g
es

B
y
m
A
t
h
N
c
a
S
e
E
s
e
t
h
fr
C
a
N
c
o
h
a
To
e
m
C
C
1. Leav
e
2. With
a
3. Press
show
n
4. Relea
s
5. Repe
a
y
keeping t
h
m
ay flick thr
o
wrongly c
h
h
us correcti
n
N
.B!!! If you
a
libration.
e
ttings co
n
ach and ev
e
e
ttings are p
r
h
e table on
p
om an exte
r
a
libration
–
N
o tanks are
o
nstruction
a
a
ve to calib
r
o
start the
c
m
pty.
alibration
d
1. Start
b
2. Start
G
3. Press
4. Relea
s
5.
T
he
c
6. Whe
n
alibration
a
2. Whe
n
3. Wait
u
4. Once
5.
T
he
c
6. Whe
n
e
Gobius on
a
pen, mak
e
and hold t
h
n
in the pan
s
e the butto
a
t this until
y
h
e butto
n
o
ugh all alte
r
h
osen settin
g
n
g the settin
g
change the
n
trol
e
ry time you
r
esented by
p
age 7.
T
his
r
nal source.
–
your wast
e
the same; t
h
a
nd age. In
r
ate the syst
e
c
alibration, s
d
uring ins
t
b
y draining
G
obius and
and hold t
h
s
e the butt
o
c
alibration s
t
n
the blue li
g
a
t a later d
n
Gobius is
o
u
ntil all ligh
t
the lights a
r
c
alibration s
t
n
the blue li
g
e
notes in th
h
e butto
n
el
n to make
y
y
ou have m
a
n
pressed u
n
r
natives wit
h
g
is correcte
d
g
.
tank mater
i
turn off G
o
colour co
m
will not ha
p
e
holding t
a
h
ere are alw
a
order to co
m
e
m before
y
tart by mak
i
t
allation
the tank
wait for th
e
h
e butto
n
o
n as soon a
s
t
arts autom
a
g
ht is on th
e
ate
o
n, press th
e
t
s are on
r
e on, relea
s
t
arts autom
a
g
ht is on th
e
3
e table of t
h
n
until the c
h
y
our choice
a
a
de the cha
n
n
til all altern
a
h
out makin
g
d
by repeati
n
i
al setting, y
o
o
bius using
t
m
binations o
n
p
pen when
y
a
nk must b
e
a
ys differen
c
m
pensate f
o
y
ou start to
u
i
n
g
sure tha
e
red, yello
w
n
until all lig
h
s
the lights
a
a
tically and
t
e
calibration
e
button
s
e the butto
n
a
tically and
t
e
calibration
h
e changes
y
h
osen rows’
a
settin
g
n
ges you w
a
a
tives are p
a
g
any chang
e
n
g the proc
e
o
u will nee
d
t
he butt
o
n
the panel
y
ou turn of
f
e
empty
c
es in e.g. s
i
o
r these diff
e
u
se your G
o
t
your tank
i
w
and green
l
h
ts are on
a
re on
t
akes aroun
d
is done
and hold
n
t
akes aroun
d
is done
y
ou need to
colours are
a
n
t
a
ssed, you
e
of setting
s
e
dure and
d
to redo th
e
o
n, your
according t
o
f
Gobius
i
ze, thickne
s
e
rences you
o
bius.
i
s complete
l
l
ights
d
30 second
d
30 second
do
s
.
e
o
s
s,
l
y
s
s

A
It
s
h
t
o
O
i
n
t
h
i
n
t
o
E
x
I
n
b
u
k
n
p
l
F
i
I
f
t
o
2
Y
s
w
la
m
t
h
D
t
h
t
h
c
o
Y
o
f
wi
r
e
p
e
G
o
E
W
m
u
n
e
s
Th
d
i
c
h
t
o
G
o
Th
t
h
nalog inst
r
is possible
t
h
ow the tan
k
o
choose be
t
O
n page 8 y
o
n
strument t
o
h
e delivery,
i
n
strument w
i
o
use this wi
t
x
tra lamp/
b
n
addition t
o
u
zzer to gi
ve
n
ow when t
h
l
ug in this a
d
i
nally
f
possible, p
l
o
verify that
different w
a
ou start Go
b
w
itching on
m
ps and se
n
h
e level is m
e
D
uring the
m
h
e sensors.
T
h
e result is i
m
o
rrespondin
g
ou turn off
f
f the curre
n
i
ll memoriz
e
e
do the cali
b
e
riod of tim
e
o
bius tech
n
ach sensor
c
W
hen the sh
a
m
easures the
n
it. The co
n
s
timate of
w
h
e sensors
a
i
fferent mat
e
h
anging ove
r
o
redo the c
a
o
bius requi
h
e construc
t
h
e sensors a
r
r
ument
t
o plug in a
n
k
level. In t
h
t
ween depe
n
o
u will find
a
o
Gobius’ c
o
i
s intended
f
i
th cables al
t
h Gobius.
b
uzze
r
o
the Gobiu
s
e
a warning
h
e tank is e
m
d
ditional su
r
l
ease finaliz
e
Gobius wo
r
a
ys of turni
b
ius by a q
u
the power
f
n
sors is im
m
e
asured an
d
m
easuring yo
T
hereafter a
m
mediately
p
g
to the rig
h
Gobius by
a
n
t from an
e
e
all setting
s
b
ration due
t
e
.
n
ology (pat
e
c
onsists of
t
a
ker creates
size of the
v
n
trol unit th
e
w
hether the l
i
a
re set to de
t
e
rials and t
h
r
time (e.g.
d
a
libration a
c
res no extr
a
t
ion of Go
b
r
e never in
d
n
analog ins
h
e table on
p
n
ding on pr
o
a
n illustratio
o
ntrol unit.
T
f
or this pur
p
ready instal
l
s
panel you
w
hen the t
a
m
pty.
T
he il
l
r
veillance.
e
the install
a
r
ks accordi
n
ng Gobius
o
u
ick push o
n
f
rom an ext
e
m
ediately pe
r
d
the correc
t
u may hear
calculation
p
resented b
h
t level.
a
quick pus
h
e
xternal sou
r
s
and the ca
l
t
o the powe
r
e
nted)
t
wo active p
a
a vibration
i
v
ibration a
n
e
n starts to
c
i
quid level
h
t
ect liquid l
e
h
icknesses. I
d
ue to poss
i
c
cording to
t
a
maintena
b
ius has ma
n
d
irect conta
c
4
trument as
a
p
age 7 you
w
o
duct and s
t
n showing
h
T
he extra c
a
p
ose. We as
s
l
ed in your
v
may want t
o
a
nk is full.
Y
l
ustration o
n
a
tion by refi
l
n
g to your r
e
o
n and off
G
n
the panel’
s
e
rnal source
.
r
formed. W
h
t
lamp is lit.
a soft hum
m
is performe
y the lighti
n
h
on the
r
ce. When
G
l
ibration. I.
e
r
being tur
n
a
rts; a shak
e
i
n the tank
w
n
d passes th
e
c
alculate in
o
h
as passed t
h
e
vels throu
g
f the tank’s
i
ble contam
i
t
he above i
n
nce
n
y advantag
e
c
t with liqui
d
a
n alternati
v
w
ill find thr
e
t
andard.
h
ow to plug
a
ble, which
i
s
ume that y
o
v
essel and t
h
o
plug in a l
a
Y
ou may als
o
n
page 8 sh
o
l
ling the ta
n
e
quirements
G
obius
s
button
o
.
A functio
n
h
en the co
n
m
ing sound
d in the co
n
n
g of the la
m
button or b
y
G
obius is tu
r
e
. you will n
o
n
ed off for a
e
r and an ac
c
w
all, the ac
c
e
data on to
o
rder to giv
e
h
e sensor o
r
g
h tank wall
s
wall thickn
e
i
nation), yo
u
n
structions.
e
s. For inst
a
d
inside the
v
e way to
e
e alternativ
e
in the
i
s enclosed i
o
u have an
h
at you wis
h
a
mp or
o
want to
o
ws how to
n
k with liqui
d
.
o
r by
n
control on
n
trol is done
from each
o
n
trol unit an
m
p
y
switching
r
ned off it
o
t need to
lengthy
c
elerator.
c
elerator
the control
e
an exact
r
not.
s
that are of
e
ss is
u
may need
a
nce, since
tank, they
e
s
n
h
d
o
f
d

wi
l
o
G
S
y
P
l
(I
f
r
e
It
w
i
ll not beco
m
o
w electricit
y
G
obius does
y
stem Illus
t
l
ug from co
f
you connect
e
d lam
p
on th
e
w
ill no
t
dam
a
m
e worn o
u
y
consumpt
i
no
t
require
t
ration
ntrol unit t
o
th
e
panel wi
r
e
panel will c
o
a
ge th
e
produ
c
u
t. Another
p
i
on, which i
s
any extra
m
o
the panel
re
wrong way
o
nstantly lig
ht
c
t.
)
5
p
ositive asp
e
s
less than
4
m
aintenance.
th
e
ht
.
e
ct of Gobi
u
4
0 mA (12
V
Attac
h
u
s is its
V
olts).
h
ing senso
r
r
s to the ta
n
n
k
T
a
L
●
a
ble of li
g
L
amp
Red
L
a
Ye
●
○
○
☼
○
○
○
☼
○
○
○
●
○
○
●
○
●
●
●
☼
●
= light
g
hts – wh
a
a
mp
e
llo
w
La
m
Gr
e
●
●
○
☼
☼
○
○
○
○
○
○
☼
☼
○
○
○
○
○
○
●
●
○
○
○
○
●
●
○
○
○
●
●
○
●
●
○
●
●
☼
☼
○= no li
g
a
t the lam
p
m
p
e
en
La
m
Bl
u
●
○
☼
☼
○
☼
○
☼
○
☼
☼
○
○
○
○
○
○
●
●
○
○
○
○
○
●
●
○
●
○
●
●
●
●
●
○
●
●
●
☼
○
g
h
t
☼=
f
6
p
s on the
m
p
u
e Expla
n
At deli
v
Gobiu
s
☼
When
s
T
est o
f
☼
T
est o
f
☼
T
est o
f
☼
When
m
T
ank l
e
T
ank l
e
T
ank l
e
T
ank l
e
After
m
Tank
i
T
ank l
e
T
ank l
e
T
ank l
e
Senso
r
1/4-se
n
1/2-se
n
3/4-se
n
1/4-se
n
1/4-se
n
1/2-se
n
No se
n
When
c
Gobiu
s
f
lashing ligh
t
panel sh
o
n
ation
v
ery
s
is not yet c
a
s
tarting
f
the ¼-sens
o
f
the ½-sens
o
f
the 3/4-sen
m
easuring
e
vel 0
e
vel 1/4
e
vel 1/2
e
vel 3/4
m
easuring
i
s empty
e
vel 1/4
e
vel 1/2
e
vel 3/4
r
errors
n
sor not fun
c
n
sor not fun
c
n
sor not fun
c
n
sor and 1/
2
n
sor and 3/
4
n
sor and 3/
4
n
sors functio
n
c
alibrating
s
is calibrati
n
t
o
w
a
librated
o
r
o
r
sor
c
tionin
g
c
tionin
g
c
tionin
g
2
-sensor not
f
4
-sensor not
f
4
-sensor not
f
n
in
g
n
g
f
unctionin
g
f
unctionin
g
f
unctionin
g

I
n
M
y
c
h
O
L
n
dicators
i
M
ark
y
our
h
oose
La
m
R
e
●
○
D
○
○
○
●
●
●
D
●
●
D
●
●
○
D = Defaul
t
O
utput cur
L
evel
I
4
-
0
1/4
1/2
3/4
i
n Setup
M
m
p
e
d
La
m
Yell
o
●
●
○
●
○
●
○
●
○
●
●
○
●
○
●
○
●
○
●
●
●
●
●
●
○
○
t
setting ●
=
rent/resis
t
I
ndustrial s
-
20 mA cur
r
6 m
A
10 m
A
14 m
A
18 m
A
M
ode
m
p
o
w
Lamp
Gree
n
●
○
○
●
●
○
○
●
●
○
○
●
○
=
light ○=
n
t
ance to
g
O
u
tandard
r
ent loop
A
A
A
A
7
n
Lamp
Blue
●
○
●
○
●
○
●
○
●
○
●
○
○
n
o light
g
auge
u
tput curr
e
Europe
a
10
-
2
6
1
1
Duration
in seconds
5 s
5 s
5 s
5 s
5 s
5 s
5 s
5 s
5 s
5 s
5 s
5 s
N/A
e
nt/resista
n
a
n standar
d
-
180 Ω
2
3 Ω
6
8 Ω
12 Ω
58 Ω
Descript
i
Calibrati
o
Measure
m
Measure
m
Measure
m
Measure
m
(installati
T
ank in
p
fibre glas
T
ank in
p
T
ank in
s
Tank in
s
steel 2 -
3
Gauge 4
Gauge 1
0
Gauge 2
4
T
he setu
p
w
ithout
c
n
ce
d
U
S
2
i
on
o
n
m
ent perio
d
m
ent perio
d
m
ent perio
d
m
ent perio
d
on mode)
p
lastic 5 - 1
0
s 4 - 8 mm
p
lastic 2 - 5
m
s
tainless ste
e
s
teel 2 - 3 m
3
mm, alum
i
- 20 mA, I
n
0
- 180 Ω,
E
4
0 - 33 Ω,
U
p
mode will
c
hanging an
y
S
standard
40 - 33 Ω
214 Ω
161 Ω
109 Ω
56 Ω
d
1 minute
d
5 minutes
d
10 minute
s
d
10 second
s
0
mm,
m
m
e
l 1 ->2 m
m
m, stainless
i
num 3 - 5
m
n
dustrial Std
E
uropean St
d
U
S Std
be exited
y
parameter
s
s
m
m
m
d
s.
E
A
Pl
e
ga
at
E
x
P
www.
f
lectrical
s
Su
p
Su
p
Lamp d
r
A
nalogu
(Ga
u
M
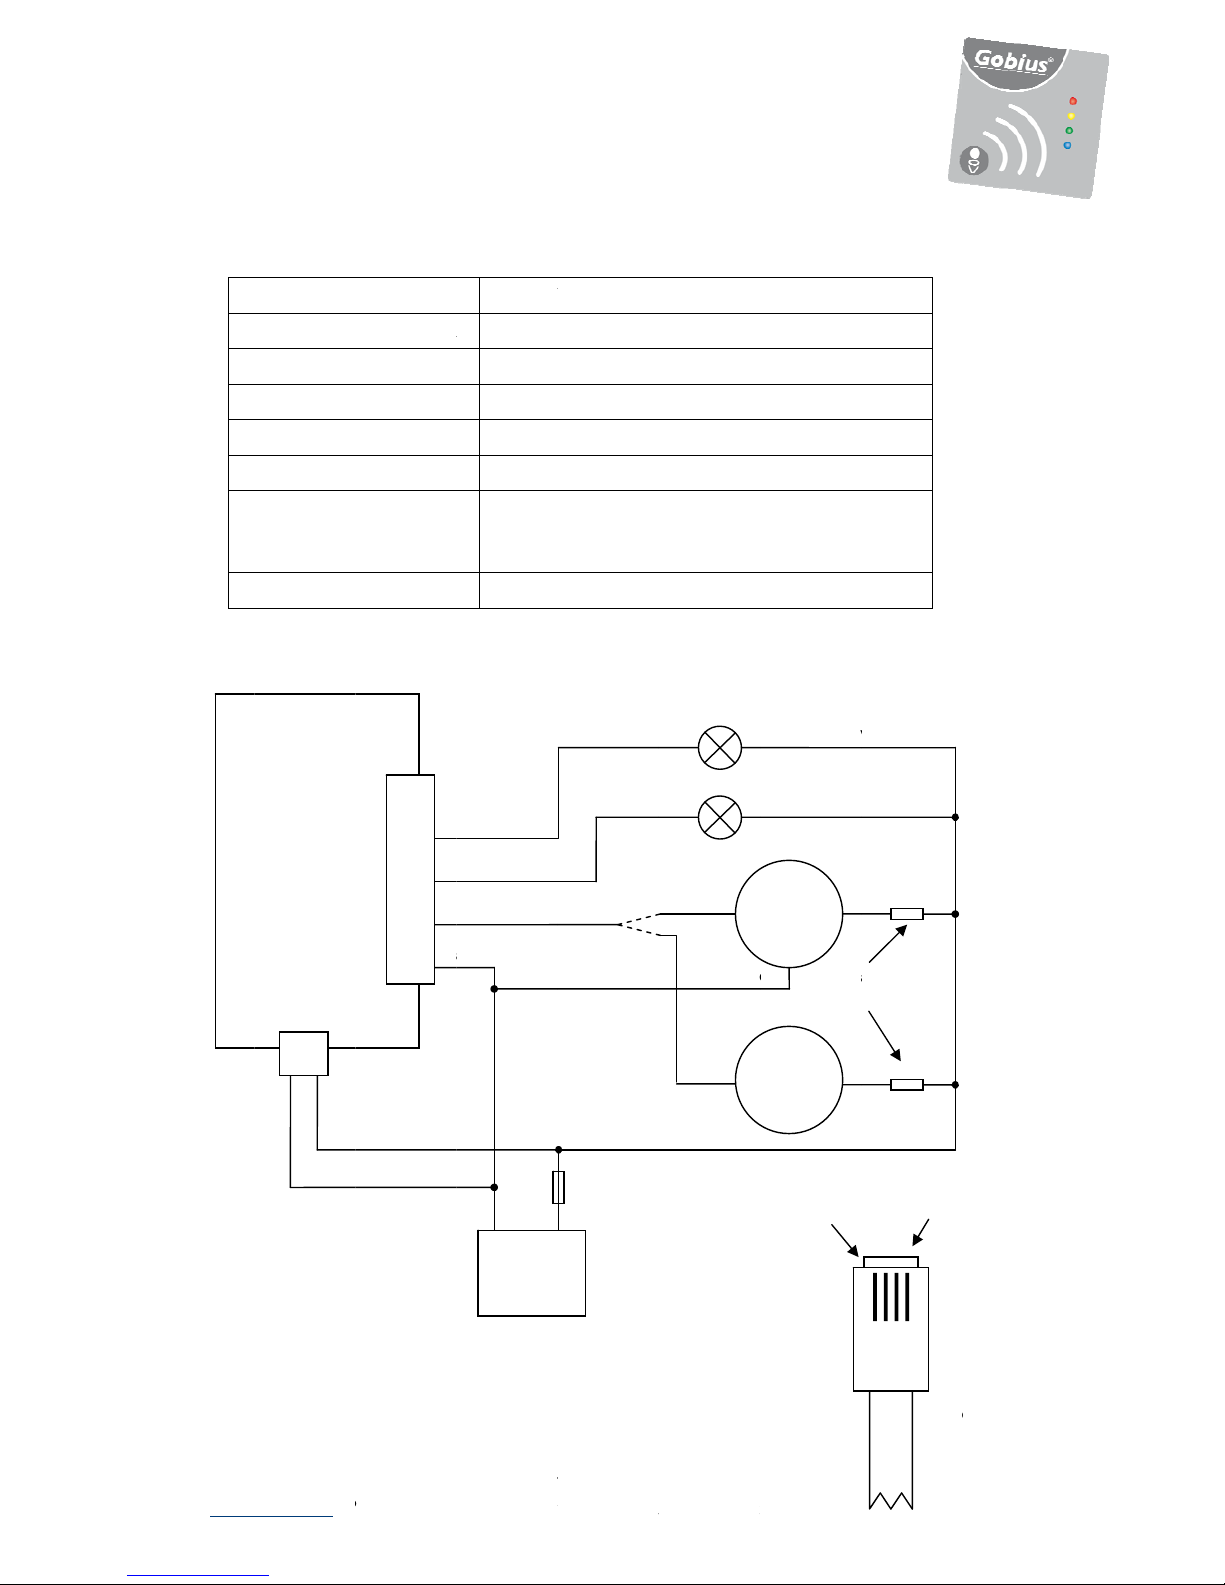
Control
U
nalog outp
u
Power inp
u
e
ase note th
a
uge can be
c
the same ti
m
W
B
x
ternal in
t
T
h
P
lease do no
t
f
mmarin.s
e
,
P
s
pecificati
p
ply Voltag
e
p
ply Curre
n
r
iver output
s
Max. voltag
e
Max. curre
n
e Instrume
n
u
ge) Output
s
M
ax. voltag
e
U
nit
u
t
u
t
1
2
3
4
Ye
R
e
G
r
Bl
a
a
t only one
c
onnected
m
e.
W
hite/Grey
B
lack
t
erfaces
h
ank you fo
t
forget to r
P
roduct
s
, in o
r
on
e
: 10 ~ 29
V
n
t: 200 mA
40 mA
m
s
:
e
: 29 V D
C
n
t: 200 mA
n
t
s
:
Industri
a
Europea
US stan
d
e
: 29V DC
-
Batter
y
12/24
V
e
llow
e
d
r
een
a
ck
r choosing
G
egister you
r
r
der to recei
v
8
V
DC
maximum (
O
m
aximum (Id
l
C
a
l standard, 4
n standard 1
0
d
ard 240-33
Ω
.
+
y
V
Fuse,
500
mA
G
obius!
r
Gobius pr
o
v
e free tec
h
O
perating)
l
e)
-20 mA curr
e
0
-180 Ω
Ω
In
d
4
-
E
s
Blu
e
Black
o
ducts on
h
nical suppo
r
e
nt loop
Gauge
d
ustry std
4
-20 mA
1 Yello
w
+
Gauge
E
Gauge
E
ur. or US
s
tandard.
R
e
Option
a
for 24
V
Lamp 1, full le
v
Lamp 2, unde
r
rt
1 Yell
o
2 Gre
e
3 Red
4 Bla
c
w
4 Bla
c
+
ed
a
l resistor
V
olts system
v
el
r
¼ level
o
w
e
n
c
k
c
k
Table of contents
Other FM Marin Measuring Instrument manuals

Popular Measuring Instrument manuals by other brands

White Lightning
White Lightning M1435-EXP Operator's manual

Pulsar
Pulsar FlowPulse Handheld instruction manual

Dwyer Instruments
Dwyer Instruments LUX-01 Installation and operating instructions

SATO KEIRYOKI
SATO KEIRYOKI 7720-00 instruction manual
Locus Solutions
Locus Solutions GO Tracker 1.3 user manual

Convergent
Convergent Convergys X5 user manual


