FoamFly Pelican Seaplane User manual

TM
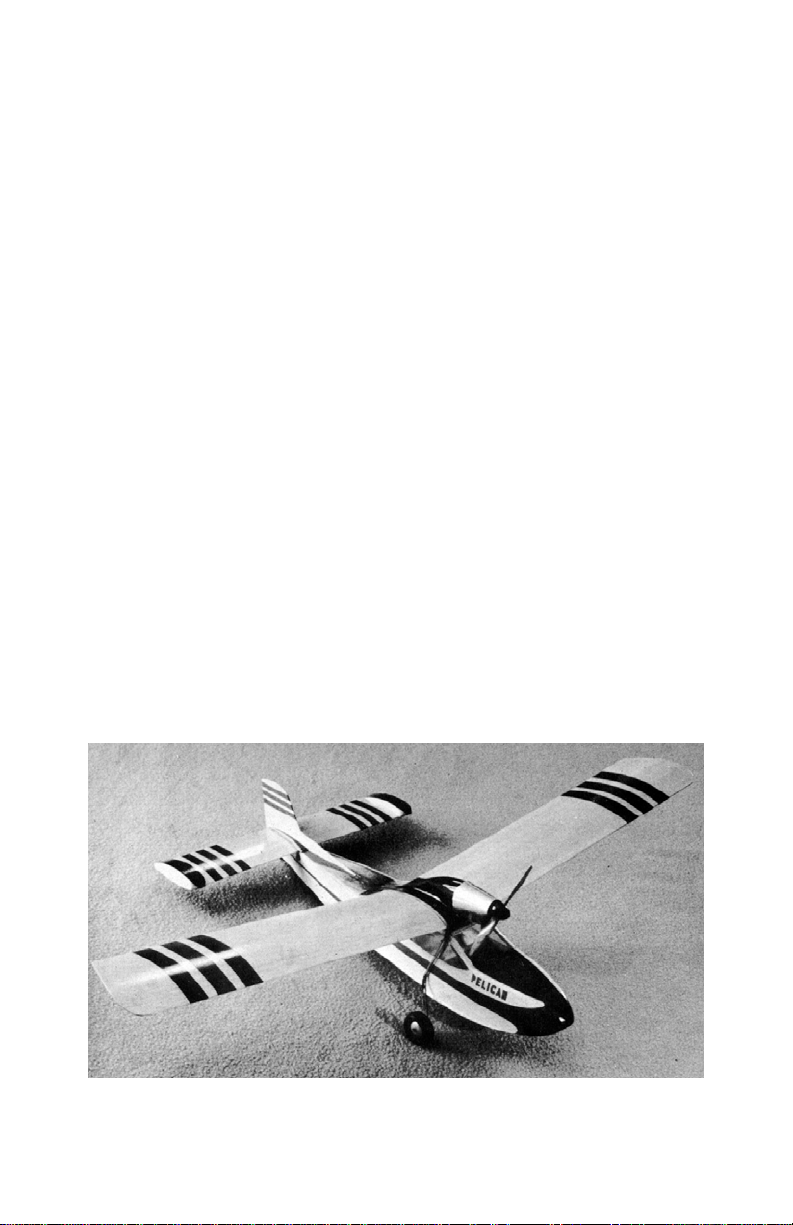
Pelican Seaplane
Instruction Manual
Electric Foam Parkflyer with “Slot and Groove” construction.
Designed By: Daniel J. Schwartz
Available Exclusively from:
www.FoamFly.com
4077 WoodCreek Dr.
Ypsilanti MI. 48197
USA
© 2004 FoamFly.com
©2004 FoamFly.com 2
Thank You for purchasing the FoamFly Pelican! Welcome to the
world of simple, durable foam flying machines. The Pelican is sure to thrill, with
its sleek styling, and old-timer flair. This plane is suitable for beginners, but it is
recommended that new pilots get the help of an instructor to trim their plane, and
help with the first flights.
Almost anybody can fly the Pelican. It’s as easy to build, and more
durable than pre-fab planes that you might find at the hobby shop. But you build
this yourself. In addition to the well earned pride, you’ll have a complete
understanding of the structure, and if it should ever need repair, you’ll be able to
do it yourself without costly replacement wings and cowlings.
The “Slot and Groove” construction makes the plane quick and easy to
assemble. All the pieces are specially designed to interlock, and are computer
cut so that they fit perfectly every time.
Pelican Specs:
•WingSpan: 42”
•Length: 25” (26.5” Including Prop and Spinner)
•Wing Area: 268 Square Inches (1.86 Sq. Ft.)
•Ready To Fly Weight 10.6 Oz.
•Motor: GWS EPS-300c “2S” (2.80:1 Gear Ratio)
•Propeller: 7x6
•Batteries: 2-cell 1200mAh Lithium Polymer, or 7 cell
300mAh NiMHs.
•Receiver: GWS R4P (4 Channel)
•Servos: GWS Pico (or Hitec HS-50)
•ESC: GWS ICS-300 (8-Amp Speed Control)
The Pelican was Inspired by 1952 Balsa Freeflight design from one of the original
masters, Ken Willard. The construction may be all new, but the styling is classic.

3
Introduction:
FoamFly.com is more than just a hobby company. It’s a community too!
Please take pictures and video of your Pelican, and upload them to the photo
gallery. Feel free to drop by and see what all the other foam junkies have been
building. There are free plans, and lot’s of tips and ideas as well as unique new
planes that you won’t find anywhere else.
Okay, you’ve got your Pelican kit in front of you, and you’re ready to cruise
the skies. Only problem: the plane is lying in pieces in front of you. Well we can
take care of that too. There’s some techniques you’ll need to be familiar with to
make the most of your kit. I’ll refer to them as they’re needed, but the details of
those techniques will be in the Appendix at the end of this manual.
Let’s begin. Don’t let all the text in this manual scare you. Take each
step taken one at time, and you’ll find that everything is within your capabilities.
Here we go.
1) Identify all the parts:
You’ll need to know which part is which, unless you want to end up with the
flying equivalent of Frankenstein’s Monster. So, let’s start by taking a look at
what you’ve got here.
a) Foam Airplane Parts:
(1) Fuselage halves (Left and Right)
(2) Fuselage Top
(3) Fuselage Bottom
(4) Fuselage Front
(5) Horizontal Stabilizer
(6) Wings (Left and Right)
(7) Parts Sheet A
(a) Motor Pylon Centers
(b) Motor Pylon Sides
(c) Elevator Halves
(d) Tip Float Sections (10)
(e) Tip Float Caps (2)
(8) Parts Sheet B
(a) Wing Ribs (8)
(b) Formers (5)
(c) Vertical Stabilizer
(d) Rudder
(e) Dihedral Braces (2 Front and Rear)
(f) Battery Hatch
(g) Keel
(9) Wheel Parts Sheet
(a) Wheel halves (4)
(b) Wheel Spacers (4)

©2004 FoamFly.com 4
And of course even a foam plane needs a few odds and ends to tie everything
together. Take a few moments to inspect what you’ve got here. As the items are
called for you’ll get more info on their intended uses.
b) Non-Foam Parts:
i) Bamboo Skewers (2)
ii) Wood Motor Mount
iii) Laser Cut Control Horns
iv) Wood Wing Reinforcement
v) Du-Bro Pushrod Connectors
vi) Rubber Bands
vii) .032” Wire pushrods
viii) Elevator Joiner Wire
ix) .055” Landing Gear Wire
x) Foam Tire material
xi) Aluminum Wheel hubs
You’ll need a few miscellaneous items to complete your plane, see the
appendix for a list.
Now we get to begin the process. You’ll notice that some of the parts are
attached together on the “parts sheets.” Before you can use any of these
you’ll need to cut them free. Using your razor knife, slice through the tabs
and free the parts.
Note: I recommend you test fit the parts at each step before applying glue…
5
1) Fuselage:
a) Before gluing the fuselage, pre-bend the front where it will form the
nose. Using the PVC Pipe, gently roll the nose inwards from the
windshield forward. The exact curve isn’t critical at this point. You just
want to take “some of the fight” out of it.
b) Cut or sand a taper on the inside edges of the rear of the fuselage
halve. Starting at a point about 1/2” in, and taper until the rear edge is
razor thin.
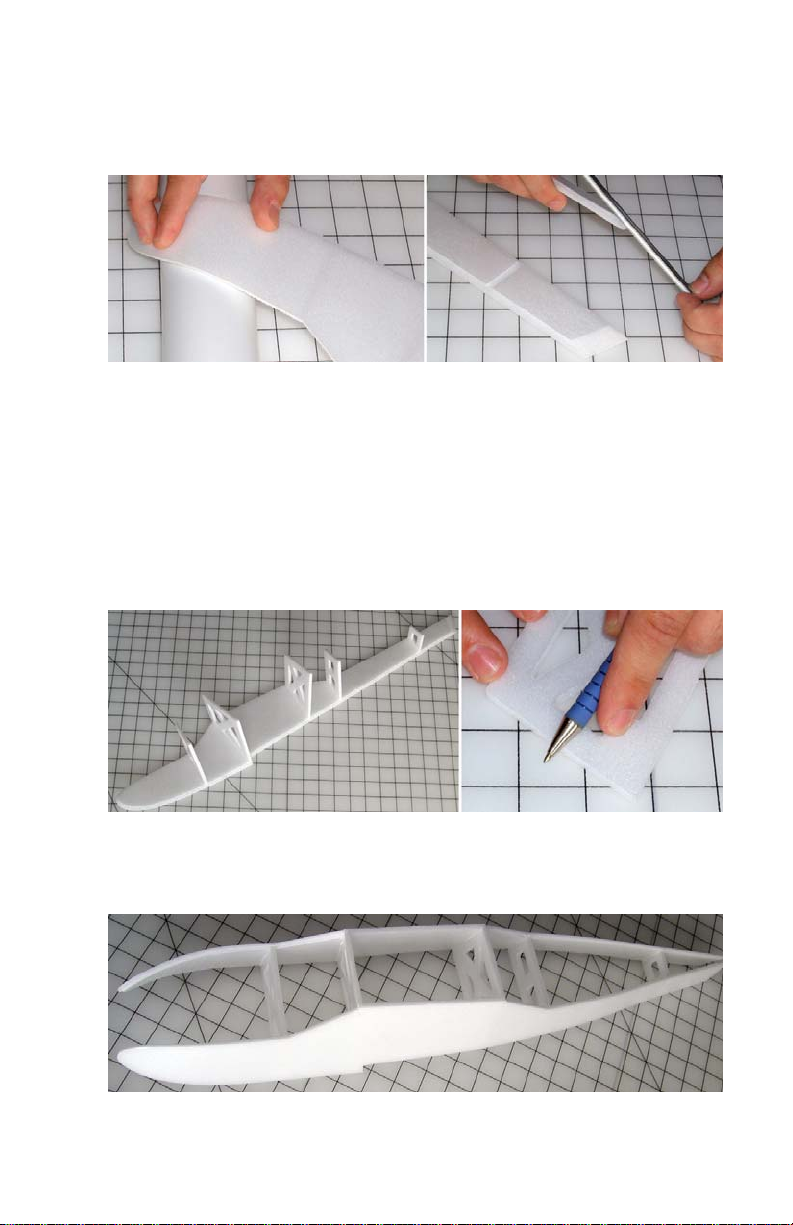
c) Set out the 5 formers and identify which one goes in each slot on the
fuselage halves. Test fit the formers. If the formers are tight in the
slots, gently squeeze the edges of the formers, or lay the formers flat on
the table and compress the sides by running a pen etc. along the edge.
Most of the formers should fit into their slots, evenly centered between
the grooves at the top and bottom. The two center formers should fit
flush with the top of the fuselage, and even with the inside of the groove
at the bottom.
d) Once you are satisfied that the fuselage will fit together smoothly, glue
the formers into one side. Repeat this for the other side, taking care
that the fuselage should be straight as it tapers towards the front and
rear.

©2004 FoamFly.com 6
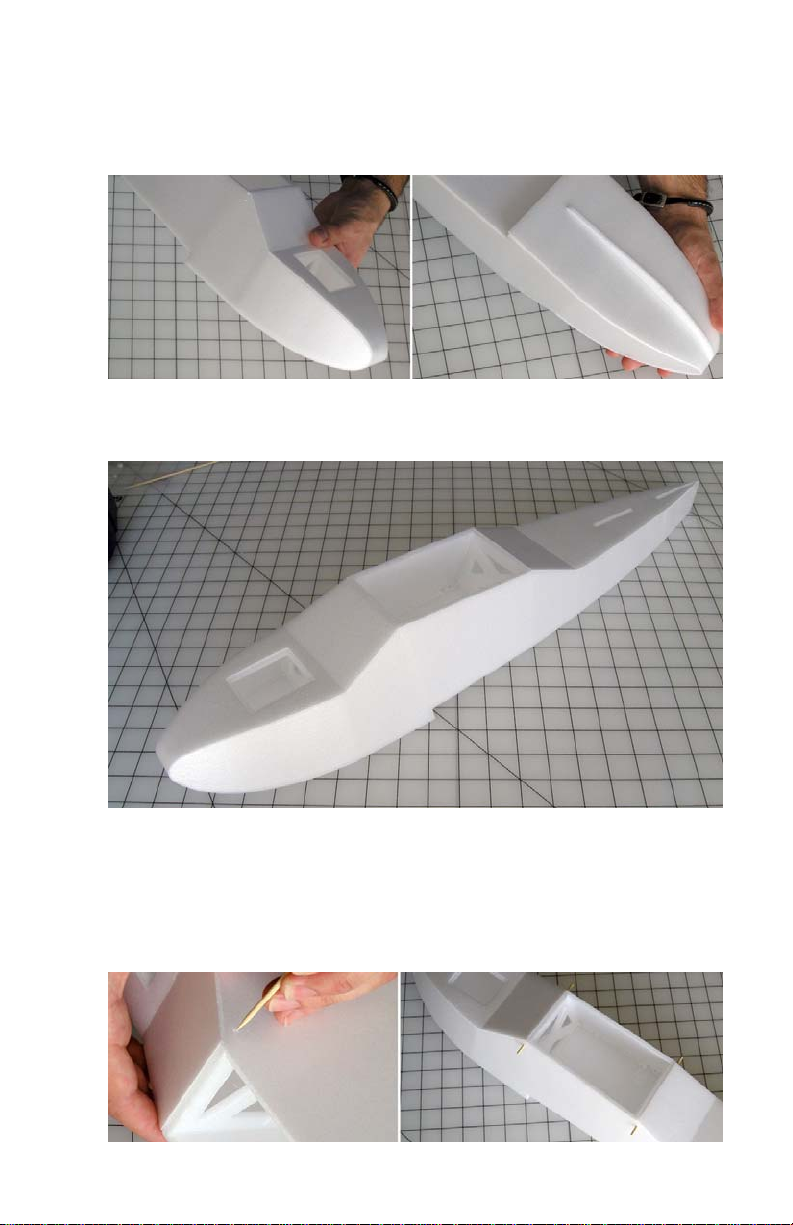
e) Test fit the top and bottom rear sections of the fuselage. You may need
to stretch to width a little to fit them in. The lip on the top and bottom
sections fits outside, while the lip on the sides fits into the groove on the
top and bottom. When you’re ready, glue the bottom section on first.
This will allow you to apply extra glue along the inside seams if desired
to help with waterproofing. Take care to glue the bottom forward
against the former that creates the step.
f) To fit the top in place, cut or sand a bevel towards the front of the top
where it meets the form so that it will fit flush. The groove on the
fuselage top and front faces the inside of the fuselage. Bend the top
away from the groove to form the angle where the “rear window” meets
the fuselage top. When the fit is good, glue the top rear section in
place.
g) The front of the fuselage glues in a similar fashion to the rear section.
But, it rolls around the nose in a single piece. Pre-bend the nosepiece
around the PVC pipe, forming a tighter radius at the narrowest part.
Take extra care around the hatch opening to avoid unnecessary
creases. Test fit the nosepiece. Bend the windshield up and bevel the
inside if necessary to fit flush with the large former. If you’re concerned
about water tightness, I would recommend gluing the front from the
bottom up. When you test fit, start at the windshield, and make a note
where the bottom edge ends up in relation to the step.
7
When you glue, start at the step, with the bottom in the position that you
noted previously, and work your way forward to the nose. You can stop at
this point to run a bead of additional glue along the inside seams to ensure
that the nose is watertight. Then, continue to glue the front piece all the way
around until it meets the former.
h) If you wish, the keel can be glued to the bottom of the forward fuselage
centered on the underside of the hull. This would help with handling on
snow and water. If you’ll be flying almost entirely off of land, then it isn’t
really necessary except for looks…
At this point the fuselage itself is basically done, and should resemble a
giant running shoe.
i) Push the pointed end of one of the bamboo skewers through each of
the four holes in the fuselage to widen them. Then cut the skewers to
length (about 5/8” should remain sticking out of each side of the
fuselage) and press them into place. They can be glued with foam safe
CA or another durable foam safe glue.

©2004 FoamFly.com 8
j) The battery hatch can be pressed into place, or can be hinged on one
side with tape. Make sure that you can open the hatch again
later…(Ask me how I know this ;)
2) Tails:
Elevator:
a) Bevel the forward edges of the two moving elevator sections. You will
need to make a connection between the two halves of the elevator so
that you will have full control of the plane. (See Appendix section,
“Tapers & Angled Cuts”) Pre-apply tape to the elevators, and then
press them into place in the horizontal stabilizer.
b) Take the 4 inch piece of wire, and make a “U” shape so that there is a
straight 2 1/8 section in the middle. Flip the horizontal stabilizer upside
down (Slotted side up) and lay it on the table. Mark the location where
the wire should go by pressing the points of the “U” into the beveled
edges of the elevator. Fold back the elevator halves, and using the
wire, or a pin drill a hole 1 inch into the front of the elevator starting at
the mark you made. Repeat for the other side. Connect the elevator
halves by pushing the “U” shaped wire into the holes you just made.
Test fit to make sure the wire is centered in the groove, and glue the
wire into the elevator halves when satisfied.

9
c) Glue the tip floats on. Fit the float sections onto the ends of the
horizontal stabilizer. 5 slotted float sections go on each side, and then
are capped by one solid section.
d) Fit the Horizontal and Vertical Stabilizers together, and test fit them into
the fuselage. The Horizontal Stab sits on top of the fuselage, and the
Vertical points forward to fit into the slot in the rear deck. Glue the
stabilizer assembly into place, making sure to apply enough glue to
ensure that the bottom seam will be waterproof.
Rudder:
e) Bevel the forward half of the moving section of the rudder. . I like to
bevel my rudder so that the hinge tape will be on the right. (It probably
doesn’t make any difference, but since prop torque tends to help the
plane turn left, you might need extra force when turning right so…) If
you plan on using tape for a hinge, make a complete 45 degree bevel
on one side. If the plane will spend almost all it’s time in the water, or
you are concerned about the waterproofness of the tape, then you might
want to use Dubro Micro Hinges. Pre-apply the tape to the moving half
of the rudder, and put the rudder in place while holding it at full
deflection to assure freedom of movement
©2004 FoamFly.com 10
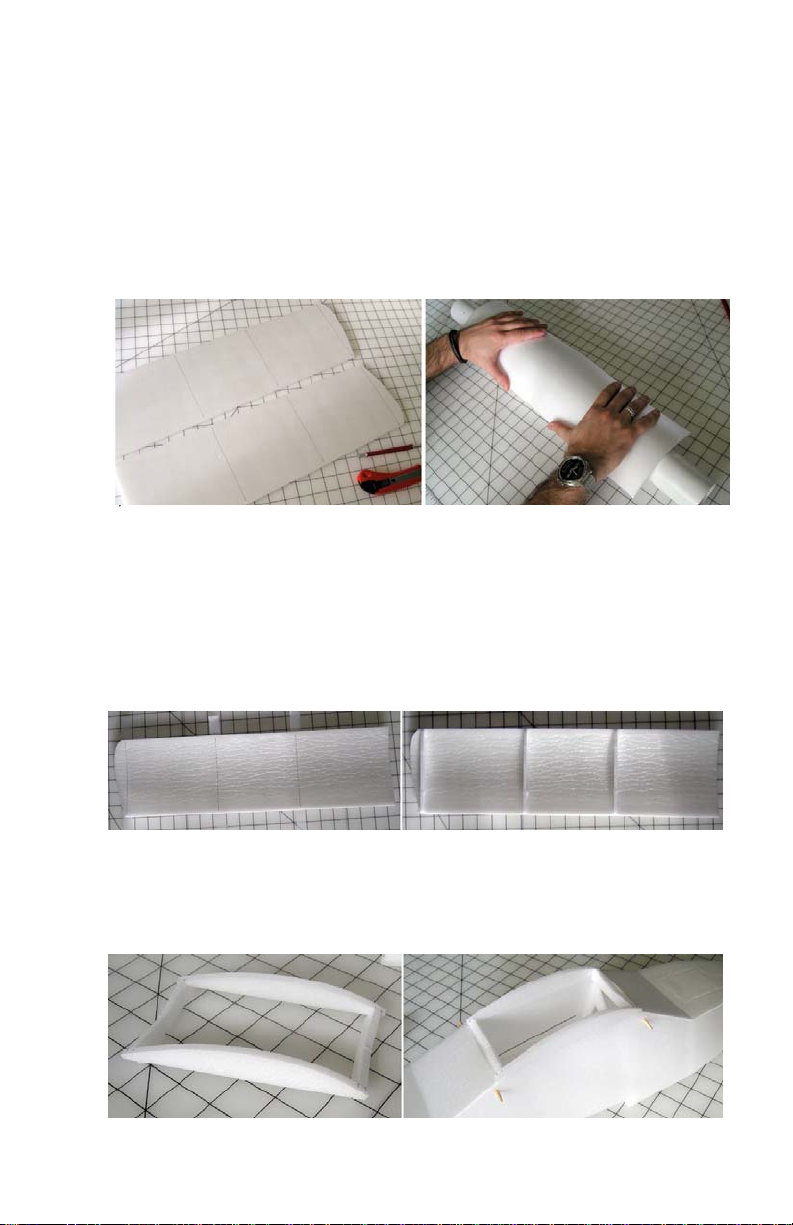
3) Wing:
a) Decide which wing will become the left, and which the right. It is
important to make sure that you end up with one of each! On the
bottom of each wing, measure out the position for the 3 outer ribs. The
innermost rib on each wing will get glued on later. Place a mark for the
ribs at 7”, 13” and 20” from the inside edge respectively. Gently roll the
wings over the PVC pipe concentrating near the leading edge. Check
your airfoil with the ribs to see what you’re working toward. You may
need to complete the leading edge of the bend with your thumb and
forefinger.
b)
c) The easiest way to clamp the ribs in place while gluing is with scotch
tape. Simple pull out a piece of tape about 3” long, and fold over a
small bit at each end (to later allow you to peel the tape off.) Place one
of these pieces of tape half on, and half off the top of the wing at the
leading and trailing edge where each of the ribs will go. When you’re
ready to glue, push the rib into place, then pull the tape over the edge,
around the rib, and press it into place. Do this at the leading and trailing
edge of the rib, and the tape will hold it in place so you can move on to
the next rib. Complete the 3 outer ribs on each wing before proceeding.
d) Assemble the two innermost ribs to the two dihedral braces. Keep in
mind that the larger brace goes towards the rear of the plane, and the
smaller one in the front. The tops of the dihedral braces should fit flush
with the top of the ribs, and they should be spaced outwards so that the
braces will help keep the wing aligned when in place on the fuselage.

11
e) Test fit the wing halves together on the dihedral braces. If the airfoil has
been rolled correctly, the centers should fit flush with each other. Glue
the wings one half at a time to the center assembly, using the ridge at
the center of the dihedral braces to help position the wing correctly. Be
sure the glue the wing halves to each other at the same time.
4) Motor Pylon:
a) You might want to cut a notch in the two center sections of the pylon to
pass the motor wire through. When assembling the Motor Pylon be
sure to align the pieces by either the motor cutout, or the top side. The
bottom sides are deliberately offset to fit into the dihedral of the wings.
Glue the four sections together. Test fit the motor stick into the pylon.
Make sure that the motor stick fits tight against the top of its slot. This
will product the correct thrust angle.
b) There is a small lip on the underside of the pylon near the front. This
tiny ridge will hang over the front edge of the wing, and is to be used for
alignment. The pylon should be centered on the wing, and place
forward to back using the lip to find the correct position. Once you get
the pylon in position, make a hole in the wing directly under the hole in
the pylon, for the motor wire to pass through, and then glue the pylon in
place.

©2004 FoamFly.com 12
5) Radio Gear:
a) Now you’re ready to mount the gear, so you can get flying. Let’s start
with an easy one. Fish the motor wire through the pylon, and slip the
motor mount onto the stick. I recommend that you fix the motor in place
somehow. I like to put a small screw through the side of the motor
mount, but if you’re can’t do that, some glue or tape might help.
Basically, it’s pretty awful if the motor pulls free during flight. Especially
since it usually happens just after you apply a burst of power, which of
course, you usually do in some kind of major maneuver. So, don’t let it
happen.
If you like, you can carefully peel some of the skin near the edge of the
pylon, and sand the edges of the pylon to a rounder shape.
That takes care of the wing, set it aside, and lets get on with the rest of it.
b) First, pushrods and control horns. One pushrod goes on each side of
the rudder. One controls the rudder (usually the one on the right) and
one controls the elevator. The pushrods pierce the rear deck at a point
around 2.25 to 2.5 inches forward of the horizontal stabilizer. They
should go in at a shallow angle, so that the protruding part just clears
the elevator. Feed the pushrods down inside the fuselage, through the
openings in the formers, and into the main cabin.
c) Follow the pushrods back to the control surfaces, and glue the Control
Horns into the Surfaces. The Rudder Control Horn goes on the right
hand side of the Rudder, far enough above the Elevator that it won’t
interfere with control surface movement. The Elevator Control Horn
goes on the top of the Elevator, on the left hand side of the Fuselage.
Make small cuts with your X-Acto knife where the control horns will line
up with the pushrods, and test fit the control horns in place.

13
Now glue them in, with a little Epoxy, or foam safe CA. Make sure the holes
are lined up directly over the hinge line.
d) You’ll want to mount your servos and receiver high enough up in the
cabin to keep them out of any water that might “accidentally” collect in
the bottom of the fuselage. Mount the servos toward the front of the
compartment with the arms toward the rear, and use the Du-Bro EZ
connectors to attach the pushrods to the servo arms. Make a small 90
degree bend in the other end of the pushrods, and slip them through the
control horns, and secure with the plastic clips. Center the servo arms
with the radio gear turned on, and then center the control surfaces
before tightening the screws.
e) Fish the battery lead for the speed controller through the forward
formers into the front compartment so that you can plug in the battery.
Leave the motor lead loose to plug in the motor before putting the wing
in place.
f) Fit the wing into place on the top
of the fuselage, and take note of
where the rubberbands will cross
over the wing when they’re in
place. Cut a four 1 inch strips of
wood, and glue them on the edges
of the wing to reinforce that area.
That’s about it for the plane, you can go out and fly it now, but I would test
the fuselage to see if it’s watertight before flying on your local pond. I have
some waterproofing and trimming tips you’ll find at the end.
©2004 FoamFly.com 14
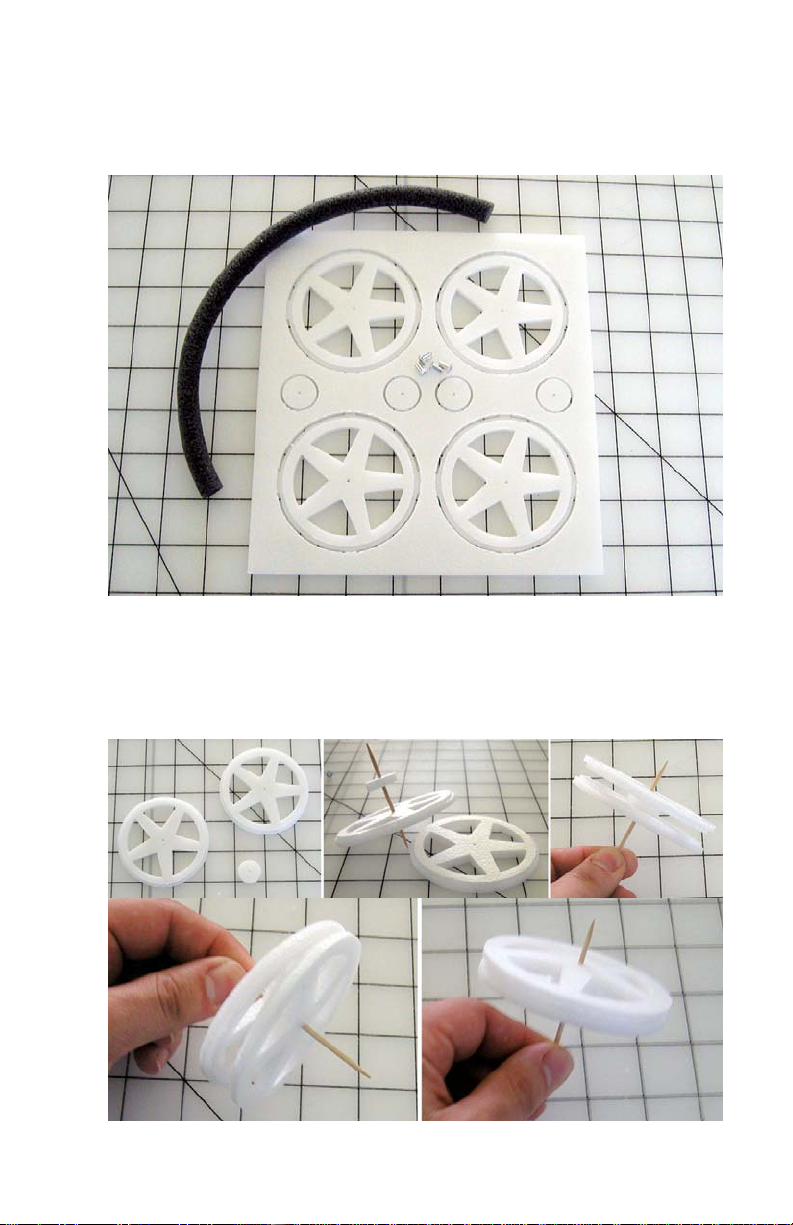
6) Wheels:
a) The wheels seem easiest to put together with hot glue, but a lot of
different glues will work. You can use one or two spacers in the middle
of each wheel, but I’ve found that one will usually do the trick.
b) Here’s how I assemble the wheel. Make a sandwich of one half wheel
(grooved side inward) a spacer (or two) and the other half wheel. Use a
toothpick to keep the segments of the wheel aligned while you’re gluing
them. After the center is glued, glue around the inside of the rim. With
hot glue, this is easiest in small sections, working your way along.

15
c) Next comes the tire. Simply wrap the tire material around the rim, and
cut off the correct length. Make your cuts perpendicular to the tire rim to
make an even seam. Glue the ends of the tire together. If you’re using
hot glue, the hot glue will melt the tire foam, so make sure that you don’t
apply the glue all the way to the edge. Press the cut ends of the tire
together firmly, and allow the glue to dry. When the glue is thoroughly
dry, you can simply snap the tire into place around the rim, and
straighten it into place. That’s it, you don’t even need to glue it.
d) Now, using a 1/8” drill bit, or a pen or pencil, gently widen the center
hole in the wheel until the wheel hub is a snug fit. Glue the wheel hub
halves in from either side of the wheel. I prefer foam safe CA for this
step. Double check to make sure you haven’t filled the axle hole with
glue. If you have, quickly push a piece of wire or a pin etc. through to
clear the jam before the glue dries. After the glue has dried, you can
clear a jam with a 1/16 inch drill bit.

©2004 FoamFly.com 16
7) Landing Gear:
a) Using the .055” wire make a U shape in the center of the wire. The
center segment should be about 1/4” wider than the fuselage. Slip a
few inches of the foam tubing down onto the wire. It will act as padding
to protect the soft foam fuselage.
b) ;Bend the wire over at a point 1” up from the existing bends. The wire
should bend forwards, and slightly outward as well. Next, at a point
1.25” further down, bend the remaining wire out. This is where the
wheels will attach. Push the tubing up the sides of the landing gear to
add to the cushioning.
c) Tie a rubberband to the high point on each side of the landing gear.
They’ll hook over the front bamboo pegs to hold the gear on, AND
provide a shock absorber effect. You might need to double the
rubberband over to provide the right amount of tension.

17
d) An extra blob of hot glue makes a perfect wheel retainer.
e) You can also use and extra point from on of the bamboo pieces jammed
into the tail, and glued as a durable tail skid
f)
The landing gear can be added and removed any time you like simply by
removing the rubberbands.
Okay, that’s it! Now you’re really ready to fly. Except… You should
probably clean up a bit first… (Heck, I cleaned up for this photo, and you
can still see the huge pile of Glues, Scraps, Tape, Knives, Tape Measure,
what a mess…)
Enjoy,
-Dan

©2004 FoamFly.com 18
APPENDIX:
The Tools: (and things you’ll need)
1) Knives: a Razor knife, and an X-Acto would both be useful.
2) Glue: 3M “Insulation 78” contact cement, or Foam-Safe CA, or Elmer’s
White glue, or RC-56 type white glue, or Epoxy. You’ll probably want a
couple of these for good measure.
3) Tape: You’ll want 2” wide clear packing tape, and also some “crystal clear”
Scotch Tape if you can find it. If not, you can cut down the packing tape.
4) Sandpaper. Any Medium grit should do fine.
5) Pliers: Something suitable for wire bending.
The Techniques: You’ll probably want to practice these on a piece of the scrap
foam.
1) “Tapers & Angled Cuts”
a) It's almost impossible to cut a straight line freehand. So, what's your
number one tool for angled cuts? Your kitchen counter. Why not?
Formica is everybody's first choice for making hotwire templates, and
it’s tough, so use it where you find it. Lay your foam on the counter with
the end of the foam flush exactly at the edge of the counter. To
accurately control the angle of the cut, position your metal ruler on top
of the foam. If you place the straightedge directly above the counter’s
edge, you get a perfectly straight cut. If you slide the ruler back from
the edge, you get a perfect angled cut. Just make sure to get your
fingers out of the way as the hot wire or knife comes by.
b) Your other option gives you a little more time while you’re working.
Simply Cut & Peel the area where the bevel is going to be, and then
using a medium sandpaper like 200, or 250, carefully sand away the
bare foam until you have a smooth angle.
2) “Glue”
a) To build the Pelican, I recommend your choice of:
i) Epoxy
ii) Foam Safe Superglue (CA)
iii) Hot Glue (Especially “Long Working Time” Hot Glue)
iv) 3M-78 Spray on Contact Cement
b) “Working with contact cement”
The contact cement will test your patience. I know you’ll be
tempted to stick the pieces together immediately, but don’t be give in.
The 3M-78 will form the strongest bond, if you allow it to dry for AT
LEAST 8 minutes before putting the pieces together, and probably
much longer. Put the glue on BOTH surfaces to be joined. If you’re not
used to contact cement, remember you really only get ONE CHANCE at
putting the pieces together. It really is instant gluing! (except for the
waiting, but that’s already over at that point)
The 3M-78 is ideally a spray glue, and there are some instances
where you can actually spray it during this project. You’ll want to make
sure that you carefully mask off any areas where you don’t want the
glue. You can do this by cutting custom shaped glue shields out of

19
paper, or masking tape. Be sure to test your masking tape on the scrap
foam to make sure that it doesn’t peel the skin off when you remove it.
For the rest of the areas (Like attaching the wings) you’ll want to
brush the glue on. Just spray some on some waxed paper, and use a
scrap of foam, or a disposable brush to paint it right on both surfaces to
be glued.
The 3M-78 has a long working time. After application, the glue can
sit for over half an hour and still make a full-strength bond. If you plan
ahead a little, you can apply the glue to all the fuselage surfaces in the
order that you’ll be assembling them, and the first ones will be ready to
press together by the time that you’re done applying glue to the last.
Then proceed in order, for an exceptionally quick build.
3) “Rolling the Foam”
You’ll be bending the foam to form the airfoil for the wings. You’ll also
need to bend the windshield and Hood parts to conform to their curves.
You need to get a feel for how much pressure the foam will take before
it gives.
a) Wings: Find yourself a section of 2” PVC pipe, (Or a BaseBall Bat,
Rolling Pin, Kitchen Counter, Bathtub edge, etc…) and press the wings
firmly and evenly down onto it to form the airfoil shape. It doesn’t take
too much pressure. The airfoil curves more sharply right near the
leading edge, so you can use smaller diameter pipe (or a Broomhandle
etc.) to add a little more curvature there if you feel it’s necessary. It’s
also acceptable to just use your thumb, and the side of your index finger
to work the leading edge bend a little.
4) Waterproofing
a) The easiest way to test your plane for watertightness, without going
swimming is to fill up your bathtub. Take the wings off the plane first,
and take out the batteries if they’re in there. Set the plane in a full
bathtub. You’ll notice that the plane sits very high in the water
especially without the battery and motor weight. Water wouldn’t come
in even if there were big holes in the sides… So, you’ll want to push the
plane down in the water about halfway. Hold it that way for about 30
seconds, and then take the plane up and inspect the insides. The
formers will tend to section off the insides, making it relatively easy to
spot the location of any leaks.
b) If you do find any leaks. You might be able to seal them up by applying
some hot glue or epoxy to the inside seams of the section where you
see the water. If the spot is hard to reach, try soaking a Q-Tip in the
glue, and then applying it that way.
c) Or, you can try a simpler method: Candle wax. That’s right. Simpy tip a
candle into the fuselage, and let the wax run down the length of the
seams and seal the inside. If you can’t get to the inside, the candle wax
can also be used to seal the outside seams. Again, since the wax can
be difficult to control, a Q-Tip can be handy.

©2004 FoamFly.com 20
Kit packing Checklist:
Foam Airplane Parts:
Fuselage halves (Left and Right)
Fuselage Top
Fuselage Bottom
Fuselage Front
Wings (2, Left, and Right)
Horizontal Stabilizer
Parts Sheet A
Parts Sheet B
Wheels Parts Sheet
Non-Foam Parts:
Bamboo Skewers (2)
Wood Motor Mount
Laser Cut Control Horns (2)
Wood Wing Reinforcement
Du-Bro Pushrod Connectors
Rubber Bands
.032” Wire Pushrods
Elevator Joiner Wire
.055” Landing Gear Wire
Foam Tire Material
Aluminum Wheels Hubs (4)
This Instruction Manual
Other FoamFly Toy manuals


