Fogo Montanha A700 User manual

9
INSTRUCTION MANUAL
INSERT TYPE
WOOD BURNING STOVES
Model A
ÍNDEX
Page
1. Introduction
10
2. Technical characteristics
10
3. Wood
10
4. Installation
11
5. Combustion air
12
6. Running in your stove
12
7. Schematic drawing
12
8. Opening and closing the door
12
9. Combustion princilple
13
10. Controls
13
11. Lighting
13
12. Control settings
13
13. Cleaning
14
14. Maintenance
14
15. Door Adjustment
16
16. Troubleshooting
16
17. Guarantee
16
THE STOVE CAN REACH HIGH TEMPERATURES.
INFLAMABLE MATERIALS MUST BE PLACED AT LEAST 1 METRE AWAY FROM THE STOVE AT ALL TIMES
KEEP YOUNG CHILDREN AWAY FROM THE STOVE
READ THESE INSTRUCTIONS CAREFULLY BEFORE USE
www.fogo-montanha.com
10
DECLARATION OF CE CONFORMITY
We, the manufacturers of the appliance, hereby declare under our sole responsibility that the products described below
conform to essential safety requirements. This declaration will be rendered invalid if any changes are made to the
appliance without our written consent
1. INTRODUCTION
Thank you for buying a FOGO MONTANHA stove. To get the best ecological performance and highest output from this
appliance please follow these installation and operating instructions. The guarantee will cease to apply if the stove is
damaged as a result of a failure to follow the installation and operating instructions. The appliance must not be
modified without the manufacturer’s written permission. Only original spare parts made by the manufacturer should be
used to repair this appliance. Prevailing laws and local architectural and fire prevention regulations must be followed.
2. TECHNICAL CHARACTERISTICS:
Model
A700
Nominal efficiency
%
66
Nominal wood consumption
Kg/hour
3,0
Maximum heated volume
m3
344
Minimum to maximum heat output
kW
8,2-15,2
CO emissions (at 13% oxygen)
Vol.%
0,2
CO2 emissions
Vol.%
10,5
Chimney diameter
mm
200
Nominal heat output
kW
11,7
Safety distance from front of stove
cm
100
Weight
kg
127
Fuel
lenha
Maximum humidity of wood
%
20
Maximum length of log
cm
50
Dimensions:
Height
mm
600
Width
mm
700
Depth
mm
420
3. WOOD
The stove burns only wood. The best results are obtained using dry wood. Logs cut to size, stored and ventilated under-
cover for at least one year and preferably two, are best as they:
Produce considerably more heat than wet or green wood.
Produce much less smoke and deposit less tar on the stove, chimney and glass panel than wet or green wood.
Only dry wood prevents emissions of hazardous substances when burning.
A stove full of wood will generate more heat over a longer period of time. Logs should not be too large and, generally
speaking, the harder the wood the better. Never use waste, chippings, wood shavings and sawdust, tree bark or waste
from chipboard, laminated wood or surface-treated wood. Do not cut the firewood too small. Very thin pieces of wood
burn very quickly and are only suitable for lighting the stove. Allow large pieces with the normal dimension of about 25cm
to burn naturally. Large logs must be chopped small.
Note: The stove is not a waste incinerator. The environment legislation expressly forbids the burning of waste in house-
hold fires. Not only is it environmentally unfriendly to use a solid fuel stove incorrectly to burn household waste, chemical-
ly treated wood waste or waste paper, or to use it as a private waste incineration plant, but it is also in breach of the
emission laws and liable to punishment. The appliance is not suitable for burning liquid fuels. Besides creating high and
unchecked air pollution, harmful combustion products and combustion residues it also has a negative effect on the
working and operating life of the stove and flue. This results in all kinds of defects and rapid wear, which may require
expensive repair and even replacement of the stove. The burning of unsuitable fuels can lead to a house fire of a type not
covered by your fire insurance.
Manufacturer
Solzaima, S.A.
Rua dos Outarelos, 111
3750-362 Belazaima do Chão, Portugal
Tel: +351 234650655 Fax: +351 234650651
Classification
Aparelho de combustível sólido; Insert
Applied Standards and Directives
EN13229 : 2001+ A1:2003 + A2:2003:2005
Test Institute
Laboratório Recupera
Universidade do Algarve
Campus da Penha
8005-139 Faro

11
4. INSTALLATION
Your flue and chimney
For your stove to work properly the chimney must also work properly. Check out the following points whilst bearing in
mind that this is for informational purposes only and is not binding for us in any manner whatsoever. It is an unfortunate
fact that there are numerous factors that can play decisive roles in the correct functioning of a chimney.
Thoroughly clean your chimney prior to installation. If it has not been used for a long time, ask a specialist to inspect it.
The chimney should be of sufficient height to guarantee a minimum draw of 8-20 Pascal. It is only possible to measure
the chimney draught while the appliance is working. If the draw is insufficient raise the chimney and/or insulate it. If the
flue draught is too great you will need to install a draught regulator.
The flue should, ideally, be vertical and not change direction at any more than 45º from vertical.
The flue should not join into another. It should be separate throughout its entire length and have its own, separate,
chimney pot.
The flue should be free of obstructions, of the same size throughout and preferably round. The size should be that
specified for the stove to function correctly (see catalogue).
If the top of the chimney is within 60cm of the ridge of the roof, or closer, it should project at least 60cm above the
ridge. Elsewhere on the roof, not close to the ridge, the chimney should be at least 1 metre above the roof, measured
from the upper side.
The chimney should not be close to tall trees, walls or buildings as these could cause downdraughts.
The chimney must be well insulated. The internal face of the flue must be free from cracks and fissures and lined with
fire cement or other, suitable, refractory material. If not, then a suitable liner must be installed throughout its entire
length.
Lining Your Chimney
European standards must be followed. Due to the technical nature of these standards they are mostly intended for
professional installers. The following lists the relevant European standards.
EN 12446: 2003 - Chimneys - Components - Concrete outer wall elements
EN 1443: 2003 - Chimneys - General Requirements
EN1856-1: 2003 - Chimneys - Requirements for metal chimneys - Part 1: Products for system chimneys
EN1856-2: 2004 - Chimneys - Requirements for metal chimneys - Part 2: Metal liners and connecting flue pipes
EN13384-1: 2003 - Chimneys - Thermal and fluid dynamic calculation methods - Part 1:
En 2006 - Chimneys serving one appliance
EN1857: 2003 - Chimneys - Components - Flue liners
EN1457: 1999 and Clay/ceramic flue liners - Requirements and test methods
En 2002
EN 1806: 2006- Chimneys - Clay/ceramic flue blocks for single wall chimneys - Requirements and test methods
EN13069: 2005 - Chimneys - Clay/ceramic outer walls for system chimneys - Requirements and test methods
EN 13063: 2006 - System chimneys with clay/ceramic flue liners - Part 1: Requirements and test methods for soot
resistance

12
The liner must be safely and securely connected to the outlet pipe of the stove. And your chimney or liner must be swept
at least once each heating season and in accordance with local regulations.
Your fireplace
If cement mortar has been used on the inside or outside of the fireplace during construction or installation then a period of
at least 7 days should be allowed before operation to prevent the cement cracking when drying out. The stove will smoke
slightly when first lit. These are fumes from the high temperature paint curing and baking hard. The house should be well
ventilated during the curing period, which will last approximately twenty minutes. During this period the paintwork of the
stove should not be touched. Only an appliance fitted by an accredited installer guarantees compliance with architectural
and fire prevention regulations. These rules must be followed to ensure the correct and safe operation of the stove. The
flue is extremely important when fitting the stove. Be sure to consult authorised specialists about the connection to ensure
compliance with local building regulations. Bear in mind the following:
The appliance door must be closed when in use and also when not in use.
There must be an adequate supply of fresh air when the appliance is in use.
Fire safety measures relating to combustible or temperature sensitive floor surfaces:
A fire resistant, non combustible covering must be fitted under and around the stove. This must be at least 15cm thick.
No combustible materials should be stored underneath the appliance (e.g. firewood).
The safety distances from combustible or temperature sensitive objects, given in the table of technical characteristics,
must be adhered to.
5. COMBUSTION AIR
Contrary to a normal fireplace the stove uses very little combustion air. In most houses entry of fresh air through gaps in
doors and windows is sufficient to provide this air. However, in houses that are well insulated this may not be sufficient. If
so, a ventilation grille should be set into an outside wall near the stove to provide additional combustion air. The combus-
tion air consumption of your particular stove can be found in the technical characteristics. Take account of other heating
appliances or air outlet installations in the same area or on the same combustion air connection. If needs be the total
combustion air consumption for the room(s) should be calculated. If 15 minutes after lighting the fire there is still a
backdraught of flue gases due to weather conditions (e.g. fog, storm) stop lighting the fire until the weather improves. Tip:
be sure to take account of extractors which might be connected in the vicinity of the stove. These create negative pres-
sure, which can lead to disruptions in the supply of combustion air. Any escape of combustion gas is potentially lethal and
can damage the health of the people living in your home.
6. RUNNING IN YOUR STOVE
Run your stove in slowly. Your first fires should be made with a small amount of wood and a gentle flame, allowing the
stresses in the metal to dissipate and the entire installation to dry out. Even after running in your stove, never make
intense, prolonged fires. Little extra heat output is achieved and you risk damaging your stove.
7. SCHEMATIC DRAWING
A. Cold Air Inlet
B. Primary Hot Air Outlet
C. Door handle guide
D. Combustion air control
E. Door Adjustment Screws (2)
8. OPENING AND CLOSING THE DOOR
Whenever opening and closing the door keep your body facing square to the stove. The stove surfaces can become very
hot. Use temperature resistant gloves at all times.
To open the door
Insert “T” shaped door handle into the handle guide (C) then:
1. Pull door towards you and lower to the horizontal position.
2. Slide door fully underneath the stove to the limits of the stops (keeping it at all
times in the horizontal position).
3. Remove door handle
To close the door
Insert “T” shaped door handle into the handle guide (C) then:
1. Supporting weight of door on the handle pull horizontally towards you to the limit of the stops.
2. Raise door to the vertical position (the door is counterbalanced and will close automatically).
3. Remove door handle.

13
9. COMBUSTION PRINCIPLE
The stove is designed so that full of wood, with a slow flame, it will burn at maximum efficiency for several hours. The
stove can be made to burn overnight, very slowly, with little or no flame. This is not advisable because this incomplete
combustion creates extra smoke, which, upon condensation, deposits tar on the stove, chimney and glass panel. An
accumulation of such tar deposits is not only unsightly but also requires regular chimney cleaning to prevent chimney
fires. If you are burning wet or green wood then the Combustion Air Control should be left open enough to ensure the
creation of a slow, gentle flame.
Radiant heat
This is given from the hot embers and stainless steel and vermiculite back panels. The radiant heat is transmitted through
the glass panel into the room and heats the immediate area in front of the stove.
Convection heat
Cool air enters via the cold air inlet, (A). It then passes along the base of the stove up the back and over the top before
being expelled from the primary hot air outlet, (B). This convection air reaches the farthest corners of the room. Its flow is
accelerated by means of a fan installed within the cold air inlet and at the back of the stove.
10. CONTROLS
Combustion air control (D)
This controls the amount of combustion air entering the stove thereby controlling the heat output. It is situated on the top
right hand side of the door.
To open - Slide to the left for greater heat output but with greater wood consumption.
To close - Slide to the right for slightly less heat output but much less wood consumption.
Being situated at the top of the door the incoming combustion air creates a high velocity air wash effect over the entire
inner surface of the glass panel. This helps keep the glass clean.
11. LIGHTING THE FIRE
From cold
1. Fully open combustion air control.
2. Open door.
3. Place a firelighter or several balls of paper on the firebrick base.
4. Cover with twigs and small pieces of wood.
5. Light firelighters or paper.
6. Close door.
7. Burn fiercely until flame has caught hold and embers are glowing.
8. Open door and fill with larger logs.
9. Fully close door.
10.Burn until stove is hot and embers are glowing.
11.Choose a Control Setting.
From warm and adding more wood
1. Fully open combustion air control.
2. Open door.
3. Using poker provided rake hot embers evenly around the firebrick base.
4. Place small logs and then larger logs on top of embers.
5. Close the door.
6. Burn fiercely until embers glow.
7. Choose a Control Setting.
Note: If you are burning wet or green wood, opening the door slightly towards you will allow additional combustion air into
the stove which will make the wood burn quicker.
12. CONTROL SETTINGS
There are three basic settings to choose from:
A. Very high radiant and convection heat output - Very high wood consumption.
Fully open the combustion air control to create a fast burning flame. This setting should only be used to fire up the stove.
Once the stove is hot and the embers glowing another setting, (B) or (C) should be chosen.
B. High radiant and convection heat output –Low wood consumption with minimum pollution and maximum
efficiency.
Gradually close combustion air control to create a slow, gentle flame. In this setting a stove full of wood should burn
overnight whilst maintaining high convection heat output.
D. Medium radiant and convection heat output –Very low wood consumption.
Fully close the combustion air control to almost extinguish the flame. The stove will burn overnight but the glass will
probably get dirty because the stove is not operating efficiently.
Whichever setting you choose depends on how much heat output you want and how long you want the wood to last.
Remember, the more open the combustion air control the greater the radiant heat output but with no improvement in
convection heat output and much higher wood consumption.
Note: For maximum heat and efficiency choose setting “B”.
14
Open door
This setting gives the charm and beauty of an open fire with very high radiant heat output but increased wood log con-
sumption. First get the stove hot by fully opening the combustion hot air. Then open the door.
13. CLEANING
Cleaning is best performed when the stove is cool.
Glass
The specially designed forced hot air wash system and vermiculite insulation helps keep the glass cleaner for longer.
However, if your glass becomes dirty.
1. Open the door.
2. Apply spray or gel type glass cleaner onto a clean cloth or kitchen paper. Apply to the inside surface of the glass (Be
careful as most glass cleaners are extremely caustic and can damage the painted surface).
3. Leave to soak.
4. Wipe off tar deposits using a slightly damp cloth. Polish with a dry cloth or paper.
DO NOT USE ABRASIVE CLEANERS
Ash cleaning
The stove has a fixed ashtray. Clean daily with the metal scoop provided. The scoop is hinged. With the handle in a
horizontal position, and locked, the scoop acts as a shovel. With the handle unlocked, and hinged upwards, the scoop
acts as a bucket.
1. Open the door.
2. Rake hot embers to one side of the firebox so that they can be used to re-start
the fire.
3. Rake spent ash to other side of the firebox and to the rear of the stove.
4. With the scoop in the horizontal position, and locked, enter into the stove in a
forwards to backwards direction and shovel up excess ash.
5. Unlock and hinge the handle of the scoop upwards and remove from the stove.
Take to the ash deposit.
6. Re-rake hot embers evenly over the vermiculite base
7. Place fresh wood on embers.
Note: Leave 1-2cms of ash on the vermiculite base. The ash insulates the hot embers and protects the vermiculite. Place
firelighters on top of the ash and not directly on top of the vermiculite.
Paint
Wipe off ash deposits on the paint by using a soft haired brush, cotton cloth, or the suction brush attachment of a vacuum
cleaner. Do not wash the stove.
Cold air inlet
Periodically open the air inlet cover plate and wipe away ash deposits that may have accumulated underneath the stove
with a dry cloth. Take care not to touch any electrical connections.
14. MAINTENANCE
Paintwork
Repaint the stove using only heat resistant paint. Only repaint the stove when it is completely cold. Before spraying be
sure to cover all parts of the stove that do not need to be sprayed (window and fireplace for example), and to de-grease
any parts to be re-sprayed. Follow carefully the instructions written on the spray can.
Chimney cleaning
It is important to have your chimney cleaned once a year. To do this the smoke damper must be removed from the
appliance. To remove the smoke damper, follow the instructions below with care.
1. Open door and remove the smoke deflector (D). To do this, place your hand on the smoke deflector clamp (C) and
rotate the back of the clamp upwards. The clamp will now come free from the deflector and you can move it towards
you and out from the stove. See photos 1 to 5.
Note: The clamp (C) and deflector (D) both have a front and back, (A) and (B). You will need to bear this in mind when re-
assembling the smoke damper.
2. You can now remove the smoke deflector (D) by raising the left hand side and lowering the right hand side, so that the
right hand side can be turned to the front and the plate removed. See photos 6 to 9.
3. The smoke damper (E) is removed by sliding it backwards and letting it drop down. See photo 10.
4. To replace the assembly work in reverse order. Be sure when reassembling that you first mount the smoke damper
operating shaft (F), photo 12, in the guide hole (G), photo 6, before placing the grooves of the smoke damper (E) onto
the fixing strips. Now move the smoke damper forwards to prevent it from dropping.

15
Broken glass
The glass panel is heat resistant and very tough. However, it can be broken through lack of care. By reading and applying
the following tips you will prevent any damage.
Never leave wood sticking out in front of the stove. Otherwise, when closing the door the protruding wood could pierce
the glass.
When filling the stove with wood never do so in a dangerous manner i.e. that the wood can fall forward and break the
glass.
When opening the door always push it underneath the stove to the limits of the stops. Otherwise when filling the stove
with wood you may droop a piece and break the glass.
When cleaning the glass do not apply excessive pressure.
Replacing broken glass
First order a glass replacement kit for your specific stove model and size from your
nearest dealer. The model specification can be found on your guarantee card. The kit
comprises of the glass surrounded on all sides by insulated aluminum U-channel.
1. Open the door towards you and jam opening using a screwdriver or other suitable
instrument.
2. Using a piece of wire remove the fiber glass rope from the metal slot at “A”.
3. Push broken glass away from you towards the bottom of the door and hinge the top
of the glass outwards

16
4. Take the replacement glass and feed the bottom edge into the bottom of the door. Push glass downwards towards the
bottom of the door and the top edge of the glass will then droop into place.
5. Pull glass towards you to the top of the door.
6. Using the same piece of wire feed the fiber glass rope back into the metal slot at “A”.
7. Push glass downwards to butt against the fiberglass rope.
It may be necessary to replace the 10mm or 12mm fiberglass rope. This rope is available from your dealer. You will
require a piece to position each side of the glass i.e.2, and one length to feed into the metal slot at “A” (a total of 3
lengths). It prevents air leaking into the stove around the glass. It must therefore be tightly packed.
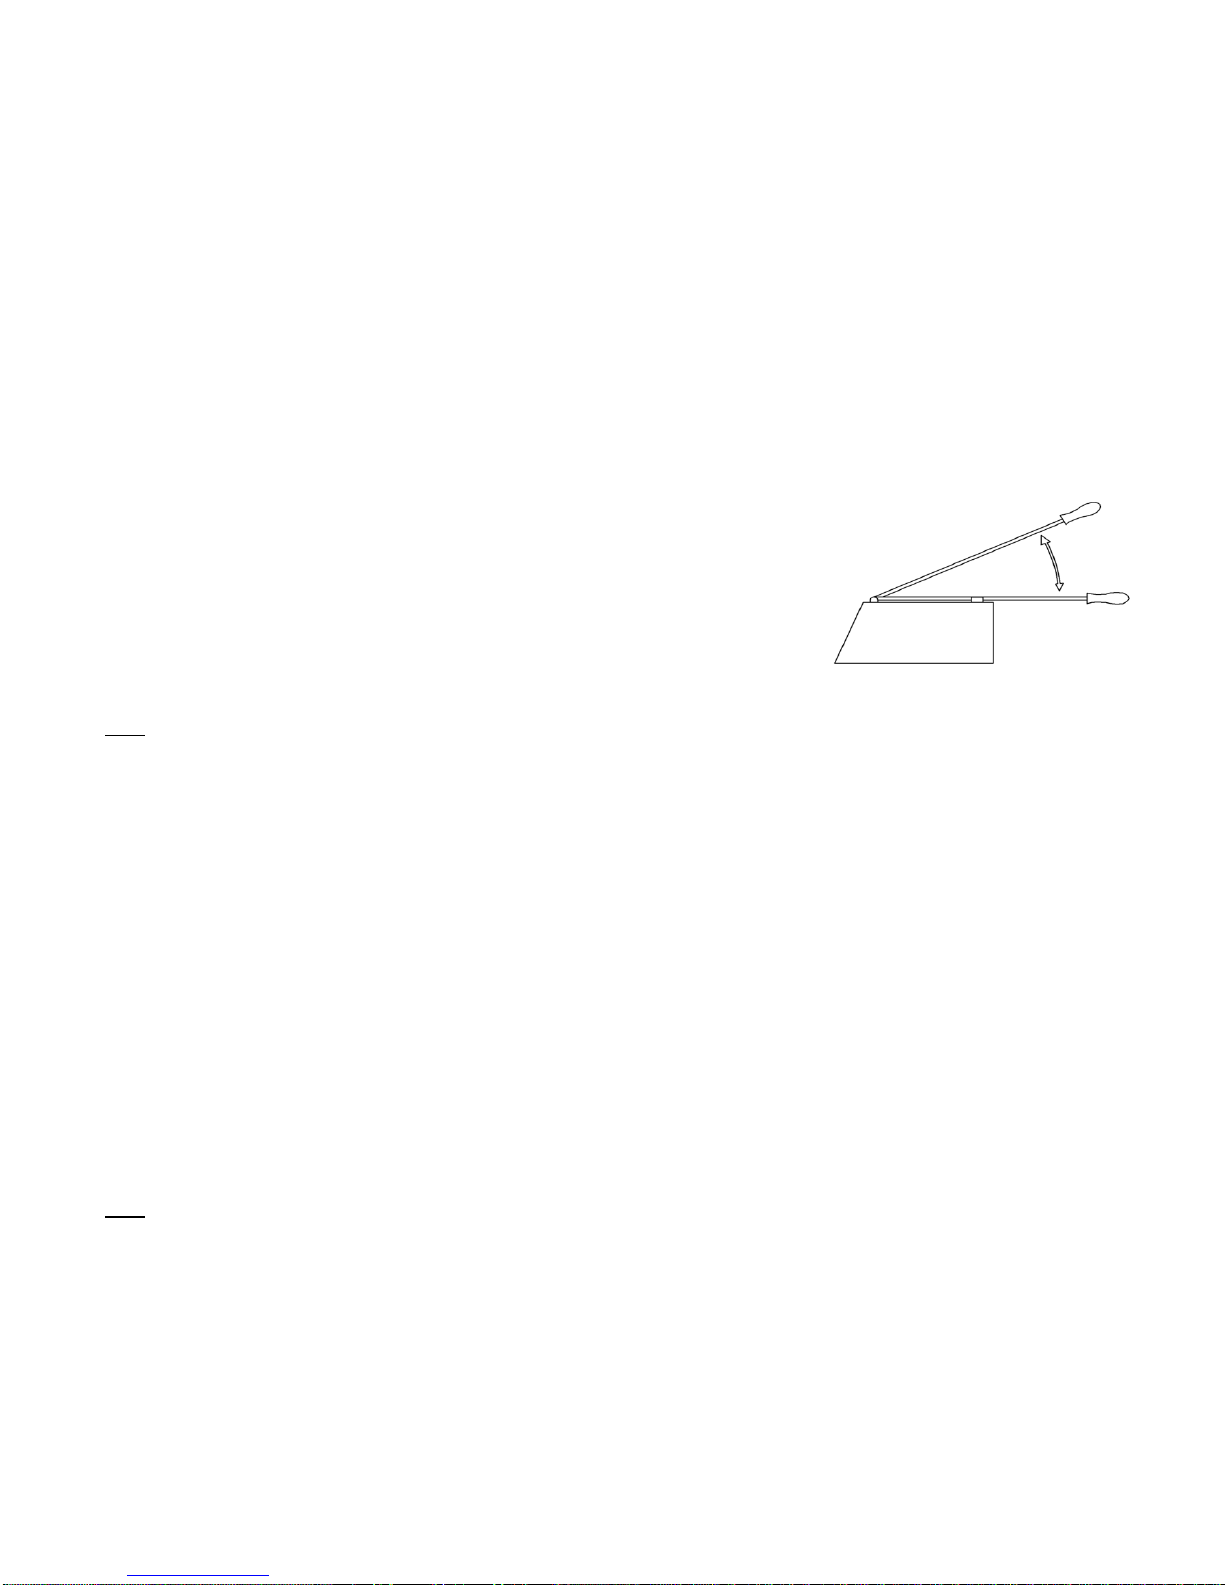
15. DOOR ADJUSTMENT
The stove door is adjustable to counter gradual wear and tear of the ceramic fiber rope seal on its inner face. The door is
adjustable via a size 4 allen screw situated on each of the door support brackets (E). By screwing the allen screw clock-
wise the door will hinge outwards. By screwing anticlockwise the door will hinge inwards. By screwing each of the screws
evenly in or out the door can be made to seal evenly and accurately against the stove frame.
16. TROUBLESHOOTING
Apparent malfunctions are often caused by incorrect operation. If you think something has gone wrong with your stove,
check out the points below. If the trouble is not remedied after checking these points, contact your local dealer and ask for
the serviceman.
Problem
Possible causes
Remedy
Stove smokes in
the open door
setting.
1. Wet or green wood.
2. Chimney needs
cleaning.
1. Burn drier wood.
2. Clean chimney.
Stove smokes in
the closed door
setting.
1. Chimney draws
badly
2. Chimney needs
cleaning.
1. Inspect chimney
2. Clean chimney.
Takes a long
time to get the
stove hot.
1. Wet or green wood.
2. Chimney needs
cleaning.
1. Burn drier wood.
2. Clean chimney.
Fire does not
stay in
overnight.
1. Insufficient wood in
stove.
2. Too soft wood e.g.
pine.
3. Door badly
adjusted.
1. Fill stove with wood.
2. Use harder wood.
3. Adjust door with allen screws.
Fire goes out.
1. Wet or green wood.
2. Stove has not been
“fired up” sufficiently.
1. Burn dry wood or leave
combustion air control more open.
2. Get the stove hotter before
closing combustion air control.
Glass gets very
dirty.
1. Lack of slow flame.
2. Wet or green wood.
1. Leave primary air control
slightly open to ensure a slow
flame at all times.
2. Use dry wood where possible.
17. GUARANTEE
Your FOGO MONTANHA stove has the following guarantees:
5 years - for the basic structure.
2 years - for internal removable parts and electrical components.
Glass windows, seals, refractory bricks and vermiculite are not included in this guarantee.
The guarantee starts from date of purchase and is only effective where:
1. The product has been purchased from an appointed dealer of FOGO MONTANHA.
2. The complaint has first been investigated by the appointed dealer of FOGO MONTANHA.
3. The installation, operation and maintenance of the product is, in the opinion of the appointed dealer and FOGO
MONTANHA, in accordance with the installation and operating instructions provided.
4. Only FOGO MONTANHA accessories have been used and wood fuels burned in accordance with FOGO MONTANHA
operating instructions.
5. No modifications have been made to the product without prior written permission of FOGO MONTANHA.
The guarantee is strictly limited to the replacement or repair, by FOGO MONTANHA or their appointed dealer, of parts
recognized by us to be defective and excludes all other indemnities. The affected part must be returned to our factory.
The costs of removal and reinstallation are not covered by this guarantee.
Note: Due to the wide variations in design and construction of chimney flues we cannot guarantee that your chimney
provides sufficient draught for your stove to be smoke free. However, if your chimney conforms to the criteria laid down in
these instructions and to European Standards smoke problems should not occur.
Table of contents
Other Fogo Montanha Wood Stove manuals


Popular Wood Stove manuals by other brands


LOHBERGER
LOHBERGER VARIOLINE AC 105 operating manual

RIKA
RIKA PRIMO RAO Assembly instructions

Westbo
Westbo VICTORIA 125 Manual and instruction

Esse
Esse Bakeheart Installation and operational instructions

Jøtul
Jøtul F 135 Installation and operating instructions

Timberwolf
Timberwolf TDS50 Series Installation and operation manual

United States Stove
United States Stove Forester US2000E manual

United States Stove
United States Stove US2500E-P Owner’s Instruction and Operation Manual

MISA
MISA 11108 Instructions for installation and use

Leenders
Leenders DISK Installation

ENERCORP
ENERCORP H100 Operating instructions and owner's manual

Heat & Glo
Heat & Glo Heat & Glo TIARAII-BK-B owner's manual