Formax FK SERIES User manual

FD 1606 AutoSeal®
FE 1606 AutoSeal®
Pressure Sealer
FK / FL Series
OPERATOR MANUAL
FIRST EDITION
5/2022


SUBJECT PAGE
DESCRIPTION 1
SPECIFICATIONS 1
UNPACKING & SETUP 2 - 3
CONTROL PANEL 5
OPERATION 6 - 7
CUSTOM FOLDS SETUP 8 - 9
MEASURING FOLD LENGTHS 10
RECALLING, EDITING & DELETING SAVED CUSTOM FOLDS SETUP 11 - 12
OPERATOR SETTINGS 13
Standard/Metric Settings 13
Standard Fold Override 14
Default Settings 15
Software Information 15
DAILY MAINTENANCE / CLEANING PROCEDURES 16
ERROR SCREENS 17
TROUBLESHOOTING / CLEARING PAPER JAMS 18 - 19
DETERMINING FOLD TYPE 20
FOLD FINE-TUNING SAMPLE PAGE 21
TABLE OF CONTENTS


DESCRIPTION
The FD 1606 AutoSeal®Pressure Sealer is designed to process a variety of form sizes and weights. The fold tables
adjust automatically for standard folds and custom folds in 8.5” x 11”, 8.5” x 14”, and A4 (metric mode) forms. Three
standard folds are pre-programmed for 11” forms, and 5 standard folds for 14” forms including uneven C and Z folds. Up
to 3 custom folds can be programmed into memory. The sealer will stop automatically after the last document has been
processed.
SPECIFICATIONS
1
Speed: Up to 100 forms per minute– based on 11” (279mm) Z-Fold
Hopper Capacity: Up to 200 forms 20# (75gsm)
Pre-Set Folds: Pre-programmed for C, V, Z in 11” and 14” forms, plus uneven C & Z in 14” forms
Pre-Set Paper
Sizes:
FD Model: 11”, 14”
FE Model: A4
Custom Folds: Stores up to 3 custom folds into memory
Form Size: Up to 8.5’’ W x 14” L
Dimensions: 30” L x 18” W x 13.5” H (76 L x 45 W x 34 H cm)
Weight: 85 lbs (39kg)
Power: 110-240VAC 50/60 Hz
Safety Certications: UL & CE
Paper side guides
In-feed table
Lower fold table
Upper fold table
Control Panel
Top cover
Catch tray

2
UNPACKING & SETUP
1. Check package for shipping damage. If there is shipping damage, do not discard the box.
2. Carefully lift the machine out of the box and place it on a solid surface. CAUTION: Two people are required to lift
the machine out of the box.
3. Install fold tables (refer to page 3 for proper installation).
4. Plug cord into machine and into wall outlet.
Jam clearing tool
Upper Fold Table Lower Fold Table
FD 1606 Base
Contents
Power Cord
Outfeed Form Knock Down Strap

Fig. 1c
Mounting Pins
Install Upper Fold Table
1. Remove the top cover, lift the cover up and pull out
(Fig. 1a).
2. Locate mounting notches on the fold table (Fig. 1b) and
the fold mounting pins on the unit (circled in red, Fig.
1c).
3. Slide the fold table into position guiding it under the
cover support pins (circled in green, Fig 1c). When the
fold table meets the pins press down rmly on the fold
table to lock it into position.
4 Insert the fold table plug into the receptacle on the
unit (Fig. 1d). Then replace the top cover to complete
installation.
Upper Fold Table Receptacle Location
Plug in Receptacle
Fig. 1d
Remove Top Cover
Fig. 1a
Mounting Notches
Fig. 1b
3

Lower Fold Table Receptacle Location
Plug in Receptacle
Fig. 2d
4
Install Lower Fold Table
1. Lift the feed tray extension and lock into position under
the alignment pins (Fig. 2a).
2. Locate mounting notches on the fold table (Fig. 2b) and
the fold mounting pins on the unit (circled in Fig. 2c).
3. Slide the fold plate into position. When the fold table
meets the pins press down rmly on the fold table to
lock it into position.
4 Insert the fold table plug into the receptacle on the
unit (Fig. 2d). Then replace the top cover to complete
installation.
Mounting Notches
Fig. 2b
Fig. 2c
Mounting Pins
Fig. 2a
Lift Feed Tray Extension

5
1.
2.
3.
1.
2.
3.
Invoice
Flyer
Brochure
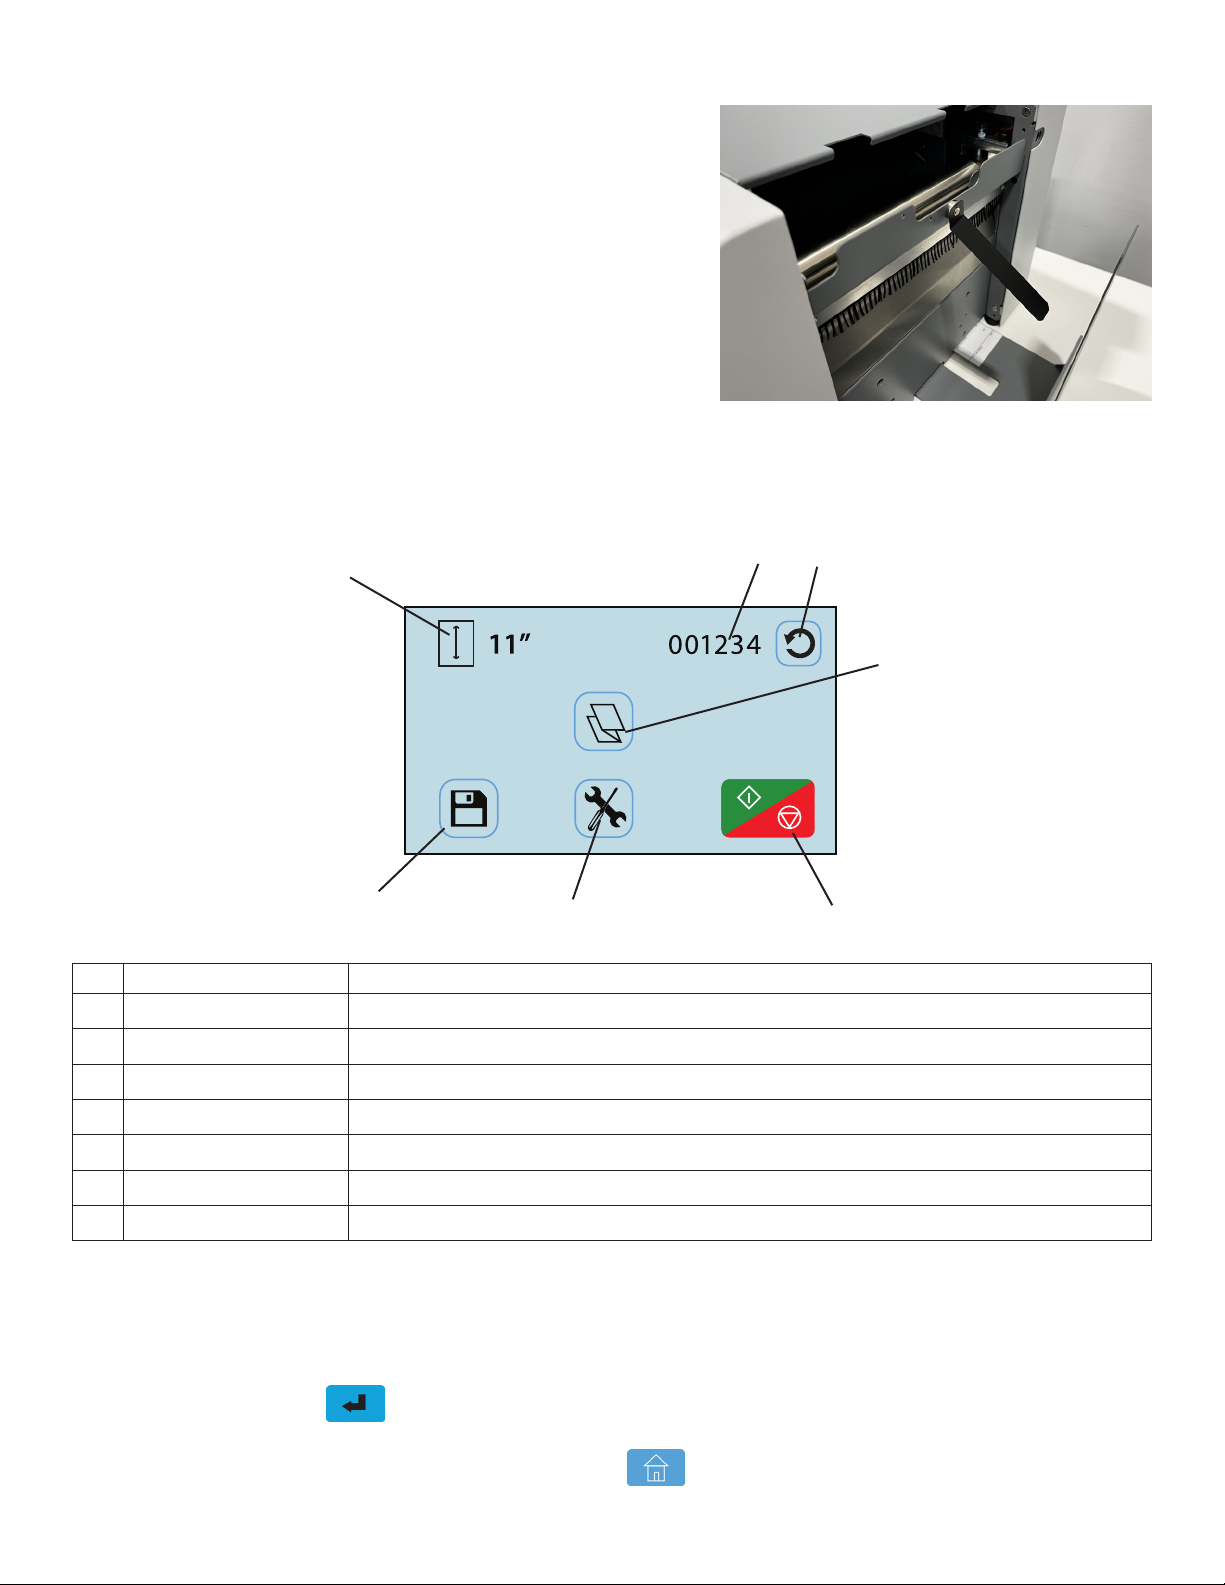
CONTROL PANEL - Home Screen Interface
No.NAME FUNCTION
1 Form Size Display Shows the size of the forms loaded in the pressure sealer
2 Resettable Counter Displays the number of forms processed, can be reset between each job
3 Counter Reset Icon Resets the counter to “0”
4 Fold Selection Icon Press to advance to fold selection screen
5 Custom Fold Access Press to select or edit previously saved custom folds
6 Operator Settings Icon Press to enter to the operator settings screen
7 Start / Stop Icon Press to start the pressure sealer. Press to stop the pressure sealer.
57
6
4
1
2 3
Any icon with a blue frame around it (i.e. #4 above) can be adjusted by pressing the icon.
Icons without a blue frame (i.e. #1 above) provide status, and cannot be pressed.
In any other screen, use the icon after choosing a setting or entering information.
To return to the home screen from any other screen, press the home icon.
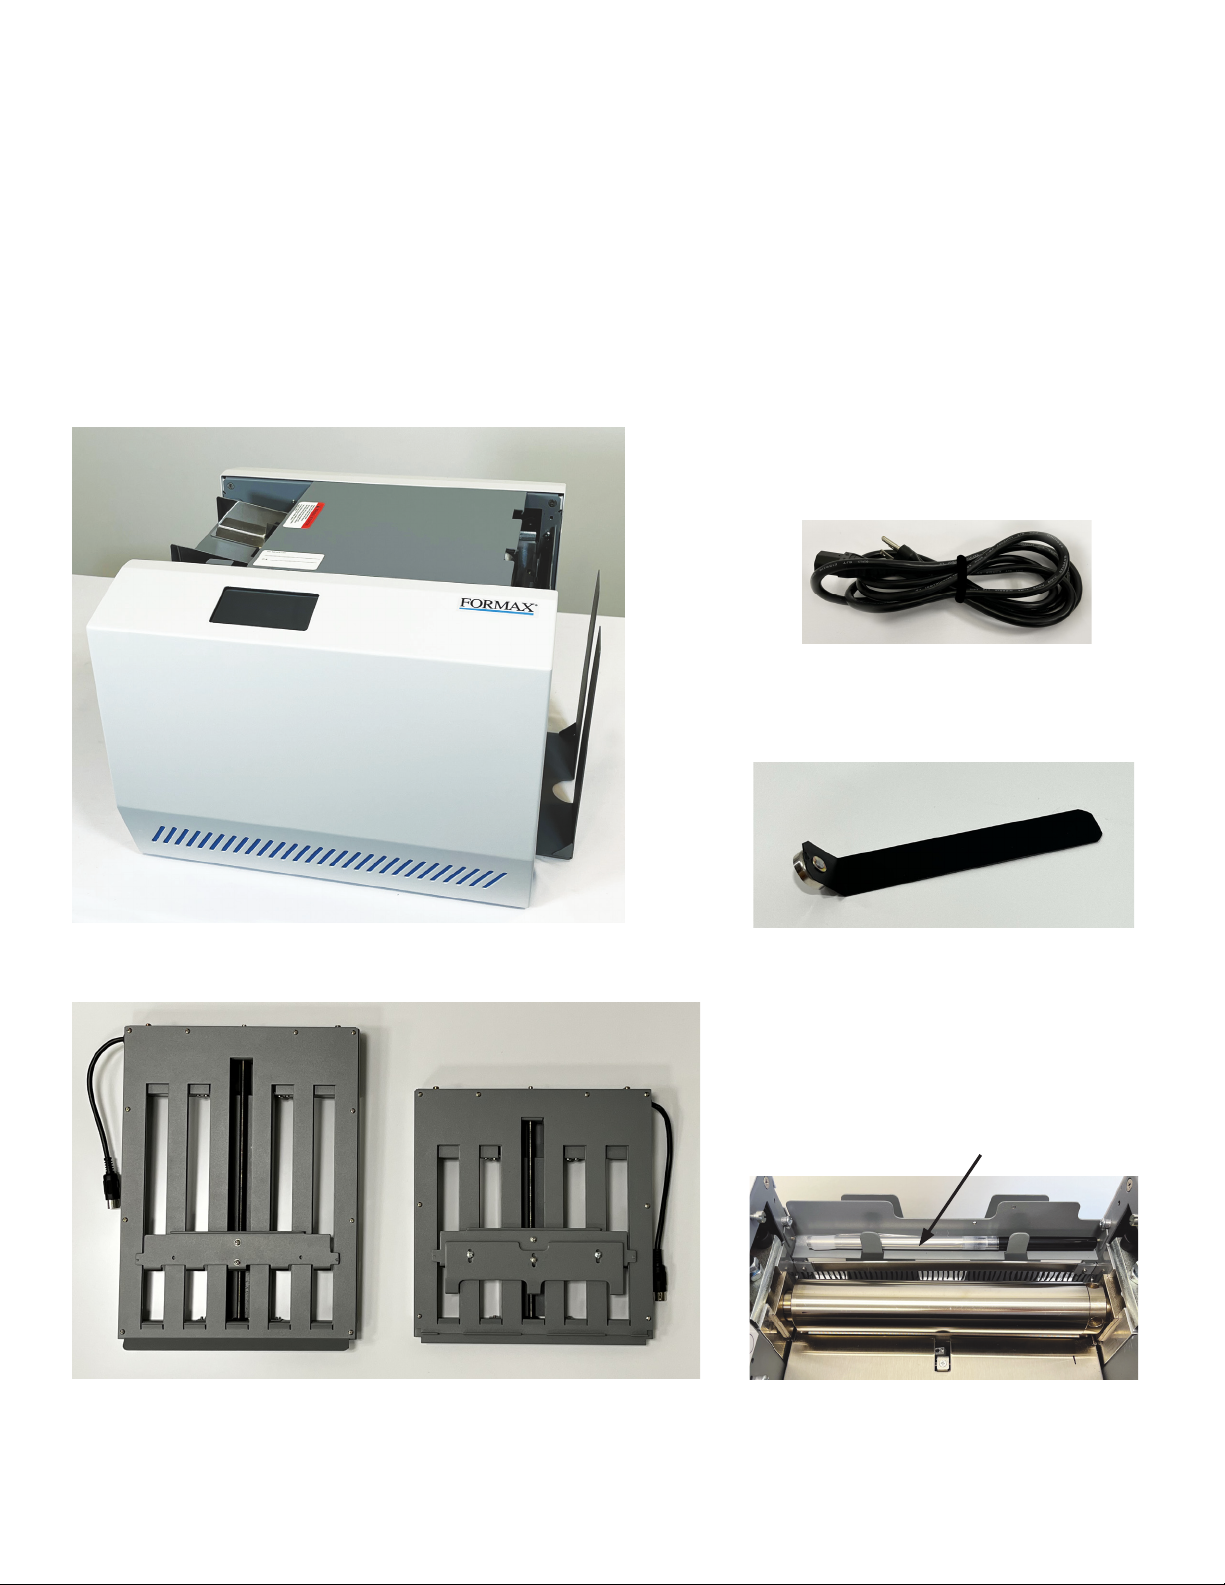
Install Form Knock Down Strap
1. To improve the stacking of folded forms attach the
magnetic form knock down strap to the support bar
below the upper fold table (Fig. 3). The strap can be
adjusted up or down or left to right for best results.
Fig. 3

OPERATION
1. Press power switch to the ON / “I” position. The power
switch is located under the lower fold table (Fig. 4a).
2. Set the side guides for the width of the forms. Slide
each guide inward or outward to allow the forms to slide
freely.
(Fig. 4b)
3. Select the type of fold desired by pressing the fold
selection icon (Fig. 5a). Note: If the fold selection
icon shows the desired fold press the “Start/Stop” icon
to begin processing forms.
If the fold required is not available in the standard fold
settings, a custom fold set up is needed. See page 8.
4. Select the standard fold type (Fig. 5b) needed and
press the “Enter” icon to set the fold stop
positions.
When the fold stops are set, the control panel will return
to the home screen. The selected fold icon will be
displayed.
6
Fig. 5a
Fold selection icon
1.
2.
3.
1.
2.
3.
Invoice
Flyer
Brochure
“Start/Stop” icon
Saved Jobs icon
Fig. 5b
Standard folds selection icons
Custom fold setup icon
Enter icon
Paper size selection icons
Fig. 4a
Fig. 4b Side guides

5. Push down on the infeed tray lever to lower the infeed
tray (Fig. 6).
Place one form onto the feeder and press the “Start/
Stop” icon to process one test form.
6. If the fold is skewed, remove forms and turn the skew
adjustment knob under the infeed tray left or right
slightly to make corrections (Fig. 7).
Test another form and make additional corrections as
needed.
7. Adjust the outfeed catch tray to accommodate the form
size being processed. Slide it in or out until to align the
mark matching the form size (Fig. 8).
8. When satised with the test fold, load a stack of
forms and press the “Start/Stop” icon to begin
processing forms. Press the same icon to stop.
Note: The forms should be neatly stacked and squared
for best results.
7
Fig. 7
Skew adjustment knob
Fig. 6
Fig. 8 Catch tray

8
CUSTOM FOLDS SETUP
Fold Selection icon
1.
2.
3.
1.
2.
3.
Invoice
Flyer
Brochure
Custom Fold icon
Three (3) custom fold settings can be stored into memory for recurring jobs with fold settings that vary from the standard
fold settings. To create a custom fold, from the Home Screen press the fold selection icon to access the fold selec-
tion screen (Fig. 9). From the fold selection screen press the Custom Fold icon (Fig. 10).
See page 10 to help determine the new fold measurements.
1. Select the upper fold table icon (Fig. 11) to set the
fold stop position for the rst fold (the icon will ash dark
gray when selected). Using the touch pad, key in the
measurement for the rst fold stop position. (Note: the
minimum position is 1.75” and the max. position is 11”).
Press the enter key to enter the measurement .
The white box under the icon will show the measurement
entered (Fig. 12).
2. Select the lower fold plate icon (Fig. 12) to set the
fold stop position for the second fold (the icon will ash
dark gray when selected). Using the touch pad, key
in the measurement for the second fold stop position.
(Note: the minimum position is 1.49” and the max.
position is 8.40”).
Press the enter key to enter the measurement .
The white box under the icon will show the measurement
entered.
For a Half Fold, leave the lower fold stop position at
Zero.
Fig. 11
Fig. 9 Fig. 10
Fig. 12

9
3. With one form loaded in the feeder press the “Start/Stop”
icon (Fig. 13) to check that the fold settings are
correct. To adjust the settings repeat steps 1 - 3.
When the folds and stacker wheels are set correctly,
press the save icon and to name and save the
custom fold.
4. Select the job number the fold will be saved as by
toughing the screen (Fig. 14). Press the letter icon
to bring up the keypad to name the custom fold.
5. Key in the name of the job (Fig. 15) and press the save
icon in the bottom right corner.
6. Select the custom job and press the blue enter icon
to conrm the fold stops (Fig. 16).
When the fold stops are set, the folder will return to the
Home Screen with the custom job selected.
Press the start icon to begin folding.
Start/Stop icon
Save icon
1.
2.
3.
1.
2.
3.
Invoice
Flyer
Brochure
1.
2.
3.
1.
2.
3.
Invoice
Flyer
Brochure
Custom Job list
Letter icon
Fig. 13
Fig. 14
CUSTOM FOLDS SETUP, cont.
Job name
Save icon
Brochure
Fig. 15
1.
2.
3.
1.
2.
3.
Invoice
Flyer
Brochure
1.
2.
3.
1.
2.
3.
Invoice
Flyer
Brochure
Enter Icon
Invoice
Custom Job list
Fig. 16
1.
2.
3.

Example 1: “Z” Fold
1. Measure the length of panel “A” + “B”, enter this number as the
upper fold table measurement.
2. Measure the length of panel “B”, enter this number as the lower
fold table measurement.
Example 2: “C” Fold
1. Measure the length of panel “A”, enter this number as the upper
fold table measurement.
2. Measure the length of panel “B”, enter this number as the lower
fold table measurement.
Measuring Fold Lengths
Panel A
Panel B
Panel A
Panel B
Use the examples below to help determine the fold lengths for custom fold settings.
10

11
1.
2.
3.
1.
2.
3.
Invoice
Flyer
Brochure
1.
2.
3.
1.
2.
3.
Invoice
Flyer
Brochure
1.
2.
3.
1.
2.
3.
Invoice
Flyer
Brochure
Enter Icon
Brochure
Custom Job list
RECALLING, EDITING & DELETING SAVED CUSTOM FOLDS SETUP
1. To recall, edit, or delete a saved custom fold from the
home screen press the saved job icon (Fig. 17).
2. From the saved custom job screen you can recall a job,
edit, rename, or delete a stored custom fold.
To recall, select the job from the list and press the blue
enter button (Fig. 18). The fold tables will be set
and the control panel will return to the home screen to
start processing the job.
3. To rename a job, select the job from the list and press
the letter icon (Fig. 18). Use the keypad to change
the name and press the save icon in the lower right
corner (Fig. 19).
4. To delete a job, select the job from the list and press the
delete icon (Fig. 20). On the conrmation screen
press the green box with the check to conrm the
deletion or press the red box with the X to cancel the
deletion (Fig. 20).
Saved Job Icon
Edit Icon
Delete Icon
Letter Icon
Job name
Save icon
Sales Brochure
1.
2.
3.
Deletion conrmation screen
Fig. 17
Fig. 18
Fig. 19
Fig. 20

12
RECALLING, EDITING & DELETING SAVED CUSTOM FOLDS SETUP
5. To edit a previously saved job, select the job from the
list and press the edit icon (Fig. 18). From the fold
setup screen use the same process as setting a custom
fold (page 9) to edit the job settings (Fig. 21). See page
10 for measuring guidelines.
Fig. 21

13
OPERATOR SETTINGS
A number of operator settings can be adjusted to personalize the FD 1606. This includes changing between standard and
metric settings, Standard Fold Override, and restoring to Default Settings.
This section will review each setting and how to adjust them. If needed, there is a Default Settings option that will restore
to factory settings. To advance to the Operator Settings Screen press the Tool icon on the Home screen (Fig. 22).
mm inch
Default Reset: Resets standard folds to factory
settings
Restablecimiento predeterminado: restablece los
pliegues estándar a la configuración de fábrica
Standard Reset: Setzt den Standard-Falz auf die
Werkseinstellungen zurück
Standard Fold Override: Adjust standard fold
and stacker settings
Anulación de plegado estándar: ajuste la
conguración estándar de plegado y apilador
Standard Fold Override: Passen Sie die
Standardeinstellungen für Falz und Stapler an
Standard Fold Override: Adjust standard fold
settings
Anulación de plegado estándar: ajuste la
conguración de plegado estándar
Standard Fold Override: Passen Sie die
Standard Fold-Einstellungen an
Versions:
CP :06.01.XX
MCB :C00XX
1.
2.
3.
1.
2.
3.
Invoice
Flyer
Brochure
Operator Settings Screen
Operator Settings Icon
Standard / Metric Settings
1. From the Operator Settings screen (Fig. 23) press the
measurement setting icon (Fig. 24) to change
between settings. The icon highlighted in blue is the
selected setting. By changing this setting the paper
sizes will change from standard to metric or vice versa.
Press the home icon to return to the Home
Screen.
mm inch
Default Reset: Resets standard folds to factory
settings
Restablecimiento predeterminado: restablece los
pliegues estándar a la configuración de fábrica
Standard Reset: Setzt den Standard-Falz auf die
Werkseinstellungen zurück
Standard Fold Override: Adjust standard fold
and stacker settings
Anulación de plegado estándar: ajuste la
conguración estándar de plegado y apilador
Standard Fold Override: Passen Sie die
Standardeinstellungen für Falz und Stapler an
Standard Fold Override: Adjust standard fold
settings
Anulación de plegado estándar: ajuste la
conguración de plegado estándar
Standard Fold Override: Passen Sie die
Standard Fold-Einstellungen an
Versions:
CP :06.01.XX
MCB :C00XX
Standard / Metric Icon
Fig. 22 Fig. 23
Fig. 24

14
Standard Fold Override
1. It may be necessary to adjust the factory set standard
fold settings for a particular fold type and paper size.
This can be done in the Standard Fold Override Mode.
From the Operator Settings menu select the Standard
Fold Override icon (Fig. 25) and press the enter
icon to select.
2. “Standard Fold Override” warning will be displayed (Fig.
26).
Press the green box with the check to continue or the
red box with the X to exit and return to the operator
screen.
3. From the Standard Fold Override Screen select the
paper size and fold type that you would like to override
(Fig. 27). Then press the enter icon.
4. Follow the same procedures as the custom fold settings
to adjust the folds (Fig. 28). Load one form and press the
“Start/Stop” icon to conrm the change is correct.
If the settings are good press the Save Icon to
save the new settings. A save conrmation screen will
be displayed.
Press the green box with the check to continue or the
red box with the X to return to the fold setup screen (Fig.
29).
mm inch
Default Reset: Resets standard folds to factory
settings
Restablecimiento predeterminado: restablece los
pliegues estándar a la configuración de fábrica
Standard Reset: Setzt den Standard-Falz auf die
Werkseinstellungen zurück
Standard Fold Override: Adjust standard fold
and stacker settings
Anulación de plegado estándar: ajuste la
conguración estándar de plegado y apilador
Standard Fold Override: Passen Sie die
Standardeinstellungen für Falz und Stapler an
Standard Fold Override: Adjust standard fold
settings
Anulación de plegado estándar: ajuste la
conguración de plegado estándar
Standard Fold Override: Passen Sie die
Standard Fold-Einstellungen an
Versions:
CP :06.01.XX
MCB :C00XX
Fig. 25
Fig. 26
Fig. 27
Fig. 28
Fig. 29
Standard Fold Override Icon

15
Default Settings - Return to Factory Settings
1. From the Operator Settings screen press the
Default Settings icon (Fig. 30).
A conrmation screen will come up (Fig. 31). Press the
green box with the check to conrm or the red box with the
X to cancel the setting.
mm inch
Default Reset: Resets standard folds to factory
settings
Restablecimiento predeterminado: restablece los
pliegues estándar a la configuración de fábrica
Standard Reset: Setzt den Standard-Falz auf die
Werkseinstellungen zurück
Standard Fold Override: Adjust standard fold
and stacker settings
Anulación de plegado estándar: ajuste la
conguración estándar de plegado y apilador
Standard Fold Override: Passen Sie die
Standardeinstellungen für Falz und Stapler an
Standard Fold Override: Adjust standard fold
settings
Anulación de plegado estándar: ajuste la
conguración de plegado estándar
Standard Fold Override: Passen Sie die
Standard Fold-Einstellungen an
Versions:
CP :06.01.XX
MCB :C00XX
Default setting Icon
Default setting conrmation screen
Fig. 30
Fig. 31
mm inch
Default Reset: Resets standard folds to factory
settings
Restablecimiento predeterminado: restablece los
pliegues estándar a la configuración de fábrica
Standard Reset: Setzt den Standard-Falz auf die
Werkseinstellungen zurück
Standard Fold Override: Adjust standard fold
and stacker settings
Anulación de plegado estándar: ajuste la
conguración estándar de plegado y apilador
Standard Fold Override: Passen Sie die
Standardeinstellungen für Falz und Stapler an
Standard Fold Override: Adjust standard fold
settings
Anulación de plegado estándar: ajuste la
conguración de plegado estándar
Standard Fold Override: Passen Sie die
Standard Fold-Einstellungen an
Versions:
CP :06.01.XX
MCB :C00XX
Software Information Icon
Fig. 32a
Software Information
1. Press the Software Information Icon (Fig. 32a) to verify
the current software revision. The software version infor-
mation will be displayed (Fig. 32b). To return to the previ-
ous screen, press the icon.
mm inch
Default Reset: Resets standard folds to factory
settings
Restablecimiento predeterminado: restablece los
pliegues estándar a la configuración de fábrica
Standard Reset: Setzt den Standard-Falz auf die
Werkseinstellungen zurück
Standard Fold Override: Adjust standard fold
and stacker settings
Anulación de plegado estándar: ajuste la
conguración estándar de plegado y apilador
Standard Fold Override: Passen Sie die
Standardeinstellungen für Falz und Stapler an
Standard Fold Override: Adjust standard fold
settings
Anulación de plegado estándar: ajuste la
conguración de plegado estándar
Standard Fold Override: Passen Sie die
Standard Fold-Einstellungen an
Versions:
CP :06.01.XX
MCB :C00XX
Fig. 32b

16
DAILY MAINTENANCE
1. It is recommended to let forms cool for one-half hour after being removed from the laser printer, before processing.
This allows toner to set on the forms and static electricity to discharge. The FD 402 Jogger is recommended for best
results. The Jogger squares the forms and dissipates heat and static electricity created by laser printers.
2. Clean infeed tires and fold rollers with Formax recommended roller cleaner & rejuvenator to remove paper dust and
toner. A Formax Cleaner Kit is available from your dealer. A damp cloth with water is the best alternative.
CAUTION: Do not use any chemicals other than the roller cleaner & rejuvenator or water.
Fig. 33
Fold Rollers
1. Make sure machine is turned o and unplugged. All folder/sealers have three infeed tires, four rubber fold rollers
and two metal seal rollers (Fig. 33).
2. Remove the top cover and remove the upper and lower fold tables.
3. Using Formax roller cleaner, spray a new cotton cloth until the cloth is saturated. Wipe the wet cloth in a back and
forth motion making sure to clean the entire surface of the infeed tires, fold and seal rollers. Next, use a dry cloth to
wipe o excess toner. The cloth should be covered with black toner surplus from cleaning the rollers.
4. Run 10-15 sheets of blank copy paper to ensure all cleaner has been removed from the tires, fold and seal rollers.
Running blank sheets will remove any excess residue of cleaner on the rollers.
NOTE: If the fold rollers are very dirty, you may use a green scrubbing sponge, i.e. Scotch Brite, with the roller cleaning
solution.
DO NOT use a scrubbing sponge on the metal seal rollers. It will damage the surface. Use ONLY a new cotton cloth and
roller cleaning solution on the seal rollers (Fig. 33).
CLEANING PROCEDURES:
Infeed Tires
Seal rollers
Other manuals for FK SERIES
1
This manual suits for next models
3
Table of contents
Other Formax Food Saver manuals