FP S-ENGuard W550 Series Instruction sheet

Configuration manual
FP S-ENGuard

Contents 3
Contents
1 About this manual______________________________________________________________ 6
2 For your safety _________________________________________________________________ 8
2.1 Intended use ______________________________________________________________ 8
2.2 Safety instructions for working on an already installed FP S-ENGuard ____ 8
2.3 How to avoid damage to property ________________________________________ 9
3 Model and equipment variants _____________________________________________ 10
3.1 Material numbers ________________________________________________________10
3.2 Equipment variants _______________________________________________________10
4 Overview of all connections _________________________________________________ 12
4.1 Model series connection assignments W550 _____________________________12
4.2 Model series connection assignments W640 _____________________________13
4.3 Model series connection assignments W667 _____________________________14
4.4 Socket for backup battery ________________________________________________15
5 Ethernet connection__________________________________________________________ 16
5.1 Initial start-up and access ________________________________________________16
5.1.1 IP address of the device _________________________________________16
5.1.2 Access to the web server ________________________________________17
5.1.3 Access with the TILA software ___________________________________19
5.1.4 Access with the TICO software __________________________________20
5.2 Factory reset ______________________________________________________________21
6 Integrated interfaces _________________________________________________________ 22
6.1 RS232 Interfaces COM1, COM4 (model dependent) ______________________22
6.2 RS485 Interfaces COM2, COM5 (model dependent) ______________________22
6.3 M-Bus Interface __________________________________________________________23
6.4 S0 Pulse inputs (Model series W550) _____________________________________23
6.5 Relay outputs 240 V (Model series W640, W667) _________________________24
6.6 Digital inputs 240 V (Model series W640, W667) _________________________25

Configuration manual FP S-ENGuard
4
6.7 Analogue inputs (Model series W667) ____________________________________ 26
6.7.1 Analogue inputs 0 to 10 V/0 to 20 mA (P0 to P3) _______________ 27
6.7.2 Pt1000 inputs (P5, P10, P6, P11) ________________________________ 33
6.8 Analogue outputs (Model series W667) __________________________________ 35
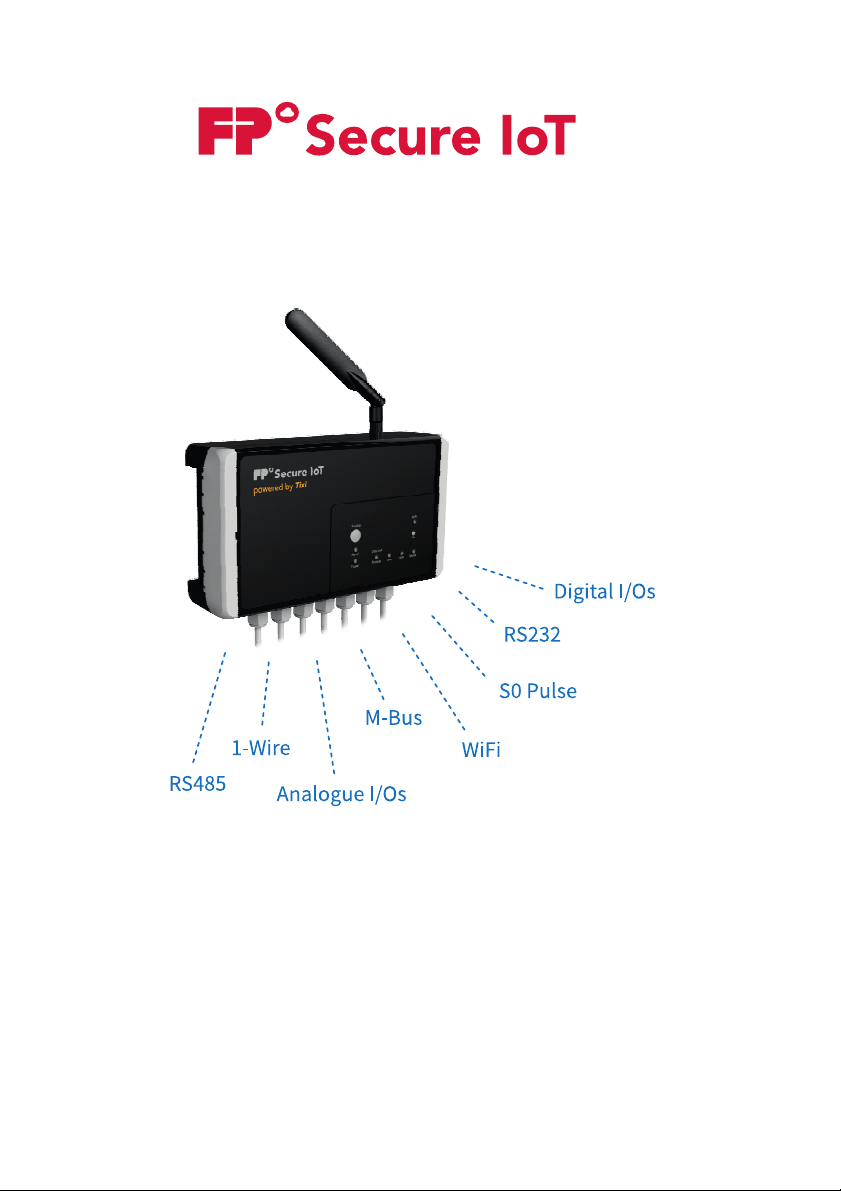
6.9 1-wire bus ________________________________________________________________ 37
6.10 System I/Os ______________________________________________________________ 39
6.11 USB host connection _____________________________________________________ 40
6.11.1 Using a USB memory stick ______________________________________ 40
6.11.2 Using FP S-ENGuard as WiFi access point _______________________ 41
6.11.3 Using FP S-ENGuard as WiFi client ______________________________ 43
6.12 Supply 24V/50 mA (Model series W640, W667) __________________________ 44
6.13 Debug port _______________________________________________________________ 45
6.14 Reset button _____________________________________________________________ 45
6.15 Power LED _______________________________________________________________ 45
6.16 Internal temperature sensor _____________________________________________ 46
6.17 Digital inputs 24 V (Model series W550 and W667) ______________________ 47
6.18 Digital outputs 48 V/120 mA (Model series W550) _______________________ 48
6.19 Relay outputs 30 V/2 A (Model series W667) _____________________________ 49
7 Expansion modules ___________________________________________________________ 51
7.1 S1-AE3 V1.0 (3 analogue inputs, replaced by S1-AE3.P V2.0) _____________ 53
7.1.1 Conversion of the analogue values to an input range of
4 to 20 mA ______________________________________________________ 55
7.2 S1-S03 (3 pulse inputs) ___________________________________________________ 57
7.3 S1-Dxx (Digital inputs and outputs) ______________________________________ 67
7.3.1 S1-D50 (5 digital inputs) _________________________________________ 68
7.3.2 S1-D05 (5 digital outputs) _______________________________________ 70
7.3.3 S1-D03G (3 digital outputs, galvanically isolated) _______________ 72
7.4 S1-PT3 (3 Pt1000 inputs) _________________________________________________ 74
7.5 S1-WL2 (2 relay outputs, changeover contact) ___________________________ 76
7.6 S1-AA2 (2 analogue outputs) _____________________________________________ 78
7.7 S1-AE3.0 V2.0 (3 analogue inputs, replaced by S1-AE3.P V2.0) ___________ 81

Contents 5
7.8 S1-AE3.P V2.0 (3 analogue inputs) ________________________________________84
7.8.1 Restrictions for the operation of passive sensors ________________89
7.9 S1-D30G (3 digital inputs, galvanically isolated) __________________________90
8 Index __________________________________________________________________________ 93

Configuration manual FP S-ENGuard
6
1 About this manual
Please read this manual carefully before configuring an FP S-
ENGuard. Keep this manual easily accessible near the device.
Target group This manual is intended exclusively for qualified specialists who
are familiar with the safety standards of electrical and automa-
tion engineering.
The configuration of the device may only be carried out by rec-
ognised qualified specialists in measurement, control and reg-
ulation technology.
Contents This manual contains important information for your safety and
describes the configuration of the devices from the following
model series:
– FP S-ENGuard W550 (in this manual: W550)
– FP S-ENGuard W640 (in this manual: W640)
– FP S-ENGuard W667 (in this manual: W667).
Prerequisites The FP S-ENGuard is mounted on the wall and electrically con-
nected as described in the “Installation and Safety” instructions
supplied with the device.
Other
documents
In addition to this manual, the following documents, among
others, are available for FP S-ENGuard
devices:
– “Installation and Safety” manual
– Datasheet
– FP-SPS-TiXML manual
– Declaration of conformity
Download the documents at
https://www.inovolabs.com/infobereich/downloads/
handbucher-datenblatter)

About this manual 7
Signal words
and symbols
This manual contains warnings at the appropriate points, which
indicate possible dangerous situations or actions and give in-
structions on how to avoid the danger. Follow these instruc-
tions.
The following signal words, colours and safety signs identify the
warning instructions and additional information in the set of
documentation for the FP S-ENGuard devices:
Warning of immediate danger to life or serious injury!
Warning of potential danger to life or serious injuries!
Warning of potential minor injuries!
Notice of potential damage to property: Damage to the device,
the software or other material assets!
A useful tip, recommendation or additional information for
handling the device.

Configuration manual FP S-ENGuard
8
2 For your safety
Please read these safety instructions carefully before configuring the device.
Make sure that you have understood all instructions.
For installation and safe use, read the basic instructions in the “Installation and Safety”
manual of the FP S-ENGuard model.
2.1 Intended use
FP S-ENGuard devices are gateways, i.e. remote communication computers.
Possible applications are remote maintenance, reporting of faults, data logging or the
use as an internal web server.
Use FP S-ENGuard only for applications that comply with the device specification.
Observe the specified characteristics.
When configuring the device, observe the safety and accident prevention regula-
tions applicable for the specific application and location.
Operate FP S-ENGuard only as described in the “Installation and Safety” manual
and this configuration manual.
Do not carry out any unauthorised interventions in the hardware and software.
2.2 Safety instructions for working on an already installed FP
S-ENGuard
Hazardous areas with live parts
When working on an already installed FP S-ENGuard, there are areas where there is a
hazard of electric voltage. Inside the device there are live parts behind a protective
cover for the mains supply.
– Danger to life from electric shock when touching live parts.
– Risk of injury from startled reactions when touching live parts.
– Danger of injury by triggering an electrical arc.
Avoiding danger from electrical voltage
Carry out the following safety measures to avoid hazards due to electrical voltage.
Before removing the protective cover for the power supply inside the FP S-ENGuard:
Disconnect the device from the power supply.
Secure it against restarting.
Keep unauthorised persons away from the device.

For your safety 9
Before starting work on the FP S-ENGuard:
Make sure that the device is voltage-free.
Observe the safety and accident prevention regulations applicable for the specific
application and location.
Before putting the FP S-ENGuard back into operation:
Make sure that the protective cover for the power supply is properly attached.
Close the cover.
Make sure that the device is closed correctly.
2.3 How to avoid damage to property
Observe the following instructions to avoid damage to the device, the peripherals and
potential consequential damage:
Only use the device in enclosed and clean spaces.
Avoid harmful environmental conditions such as heat, sunlight, strong shocks and
vibrations.
Please note the special instructions for handling the SIM card.
Protect the interfaces from electrical damage by avoiding mixing up connections.
Use a torque screwdriver to avoid mechanical damage to the connections.
Protect the outputs from destruction by observing the maximum output loads in
accordance with the specification.
Ensure that the supply voltage and earthing is connected correctly (L, N, PE, com-
pliance with the characteristic values, sufficient cable cross-section).
Only carry out a software update if no peripherals are connected.
Ensure the correct termination of the end devices. Incorrect or missing termination
can lead to communication problems.

Configuration manual FP S-ENGuard
10
3 Model and equipment variants
3.1 Material numbers
3.2 Equipment variants
Model Material number
FP S-ENGuard W550 LAN 50.0070.0001.00
FP S-ENGuard W550 NB 50.0070.0003.00
FP S-ENGuard W550 BB 50.0070.0004.00
FP S-ENGuard W640 LAN 50.0070.0011.00
FP S-ENGuard W640 NB 50.0070.0013.00
FP S-ENGuard W640 BB 50.0070.0014.00
FP S-ENGuard W667 LAN 50.0070.0021.00
FP S-ENGuard W667 NB 50.0070.0023.00
FP S-ENGuard W667 BB 50.0070.0024.00
GETEC FP S-ENGuard W550 BB 50.0170.0001.00
Legend
Standard
N× Number
–Not available
W550 LAN
W550 NB
W550 BB
W640 LAN
W640 NB
W640 BB
W667 LAN
W667 NB
W667 BB
Built-in power supply unit,
110 V - 240 V
CPU 400 MHz, ARM9
128 MB RAM
128 MB FLASH Memory
USB 1× 1× 1× 2× 2× 2× 2× 2× 2×
RS232 1× 1× 1× 1× 1× 1× 1× 1× 1×
•
•
•
•
•
•
•
•
•
•
•
•
•
•
•
•
•
•
•
•
•
•
•
•
•
•
•
•
•
•
•
•
•
•
•
•
•

Model and equipment variants 11
RS485 1× 1× 1× 1× 1× 1× 1× 1× 1×
M-Bus Master (max. number of end
devices) 25 25 25 100 100 100 100 100 100
1-Wire Master (max. number of sen-
sors) 30 30 30 30 30 30 30 30 30
Digital inputs 240 V 2× 2× 2× 2× 2× 2× 2× 2× 2×
Digital inputs 24 V ------5× 5× 5×
Digital outputs 1×1×1×------
Analogue inputs ------4× 4× 4×
Analogue outputs ------3×3×3×
Relay outputs ---2× 2× 2× 2× 2× 2×
Relay outputs (make contacts) ------3×3×3×
S0 Pulse inputs 3× 3× 3× - - - - - -
Pt1000 Sensor inputs ------2×2×2×
Temperature sensor (1-Wire, built-in)
Socket for S1 Expansion module 1× 1× 1× 5× 5× 5× 2× 2× 2×
Ethernet connection
Antenna connection - - -
UMTS Modem - - - - - -
LTE Modem ------
Legend
Standard
N× Number
–Not available
W550 LAN
W550 NB
W550 BB
W640 LAN
W640 NB
W640 BB
W667 LAN
W667 NB
W667 BB
•
•
•
•
•
•
•
•
•
•
•
•
•
•
•
•
•
•
•
•
•
•
•
•
•
•
•
•
•
•
•

Configuration manual FP S-ENGuard
12
4 Overview of all connections
4.1 Model series connection assignments W550
The illustration shows the FP S-ENGuard W550 NB.

Overview of all connections 13
4.2 Model series connection assignments W640
The illustration shows the FP S-ENGuard W640 BB.

Configuration manual FP S-ENGuard
14
4.3 Model series connection assignments W667
The illustration shows the FP S-ENGuard W667 BB.

Overview of all connections 15
4.4 Socket for backup battery
Most models are equipped with a socket for a backup battery.
The backup battery is automatically charged during normal
mains operation. The backup battery supplies the device with
power for up to 3 hours in the event of a power failure.
A type with 3.7 V / 750 mA must be used as backup battery.
Suitable rechargeable batteries are available from
FP InovoLabs GmbH.
Fire or damage to property due to incorrect rechargeable
batteries
Commercially available AA rechargeable batteries (1.2 V) will
damage the device and may even cause a fire by destroying the
battery.
Only use rechargeable batteries of the specified type
(3.7 V / 750 mA).
Do not use commercially available rechargeable batteries
(1.2 V).
Please note that the M-Bus does not work in rechargeable bat-
tery mode.
Variable
/Process/SysIO/P0
The loss of the energy supply can be detected via the system
variable
/Process/SysIO/P0. With normal mains power supply, the
variable is set to “1”. As soon as the power supply fails, the var-
iable changes to “0”.
Via an appropriately programmed EventState/EventHandler,
emergency actions can still be triggered if the mains power
supply fails. Emergency actions can be:
– Sending a message via GSM (SMS, EMail; only useful for de-
vices with GSM modem)
– Creating a log entry to document time of power failure
Variable
/Process/SysIO/P3
The variable /Process/SysIO/P3 indicates the state of
charge of the rechargeable battery.
(1=Charging process running, 0=charging finished)
Variable
/Process/SysIO/P4
The variable /Process/SysIO/P4 indicates the battery
voltage in mV.

Configuration manual FP S-ENGuard
16
5 Ethernet connection
5.1 Initial start-up and access
5.1.1 IP address of the device
The device can be configured via the LAN connection using the
parametrisation software TICO or TILA. Ex works or after a fac-
tory reset, the device has a fixed IP address or can be addressed
via a defined host name in a network with DHCP server.
With a Tixi WiFi stick, access can also be wireless, see
chapter 6.11.2.
Network without
DHCP server
Direct connection to PC.
The device tries to obtain an IP address from a DHCP server for
about 30 seconds after turning on. If it has not received an an-
swer after 30 seconds, the device's LAN LED flashes and the de-
fault IP address is set as follows.
Network with
DHCP server
In a network with DHCP server, the host name is formed ac-
cording to the following scheme:
Tixicom-Devtype-serial (applies to LAN and WiFi)
Key figures at a glance
– 10/100 Base-T in accordance with IEC 60028-2-6
– 8P8C port (RJ45), shielded EIA/TIA-568 A/B
– Name of connection: LAN
IP address at the LAN port 192.168.0.1
IP address over WiFi 192.168.100.1
Devtype = Device type
serial = Serial number of the device,
see test label inside (8 digits)

Ethernet connection 17
Device types (Devtype)
Devtype is formed according to the following scheme:
Wx*** – where x is E, U or T depending on the model.
E = LAN model (Ethernet)
U = NB model (NB = narrow band, 2G and/or 3G)
T = BB model (BB = broadband/LTE)
Example: for FP S-ENGuard W667 BB the Devtype is WT667
Example: Default host name for a model series device W667 BB / WT667
with the serial number 04240361
Tixicom-WT667-04240361
If you have integrated the device into a domain network with
DHCP server, it is usually necessary to add the local address of
your domain network to the host name.
In the Tixi.Com corporate network, for example:
Tixicom-WT667-04240361.tixicom.local
5.1.2 Access to the web server
On delivery and after a factory reset, a standard website is in-
stalled.
To access the default web page, enter the IP address or host
name of your device in the address line of your browser.
Example:
Access via host names Access via WiFi with fixed IP address

Configuration manual FP S-ENGuard
18
The standard website clearly displays a variety of information
on the hardware and configuration of the device.
Additionally, the configuration ([System config] button) and
the process data ([System properties] button) of the connected
sensors (meters, PLCs etc., if configured) can be displayed in
separate windows.

Ethernet connection 19
5.1.3 Access with the TILA software
Start the TILA software.
Click the “Online” button on the home page.
Double-click on the appropriate entry in the list of possible
connections.
Enter the IP address or host name of the device in the
“IP Settings” section.
If the “Tixi WLAN stick” option has been selected, the IP address
is already preset and need not be adjusted.
Now click on the “Connect” button.
When the connection has been successfully established, this is
signalled at the upper right edge of TILA.
GPRS/Internet/LAN for connections via the LAN port of
the device
Tixi WLAN stick for connections via WiFi with the Tixi
WiFi stick

Configuration manual FP S-ENGuard
20
5.1.4 Access with the TICO software
Start the TICO software.
Click on the “Settings” menu item and select “TCP/IP”.
Enter the IP address or the host name in the dialogue and
click “OK”.
Example: Connection via WiFi stick
If the “Online” option in the middle of the TICO window is ac-
tivated, deactivate the option with a single mouse click.
Click on the “Port” menu item and select “TCP/IP”.
After the connection has been successfully established, the
“Online” option is activated.
This manual suits for next models
22
Table of contents
Other FP Gateway manuals