freecam C381U User manual

C381U Wireless Solar Powered
Garden Light Camera
Shenzhen Leshi Video Technology Co., Ltd.
www.freecamglobal.com
User Manual V1.0
®The C381U is an intelligent solar powered garden light camera.
●Perfect for garden and pathways – The solar-powered garden
light camera combines garden lights and rechargeable security
cameras, full wireless design is the best choice for outdoor home
security;
●Powered by the sun– place your Freecam Smart garden Light
Camera in direct sunlight to recharge and store power,It can work
continuously;
●Monitor your home security – a real-time notification will push to
the connected smart phone when motion is detected;Equipped
with 2-way audio and support view live video to stay in-the-know
when anything happens at home;
●Built-in 16GB TF Card – When motion is detected, the built-in TF
card will automatically store the video, which is safer than cloud
storage and there is no subscription fee.
2.1 Turn on the power button,blue light will be blinking,if it is not at this
condition please press and hold the reset button for 3-5 seconds.
2Camera Indicator Light Status
3Accessories
⑤ Metal Plugx1
⑥ Basex1
⑦ Mounting Platex1
⑧ Wall Mount Bracketx1
① USB charging cablex1
② Manual x2
③ Screw set x1
④ Lamp Pole(30cm)x2
1Exterior diagram
⑨ Infrared LEDs
⑩ Charging Indicator①
⑪ USB charge socket
⑫ Power switch
⑬ Speaker
⑭ TF card slot
⑮ Reset button
① Solar panel
② LED Switch Hole
③ LED Light
④ Battery camera
⑤ Lens
⑥ Status Indicator②
⑦ PIR sensor
⑧ Microphone
* If it red blinks over 2 minute and still can't connect success, please
reset device and check the router's WiFi signal.
4Installation Illustration
The C381 can be mounted on ground or on a wall.
1 Before installing the camera,please connect the USB cable to the camera
and a DC5V/1A mobil phone adaptor, then charge the camera untill the
charging indicator light goes off,For the first time please charege the camera
over 6 hours.
2 Install the camera in the place with a strong WiFi signal.
Camera LED Indicator light status Status
Purple Power indicator on
Purple Power indicator on
and goes out
Indicator blue light blinks
Indicator Red Light Blinking
Slowly
Indicator Red Light Blinking
fastly
Indicator off
Charging
Charge complete
Waiting for connecting
Connecting to WiFi
Connect to the server
Normal working or
power off
①Indicator②Indicator
④ ⑦ ⑧⑤
① ② ③
⑥
56mm184mm
125mm
290mm
⑧
⑦
⑤
④
①
③
②
⑥⑩
⑨
⑪
⑫
⑭
⑮
⑬
6Technical parameters
Lens
Video
Audio
WiFi
IR night vision
PIR motion detection
Cycle time
Network P2P Connection
Battery power indicator
Expandable storage space
Standby Time
Net weight
Waterproof level
* Please follow the link: www.freecamglobal.com
for more FAQ(Frequently Asked Questions) solutions
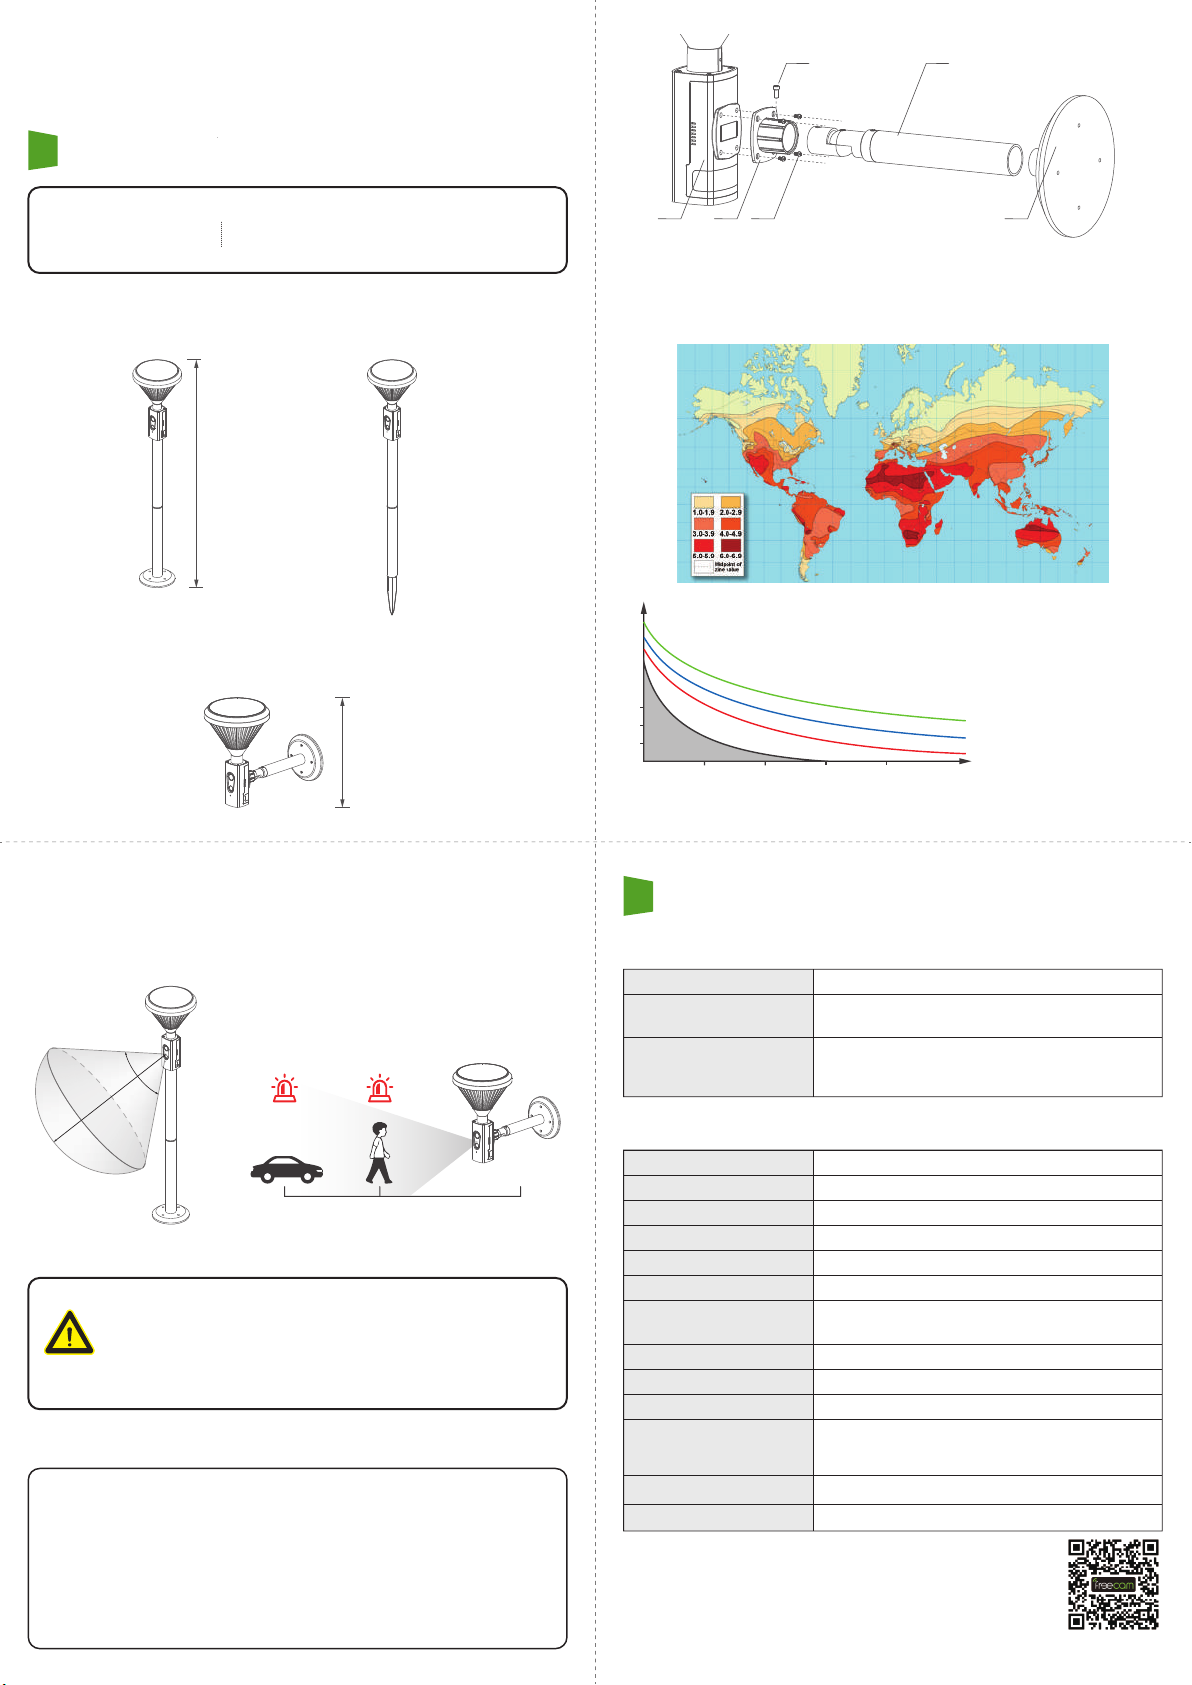
1 Ground Setup
1)Fix the mounting plate under camera body.
2)Prior to setup and selecting location of installation:
2.2 Following about APP configuration please refer to the APP installation
instruction
2.3 The WiFi indicator light is off when configuration succeed than go to
normal working condition.
2 Wall Mount Setup
1)Use screws to fix mounting plate at the under of camera.
2)Fix the base and wall mount bracket, then screw up the bracket and
mounting plate.
381-V1.0-E-LS0001-1/2
5Lamps and Lanterns Mounting
FCC ID:2AJPAC310
FCC Warning
This device complies with part 15 of the FCC Rules. Operation is subject
to the following two conditions: (1) this device may not cause harmful
interference, and (2) this device must accept any interference received,
including interference that may cause undesired operation.
Any changes or modifications to this unit not expressly approved by the
party responsible for compliance could void the user’s authority to
operate the equipment.
110°
≥5m
5 PIR Detection range
3.2mm /120°
HD1080P/H.264
Support two-way audio
Support IEE802.11b/g/n protocol(2.4GHz)
Support
Motion detect range ≈ 15 Feet (5 meters)
If there is no operation within 8 seconds after
trigger is started, enter the sleep state
Support
APP support
Maximum support 64GB Micro TF card
Battery2600mAh, No light condition up to 2
months based on 10 events per day. Can work
continuously under sunlight condition.
1400g
IP 65
PIR sensor is a high-sensitivity detector which is used for infrared detection
of object motion. However, motion detection can be triggered by the change
of background lighting change, passing by vehicles or the blowing leaves.
Material
Lighting Duration
Solar panel
Metallic
Battery 1000mAh; Lighting time(Night) approx
2 – 3 times than sunlight time(Day)
Charging power to LED light battery and Camera
battery
Camera Screw
Screw
BaseMounting
Plate
Wall Mount Bracket
(Metal Plug)
920mm
300mm
Fig. 1
Note: The shaded area means
charging the equipment
artificially according to
practical situation.
Continuuous working time
of camera (day)
Average sunshine time (hour / day)
3 hours / sunshine
2 hours / sunshine
1 hour / sunshine
The number of wake-up times
5
10
20
40
80
30 60 90 120
PIR detection
High sensitivity
PIR detection
low sensitivity
Solar Powered Garden Light
Solar Rechargeable Battery Camera
In order to avoid frequent false alarms and reduce
battery power consumption, when selecting the installa-
tion location of the camera, make sure that there are no
frequently moving objects in the PIR detection area;
such as vehicles; leaves; pedestrians.
Notice
Select an area with sufficient sunlight. Ideally, position the camera
under direct sunlight.After mounting finish, use needle to insert into the
LED switch hole to trigger switch. 6 Operation time of this camera is determined by amount of solar charging
and the number of times the camera is triggered and awoken. Fig. 1 depicts
the relationship between these factors. Refer to Fig. 1 to estimate the
camera’s continuous working time.


