Freesat 4K TV BOX User manual
Recordable 4K TV Box
YOUR QUICK
START GUIDE
2TB1TB500GB

Over the next few pages we’ll take you through
some simple steps to get your Freesat TV box up
and running.
Freesat is a satellite TV service for
viewers in the UK only.
If you already have a satellite dish
and cabling installed, your Freesat TV
box should work with your existing
set-up (including where you previously
received UK satellite TV from a
dierent provider).
If you don’t have a dish you will need
to speak to a satellite installer to get
one fitted. For more information visit
freesat.co.uk/dishinstall or call our UK
based call centre on the number below.
In an eort to save some trees the
full user manual is available online at
freesat.co.uk/manuals. If you don’t
have access to the internet, or have any
questions, please call our help line.
2
WELCOME
to a world of great TV
Getting the best from your TV box
Connecting your Freesat TV box
to your broadband ensures you
have the latest features available
on Freesat and access to all
the services that require an
internet connection.
Need help?
Call our UK based call centre on 0345 313 0051 and one of our fully trained
colleagues will be happy to help.
3
• Freesat TV box
• Remote control
• 2x AAA batteries
• Power supply unit & power cable
• HDMI cable
• Safety notice
• Quick Start Guide
Check you have everything you need to get started:
Please refer to the Safety notice
(supplied seperately) before installing
your box.
Do not plug the box into the wall outlet
until you have completed these steps.
1Start by inserting the batteries
into the remote control unit, as
indicated by the markings within
the battery compartment.
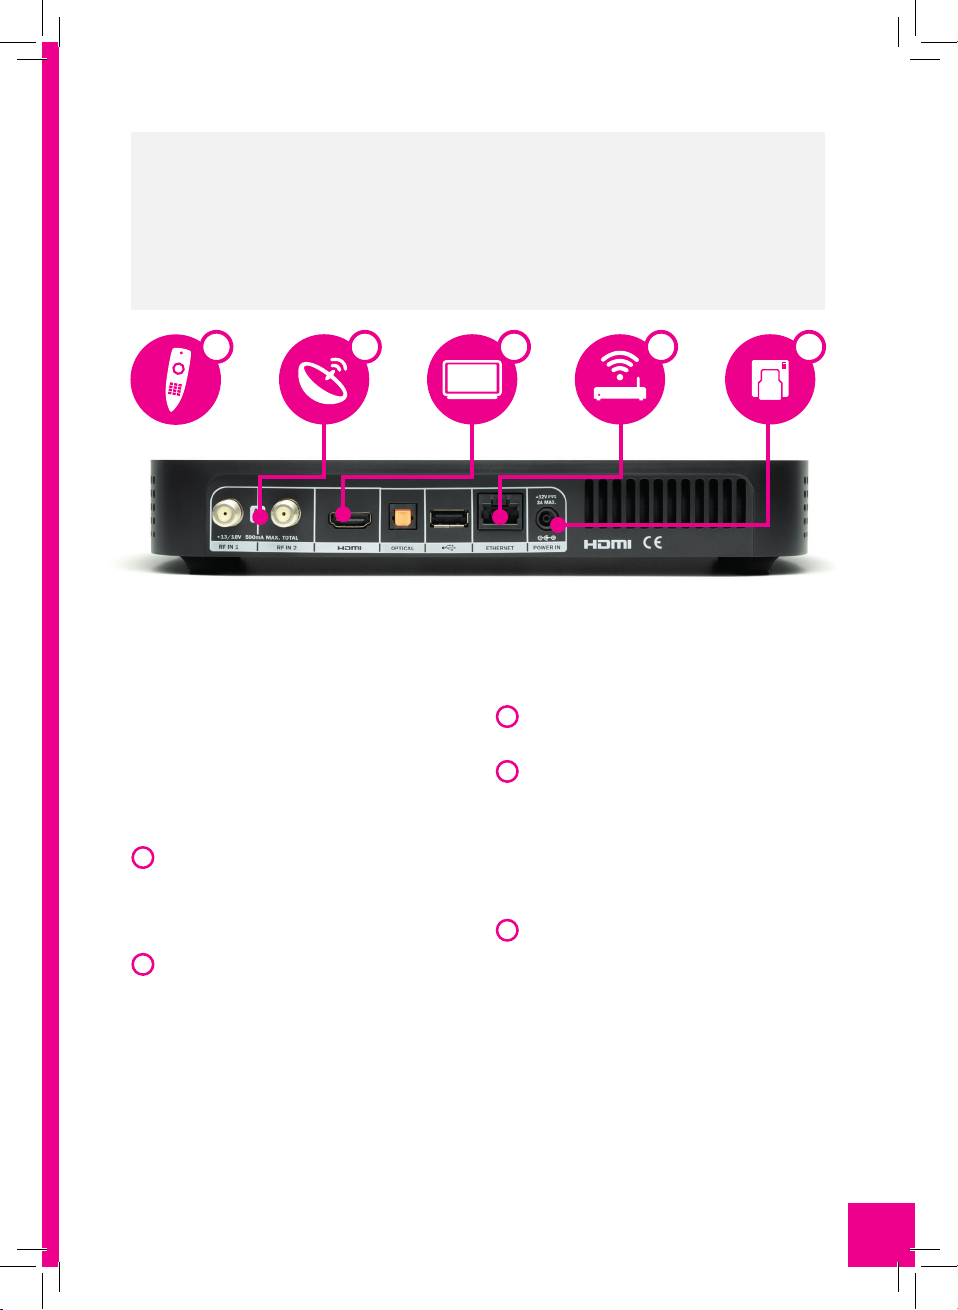
2Next, connect the cables from your
satellite dish into the ports labelled
RF IN 1 and RF IN 2 on the back
of your box by screwing them in.
If your satellite dish cable only has
one connector, it can be connected
to either port.
3Connect your box to your TV
using the HDMI cable supplied.
4If you are connecting your box
to your broadband router using
an Ethernet cable (not supplied)
please do so now, or you can
connect wirelessly later during
the start-up process.
5Finally, connect the power supply
unit into the POWER IN port,
then plug into the wall outlet and
switch on (the light on your power
supply unit will illuminate when the
power is on). Power up your box by
pressing the button on the top or by
pressing the power button on your
remote control, turn on your TV,
and you’re ready to go!
21
Connecting your Freesat TV box to your
TV and satellite dish
3 4 5

SET UP
STEP 1
Getting started!
When you first start up your box you
will see a Welcome message from
Freesat along with the terms of service
and end user licence agreement that
you will need to read and accept by
scrolling to the bottom of the screen
and clicking where indicated. A copy
of these can also be found at
freesat.co.uk/terms-of-service
STEP 2
Connecting to the internet
Your Freesat TV box will automatically
look for available wireless networks
and list them on screen.
Select your wireless network and enter
your wireless password.
If you are connecting to your broadband
via Ethernet cable and haven’t done
so, please plug this into your box and
connect it to your router now.
Once connected, your box may
perform a software update if one is
available. This will ensure that it is
loaded with the latest features for the
very best Freesat experience. If your
box is not connected to the internet,
it will periodically update whilst in
standby mode.
4
Need help?
For help troubleshooting your
first time installation please visit
freesat.co.uk/help

STEP 3
Enter your postcode
Next, enter your postcode in the box
shown so that your box can tune into
the correct BBC and ITV channels for
your region. Don’t forget to include the
space in your postcode!
Your box will then initiate a channel
scan for all of your national and
local channels.
STEP 4
Setting up your Freesat account
A Freesat account is required to pair
your box with the Freesat App (for
more information about the App please
see page 11). Once paired, you can use
the App to set remote recordings and
reminders, and it can even be used as a
remote control.
If you already have a Freesat account
please log in when prompted.
Alternatively, you can create a Freesat
account by entering your email address
on screen and we will immediately send
you a registration form to complete on
your phone or computer.
Once your Freesat account is set up you
can log in straight away by following
the on screen prompts.
5
SET UP
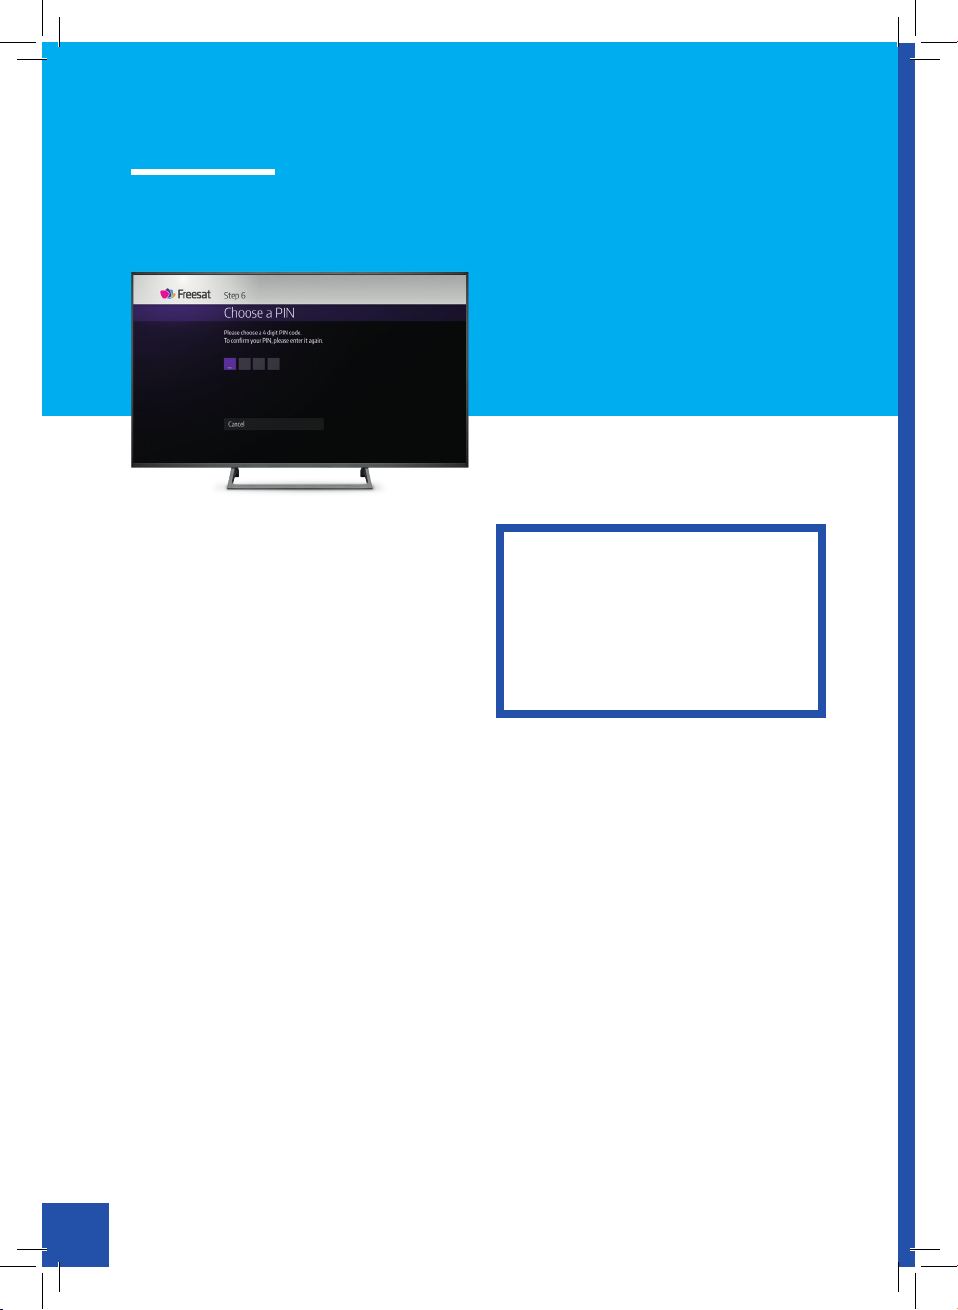
STEP 5
Parental controls
Finally, you will be given the
opportunity to change the parental
control PIN to limit access to content
which may be inappropriate for
children. The PIN is pre-set to 0000.
You can choose to keep that PIN or to
change it to any four-digit number.
For more in depth details on how to set
your PIN during first time install or at a
later date, and what it enables you to
control, please see your user manual.
Alternatively, you can skip this section
by selecting this option at the bottom
of the screen.
6
Your set-up is now
complete and you’re
ready to go – happy
watching!
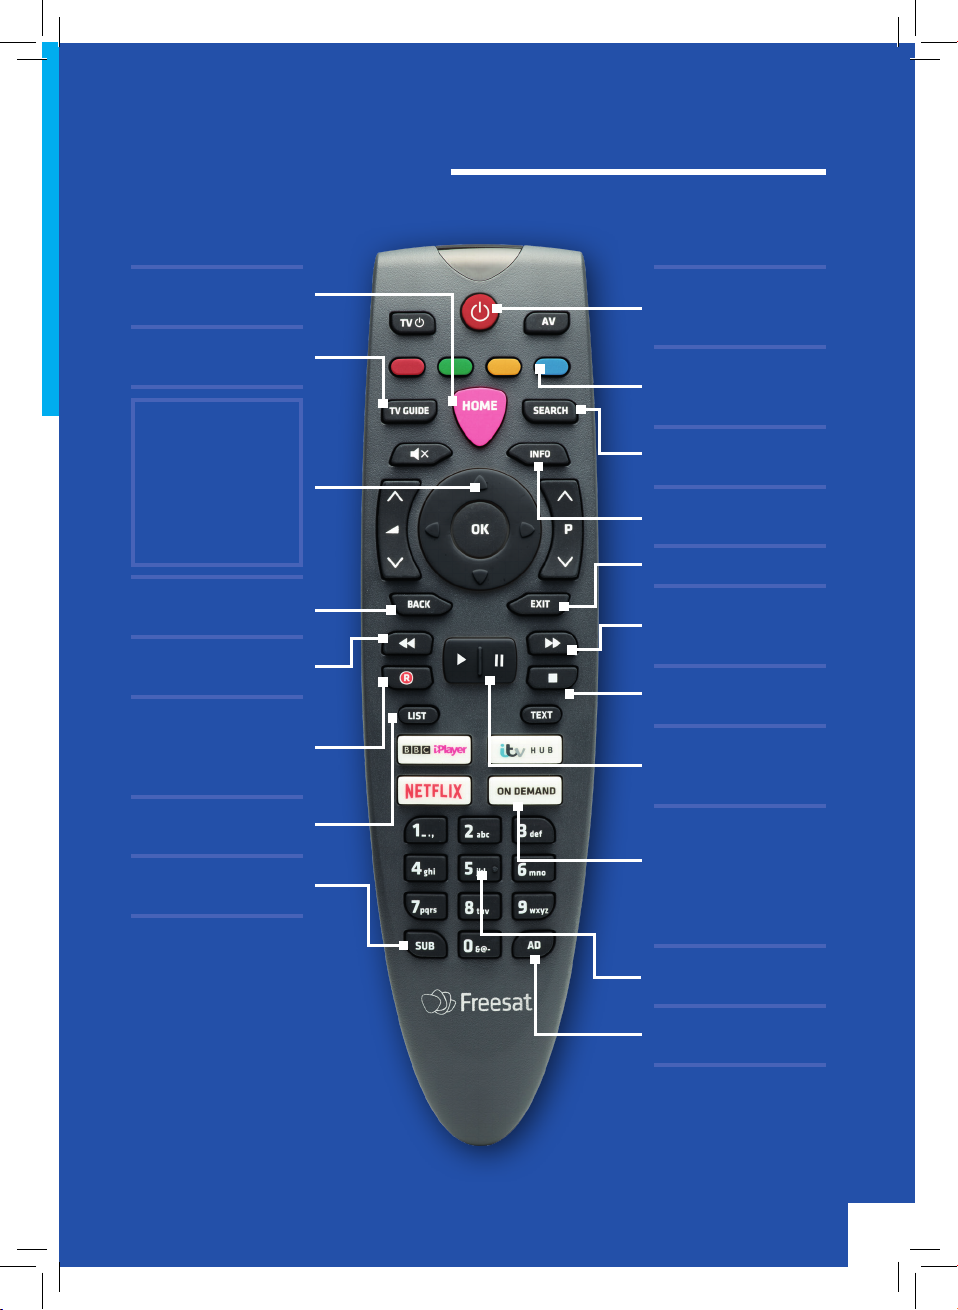
REMOTE CONTROL
Home – takes you to the
main menu
TV Guide – opens and
closes the TV Guide
Up, down, left, right
arrows – move
around the TV Guide
and menus
OK – confirms your
selection
Back – goes back one
step
Rewind – rewinds up to
x32 times faster
Record – records what
you’re watching or sets
a recording in the TV
Guide
List – sorts the TV Guide
into channel categories
SUB – turns subtitles
on or o
Power – turns the box
on and puts it into
standby mode
Colour buttons – give
you more options
on screen
Search – brings up the
Search screen
Info – gives you more
info about a programme
Exit – returns to live TV
Fast forward – fast
forwards up to x32
times faster
Stop – stops a recording
and On Demand playback
Pause – pauses live
TV, recordings and
On Demand playback
On Demand – opens
the On Demand menu,
or use one of the other
buttons to jump straight
to your favourite player
in just one click
Number buttons – to
enter channel numbers
AD – turns audio
description on or o
7

8
TV GUIDE
Freesat’s TV Guide is the best place to find out
what’s on.
The TV Guide shows you what’s
available to watch right now and what’s
coming up next. You can scroll up
and down to see what’s on all of the
channels, or filter them to a specific
genre by using the ‘List’ button on
your remote control.
To find out more about a programme,
highlight it and press the info button
on your remote control to see a brief
description of the show at the top of
the screen.
If you are connected to broadband you
can use the left arrow on your remote
to roll back the TV Guide to see what
was on in the last seven days and is
available to watch now On Demand.
Or move it forward, to see what’s on
in the next seven days.
9
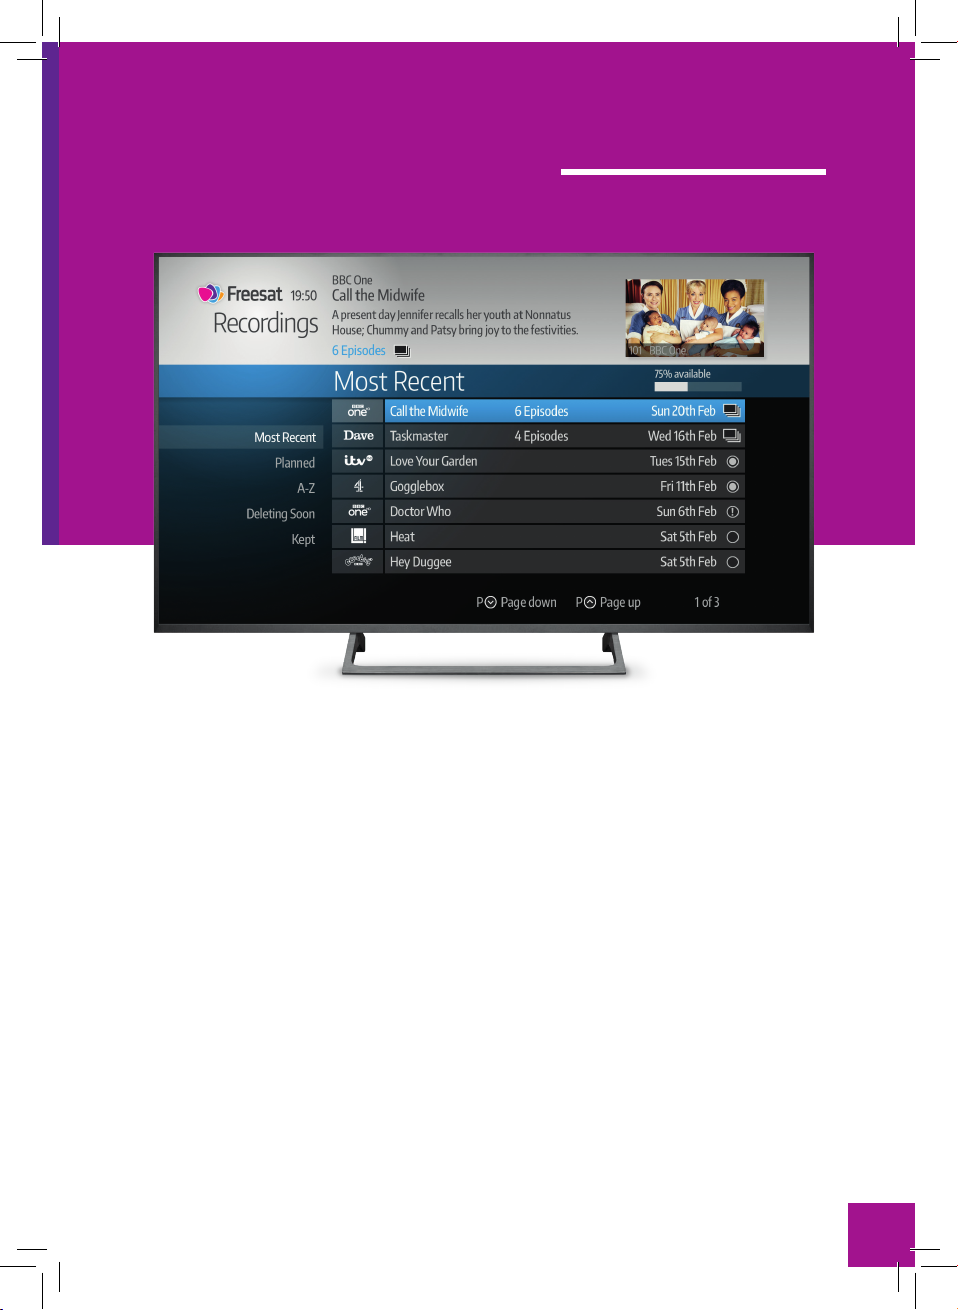
RECORDINGS
It’s easy to record your favourite shows, and
you can manage your recordings by visiting the
Recordings section.
You can record shows from live TV,
the TV Guide and Search. And if you
download the Freesat App and pair
it with your box, you can even set
recordings when you are out and about.
You will be able to record up to two or
up to four programmes at the same
time depending on whether you have
a standard or wideband LNB on your
satellite dish.
A standard satellite dish can be
upgraded with a wideband LNB by
a satellite dish installer. For more
information about satellite dishes
and installation please visit
freesat.co.uk/dishinstall.

10
ON DEMAND
Thousands of hours of entertainment that’s ready
to watch when you are.
There’s a great choice of On Demand
players oering free services available
with your Freesat TV box. If you want
a little more, you’ll also find a selection
of On Demand players oering
services on a subscription or other
payment basis.
The On Demand button on your
remote launches the On Demand menu,
or click straight through to BBC iPlayer,
ITV Hub or Netflix.
Your Freesat TV box will need to be
connected to your broadband to access
On Demand services.
Other manuals for 4K TV BOX
1
Table of contents
Other Freesat Set-top Box manuals


