manuals.online logo
Brands
  1. Home
  2. •
  3. Brands
  4. •
  5. Frigidaire
  6. •
  7. Dryer
  8. •
  9. Frigidaire FASE7073LR0 Owner's manual

Frigidaire FASE7073LR0 Owner's manual

This manual suits for next models

13

Other Frigidaire Dryer manuals

Frigidaire AGQ7000CE User manual

Frigidaire

Frigidaire AGQ7000CE User manual

Frigidaire AEQ7000ES User manual

Frigidaire

Frigidaire AEQ7000ES User manual

Frigidaire AGQ6000ES - AffinityTM 5.8 cu. Ft. Dryer User manual

Frigidaire

Frigidaire AGQ6000ES - AffinityTM 5.8 cu. Ft. Dryer User manual

Frigidaire FARE1011MW Installation instructions

Frigidaire

Frigidaire FARE1011MW Installation instructions

Frigidaire MLXE62RE User manual

Frigidaire

Frigidaire MLXE62RE User manual

Frigidaire 137101400 User manual

Frigidaire

Frigidaire 137101400 User manual

Frigidaire Affinity FAQG7073K W User manual

Frigidaire

Frigidaire Affinity FAQG7073K W User manual

Frigidaire GLEQ332AS2 User manual

Frigidaire

Frigidaire GLEQ332AS2 User manual

Frigidaire FASG7021NW User manual

Frigidaire

Frigidaire FASG7021NW User manual

Frigidaire FGQ1442E User manual

Frigidaire

Frigidaire FGQ1442E User manual

Frigidaire GLER341CDC0 User manual

Frigidaire

Frigidaire GLER341CDC0 User manual

Frigidaire GLGR331MA User manual

Frigidaire

Frigidaire GLGR331MA User manual

Frigidaire FEQ5000HS0 User manual

Frigidaire

Frigidaire FEQ5000HS0 User manual

Frigidaire FEFB9100E User manual

Frigidaire

Frigidaire FEFB9100E User manual

Frigidaire FASE7021NW0 Owner's manual

Frigidaire

Frigidaire FASE7021NW0 Owner's manual

Frigidaire Affinity FAQE7011L User manual

Frigidaire

Frigidaire Affinity FAQE7011L User manual

Frigidaire CASE7074NW0 User manual

Frigidaire

Frigidaire CASE7074NW0 User manual

Frigidaire 137186200B Owner's manual

Frigidaire

Frigidaire 137186200B Owner's manual

Frigidaire GLGQ642CAS4 Quick start guide

Frigidaire

Frigidaire GLGQ642CAS4 Quick start guide

Frigidaire GLER341C User manual

Frigidaire

Frigidaire GLER341C User manual

Frigidaire GCET1031FS4 User manual

Frigidaire

Frigidaire GCET1031FS4 User manual

Frigidaire GLGQ442CE User manual

Frigidaire

Frigidaire GLGQ442CE User manual

Frigidaire AEQB7000ES0 User manual

Frigidaire

Frigidaire AEQB7000ES0 User manual

Frigidaire FFQE5000QW Owner's manual

Frigidaire

Frigidaire FFQE5000QW Owner's manual

Popular Dryer manuals by other brands

Whirlpool WED9270XL2 parts list

Whirlpool

Whirlpool WED9270XL2 parts list

Kleenmaid KED2000 Repair instructions

Kleenmaid

Kleenmaid KED2000 Repair instructions

SPI Supplies SPI-DRY Operation manual

SPI Supplies

SPI Supplies SPI-DRY Operation manual

Amana NGD5800DW Use & care guide

Amana

Amana NGD5800DW Use & care guide

Bosch WTG86402GB Installation and operating instructions

Bosch

Bosch WTG86402GB Installation and operating instructions

Maytag MED4200BW0 installation instructions

Maytag

Maytag MED4200BW0 installation instructions

ffuuss eos user manual

ffuuss

ffuuss eos user manual

KitchenAid 53-3498 installation instructions

KitchenAid

KitchenAid 53-3498 installation instructions

Schulthess Spirit topLine TW 8340 operating instructions

Schulthess

Schulthess Spirit topLine TW 8340 operating instructions

Whirlpool LGR4624BW0 parts list

Whirlpool

Whirlpool LGR4624BW0 parts list

World Dryer AirMax D M5-972A manual

World Dryer

World Dryer AirMax D M5-972A manual

Alliance Laundry Systems ADEE9BSS user guide

Alliance Laundry Systems

Alliance Laundry Systems ADEE9BSS user guide

Miele PDR 910 EL Operating and installation instructions

Miele

Miele PDR 910 EL Operating and installation instructions

Amana NGD5800TQ0 parts list

Amana

Amana NGD5800TQ0 parts list

Bosch WTA79200GB Installation and operating instructions

Bosch

Bosch WTA79200GB Installation and operating instructions

AEG TR838P4OB user manual

AEG

AEG TR838P4OB user manual

Asko T760 user guide

Asko

Asko T760 user guide

Electrolux EW2H328R2 user manual

Electrolux

Electrolux EW2H328R2 user manual

manuals.online logo
manuals.online logoBrands
  • About & Mission
  • Contact us
  • Privacy Policy
  • Terms and Conditions

Copyright 2025 Manuals.Online. All Rights Reserved.

•ABLE OF
Important Safety Instructions .............................. 2-4
Features ............................................................... 5
Operating Instructions ................... 6-14
Dryer Settings Chart ................................... 15-17
Care and Cleaning ............................................... 18
CONTENTS
SoluUons to Common Problems .........
Notes ..............................................
Espa_ol ...........................................
o
www.frigidaire.com USA 1-800-944-9044 www.frigidaire.ca Canada 1-800-265-8352
Pleasereadallinstructionsbeforeusingthisdryer,
Recognize safety symbols, words and
labels
Safety items throughout this manual are labeled with
a WARNING or CAUTION based on the risk type as
described below:
Definitions
This is the safety alert symbol. It is used to alert
you to potential personal injury hazards. Obey al! safety
messages that follow this symbol to avoid possible injury
or death.
DANGER indicates an imminently hazardous situation
which, if not avoided, will result in death or serious
WARNING indicates a potentially hazardous situation
which, if not avoided, could result in death or serious
CAUTION indicates a potentially hazardous situation
which, if not avoided, may result in minor or moderate
For your safety the following information in this manual
must be followed to minimize the risk of fire or explosion
or to prevent property damage, personal injury or death.
Do not store or use gasoline or other flam-
mable vapors and liquids in the vicinity of
this or any other appliance.
WHAT TO DO IF YOU SMELL GAS:
• Do not try to light any appliance.
• Do not touch any electrical switch; do not
use any phone in your building.
• Clear the room, building or area of all occu-
pants.
• Immediately call your gas supplier from a
neighbor's phone. Follow the gas supplier's
instructions.
• If you cannot reach your gas supplier, call
the fire department.
Installation and service must be performed
by a qualified installer, service agency or the
gas supplier,
Read all instructions before using this appliance. This
book contains valuable information about:
- Operation
- Care
-Service
Keep it in a safe place.
IMPORTANT indicates installation, operation or
maintenance information which is important but not
hazard-related,
This Use and Care Guide provides general operating
instructions for your dryer. It also contains information
about features for several other models. Your dryer may
not have every feature included.
Use the dryer only as instructed in this Use & Care
Guide.
Save these instructions for future reference,
Product Record
Record Your Model and Serial Numbers
The model and serial numbers of your dryer are found on
the dryer serial plate located at the top of the door open-
ing. Record and retain these numbers.
Model Number
Serial Number
Purchase Date
240 v Electric Dryer 120 v GasDryer
Grounding type
wall receptacle
10-30R
3-wire UL-approved service Do not. under
cord must be installed any circumstances
'fused 30 amp) on electric dryers Inot cut. remove,
provided with unit or bypass the
except those grounding prong.
manufactured for sale
in Canada).
14-30R _
4-wire _ J
(fused 30 ampj Power cord with
3-prong grounded plug
Avoid fire hazard or electrical shock. Do not use an adaptor plug or extension cord or remove grounding
prong from electrical power cord. Failure to follow this warning can cause serious injury, fire or death.
& WARNING - RISK OF FIRE
To reduce the risk of fire, electrical shock, or injury to persons when using this dryer, comply with the basic warnings
listed below. Failure to comply with these warnings could result in serious personal injuries.
You can be killed or seriously injured if you don't follow these Important Safety Instructions:
PREVENT FIRE
*Do not dry items that have been previously cleaned in,
soaked in, or spotted with gasoline, cleaning solvents,
kerosene, waxes, etc. Do not store these items on or
near the dryer. These substances give off vapors that
could ignite or explode.
,Do not place items exposed to cooking oils in your dryer.
Items contaminated with cooking oils may contribute to
a chemical reaction that could cause a load to catch fire.
Do not dry articles containing rubber, plastic or similar ma-
terials such as bras, galoshes, bath mats, rugs, bibs, baby
pants, plastic bags and pillows that may melt or burn.
Some rubber materials, when heated, can under certain
circumstances produce fire by spontaneous combustion.
FIRE HAZARD
A clothes dryer produces combustible lint, The dryer
must be connected to an outdoors exhaust. Regularly
inspect the outdoor exhaust opening and remove any
accumulation of lint around the opening and in the
* Clean the lint screen before or after each load. The in-
terior of the dryer, lint screen housing and exhaust duct
should be cleaned approximately every 18 months by
qualified service personnel. An excessive amount of lint
build-up in these areas could result in inefficient drying
and possible fire. See Care and Cleaning.
Do not operate the dryer if the lint screen is blocked,
damaged or missing. Fire hazard, overheating and
damage to fabrics can occur.
Do not obstruct the flow of ventilating air. Do not stack
or place laundry or throw rugs against the front or back
of the dryer.
Do not spray any type of aerosol into, on or near dryer
at any time.
Do not use fabric softeners or products to eliminate
static unless recommended by the manufacturer of the
fabric softener or product.
Do not continue to use the dryer is you hear squeaking,
grinding, rubbing or other unusual noises. This could
be a sign of mechanical breakdown and lead to fire or
serious injury. Contact a qualified technician immedi-
ately.
Failure to comply with these warnings could result in
fire, explosion, serious bodily injury and/or damage to
the rubber or plastic parts of the dryer.
PROTECT CHILDREN
- Do not allow children to play on or in the dryer. Close
supervision of children is necessary when the dryer is
used near children. As children grow, teach them the
proper, safe use of all appliances.
o Destroy the carton, plastic bag and other packing ma-
terials after the dryer is unpacked. Children might use
them for play. Cartons covered with rugs, bedspreads
or plastic sheets can become airtight chambers.
Keep laundry products out of children's reach. To pre-
vent personal injury, observe all warnings on product
labels.
• Before the dryer is removed from service or discarded,
remove the dryer door to prevent accidental entrapment.
Failure to comply with these warnings could result in
serious personal injuries.
PREVENT INJURY
•To prevent shock hazard and assure stability during
operation, the dryer must be installed and electrically
grounded by a qualified service person in accordance with
local codes, Installation instructions are packed in the
dryer for the installer's reference. Refer to INSTALLATION
INSTRUCTIONSfor detailed grounding procedures. If the
dryer is moved to a new location, have it checked and
reinstalled by a qualified service person.
• To prevent personal injury or damage to the dryer, the
electrical power cord of a gas dryer must be plugged into
a properly grounded and polarized 3-prong outlet. The
third grounding prong must never be removed. Never
ground the dryer to a gas pipe. Do not use an extension
cord or an adaptor plug.
ALWAYSdisconnect the dryer from the electrical supply
before attempting any service or cleaning. Failureto do so
can result in electrical shock or injury.
• Do not use any type spray cleanser when cleaning dryer
interior. Hazardous fumes or electrical shock could occur.
• To prevent injury, do not reach into the dryer if the drum
is moving. Wait until the dryer has stopped completely
before reaching into the drum.
PREVENT IN3URY AND DAHAGE TO THE DRYER
- All repairs and servicing must be performed by an
authorized servicer unless specifically recommended in
this Owner's Guide. Use only authorized factory parts.
Do not tamper with controls.
Do not install or store the dryer where it will be ex-
posed to the weather.
A thermal limiter switch automatically turns off the
motor in the unlikely event of an overheated situation
(electric dryers only). A service technician must replace
the thermal limiter switch after correcting the fault.
Failure to comply with these warnings could result in
serious personal injuries.
The California Safe Drinking Water and Toxic Enforcement Act requires the Governor of California to publish a list of
substances known to the state to cause cancer, birth defects or other reproductive harm, and requires businesses to
warn customer of potential exposure to such substances. Included in this list are soot and carbon monoxide, both of
which may be produced by the use of this product.
The instructions appearing in this Use and Care Guide are not meant to cover every possible condition and situa-
tion that may occur. Common sense and caution must be practiced when installing, operating and maintaining any
Cycle Selector LCD Display Control Lock
Drum Light
Large Surface
Moisture Sensor
Reversible Door
Door Latch
Adjustable
Leveling Legs
Lint Filter
Door Strike
L_ ................... _
Stacking Kit for Mounting
on Matching Washer* *Not all models come with drying rack and
stacking kit from the factory. They may be
purchased as accessories.
Normal Operating Sounds
You may or may not hear the following sounds from your new
dryer:
A. WATER VALVE (Steam models only.) The flow of water is
controlled by electric solenoids. During operation there may
be a clicking sound as the valve opens and closes to control
the water flow.
B. SUSPENSION ROLLERS The dryer drum is supported by a
set of suspension rollers. At times there may be a thumping
or rolling sound when the dryer starts. This may happen if
the dryer has not been in use for a period of time, or after a
heavy load has remained in the dryer drum for an extended
period, creating a temporary fiat spot on the edge of the
roller. The noise should dissipate as the dryer operates and
the fiat spots smooth out.
C. AIR FLOW SYSTEM Your dryer is equipped with a high
volume air handling system. In some installations there may
be some sounds associated with air movement throughout
the dryer, including the air duct, blower, and exhaust system.
This is normal and can vary with load size and type.
D. GAS VALVE (Gas models only.) The flow of gas is controlled
by electric solenoids. During operation there may be a clicking
sound as the valve opens and closes to control the gas flow.
E. GAS BURNER (Gas models only.) When the burner is
operating, there may be sounds generated as the air flow
mixes with the gas flame. This noise is normal and will only
occur when the gas is ignited in the combustion tube.
O
@
i!i!i!i;i;i!ii!ili!i!i!i!i!i!i!i!i!i!i!i!i!ii!¸iiii!!!!!!!!!!!!!ii!ii!i!!_iil¸_i_i_i_i_i_i_i_i_i_i_i_i;:!:_:!!!!!!!!!!i!_ii!i!i!i!i!i!i!i!i!i!i!i!i!i!i!i!i!i!i!i!i!i!i!i!i!i!i!i!i!i!i!i!i!i!i!i!i!i!i!i!i!i!i!i!i!i!i!i!i!i!i!i!i!i!i!i!i!i!i!i!i!i!i!i!i!i!i!i!! .... ;;;;;;;;;;;;;;;;;;;;;;;;;;;;;;;;;;;;;;;;;;;;;;;;;;;;;;;;;;;;;,
Do not continue to use the dryer if you hear
squeaking, grinding, rubbing or other unusual
noises. This could be a sign of mechanical
breakdown and lead to fire or serious injury.
Contact a qualified technician immediately.
Operating Your Dryer
To reduce the risk of fire, electric shock or injury to
persons, read the IMPORTANT SAFETY INSTRUCTIONS
in this Use and Care Guide before operating your dryer.
(Mesh bag not included.)
1Prepare load for drying,
- Dry items of similar fabric, weight and construction
in the same load.
- Separate dark items from light=colored items. Sepa=
rate items that shed lint from those that attract lint.
- Check for stains which may not have been removed
in washing. Repeat stain removal process and wash
again before drying. Dryer heat may permanently
set some stains.
- Place delicate or small items in a mesh bag.
- Be sure buckles, buttons and trim are heatproof
and won't damage the drum finish. Close zippers;
fasten hooks and Velcro<_>-likefasteners. Tie strings
and sashes to prevent snagging and tangling.
Operating Your Dryer, continued
2Check that the lint filter is dean and in place.
©
3 Load the dryer and close the door.
- Load items loosely. The average wet load wiii
fillthe drum 1/3 to 1/2 full. Items need room to
tumble freely for even drying and less wrinkling.
- If desired, place a dryer fabric softener sheet on
top of the load at the beginning of the cycle.
- To save energy and time and avoid uneven drying
and wrinkling, do not overload the dryer.
•When drying large items, dry only two or three
items at a time. Fill out the load with small and
medium sized items.
o For delicate or very small loads, add two or three
similar items to improve tumbling action.
4Select the appropriate cycle and settings for
each load.
Over-drying can cause wrinkles, shrinkage, lint,
harshness and a build up of static electricity.
Turn the cycle selector knob in either direction to
select the cycle desired. The indicator for that cycle
will be illuminated.
The estimated drying time for Auto Dry cycles or
the actual drying time for Timed Dry cycles will be
displayed.
• A suitable drying temperature, dryness level and
options will automatically be indicated for the cycle se-
lected. See the "Dryer Settings Chart" for more details.
To change the drying temperature and dryness
level, press the Temp or Dry Level buttons to
scroll to the desired settings.
To select or delete an option, press the button for
that option. The indicator will be illuminated when
the option has been selected. The indicator will no
longer be lighted when the option has been deleted.
If a setting is not available for the cycle selected, the
indicator will not light.
Adjustments made to a cycle wi be remembered and
recalled each time that cycle is selected in the future.
oouons To return to factory
settings, press these
two buttons at the
same time and
hold until the signal
...... sounds.
5Start the cycle.
*Close the door and press Start to begin the cycle.
The dryer will not operate with the door open. To
interrupt the cycle, press Pause; press Start to
resume the cycle. Press cancel to stop the cycle.
If changes to the cycle, temperature, dryness level
or options are attempted after the cycle starts, the
lights will blink and a signal will beep.
To change the cycle once the cycle has begun,
press cancel and select a new cycle. To change
the temperature, dryness level or options once the
cycle has begun, press Pause and make the new
selections.
To add or remove items when the dryer is running,
open the door. The dryer will stop when the door
is opened. Allow the drum to come to a complete
stop before reaching inside.
Close the door and press Start to resume the cycle.
A signal will sound at the end of the cycle if the
chime option has been selected.
6When the cycle ends, remove items immedi=
ately and hang or fold.
Clean the lint filter after every load. CLERFI FILTER
will be displayed at the end of the cycle to remind you
to remove lint from the filter. ....
normal
towels
bulky
heavy
allergy mixed load
casual
casual quickdry
allergy delicates
mixed
load
casual
refresh
time
dry
specialty
cycles
Specialty Cycles may include, but
not limited to:
,.leans
• Kids Wear
•Active Wear
• Warm Up (on select models)
quickdry
delicates
steam
refresh
time
dry
specialty
cycles
Specialty Cycles may include, but
not limited to:
,Jeans
• Pet Beds
• Kids Wear
•Stuffed Toys
•Active Wear
•Warm Up
This manual covers many models and not all cycles, options, or features listed are available on every model. Consoles shown
above for reference only. Your model may differ.
Cycle Selection
Turn the cycle selector in either direction to the cycle
desired. The indicator for that cycle will be illuminated.
To change the cycle once it has begun, press the cancel
button before selecting a new cycle, lust turning the
cycle selector knob to another selection will not change
the cycle.
For best results
Follow the fabric care label instructions
on items to be dried.
Cycle Selection, continued
Auto Dry Cycles
Auto Dry cycles take the guesswork out of selecting the
correct drying time for each load. Moisture sensing bars
at the back of the dryer drum sense the moisture level of
the load as it tumbles through the heated air. With Auto
Dry cycles, the load will automatically be dried at the
selected temperature to the desired dryness level.
Auto Dry cycles save time and energy and protect fabrics.
When the load has reached the selected dryness level, it will
continue to tumble during a cool down period. This helps
reduce wrinkling and makes items easier to handle during
unloading.
Drying time varies depending on size and dampness of
load and fabric type. If the load is too small or almost dry,
the moisture sensing bars may not detect enough moisture
to continue the cycle and the cycle may end after a few
minutes. If this occurs, select a Timed Dry cycle.
Room temperature and humidity, type of installation and
electrical voltage or gas pressure can also affect drying time.
Heavy (on select models)
Select this Auto Dry cycle to dry durable fabrics such as
jeans and overalls.
Heavy/Bulky (on select models)
Select this Auto Dry cycle to dry durable fabrics such as
jeans and overalls.
Bulky (on select models)
Select this Auto Dry cycle to dry bedding and bulky items
such as comforters, blankets, sleeping bags and parkas.
Towels (on select models)
Select this Auto Dry cycle for towels and bath mats.
Normal
Select this Auto Dry cycle for cotton items.
Allergy (on select models)
Select this Auto Dry cycle to compliment your washer's
Allergy cycle or where you wish to reduce allergens as
you dry your load. Items prone to heat damage are not
recommended for this cycle.
Mixed Load (on select models)
Select this Auto Dry cycle to dry loads containing a mix
of fabrics.
Jeans (on select models)
Select this Auto Dry cycle for drying an entire load of
denim jeans.
Casual
Select this Auto Dry cycle for cottons and blends with a
no-iron finish.
Delicates
Select this Auto Dry cycle for knits and delicate items.
Timed Dry Cycles
FIRE HAZARD
To avoid fire hazard, do not use heat to dry items
containing feathers or down, foam rubber, plastics
similarly textured, rubber-like materials. Use the Timed
Dry cycle and the Air Dry setting.
Quick Dry (on select models)
Select this timed cycle to quickly dry small loads in 25
minutes.
Steam Refresh (steam models only)
Select this cycle to refresh fabrics, remove odors and
reduce static by injecting the perfect amount of steam
into clothing that has been left in the dryer, stored in
crowded closets, drawers, or unpacked luggage.
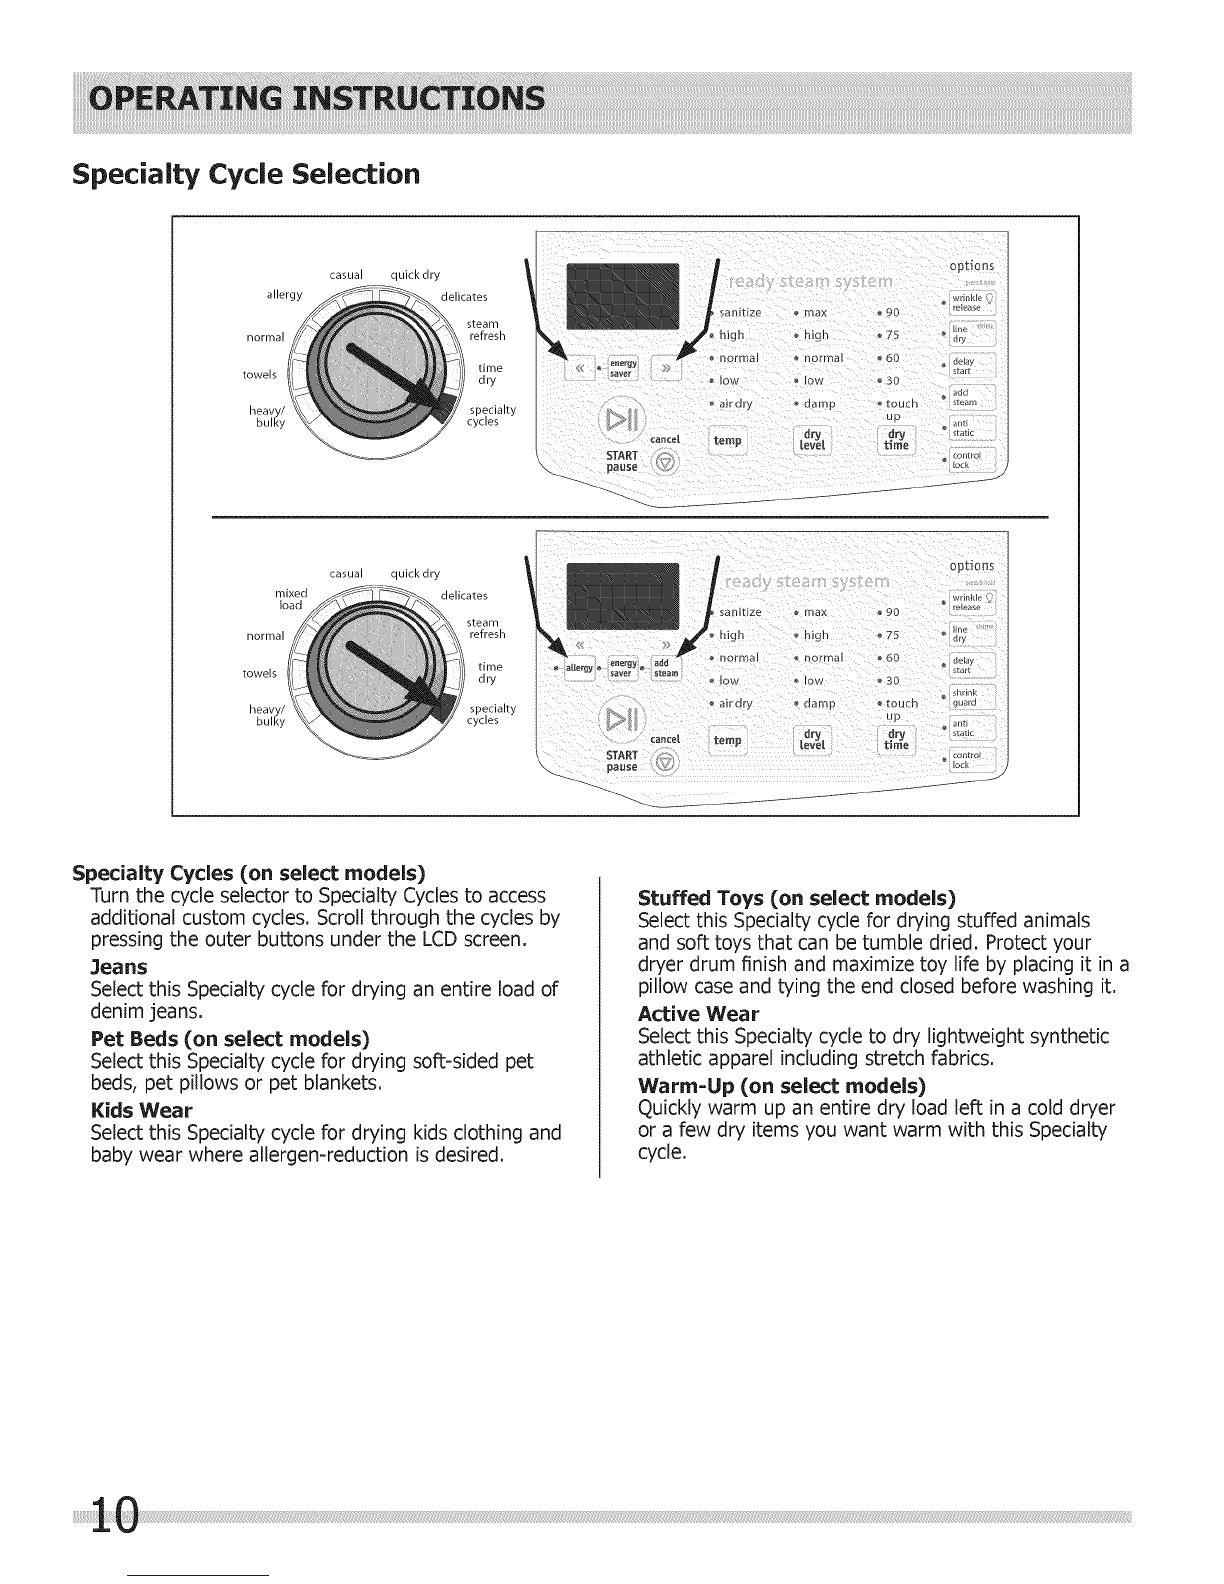
Time Dry
To manually select the drying time for any load, turn
the knob to Time Dry. Press the Dry Time button (on
select models) on the setting panel to scroll through
drying times from 15 (Touch Up) to 90 minutes.
"Dry Time" button
On models without a Dry Time button, continue to
turn the cycle Selector knob while on the Time Dry
cycle, to increase or decrease drying time displayed on
the LCD screen.
allergy mExed]oad
quickdry .gn _nEgn ,:j_
_aJrarv oaam_,
K
Continue turning to select
manual drying time No "Dry Time" button
Because this is not an Auto Dry cycle, you will not be
able to select a dryness level.
Specialty Cyde Selection
allergy
normal
towels
heavy/
bulky
casual quick dry
delicates
steam
START
pause
o_tions
release
90
Ein_
75 _ dry
60 _ cl_ay
_tart
"OW e lOW _ 30
aug
air dry _ damp -touch steam
up arm
_amceL temp dr_ d_y _tk
{eve[ t_me
lock
mixed
load
normal
towels
heavy/
bulky
casual quickdry
delicates
steam
optloris
Specialty Cycles (on select models)
Turn the cycle selector to Specialty Cycles to access
additional custom cycles. Scroll through the cycles by
pressing the outer buttons under the LCD screen.
Jeans
Select this Specialty cycle for drying an entire load of
denim jeans.
Pet Beds (on select models)
Select this Specialty cycle for drying soft-sided pet
beds, pet pillows or pet blankets.
Kids Wear
Select this Specialty cycle for drying kids clothing and
baby wear where allergen-reduction is desired.
Stuffed Toys (on select models)
Select this Specialty cycle for drying stuffed animals
and soft toys that can be tumble dried. Protect your
dryer drum finish and maximize toy life by placing it in a
pillow case and tying the end closed before washing it.
Active Wear
Select this Specialty cycle to dry lightweight synthetic
athletic apparel including stretch fabrics.
Warm=Up (on select models)
Quickly warm up an entire dry load left in a cold dryer
or a few dry items you want warm with this Specialty
cycle.