Fujitsu Fujitsu Stylistic User manual

Fujitsu Stylistic®
TABLET DOCK
USER’SGUIDE
Tablet Dock(1-2) 5/12/03, 4:11 PM1

2
Fujitsu and the Fujitsu logo are registered trademarks of Fujitsu Ltd., and Stylistic is a registered
trademark of Fujitsu Ltd.
Microsoft and Windows are registered trademarks of the Microsoft Corporation.
All other trademarks mentioned herein are the property of their respective owners.
Product description data reflects Fujitsu design objectives and is provided for comparative
purposes; actual results may vary based on a variety of factors. Specifications are subject to
change without notice.
© 2003 Fujitsu. All rights reserved.
DECLARATION OF CONFORMITY
according to FCC Part 15
This device complies with Part 15 of the FCC rules. Operations are subject to the following two conditions:
(1) This device must not be allowed to cause harmful interference, (2) This device must accept any
interference received, including interference that may cause undesired operation.
Tablet Dock(1-2) 5/12/03, 4:11 PM2

Tablet Dock User’s Guide
3
Fujitsu StylisticTablet Dock
This guide contains information on using your
Tablet Dock.You should read this section
before using the dock, even if you are familiar
with other computer docking devices.
Your Tablet Dock may be configured in one of
two ways:
Your Fujitsu Stylistic Tablet Dock has the
following interfaces:
Configuration
Tablet Dock with CD-ROM Drive
Tablet Dock with Combo DVD/
CD-RW Drive
LAN (RJ45)
Jack
VGA Port
Line Out
Jack
DC In
USB Ports
IEEE 1394
Jack
Allows you to connect a Local
Area Network (LAN) device or
broadband device such as a
cable modem.
Allows you to connect an
external monitor.
Allows you to connect
headphones or external
speakers.
Allows you to connect power to
the system.
Allow you to connect up to three
Universal Serial Bus (USB)
devices or hubs.
Allows you to connect a
peripheral such as a digital video
camera.
Port/Jack Purpose
Do not expose the Tablet Dock to rain,
moisture, excessive dirt or temperatures
outsidetheEnvironmental Specifications
as it may cause fire and shock hazards.
High voltage is present inside the Tablet
Dock.Donotremovethecoverunder any
circumstances.There is a serious shock
hazard.
Switch the unit OFF, unplug the power
cordandcontactaqualified service tech-
nician or Fujitsu Services and Support if:
• Liquid has been spilled on theTablet
Dock.
• The Tablet Dock has been dropped.
• Small objects went inside your
TabletDock whichmaycause ashort
circuit and/or create a hazard of
shock.
• Fuses continue to blow out.
• Adistinctchange intheoperationand
performance of the Tablet Dock
occurs.
• The power cord or plug is damaged
or frayed.
Theunitshould beoperatedonlyfrom the
type of power indicated on the marked
label.
The socket outlet must be installed near
theequipmenttobeaccessible using the
system’s AC power cord. Never connect
theTablet Dock to AC power by using an
extension cord.
Always use your Tablet Dock on a solid,
flat, level, clean, and dry surface.Nearby
there should be electric power, as well
asatelephone jackforamodem oraLAN
port.
Save packing material in order to safely
shipor store theTabletDockin thefuture.
Tablet Dock(3-7) 5/12/03, 4:12 PM3

4
IDENTIFYINGTHE COMPONENTS
Before using your Tablet Dock, you should familiarize yourself with its various features.
Side Latch
(both sides)
Interface Connector
Back Latch
Positioning Guide
Platform
Front of base
(Do not use as
a carrying handle)
Positioning Guide
Lock Release Button
Lock Handle
KensingtonTM Lock Slot
CD-ROM or Combo
DVD/ CD-RW Drive
Easel Release
Buttons
LAN (RJ-45) Jack
External Monitor (VGA) Port
Line Out Jack
IEEE 1394 Jack
USB Ports (Qty. 3)
DC In Jack
Figure 1. Front View
Figure 2. Back View
Air Vents
CD-ROM Access
Indicator
Tablet Dock(3-7) 12/12/03, 10:36 AM4

Tablet Dock User’s Guide
5
DOCKINGYOUR SYSTEM
Microsoft®Windows®uses “plug- and-play”
technology to automatically load the files
necessary to operate your Tablet Dock and any
attached devices.
1. Plug the system’s AC adapter into a wall
outlet, then into the Tablet Dock’s DC Input
jack.
2. Set the Fujitsu Stylistic on the Tablet Dock,
with the system oriented in the same
direction as the dock.(See Figure 3 for
location).The connector in the back of the
system should be aligned with the interface
connector on the Tablet Dock.
3. Carefully push the system towards the
docking port until you hear a click.The click
indicates that the side latches are in place.
Note that the system is not yet locked into
place until the following step is performed.
Microsoft®Windows®uses “plug-and-play”
technology to automatically load the files
necessary to operate your Tablet Dock and
any attached devices.
Figure 3. Docking the system
UNDOCKINGYOUR SYSTEM
Use these instructions when you want to
remove your system from the Tablet Dock.
1. Press the lock release button on the top of
the right slide (above the lock handle).
While holding it down, pull the lock handle
upwards to unlatch the back latches from
the system.
2. Pull the system upwards, away from the
platform.The system is now undocked.
The front portion of the base should not be
used as a handle.It is designed to support
the system when it is installed in the Tablet
Dock, but not as a handle.
The system can be removed from theTablet
Dockwhetherthe system isoperatingor not.
Lock Handle
Lock Handle
Lock Release
Button
4. Firmly pull the lock handle down as far as it
will go.This engages the back latches and
side latches, and locks the system in place.
5. Your Tablet Dock is now ready for use.You
may now attach devices to it.
Tablet Dock(3-7) 5/12/03, 4:12 PM5

6
Figure 4. Portrait Orientation
Figure 5. Landscape Orientation
Figure 7. Changing Display from
Landscape to Portrait Mode
To change the position of the display, simply
grasp the edge of the system and turn it in the
direction shown in Figures 6 and 7.
Figure 6. Changing Display from
Portrait to Landscape Mode
CHANGING SYSTEM
ORIENTATION
Microsoft®Windows®uses “plug-and-play”
technology to automatically load the files
necessary to operate yourTablet Dock and any
attached devices.
• If the display is in portrait position, turn the
display to the right, as shown in Figure 6.
• If the display is in landscape position, turn
the display to the left, as shown in Figure 7.
(* The illustration may not be exact
representation of the exact product.)
Tablet Dock(3-7) 5/12/03, 4:12 PM6

Tablet Dock User’s Guide
7
CONNECTING DEVICES
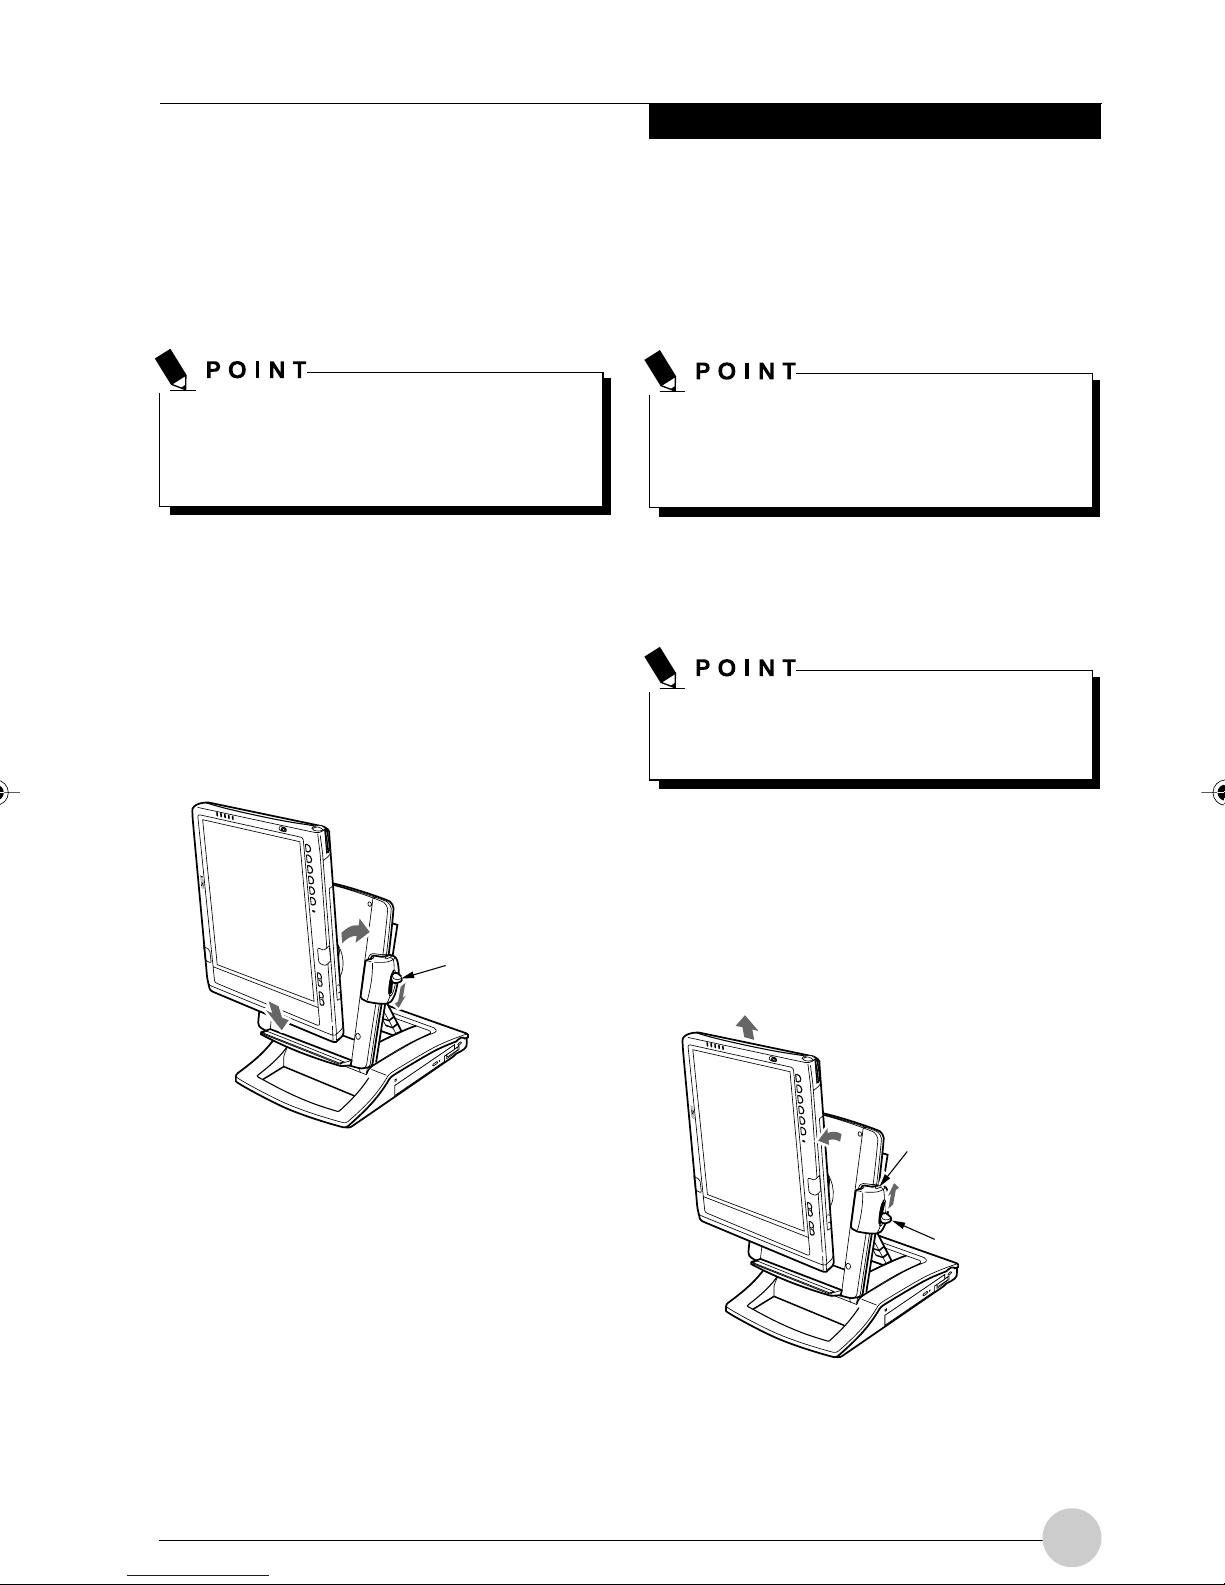
Once your system is installed in theTablet
Dock, you are ready to attach external devices
to the dock.
To Attach an ExternalVGA Monitor
This option allows you to use an external
monitor with your system.The only
requirement is that the external device
(monitor, projector) is a VGA device. Consult
the instructions that come with the device.
1. Securely insert the external monitor plug
into the display port on the back of the
Tablet Dock
(Figure 2)
. Always check the
icon by the port before inserting.Tighten
screws if available.
2. You may switch between the internal
monitor and external monitor using the
Display Configuration utility located in the
system tray at the bottom right of the
screen, or through the Control Panel
settings.
To Attach a USB device
Use of the USB ports allows attaching USB
devices to a docked system.
1. Securely insert the connector into one of
the three USB ports on the left side of the
Tablet Dock
(Figure 2)
. It may be necessary
to wait a short time while the appropriate
drivers are located and installed by the
system.
To Attach an IEEE 1394 device
The IEEE 1394 jack allows attaching peripherals
such as digital cameras to a docked system.
1. Securely insert the connector into the IEEE
1394 jack on the left side of the Tablet Dock
(Figure 2)
.
Refer to the device manufacturer’s installation
and usage instructions for configuration
instructions.
To Attach External Audio Equipment
The Tablet Dock provides a Line Out jack for
headphones or external speakers.
1. To attach an external audio device, insert
the plug into the Line Out jack on the back
of the Tablet Dock
(Figure 2)
.
To Attach a LAN Device
The LAN (RJ-45) jack allows you to connect
the system’s internal Fast Ethernet to a LAN,
or broadband devices such as a cable modem,
DSL, or satellite internet.
1. To attach a LAN device, insert the plug into
the LAN (RJ-45) jack on the back of the
Tablet Dock.
Refer to the device manufacturer’s installation
and usage instructions for configuration
instructions.
USINGTHE INTERNAL MEDIA
DRIVE
The Tablet Dock is outfitted with either a CD-ROM
drive or a Combo DVD/CD-RW drive,
depending upon the configuration of your dock.
A CD-ROM drive allows you to access
software, data, or audio CDs. A DVD/CD-RW
combo drive allows you to access movies,
audio, software, data, or audio DVD/CDs, and
to write data onto recordable CDs.
Connecting external speakers (including
headphones) or microphone disables the
system’s internal speaker or internal
microphone.
Tablet Dock(3-7) 5/12/03, 4:12 PM7

8
• CD-ROM drive
The drive will work as soon as the system is
docked and powered up.
• Combo DVD/CD-RW drive
Packaged with the Tablet Dock is a CD that
contains the applications required to run the
DVD and CD/RW features.The combo drive
will only act as a CD-ROM drive until you
install the additional software.
The instructions for installing and removing disks
is the same for both drives.For information about
the software’s features and capabilities, refer to
the help files associated with the related
applications.
Prolonged use of the media drive, such
as watching a DVD movie, will
substantiallyreduce yourbattery lifeif no
other power source is attached. Be sure
to attach an AC Adapter when using the
Tablet Dock for prolonged tasks.
All Fujitsu DVD players are set to play
DVD titles with region code number 3
which is specified for the Asia Pacific
market.The region number is a regional
restriction code defined by the DVD
Forum consortium.Different regioncodes
are recorded on video DVD titles for
publication indifferentareas of the world.
If the regional code of the DVD player
doesnot matchthe regional codeson the
titles, then playback is impossible.
You can change the region code on the
DVD player using the Properties menu of
the DVD software. Note, however, that
you can only change the region code up
to four times.After the fourth change, the
last region code entered becomes
permanent, and cannot be changed.
Tablet Dock(8-10) 5/12/03, 4:13 PM8

Tablet Dock User’s Guide
9
LOADING MEDIA
(Refer to Figure 8 for the following steps)
To load a disc into your media player drive,
follow these steps:
1. Push and release the eject button on the
front of the drive to open the holder tray.The
tray will come out of the system a short
distance.
2. Gently pull the tray out until a media disc
can easily be placed in the tray.
3. Place the media into the tray, label side up,
with the hole in the center of the disc. Snap
the disc onto the raised circle in the center
of the tray.
4. Gently push the holder tray back in until you
hear a click.
REMOVING MEDIA
(Refer to Figure 8 for the following steps)
1. Push and release the eject button on the
front of the media player drive.This will stop
the drive and the holder tray will come out
of the system a short distance.
2. Gently pull the tray out until the disc can
easily be removed from the tray.
3. Carefully remove the media disc from the
holder tray.
4. Gently push the holder tray back in until you
hear a click.
Do not operate your media drive unless your
system is sitting on a relatively flat surface.
Using the drive when the system is not level
may damage the drive or prevent proper
operation.
There may be a protective sheet in the tray
from when it was shipped;please make sure
it is removed before operating the drive.
Figure 8. Loading/Ejecting Media
Tablet Dock(8-10) 5/12/03, 4:13 PM9

10
SAFETY PRECAUTIONS
• Never move the Tablet Dock with the
system docked unless it is fully locked.If
the system were to undock accidentally, it
could drop and be damaged.
• Never power-off or remove the computer
from the Tablet PC while the system is
reading or writing to a floppy or hard drive.
This could result in data loss.
• Always wait at least 5 seconds before
restarting the Tablet PC after turning it off.
Failure to do this can result in damage to
the system’s electrical circuitry.
Tablet Dock(8-10) 5/12/03, 4:13 PM10

Fujitsu Stylistic®
TABLET DOCK
用戶指南

2
Fujitsu 和 Fujitsu 標志是 Fujitsu Ltd 的注冊商標﹔Stylistic 是 Fujitsu Ltd 的注冊商標。
Microsoft 和 Windows 是 Microsoft Corporation 的注冊商標。
這里提及的其它所有商標均屬其各自擁有人所有。
產品說明數據反映了 Fujitsu 的設計目標﹐它基于比較之目的提供﹐實際效果可能會根據各種不同因素
而有所差異。具體規格會隨時變更﹐恕不另行通知。
© 2003 Fujitsu﹐保留所有權利。
符合 FCC 第 15 部分規定之聲明
本設備符合 FCC 規則第 15 部分之規定。操作使用應符合以下兩項條件:
(1)本設備一定不能造成有害干擾﹐(2)本設備必須能承受接收到的干擾﹐
包括會造成意外操作的干擾。

Tablet Dock 用戶指南
3
Fujitsu Stylistic Tablet Dock
本指南包含有關使用 Tablet Dock 的信息。在使用
Dock 之前應閱讀這一部分的內容﹐即使您熟悉其
它計算機的對接設備。
Tablet Dock 可以按照以下兩種方式中的一種進行
配置:
此款 Fujitsu Stylistic Tablet Dock 帶有以下接口:
配置
配備 CD-ROM 驅動器的 Tablet Dock
配備組合 DVD/ CD-RW 驅動器的 Tablet Dock
LAN
(RJ45)
插孔
VGA 端口
線路輸出
直流輸入
插孔
USB 端口
IEEE 1394
插孔
用來連接局域網(LAN)設備
或線纜調制解調器等寬帶設
備。
用來連接外部顯示器。
用來連接耳機或外部揚聲器。
直流輸入用來將電源連接到系
統。
用來連接最多三個通用串行總
線(USB)設備或集線器。
用來連接數碼攝像機等外設。
端口∕插孔 用途
要點
嚴禁使 Tablet Dock 遭受雨淋﹑受潮﹐或者
放在非常污濁或溫度超出“環境技朮規
格”限制的地方﹐這樣做可能會造成火災
和電擊危險。
Tablet Dock 內有高壓。嚴禁卸下護蓋。這
樣做會有嚴重的電擊危險。
如果出現以下情況﹐請關掉裝置﹐拔下電
源線﹐然后致電合格的服務技朮人員或
Fujitsu 服務中心:
•Tablet Dock 內濺入了液體。
•Tablet Dock 被摔壞。
•小物件落入 Tablet Dock﹐可能造成短
路和(或)電擊危險。
•保險絲連續燒斷。
•運行出現明顯變化﹐Tablet Dock 性能
變得不穩定。
•電源線或插頭損壞或磨損。
只能按照所貼標簽上注明的電源類型使用
本產品。
電源插座必須安裝在設備的附近﹐以方便
連接系統的交流電線。嚴禁使用延長線將
Tablet Dock 連接到交流電源。
警告
必須在穩固﹑平坦﹑水平﹑干淨和干燥的
表面使用 Tablet Dock。附近應該有電源﹐
以及電話插孔﹐以便連接調制解調器或
LAN 端口。
保存好包裝材料﹐以便以后運輸或存放
Tablet Dock 時使用。

4
組件介紹
使用 Tablet Dock 之前應熟悉一下各種不同的功能配置。
側面扣鎖
(兩側)
接口
背面扣鎖
定位裝置
平台
基座正面
(請勿將其用作攜
帶手柄)
定位裝置
背面扣鎖
鎖釋放按鈕
KensingtonTM 鎖插槽
CD-ROM 或組合
DVD/ CD-RW 驅動器
支架釋放
按鈕
LAN (RJ-45)插孔
外部顯示器(VGA)端口
線路輸出插孔
IEEE 1394 插孔
USB 端口(三個)
直流輸入插孔
圖 1. 前視圖
圖 2. 后視圖
鎖柄
CD-ROM 存取指示燈

Tablet Dock 用戶指南
5
對接系統
Microsoft®Windows®使用“即插即用”技朮來自
動裝入運行 Tablet Dock 和其它所連設備所需的文
件。
1. 將系統交流適配器插接到牆上插座﹐然后再連
到 Tablet Dock 的直流輸入插孔。
2. 在 Tablet Dock 上調整 Fujitsu Stylistic﹐使系統
與 Dock 方向相同。(請參閱圖 3 以了解具體
位置)。系統背后的接口應對准 Tablet Dock 上
的接口。
3. 小心將系統推入對接端口﹐直至聽到卡嗒一
聲。卡嗒聲表示側面扣鎖已到位。請注意﹐此
時系統尚未鎖定到位﹐直至執行了以下步驟。
Microsoft®Windows®使用“即插即用”技朮來
自動裝入運行 Tablet Dock 和其它所連設備所
需的文件。
要點
圖 3. 對接系統
斷開系統對接
請在從 Tablet Dock 上卸下系統時遵循以下說明。
1. 按下右側頂部的鎖釋放按鈕(鎖柄上面)。按
下時﹐向上拉鎖柄﹐以便將系統的背面扣鎖打
開。
2. 向上拉系統﹐使其脫離平台。現在系統已經斷
開對接。
基座的前面部分不應用作手柄。在設計上﹐
它是為了支撐安裝在 Tablet Dock 的系統﹐而
非用作手柄。
要點
不管系統是否正運行﹐您可以隨時從 Tablet
Dock 上卸下系統。
要點
鎖扣手柄
鎖扣手柄
鎖扣釋放按鈕
4. 用力將鎖柄拉到盡頭。這會使背面扣鎖與側面
扣鎖咬合﹐將系統鎖定到位。
5. Tablet Dock 現在已經可以使用。您現在可以將
設備連接到它。

6
圖 4. 縱向
圖 5. 橫向 圖 7. 將顯示器從橫向改變為縱向模式
要改變顯示器的位置﹐只需抓住系統的邊緣﹐按
照圖 6 和 7 所示的方面轉動。
圖 6. 將顯示器從縱向改變為橫向模式
改變系統方向
Microsoft®Windows®使用“即插即用”技朮來自
動裝入運行 Tablet Dock 和其它所連設備所需的文
件。
•如果顯示器處于縱向位置﹐請如圖 6 所示向右
轉動顯示器。
•如果顯示器處于橫向位置﹐請如圖 7 所示向左
轉動顯示器。
(* 圖示可能與實際產品不完全一致。)

Tablet Dock 用戶指南
7
連接設備
系統安裝到 Tablet Dock 之后﹐您就可以在 Dock 上
連接外部設備了。
連接外部 VGA 顯示器
這個選項可以讓您配合系統使用外部顯示器。唯
一的要求是外部設備(顯示器﹑投影器)必須是
VGA 設備。請查閱隨設備附帶的說明。
1. 將外部顯示器插頭牢固插入到 Tablet Dock 背后
的顯示器端口(
圖 2
)。在插入之前一定要檢
查一下端口旁邊的圖標。如果可行﹐可以擰上
螺絲。
2. 您可以使用屏幕右下角系統任務欄上的 Display
Configuration(顯示器配置)實用程序﹐或通
過“控制面板”設置在內部顯示器和外部顯示
器之間切換。
連接 USB 設備
使用 USB 端口可以將 USB 設備連接到對接的系
統。
1. 將接口牢固插入到 Tablet Dock 左側三個 USB
端口中的其中一個(
圖 2
)。系統找到并安裝
相應的驅動程序之前可能需要很短一些時間。
連接 IEEE 1394 設備
IEEE 1394 插孔可以用來將數碼相機等外設連接到
對接的系統。
1. 將接口牢固插入到 Tablet Dock 左側的 IEEE
1394 插孔
(圖 2)
。
請參閱設備的制造商安裝與使用說明以獲得有關
配置信息。
要點
連接外部音頻設備
Tablet Dock 提供了一個可以用于耳機或外部揚聲
器的線路輸出插孔。
1. 要連接外部音頻設備﹐請將插頭插入到 Tablet
Dock 背后的線路輸出插孔
(圖 2)
。
連接 LAN 設備
LAN(RJ-45)插孔可以用來將系統內部快速以太
網連接到 LAN﹐或線纜調制解調器﹑DSL﹑衛星
internet 等寬帶設備。
1. 要連接 LAN 設備﹐請將插頭插入 Tablet Dock
背后的 LAN(RJ-45)插孔。
請參閱設備的制造商安裝與使用說明以獲得有關
配置信息。
使用內部媒體驅動器
Tablet Dock 配備有 CD-ROM 驅動器或組合 DVD/
CD-RW 驅動器﹐具體情況視 Dock 的配置而定。
CD-ROM 驅動器可以用來存取軟件﹑數據或音樂
CD。DVD/CD-RW 組合驅動器可以用來存取影
片﹑音頻﹑軟件﹑數據或音樂 DVD/CD﹐以及將
數據寫入到可繞錄的 CD。
連接外部揚聲器(包括耳機)或麥克風會禁
用系統的內部揚聲器或內部麥克風。

8
•CD-ROM 驅動器
只要系統對接并加電后﹐該驅動器即可以使
用。
•組合 DVD/CD-RW 驅動器
Tablet Dock 中附帶了一張光盤﹐其中包含了運行
DVD 和 CD/RW 功能所需的應用程序
。
在安裝附
加軟件之前﹐組合驅動器只能作為 CD-ROM 驅
動器使用
。
安裝和卸下磁盤的說明與這兩個驅動器相同。有
關軟件功能的信息﹐請參閱與相關應用程序有關
的幫助文件。
要點
如果您沒有連接其它電源﹐而長時間使用
媒體驅動器﹐如觀看 DVD 影片﹐則會縮
短電池的使用時間。長時間使用 Tablet
Dock 時一定要連接上交流適配器。
所有 Fujitsu DVD 播放器均已設置為可以
播放區域碼為 3(為亞太市場指定)的
DVD 影片。區域碼是一個由 DVD Forum
consortium 定義的區域限制代碼。世界不
同區域出版的視頻 DVD 影片上都印有不
同的區域碼。如果 DVD 播放器的區域碼
與影片上的區域碼不同﹐則將無法播放。
您可以使用 DVD 軟件的 Properties“屬
性”菜單更改 DVD 播放器的區域碼。但
是﹐注意您最多只能更改四次區域碼。第
四個更改之后﹐最后輸入的區域碼會變成
永久性的區域碼﹐不能再更改。

Tablet Dock 用戶指南
9
裝入媒體
(請參閱圖 8 以了解以下步驟)要將光盤裝入到
媒體播放器驅動器﹐請執行以下步驟:
1. 按下釋放驅動器前面的彈出按鈕﹐打開托盤。
托盤會從系統中露出來一點。
2. 輕輕拉出托盤﹐直至媒體光盤可以容易地放入
托盤。
3. 將媒體放入托盤﹐標簽的一面朝上﹐小孔位于
光盤中心。將光盤扣入到托盤中心的凸緣上。
4. 輕輕推入托盤﹐直至聽到卡嗒聲。
取出媒體
(請參閱圖 8 以了解以下步驟)
1. 按下釋放媒體播放器驅動器前面的彈出按鈕。
這會停止驅動器的運行﹐托盤會從系統中露出
來一點。
2. 輕輕拉出托盤﹐直到光盤可以從托盤中方便地
取出。
3. 小心從托盤中取出媒體光盤。
4. 輕輕推入托盤﹐直至聽到卡嗒聲。
務必要在相對平坦的表面上使用系統中的媒體
驅動器。如果在不平的表面上使用系統中的驅
動器﹐則可能會損壞驅動器或使它無法正常操
作。
注意
托盤在出廠時可能會帶有保護層﹐請務必在操
作驅動器之前取下它。
注意
圖 8. 裝入∕彈出媒體

10
安全注意事項
•切勿在系統對接的情況下移動 Tablet Dock﹐除
非它已經完全鎖定。如果系統被意外斷開對
接﹐則可能會摔壞。
•切勿當系統正在讀寫軟盤或硬盤驅動器時﹐斷
開 Tablet PC 電源﹐或取下計算機。這樣做可
能會造成數據丟失。
•關閉 Tablet PC 之后至少必須等 5 秒才能重新
啟動。如果沒有這樣做﹐則可能會對系統電路
造成損壞。
Other manuals for Fujitsu Stylistic
2
Table of contents
Other Fujitsu Docking Station manuals

Fujitsu
Fujitsu U810 - LifeBook Mini-Notebook - 800 MHz User manual

Fujitsu
Fujitsu Stylistic 3400 User manual

Fujitsu
Fujitsu Mini-Dock FPCPR25 User manual

Fujitsu
Fujitsu FPCCR05 User manual

Fujitsu
Fujitsu Docking Cradle User manual

Fujitsu
Fujitsu Stylistic LT 800P User manual

Fujitsu
Fujitsu Stylistic ST4000 Series User manual

Fujitsu
Fujitsu PenCentra 130 User manual

Fujitsu
Fujitsu Tablet DOCK ST5100 Series User manual

Fujitsu
Fujitsu Stylistic 4110P User manual