FUNAI EZ season MX-110D User manual

V2.12F

1
About FUNAI website
zURL: http://www.funai.de
zFrom the FUNAI website, you can learn more about
our company, keep informed of the latest news about
FUNAI, read more about our products, download
related software and receive technical support.
zYou can download the latest version of firmware to
keep the player in optimal condition at all times.
FUNAI makes no representation for the errors, omissions
or updates of this document. FUNAI also makes no
representation for the data or music files lost of the player.
Users should download the latest version of the user's
manual from our website.
FUNAI is a registered trademark of Funai Europe GmbH.
Trademarks of Microsoft Windows Media and Windows
are owned by Microsoft Corporation.Trademarks of other
products mentioned in this user's manual are owned by
respective companies or organizations.
○
C 2004 Funai Europe GmbH. All rights reserved.
2
Product features
zUnique design
Mirror surface design; special grid-structure for
thumbnail pictures; changeable panels; and unique blue and
white backlight.
zWorld-premiered player-to-player data
transfer function
Exclusive data transfer kit to allow player-to-player data
transfer for sharing of music, voice and file data.
zChangeable cabinets to match your
moods (MX-125D / 225D series)
High-quality aluminum alloy cabinets in a wide variety of
colors allow you to change the appearance of the player to
match your moods everyday.
zMultilingual display support
Supports over 40 languages and offers user interface in 10
different languages.
zMultiple audio file format support
Supports MP3, WMA and ADPCM (WAVE) formats.
zSuper energy saving
Supports continuous playing for 18 hours for one alkaline
battery.

3
Product features
zFirmware update
With the free online firmware download, you can update
new firmware to the player via USB easily.
zListening to FM channels
You can listen to any FM channel loud and clear with the
Player. You can also search and store your favorite FM
channels, and even record a program on the player
if you feel like it.
z19 EQ options
The Player comes with 19 different equalizer options:
Normal, Rock, Jazz, Classic, Pop, Ultra-Bass, Blues, Club,
Dance, Full Bass & Treble, Full Treble, Large Hall, Live,
Party, Reggae, Ska, Soft Music, Soft Rock, and Techno.
zHigh quality sound effects
The Player has an S/N ratio greater than 95dB.
zPortable storage device
The Player is also a portable storage device allowing high
speed data transfer to and from a PC with USB
1.1 / 2.0 full-speed interface.
4
Contents
About FUNAI website ........................................1
Product features................................................2
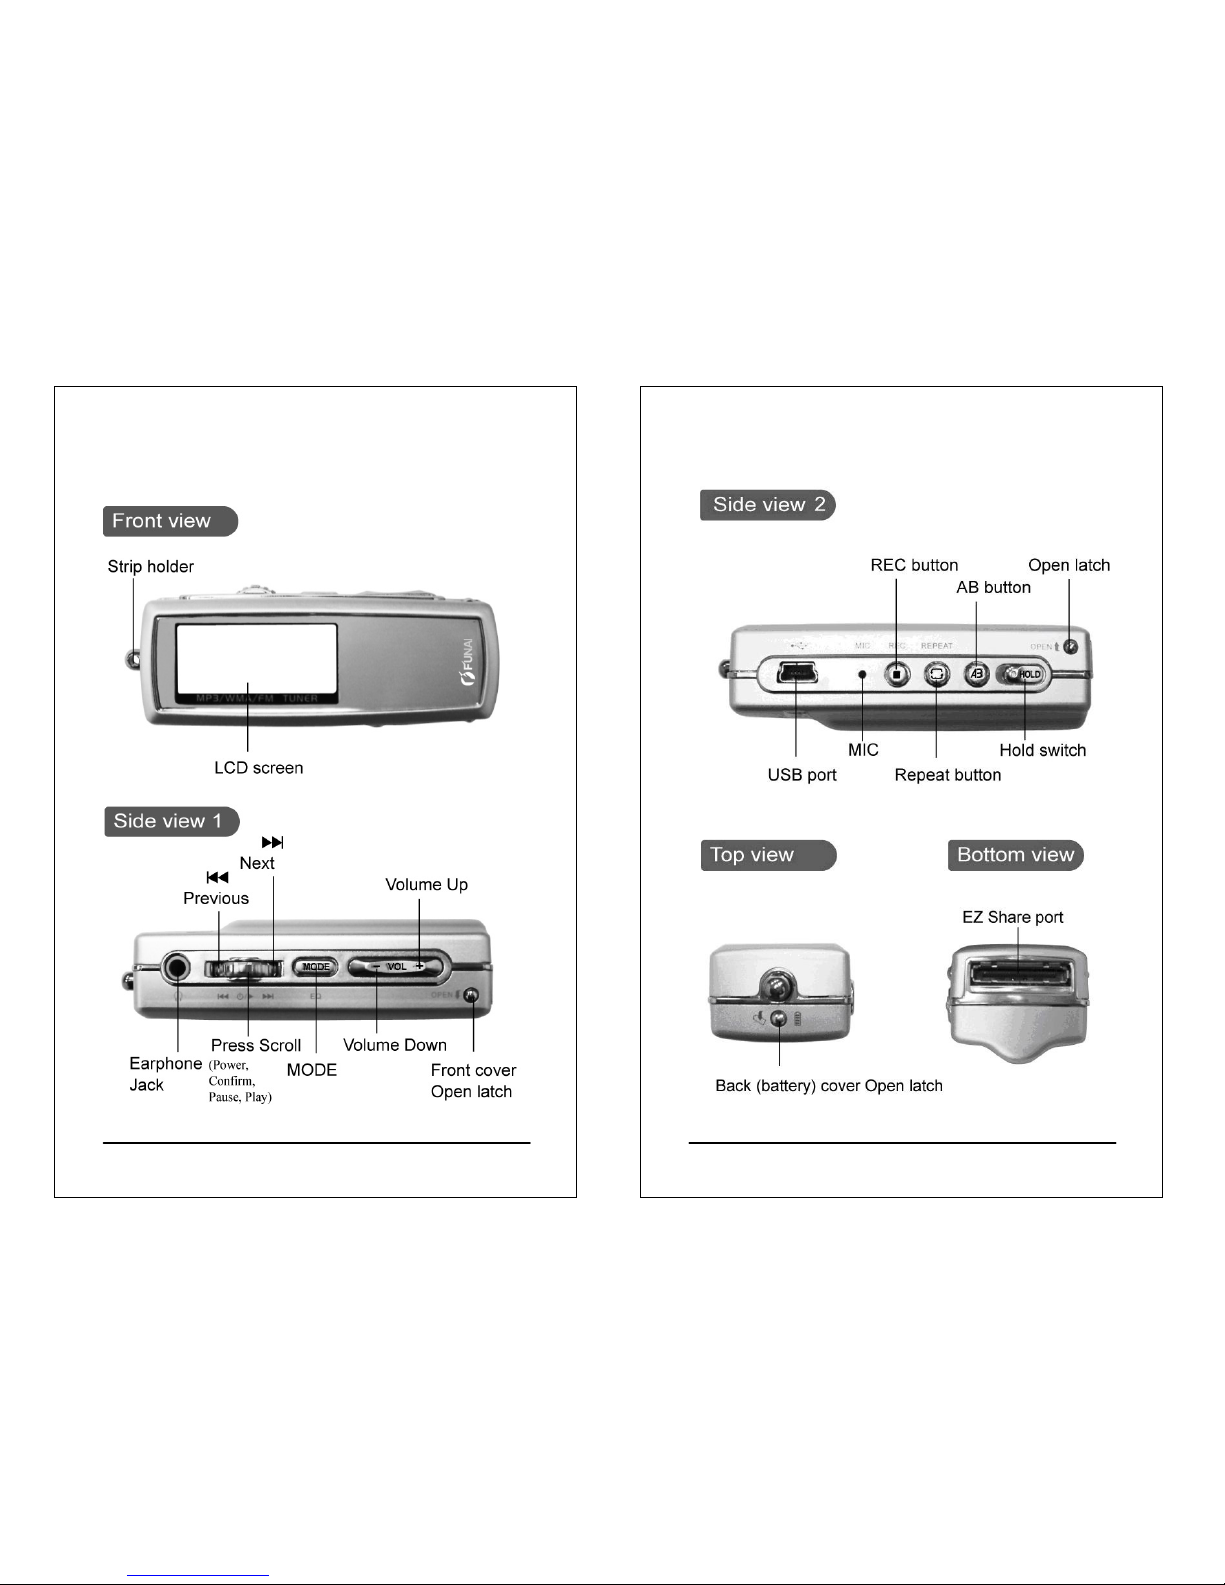
Appearance.......................................................5
Installing batteries .............................................7
Changing panel ...............................................12
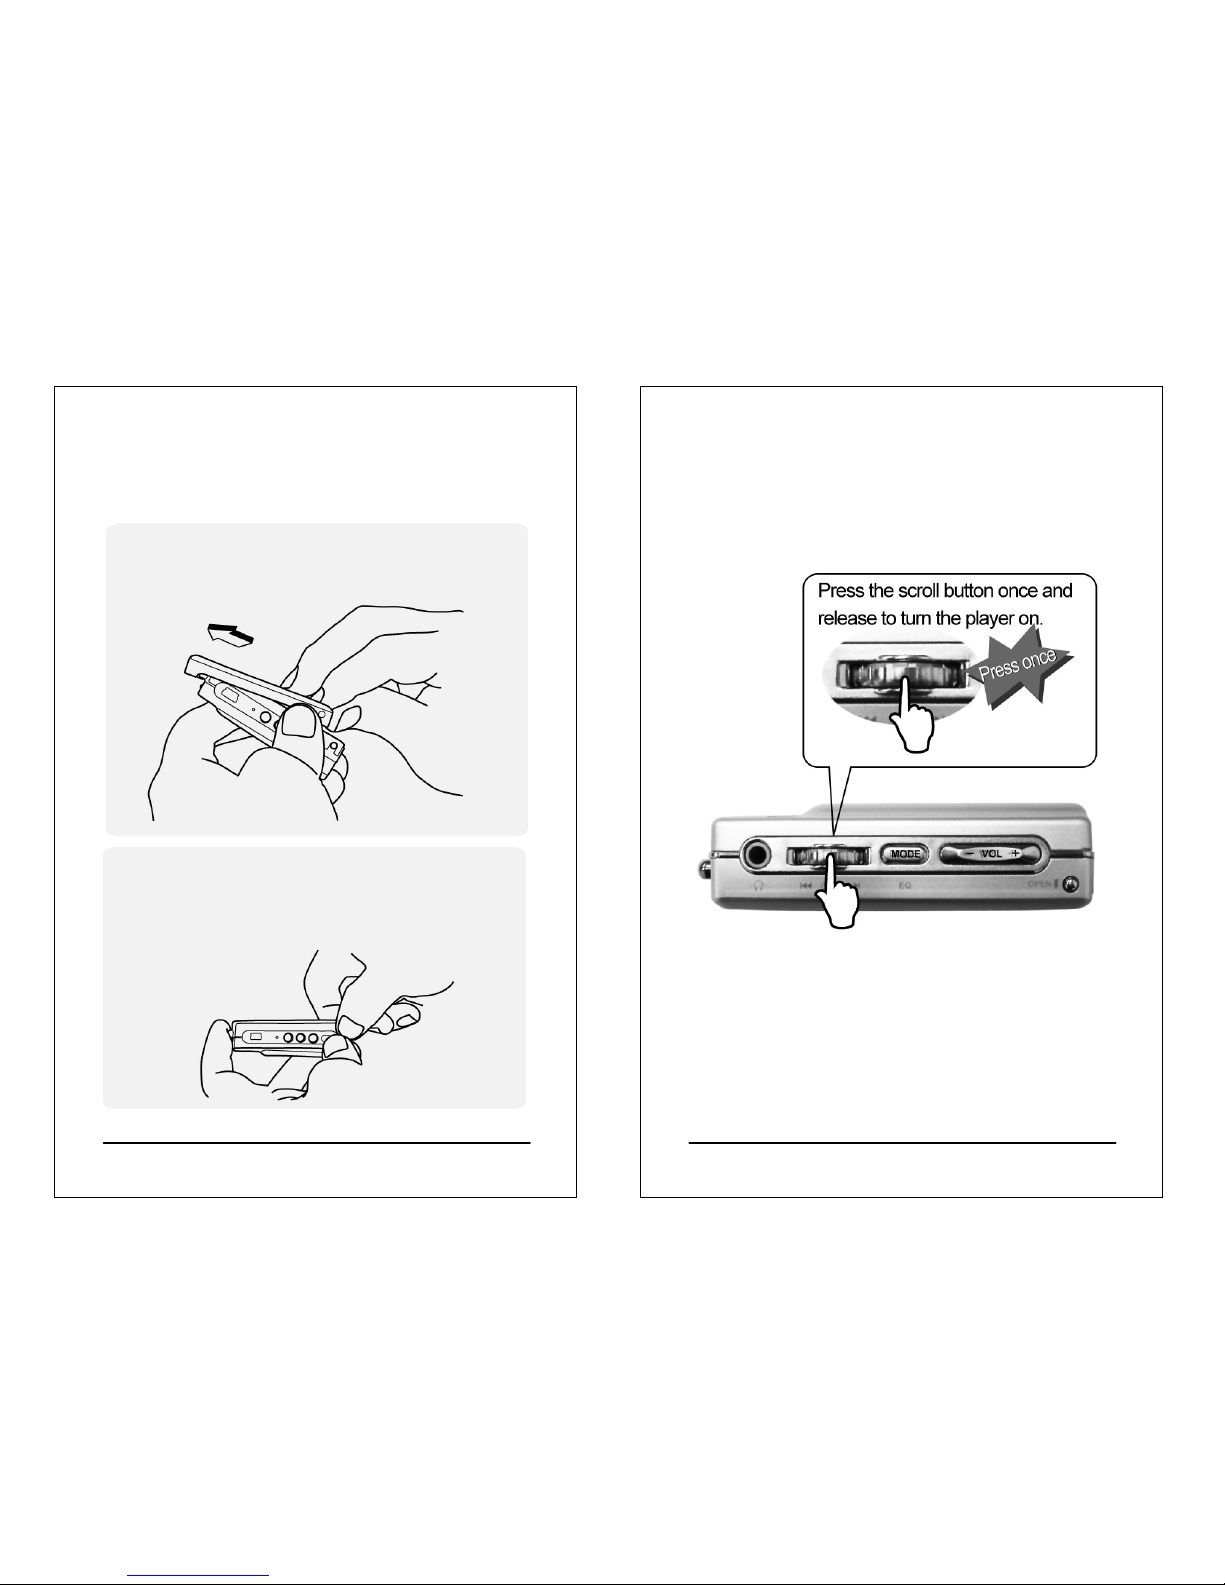
Turning the player on.......................................14
Turning the player off.......................................15
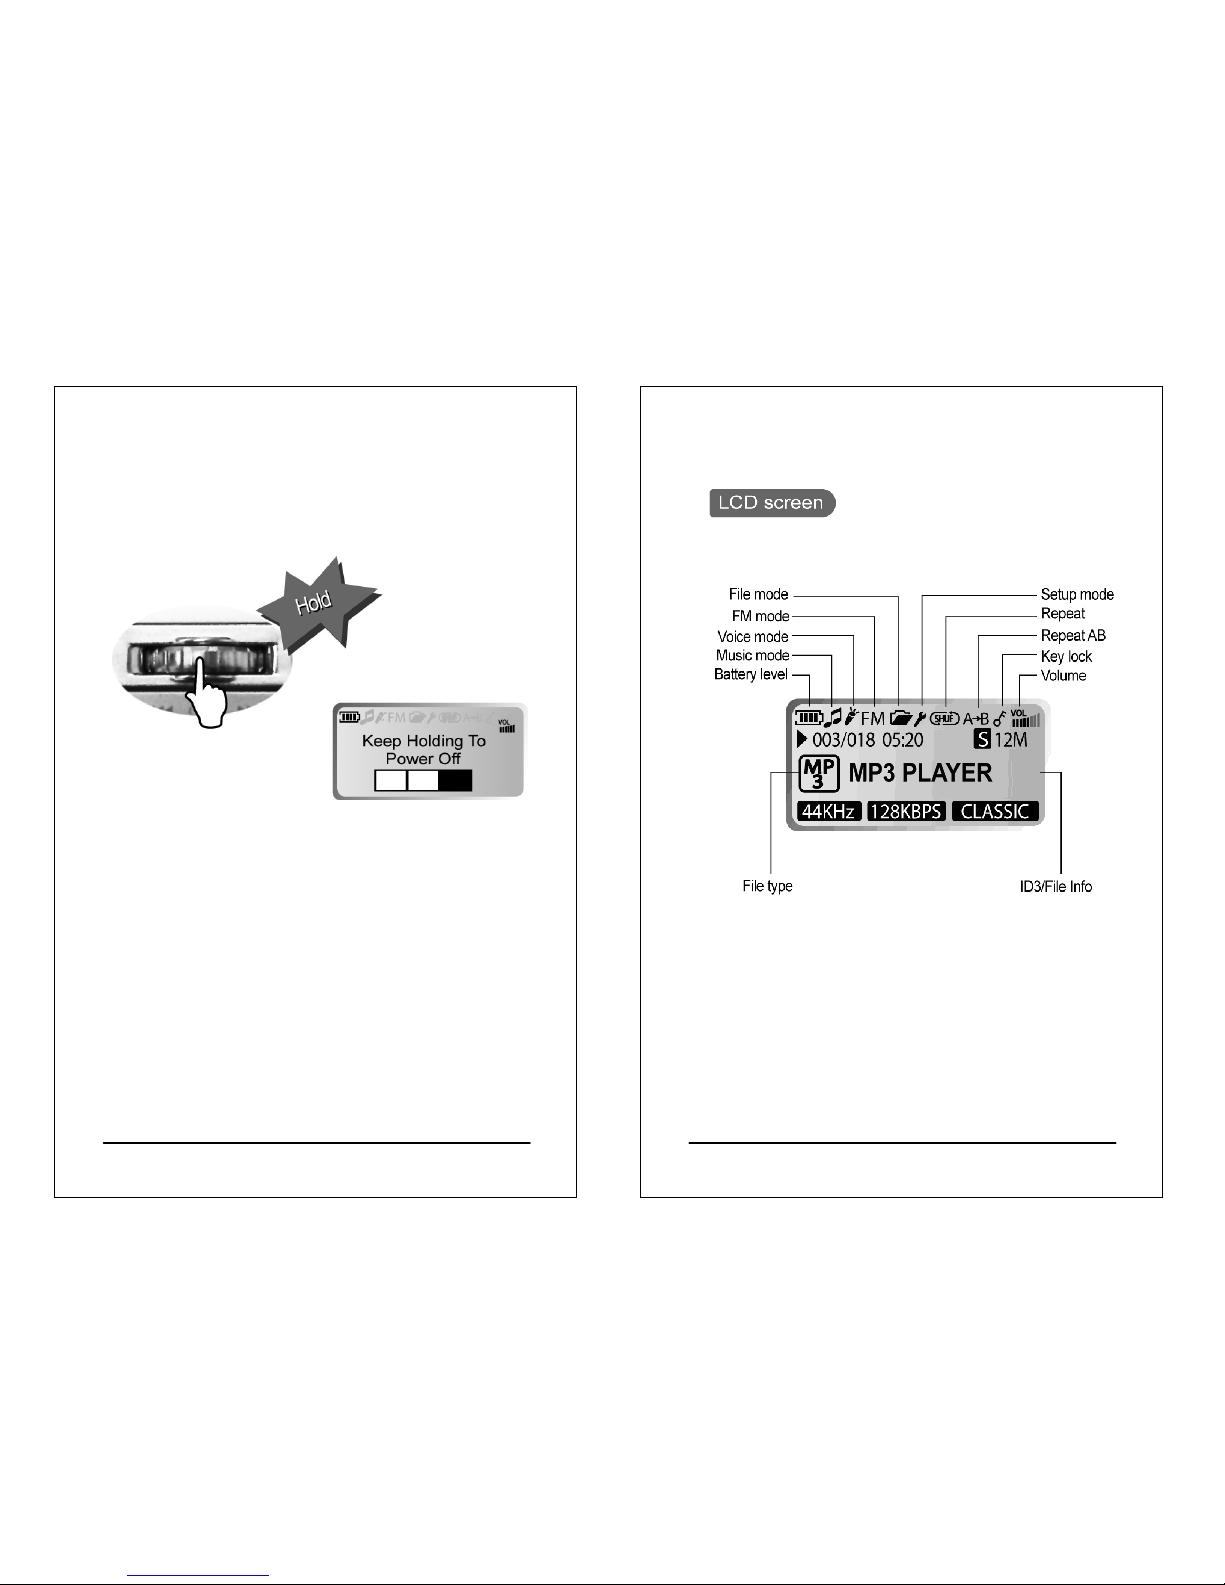
LCD display description...................................16
Basic operation ...............................................18
Installing software............................................20
Connecting the player to a PC.........................26
Copy files into the player .................................28
Firmware update .............................................29
Main menu ......................................................33
Connecting your player with another player.....34
Playing back music..........................................36
Recording and playing back voice files............41
Listening to FM channels.................................43
Recording an FM program...............................45
Setup...............................................................48
Changing cabinets...........................................58
Troubleshooting...............................................59
Cautions..........................................................61
List of accessories...........................................62
Firmware update failure...................................66
Certification information...................................67

5
Appearance
(MX-125D/225D)
(MX-125D/225D)
6
Appearance
(MX-125D/225D)
(MX-125D/225D)

7
Installing batteries
Turn the player off before installing batteries. Open the back
(battery) cabinet.
zInstalling batteries for MX-125D / 225D
1. Press and hold the strip holder (p. 5) with
one thumb and press and hold the back
cabinet Open latch (p. 6) with alternate thumb.
Hold the player with other fingers
at the same time.
8
Installing batteries
(For MX-125D and MX-225D only)
2. Open the back cabinet by pressing and holding
the two sides of Open latch as shown in the
picture below. Do not press the Open latch
directly to avoid damaging.
3. Move the back cabinet downward to detach
it from the player.

9
Installing batteries
(For MX-125D and MX-225D only)
4.Install new batteries in the battery compartment. Make
sure that the poles of batteries are installed correctly.
Wrong battery installation will cause the player damage.
5.Install the back cabinet by aligning it to the player and
then the latch.
10
Installing batteries
zInstalling batteries for MX-110D / 210D
1. Press and hold the two sides of the player body
with one hand, and press and push down
the battery cabinet with alternate thumb.
Hold the player with other fingers
at the same time.

11
Installing batteries
(For MX-110D and MX-210D only)
2. Install new batteries in the battery compartment. Make
sure that the poles of batteries are installed correctly.
Wrong battery installation will cause
the player damage.
3. Install the back cabinet by aligning it to the player and
then the latch.
12
Changing panel
(For MX-125D and MX-225D only)
Please power off the player and tear off the protective
membrane before changing the front panel.
1. Hold the player with one hand and press and
hold the front cabinet Open latch (p.5) with the
thumb of another hand. Slowly lift the front cabinet
near the bottom of the player.
2. Lift the front cabinet near the bottom of
the player about 1cm, as shown in the picture below.

13
Changing panel
(For MX-125D and MX-225D only)
1.Push the front cabinet toward the direction of the strip
holder (p. 5) to detach it from the player.
2.Place the panel you want to replace with in the slot and
install back the front cabinet according to the reverse
order of opening the front cabinet.
14
Turning the player on
zPress the Scroll button to turn the player
on.
zIf the player turns on the backlight and show nothing on the
screen, please try to exchange a new battery. If the status is
still the same after exchanging a battery, try to install the
firmware driver from your CDROM and update the firmware
of the player, follow the procedure as p. 29.

15
Turning the player off
zPress and hold the Scroll button for about
3 seconds to turn the player off.
zTimer off
The player will turn off automatically when being idle or
operating for a period of time. You can set the timer from
Setup to adjust the duration of idling or operating.
(Default is 5 minutes) (See p. 54 and p. 55 for details)
16
LCD display description

17
LCD display description
*The free memory size will be less than the internal memory
size (128MB or 256MB) when the player is empty because
the firmware of player stored in the player to occupy some
free space.
18
Basic operation
1. Select previous track/channel/file/item
2. Play/Pause/Confirm/Power
3. Select next track/channel/file/item
4. Enter Main Menu to select other mode / select EQ
5. Reduce volume
6. Increase volume
7. Start/Stop recording
8. Repeat/Shuffle
9. Repeat AB for language learning
10. Key lock / Hold switch

19
Basic operation
zPress + on the volume button to increase volume.
Press - on the volume button to reduce volume.
zWhile playing back an audio file, press and hold
MODE for about 3 seconds, the EQ indicator on
the lower right corner of the LCD screen will blink.
Scroll the Scroll button to select an EQ type and
press Scroll button to confirm selection.
(Default EQ: ROCK)
EQ options cycle : NORMAL ROCK JAZZ
CLASSIC POP U.BASS BLUES CLUB
DANCE FULL BT FULL TRE L.HALL LIVE
PARTY REGGAE SKA SOFT S.ROCK
TECHNO NORMAL
Where “U.BASS” means Ultra-Bass; “FULL BT” means
Full Bass & Treble; “FULL TRE” means Full Treble;
“L.HALL” means Large Hall; “S.ROCK” means Soft Rock.
20
Installing software
zPut the Installation CD in the CD-ROM, and the following
screen will pop up on your PC monitor automatically.
(Screen is subject to change due to different versions of software.)
zIf the installation program does not run automatically, run
the autorun.exe program on the Installation CD manually.
zThe Installation CD contains the driver installation
(Firmware Download) program and the user's manual.
zClick Install to start software installation.

21
Installing software
zSystem requirements
- CPU: Pentium 133MHz or faster
- Device: CD-ROM
- Interface: USB port (1.1 or 2,0)
- OS: Windows 98SE/ME/2000/XP
- Disk space: 5MB
zThe Firmware Download program that comes with the software
installation program will install the latest version of firmware to
your player.
22
Installing software
zProgram installation
Click Install to install drivers and
the latest firmware download program.
1.
2. Click [Next].

23
Installing software
3. Click [Yes]
4. Click [Next]
24
Installing software
5. Click [Next]
6. Installation progress screen

25
Installing software
7. Click [Finish] when finish the installation.
26
Connecting the player to a PC
zIf you want to update the player firmware or duplicate
music files to the player, connect it to a PC with a
USB cable as shown in the picture below.
zConnectors on the USB cable

27
Connecting the player to a PC
zAfter connected the player and PC, the OS will automatically
generate a Removable Disk in My Computer. You can enter
the disk to access the data In the player.
zYou can access to the player from the Window Explorer
(Windows 2000/XP)/File Manager (Windows 98SE/ME) or
My Computer and add audio files or other files to and erase
files on the player.
zIf you want to remove the USB cable from the player after
adding or erasing files, follow the instructions below to avoid
damaging files on the player.
1. Double click the Remove Hardware icon in the taskbar
tray as shown in the picture below
2. Click Stop when the following window pops up. When
the message "You can remove hardware now"
appears on the screen, remove the player.
28
Copy files into the player
zPlease refer to the last section about “Connecting the player
to a PC”. Connect the player and the PC with a USB cable.
zAfter connecting the player to a PC successfully, there will
be a new disk “Removable Disk” in My Computer.
zEnter the directory stored your music files (mp3 or wma)
and select them thru your mouse. After selection, you’re
your mouse on the selected files and click right button of
your mouse to select “Copy”, enter the Removable Disk
from My Computer, and click right button of your mouse to
select “Paste”, then the music files will be copied into the
player.
zAfter copying files into the player, please follow the
procedure of the last page p. 27 to remove the hardware.

29
Firmware update
zThe firmware of the player can be upgradeable to keep the
player in optimal condition at all times and expand the file
format and language supports.
zGet the latest firmware from our website or New Firmware
CD disc. Confirm the model of your player before updating
the firmware.
zIf you use New Firmware CD disc to update the firmware,
put the CD disc into CDROM, and it will pop-up a installation
menu automatically, please refer to p.20.
zIf you get the new firmware from our website, extract the
downloaded file to a directory, e.g. C:\temp. Open the
directory from My Computer or Window Explorer (Windows
2000/XP)/File Manager (Windows 98SE/ME) and run
Setup.exe (double click the ).
zIf you have already installed a previous version of Firmware
Download program, remove it first by clicking Yes in the
following dialog box.
30
Firmware update
zClick Finish to complete software remove.
zRun autorun.exe in the root directory of CD drive again
in windows explorer in p.20.

31
Firmware update
zSelect Firmware Download program from Start Programs
FUNAI MP3 Player Firmware Download
as shown in the picture below.
zAfter running the firmware update, click Start to update
firmware. (Caution! All data including audio and personal
files on the player will be deleted, and default settings will be
restored when Format Data Area option is checked.
You will need to Format Data Area when updating most
firmware versions.)
32
Firmware update
zClick Close to complete firmware update and disconnect
the player from your PC as shown in p. 27.
zDo not disconnect the USB cable while updating firmware.
You will be unable to turn your the player on if firmware
update fails or is interrupted.
zIf you cannot turn on your player due to firmware update
failure, see Firmware Update Failure in p. 66 for details.

33
Main menu
zWhen you press MODE button to switch the mode, you will
see 5 icons in a main menu as below. Push the Scroll button
to select the mode and press the Scroll button to enter the
mode.
Music mode
Voice mode
FM radio mode
File mode
Setup mode
34
Connecting your player with
another player
Please contact your agent for purchasing the connector.
zConnect your player (A) and another player (B)
to the exclusive data transfer kit as shown in the
picture below. (Face the side of the data transfer kit
with a screw hole upward.)
zIf you want to transfer files from A to B, we recommend
you to set A to File Send mode and B to Receive mode
before connecting them to the data transfer kit. Then
select files on A and press the Scroll button to start
transferring files to B. (No file menu will be found on A
if it is incorrectly connected.)
Select File Send mode
Turn on A and press Mode to launch to File mode (p. 33).
Select File Send mode as shown in the picture below.

35
Connecting your player with
another player
Select Receive mode
Turn on B and press Mode to launch to File mode (p. 33).
Select Receive mode as shown in the picture below.
Sending files
Scroll the Scroll button to select files displayed on player A
and press Scroll button to starting sending files as shown in
the picture below.
zDo not touch any buttons or unplug the player while
transferring files; otherwise the player will freeze and data
sent will be damaged.
36
Playing back music

37
Playing back music
zSwitch mode:Press Mode once to launch main menu to
select other mode. (See p. 33)
zInterrupting playback:Press Scroll button once to interrupt
(Pause) playback and press again to resume playback.
zSelecting previous track:Push Scroll button backward
(to the left) to start playing the audio file from the beginning
and push again to skip to the previous track.
38
Playing back music
zSelecting next track:Push Scroll button forward (to the right)
to skip to the next track.
zFast forward:Push and hold Scroll button forward (to the
right) to run forward and release button to resume normal
playback.
zFast rewind:Push and hold Scroll button backward (to the
left) to run rewind and release button to resume normal
playback.
* Fast forward and fast rewind functions will not work
properly on MP3 files in VBR format.
This manual suits for next models
3
Table of contents