Furniture Solutions MUNICH 18MUNT06 User manual

Imported by Furniture Solutions (Aust) Pty Ltd New South Wales, Australia.
For any assistance with assembly or for missing parts please contact:
Place of purchase or Furniture Solutions on below
Customer Service (Australia) Phone-1300 794 188
Email- customerservice@furnituresolutions.com.au
INSTRUCTION MANUAL
MUNICH BENCH
ITEM CODE: 18MUNT06-T08
1
This manual is for 2 Dining Table models
Images may not look the same size as your
purchased item, but instructions are the same
for both.

PRE-ASSEMBLY PREPARATION
Before you start:
1. Choose a clean, level, spacious assembly area. Avoid hard surfaces that may
damage the product
2. Take care when lifting. Product should be assembled as near as possible to
the point of use
3. Ensure that you have all required contents for complete assembly
4. Always read the assembly instructions carefully before beginning assembly.
5. Keep all hardware parts and packaging out of reach of small children.
6. Do not over tighten the screws and bolts as this may damage the threads
2
30
MINUTES
ALLOW TIME PEOPLE REQUIRED
X2
Tool required to complete assembly
Please note that timber used in product will require oiling
after assembly is complete.

COMPONENT & FITTINGS LIST
PART 1.8m CODE
1
TABLE TOP x 1 P.04706F1.TT
2
LEG FRAME x 2 P.04706F1.LF
3
CROSS BASE x 1 P.04706F1.CB
3
PART 2.4m CODE
1
TABLE TOP x 1 P.04906F1.BT
2
LEG FRAME x 2 P.04906F1.LF
3
CROSS BASE x 1 P.04906F1.CB

Assembly Instructions
Prepare product as per page 2:
Build Timber Frame: Fit Leg frame
You will note that leg frame [2] sit at angle. Stand leg frame as indicated in diagram below, next
with the help of another person aline the cross base as indicated below, insert tongue of timber
into hole on inside of leg frame and aline the lower part of cross base as shown below. Next take
slotted nut [C] insert into hole in top of cross base. Ensure slot is facing up, then take long bolt
with washer [A] insert thru hole in leg frame as shown below. Ensure to seat thread correctly into
slotted nut, use flat tip screw driver to aline bolt and slotted nut as indicated below. Please thread
bolt by hand as you will be able to feel once thread is aligned correctly do not tighten yet.
Next take bolt and washer [B] insert thru hole as indicated below, again fit by hand to ensure bolt
is seated correctly into thread. Once both bolts are seated correctly table tool [D] and tighten both
bolts. Repeat for second Leg Frame. Move to next page.
4

ASSEMBLY INSTRUCTIONS
STEP
2: FIT TABLE TOP TO BASE
Please note this is a very heavy item and will require 2 reasonably strong people to pick up and
place into position.
With the help of another person or two remove top from carton. Ensure holes in bottom of top
(1) are facing towards the ground. With help of another person pick top up by the long edge 1
person each side, centre to balance top on base as per diagram, once top (1) is stable, from under
table line up holes between leg and top, move slowly as to not upset balance. Once lined up take
bolt [E] & washer insert into hole and by hand seat thread properly, turn 2-
3 times, at this point do
not tighten, Repeat for all other bolts as per diagram 4 in total. Once all bolts are seated correctly
tighten using Allen keys (D) provided. Note do not overtighten just till firm. Assembly Complete
Warning never drag bench always lift FROM THE SIDE and with the help of another person.
Dragging can cause damage to product and or your floor surface.
5
Reverse Close up View

6
CARE AND MAINTENANCE
Varieties of materials are used in construction of “Outdoor” furniture ranges.
All will require some form of maintenance to extend the life of finishes and general appearance.
Please see below instruction unique to your chosen product.
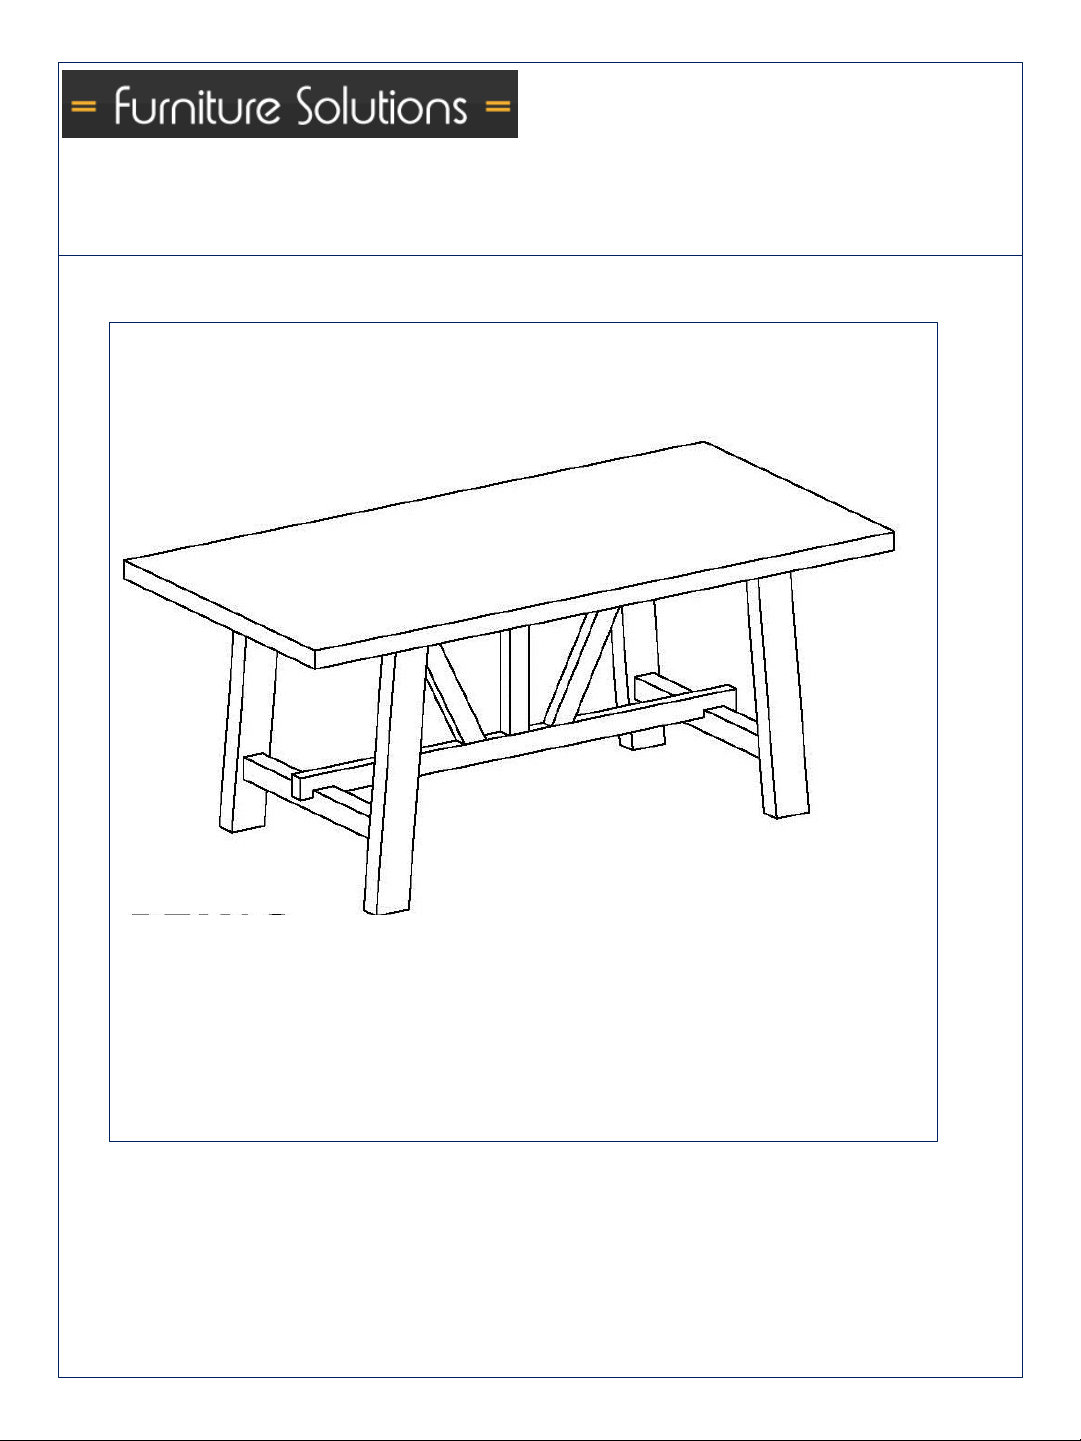
Munich Dining Range Construction;
Tops: Concrete
Base: Acacia Timber
Tops;
Cement & sand mixed and poured into a matrix or moulding frame, this produces a panel of
required size of 5mm thickness. Then a layer of fiberglass is applied to back of panel to add
strength and rigidity and during the assembly process a further support system is added a steel
frame to avoid flex. Once this is added another panel is added to seal all panels into a box.
Finishing is apply to surface sanding and a final coat of clear paint is sprayed on.
Care Instruction;
Please keep dust free, avoid leaving vegetation on surface as leaves and sap can leave stains
that can not be removed. Avoid leaving spills on surface as orange juice & alcohol are acidic and
will damage surface coating if left unattended for any length of time.
Regular cleaning please use a soft bristle dust pan brush or a soft clean cloth, using a hose is
permissible but not at high pressure, please pat dry as the trace minerals in water may leave a
mark once water has evaporated (Do Not Use Bore Water).
Included in packaging is a small can of wax, note this is for cleaning of grime build up.
Using a soft clean cloth you apply the wax in a circular motion to affected area, with this action
the wax then picks up the grime and retains the grime within its self, then with a soft clean coth
remove the wax taking the grime with it. Repeat if necessary. Note may not clean up all
especially any dye based grime and or chemicals.
Base: Acacia Timber
Natural finish on timber will require treatment to reduce swelling of timber from moisture
intake. Please apply a clear coating of decking oil (solvent based) once you have assembled and
follow advice from hardware specialist or from the can for future maintence.
Wood is a living material and over time minor cracks and colour changes will occur. This is a
natural reaction for timber exposed to the elements. Oiling is the key to reduce effects.
Definition of Regular Cleaning;
Numerus factors can influence the time frame for cleaning, depending area you live in, the
weather, positioning of the product (fully protected, partial protection, fully exposed to the
elements). You will need to monitor yourself to establish the cleaning requirement for your
unique situation.
Areas with high salt content and or pollution will require the most frequent cleaning.
To reduce some maintenance you should buy and use an outdoor cover to protect your
furniture from the elements when not in use.

7
SAFETY WARNINGS AND ADVICE
Notices and Advice
Please be advised that products are limited in design for residential use only and are not
suitable for commercial use.
Please be advised that materials used in your furniture are not impervious to neglect, acts of
god, abuse, alcohol spills, improper use of chemicals such as bleach or any solvent based
products.
Please be advised that heat sources such as barbeques, open fires,
temporary/mobile/overhead heaters, poorly insulated candle holders, hot pots, pans, hot
serving dishes can have adverse affects on your furniture.
Please be advised that fitting, bolts, nuts and or screws should be checked periodically to
ensure they have not loosened over time. Remember do not overtighten.
Please be advised coverings are not animal proof. Claws can scratch covering & saliva is
acidic and can damage finish.
Please be advised that continues exposure to the elements will reduce the life of finishes
and fittings.
DO NOT
•Place in close proximity to open flame or heaters.
•Leave spills or food, clean off immediately
•Pull loose thread, cut them instead.
•Sit or lean on arms
•Stand on chair or bench's
•Stand on table tops
•Place heavy objects on table tops
•Place objects such as pot plants as a display piece on tables recommend weight
restriction for table top is 60kg across the table.
Safety warnings
•DO NOT:
•drop, drag always move furniture with the help of another person lift and place only
•Over load bench seats recommended weight evenly distributed is 360kg IE: 3 people
120kg each; 4 people 90kg each.
•Tables, chairs & bench's are designed for seating, not work bench's.
•Allow child to play under table

8
Warranty Detail:
1 Year Warranty
A one (1) year warranty applies to product against any defect associated with faulty
workmanship for a period of (1) year from date of purchase.
Furniture Solutions accepts no responsibility for defects caused by incorrect assembly,
mishandling, acts of god, general wear & tear, stains from spills/vegetation, chipping/scratching,
exposure to extreme heat/cold, mould/mildew, hardware corrosion, misuse of the products &
defects caused by failure in duty of care for the product in accordance with the care instructions.
Warranty only extends to original purchaser and is not transferable, except when given as a gift.
Goods are limited in design for domestic use only, and are not suitable for commercial use.
Duty of care:
While every attempt is made to supply product using quality components there is always a need
from consumer to help ensure a long life of use for product.
*Proper use of item, only what it is designed to do. Designed for dining, not suitable for use as a
workbench, substitute ladder or dance floor.
*Regular maintenance and cleaning: Please consult your Instruction manual included in packaging
for advice of cleaning
*Protecting product from the harsh environment: Pollution, excessive moisture & heat.
To extend the life of your outdoor furniture we recommend the following furniture covers
must/should be used on furniture which is used in areas not protected from elements.
Caution should be used when using oils, lotions & other chemicals such as chlorine not to spill on
furniture.
Instruction Manual –Have been written to suit individual materials used in construction, please
retain for future use for duty of care, assembly, parts & component sizing.
Claim management:
To make a warranty claim, customers can either contact the retailer where the purchase was
made or Furniture Solutions on contact details below. Proof of purchase will be required before
proceeding with any claim. In the case of product defects providing photos may be able to speed
up processing of the claim. If missing parts please refer to assembly instructions for identification
of said part and contact either of the above.
“Our goods come with guarantees that cannot be excluded under the Australian Consumer Law.
You are entitled to a replacement or refund for a major failure and for compensation for any other
reasonably foreseeable loss or damage. You are also entitled to have the goods repaired or
replaced if the goods fail to be of acceptable quality and the failure does not amount to a major
failure”.
This manual suits for next models
1
Table of contents
Other Furniture Solutions Outdoor Furnishing manuals
Popular Outdoor Furnishing manuals by other brands

Walker Edison
Walker Edison OWLS Assembly instructions

Lifetime
Lifetime 60366 Assembly instructions

Barton
Barton 96113 Owner's manual and safety instructions

Outsunny
Outsunny 312-026 Assembly instruction

Rowlinson
Rowlinson Winchester Arbour Assembly instructions

Palmako
Palmako AD44-0408 installation manual

makro
makro BB2211 Assembly and user instructions

Costway
Costway OP70651 user manual

Home Decorators Collection
Home Decorators Collection FWS80209AF Use and care guide

Extremis
Extremis Anker manual

Cello
Cello Korsika instruction manual

Yardistry
Yardistry MERIDIAN YM11756 Installation and operating instructions