Fusion Raven User manual

Quick Setup Guide
www.fusiontlc.com
A Smart Team LLC Project
935 Falls Rd, Shelburne VT, 05482
Copyright © 2021 FUSION TLC

Welcome to Fusion TLC
Features, Warranty and Support
Physical Orientation
Getting Started
Turning Raven On
Turning Raven Off
Mounting Raven On The Camera
Charging Raven Battery
WiFi Setup For Firmware Updates
Updating the Raven Firmware
Navigating Interface
Zone Control Display
Zone Mode Screen
Quick Settings Screen
Connecting Flash
Prepare Raven
Prepare Flash
Test Connection
Warning Information
Follow Us
Menu
• • • • • • • • • • • • • • • • • • • • • • • • • • • • • • • • • • • • • • • • • • • • • • • • •
1
• • • • • • • • • • • • • • • • • • • • • • • • • • • • • • • • • • • • • • • • • • •
2
• • • • • • • • • • • • • • • • • • • • • • • • • • • • • • • • • • • • • • • • • • • • • • • • • • • •
3
• • • • • • • • • • • • • • • • • • • • • • • • • • • • • • • • • • • • • • • • • • • • • • • • • • • • • • • •
4
6
5
• • • • • • • • • • • • • • • • • • • • • • • • • • • • • • • • • • • • • • • • • • • • • • • • • • •
• • • • • • • • • • • • • • • • • • • • • • • • • • • • • • • • • • • • • • •
7
9
• • • • • • • • • • • • • • • • • • • • • • • • • • • • • • • • • • • • • • • • • • • • • • •
• • • • • • • • • • • • • • • • • • • • • • • • • • • • • • • • • • • • • • • • • •
9
• • • • • • • • • • • • • • • • • • • • • • • • • • • • • • • • • • • • • • • • • • • • • • • • • • • • •
11
• • • • • • • • • • • • • • • • • • • • • • • • • • • • • • • • • • • • • • • •
15
13
• • • • • • • • • • • • • • • • • • • • • • • • • • • • • • • • • • • • • • • • • • • • • • • • •
• • • • • • • • • • • • • • • • • • • • • • • • • • • • • • • • • • • • • • • • • • • • • • • • • • •
15
15
16
17
4
19
4
4
• • • • • • • • • • • • • • • • • • • • • • • • • • • • • • • • • • • • • • • • • • • • • • • • • • • • • •
• • • • • • • • • • • • • • • • • • • • • • • • • • • • • • • • • • • • • • • • • • • • • • • • • • • •
• • • • • • • • • • • • • • • • • • • • • • • • • • • • • • • • • • • • • • • • • • • • • • • • • • • •
• • • • • • • • • • • • • • • • • • • • • • • • • • • • • • • • • • • • • • • • • • • • • • • • • • • • • • • • • • • •
• • • • • • • • • • • • • • • • • • • • • • • • • • • • • • • • • • • • • • • • • • • • • • • • • • • • •
• • • • • • • • • • • • • • • • • • • • • • • • • • • • • • • • • • • • • • • • • • • • • • • •
• • • • • • • • • • • • • • • • • • • • • • • • • • • • • • • • • • • • • • • • • • • • • • • • • •
• • • • • • • • • • • • • • • • • • • • • • • • • • • • • • • • • • • • • • • • • • • • • • • • • • • • • •

Dual brand connectivity and control
TTL, Manual & PowerTrack
SyncView & HSS
Remote camera triggering
MultiPop & SpeedCycle
OLED touchscreen & lithium-ion battery
Nose light
RF noise indicator
Intervalometer
WIFI firmware updates
Here are some of the features that come with your Raven. For more details on these features,
scan the QR code and navigate to "Explore Raven" in the main menu.
Hello!
We’re delighted to invite you to our community of avid photographers and creators. With the
need to advance photography equipment and make better tools to give you the ultimate
creative experience, Fusion TLC is the revolution in total light control.
We are committed to bringing you a premium user experience through modern equipment
that is smart, intuitive and flexible. With easy upgrades through cloud software updates
increasing the product life expectancy, designing more greener products, and creating the
first trigger with LED focus assist lighting, we are here to disrupt the market.
The Raven will transform your photoshoots with seamless cross compatibility between
devices and effortless adjustments, liberating you to create beautiful images faster.
Enjoy your new Raven!
Jim Clark and Jason Lin
Founders at Fusion TLC
Welcome to Fusion TLC Features, Warranty and Support
The Raven comes with a limited, one year manufacturers, warranty for parts and labor that is
automatically activated from the date of unit purchase. If you have any questions, contact us
at [email protected] and we’ll help you find a solution.
12

Turning Raven on
Press and hold the Back/Home button for 1 second. The FusionTLC icon and logo will appear
while the Raven boots up. The Raven will then launch the Zone Control Display. To navigate
the menu, use the touchscreen to scroll up or down to select features. Pressing the
Back/Home button will return you to the previous menu.
Turning Raven off
Press and hold the Back/Home button for 3 seconds. A slide-to-power-off button will appear.
Slide the button to the right with your finger.
Mounting Raven on the camera
Confirm that the make of the camera and model of Raven are identical (e.g. Nikon camera and
Nikon-Raven). The make of the Raven is described on the label on the underside of the Raven.
Press and hold the Shoe Release buttons on both sides of the Raven and then slide the Raven
onto the hot shoe mount of the camera. Do not force the Raven onto the hot shoe mount or
you risk breaking the locking pin.
Getting StartedPhysical Orientation
SyncView
Back/Home
Control Dial
Touchscreen
Zone buttons
Microphone and speaker
Shoe release
Hot shoe
Nose cone light /
light meter
34

Getting Started
Charging Raven battery
The Raven has a built-in 2500 mAh rechargeable lithium-ion battery that delivers up to 16
hours of continuous use (users may experience up to 30 hours of use depending on
environmental conditions). The Raven can charge from 0% to 100% in approximately 3 hours
when using the supplied USB 2.0 type A to Micro B cable and using at least 1 amp minimum
USB charger/phone charger. It can also be charged while in use for extremely long
photoshoots.
It is not recommended to leave the Raven plugged in and charging continuously. When not in
use, topping off the Raven battery once or twice a week will achieve a longer battery life.
When the Raven has 20% or less battery charge remaining, select screens will display a red
tint as a warning to charge your Raven. A Raven with 24% or less battery charge remaining
will not be able to perform WiFi cloud updates.
Getting Started
Start by swiping from the bottom to top on the Zone Control Display.
Then rotate the dial until you see the Settings icon and tap on it.
Now rotate the dial until you see the Wifi icon and tap on it.
This will begin the Wifi scanning process. Once that is complete, a list of all 2.4 GHz Wifi
networks names will appear. Scroll through the list and to find your Wifi network. When
your Wifi network is centered, tap on
✓
.
Here you will enter your Wifi password.
Press the A button, or tap on A on the touch screen, to select uppercase, lowercase,
number, or symbol.
Wifi setup for firmware updates
First you will need to connect your Raven to a 2.4GHz Wifi network. Once the Wifi is
connected to a network, checking for updates in the future is just one push of a button from
the Quick Settings Screen.
Connecting to Wifi:
56

Getting Started
Use the dial to rotate through the characters. You can use the touch screen as well.
Scroll through until the first character is centered in the display. Then press the C button
to enter that character. It will move that character to the left to allow you to proceed to
the next character. Do not press the C button or tap on C on the touch screen for your
last character of your password.
If you need to edit your character selections, press the D button to go back to an earlier
entry to edit your selection.
Pressing the B button will delete the character entry.
When finished entering your Wifi password tap on
✓
to connect to your Wifi network.
Once connected press the Back/Home button to return to the Zone Control Display
Wifi setup for firmware updates cont.
When done downloading, it will ask to "Update Now?", tap on
✓
to proceed.
The majority of the updates will take less than the stated 8 minutes.
During the updates you might see up to 5 progress bars. However, not every update will
contain updates to every category of the Raven.
Once completed, the Raven will return to the Zone Control Display.
Updating the Raven firmware cont.
If there is an update available it will say "Downloading Now", or tell you if you are up to date.
*Your Raven must have at least 25% battery to update firmware
Getting Started
78
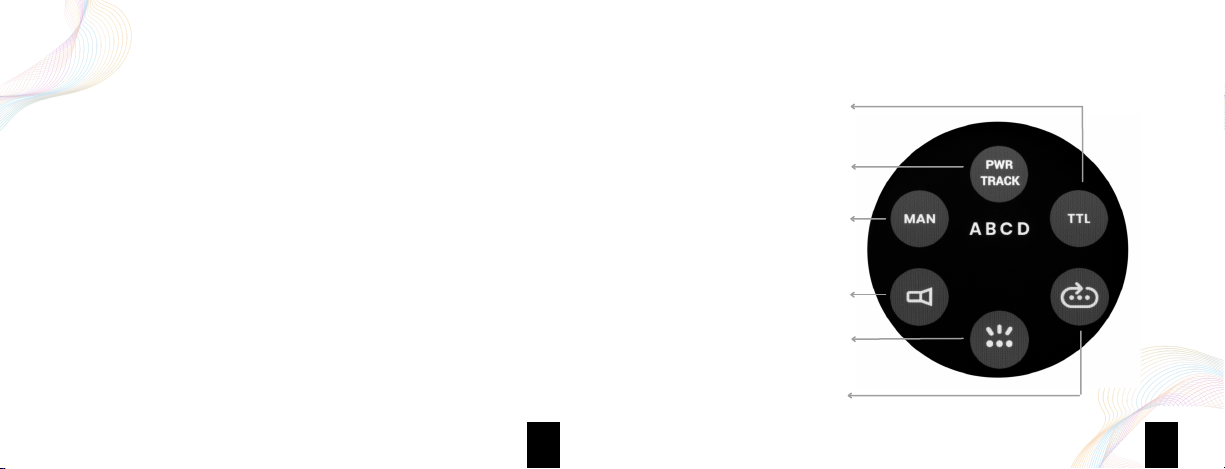
To do this, you will need to press 3 buttons at exactly the same time for one quick press
and release.
Press and release the Test, Back/Home, and SyncView buttons.
The reset should be very quick, about 6 seconds, to reboot to the Zone Control Display.
Raven reset
If the reset of the Raven does not work, and the issue still exists, please contact us.
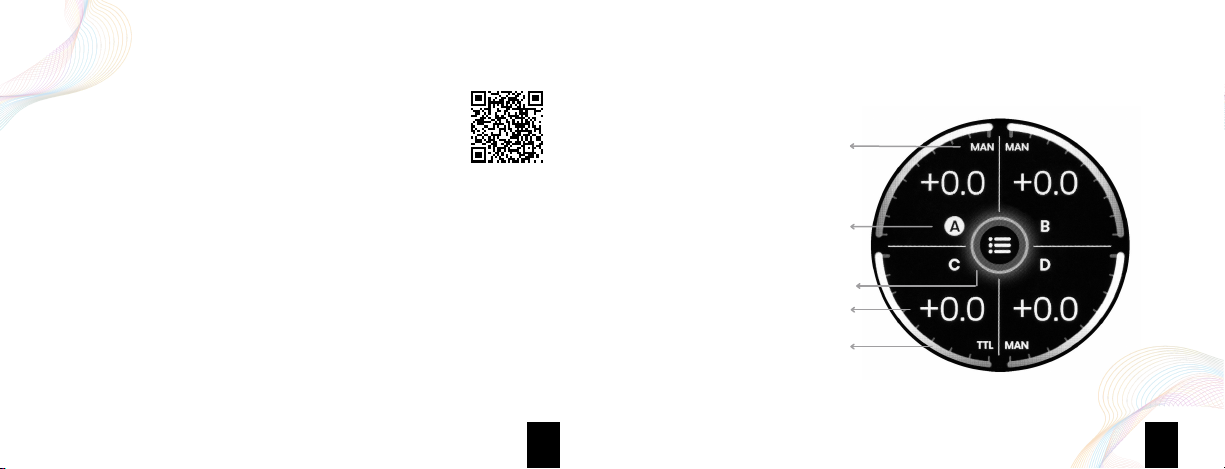
From the Zone Control Display swipe from the top to the bottom.
Tap on the cloud icon and the Raven will search the cloud for available updates.
Updating the Raven firmware
Cloud updating

Zone control display (main screen)
Enable a zone: A zone that is enabled will display an intensity value in its respective quadrant.
If a zone is not enabled, no intensity value will be displayed. If a zone is enabled, the Raven will
trigger it. To enable a zone, press and hold the Zone Button for 1 seconds OR tap and hold
the zone field on the touchscreen for 1 seconds. The same process is used to disable a zone.
Select a zone: a zone that is selected will display a white circle around the zone letter. To
select a zone, press the Zone Button once or tap the zone on the touchscreen. The same
process is used to deselect a zone.
Edit a zone: select the zones you wish to edit. Then tap the central zone mode selector. You
will then be taken to the zone mode screen.
Navigating Interface Navigating Interface
Exposure mode
Zone letter
Zone Mode Selector
Power level amount
Power Level Indicator
910
Raven screen flowchart
Scan the QR code to visit the screen navigation for the Raven.

Zone mode screen
This menu is accessed by pressing the central zone edit icon in the Zone Control Display. To
enable or disable a feature, simply touch the icon. If the icon is green, the feature is enabled, if
it is gray, the feature is disabled. The zone edit menu contains the following options:
PowerTrack: Enable or disable power tracking to keep a constant exposure as you adjust
settings on the camera like ISO or shutter speed.
TTL: enables or disables TTL mode for remote flashes
SpeedCycle: Triggers each zone sequentially with each shutter release starting at lowest
lettered zone.
MultiPop: Triggers remote flashes multiple times with one exposure
Modeling Light Control: enables or disables modeling light control
Manual mode: enables or disables manual mode for remote flashes
Navigating Interface
Enable/disable TTL
Enable/disable Manual mode
Enable/disable
Modeling light control
Enable/disable PowerTrack
Enable/disable MultiPop
Enable/disable SpeedCycle
Navigating Interface
11 12

Quick settings screen
This menu is accessed by swiping from top to bottom while in the Zone Control Display
(main screen). The quick settings menu contains the following options:
Primary brand channel selection: press this button to quickly change the channel for your
primary remotes. This setting will also active the RF noise level indicator for each channel.
Cloud firmware update: the Raven’s firmware can be updated as needed via the cloud,
when the Raven is connected to WiFi
Screen brightness: allows you to adjust the brightness level of the Raven’s screen, either
manually or automatically
Primary/secondary brand selection: Allows you to choose 2 different remote systems for
triggering.
Sound: enables or disables the Raven’s sound indicators and sound effects
Nose Cone Light: enables or disables the built in LED light. Specific settings for the LED can
be found in the settings carousel screen under "local light".
Navigating Interface
Cloud firmware update
Nose cone light enable/disable
Sound on/off
Select primary brand channel
Primary/secondary brand selection
Screen brightness
Navigating Interface
13 14

Test Connection
Press the Test button on the Raven to send a test flash command to all active zones. If a flash
does not fire, confirm the following:
Connecting A Flash
Prepare Raven
From the main menu, swipe down to get to the quick settings screen menu. Then tap the
primary/secondary brand selection button at the bottom. Select your primary and secondary
flash brand from the list of available flash brands. If you are only utilizing one flash brand,
select “None” for the secondary. Swipe up to return to the zone control display screen. Select
the zone(s) for which you want to utilize a flash brand. Edit these zones to correspond to the
desired use (i.e. TTL, Multi-Pop, etc).
Select the channel you’d like to control the flash with in the quick settings menu by selecting
the channel selector icon. All remotes must use the same channel, regardless of brand.
Prepare Flash
Set the flash to the same channel and zone you intend to use with the Raven. If the Raven is
set to Manual + Sync or Sync Only in Control Mode, then you will need to physically set the
flash to either Manual or TTL mode. When using Nikon or Canon speedlights with the
PocketWizard FlexTT, set the flash to TTL even if the Raven is set to Manual.
Connecting A Flash
15 16
We hope you love your Raven. Feel free to contact
us for any questions at [email protected] or
scan the QR code.
Flash & Raven zones are the same and in
same control mode;
Flash is powered on and able to receive
control signals;
Flash & Raven are updated to the latest
firmware;
Flash is compatible with Raven. Learn more
about compatibility by scanning the QR code.

WARNING: Changes or modifications to this unit not expressly approved by the
party responsible for compliance could void the user’s authority to operate this
equipment.
This equipment has been tested and found to comply with the limits for a Class B digital
device, pursuant to Part 15 of the FCC rules. These limits are designed to provide reasonable
protection against harmful interference in a residential installation. This equipment generates,
uses, and can radiate radio frequency energy, and, if not installed and used in accordance
with the instructions, may cause harmful interference to radio communications. Mounting
and cable connections detailed in this document represent the intended usage, however,
there is no guarantee that interference will not occur in a particular installation. If this
equipment does cause harmful interference to radio or television reception, which can be
determined by turning the equipment off and on, the user is encouraged to try to correct the
interference by one or more of the following measures:
(1) Reorient or relocate the receiving antenna.
(2) Increase the separation between the equipment and the receiver.
(3) Consult the dealer or an experienced radio or television technician for help.
This device complies with Part 15 of the FCC rules and also with RSS-210 of Industry Canada.
Operation is subject to the following two conditions:
(1) This device may not cause harmful interference, and
(2) This device must accept any interference received, including interference that may cause
undesired operation. Part 15.21: Changes or modifications not expressly approved by the
party responsible for compliance could void the user’s authority to operate the equipment.
Contains FCC ID: 2AC7Z-ESPWROOM32D
Contains IC: 21098-ESPWROOM32D
FCC ID: 2AWL4-R1
IC: 26969-R1
17 18

Follow Us
Instagram Facebook
YouTube
19
Table of contents
Other Fusion Lighting Equipment manuals
Popular Lighting Equipment manuals by other brands

Glow Bricks
Glow Bricks FORBIDDEN WEST HORIZON Lego 76989 installation guide

ACR Electronics
ACR Electronics HemiLight3 quick start guide

LOUVERS LED
LOUVERS LED Talon installation instructions

hillvert
hillvert HT-WEDGE-50A user manual

Sunlight Supply
Sunlight Supply Adjust-A-Wings instructions

Tridonic
Tridonic Excite Series manual

Lucci fini
Lucci fini 2100249 installation instructions

Zodiac
Zodiac Hydroxinator iQ Series Instructions for installation and use

BOSS ILLUMINATION
BOSS ILLUMINATION FERO product manual

BARRON
BARRON EXITRONIX 400WX Series installation instructions

Prolux
Prolux MATRIX BAR 6 IP user manual

STERNO HOME
STERNO HOME GL33600 instructions