1. TECHNISCHE SPECIFICATIES HYDRO
Profondeur de
l’analyse
Bois 20mm
Béton 10mm
Densité Bois 420-700kg/m³
Béton 1800-2400 kg/m³
Groupe de bois 1-8
Groupe de béton 1-4
Résolution 0,1% d’humidité
Plage de mesure Bois 2.0 -99.9%
Béton 0-20.0%
T° de stockage -10°C / +60°C
T° de service -0°C / +40 °C
Piles 2x piles alcalines 1,5V AAA
Puissance 17 mA (avec LED)
Fonction arrêt
automatique
1 minute
Dimensions 110x43x25mm
Poids 75g
2. TABLEAU DES BOIS
Groupe Densité kg/m³ Espèces
1420 Sapin, peuplier, tremble
2 460 Pin, tilleul, orégon
3 500 Aulne, cèdre, meranti
4 540 Mélèze, cerisier, acajou
5 580 Ramin, noyer, orme
6 620 Frêne, érable, bouleau, teck
7 660 Hêtre, poirier, if
8 700 Chêne, hickory
3. TABLEAU DES BÉTONS
Groupe Densité kg/m³ Types
11800 Pierre à faible densité
2 2000 Pierre à densité normale
3 2200 Béton lourd
4 2400 Béton lourd
Remarque
1) En raison de la production de divers types de béton variant
selon les marques et présentant différentes propriétés, il peut y
avoir d’éventuelles anomalies non dues à l’instrument.
Introduction
User’s manual contains information about operating, functions,
technical specications and other important information for user.
The instrument is designed for moisture measurement of wide
ranges of solid materials such as concrete (4 groups) wood (8
different groups).
Carefully read the User Manual before using this product.
1. APPLICATION FIELD
1.1. The device is made for the rapid moisture testing of various
types of wood and concrete. The device measures the
moisture content of a material, judging by its electrical
resistance at a temperature above 0°C.
Variety of measuring items:
- 8 groups – wood
- 4 groups – concrete (light and heavy), concrete blinding
coat. Full list of material groups you can nd in the applica-
tion 1.
1.2. The main application eld: various kinds of timber works, as
well as construction production and technologies, in which
the humidity of materials regulated by normative-technical or
technical documentation.
1.3. The device produces with averaged characteristics settings.
1.4. Operating temperature: +5 … +40°C, with several humidity
till 90% at the temperature 25°C and air-pressure 86 … 106
Pa.
2. TECHNICAL SPECIFICATIONS
2.1. Working range
2.1.1. Construction material:
Heavy concrete (2400kg/m3) from 0,1 to 10%
Light concrete (2200kg/m3) from 0,1 to 20%
Concrete blinding coat (1800-2000kg/m3) from 0,1 to 35%
2.1.2. Wood (420-700kg/m3) from 2 to 65%
2.2. Accuracy within limits, %
2.2.1. Construction materials:
from 1 to 10% up to +/- 0,9%
from 10 to 35% up to +/- 1,5%
2.2.2 Wood
from 1 to 10% up to +/- 1,0%
from 10 to 20% up to +/- 1,5%
from 20 to 45% up to +/- 2,0%
more than 45% n/a
2.3. The device equipped with calibration curves on the following
materials above 2.1.1 – 2.1.2
2.4. Power supply 2x AAA batteries
2.5. Power input (with LED) 17mA
2.6. Operating time 10 hours
2.7. Dimensions 110x43x25mm
2.8. Weight 75g
2.9. The device constructed as an electronic unit with the integra-
ted humidity sensor.
3. FUNCTIONS
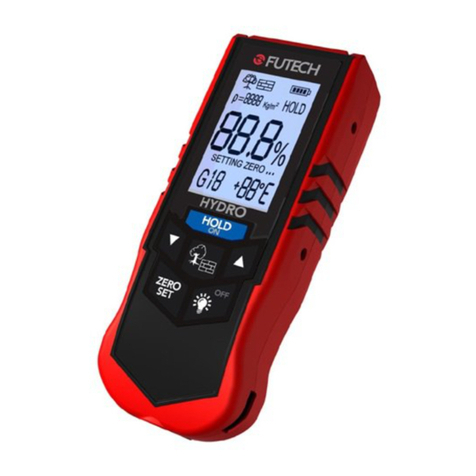
On the front panel there are digital display (see picture), and the
keyboard that consists of 6 buttons (see Picture), humidity sensor
located under the back pane of the device. Batteries located into
the battery compartment in the back low part of the device.
1.Selected material
2. Battery status
3. Measurement recording (Hold)
4. Measuring result
5. Temperature
6. The number of chosen material group
1. Power and measurement recording button
2. Choosing material group button
3. Choosing material button
4. LED button; Hold – turning off the device
5. Auto zero mode button
4. WERKING
4. Operation
4.1 Turn on/off the device
Turn the device on with short press on the button HOLD/ON. If
there are no information on display appeared or the battery status
indicator shows low battery voltage, change the power supply.
To turn the device off press and hold the button /OFF until the
device turns off.
The device will turns off automatically after 1 minute if you do not
press any button.
4.1. Auto Zero functie
Wanneer u de knop ZERO/SET indrukt gaat het instrument in de
Zero mode en verschnt de volgende informatie in het scherm.
SET ZERO
At this point the sensor of the device should be taken away from
all objects on 30cm and press the button ZERO/SET again. The de-
vice will make the auto tuning and goes to the measuring mode,
see the picture.
SETTING ZERO...
Using auto zero mode you set up the humidity sensor readings to
the zero. To avoid deviation the auto zero mode should be used
periodically (time range 10-15 minutes).
4.2. Measuring mode
After choosing the material by button / and the material
group by button q/p put the sensor plate on the testing surface.
To obtain accurate readings it is necessary to ensure that the
sensor ts to the test surface (between the sensor and the surface
should be no gaps), and after reads the result.
The surface should be even, clean and homogeneous, without
deep dents and protrusions. The device should be slightly pressed
to the test surface with a force of about 1kg while obtaining the
measurements. Moisture measurement results can be obtained
for:
- Wood – arithmetic mean of more than three times measurement
- Concrete – arithmetic mean of more than ve times measurement
The measuring depth is 15-20mm which depends on moisture
and density of the measuring material (the device equipped with
calibration setting on this depth). If the thickness of the chosen
material is less then 15mm, the measurement should be carries
out with holding device with material on the air, so that the sensor
do not get information on the other materials.
To avoid the deviation use the auto zero mode (refer to the 4.2)
4.3. Sensor temperature units
If you hold the button p, the temperature unit changes from Celsi-
us to Fahrenheit, and with second long press it changes back.
5. MAINTENANCE
5.1. Preventive measures and checking should be periodically
done by users
5.2. Keep the device clean and protected from any bumps, dust
and dampness; wipe it with a clean and soft cloth.
5.3. After using remove all the dirt, thus etc., from the device.
5.4. If the battery status indicator shows low battery voltage, turn
off the device and change the power supply
5.5. To optimize the battery discharge time, turn on the device
before measuring and turn it off after using.
5.6. If during operation the device does not respond to the
keystrokes and does not turn off, open the battery compart-
ment for a few seconds, remove one of the batteries, insert it
back and re-start the instrument.
5.7. If the device does not respond to the turn on button, remove
FR - 9FR - 8
EN - 1
EN - 5
NOTE
EN - 9EN - 8
EN - 4
NOTE
EN - 2
EN - 6
NOTE
EN - 10
EN - 3
EN - 7
NOTE
EN - 11
FR - 10 FR - 11
5.5. Pour optimiser la durée des piles, mettez en marche l’instru-
ment juste avant les mesures et éteignez-le juste après.
5.6. Si, en cours de fonctionnement, l’instrument ne réagit pas aux
touches et ne s’éteint pas, ouvrez le compartiment des piles
pendant quelques secondes, enlevez une des piles, remet-
tez-la en place et remettez en marche l’instrument.
5.7. Si l’instrument ne réagit pas à la touche de mise en marche,
enlevez les piles, nettoyez les contacts avec un tampon imbi-
bé d’alcool ou avec du papier de verre, remettez en place les
piles et vériez que l’instrument fonctionne à nouveau.
5.8. Toute réparation doit être effectuée par un centre de service
après-vente agréé.
5.9. Si vous n’utilisez pas l’instrument pendant un long laps de
temps, enlevez les piles pour éviter qu’elles ne coulent et
endommagent l’appareil. L’instrument est un appareil très
technique et ne doit pas être réparé par l’utilisateur ; par
conséquent, nous ne fournissons pas la documentation
technique complète de l’instrument.
Ensemble
Instrument 1x
Piles 2x
Mode d’emploi 1x
Sac 1x
the batteries from the device; wipe the battery contacts with
alcohol-wetted swab or clear it with ne sandpaper, insert the
batteries back and check if the device works again.
5.8. Repair must be carries out by authorized after-sales service
centres.
5.9. In case of long-term non-use, remove the power supply from
the battery compartment in order to avoid the damage of
the device by leaked uid. The device is a highly technical
product and should not be repaired by its users, that is why
we do not supply users with a complete technical documen-
tation of the device.
Complete set
Instrument 1x
Battery 2x
Manual 1x
Bag 1x
1. TECHNICAL SPECIFICATIONS
Scanning depth Wood 20mm
Concrete 10mm
Density range Wood 420-700kg/m³
Concrete 1800-2400 kg/m³
Timber group 1-8
Concrete group 1-4
Resolution 0,1% humidity
Measuring range Wood 2.0 -99.9%
Concrete 0-20.0%
Temperature range -10°C / +60°C
Operating tempe-
rature
-0°C / +40 °C
Power supply 2x 1,5V AAA Alkaline batteries
Power input 17mA (incl. lightning)
Auto shut off
function
1 minute
Dimensions 110x43x25mm
Weight incl.
batteries
75 gram
2. TIMBER TABLE
Group Density kg/m³ Species
1420 Spurce, poplar, aspen
2 460 Pine, basswood, oregon
3 500 Alder, cedar, meranti
4 540 Larch, cherry, mahogany
5 580 Ramin, walnut, elm
6 620 Ash, maple, birch, teak
7 660 Beech, pear, yew
8 700 Oak, hickory
3. CONCRETE TABLE
Group Density kg/m³ Species
11800 Low density screed
2 2000 Regular density screed
3 2200 Heavy concrete
4 2400 Heavy concrete
Note:
1) Since the production of concrete varies from brand to brand the
corresponding data (e.g. specic weight etc.) need to be obtained
from the manufacturer. Based on this information the correct
group position can be determined.
1
2
32
5
6
HYDRO
MOISTURE METER
VOCHTMETER
MESURE DE L’HUMIDITÉ
