manuals.online logo
Brands
  1. Home
  2. •
  3. Brands
  4. •
  5. Kingfisher
  6. •
  7. Measuring Instrument
  8. •
  9. Kingfisher KI23400 Series User manual

Kingfisher KI23400 Series User manual

Revision 2 Date: 11 Sep 2020 Page 1of 7
QUICK REFERENCE GUIDE
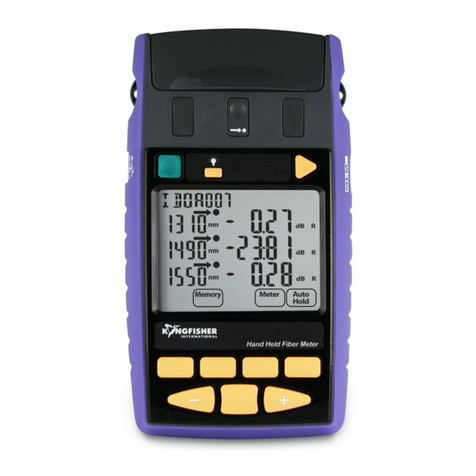
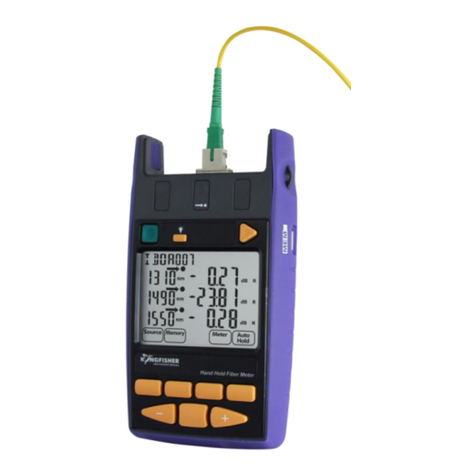
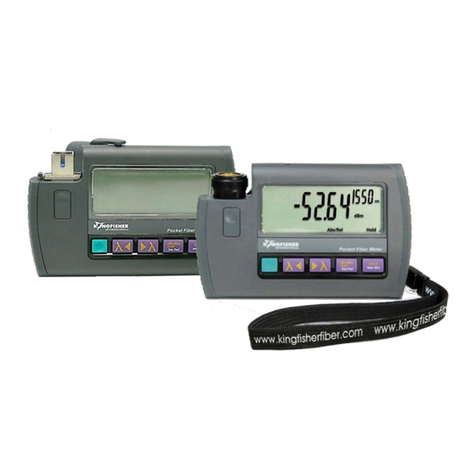
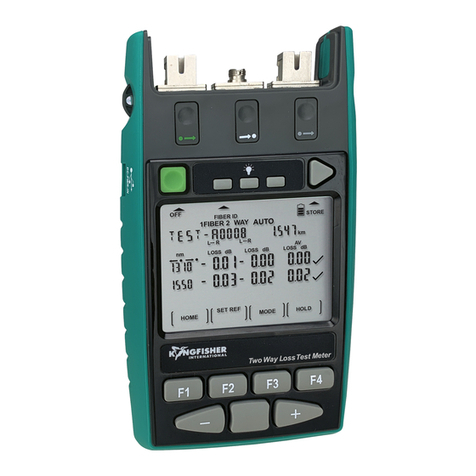
KI23400/KI27400 Series 2-Way Loss Test Meter
Revision 2 Date: 11 Sep 2020 Page 2of 7
Quick Reference Guide: KI23400/KI27400 2-way Loss Test Meter
General Operation:
•To remove interchangeable connector adaptor, press button
on front of case and pull off adaptor. This may be easier with
a test lead attached.
•To turn instrument on / off, press On/Off.
•Low battery is indicated with a battery symbol.
•To turn back light on / off, press Backlight button.
•To disable auto-off at turn-on, hold On/Off for 3 seconds
until ‘Perm’ is displayed.
•To disable or activate beeping at turn-on, hold F2 then press
On/Off, “beep” displays.
•To enter Slow Mode at turn-on, hold down F3 then press
On/Off, “tone” displays.
•To view firmware version and instrument serial number at
turn-on, hold F4 then press On/Off.
•To view all display segments at turn-on, press and hold
On/Off, F1 at the same time until it stops beeping.
•To set time & date, when instrument is off, hold down
Toggle Centre then press On/Off. Press - or +to modify the
selected (flashing) item. Press Toggle Centre to change
selected item. Press F2 to save new time and date settings.
Press F1 to exit without saving new settings.
•To enter Meter menu, press F3.
•To enter Memory menu, press button above [MEMORY].
•To return to Home menu, press F1.
Meter Menu:
•To enter Meter menu at Home menu, press F3.
•To select operational λ in Meter mode, press –or +.
•To toggle log / linear display mode, press F3.
•To display max and min values for absolute power and loss,
press - and +simultaneously. To return to standard display,
press - and +simultaneously again.
•To set reference, toggle to dB mode, then hold down F2 for
3 seconds until the instrument beeps finish
•To stop / start display update, press F4.
•If a test tone is detected, meter will display ‘Hz’.
•To store to memory press triangular button above [STORE].
•To return to Home menu, press F1.
Source Menu:
•To enter Source menu at Home menu, press F1.
•To select operating λ, press -or +.
•To turn source on and off, press Toggle Centre.
•[Laser source only] To change power level, press and hold
F2 then use - or +(not applicable to LED sources). To toggle
between max and min power levels, hold F2 then press
Toggle Centre.
Quick Reference Guide: KI23400/KI27400 2-way Loss Test Meter
Revision 2 Date: 11 Sep 2020 Page 3of 7
•To select modulation while source is on, press and release
F3. Repeatedly press this button to scroll & select a tone
frequency or ID-tone. Alternatively, press and hold F3 then
use - or +to cycle through all options.
•To end modulation, press and hold F3 then press Toggle
Centre. Alternatively, press and hold F3 for 3 sec.
•To return to Home menu, press F1.
Autotest Operation:
•[1-way Autotest only] To start Autotest, press F4 of the
instrument connected at the source end of a fiber.
•[2-way Autotest] To start Autotest, press F4 on either one of
the connected instruments.
•[1-way Autotest only]: To toggle display to show absolute-
power(dBm)/loss(dB)/reference-power(dBm) or absolute-
power in both dBm & watt, press F3 repeatedly.
To show sources’ nominal power levels, hold down Toggle
Centre.
•[2-way Autotest only]: As default, a summary of losses (dB)
for each direction and their averages are displayed.
To change to display absolute-power (dBm), loss (dB),
reference-power (dBm) for each direction, press F3. Press -
or +to show data for other wavelengths. Press F3 again to
return to default display.
When display shows absolute power (dBm), loss (dB),
reference power (dBm), hold down Toggle Centre to show
sources’ nominal power levels.
•To set reference, press and hold F2 for 3 seconds until
beeps stop. The reference will then update over the next few
seconds.
•To stop / restart display update, press F4.
•[1-way Autotest only]: To end Autotest, press F1 of the
instrument connected at source end or, disconnect patch
lead for more than 8 seconds.
•[2-way Autotest only]: To end Autotest, press F1 on either
one of the connected instruments or, disconnect patch lead
for more than 8 seconds.
•To record data to internal memory in Meter or Autotest
mode, press triangular button above [STORE]. Data will be
stored in the next empty location.
Autotest User-to-User Communication (2-way mode only):
•Connect an instrument at each end of a fiber link.
•Start 2-way Autotest on any of the connected instruments.
•For near-end unit to ‘flag’ far-end unit: Press F4 on near-end
unit. Far-end instrument will beep once and, “HOLD” will
flash (display update stops) on both units.
Quick Reference Guide: KI23400/KI27400 2-way Loss Test Meter
Revision 2 Date: 11 Sep 2020 Page 4of 7
•For far-end unit to respond to near-end unit: Press F4 on far-
end unit. Near-end instrument will beep once and, “HOLD”
will stop flashing (display update resumes) on both units.
Autotest Wavelength Restriction:
•To start Autotest with restricted wavelengths,
Method 1(for instrument with 2 light source ports only),
▪To start Autotest for single mode λ (left source port),
hold down - and press F4.
▪To start Autotest for multimode mode λ (right source
port), hold down +and press F4.
Method 2,
▪To activate (include) / deactivate (exclude)
wavelength/s for Autotest, press F1 in Home menu,
then press –or +to select the wavelength/s. Hold F4
then press Toggle Centre to change between ‘in’
(activated) or ‘out’ (deactivated).
▪To start Autotest for the activated wavelength/s only,
hold Toggle Centre then press F4.
Memory Operation:
Recording Data to Memory
•In METER or AUTO mode, press triangular button above “STORE”.
•To change the next location pointer for storage, press button
above “MEMORY” at Home menu, select desired location
using the +or -, hold button above “MEMORY” then press
F2 for three seconds, or until it stops beeping.
Recalling Stored Data from Memory
•To enter Memory mode, press button above “MEMORY” at
Main menu.
•To select a memory location to display data, press +or -.
•[For data saved in 2-way Autotest mode only]: To toggle
display to show summary or detail data of test results, press
F3 repeatedly.
To show nominal source power, hold down left rectangular
button above LCD (only when display shows detail data).
To view detail data for other wavelengths, press F4.
To view saved time and date, press and hold Toggle
Centre.
To exit memory mode, press F1.
•[For data saved in 1-way Autotest mode only]: To toggle
display to show absolute power in dBm or in both dBm and
watt, press F3 repeatedly.
To show nominal source power, hold down left rectangular
button above LCD.
To view saved time and date, press and hold Toggle
Centre.
To exit memory mode, press button below [HOME].
Quick Reference Guide: KI23400/KI27400 2-way Loss Test Meter
Revision 2 Date: 11 Sep 2020 Page 5of 7
•[For data saved in Meter mode only]: To toggle display to
show absolute power in dBm or in both dBm & watt, press
F3 repeatedly.
To view saved time and date, press and hold Toggle
Centre.
To exit memory mode, press F1.
To retest or overwrite results
•Note currently displayed memory location: At Main menu,
press button above “MEMORY”. Note current memory
location e.g. “MEM 123”.
•Go to the memory location for retest/overwrite, select
desired location using +or -, then hold down button above
“MEMORY” and press F2 for three seconds or until it stops
beeping.
•Press F1 to exit Memory mode.
•To retest: Press F3 (Meter mode) or F4 (Autotest mode) to
return to data acquiring mode. Press button above [STORE]
now will save new results in the memory location selected
above.
•Return memory location pointer for next storage to where it
was before the retest: Press button below [HOME] then that
above “MEMORY”, select the desired location (“MEM 124”
in this example) using +or -, then hold down button above
“MEMORY” and press F2 for three seconds or until it stops
beeping.
•Continue testing.
Clearing Memory
•To clear all stored data, in Memory mode, hold down button
above “MEMORY”, then press and hold F2 followed by F4
until it stops beeping.
Transfer Instrument Memory Data to USB Stick:
•At main menu, press button above “MEMORY” to enter
memory mode.
•Insert USB stick into USB port (“MEM”) on the right side of
the instrument and, press triangular button above “USB”.
Wait till instrument stop beeping.
Pass/Fail Operation:
•Loss test status for each wavelength will be shown with a
‘✓’ (pass) or ‘X’(fail) or alternating ‘✓’ / ‘X’ (marginal) on
LCD. A failed length test value (only in 2-way Autotest) will
flash.
•Overall test result, “PASS” will be shown if:
-pass/fail check function is disabled.
-loss test statuses of all wavelengths (and length test
status in the case of 2-way Autotest) are pass or
marginal.
Quick Reference Guide: KI23400/KI27400 2-way Loss Test Meter
Revision 2 Date: 11 Sep 2020 Page 6of 7
-An overall test result, “FAIL” will be shown at the top
right corner of LCD if, loss test status of any wavelength
(or Length test status in the case of 2-way Autotest) is
fail.
•Pass/fail method selection:
For 2-way Autotest: If ‘WC’ is selected, the worst-case loss
value will be used to determine the test status. If ‘AV’ is
selected, the average loss value will be used to determine
the test status.
For 1-way Autotest: Worst case loss value will always be
used to determine the test status regardless of the selected
pass/fail method.
Pass/Fail Threshold Set Up:
To downloaded from KITS reporting software
•Refer to instruction in the software manual.
To set up directly on the instrument
•Turn on instrument with “-”button (for SM), or “+” (for MM)
key depressed.
•“Imported Setup” will show if a setup has been imported from
KITS and will vanish if any changes are made locally.
•Press F3 to toggle between loss / ORL setup screens.
•Press Toggle Centre repeatedly to select a value to adjust
threshold for PASS and/or MARGINAL.
•Use -or +to adjust value.
•Use F4 to toggle WC (worst case) / AV (average) pass/fail
method.
•Press F2 to save or F1 to cancel new settings.
Tone Detection Operation:
•Connect 2 instruments with a fiber i.e. at the source-port on
one unit and the meter-port on the other.
•On source unit, enter Source menu, press F3 to scroll
modulation options.
•On meter unit, it detects the standard optical test tone (e.g.
270 Hz, 1 KHz, 2 KHz), a buzzer sounds and the display
changes to show the actual measured modulation frequency
in Hz.
•To end the operation (on source unit), press and hold F3,
then press Toggle Centre. Alternatively, press and hold F3
for 3 sec.
Slow Mode Operation:
•To enter Slow Mode during turn on, hold down F3 & press
On/Off. The flashing symbol ‘ ’ indicates that slow mode
has been activated.
•Alternatively, to turn slow mode on/off while in Meter mode,
press and hold key F3 then press F4.
•To turn Slow Mode on while in Tone detection mode, press
F4. This will disable tone detection.
Quick Reference Guide: KI23400/KI27400 2-way Loss Test Meter
Revision 2 Date: 11 Sep 2020 Page 7of 7
To turn Slow Mode off (i.e. to resume Tone detection), press
F3 to go to Meter menu, hold F3 then press F4.
Text ID Tag Operation:
To create a new Text ID Tag
•Enter Meter or AUTO menu.
•Press button above “FIBER ID”, then press F4.
•Press -or +to select new alphanumeric character, then
press Toggle Centre to move to the next character.
•Press F2 to save or F1 to cancel.
To use a stored Test ID Tag
•Enter Meter or AUTO menu.
•Press button above “FIBER ID”.
•Press -or +to find required Tag,
•Press F2 to confirm or F1 to cancel selection.
To modify a stored Text ID Tag
•Enter Meter or AUTO menu.
•Press button above “FIBER ID”, then -or +to select a stored
ID Tag.
•Press F3 to enter edit mode.
•Press -or +to select new alphanumeric character, then
press Toggle Centre to move to the next character.
•Press F2 to confirm or F1 to cancel modification.
To delete a Text ID Tag
•Enter Meter or AUTO menu.
•Press button above “FIBER ID”, then -or +to select a stored
ID Tag.
•Press F3 to enter edit mode, then press F4 to delete.
•Press F2 to confirm or F1 to cancel deletion.
Visible Laser Operation:
•At Home menu, press F1 to enter Source menu.
•Press -or +to select 650 nm to turn on visible red light.
•Press Toggle Centre to turn off visible red light.
•Press F1 to return to Home menu.
Instrument Data Sanitization:
To erase all parts of the non-volatile user memory, including user
data, and restore default instrument settings:
•Turn on instrument.
•Enter Memory mode by pressing button above “MEMORY”.
•Press and hold these buttons: “MEMORY”, F2, F4, Toggle
Centre simultaneously for 3 seconds until beeping stops.
“dFLt” will display during operation.

Other manuals for KI23400 Series

2

This manual suits for next models

1

Other Kingfisher Measuring Instrument manuals

Kingfisher KI 2600 Series Installation guide

Kingfisher

Kingfisher KI 2600 Series Installation guide

Kingfisher KI 2600 Series User manual

Kingfisher

Kingfisher KI 2600 Series User manual

Kingfisher KI 6680 User manual

Kingfisher

Kingfisher KI 6680 User manual

Kingfisher KI6501 User manual

Kingfisher

Kingfisher KI6501 User manual

Kingfisher 3663602490074 User manual

Kingfisher

Kingfisher 3663602490074 User manual

Kingfisher KI 2600 Series User manual

Kingfisher

Kingfisher KI 2600 Series User manual

Kingfisher KI23400 Series User manual

Kingfisher

Kingfisher KI23400 Series User manual

Kingfisher KI6102 Series User manual

Kingfisher

Kingfisher KI6102 Series User manual

Kingfisher KI6512 User manual

Kingfisher

Kingfisher KI6512 User manual

Kingfisher KI 9600A-Ge Operating manual

Kingfisher

Kingfisher KI 9600A-Ge Operating manual

Kingfisher KI 6700 User manual

Kingfisher

Kingfisher KI 6700 User manual

Kingfisher BIMW20LUK User manual

Kingfisher

Kingfisher BIMW20LUK User manual

Kingfisher KI 6680 User manual

Kingfisher

Kingfisher KI 6680 User manual

Kingfisher KI6503 series User manual

Kingfisher

Kingfisher KI6503 series User manual

Kingfisher KI 9600 Series Installation guide

Kingfisher

Kingfisher KI 9600 Series Installation guide

Kingfisher DIMENSION AutoGet WiFi User manual

Kingfisher

Kingfisher DIMENSION AutoGet WiFi User manual

Kingfisher KI 9600 Series User manual

Kingfisher

Kingfisher KI 9600 Series User manual

Kingfisher KI5000 Series User manual

Kingfisher

Kingfisher KI5000 Series User manual

Kingfisher KI 3800 Series User manual

Kingfisher

Kingfisher KI 3800 Series User manual

Kingfisher KI9600A Operating manual

Kingfisher

Kingfisher KI9600A Operating manual

Kingfisher KI 6354 Series User manual

Kingfisher

Kingfisher KI 6354 Series User manual

Kingfisher KI 2400 Series User manual

Kingfisher

Kingfisher KI 2400 Series User manual

Kingfisher KI 2600 Series Instruction Manual

Kingfisher

Kingfisher KI 2600 Series Instruction Manual

Kingfisher KI6106 Series User manual

Kingfisher

Kingfisher KI6106 Series User manual

Popular Measuring Instrument manuals by other brands

LaserLinc NetLinc TLAser400 quick start guide

LaserLinc

LaserLinc NetLinc TLAser400 quick start guide

Observator Instruments ANALITE NEP160 user manual

Observator Instruments

Observator Instruments ANALITE NEP160 user manual

Pro-Ject Audio Systems Measure it S2 manual

Pro-Ject Audio Systems

Pro-Ject Audio Systems Measure it S2 manual

Skyrc SK - 500040 instruction manual

Skyrc

Skyrc SK - 500040 instruction manual

GPI GBM 110 Installation & operating instruction

GPI

GPI GBM 110 Installation & operating instruction

McCrometer SPI Mag 282L Installation, operation and maintenance manual

McCrometer

McCrometer SPI Mag 282L Installation, operation and maintenance manual

MITECH mt180 user manual

MITECH

MITECH mt180 user manual

Mindray Accutorr 3 operating instructions

Mindray

Mindray Accutorr 3 operating instructions

Fluke ScopeMeter 123 Getting started

Fluke

Fluke ScopeMeter 123 Getting started

Aktobis WDH-318KC manual

Aktobis

Aktobis WDH-318KC manual

Tonghui TH2512 instruction manual

Tonghui

Tonghui TH2512 instruction manual

Leuze electronic MSI-SR-LC21M Series Original operating instructions

Leuze electronic

Leuze electronic MSI-SR-LC21M Series Original operating instructions

PICO TETRIS 1000 user guide

PICO

PICO TETRIS 1000 user guide

Radiation Alert CHARGER Operation manual

Radiation Alert

Radiation Alert CHARGER Operation manual

Dwyer Instruments DPMP-5 Series Installation and operating instructions

Dwyer Instruments

Dwyer Instruments DPMP-5 Series Installation and operating instructions

Bosch GLM 50 Professional Original instructions

Bosch

Bosch GLM 50 Professional Original instructions

Ditel DINOS DN Series Quick installation guide

Ditel

Ditel DINOS DN Series Quick installation guide

Felix Storch F-940 instruction manual

Felix Storch

Felix Storch F-940 instruction manual

manuals.online logo
manuals.online logoBrands
  • About & Mission
  • Contact us
  • Privacy Policy
  • Terms and Conditions

Copyright 2025 Manuals.Online. All Rights Reserved.