Futurecom Mobexcom P25 Operating instructions

8M083X01 (6881013Y39) REV 16 April 2014
MOBEXCOM P25
DIGITAL VEHICULAR
REPEATER
Installation & Programming Guide

8M083X01 (6881013Y39) REV 16 ii
NOTES

8M083X01 (6881013Y39) REV 16 iii
Related Publications
Publication
Number
Description
8A083X20
DVRS User’s Manual
8A083X21
Tactical DVR User’s Manual
8M083X02
Tactical DVR Installation and Programming Guide
8F083X03
DVRS - Product & RF Safety Booklet
8F083X01
Indoor Fixed Mount DVRS – Installation Guide
8F083X02
Transportable DVRS – Installation Guide
8F083X04
Flash Loader and Tweaker Programmer Installation Guide
Manual Revisions
Revision #
Date
ECN
Notes & References
0
12/15/2005
na
Original Release
1
1/11/2006
06006
Motorola manual number added
2
12/20/2006
06245
Phase II update – Application 2.40
3
5/31/2007
7110
Phase II update – Application 2.70
4
10/30/2007
7157
Phase II update – Application 2.80
5
11/26/2007
7182
Phase II update – Application 2.83
6
09/30/2009
9067
Phase II update – Application 3.00
7
12/10/2009
9099
Phase II update – Application 3.10
8
04/22/2010
10027
Phase II update – Application 3.20
9
11/12/10
10051
Phase II update – Application 3.22, Customer
Specific Release
10
2/7/2011
11006
Phase II update – Application 3.22, Factory
Release
11
9/30/2011
11041
Phase II update – Application 3.30
12
1/18/2012
12005
Phase II update – Application 3.31
13
3/2/2012
12014
MSU and APX PSU FW compatibility update
14
5/14/2012
12027
Updated USB Driver – Application 3.32
15
9/28/2012
12079
Application 3.40
16
25/04/2014
14019
Application 3.41

8M083X01 (6881013Y39) REV 16 iv
Foreword
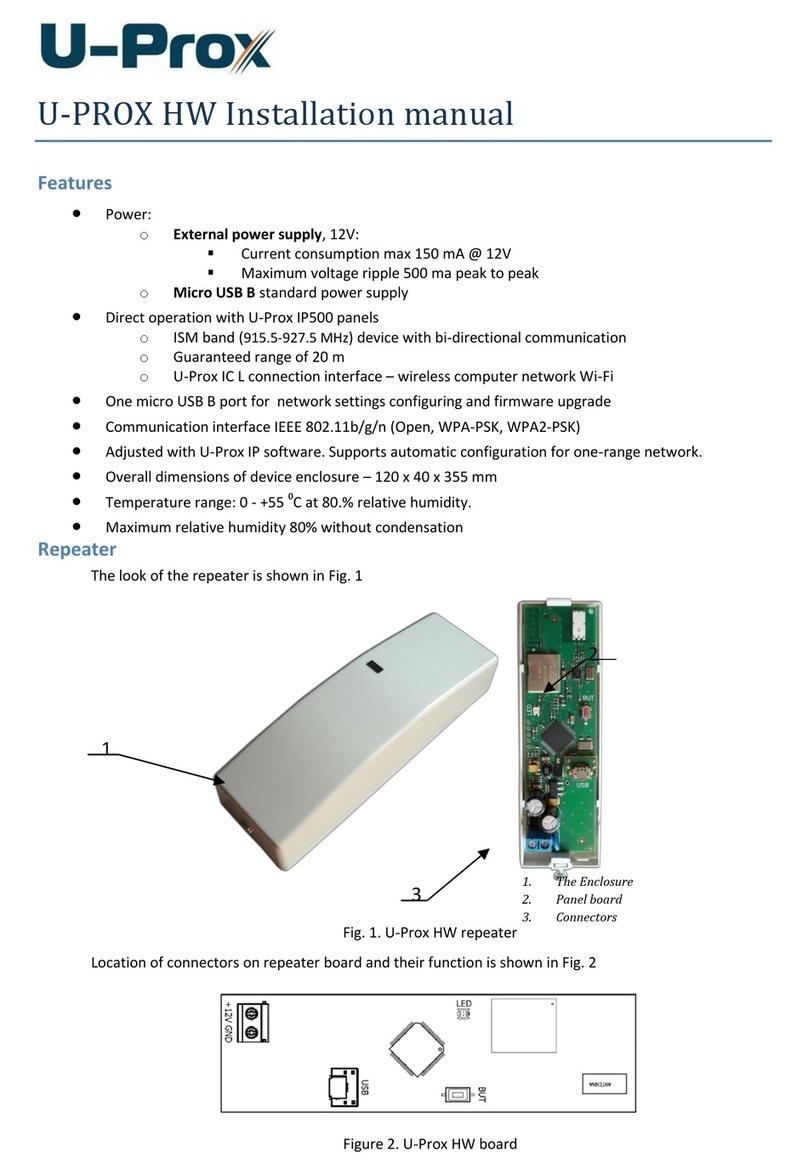
This manual provides Installation and Programming guidelines for all models of the
Futurecom Mobexcom P25 Digital Vehicular Repeater (DVR).
The P25 Digital Vehicular Repeater (DVR) is designed to be seamlessly interfaced to a
Remote Mount XTLTM2500 or XTLTM5000 Digital Mobile Subscriber Unit (MSU) with M5,
O3 or O5 Control Head.
When the DVR is interfaced to a Remote Mount XTLTM 5000, the complete equipment
package is referred to as Digital Vehicular Repeater System (DVRS).
The DVR may also be used as a stand alone (Tactical) repeater. The operation of the
Tactical DVR is described in publication 8A083X21. The Installation & Programming
Guidelines referring to the Tactical DVR Model are described in document 8M083X02.
The DVR can not be interfaced to XTLTM5000 radios which are using the W-series
control heads.
For W-series Control Head compatible equipment, please refer to the Mobexcom II
Analog VR Documentation.
For details on the DVRS Operation, please refer to the DVRS User’s Guide 8A083X20.
For details on the XTLTM5000 Mobile Radio operation, please refer to the applicable
Manuals available from Motorola.
The DVRS Operation described in this Document requires the following Firmware:
XTLTM2500 / XTLTM5000 - firmware release: Host R20.00.05
XTSTM1500 /XTSTM2500 / XTSTM5000 - firmware release R17.01.01
APXTM4000 / APXTM6000 / APXTM7000 – firmware release R07.00.05 or later
DVR must be loaded with firmware release: Application 4C083X01 R03.41 or later
Tweaker Programming software – Version 3.45 or later
O3/O5/M5 Control Head - firmware releases R16.00.00

8M083X01 (6881013Y39) REV 16 v
Computer Software Copyrights
The products described in this manual include copyrighted Futurecom computer
programs stored in semiconductor memories or other media. Laws in the United States,
Canada and other countries preserve for Futurecom certain exclusive rights for
copyrighted computer programs, including but not limited to, the exclusive right to copy
or reproduce in any form the copyrighted computer programs. Any copyrighted computer
program contained in the Futurecom products described in this manual may not be
copied, reproduced, modified, reverse-engineered, or distributed in any manner without
the express written permission of Futurecom. The purchase of Futurecom products shall
not be deemed to grant either directly or by implication, estoppels, or otherwise, any
license under the copyrights, patents or patent applications of Futurecom, except for the
normal non-exclusive license to use that arises by operation of law in the sale of a
product.
Document Copyrights
No part of this manual may be reproduced, distributed or transmitted in any form or by
any means, for any purpose without written permission of Futurecom.
Disclaimer
The information in this document is carefully examined and is believed to be entirely
reliable. However, no responsibility is assumed for inaccuracies.
Futurecom Systems Group, ULC reserves the right to make changes to any products
herein to improve readability, function or design. Futurecom does not assume any
liability arising out of the application or use of any product or circuit described herein.
Trademarks
MOTOROLA, ASTRO, XTLTM 2500, XTLTM5000, XTSTM1500, XTSTM2500, XTSTM5000,
APXTM4000, APXTM6000, APXTM7000, MDC1200 are trademarks of Motorola Inc.

8M083X01 (6881013Y39) REV 16 vi
Commercial Warranty
Futurecom Systems Group, ULC . warrants to the original purchaser all standard
products sold by Futurecom Systems Group, ULC to be free of defects in material and
workmanship for one (1) year from the date of shipment from Futurecom Systems
Group, ULC.
Futurecom’s warranty hereunder DOES NOT cover the following :
(i) Defects or damage resulting from use of the product in other than its normal
and customary manner.
(ii) Defects or damage from improper installation, testing, operation, or
maintenance.
(iii) Defects or damage due to alterations, modifications or adjustments carried
out by the Buyer without Futurecom’s explicit approval.
(iv) Defects or damage from misuse, accident, water or neglect.
(v) Freight costs to the repair depot.
(vi) Scratches or other cosmetic damage to the product surfaces that does not
affect the operation of the product.
(vii) Normal wear and tear.
The warranty set forth herein is conditioned upon proper storage, installation, use and
maintenance in accordance with applicable written recommendation of Futurecom. The
warranty furnished hereunder does not extend to damage to items purchased hereunder
resulting in whole or in part from the use of components, accessories, parts of supplies
not furnished by Futurecom Systems Group, ULC.
Futurecom’s sole obligation shall be to repair or replace, at Futurecom’s option, any
defective component or item and pay transportation expenses for such replacement at
no charge to Buyer who shall provide labor for the removal of the defective component
or item and installation of its replacement at no charge to Futurecom. Buyer shall bear
all risk of loss or damage to returned goods while in transit. In the event no defect or
breach of warranty is discovered by Futurecom upon receipt of any returned item, the
item will be returned to Buyer at Buyer’s expense and Buyer will reimburse Futurecom
for the transportation charges, labor and associated charges incurred in testing the
allegedly defective item.
Except as expressly provided herein, Futurecom makes no warranty of any kind,
expressed or implied, with respect to any goods, parts and service provided by
Futurecom including, but not limited to, the implied warranties or merchantability and
fitness for a particular purpose. The sole and exclusive remedy for breach of any
warranty is limited to the remedies provided in the paragraph above. Futurecom shall
not in any event be liable for any other damages arising out of or in connection with
furnishing of goods, parts or service hereunder, or the performance, use of, or inability to
use any goods, parts or service, or otherwise, whether based on contract, tort or any
other legal theory.
To exercise this warranty, please contact Futurecom’s Administration Department in
Concord, Ontario, Canada at 1-800 701 9180 to obtain a return material authorization
(RMA) and shipping instructions. No product will be accepted for return without an RMA.
The repair of a product by Futurecom pursuant to this warranty is warranted for the
balance of the original warranty period, or at least 90 days from date of shipment to
Buyer of the repaired product.
If Extended Warranty is required, it must be purchased either at the time of
original purchase or while the unit is under the standard first year warranty
coverage.
Part I – DVRS INSTALLATION

8M083X01 Rev. 16
6881013Y39
DVRS Installation & Programming Guide – PART I
April 2014 Page 2 of 30
Part I - Installation
Compliance with RF Energy Exposure Safety Standards ..........................................4
Introduction...................................................................................................................5
Identifying Your DVRS Model......................................................................................6
Frequency Band of Operation................................................................................................. 6
In-Band.................................................................................................................................... 6
Cross-Band............................................................................................................................. 9
DVR Dimensions................................................................................................................... 10
Cross-Band DVR Dimensions ........................................................................................................10
In-Band DVR Dimensions ..............................................................................................................11
DVRS Installation Basics............................................................................................12
Planning the Installation ............................................................................................12
Installation Tools Required........................................................................................12
Mounting the DVR.....................................................................................................13
Cross-Band DVRS Mounting................................................................................................ 13
In-Band DVRS Mounting....................................................................................................... 14
Mounting the Mobile Radio........................................................................................17
Connecting the DVRS Cables ...................................................................................17
Power Cable ......................................................................................................................... 17
RF Cables............................................................................................................................. 18
Control Cables ...................................................................................................................... 18
Option Cables ....................................................................................................................... 20
In-Band DVRS Option Cables ........................................................................................................20
Cross-Band DVRS Option Cables ..................................................................................................20
DVR Options.............................................................................................................24
DVR Auxiliary Cable ............................................................................................................. 24
AVRA .................................................................................................................................... 25
Status Lights ......................................................................................................................... 25
External Alarm ...................................................................................................................... 25
Duplexer RF Switch .............................................................................................................. 25
DVRS Antenna Installation........................................................................................26
Glossary.......................................................................................................................27
Index ............................................................................................................................30

8M083X01 Rev. 16
6881013Y39
DVRS Installation & Programming Guide – PART I
April 2014 Page 3 of 30
List of Tables
Table 1 DVRS Compatibility............................................................................................5
Table 2 In-Band DVRS Models .......................................................................................6
Table 3 Cross-Band DVRS Models.................................................................................9
Table 4 DVR RF Cables................................................................................................18
Table 5 DVRS Control Cable Types..............................................................................18
Table 6 Summary of DVRS Control and RF Cables ......................................................23
List of Figures
Figure 1 In-Band DVRS Simplified Block Diagram - VHF ................................................7
Figure 2 Typical In-Band DVRS Mounting Layout - VHF .................................................7
Figure 3 700MHz In-Band DVRS Simplified Block Diagram ............................................8
Figure 4 Typical In-Band DVRS Mounting Layout - 700 / 800 MHz .................................8
Figure 5 Cross-Band DVRS Simplified Block Diagram....................................................9
Figure 6 Typical Cross-Band DVRS Mounting Layout ...................................................10
Figure 7 Cross-Band DVR - Dimensions mm / [in].........................................................10
Figure 8 Typical VHF (or UHF) In-Band DVR - Dimensions mm / [in]............................11
Figure 9 Typical 700 / 800 In-Band DVR - Dimensions mm / [in]...................................11
Figure 10 Cross-Band DVR Mounting Details................................................................13
Figure 11 In-Band DVR Mounting Details......................................................................14
Figure 12 In-Band DVRS (VHF or UHF) Wiring Details - Front View .............................15
Figure 13 In-Band DVRS (VHF or UHF) Wiring Details - Back View..............................15
Figure 14 Cross-Band DVRS Wiring Details - Front View..............................................16
Figure 15 Cross-Band DVRS Wiring Details - Back View..............................................16
Figure 16 DVR Connectors - Front and Back View........................................................17
Figure 17 DVR-to- MSU Control Cable 7W083X05-01..................................................19
Figure 18 DVR-to- MSU (with Siren) Control Cable 1W083B09-01 ...............................19
Figure 19 DVR Auxiliary Cable - 7W083X06-01............................................................20
Figure 20 In-Band VHF (or UHF) DVRS Interconnect Cabling - Front...........................21
Figure 21 In-Band VHF (or UHF) DVRS Interconnect Cabling - Back............................21
Figure 22 In-Band DVRs (700 or 800MHz) Interconnect Cabling - Front.......................22
Figure 23 In-Band DVRS (700 or 800MHz) Interconnect Cabling - Back.......................22
Figure 24 Cross-Band DVRS Interconnect Cabling - Front............................................23
Figure 25 Cross-Band DVRS Interconnect Cabling - Back............................................23
Figure 26 Auxiliary Cable (7W083X06-01) DB15 Pinout................................................24

8M083X01 Rev. 16
6881013Y39
DVRS Installation & Programming Guide – PART I
April 2014 Page 4 of 30
Compliance with RF Energy Exposure Safety
Standards
ATTENTION!
This radio equipment is intended for use in occupational / controlled conditions,
where users have full knowledge of their exposure and can exercise control over
their exposure to meet FCC limits. This radio device is NOT authorized for general
population, consumer or any other use.
To ensure compliance with Radio Frequency (RF) Energy Safety Standards:
Install only Futurecom / Motorola approved antennas and accessories.
Ensure the antenna installation is consistent with the DVR Antenna Installation
instructions described in this document as well as with the Mobile Radio Antenna
Installation Instructions provided in the Motorola Installation Manual.
Ensure the Product & RF Safety Booklets enclosed with the Mobile Radio and
the DVR are available to the end user upon completion of the installation.

8M083X01 Rev. 16
6881013Y39
DVRS Installation & Programming Guide – PART I
April 2014 Page 5 of 30
Introduction
The P25 Digital Vehicular Repeater (DVR) is designed to be seamlessly interfaced to a
Remote Mount XTLTM5000 Digital Mobile Radio with O5 or O3 Control Head or Remote
Mount XTLTM2500 Digital Mobile Radio with M5 Control Head
The P25 DVRS allows Portable Subscriber Units (PSU) to be used in areas where only
Mobile Subscriber Unit (MSU) coverage is available and portable radio coverage is
either intermittent or non existent.
Installed in the trunk of a car, fire truck, armored vehicle, ambulance, the P25 DVRS
extends radio communications to the PSU users who are outside of the vehicle, inside a
nearby building or in any marginal portable radio coverage areas.
The DVRS not only extends voice (clear or encrypted) communications but it also
supports key trunking system features and can be configured to provide various
advanced options to the Users.
The following Table provides comprehensive information on the DVRS compatibility
options.
FIXED NETWORK TYPE / MOBILE RADIO MODE
Portable
Radio Type /
Mode
Conventional
Analog incl.
Mixed Receive
Conventional P25
incl. Mixed Receive
3600 Analog /
Digital Trunking
9600 P25 Trunking
Conventional
Analog
YES
A
YES
A/M
YES
A
YES
A/M
Generic P25
Conventional
NO
YES
D/M
NO
YES
D/M
P25
Conventional
‘DVRS
Enhanced’
YES
FA
YES
D/FA/M
YES
FA
YES
D/FA/M
Table 1 DVRS Compatibility
DVRS Channel Types:
A = Analog (see Part II of this manual)
D = Digital (see Part II of this manual)
M = Mixed (see Part II of this manual)
FA = Forced Analog (see Part II of this manual)
NOTE
Mixed DVR Channel Mode is intended to be used only in systems where a mixture of old
conventional PSUs and new Digital PSUs are used on the same frequency. Mixed mode
has some limitations and should not be used as an universal solution – refer to the
Mixed DVR Mode section of this Document.
NOTE
The DVR can be interfaced to a High Power MSU, however, the Transmit power of the
MSU must be reduced to comply with the maximum power restrictions described in the
RF Safety Booklet, which is shipped with the DVR.
External power amplifiers can not be used.

8M083X01 Rev. 16
6881013Y39
DVRS Installation & Programming Guide – PART I
April 2014 Page 6 of 30
Identifying Your DVRS Model
Frequency Band of Operation
Depending on the frequency band of operation of the XTLTM 2500 / XTLTM 5000 Mobile
Subscriber Unit (MSU) and DVR, the DVRS models are classified as follows:
In-Band – when the MSU and DVR operate in the same frequency band.
Cross-Band – when the MSU and DVR operate in two different frequency
bands.
In-Band
The following In-Band DVRS Model Groups are available:
DVR BAND OF OPERATION [MHz]
136-174
380-430
450-470
470-512
764-776
794-806
806-825
851-870
XTLTM 2500
XTLTM 5000
BAND OF
OPERATION
[MHz]
136-174
380-470
OR
450-520
380-470
OR
450-520
380-470
OR
450-520
762-776
794-806
OR
806-825
851-870
762-776
794-806
OR
806-825
851-870
Table 2 In-Band DVRS Models
The in-band DVRS models are equipped with two sets of filters, which are required in
order to ensure interference-free operation when both the MSU and DVR are
transmitting and receiving simultaneously. The DVR is a full duplex repeater and is
equipped with a duplexer, which provides sufficient isolation to prevent desense during
DVR repeat activation. The DVR duplexer also provides 40 dB isolation on the Mobile
radio transmit / receive frequencies. The filters installed at the output of the MSU are
designed to provide 40 dB isolation on the DVR transmit and receive frequencies.
IMPORTANT
The above filtering isolation must be complemented by 30dB minimum antenna
isolation (between the DVR and Mobile Radio antennas) in order to ensure
interference-free operation. It is recommended that the Mobile antenna is mounted
on the roof of the vehicle while the DVR antenna is mounted on the trunk.
Each DVRS is shipped equipped with custom filters tuned to the specified
frequency bands – note the frequency range specified on the filter Labels.
Programming the DVR / Mobile radio to operate on frequencies outside of the
original specified bands may result in intermittent or complete loss of
communications. Frequency changes may require filtering retuning or
replacement.
The In-Band DVRS models are also equipped with an RF Bypass Switch, which
bypasses the filtering at the output of the MSU when a “DVR – Disabled” TG is selected
on the O5 / O3 / M5 Control Head.

8M083X01 Rev. 16
6881013Y39
DVRS Installation & Programming Guide – PART I
April 2014 Page 7 of 30
When a “DVR – Enabled” TG is selected on the O5 / O3, the RF Switch inserts the extra
filters between the MSU Antenna port and the MSU antenna to ensure interference-free
operation.
The complex in-band filtering is only feasible if sufficient frequency gap is present
between the DVR frequencies and the MSU frequencies associated with the “DVR -
Enabled” TGs.
For more information on the feasible filtering options, please refer to the DVRS Ordering
Guides.
Figure 1 In-Band DVRS Simplified Block Diagram - VHF
Figure 2 Typical In-Band DVRS Mounting Layout - VHF
The In-Band models are comprised of a DVR Repeater and its associated filtering
shelves mounted on one side, a model-specific in-band filtering shelf (shelves) mounted
as close as possible to the DVR and a Remote Mount MSU mounted next to the in-band
filtering as shown on Figure 2.
Remote Mount XTL5000
VHF
Mobexcom P25 DVR
VHF Duplexer
O5
Tx
Rx
Tx/Rx
Speaker
Notch
Filters
RFSW

8M083X01 Rev. 16
6881013Y39
DVRS Installation & Programming Guide – PART I
April 2014 Page 8 of 30
Figure 3 700MHz In-Band DVRS Simplified Block Diagram
Figure 4 Typical In-Band DVRS Mounting Layout - 700 / 800 MHz
NOTE
The DVR and MSU always require two separate antennas.
NOTE
The In-Band filters connected to the MSU have typical insertion loss of 1.5dB.
Remote Mount XTL5000
800MHz
Mobexcom P25 DVR
700MHz Duplexer
O5
Tx
Rx
Tx/Rx
Speaker
Notch
Filters
RFSW

8M083X01 Rev. 16
6881013Y39
DVRS Installation & Programming Guide – PART I
April 2014 Page 9 of 30
Cross-Band
The following Cross-Band DVRS Model Groups are available:
DVR BAND OF OPERATION [MHz]
136-174
380-430
450-470
470-512
764-776
794-806
806-825
851-870
XTLTM 2500
XTLTM 5000
BAND OF
OPERATION
[MHz]
380-470
OR
450-520
OR
762-776
794-806
OR
806-825
851-870
136-174
OR
762-776
794-806
OR
806-825
851-870
136-174
OR
762-776
794-806
OR
806-825
851-870
136-174
OR
762-776
794-806
OR
806-825
851-870
136-174
OR
380-470
OR
450-520
136-174
OR
380-470
OR
450-520
Table 3 Cross-Band DVRS Models
IMPORTANT
Each DVRS is shipped equipped with custom filters tuned to the specified
frequency bands.
Programming the DVR / MSU to operate on frequencies outside of the original
specified bands may result in intermittent or complete loss of communications.
Frequency changes may require filtering retuning or replacement.
Figure 5 Cross-Band DVRS Simplified Block Diagram
Remote Mount XTL5000
VHF
Mobexcom P25 DVR
700MHz Duplexer
O5
Tx
Rx
Tx/Rx
Speaker

8M083X01 Rev. 16
6881013Y39
DVRS Installation & Programming Guide – PART I
April 2014 Page 10 of 30
Figure 6 Typical Cross-Band DVRS Mounting Layout
The Cross-Band DVRS package includes a DVR Repeater and Duplexer Enclosure,
mounted on one side and a Remote Mount MSU mounted next to the DVR.
DVR Dimensions
Cross-Band DVR Dimensions
Figure 7 Cross-Band DVR - Dimensions mm / [in]

8M083X01 Rev. 16
6881013Y39
DVRS Installation & Programming Guide – PART I
April 2014 Page 11 of 30
In-Band DVR Dimensions
Figure 8 Typical VHF (or UHF) In-Band DVR - Dimensions mm / [in]
Figure 9 Typical 700 / 800 In-Band DVR - Dimensions mm / [in]

8M083X01 Rev. 16
6881013Y39
DVRS Installation & Programming Guide – PART I
April 2014 Page 12 of 30
DVRS Installation Basics
Planning the Installation
Before starting the installation, inspect the vehicle and determine how and where you
intend to mount the two DVRS antennas (one connected to the Mobile Radio and one to
the DVR), the DVR components, MSU, Control Head, MSU accessories.
When planning the DVRS installation, make sure to leave adequate room around all
DVRS modules to allow for easy RF and Control cabling connections, to enable
programming / re-flashing access to both the DVR and MSU ports and access to the
DVR mounting screws.
Ensure all DVRS components are mounted within the interconnecting cables range.
The DVRS operates only in negative ground, +12VDC electrical systems. Before starting
the installation, make sure that the ground polarity of the vehicle is correct. Accidentally
reversing the polarity will not damage the radio, but will cause the cable fuses to blow.
CAUTION
Before installing any electrical equipment, check the vehicle manufacturer’s User
Manual.
Installation Tools Required
Description
Needed for:
Drill
Mounting base installation screws.
Center Punch
Mounting base installation screws.
6mm Allen Key
Tightening the 8mm machine screws for securing DVR/Filters
to their mounting bases.
Wire Cutters and
Crimping Tool
DC power cable installation.
#1 Philips Screwdriver
Tightening of cover screws.
3/16” Flat Screwdriver
Tightening of connector screws.

8M083X01 Rev. 16
6881013Y39
DVRS Installation & Programming Guide – PART I
April 2014 Page 13 of 30
Mounting the DVR
Cross-Band DVRS Mounting
1. Select the locations of the DVR and MSU such that the interconnecting cable can
reach and there is enough space for securing the side thumbscrews of the DVR.
2. Using the mounting base as a template, mark the positions of the 6 holes on the
mounting surface.
3. Center-punch the spots you have marked and realign the mounting base in position.
4. Secure the mounting base with six self-drilling screws. 6mm or ¼” screws are
recommended.
5. Leave enough room for adequate access to the DVR connectors and screws.
6. Route the cables through the mounting base as required.
7. Drop the DVR Assembly into the mounting base and slide it back.
8. Secure the DVR assembly with the two 8mm machine screws and split spring lock
washers provided.
9. Tighten the 8mm machine screws with the 6mm Allen Key. The required tightening
torque is 21.7 Nm (16 lb in).
10. Connect all cables and then secure the front and rear DVR covers by tightening the 4
thumbscrews provided.
Figure 10 Cross-Band DVR Mounting Details

8M083X01 Rev. 16
6881013Y39
DVRS Installation & Programming Guide – PART I
April 2014 Page 14 of 30
In-Band DVRS Mounting
1. Select the locations of the DVR, in-band filters and MSU such that the
interconnecting cables can reach and there is enough space for securing the side
thumbscrews.
2. Using the mounting base as a template, mark the positions of the 12 holes on the
mounting surface.
3. Center-punch the spots you have marked and realign the mounting base in position.
4. Secure the mounting bases with six self-drilling screws. 6mm or ¼” screws are
recommended.
5. Leave enough room for adequate access to the DVRS connectors and screws.
6. Route the cables through the mounting bases as required.
7. Drop the DVR and the Notch Filter Assemblies into the mounting bases and slide
each back.
8. Secure the DVR assembly with the two 8mm machine screws and split spring lock
washers provided.
9. Tighten the two 8mm machine screws with the 6mm Allen Key. The required
tightening torque is 21.7 Nm (16 lb in).
10. Repeat step 9 to install the Notch filter assembly.
11. Connect all cables and then secure the front and rear DVR covers by tightening the 4
thumbscrews provided.
12. Secure the rear Notch Filter cover by tightening the 4 thumbscrews provided.
Figure 11 In-Band DVR Mounting Details
Other manuals for Mobexcom P25
2
Table of contents
Other Futurecom Repeater manuals

Futurecom
Futurecom PDR8000 Operating instructions

Futurecom
Futurecom PDR8000 Quick reference guide

Futurecom
Futurecom PDR8000 Operating instructions

Futurecom
Futurecom DVRS User manual

Futurecom
Futurecom MOBEXCOM DVRS User manual

Futurecom
Futurecom 8A535X03 User manual

Futurecom
Futurecom PDR8000 Quick reference guide

Futurecom
Futurecom MOBEXCOM DVRS User manual

Futurecom
Futurecom DVR-LX User manual

Futurecom
Futurecom Mobexcom P25 Operating instructions