Futureglass AST-SLDK48 User manual

Shower Enclosure
Installation Guide
Astro Square Slider
Shower Hardware Kit
AST-SLDK- 48"- 72"

N PO
A B C ED
F J x 2 K
4mm
H x 2 I
5mm
x 2x 2G x 1
5mm
x 1
L x 2 M x 2
Included in your purchase Shipped in 2 separate boxes
ASlider Panel Edge Strip
BSlider Panel Weather Strip
CFixed Panel Weather Strip
DShower Rod
EAluminum Floor Strip
FSlider Panel Handle
GFixed Panel Floor Clip, Screw
& Wall Anchor
HFixed Panel Brackets
I Shower Rod Brackets, Screws
& Wall Anchors
JSlider Panel Stoppers
KFloor Bracket & Screw
LSlider Panel Rollers
MRoller Guides
NAluminum Floor Strip Cap
ORoller Adjustment Tool
PRubber Block set (various sizes)

Thank you
for your purchase.
Caution: Prohibited Products *Note these may damage the treatment
and void any warranty
•Avoid the use of any abrasives or polishes including water spot removers,
toothpaste, polishes, rough, or griy substances
•Avoid the use of acids or alkalis that you would not want in contact with
your skin for an extended period of time
•Avoid products such as Comet, Ajax, Ji or Cerium Oxide which polish
back the actual substrate
•Avoid the use of any harsh or chemical cleaners, with correct maintenance
these are never required
If for any reason you are having trouble with installation, or if the size
of the product does not fit your designated space, please contact
Future Glass directly.
Future Glass takes pride in providing quality products and customer
service. We want to ensure your happiness with your purchase for years
to come.
If you have any questions, please do not hesitate to reach out to us.
Thank you again for choosing Future Glass!
Best Regards,
The Team at Future Glass
(760) 203 6255
info@futureglass.us

Installation Guide
Tools required for install.
A B C D
1⁄8"
E
¼"
F H I J KG
ASilicone and caulking gun
BPower drill
CPhillips head screwdriver
DPencil
E⅛" tile drill bit
F¼" tile drill bit
G Hacksaw
HUtility knife
ILevel
JHammer
KTape measure
Note: Silicone is not provided and will need to be
purchased separately. We recommend using a clear,
mold resistant silicone which can be purchased at
your local hardware store.

Before You Start
If your shower head is on the
le, the Slider Panel should be
installed on the le side.
If your shower head is on the
right, the Slider Panel should
be installed on the right side.
•Confirm that you have the correct model size.
See table below to insure that the model you
received will fit your shower opening.
•Choose which side of your shower to install the
Slider Panel (Sliding Door): Future Glass highly
recommends installing the sliding shower door
on the same side as your shower head. This
will help to prevent water leaking from the gap
between the two glass panels.
AST-SLDK48 = 44" - 48"
AST-SLDK52 = 48" - 52"
AST-SLDK56 = 52" - 56"
AST-SLDK60 = 56" - 60"
AST-SLDK64 = 60" - 64"
AST-SLDK68 = 64" - 68"
AST-SLDK72 = 68" - 72"
Confirm you have the correct model size.
Model numbers and corresponding size range:

2˝(51mm)2˝(51mm)
4 ⁄˝(120mm)
2 ⁄˝(59 mm)
35 ⁄˝
(900mm)
2 ⁄˝(59 mm)
4 ⁄˝(120mm)
⁄˝(16mm)
Diameter
Holes
⁄˝(10mm)
Diameter
Holes
⁄˝
(12mm)
Diameter
Holes
2˝(51mm)
8˝
(203mm)
*Diagram Not to Scale
Glass Fabrication
If fabricating custom glass for the Astro Square Slider Shower Hardware Kit,
please use the specs below for the Sliding Door Panels.
Astro Square Slider Kits
48"- 60" Door Panel
Dimensions
•Designed for Use With
⁄" (8 mm) Monolithic
Tempered Glass
•Do not use Laminated Glass.
•Maximum Recommended
Glass Panel weight: 90 lbs.
PRODUCT SKU DOOR WIDTH
AST-SLDK- 48 25 /" (648mm)
AST-SLDK- 52 27 /" (699mm)
AST-SLDK- 56 29 /" (749mm)
AST-SLDK- 60 31 /" (800 mm)
Sliding Shower Door Widths:
Sliding Shower Door Height:
Overall Height minus /" (6mm)
Important: Drawing not shown to
scale. Shower Rod is cut 1" (25mm)
less than Opening Width.
Use wall-to-wall tight dimension.
Overall Height is height from
threshold/floor to top of glass.

2˝(51mm)2˝(51mm)
4 ⁄˝(120mm)
2 ⁄˝(59 mm)
35 ⁄˝
(900mm)
2 ⁄˝(59 mm)
4 ⁄˝(120mm)
⁄˝(16mm)
Diameter
Holes
⁄˝(10mm)
Diameter
Holes
⁄˝
(12mm)
Diameter
Holes
3 ⁄˝(80mm)
8˝
(203mm)
*Diagram Not to Scale
Astro Square Slider Kits
64"- 72" Door Panel
Dimensions
•Designed for Use With
⁄" (8 mm) Monolithic
Tempered Glass
•Do not use Laminated Glass.
•Maximum Recommended
Glass Panel weight: 90 lbs.
PRODUCT SKU DOOR WIDTH
AST-SLDK- 64 33 /" (851mm)
AST-SLDK- 68 35 /" (902mm)
AST-SLDK- 72 37 /" (953mm)
Sliding Shower Door Widths:
Sliding Shower Door Height:
Overall Height minus /" (6mm)
Important: Drawing not shown to
scale. Shower Rod is cut 1" (25mm)
less than Opening Width.
Use wall-to-wall tight dimension.
Overall Height is height from
threshold/floor to top of glass.

Glass Fabrication
If fabricating custom glass for the Astro Square Slider Shower Hardware Kit,
please use the specs below for the Fixed Panel.
Astro Square Slider Kits
48"- 72" Fixed Panel
Dimensions
•Designed for Use With
⁄" (8 mm) Monolithic
Tempered Glass
•Do not use Laminated Glass.
•Maximum Recommended
Glass Panel weight: 90 lbs.
PRODUCT SKU PANEL WIDTH
AST-SLDK- 48 24" (610 mm)
AST-SLDK- 52 26" (660mm)
AST-SLDK- 56 28" (711mm)
AST-SLDK- 60 30" (762mm)
AST-SLDK- 64 32" (813mm)
AST-SLDK- 68 34" (864mm)
AST-SLDK- 72 36" (914mm)
Shower Fixed Panel Widths:
Shower Fixed Panel Height:
Overall Height
Important: Drawing not shown to
scale. Shower Rod is cut 1" (25mm)
less than Opening Width.
Use wall-to-wall tight dimension.
Overall Height is height from
threshold/floor to top of glass.
3 ⁄˝(82mm)3 ⁄˝(82mm)
3 ⁄˝(80mm) 3 ⁄˝(80mm)
⁄˝(13mm)
Diameter
Holes
*Diagram Not to Scale

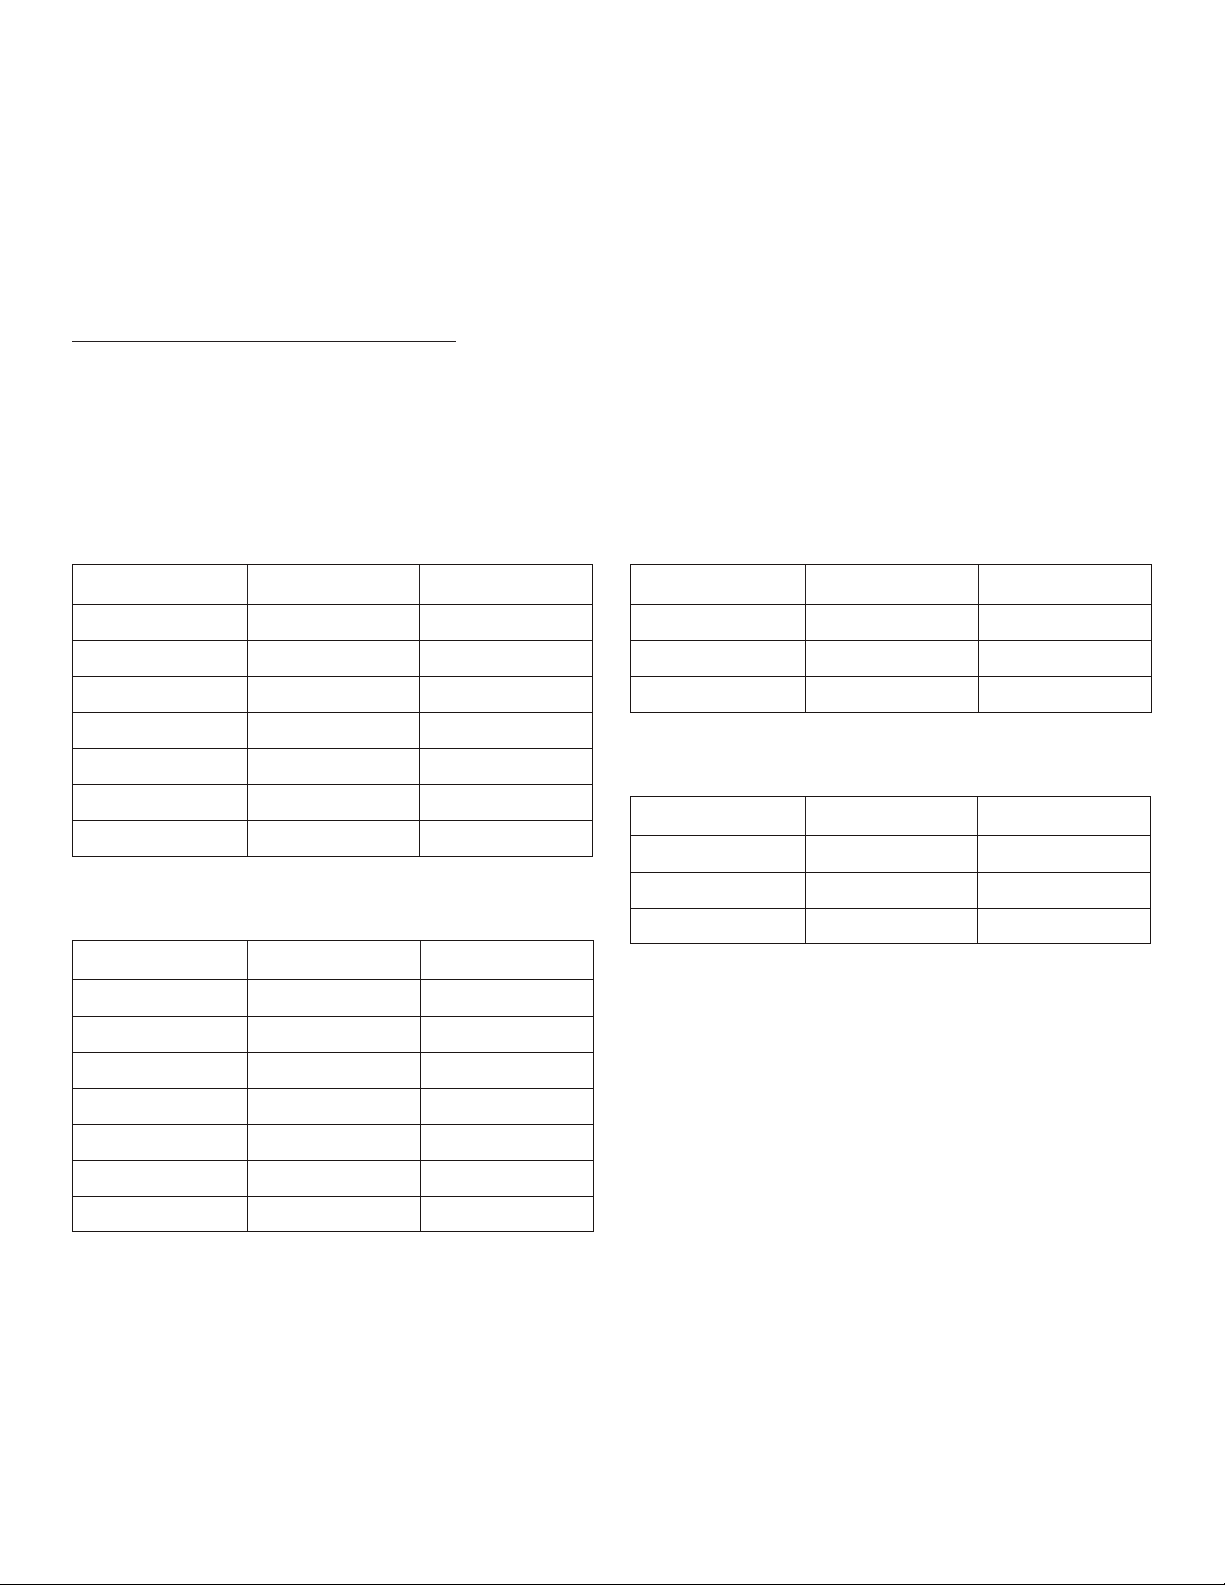
Future Glass Tempered Glass Panels
Future Glass stocks glass panels to fit all Astro Square Slider Shower Hardware Kits.
Please see tables below for panel sizing and component skus. The numeric value in the skus relates to the
numeric values in the Astro Square Slider Shower Hardware Kit skus. For example: If you are purchasing
an AST-SLDK-48 Hardware Kit, you would need a Door Panel (SQ-SL-D-48) and a Fixed Panel (SQ-SL-F-48)
to complete your project. To view the complete collection, visit our website:
futureglass.us/collections/glass-panels
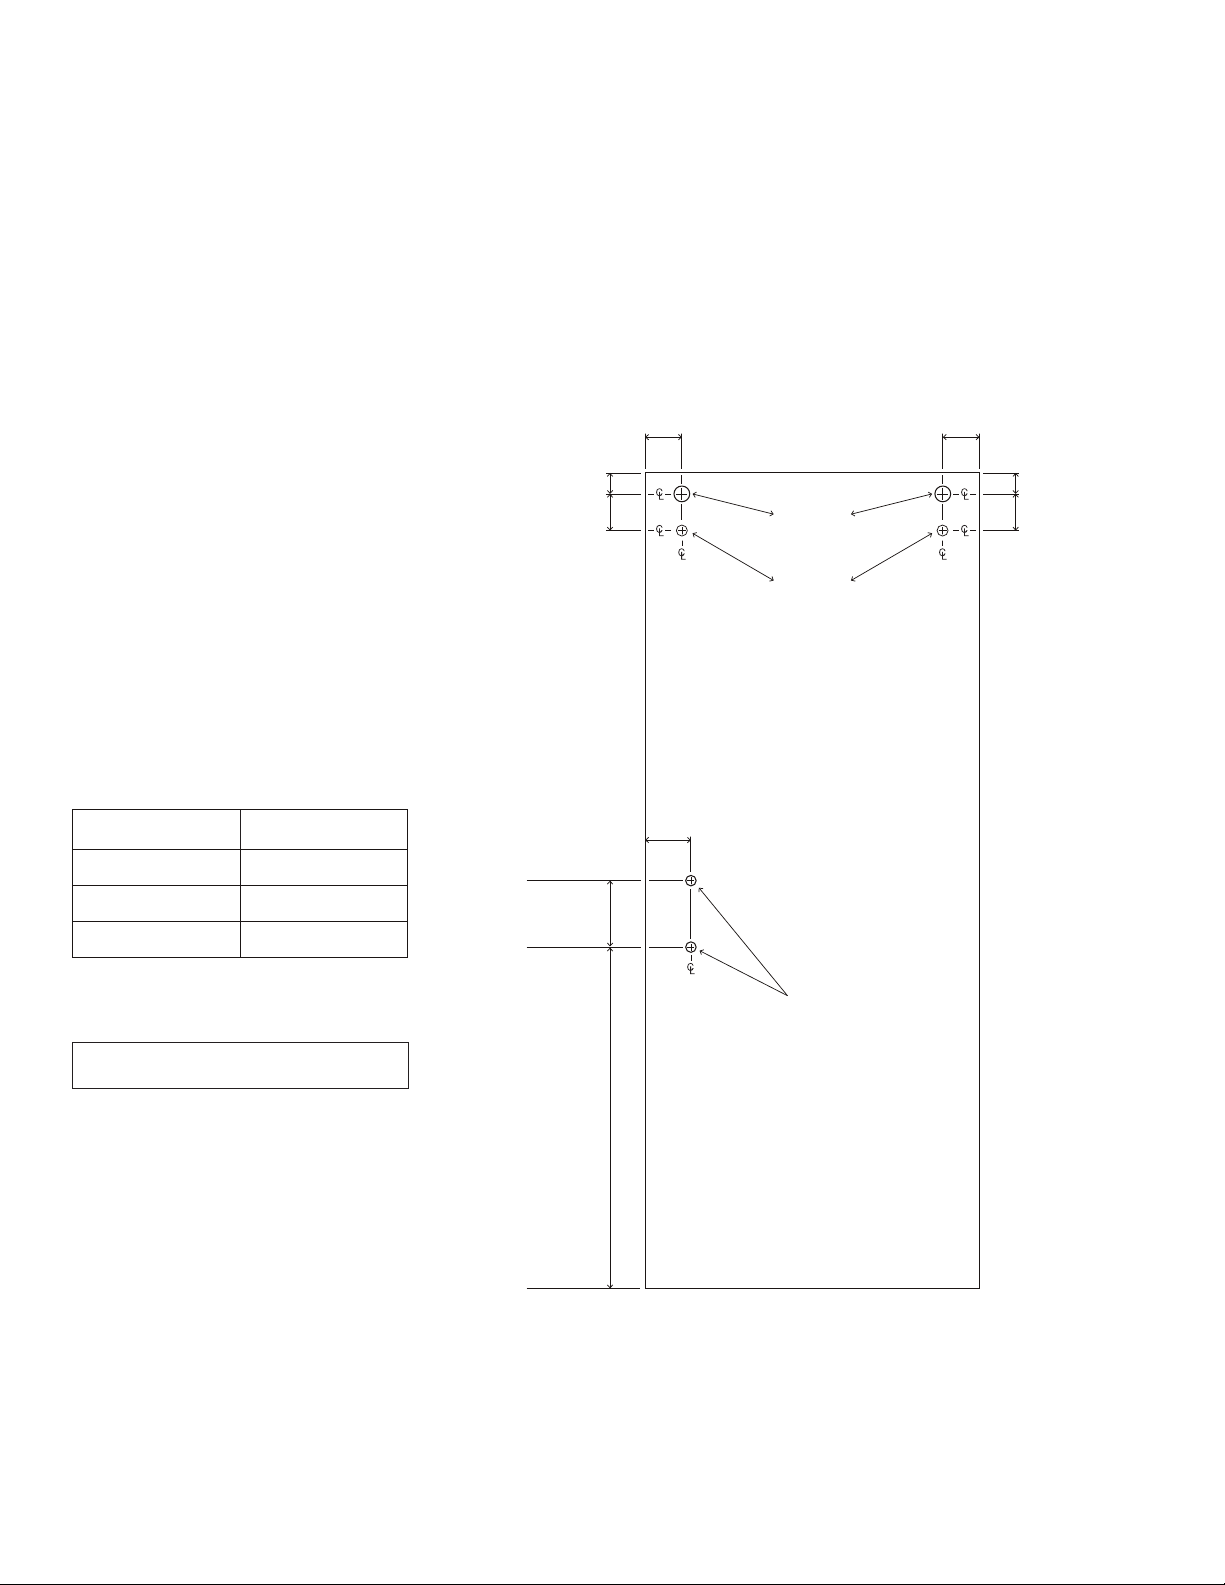
Astro Square Slider Full Height
Glass Panels
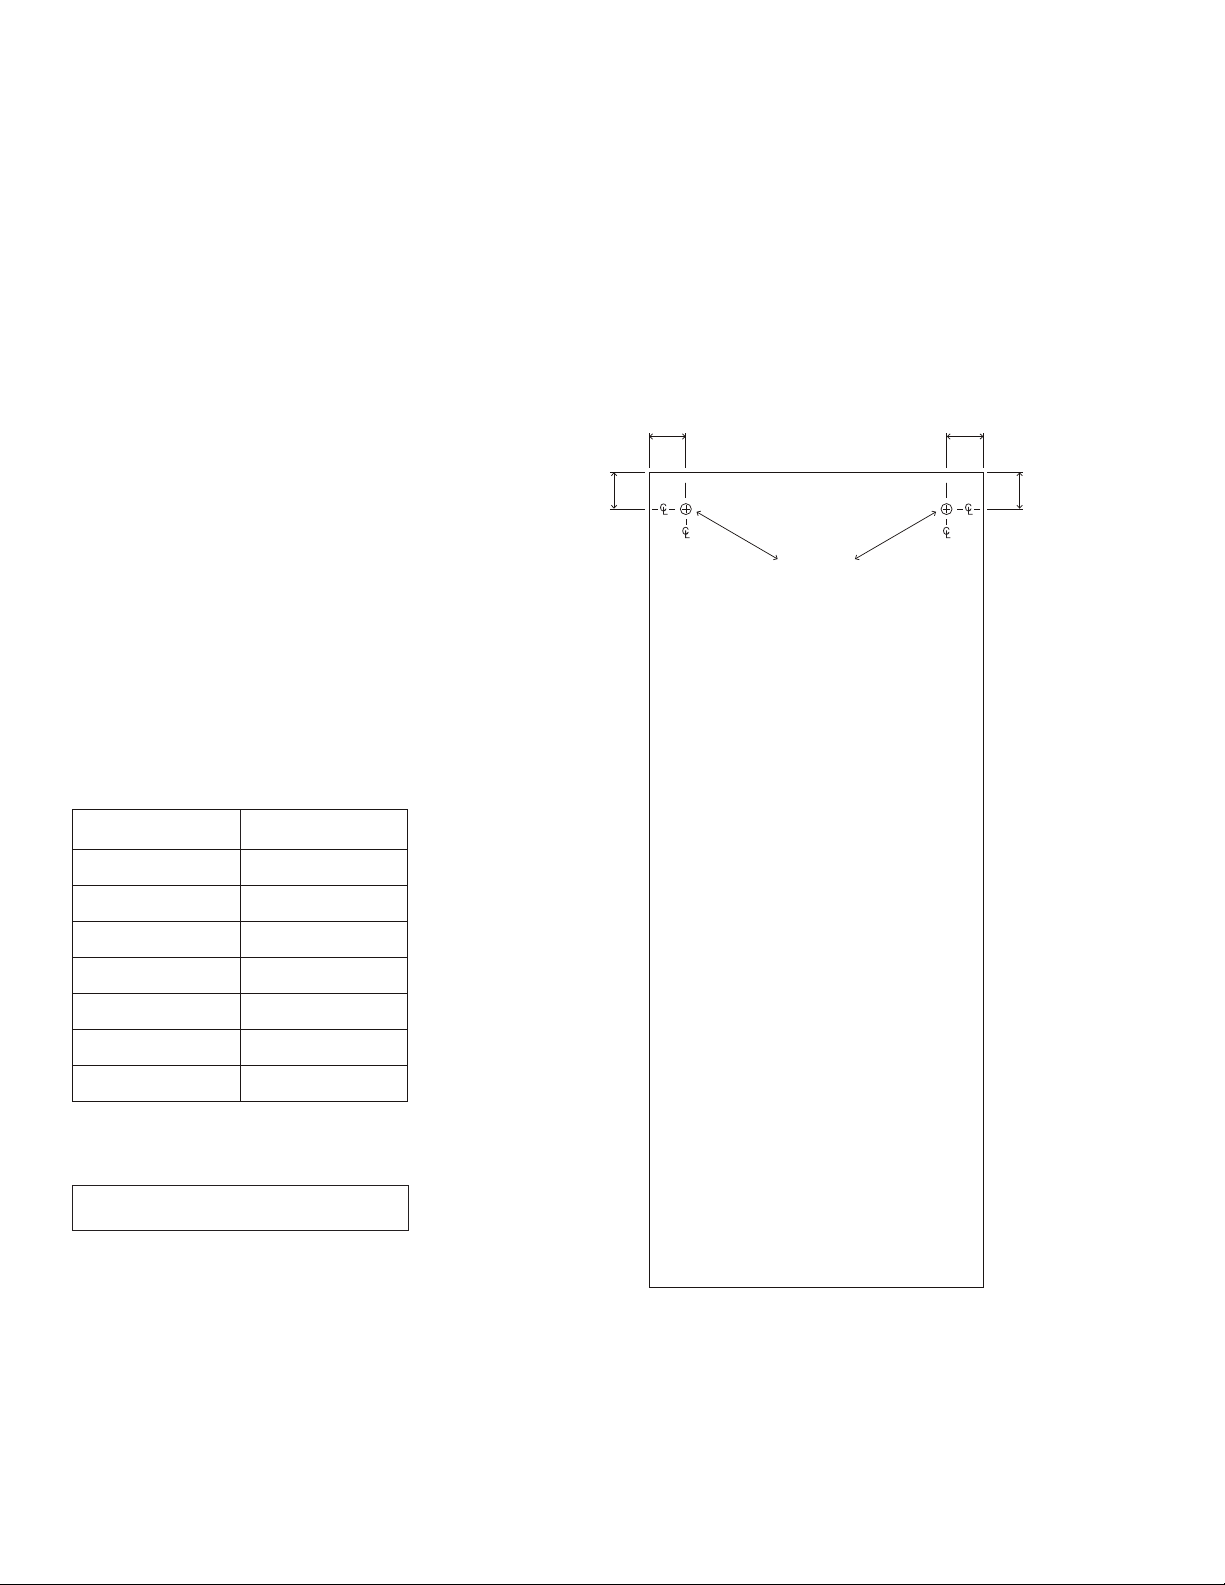
Astro Square Slider Bath Height
Glass Panels
PRODUCT SKU DOOR WIDTH DOOR HEIGHT
SQ-SLD-D-48 25 /" (648mm) 77 /" (1974mm)
SQ-SLD-D-52 27 /" (699mm) 77 /" (1974mm)
SQ-SLD-D-56 29 /" (749mm) 77 /" (1974mm)
SQ-SLD-D-60 31 /" (800 mm) 77 /" (1974mm)
SQ-SLD-D-64 33 /" (851mm) 77 /" (1974mm)
SQ-SLD-D-68 35 /" (902mm) 77 /" (1974mm)
SQ-SLD-D-72 37 /" (953mm) 77 /" (1974mm)
Shower Sliding Door skus:
PRODUCT SKU DOOR WIDTH DOOR HEIGHT
B-SQ-SL-D-56 29 /" (749mm) 59 /" (1517mm)
B-SQ-SL-D-60 31 /" (800 mm) 59 /" (1517mm)
B-SQ-SL-D-72 37 /" (953mm) 59 /" (1517mm)
Bath Sliding Door skus:
PRODUCT SKU DOOR WIDTH PANEL HEIGHT
B-SQ-SL-F-56 28" (711mm) 60" (1524mm)
B-SQ-SL-F-60 30" (762mm) 60" (1524mm)
B-SQ-SL-F-72 36" (914mm) 60" (1524mm)
Bath Fixed Panel skus:
PRODUCT SKU PANEL WIDTH PANEL HEIGHT
SQ-SL-F-48 24" (610 mm) 78" (1981mm)
SQ-SL-F-52 26" (660mm) 78" (1981mm)
SQ-SL-F-56 28" (711mm) 78" (1981mm)
SQ-SL-F-60 30" (762mm) 78" (1981mm)
SQ-SL-F-64 32" (813mm) 78" (1981mm)
SQ-SL-F-68 34" (864mm) 78" (1981mm)
SQ-SL-F-72 36" (914mm) 78" (1981mm)
Shower Fixed Panel skus:

Place Slider Panel inside shower.
Before starting the installation process, place the Slider
Panel inside the shower on cardboard to protect the
boom of door. Be sure to face handle holes toward wall
door closes to. This will make it easier for installation at
a later stage once the Fixed Panel and Shower Rod have
been set in place.
01 02
Mark the threshold and Fixed Panel wall.
Measure the width of threshold tile where shower door
is to be installed, this needs to be a minimum of 2 " to
install this model of shower enclosure. On the wall where
the Fixed Panel is to be placed, measure to the center of
the threshold tile and mark the wall with a pencil. Using
a level, draw a line up the wall at this point.
Tip: We recommend using a pencil
so this can be easily removed.
Center of
threshold
Important: If installing an enclosure with
fiberglass walls, a stud must be directly
behind where the panel will be installed.

0403
Mark the hole to drill on Fixed Panel wall.
Along the drawn level line, mark 75" from threshold.
Mark the vertical line on Slider Panel wall.
On the opposite wall where the Slider Panel will close
towards, measure to the center of the threshold tile and
draw a vertical line using a level. This line will be a guide
to install the Shower Rod
75"
Center of
threshold

Important: If installing an enclosure with
fiberglass walls, a stud must be directly
behind where the panel will be installed.
A ⁄" tile drill bit can be used to create
pilot holes for a tiled enclosure,
but this is optional.
Drill the hole for the first Shower Rod Bracket.
Using a ⁄" drill bit, drill a hole and install the Wall Anchor.
Trim excess from the Wall Anchor hanging out of hole
with utility knife so Bracket sits flush to wall.
If the shower wall is fiberglass, use a ⅛" drill bit. You will
not use the green Anchor but rather screw the Shower
Rod Bracket directly into the fiberglass shower wall.
06
Install first Shower Rod Bracket.
Place Shower Rod Bracket over hole and drill screws
into Wall Anchor to secure Bracket. Make sure the
two interior Bracket pieces are centered on each
other when installing on wall, this will allow adjustment
up or down at a later stage if required. Be sure it is
securely tightened.
05

07
Proper set up for
shower door on
right side
Proper set up for
shower door on
left side
Configure Shower Rod direction and Stoppers.
If the Stoppers are upside down and underneath the
Rod, you will need to flip them over. Remove the Fixed
Panel Bracket nearest to the end of the Rod using allen
key included. Loosen and remove the Stopper closest to
it then flip Stopper over and slide it back onto rod and
tighten. Return Fixed Panel Bracket to original position.
At the far end of the Rod, simply remove the Stopper,
flip it over and slide it back onto the Rod and tighten
allen screws.
AST-SLDK48 = 44" - 48"
AST-SLDK52 = 48" - 52"
AST-SLDK56 = 52" - 56"
AST-SLDK60 = 56" - 60"
AST-SLDK64 = 60" - 64"
AST-SLDK68 = 64" - 68"
AST-SLDK72 = 68" - 72"
08
Measure and cut Shower Rod.
Shower
opening
width
Saw
here
1"
Important: You must cut rod at opposite
end from the Fixed Panel Brackets.
Measure your opening width. Subtract 1" from this
measurement and then measure out this distance on the
Shower Rod. For example: Ifyour opening measurement
is 47" your rod length should be 46". Use a hacksaw and
cut your Shower Rod to the correct length.
Model numbers and corresponding size range:

10
Level Shower Rod and mark Rod Bracket position.
Slide Fixed Panel side of Shower Rod into first Shower
Rod Bracket. Using a level, check Shower Rod is perfectly
level from one wall to the other. Once in correct position
mark the placement of the second Shower Rod Bracket
on wall. Make sure wall bracket is centered over vertical
line previously drawn on wall
09
Move Slider Panel side Door Stopper over.
Slide Slider Panel side Door Stopper all the way over to
other side to accommodate level in next step.

11
Mark hole to drill for second Shower Rod Bracket.
Remove Shower Rod from first Bracket and remove
second Shower Rod Bracket from Shower Rod and
mark the hole to be drilled on wall.
12
Drill the hole for second Shower Rod Bracket.
Using a ⁄" drill bit, drill a hole and install the Wall Anchor.
Trim excess from the Wall Anchor hanging out of hole
with utility knife so Bracket sits flush to wall.
If the shower wall is fiberglass, use a ⅛" drill bit. You will
not use the green Anchor but rather screw the Shower
Rod Bracket directly into the fiberglass shower wall.
Important: If installing an enclosure with
fiberglass walls, a stud must be directly
behind where the panel will be installed.
An ⁄" tile drill bit can be used to create
pilot holes for a tiled enclosure,
but this is optional.

14
Remove Shower Rod Bracket from interior.
Use Allen key to loosen Shower Rod Bracket from
Bracket interior. Slide Shower Rod Bracket o of
Bracket interior.
13
Install Shower Rod Bracket interior.
Screw in Shower Rod Bracket on Slider Panel side wall.

15
Slide Shower Rod Bracket on to Shower Rod.
Slide second Shower Rod Bracket on to Shower Rod
past the cut end.
16
Install Shower Rod.
Slide Fixed Panel Side of Shower Rod into first Shower
Rod Bracket.Align Shower Rod and slide second Shower
Rod Bracket onto Bracket interior on wall. Re-check the
Shower Rod is level and tighten all allen screws on both
Shower Rod Brackets.
If Shower Rod is not level you can change the height up
or down by adjusting the two interior pieces on one of
the Shower Rod Brackets to make level.

18
Drill hole for Fixed Panel Floor Clip.
Using a ⁄" drill bit, drill hole and install Anchor
(see important message below). Trim excess from the
Anchor with utility knife. Fill this hole with a lile bit
of silicone to waterproof before installing Fixed Panel
Floor Clip.
17
5⁄8"
31⁄2"
Mark hole to drill for Fixed Panel Floor Clip.
On Fixed Panel Side of shower threshold, measure
3 ⁄" from wall. Then measure ⁄" over towards outside
of threshold from that point. Mark hole to drill for Fixed
Panel Floor Clip.
Important: When fixing Fixed Panel
Floor Clip to fiberglass shower base
use a ⁄" drill bit to predrill the hole
and screw directly into shower base.
You will not use the Anchor.

20
Unscrew Fixed Panel Brackets.
Unscrew Fixed Panel Brackets from front of
Shower Rod.
19
Fixed Panel width
from wall
3"
Position
grub screw
to inside
of shower
Install Fixed Panel Floor Clip and Rubber Block.
Install Fixed Panel Floor Clip and place a ⁄" rubber block
inside the clip to protect glass panel during installation.
Measure the width of the Fixed Panel from the wall
and place the /" thick Rubber Blocks provided 3" in
from the outside edge where the glass panel will sit on
the tile or threshold.
Important: Grub screw in Clip must have
rubber tip so it can contact glass panel
without damage. Please contact us if
grub screw is missing rubber tip.

Set the Fixed Panel in place.
Gently slide the Fixed Panel down into the Fixed Panel
Floor Clip and on to the Rubber Block. Line up the holes
over Fixed Panel Brackets on the Shower Rod.
22
Align Fixed Panel and fasten Brackets.
Check to make sure the glass is level. If not, adjust by
adding thinner ⁄" Rubber Blocks to the blocks already
on floor or in Fixed Panel Floor Clip. Once level, tighten
the grub screws on the Fixed Panel Floor Clip and on
the Fixed Panel Brackets on Shower Rod very tight.
21
Tip: Use additional Rubber Blocks on
either existing blocks to raise/drop
the fixed panel if required.
Important: Be sure that tempered safety
glass stamp on the Fixed Panel is
positioned in corner closest to the wall.
This way it is barely visible once installed.
This manual suits for next models
6
Table of contents
Popular Bathroom Fixture manuals by other brands

Burlington
Burlington 55 Roll Top basin with stand Assembly instructions

RAVAK
RAVAK KASKADA installation instructions

BELLOSTA
BELLOSTA Stresa 1705/3 Installation instruction

Rubi
Rubi FALL RFA17 Installation

Signature Hardware
Signature Hardware PROVINCETOWN 948641 quick start guide

Villeroy & Boch
Villeroy & Boch Universal Shower Set installation instructions

AMERICH
AMERICH VSM Operator's manual

Kalia
Kalia KONCEPT DR1215 installation instructions

Hans Grohe
Hans Grohe Talis Puro Showerpipe Instructions for use/assembly instructions

American Standard
American Standard SPA EXPERIENCE installation instructions

noken
noken FORMA 100214310 N350798850 manual

Monzana
Monzana MZBG156 instructions