FXA FXA HCM450 User manual

Concrete Mixer
Concrete mixer FXA HCM450
502039977

1
UNDERSTAND YOUR MIXER
Read and understand the owner’s manual and labels affixed
to the mixer. Learn its application and limitations as well as
the specific potential hazards peculiar to it.
Become familiar with the controls before operating this mixer.
STAY ALERT
Do not operate the mixer while under the influence of drugs,
alcohol, or any medication that could affect your ability to use
it properly.
Do not use this mixer when you are tired or distracted from
the job at hand. Watch what you are doing at all times. Use
common sense.
AVOID DANGEROUS CONDITIONS
Make sure there is adequate surrounding workspace.
Keep your work area clean and well lighted. Cluttered areas
invite injuries. Keep area around the mixer clear of obstructions,
grease, oil, trash and other debris which could causepersons
fall onto moving parts.
Only use or operate the mixer on solid, flat, level ground that
is capable to support the weight of the mixer and its load to
prevent the mixer from tipping over.
Do not attempt to move the mixer when it is loaded and/or
in operation.
This mixer is intended for the production of concrete, mortar
and plaster. It is not suitable for the mixing of flammable or
explosive substances. Do not use it in areas where fumes
from paint, solvents or flammable liquids pose a potential
hazard.
INSPECT YOUR MIXER
Check your mixer before turning it on. Keep guards in place
and in working order. Do not plug mixer with motor cover off.
Check all bolts, nuts, and screws for tightness before each
use,especiallythosesecuringguardsanddrivemechanisms.
Vibration during mixing may cause these to loosen.
Form a habit of checking to see that all the adjusting tools,
shovels, hand trowels and other tools/equipments are removed
from mixer area before turning it on.
Replace damaged, missing or failed parts before using it.
Warning labels carry important information. Replace any
missing or damaged warning labels.
SAFETY WARNINGS & INSTRUCTIONS
SYMBOL AFFIXED TO THE MACHINE

2
DRESS PROPERLY
Do not wear loose clothing, gloves, neckties or jewelry (rings,
wrist watches). They can be caught in moving parts. Protective
electrically non-conductive gloves and non-skid footwear are
recommended when working. Wear protective hair covering
to contain long hair, preventing it from getting caught in
machinery. Wear a face or dust mask if the operation is dusty.
Always wear safety goggles and/or face shields. Everyday
eyeglasses have only impact resistant lenses. They are not
safety glasses.
DO NOT ABUSE CORD
Never carry mixer by cord or yank it to disconnect it from
socket.
Keep cord from heat, oil and sharp edges.
EXTENSION CORDS
Extension cords must be no longer than 50 meters in length.
The
wire
section
must
be
1.5mm2
on
230V
to
allow
sufficient
current flow to the motor. Improper use of extension cords
may cause inefficient operation of the mixer which can result
in overheating and motor damage.
Only extension cords to H07RN-F specification intended for
outdoor purpose may be used. Avoid use of free and
inadequately insulated connections. Connections must be
made with protected material suitable for outdoor use. Make
sure that any extension cord connections are dry and safe.
Ensure that the extension cord is carefully laid out avoiding
liquids, sharp edges and placeswhere vehicles might run over
it.Avoidallowingtheextensioncordtobetrappedunderneath
the mixer. Unroll itfully or it will overheat and could catch fire.
AVOID ELECTRICAL SHOCK
Check that theelectric circuit is adequatelyprotectedand that
it corresponds with the power, voltage and frequency of the
motor.
Do not plug or unplug the motor while standing in or around
damp or wet ground. Do not use the mixer in wet or damp
areas or expose it to rain.
Prevent body contact with grounded surfaces: pipes, radiators,
ranges, and refrigerator enclosures.
Make sure your fingers do not touch the plug’s metal prongs
when plugging or unplugging the mixer.
KEEP VISITORS AND CHILDREN AWAY
Keep unauthorized persons away from the mixer.
Do not allow children to handle or climb on or in the mixer.
SYMBOL AFFIXED TO THE MACHINE
SAFETY WARNINGS &INSTRUCTIONS

3
DO NOT OVERREACH
Keep proper footing and balance at all times when loading
or unloading the mixer.
Never stand on mixer. Serious injury could occur if the mixer
is tipped or if the moving parts are unintentionally contacted.
Do not store anything above or near the mixer where anyone
might stand on the mixer to reach them.
AVOID INJURY FROM UNEXPECTED ACCIDENT Keep
hands out of the way of all moving parts. Do not place any
part of your body or any tool, like shovel in the drum during
operation. When operating, do not pass hands through the
clearance between frame and support arm or the one
between the drum and support arm.
DO NOT FORCE TOOL
It will do a better and safer job at its design rate. Always work
within the rated capacity.
Do not start the motor if the drum is fully loaded. Do not turn
mixer off while full of concrete.
Do not use the mixer for a purpose for which it was not
intended.
The mixer is not to be towed by any vehicle.
NEVER LEAVE MIXER RUNNING UNATTENDED
Do not leave mixer until it has come to a complete stop.
DISCONNECT POWER
Never open the motor cover before unplugging the mixer.
Disconnect from power supply when not in use, before moving,
making adjustments, changing parts, cleaning, or working on
the mixer. Consult technical manual before servicing.
MAINTAIN YOUR MIXER WITH CARE
Clean the mixer immediately after use. Keep the mixer clean
for best and safest performance.
When maintaining this mixer, only the manufacturer’s original
replacement parts may be used.
PROTECT THE ENVIRONMENT
Take left over materials to an authorized collection point or
follow the stipulations in the country where the mixer is used.
Do not discharge into drains, soil or water.
STORE IDLE EQUIPMENT
When not in use, the mixer should be stored in a dry location
to inhibit rust. Keep the mixer away from children and others
not qualified to use it.
SAFETY WARNINGS & INSTRUCTIONS
SYMBOL AFFIXED TO THE MACHINE

4
ELECTRICAL CONNECTION SPECIFICATIONS
This mixer is double insulated to Class II
protection andIP44Drated. Theinsulation
will only remain effective if the original
insulating parts are used for repairs and
the spaces between the original insulation
are maintained.
Double insulation eliminates the need
for the three-wire grounded power cord
andgrounded power supply system. Double
insulated tools can use either a two or three
wire extension cord.
Do not connect either core to
the earth pin.
The use of an Residual Current Device
(“RCD”), (earth leakage trip), on 230V
electrics is recommended. If using an
extension cable, plug it directly into the
RCD.
When operating in Switzerland, plug the
mixer only in sockets protected by fault
current breaker.
Model Number
HCM450
Motor
550W S6 30%
Drum Capacity
125 Liters
Drum Mouth
380 mm
Drum Speed
26.6 / min
Overall
Sizes
L
1200 mm
W
710 mm
H
1400 mm
Weight
51 kg

5
A
4
CONTENTS OF THE SHIPPINGCONTAINER
ASSEMBLY INSTRUCTIONS
Two people assist in assembly
recommended.
THE STAND
1.
With a split pin inserted into the inner holes
in each stub axle, place a flat washer, then
a wheel followed by another flat washer.
Insert another split pin into the axle holes
outside each flat washer. Bend each side of
the pins outward so they do not fall out.
A
B
C
D
M8
M8
M8
M8
M10
M8
16
16
16
25
60
2 E
6
2 F
2 G
1 H
4 I
4
M8
70
2
M8
55
1
M8
70
2
M8
55
1
M8
42
65
2
1

6
THE BOTTOM DRUM
M8 70 2
M8 55 1
2.
With the frame lying on its side, attach the
support leg as shown. Insert two M8X70 hex
bolts through the holes from one side, then
flat washers, lock washers and nuts from the
other side. Also screw a M8X55 hex bolt with
lock and flat washers to the nut on the frame.
Tighten down.
1. Slide the bearing block on the shaft. Hold it
in place with 42 spiral ring.
2. Carefully,and withtwopeople, set the bottom
drum with support arm onto the side supports
of the stand as shown, so that the bearing
blocks slot into the channels provided by the
side supports. The larger diameter shaft
should be at the leg end of the stand.
3. At each side, line up the holes in the side
support with those in the bearing block and
insert a M8X65 hex bolt from one side, then
a flat washer, lock washer and nut fromthe
other side. Tighten with a wrench.
3.
Turn the frame over and attach the axle
bracket with wheels in the same manner.
4.
Make sure all bolts and nuts are tightened.
THE MIXING BLADES
E
2
M8 16
1
2
M8 65
42
B
M8
M8
70
55
2
1
C
D

7
Mount the mixing blades inside the bottom drum
loosely as shown - Two holes are provided at
the base of the drum into which a M8X16 bolt
may be inserted from the outside. A leather
washer, flat washer, lock washer and a nut
should be threaded on loosely on the inside.
The leather washer shouldbe placed under the
blade down against the drum.
2. Screw a M8X16 hex bolt with lock and flat
washers into each threaded hole in the
rim/ring gear. Make sure the tightening
process is carried out progressively.
3. Secure the mixing blades to the upper drum
by inserting two M8X16 cross headed screws,
from the outside through the holes in the
drum.
NOTE: Two arrows are labeled on upper
drum and bottom drum to make
their position relation. If you have
any difficulty in correctly
positioning the mixing blades, it is
helpful if you temporarily mount
the upper drum on the top of the
bottom drum, rotating it so that the
two arrows line up.
4. A leather washer should be positioned inside
between the drum and blade. Secure the
mixingbladeon theinside usinga flat washer,
spring washer and nut.
5. Finally, ensure top and bottom mixing blade
mountings are tight.
THE TIPPING WHEEL
THE UPPER DRUM
1. Position the upper drum on bottom drum
over the rim, making sure the mounting holes
align in both as well as the labeled arrows.
1. Slide the locking plate over the large diameter
shaft at the leg end of the frame with the rim
facing inwards as shown. Secure with two
M8X25 bolts, each with a nut, lock and flat
washers.
M8 16
M8 16
6
2
F
G
2
M8 25

8
NOTE: The wheel must be allowed to pivot
about the bolt so that the lugs on
the bracket can be engaged or
disengaged from the slots in the
locking plate.
THE TRANSMISSION CASE
Lining up the keyways, slide the transmission
case over the pinion shaft. Secure the case to
the frame with four M8 nuts.
2. The spring is clamped in its holder by a U
shaped plate for easier assembly. Slide the
wheel over the larger diameter shaft until the
holes in the bracket line up with the hole
drilled. Insert a M10X60 hex bolt and screw
on a nut with flat and lock washers from the
other side. Screw the nut up against the
bracket firmly, but not so tightly so as to
prevent the wheel from pivoting about the
bolt. Free the spring by removing the U
shaped plate.
OPERATION INSTRUCTIONS
DRUM TILTING
The spring-loaded tipping wheel with locking
lugs provides an easy positive control of the
drum which can be locked in the mix, discharge
and stored position.
I
4
M8
H
1
M10 60

9
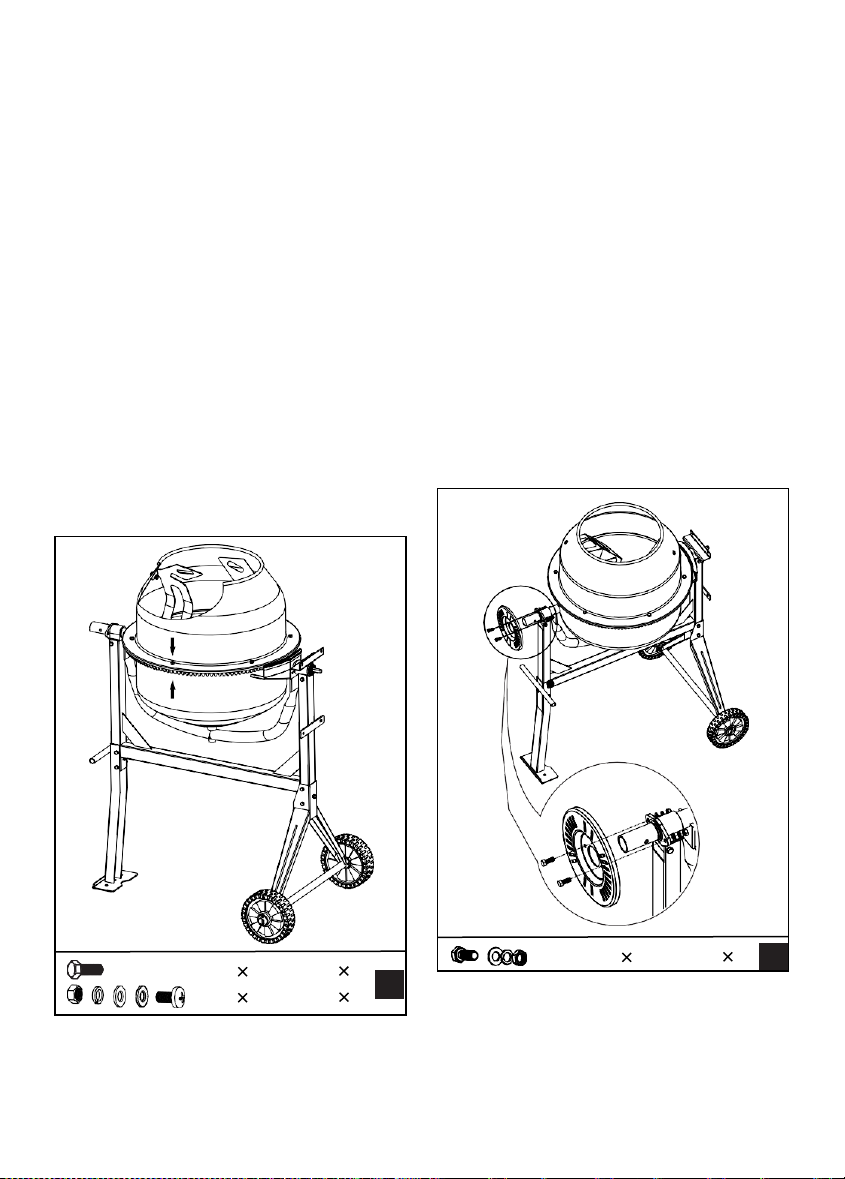
The drum is locked in position by lugs on the
self-locating tipping wheel which engage into
the locking plate on the mixer frame. To tilt the
drum, withdrawn the tipping wheel to dis-engage
the locking lugs. This then allows the tipping
wheel and drum to be turned in the same
direction.
To retain the drum in position, aligning the lugs
with the slots, release the tipping wheel a little
NOTE:
Do not throw material into the
mixer to avoid sticking firmly to
the back of the drum. Trickle it
steadily over the ram.
A built-in thermal protecter is
arranged in the motor to prevent it
from overheating. The thermal
protecter restores automatically
when the motor cools down.
while retaining the drum. Rotate the tipping
wheel until the locking lugs engage into the
locking plate on the mixer frame.
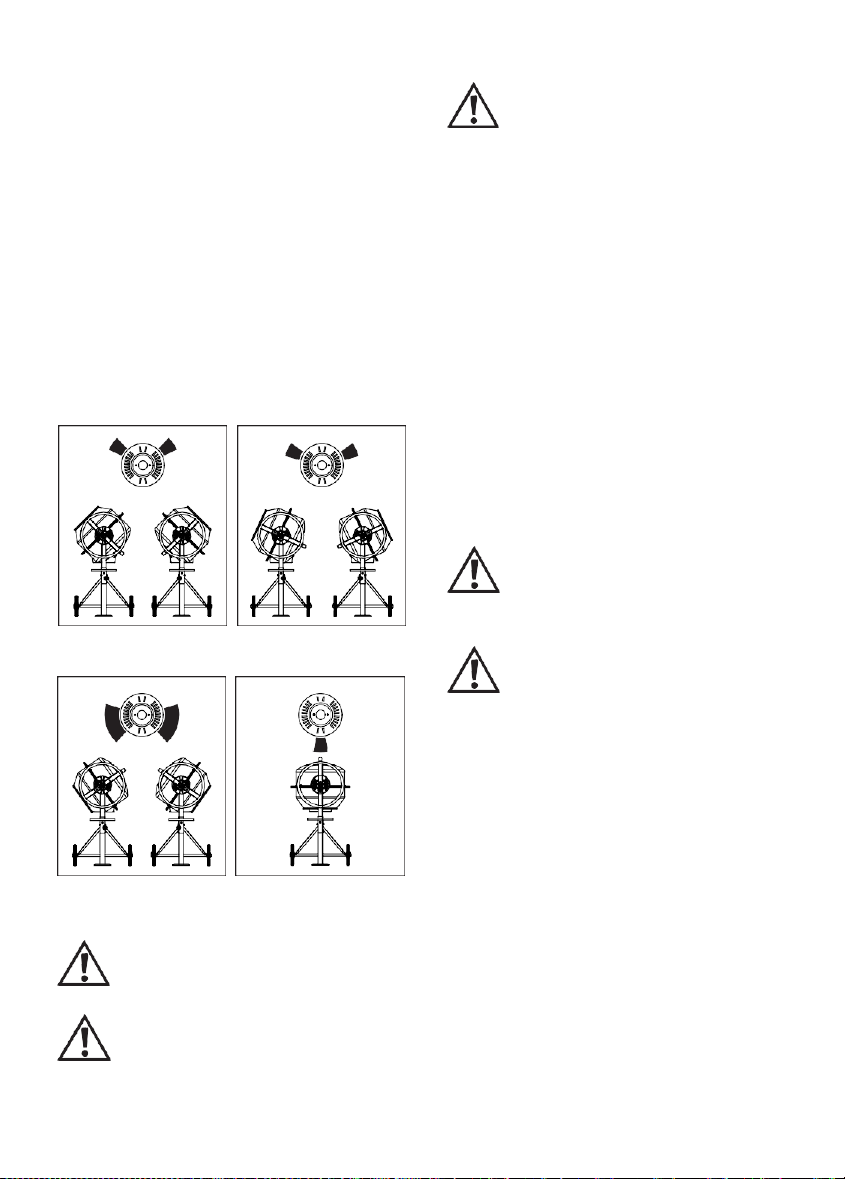
Loading/Mixing Position
For Mortar For Concrete
Emptying Position Storage Position
LOADING
Completely unwind the extension
cord. Connect it to the concrete
mixer first before plugging in power
supply.
Always start the mixer before
loading the drum. Loading the drum
with drum rotating.
For best results, proceed as follows:
1. Add the required amount of gravel into the
drum.
2. Add the required amount of cement into the
drum.
3. Add the required amount of sand into the
drum.
4. Pour the required amount of water into the
drum.
EMPTYING
Do not turn mixer off while full of
load. Emptying the drum with drum
rotating.
CLEANING
Never put hands inside the drum
with drum rotating.
Thoroughly clean the mixer at the end of each
day’s operation. Keep your mixer clean. The
slightest trace of material left in the drum will
harden and attract more each time you use it
until the machine is useless. Dried cement
should be scraped out of the drum. Do not throw
bricks into mixer drum to clean it out. Do not
beat on the drum with a shovel, a hammer or
other tools to break up accumulations of dried
cement mix, as damage to the mixer may result.
The drum may be scoured for approximate 2
minutes, using 1” gravel and water mixture.
Then discharge the gravel/water mixture and
hose down the drum assembly inside and out.
The IP44D protection class construction of the
concrete mixer enables you to hose down the
drum assembly safely.

10
Do not pour or spray water directly
over the motor cover, especially
the openings in it.
Wipe off any external material on
the motor cover. Do not use petrol,
turpentine, lacquer or paint thinner,
dry cleaning fluids or similar
products. The use of chemical
products or solvents may affect
the properties of the cover which
was made of high density
polyethyiene PET.
WIRING DIAGRAM
MAINTENANCEINSTRUCTIONS
Ensure the extension cord is
always unplugged before the motor
cover is removed.
The drive belt is under constant even tension
by a spring loaded jockey. No adjustment apart
from a touch of grease on the spindle.
The bearings are sealed for life.
The wiring diagram and parts
schematic in this manual are as
reference tools only. Neither the
manufacturer nor distributor
makes any representation or
warranty of any kind to the buyer
that he or she is qualified to
make any repairs to the product
or that he or she is qualified to
replace any parts of the product.
Only qualified technicians should
repair the mixer. Any
maintenance and repairs carried
out, to any of the electric
components must be undertaken
by a qualified electrician.
Parts in a circle should only be
fitted by a qualified electrician.

11
PARTS SCHEMATIC

12
EU Declaration of Conformity
We
Kesko Corporation Group Companies,
Address: Satamakatu 3, Fl-00160, Helsinki, Finland
Telefon: +358-10 53032 Fax: +358-9 857 4783
Declare under our sole responsibility that the following product
Equipment: Concrete mixer
Brand name: FXA
Model/type: 502039977/HCM450
is in conformity with the
Machine Directive (MD) 2006/42/ EC
Electromagnetic Compatibility Directive (EMC) 2014/30/ EU,
and the following harmonised standards and technical specifications have been
applied:
EN 12151:2007
EN 60204-1: 2006+A1:2009
EN 55014-1: 2006/A1:2009/+A2:2011
EN 55014-2: 2015
EN 61000-3-2:2014
EN 61000-3-3:2013
Helsinki, Finland, 11, 2018
Kesko Corporation Group Companies,

13
TURVALLISUUSVAROITUKSET JA OHJEET
LAITTEESEEN KIINNITETTY SYMBOLI
TUTUSTU SEKOITTIMEEN
Lue ja omaksu käyttäjän opas ja sekoittimeen kiinnitetyt tarrat.
Opettele sekoittimen käyttö ja rajoitukset sekä sille ominaiset
mahdolliset vaarat.
Tutustu sen hallintalaitteisiin ennen käyttöä.
PYSYTTELE VALPPAANA.
Äläkäytä sekoitinta, jos olet huumeiden, alkoholin tai sellaisten
lääkkeiden vaikutuksen alaisena, jotka voisivat vaikuttaa kykyysi
käyttääsitäasianmukaisesti.
Äläkäytäsekoitinta, jos olet väsynyt tai huomiosi kääntynyt pois
työstä. Katso aina, mitä olet tekemässä. Käytä tervettä
maalaisjärkeä.
VÄLTÄ VAARATILANTEET
Varmista, ettäympärilläon riittävästi työskentelytilaa.
Pidä työskentelyalue puhtaana ja hyvin valaistuna. Epäsiistit
työskentelyalueet ovat otollisia tapaturmille. Pidä sekoittimen
ympäristö puhtaana esteistä, öljystä, rasvasta ja muusta
roskasta, joka voisi saada henkilön kaatumaan päin liikkuvia
osia.
Käytä sekoitinta ainoastaan kiinteällä, tasaisella alustalla, joka
kannattaa sekoittimen ja sen kuorman painon, ettei sekoitin
kaatuisi.
Äläyritäsiirtääsekoitinta, kun se on täytetty ja/tai käynnissä.
Sekoitin on tarkoitettu betonin, muuraus- ja rappauslaastin
valmistamiseen. Se ei sovellu herkästi syttyvien tai
räjähdysvaarallisten aineiden sekoittamiseen. Älä käytä sitä
paikoissa, joissa maalien, liuottimien tai herkästi syttyvien
nesteiden höyryt aiheuttavat mahdollisen vaaran.
TARKASTA SEKOITTIMESI
Tarkista sekoittimesi ennen kuin käynnistät sen. Pidä
turvalaitteet paikoillaan ja kunnossa. Älä kytke sekoitinta
virtalähteeseen, jos moottorin kansi on irrotettu. Tarkista aina
ennen käyttöä kaikkien pulttien, mutterien ja ruuvien kireys,
erityisesti niiden, jotka kiinnittävät turva- ja käyttölaitteet.
Sekoituksen aikainen tärinävoi löystyttääniitä.
Ota tavaksesi tarkistaa, ettäkaikki säätötyökalut, lapiot, kauhat ja
muut työkalut/laitteet on poistettu sekoittimen alueelta ennen
sekoittimen käynnistämistä.
Vaihda vahingoittuneet, puuttuvat tai epäkuntoon menneet osat
ennen sekoittimen käyttöä. Varoitustarroissa on tärkeitä tietoja.
Korvaa puuttuvat tai vahingoittuneet varoitustarrat.

14
TURVALLISUUSVAROITUKSET JA OHJEET
LAITTEESEEN KIINNITETTY SYMBOLI
PUKEUDU ASIANMUKAISESTI
Älä käytä väljiä vaatteita, käsineitä, solmioita tai koruja
(sormuksia, rannekelloja). Ne voivat takertua työkalun liikkuviin
osiin. Työskentelyn aikana suositellaan käytettävän sähköä
johtamattomia käsineitä ja liukumattomia jalkineita. Käytä pitkät
hiukset peittävää hiussuojaa, joka estää hiuksia tarttumasta
koneistoon. Käytä kasvo- tai hengityssuojainta, jos käyttö on
pölyistä. Käytäaina suojalaseja ja/tai kasvosuojusta. Tavallisissa
silmälaseissa on ainoastaan iskunkestävät linssit. Ne eivät ole
suojalasit.
ÄLÄ KÄYTÄ JOHTOA VÄÄRIN
Älä kanna sekoitinta johdosta tai irrota johtoa pistorasiasta
kiskaisemalla johdosta.
Pidäjohto pois kuumasta, öljystäja terävistäreunoista.
JATKOJOHDOT
Jatkojohdot saavat olla korkeintaan 50 m pitkiä. Johdon
poikkipinta-alan on oltava vähintään 1,5 mm2jännitteen ollessa
230 V niin, että moottoriin tulee riittävästi virtaa. Jatkojohtojen
epäasianmukainen käyttö voi johtaa sekoittimen tehottomaan
toimintaan, minkä seurauksina voivat olla ylikuumeneminen ja
moottorivaurio.
Ainoastaan ulkokäyttöön tarkoitettuja H07RN-F-standardin
mukaisia jatkojohtoja saa käyttää. Vältä avoimia ja
riittämättömästi eristettyjä liitoksia. Liitokset on tehtävä
ulkokäyttöön soveltuvaa suojamateriaalia käyttäen. Varmista,
että jatkojohtoliitokset ovat kuivia ja turvallisia. Varmista, että
jatkojohto on vedetty huolellisesti nesteitä ja teräviä reunoja
välttäen samoin kuin paikkoja, joissa ajoneuvot voivat ajaa sen
yli. Varo, ettei jatkojohto jää jumiin sekoittimen alle. Kelaa se
kokonaan auki tai se voi ylikuumeta ja syttyäpalamaan.
VARO SÄHKÖISKUA
Tarkista, että virtapiiri on riittävästi suojattu ja että se vastaa
moottorin tehoa, jännitettäja taajuutta.
Älä liitä moottoria virtalähteeseen tai irrota siitä, jos seisot
märällä tai kostealla maaperällä. Älä käytä sekoitinta kosteissa
tai märissäpaikoissa tai altista sitäsateelle.
Varo koskemasta vartalollasi maadoitettuihin pintoihin, kuten
putkiin, lämpöpattereihin tai jääkaappeihin.
Varmista, etteivät sormesi osu pistokkeen metallisiin piikkeihin,
kun liität sekoittimen virtalähteeseen tai irrotat sen.
PIDÄ VIERAILIJAT JA LAPSET LOITOLLA
Pidäasiattomat henkilöt pois sekoittimen luota.
Äläanna lasten käsitelläsekoitinta tai kiivetäsen päälle.

15
TURVALLISUUSVAROITUKSET JA OHJEET
LAITTEESEEN KIINNITETTY SYMBOLI
ÄLÄ KURKOTA
Seiso tukevasti ja säilytä tasapaino vakaana täyttäessäsi tai
tyhjentäessäsi sekoitinta.
Älä milloinkaan seiso sekoittimen päällä. Voit loukkaantua
vakavasti, jos sekoitin kaatuu tai vahingossa kosketat liikkuvia
osia. Älä säilytä mitään sekoittimen yläpuolella tai lähellä niin,
ettäkukaan nousisi sekoittimen päälle ylettyäkseen siihen.
VÄLTÄ YLLÄTTÄVÄN ONNETTOMUUDEN AIHEUTTAMA
LOUKKAANTUMINEN
Pidä kätesi pois kaikista liikkuvista osista. Älä laita mitään
kehonosaa tai työkalua kuten lapiota rumpuun sekoittimen
käydessä. Sekoittimen käydessä älä työnnä käsiäsi rungon ja
tukivarren väliin tai rummun ja tukivarren väliin.
ÄLÄ KÄYTÄ TYÖKALUA VÄKISIN
Se toimii paremmin ja turvallisemmin suunnittelunopeudellaan.
Käytäsitäaina nimelliskapasiteetiltaan.
Älä käynnistä moottoria, jos rumpu on täyteen kuormattu. Älä
sammuta sekoitinta, kun se on täynnäbetonia.
Äläkäytäsekoitinta muussa kuin sen käyttötarkoituksessa.
Sekoitinta ei saa hinata millään ajoneuvolla.
ÄLÄ MILLOINKAAN JÄTÄ KÄYNNISSÄ OLEVAA
SEKOITINTA ILMAN VALVONTAA
Äläpoistu sekoittimen luota ennen kuin se on täysin pysähtynyt.
IRROTA VIRTALÄHTEESTÄ
Älä milloinkaan avaa moottoria irrottamatta sekoitinta
virtalähteestä. Irrota sekoitin virtalähteestä silloin kun se ei ole
käytössä, kun siirrät sitä, teet säätöjä, vaihdat osia, puhdistat tai
teet sen parissa mitään töitä. Tutustu tekniseen käsikirjaan
ennen huoltamista.
PIDÄ SEKOITIN HUOLELLISESTI KUNNOSSA
Puhdista sekoitin heti käytön jälkeen. Pidä sekoitin puhtaana,
niin se toimii parhaiten ja turvallisimmin.
Tämän sekoittimen kunnossapidossa saa käyttää ainoastaan
valmistajan alkuperäisiävaihto-osia.
SUOJELE YMPÄRISTÖÄ
Vie ylijäämämateriaalit luvalliseen keräyspisteeseen tai noudata
sen maan määräyksiä, jossa sekoitinta käytetään. Älä tyhjennä
sitäviemäriin, maahan tai veteen.
VARASTOI LAITE, KUN SITÄ EI KÄYTETÄ
Kun sekoitinta ei käytetä, sitäon säilytettäväkuivassa paikassa
ruostumisen estämiseksi. Pidä sekoitin pois lasten ulottuvilta
sekämuiden henkilöiden, joilla ei ole osaamista sen käyttöön.

16
SÄHKÖLIITÄNTÄ
TEKNISET TIEDOT
Sekoitin on kaksoiseristetty suojausluokkaan II ja
IP44D-luokiteltu. Eristys pysyy tehokkaana
ainoastaan, jos korjauksiin käytetään alkuperäisiä
eristysosia ja välit alkuperäisen eristyksen välillä
säilytetään.
Kaksoiseristys poistaa kolmijohtimisen
maadoitetun virtajohdon ja maadoitetun
virransyöttöjärjestelmän tarpeen.
Kaksoiseristettyjä työkaluja voidaan käyttää joko
kaksi- tai kolmijohtimisen jatkojohdon kanssa.
Älä liitä kumpaakaan sydäntä
maadoitusnastaan.
Jäännösvirtalaitteen (RCD) (maavuotolaukaisu)
käyttöä suositellaan 230 V sähkölaitteiden
kanssa. Jos käytät jatkokaapelia, liitäse suoraan
jäännösvirtalaitteeseen.
Kun käytät sekoitinta Sveitsissä, liitä se
ainoastaan vikavirtakatkaisijalla suojattuun
pistorasiaan.
Mallinumero
HCM450
Moottori
550 W S6
30 %
Rummun tilavuus
125 litraa
Rummun suuaukko
380 mm
Rummun nopeus
26,6 /
min
Kokonaismitat
P
1200 mm
L
710 mm
K
1400 mm
Paino
51 kg

17
PAKKAUKSEN SISÄLTÖ
KOKOONPANO-OHJEET
Kokoonpano suositellaan tehtävän
kahden henkilön voimin.
JALUSTA
x 4
A
1. Kun saksisokka on aseterttu kummankin
akselinpään sisempään reikään, aseta
litteä aluslevy, sen jälkeen pyörä, jonka
jälkeen toinen litteä aluslevy. Työnnä
toinen saksisokka kummankin aluslevyn
ulkopuolella olevaan akselin reikään.
Väännäsaksisokan kärjet ulospäin niin,
ettei sokka putoa pois.

18
M8 x 70
M8 x 55
x 2
x 1
B
2. Rungon maatessa kyljellään kiinnitä
tukijalka kuvan mukaisesti. Aseta kaksi
M8X70-kuusiopulttia reikiin yhdeltä
puolelta, sitten litteät aluslevyt,
jousialuslevyt ja mutterit toiselta puolelta.
Ruuvaa myös M8X55-kuusiopultti jousi-
ja litteiden aluslevyjen kanssa rungossa
olevaan mutteriin. Kiristä.
M8 x 70
M8 x 55
x 2
x 1
C
3. Käännärunko ympäri ja kiinnitäakselirip
ustin pyörineen samalla tavalla.
4. Varmista, että kiristät kaikki pultit ja
mutterit.
RUMMUN POHJAOSA
M8 x 65
ᴓ42
x 2
x 1
D
1. Aseta laakeripukki akselille. Pidä se
paikallaan ᴓ42 spiraalirenkaalla.
2. Aseta varoen ja kahden hengen voimin
rummun pohjaosa kannatusvarsineen
jalustan sivutukien varaan kuvan
mukaisesti niin, että laakeripukit
menevät sivutuissa oleviin kanaviin.
Halkaisijaltaan suuremman akselin tulee
olla jalustan jalan puoleisessa päässä.
3. Kohdista kummaltakin sivulta
keskenään sivutuissa olevat reiät
laakeripukissa olevien reikien kanssa ja
laita toiselta puolelta M8X65-kuusiopultti,
sitten litteä aluslevy, jousialuslevy ja
mutteri toiselta puolelta. Kiristä
avaimella.
SEKOITINLAVAT
M8 x 65
x 2
E

19
Asenna sekoitinlavat rummun pohjaosan
sisäpuolelle löysästi kuvan mukaisesti.
Rummun pohjassa on kaksi reikää, joihin
voidaan asettaa M8X16-pultti ulkopuolelta.
Nahka-aluslevy, litteä aluslevy, jousialuslevy
ja mutteri kierretään paikalleen sisäpuolelta
löysästi. Nahka-aluslevy asetetaan lavan alle
rumpua vasten.
HUOM: Rummun ylä- ja pohjaosassa on
nuolitarrat, jotka osoittavat osien
paikan toistensa suhteen. Jos
sinulla on vaikeuksia sijoitella
sekoitinlavat oikein, auttaa, kun
laitat väliaikaisesti rummun yläosan
pohjaosan päälle kääntäen sitä
kunnes nuolet ovat kohdakkain.
RUMMUN YLÄOSA
M8 x 16
M8 x 16
x 6
x 2
F
1. Aseta rummun yläosa pohjaosan päälle
reunan yli varmistaen, että kummankin
kiinnitysreiät kohdistuvat samoin kuin
nuolitarrat.
2. Ruuvaa M8X16-kuusiopultti
jousialuslevyn ja litteän aluslevyn
kanssa kierteellisiin reikiin
reunassa/hammaskehässä. Varmista,
ettäkiristys tapahtuu asteittain.
3. Kiinnitä sekoitinlavat yläosaan kahdella
M8X16-ristipääruuvilla, jotka asetetaan
paikoilleen ulkopuolelta rummun reikien
läpi.
4. Nahka-aluslevy tulee asettaa
sisäpuolelle rummun ja lavan väliin.
Kiinnitäsekoitinlapa sisäpuolelta litteällä
aluslevyllä, jousilevylläja mutterilla.
5. Varmista lopuksi, että asennus
pohjaosasta ja yläosasta on kireä.
KAATOPYÖRÄ
M8 x 25
x 2
G
1. Työnnä lukituslevy läpimitaltaan
isomman akselin päälle rungon
jalanpuoleisesta päästä särmän
osoittaessa sisäänpäin kuvan
mukaisesti. Kiinnitä kahdella M8X25-
pultilla, kumpikin mutterilla,
jousialuslevylläja litteilläaluslevyillä
This manual suits for next models
1
Table of contents
Languages:
Other FXA Mixer manuals