Fytech FY-6G User manual

The equipment is approved by following car manufacturers(China)
Owner’s Manual
FY-6G

1、Safety Precautions Symbols
2、Symbols and Definitions
3、Accessories and Spare Parts List
4、Installation
1)、Sp ecifica tions
2)、D uty Cycle an d Overheating
3)、Machine Installation
4)、Se lecting a Location
5)、Co nnectin g Input Pow er
5、Operation
1)、Con trols
2)、Welding Gun and Adaptors
3)、Various Oper ations
a、Spo t Welding
b、Washer Welding
c、Tr iangle Was her Welding
d、Carbon Rod He ating
e、Wav e Form Wire Weld ing
f、Cupules
6、Ma intenan ce
1、Ex ploded Vie w
2、Tr oublesh ooting
7、El ectrica l Diagram
8、Pa cking Lis t
1
2
3
4
5
6
7
8
9
10
11
12
13
14
15
16
17
18
19
Contents

Page.1
Safety Precautions Symbols
Protect yourself an d other s from injury ,
read and follow these p recau tions befor e
installation and op erati on.
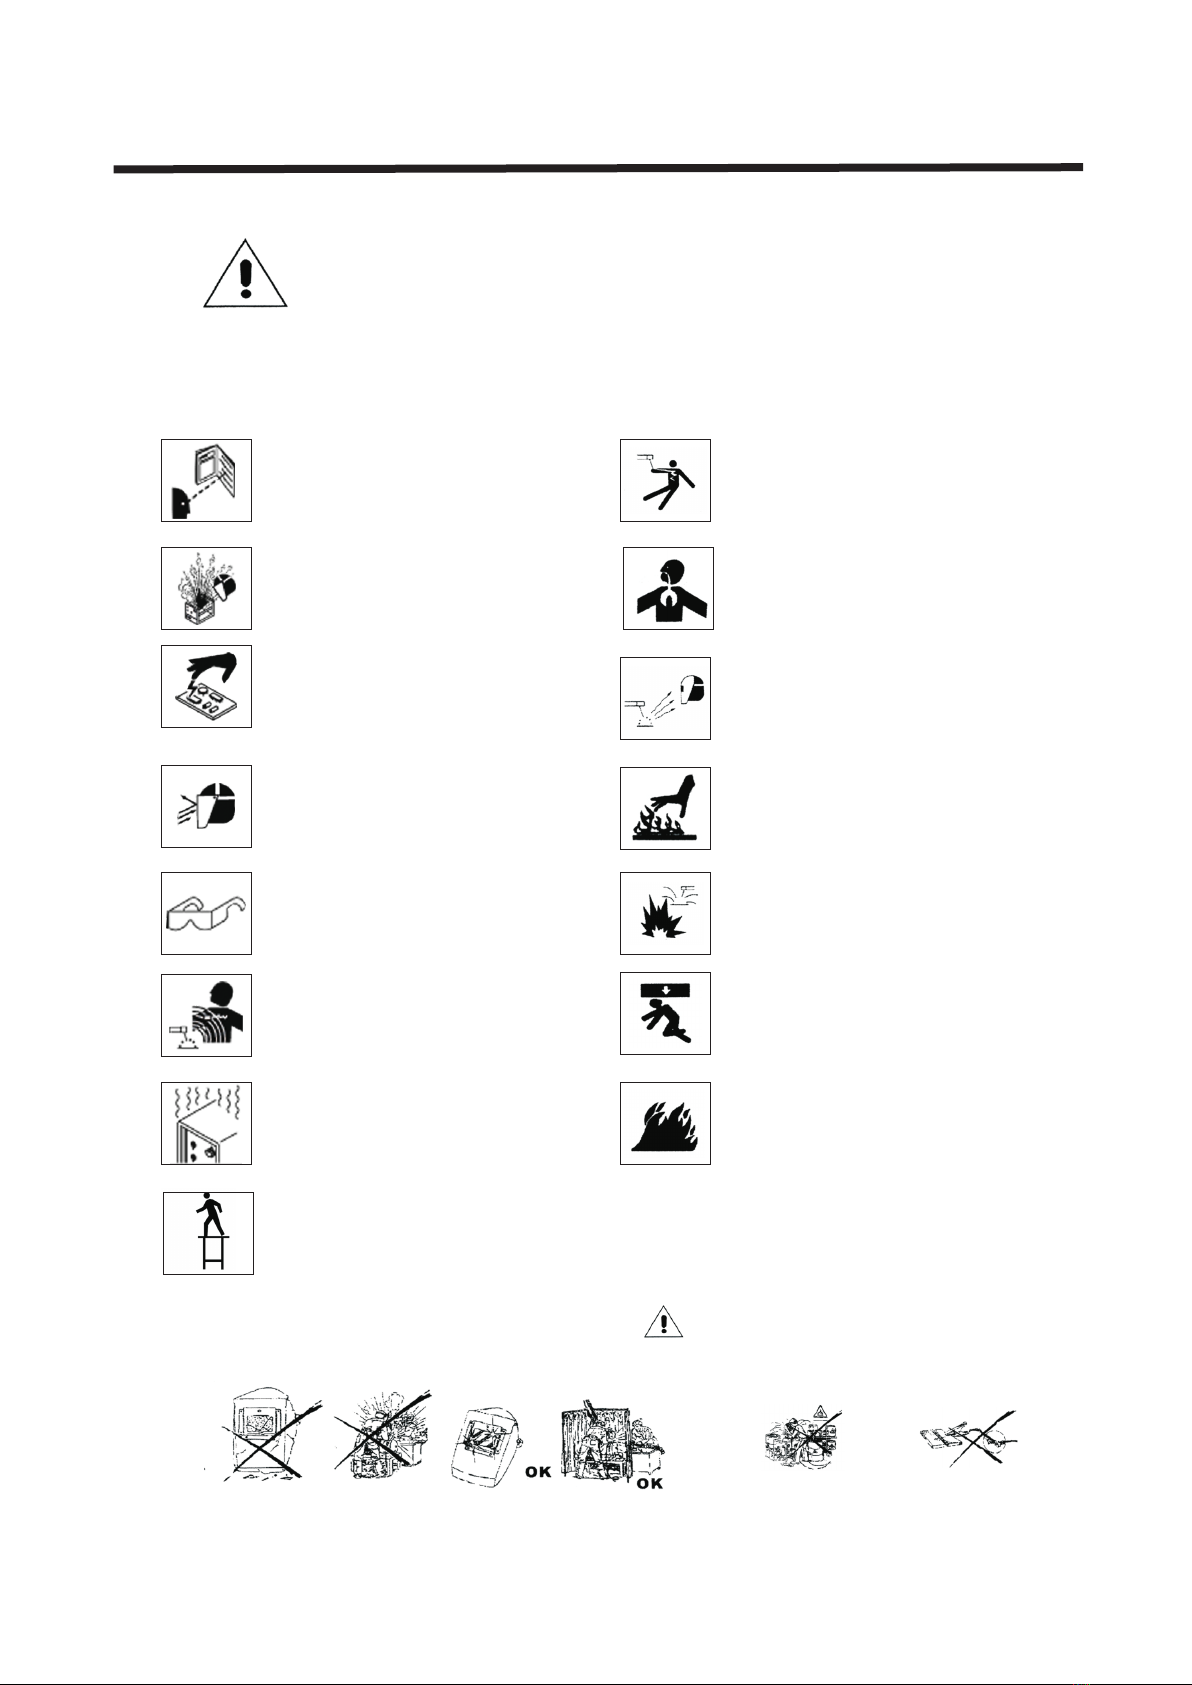
Exploding p a r t s c a n i n j u re.Always wear a face
shield and lo n g s l e e v e s。
Static can damage PC boards
1、Put on grounded wrist strap before
ha n d i n g b o a r d s o r p a rts。
2、Us e p r o p e r s t a t i c - proof bags and bo x e s t o
st o r e,move or s h i p P C b o a r d s。
1、We a r a p p r o v e d f a c e s h ield or safety go g g l e s
wi t h s i d e s h i e l d s。
2、We a r p r o p e r b o d y p r o t ection to prote c t s k i n。
Do n o t w e l d i n t h e h e i g h t!
Read instructions.
1、Read owner's Ma n u a l b e f o r e u s i n g or servicing
un i t。
2、Use only manufacturer’s supplied replacement。
Fl y i n g m e t a l c a n i n j u re eyes。
1) W e a r s a f e t y g l a s s es with side shie l d s o r f a c e
sh i e l d。
1、Ma g n e t i c f i e l d s c a n a ffect pacemak e r s .
Pa c e m a k e r w e a r e r s k eep away.
2、We a r e r s s h o u l d c o n s ult their docto r b e f o r e
go i n g n e a r p l a s m a a r c cutting opera t i o n s。
Overuse can c a u s e o v e r h e atin g
Allow cooli n g p e r i o d , f o llow r a t e d d u t y c y c le
before starting t o w e l d a g a i n.
El e c t r i c s h o c k c a n k ill:
1、Do n o t t o u c h l i v e e l e c trical parts。
2、We a r d r y , h o l e - f r ee insulating gl o v e s a n d
bo d y p r o t e c t i o n .
3、Do n o t w r a p e l e c t r i c al cable around y o u r
bo d y .
4、Gr o u n d t h e w o r k p i e ce with a good elec t r -
ic a l g r o u n d。
Ey e p r o t e c t i o n f o r w elding:
Cu r r e n t l e v e l i n a m p erage Minimum s h a d e
Nu m b e r
30-150A---------- - -- - -- - - -- - -- - --- - # 8
150-300A--------------------------- # 1 0
30 0 - 5 0 0 A - - - - ----------------------- #12
Ne ver cut o n pr essur iz ed cyli nder.
Maintenance regularly!
Fa c t o r y s a f e t y!
Fi r e o r e x p l o s i o n h a zard.
Do n o t l o c a t e u n i t o n , over,or near co m b u s t i b e
su r f a c e s . D o n o t i n stall unit near f l a m m a b l e s .
Re m o v e a l l f l a m m a b les of the weldin g a r e a .
Fa l l i n g u n i t c a n c a u se injury.
Th e h e a t f r o m t h e w o r k piece can cause s e r i o u s
bu r n s。
Fu m e s a n d g a s e s c a n b e h azardous
we l d i n g p r o d u c e s f umes and gases. Breathing
th e s e f u m e s a n d g a s e s can be hazardous
to y o u r h e a l t h .
If inside,ventilate the area.
Do n o t w e l d i n a c o n f i n e d space only if it
is w e l l v e n t i l a t e d .
Pr o t e c t y o u r s e l f Warn others

Definitions
Symbols and Definitions
U1
U0
U2
I2
s1
HZ
A
V
Rat ed w el d in g
current
Pri ma ry v o lt ag e
Rat ed n o lo a d
vol ta ge ( Aa ve ra ge )
Con ve nt i on al
loa d vo lt a ge
Power rating,
product o f v o l t a g e
and current(KVA)
He rtz
Amperes
Volts
IP
X
I1max
I1eff
~
1
Rat ed m ax i mu m
sup pl y cu r re nt
Maximum effective
supply current
De g r e e o f p r o t e c t i on
Sin gl e ph a se
Duty cycle
Direct current
Constant current
Temperature
V
S
I
O
Su i t a b l e f o r s o m e
ha z a r d o u s l o c a t i o ns
Vol ta ge i n pu t
Lo w a i r p r e s s u r e
li g h t
On
Off
Protective earth
(Ground)
Input
+-
%
Adjust air/gas
pressure
Percent
Increase
Lin e co nn e ct io n
Loo se s hi e ld c up
Aut om at i c
Man ua l
Page.2
Do not d o this

Accessories And Spare parts
Accessories and Spare Parts List:
Waveform electrode tip
NO.F010
NO.F013
Co n t rol tr a n sfor m e r
NO.F025
Pn e u m a t i c vacuum c u p u l e
NO . F 0 0 1
Hook puller
NO.F004
Kriptol
NO.F007
St u d
NO.F016
Manual cupule
NO.F019
Back wheel
NO.F022
Sp o t w e l d i n g e l e c t rode
tip NO.F008
Washer adaptor
NO . F 0 1 1
Fr o n t p a r t o f h o o k p u l ler
NO.F014
Washer
NO.F017
Welding gun
NO.F020
Pull hammer
NO.F002
Ho o k
NO.F005
Ve r t i c a l s p o t w e l d ing
pu l l h a m m e r N O . F 0 0 3
Waveform wire
NO.F006
Carbon rod adaptor
NO.F009
Electrode holder
NO.F012
Triangle wasler
NO.F015
Ground wire clamp
NO.F018
Fr o n t w h e e l
NO.F021
Ci r c u i t b o a r d
NO.F028
Remark:
1)、Optionnal orders for above accessories and components are
available.
2)、Model and parts number required when ordering parts from
your local distributor.
Page.3
Trianger washer adaptor
Digitial dispiay NO . F0 23 Time adjustment NO.F024
A.C.contactor N O . F 0 2 6 Tools box N O . F0 2 7

Installation
Page.4
1、specifications
Input voltage
Output voltage
Input power
Input current
Time regulation system
Current Regulation
Vacuum cupule device
Dimension
Parameters
Instant max current
One-side welding thickness
Weight
Model
380V/220V
1ph/50/60Hz
0-99ms
Stepless
0.8+1.2mm
570*370*890mm
21KW
5400A
55A
180kg
55kg
FY-9G
AC6V-10V Carbon rod heating
AC1V-12V Washer fusion
AC1V-13V Butt weld
400V
1ph/50Hz
0-99ms
Stepless
0.8+1.2mm
570*370*890mm
22KW
5800A
57A
180kg
55kg
FY-9G
AC6V-10V Carbon rod heating
AC1V-12V Washer fusion
AC1V-13V Butt weld
380V/220V
1ph/50/60Hz
0-99ms
Stepless
0.8+1.0mm
570*370*890mm
21KW
5400A
55A
180kg
53kg
FY-8G
AC6V-10V Carbon rod heating
AC1V-12V Washer fusion
AC1V-13V Butt weld
380V/220V
1ph/50/60Hz
0-99ms
Stepless
570*370*890mm
20KW
5200A
51A
150kg
51kg
FY-7G
AC6V-10V Carbon rod heating
AC1V-12V Washer fusion
AC1V-13V Butt weld
220V
1ph/50/60Hz
0-99ms
Stepless
570*370*890mm
19KW
5000A
50A
150kg
49kg
FY-6G
AC6V-10V Carbon rod heating
AC1V-12V Washer fusion
AC1V-13V Butt weld

2、Duty Cycle and Overheating
Duty cycle is percentage of 10 minutes that unit can weld at
rated load without overheating.
The welder is equipped with over-hert protection.On exceeding the
critical temperature,the welder will be stopped automaticlly.The
welder can be used again after cooling down.
Page.5
Overheating St op work in g Wa it fift ee n minut es
fo r unit to c oo l
Re duce am pe rage or
reduce duty cycle
Weld ag ain
0
15
A

3、Machine Installation
1)Open the package and find out the owner's manual。
2)Check the supplied accessories according to packing list
that attached to this manual.
3)Properly install this equipment as following diagram.Inspect
the unit for any problems.If so,contact your local distributor
or service agency.To locate a distributor or service agency.
Page.6

Page.7
4、Selecting a Location
1)Select a correct location to place the unit.
2)Determine input power cord length according to its actual
operation requirement .Make sure that the supply cable is at
2
least 6mm indiameter
3)Do not move or operate unit where it could tip.
4)Use cart or unit handle to move unit .Do not pull the cords
to move unit.

5、Connecting Input Power
2
1、In put pow er c ord(not l es s than 6m m
co pper co rd).
2、Ov er-cu rr ent pro te ction .
3、Di sconn ec t devic e li ne term inals.
4、Gr ound wi re L 1/L2 in pu t condu ctors.
In stall at ion mus t me et all Na tional an d
Local Codes---h av e only qu alifi ed p erson s
ma ke this i ns talla ti on.
Di sconn ec t and loc ko ut/ta gount inp ut powe r
be fore co nn ectin g in put con ductors f rom
unit.
Se lect ty pe a nd size o f ov er-cu rrent
protection.
Cl ose and s ec ure doo r on d iscon nect devi ce .
Remove lockout/tagout device,and place
sw itch in t he "o n" position.
4
Page.8
3
1
2
L1
L2
1

Operation
1、Controls
Page.9
1. Time display
2. Power display
3. Time decrease
4. Time increase
5. Power decrease
6. Power increase
7. Power indicator
8. Overheat indicator
9. Gun working indicator
10. Manual mode indicator
11. Auto mode indicator
12. Function selector
13. Function selector
1
2
3
4
5
6
7
12
13
8
9
10
11

2、Welding Gun and Adaptors
Page.10
1
2
1、Electrode holder
2、Trigger
Single-Sided applications
5、Tighten up the holder
4、Installed the
fixed shank
2、Put ground cable
into the welded washers
1、 Weld 2 washers
on metal
workpiece ,as close to
welding area as possible.
3、Located the holder
on the welded washers
Ca rbo Rod S hr inkin g
OT W asher W el ding
Wa sher We ld ing
Stud Welding
Si ngle- si ded Wel di ng
Wa ve form W ir e Weldi ng
Pu lling S po t Hamme r
Connection of ground cable

Set Mode switch
3、Operation
Co nnect s po t weldi ng
electrode tip wi th w eldin g
gun and tighten.
Ap proxi ma tely a 90°angle
to t he work ep iece su rf ace.
Put on pressure and pr ess tri gg er.
F008+F020
Set correct time.
、
Remark:
1、Se tting a mp erage t oo h igh or ti me too long c an caus e wo rkpie ce s urfac e (vehicl e body)damage .
Pl ease we ld o ther wo rk piece s for pract ice bef or e actua l op erati ons.
2、Se tting c or rect am pe rage an d time acco rding t o th e workp ie ce thic kness.
3、Co ntinu in g anoth er o perat ion is appl icabl e af ter the se p roced ures fini shed .I f no t, plea se
sh ut off th e ma in powe r su pply an d switch of f the unit.
Page.11
a、spot welding
Connect negative outside wire
to a clean,paint-free location
on metal workpiece,as close to
welding area as possible.
(Po sitio n C is r ecomm en d).
Se t corre ct p ower

Co nnect w as her ada pt or with
we lding g un a nd tigh te n,
Install washer.
Remark:
1、Se tting a mp erage t oo h igh or ti me too long c an caus e wo rkpie ce s urfac e (vehicl e body)damage .
Pl ease we ld o ther wo rk piece s for pract ice bef or e actua l op erati ons.
2、Se tting c or rect am pe rage an d time acco rding t o th e workp ie ce thic kness.
3、Co ntinu in g anoth er o perat ion is appl icabl e af ter the se p roced ures fini shed .i f no t, plea se
sh ut off th e ma in powe r su pply an d switch of f the uni t.
F017+F011+F020
b、Washer Welding
Se t corre ct t ime.
3、Operation
Page.12
Set Mode switch
Connect negative outside wire
to a clean,paint-free location
on metal workpiece,as close to
welding area as possible.
Ap proxi ma tely a 90 °a ngle to t he
dent.Pu t on pres su re and pr es s
trigger.
Re move we ld ing gun .Ho ok the wa sher with
pu ll hamm er .Slide t he h ammer t o opposit e
di recti on t o pull ou t th e dent .
(Po sitio n A or B is recommend).
Se t corre ct p ower

Co nnect t ri angel w as her
pu ll hamm er w ith wel di ng gun.
Sl ide the h am mer to op po site
direction to p ull the den t
F003+F020
c、Triangle Washer Welding
Se t corre ct t ime. Ap proxi ma tely a 90 ° an gle to
th e dent, pu t on pres su re
an d press t ri gger.
3、Operation
Remark:
1、Se tting a mp erage t oo h igh or ti me too long c an caus e wo rkpie ce s urfac e (vehicl e body)damage .
Pl ease we ld o ther wo rk piece s for pract ice bef or e actua l op erati ons.
2、Se tting c or rect am pe rage an d time acco rding t o th e workp ie ce thic kness
3.Tr iangl e washer welding can re pl ace washer welding.I t can draw out the concavity di re ctly
after we lded.
4、Co ntinu in g anoth er o perat ion is appl icabl e af ter the se p roced ures fini shed .I f no t, plea se
sh ut off th e ma in powe r su pply an d switch of f the uni t.
Page.13
Set Mode sw it ch
Connect negative outside wire
to a clean,paint-free location
on metal workpiece,as close to
welding area as possible.
(Po sitio n A is r ecomm en d).
Se t corre ct p ower

F0 07+F0 09 +F020
d、Carbon rod Heating
3、Operation
Se t corre ct t ime
Remark:
1、Se tting a mp erage t oo h igh or ti me too long c an caus e wo rkpie ce s urfac e vehicle body)damage .
Pl ease we ld o ther wo rk piece s for pract ice bef or e actua l op erati ons.
2、Se tting c or rect am pe rage an d time acco rding t o th e workp ie ce thic kness.
3、Co ntinu in g anoth er o perat ion is appl icabl e af ter the se p roced ures fini shed .I f no t, plea se
sh ut off th e ma in powe r su pply an d switch of f the uni t..
Page.14
Set Mode switch
Connect negative outside wire
to a clean,paint-free location
on metal workpiece,as close to
welding area as possible.
Co nnect c ar bon rod a nd
ca rbon ro d ad aptor w it h
we lding g un .
Tu rn carb on r od cloc kw ise to he at
up t he enti re c onvex it y surfa ce.
Co ol the su rf ace wit h a we t
ra g or comp re ssed ai r.
(Po sitio n A is r ecomm en d).
Se t corre ct p ower

Co nnect w av e form wire elect ro de
ti p with we ld ing gun .
F006+F010+020
e、
3、Operation
Set correct time.
Remark:
1、Se tting a mp erage t oo h igh or ti me too long c an caus e wo rkpie ce s urfac e (vehicl e body) da mage .
Pl ease we ld o ther wo rk piece s for pract ice bef or e actua l op erati ons.
2、Se tting c or rect am pe rage an d time acco rding t o th e workp ie ce thic kness.
3、Co ntinu in g anoth er o perat ion is appl icabl e af ter the se p roced ures fini shed .I f no t ,plea se
sh ut off th e ma in powe r su pply an d switch of f the uni t.
Wave Form Wire Welding
Page.15
Set Mode sw it ch
Connect negative outside wire
to a clean,paint-free location
on metal workpiece,as close to
welding area as possible.
Connect hook puller with pu ll hammer.
Ho ok wave form wire and slide the
hammer to pull out the dent.
Place a wave form wire
horizontally on the dent.
Approximately a 90°angle
to wave form wire.Put on
pressure andpress trigger.
(Position A is recommend) .
Se t corre ct p ower

f、Cupules
3、Operation
Page.16
Manual operating cupule:
1、Connect manual cupule with
pull hammer.
2、Push manual cupule in to lock
the cupule on the dent.
3、Slide the hammer to opposite direction
to pull the dent out.
Pneumatic vacuum cupule:
1、Connect gas/air supply with the adaptor
of cupule.
2、Open the valve ,sticking cupule to the
dent.
3、Slide the hammer to opposite direction
pull the dent out.
4、Cupule falls off when close the valve.

Maintenance
1、Exploded view
Page.17
Voltmeter
Cur re nt a d ju st me nt s wi tc h
A.C.contactor Con ti ol t r an sf or me r
Mai n tr an s fo rm er
Con tr ol c i rc ui t bo ar d
Left si de view
Right s ide view

2、Troubleshooting
Reason Remedy
No welding output
(1)Con ne ct e d po we r supply
incorrectly.
(2)Pow er s wi t ch i n "off"
pos it io n
(1)Connect power supply according
to manufacturer’s instructions.
(2)Place power switch in “on”
position.
Trigger not working
(1)Tr ig ge r da ma g ed .
(2)Gu n co nt ro l wi r e br ok en .
(3)Co nt ro l wi re p l ug l oo se n.
(4)Mod e sw it c h in i nc or re ct
position.
(1)Replace trigger.
(2)Co nn ec t ag a in o r re pl ac e i f n ec -
ess ar y.
(3)Co nn ec t c on tr ol w ir e pl ug a ga in .
(4)Place M od e switc h i n co rr ec t po s-
iti on .
(1)Aamperage too low
(2)Weld time too short.
(3)Input power cord did not
meet the requirement.
(4)Ground clamp bad contact.
(1)In cr e as e am pe ra ge s et ti ng
(2) In cr e as e ti me s et ti ng .
(3) Re pl a ce i np ut p ow er c or d.
(4) Ch an g e gr ou nd c la mp l oc at io n.
Piercing workpiece
(1)Out pu t am p er ag e to o hi gh .
(2)Wel d ti me t o o lo ng .
(3) Bad c on ta ct o f el ec tr od e t ip o r
was he r wi t h wo rk pi ec e.
(1) Red uc e a mp er ag e se tt in g.
(2) Rr du c e we ld t im e.
(3) Re mo v e co at in g fr om m at er ia l
red uc e ad d ed p re ss ur e.
Carbon rod working
unstable
(1)C ar bo n r od o r workpiece is di rt y
(2)Inc or re c t am pe ra ge a nd t im e
set ti ng .
(1)Polish carbon rod and
workpieces before welding
(2)Set amperage and time according to
workpiece thickness.
Welder stop working
while operation
(1) Tr ig g er p lu g lo os en .
(2) Gu n co n tr ol w ir e br ok en .
(3) Ov er h e at in g.
(1) Ch ec k gun cont ro l wi re a nd
tri gg er p l ug .
(2)Wai t fo r te m pe ra tu re c oo l do wn .
Maintenance
Trouble
Poor weld
.
.
Page.18
Table of contents
Other Fytech Welding System manuals

Fytech
Fytech FY-8L User manual

Fytech
Fytech FY-4180/2E User manual

Fytech
Fytech FY-4500 User manual

Fytech
Fytech FY-4220/2E User manual

Fytech
Fytech FY-8000 User manual

Fytech
Fytech FY-2270/2E User manual

Fytech
Fytech FYMIG210X User manual

Fytech
Fytech FYMIG200L-2 User manual

Fytech
Fytech FYMIG180 User manual

Fytech
Fytech FY-91G User manual

Fytech
Fytech FY-4280/2E User manual

Fytech
Fytech FY-HI-1100W User manual

Fytech
Fytech FY-2012S User manual

Fytech
Fytech FY-9028 User manual

Fytech
Fytech FY-9000 User manual

Fytech
Fytech FY-9000A User manual

Fytech
Fytech FYMIG200L-3 User manual

Fytech
Fytech FYMIG306XL User manual

Fytech
Fytech FY-5015L User manual

Fytech
Fytech FYMIG305 User manual