G21 C&W 45 l User manual

HU PL
SK
DE
EN
CZ
COOL
BOX
C&W 45 l


Thank you for purchasing our product.
Before using this unit, please read this manual in order to avoid improper handling and use
ofthedevice.
Description
The appliance works on the base of the heat pump (SSD thermoelectric Peltier element). This is
ahigh-performance thermoelectric system with extremely reliable technology. This system en-
sures that your food and drinks stored in the car cooler will be perfectly chilled or vice versa still
warm (depending on mode). The appliance is ideal for the use in homes, offices, for camping and
travelling.
Function
1. Cooling: the appliance is able to work in temperatures up to 20°C. The best effect can be
achieved if you put into the car cooler cold drinks and food. The appliance will only keep the food
and drinks cold. Car cooler is able to cool food from room temperature in approximately 2 hours.
2. Warming: you can set the thermostat from 55 - 65°C. The appliance is designed so that it can
keep food warm. The appliance is able to warm food up. The appliance needs more than 2hours
but then turned off is still able to keep food warm for several hours.
Specification
Voltage
Alternating current (AC)
220 - 240 V
Direct current (DC) 12 V
Heating power 50 - 60°C
Cooling power Up to 20°C below ambient
temperature
Length of the power
cable (DC) 2,0 m
Energy con-
sumption
Direct current 55 W max. Length of the power
cable (AC) 1,8 m
Alternating
current 65 W max. Size 570x400x440 mm
Capacity 45 l Weight 9,5 kg
Climate class N Ambient temperature 10 - 32°C
EN

Parts description
1. Top cover 7. The red led control – warming 13. Locking
2. Power cord or place for cutlery 8. Cool / warm mode selector 14. Handle
3. Fan (output) 9. Alternating current / direct current
selector 15. Wheels
4. Fan (input) 10. Plug – direct current 16. Gutter pipe with cover
5. Handle 11. Plug – alternating current 17. Inner fan (output)
6. The green led control– cooling 12. Removable container 18. Inner fan (input)
Accessories
1
2
3
4
DC
DC
AC
5
6 7 8 9 10 11
12 18 17
13
2
14
15
16

Maintenance
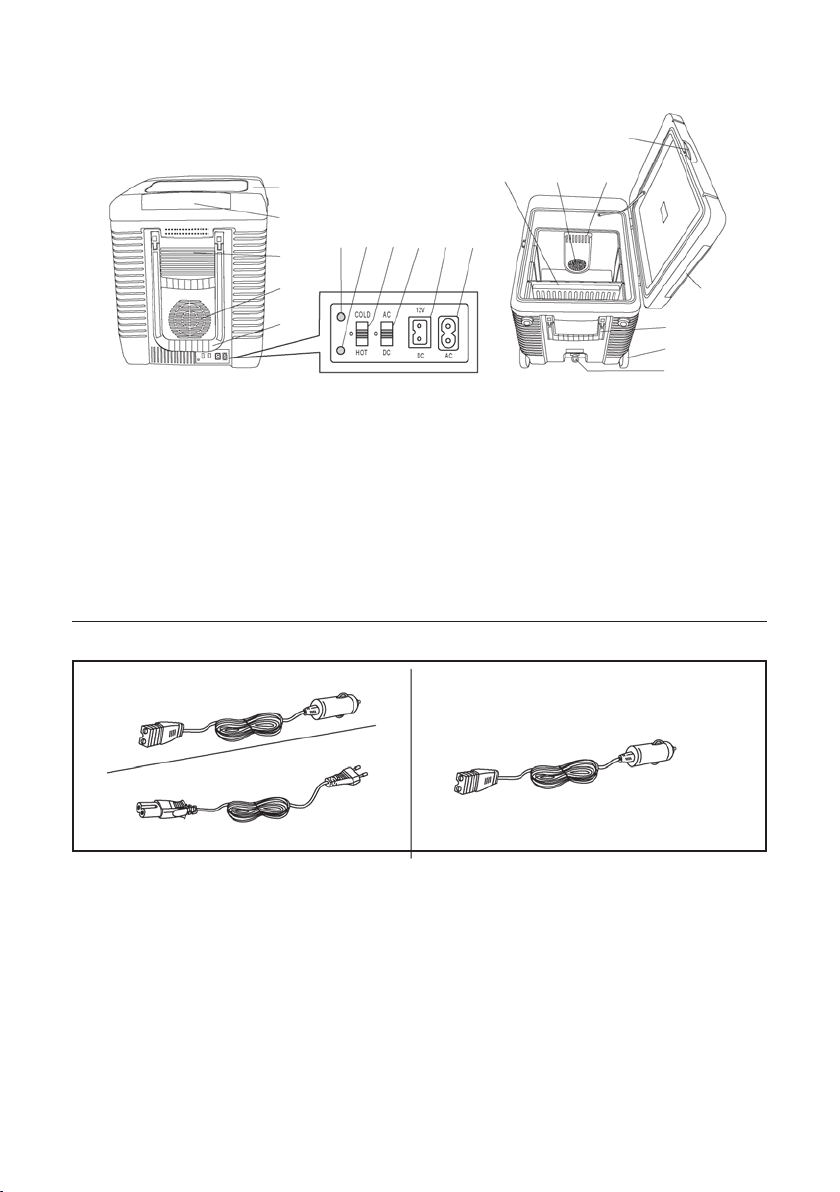
How to connect the power cord
Warning: Switch AC / DC switch to the off position before plugging the power cord into the wall
socket.
AC power supply: DC power supply:
Warning: Do not use any other methods of connecting to power supply. This could result in fire or
electric shock.
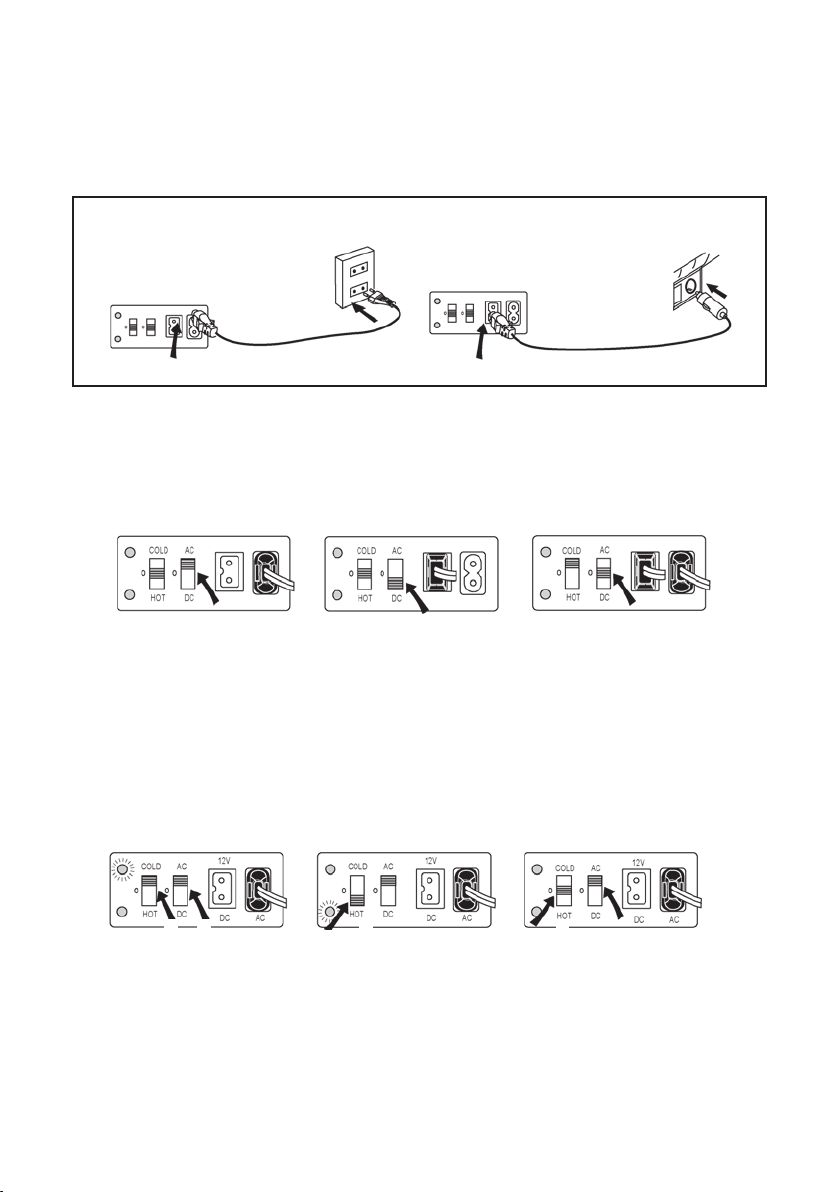
How to use AC / DC switch
1. Set the switch to the AC
position, connect the appli-
ance into the classic house-
hold socket and switch on the
appliance by switching the
switch to the ON position.
2. Set the switch to the DC
position, connect the applian-
ce into the car cigarette ligh-
ter socket and switch on the
appliance by switching the
switch to the ON position.
3. If you will set the switch to
the OFF position, the applian-
ce stops to work.
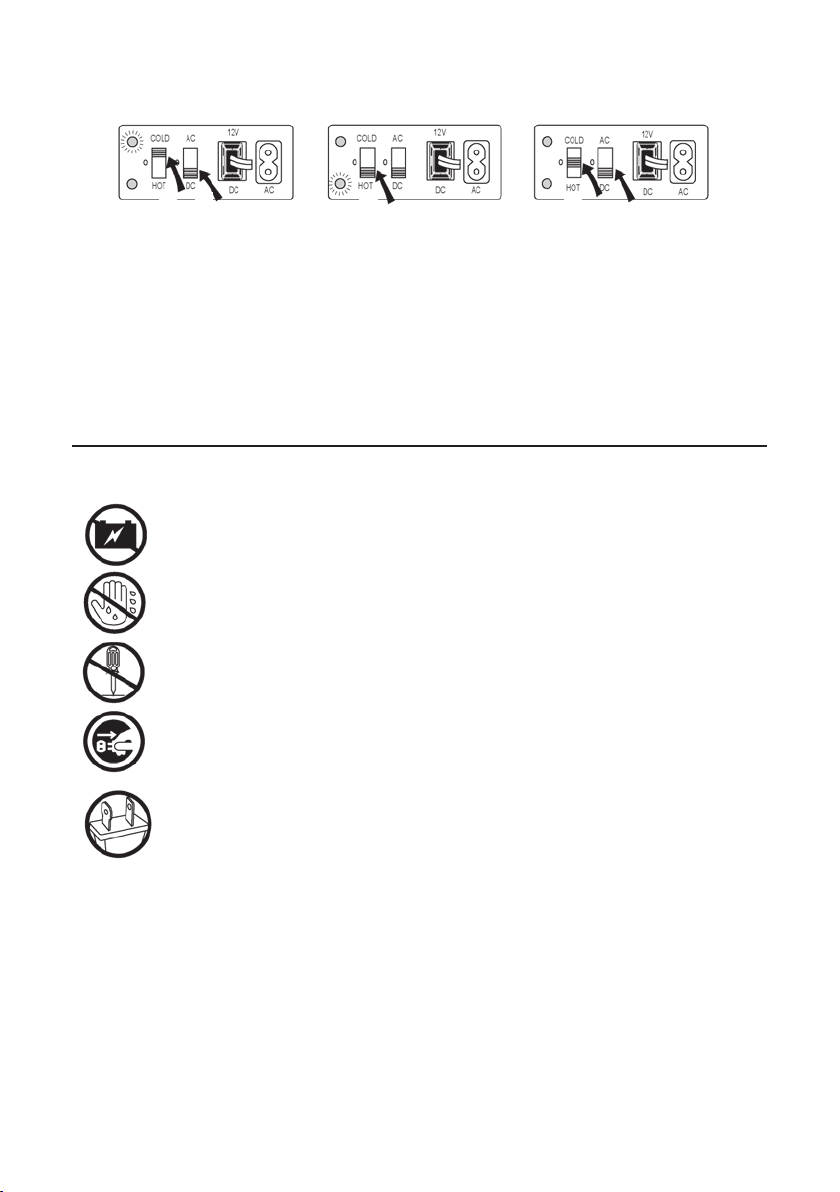
How to use cooling/warming mode selector when you plug the appliance into the wall socket
with alternating current
1. Set the switch to the AC position.
2. If you set the switch to the cooling mode, the green LED will light up.
3. If you set the switch to the warming mode, the red LED will light up.
4. If you set the switch to the OFF position, the appliance does not work.
12 3
12 34

How to use cooling / warming mode selector when you plug the appliance into the wall socket
with direct current
1. Set the switch to the DC position.
2. If you set the switch to the cooling mode, the green LED will light up.
3. If you set the switch to the warming mode, the red LED will light up.
4. If you set the switch to the OFF position, the appliance does not work.
Warning: When you change modes do not use immediate switching from cooling to warming and
vice versa, always leave the switch at least 5 minutes in the OFF position. This could cause da-
mage to the cooling/heating system.
Warning
Do not put electrical appliances into the cooling box.
Do not disconnect the appliance from the power supply with wet or moist hands and
do not wash the fan and electrical parts with water. Do not immerse the appliance
into water.
It is prohibited to dismantle and repair the appliance on your own.
Before unplugging the appliance always turn the switch to the OFF position and wait
until the appliance stops to work.
The appliance is equipped with polarized plug. The plug must always be exactly the
type of wall socket. Do not use the appliance in any other type of the outlet than that
for witch it is intended, do not use reduction. Do not replace the plug on your own.
Warning: Do not pull the cable to remove the plug from the socket.
2 1 3 4

Warning: If the appliance is not in use, disconnect the plug from the wall socket. Permanent co-
nnection can have an impact on the life of the product and may result in a risk of fire or electric
shock.
1. Do not expose to rain or
moisture.
2. Do not wash directly
under the running water.
3. Use of the appliance in high
temperatures may lead to
drop formation under the co-
ver – this is not a defect, wipe
it with dry cloth.
4. Do not step on the cord and do not put any
obstacles on it. It could destroy the protective
layer.
5. If there is too much condensed water in
the appliance it is possible to run it off. Only
lift up the cover at the bottom side of the
appliance.
6. Be sure that the unit is ope-
rated in a well-ventilated area for
example on the back car seats. Do
not place the appliance in a trunk.
7. The appliance is not
intended for children.
Children under the
8years are not allowed
to use the car cooler.
Children cannot play with
the appliance.

8. Do not use aggressive
detergents or alcohol deter-
gents as this may damage the
unit surface.
9. Do not let the appliance
fall on the floor. It could cause
damage to electrical parts or
the whole appliance.
10. Ensure that the cooler/
warmer is in a well-ventilated
area and avoid blocking or in-
terfering with the flow of air to
the ventilator.
11. Use the appliance at least 10 cm far from the wall or other obstacles.

Maintenance
1. Before cleaning the cooler / warmer disco-
nnect the power cable.
2. Use the neutral detergents and damp cloth
or sponge to clean grease.
3. Dust or dirt in the ventilator may decrease cooling efficacy. It is appropriate to clean dirt with
vacuum cleaner or brush.
Do not forget to clean all plugs. Dust can cause short circuit and fire.

Troubleshooting
Read carefully the following table before sending the appliance to repair:
Symptom Possible cause Reparation
No cooling. Loosen contact between
appliance and wall socket.
The appliance is exposed to
direct sunlight and high tem-
peratures.
Fan is full of dust or is jammed
with some obstacle and pro-
peller does not turn.
The appliance is operated too
close to the wall and the air can-
not circulate in the ventilator.
Check whether cable and en-
dings are correctly plugged in
the wall socket.
Move the appliance to the dark
cool place.
Clean the fan and remove
undesirable obstacles that
can block propeller.
Move the appliance to the lon-
ger distance from the wall.
Strange sounds, noisiness or
vibrations during operation.
Cooling unit is broken. Switch the appliance off and
unplug from the electricity.
Odor during operation (bur-
ning smell).
Cooling unit is overheated. Switch the appliance off and
unplug from the electricity.
Contact specialist.
The English version of the manual is an exact translation of the original manufacturer‘s instructions.
Images used in this manual are for illustrational purposes only and may differ from the actual product.

Vielen Dank, dass Sie sich für unser Produkt entschieden haben.
Lesen Sie bitte vor dem Gebrauch diese Gebrauchsanweisung sorgfältig durch.
Beschreibung
Das Gerät arbeitet auf der Basis der Wärmepumpe (SSD thermoelektrisches Peltier-Element).Dies
ist ein Hochleistungsthermosystem mit äußerst zuverlässiger Technik. Dieses System stellt sicher,
dass Ihre Speisen und Getränke im Auto kühl gelagert oder gekühlt oder umgekehrt erwärmt wer-
den (je nach Modus). Das Gerät ist ideal für den Einsatz in Wohnungen, Büros, für Camping oder
Reisen im Auto oder mit dem Boot.
Funktion
1. Kühlung: Das Gerät funktioniert bei Temperaturen bis zu 20 Grad Celsius. Die beste Wirkung
kann erzielt werden, wenn Sie in die Kühlerbox bereits kalte Getränke und Speisen tun. Das Gerät
wird die Speisen und Getränke kühl halten. Die Kühlerbox ist in der Lage, Lebensmittel von Raum-
temperatur in ca. 2 Stunden abzukühlen.
2. Aufwärmen: Sie können den Thermostat von 55 bis 65 Grad Celsius einstellen. Das Gerät ist
so konzipiert, dass es Speisen warm halten kann. Das Gerät ist ebenso in der Lage, Speisen au-
fzuwärmen. Das Gerät braucht dazu mehr als 2 Stunden, ausgeschaltet ist es dann aber noch in
der Lage, die Speisen für einige Stunden warm zu halten.
Spezifikation
Spannung
Wechselstrom (AC)
220 - 240 V
Gleichstrom (DC) 12 V
Heizleistung 50 - 60°C
Kühlleistung Bis zu 20°C Grad unter Um-
gebungstemperatur.
Länge des Netzkabels
(DC) 2,0 m
Energiever-
brauch
Gleichstrom 55 W max. Länge des Netzkabels
(AC) 1,8 m
Wechselstrom 65 W max. Größe 570x400x440 mm
Kapazität 45 l Gewicht 9,5 kg
Klimaklasse N Umgebungstemperatur 10 - 32°C
DE

Teilebeschreibung
1. Obere Abdeckung 7. Rote LED Steuerung - Erwärmung 13. Verriegelung
2. Netzkabel oder Platz für Besteck 8. Kühlen / wärmen Betriebsartenschalter 14. Griff
3. Ventilator (Luftzufuhr) 9. Umschalter Wechselstrom / Gleichstrom 15. Räder
4. Ventilator (Luftabfuhr) 10. Stecker -Gleichstrom 16. Ablaufrohr mit Deckel
5. Griff 11. Stecker - Wechselstrom 17. Innenventilator (Ausgang)
6. Grüne LED Steuerung - Kühlung 12. Abnehmbaren Behälter 18. Innenventilator (Eingang)
Zubehör
1
2
3
4
DC
DC
AC
5
6 7 8 9 10 11
12 18 17
13
2
14
15
16

Wartung
Netzkabel anschließen
Warnung: Schalten Sie den AC / DC-Schalter in die Aus-Stellung, bevor Sie das Netzkabel in die
Steckdose stecken.
AC Stromversorgung: DC Stromversorgung:
Warnung: Verwenden Sie keine anderen Methoden um die Kühlbox an die Stromversorgung anzu-
schließen. Dies könnte zu einem Brand oder Stromschlag führen.
Verwendung des AC / DC-Schalters
1. Stellen Sie den Schalter in
die AC Position, verbinden
Sie das Gerät mit der klassis-
chen Haushaltssteckdose und
schalten das Gerät ein, indem
Sie den Schalter in die ON Po-
sition stellen.
2. Stellen Sie den Schalter in
die DC Position, verbinden
Sie das Gerät mit dem Ziga-
rettenanzünder im Auto und
schalten das Gerät ein, indem
Sie den Schalter in die ON Po-
sition stellen.
3. Wenn Sie den Schalter in
die OFF Position stellen, hört
das Gerät auf zu arbeiten.
Verwendung des Betriebsartenschalters Kühlen / Wärmen, wenn Sie das Gerät an eine Stec-
kdose mit Wechselstrom angeschlossen haben
1. Stellen Sie den Schalter in die AC Position.
2. Wenn Sie den Schalter in den Kühlmodus schalten, leuchtet die grüne LED.
3. Wenn Sie den Schalter in den Erwärmen-Modus schalten, leuchtet die rote LED.
4. Wenn Sie den Schalter in die OFF Position schalten, hört das Gerät auf zu arbeiten.
1 2 3
12 3 4

Verwendung des Betriebsartenschalters Kühlen / Wärmen, wenn Sie das Gerät an eine Stec-
kdose mit Gleichstrom angeschlossen haben.
1. Stellen Sie den Schalter in die DC Position.
2. Wenn Sie den Schalter in den Kühlmodus schalten, leuchtet die grüne LED.
3. Wenn Sie den Schalter in den Erwärmen-Modus schalten, leuchtet die rote LED.
4. Wenn Sie den Schalter in die OFF Position schalten, hört das Gerät auf zu arbeiten.
Warnung: Wenn Sie die Betriebsart ändern, schalten Sie nicht gleich vom Kühlen zu Erwärmen
um und umgekehrt, lassen Sie immer für mindestens 5 Minuten den Schalter in der OFF Position
stehen. Eine unmittelbare Umschaltung könnte eine Beschädigung des Kühl- / Heizungssystems
verursachen.
Warnung
Stellen Sie keine elektrischen Geräte in die Kühlbox.
Trennen Sie das Gerät niemals von der Stromversorgung mit nassen oder feuch-
ten Händen und waschen Sie den Ventilator oder die elektrischen Bauteile nicht mit
Wasser .Das Gerät nicht in Wasser tauchen.
Es ist verboten, das Gerät eigenhändig zu demontieren und zu reparieren.
Bevor Sie das Gerät von der Stromversorgung trennen, stellen Sie den Schalter im-
mer in die OFF Position und warten, bis das Gerät aufhört zu arbeiten.
Das Gerät ist mit einem polarisierten Stecker ausgestattet. Der Stecker muss immer
mit dem Steckdosentyp übereinstimmen. Verwenden Sie das Gerät nicht an einem
anderen Steckdosentyp, als für den es vorgesehen ist, verwenden Sie keine Adapter.
Ersetzen Sie den Stecker nicht eigenverantwortlich.
Warnung: Ziehen Sie nicht am Kabel, um den Stecker aus der Steckdose zu ziehen.
2 1 3 4

Warnung: Wenn das Gerät nicht benutzt wird, ziehen Sie den Stecker aus der Steckdose. Eine
permanente Verbindung kann einen Einfluss auf die Lebensdauer des Produkts haben und kann
zu Brandgefahr oder Stromschlag führen.
1. Gerät nicht Regen oder Fe-
uchtigkeit aussetzen.
2. Nicht direktem Sonnenlicht
aussetzen.
3. Nicht direkt unter fließen-
dem Wasser waschen.
4. Die Verwendung des Geräts bei hohen
Temperaturen kann zur Tropfenbildung unter
dem Deckel führen - dies ist kein Defekt, wis-
chen Sie die Feuchtigkeit einfach mit einem
trockenen Tuch ab.
5. Treten Sie nicht auf das Kabel und stellen
keine Hindernisse auf ihn. Dies kann die Isola-
tion beschädigen.
6. Wenn es zu viel Konden-
swasser im Gerät kommt, gibt es
die Möglichkeit es ablaufen zu
lassen. Heben Sie dazu die Ab-
deckung an der Unterseite des
Gerätes an.
7. Achten Sie darauf,
dass das Gerät an einem
gut belüfteten Platz, be-
ispielsweise auf der Rüc-
kbank, betrieben wird.
Stellen Sie das Gerät
nicht in den Kofferraum.

8. Das Gerät ist für Kinder
nicht geeignet. Kinder un-
ter 8 Jahren dürfen den Au-
tokühler nicht verwenden.
Kinder dürfen nicht mit dem
Gerät spielen.
9. Verwenden Sie keine
scharfen Reinigungsmittel
oder Reinigungsmittel die auf
Alkohol basieren, da dies die
Geräteoberfläche beschädi-
gen kann.
10. Lassen Sie das Gerät nicht
auf den Boden fallen. Dies
könnte zu Schäden an den
elektrischen Bauteilen oder
zur Beschädigung des ganzen
Gerätes führen.
11. Stellen Sie sicher, dass der Kühler / Wärmer an einem gut belüfteten Platz steht und das
nichts den Luftstrom zum Ventilator blockiert oder stört. Stellen Sie das Gerät mindestens 10 cm
entfernt von Wänden oder anderen Hindernissen auf.

Wartung
1. Trennen Sie vor dem Reinigen der
Kühler-/Wärmebox das Netzkabel.
2. Verwenden Sie zur Reinigung neutrale
Reinigungsmittel und ein feuchtes Tuch oder
Schwamm.
3. Staub oder Schmutz in im Ventilator senken die Wirksamkeit der Kühlung. Deshalb ist es
angebracht, diesen mit einem Staubsauger oder einer Bürste von Verunreinigungen zu befreien.
Vergessen Sie nicht, alle Stecker zu reinigen. Staub kann Kurzschlüsse und Feuer verursachen.

Fehlerbehebung
Lesen Sie sorgfältig die folgende Tabelle durch, bevor Sie das Gerät zur Reparatur bringen:
Symptom Mögliche Ursache Behebung
Keine Kühlung. Kein Kontakt zwischen Gerät
und Steckdose.
Das Gerät ist direkter Son-
neneinstrahlung oder hohen
Temperaturen ausgesetzt.
Ventilator ist voller Staub
oder wird von einem Hinder-
nis blockiert, so dass sich der
Propeller nicht drehen kann.
Das Gerät wird zu nah an einer
Wand betrieben und die Luft
kann nicht zirkulieren.
Prüfen, ob Kabel und Enden
richtig in der Steckdose stec-
ken.
Das Gerät an einen schatti-
gen, kühlen Ort stellen.
Den Ventilator reinigen und
unerwünschte Hindernisse,
die den Propeller blockieren
können, entfernen.
Das Gerät etwas weiter weg
von der Wand aufstellen.
Seltsame Geräusche, Lärm
oder Vibrationen während des
Betriebs.
Kühleinheit ist defekt. Das Gerät ausschalten und
von der Stromversorgung
trennen Kundendienst kon-
taktieren.
Geruchsentwicklung während
des Betriebs (Brandgeruch).
Kühleinheit ist überhitzt. Das Gerät ausschalten und
von der Stromversorgung
trennen Kundendienst kon-
taktieren.
Die deutsche Version der Anleitung ist eine genaue Übersetzung der Anleitung des Herstellers.
Die in diesem Handbuch verwendeten Bilder dienen nur zur Illustration und können nicht genau
das Produkt entsprechen.

Děkujeme za nákup našeho výrobku.
Před použitím přístroje si prosím přečtěte tento návod, vyhnete se tak neodborné manipulaci aza-
cházení s přístrojem.
Popis
Přístroj pracuje na bázi termoelektrického SSD tepelného čerpadla (Peltierův článek). Jedná se
ovysoce výkonný termoelektrický systém s extrémně spolehlivou technologií. Tento systém zaru-
čuje, že Vaše potraviny a nápoje uložené v chladničce budou perfektně vychlazené nebo naopak
stále teplé (dle zvoleného režimu). Přístroj je ideální pro použití v domácnosti, kanceláři, při kem-
pingování, cestování v automobilu, či na lodi.
Funkce
1. Chlazení: Přístroj dokáže pracovat v teplotách až 20°C. Nejlepšího efektu lze dosáhnout, po-
kud budete do chladničky umisťovat již studené nápoje a potraviny. Chladnička bude nápoje apo-
traviny pouze udržovat vychlazené. Chladnička dokáže vychladit potraviny a nápoje z pokojové
teploty na studené za zhruba 2 hodiny.
2. Zahřívání: Na termostatu lze nastavit 55 - 65°C. Přístroj je navržen tak, aby jídlo či nápoje do-
kázal udržovat v teple, či aby dokázal ohřát studené jídlo. Přístroj na ohřátí potravin potřebuje více
jak 2 hodiny času, ale poté dokáže i vypnutý udržovat jídlo teplé několik hodin.
Specifikace
Napětí Střídavý proud 220 - 240 V
Stejnosměrný proud 12 V Topný výkon 50 - 60°C
Chladící výkon Až 20°C pod okolní teplotu
Délka napájecího
kabelu stejnosměrného
napětí
2,0 m
Spotřeba energie
Stejnosměrný
proud 55 W max. Délka napájecího kabe-
lu střídavého napětí 1,8 m
Střídavý proud 65 W max. Rozměry 570x400x440 mm
Objem 45 l Hmotnost 9,5 kg
Klimatická třída N Okolní teplota
(doporučená) 10 - 32°C
CZ

Popis částí
1. Horní kryt 7. Červená LED dioda indikující ohřívání 13. Zamykání
2. Napájecí kabel nebo místo pro příbory 8. Přepínač mezi módy ohřívání / chlazení 14. Rukojeť
3. Ventilátor (výstup) 9. Přepínač mezi střídavým
a stejnosměrným proudem 15. Kolečka
4. Ventilátor (vstup) 10. Zástrčka na stejnosměrný proud 16. Okapová roura s krytem
5. Rukojeť 11. Zástrčka na střídavý proud 17. Vnitřní ventilátor (výstup)
6. Zelená LED dioda indikující chlazení 12. Odnímatelný zásobník 18. Vnitřní ventilátor (vstup)
Příslušenství
1
2
3
4
DC
DC
AC
5
6 7 8 9 10 11
12 18 17
13
2
14
15
16
Table of contents
Languages:
Other G21 Accessories manuals
Popular Accessories manuals by other brands

NATURE & DECOUVERTES
NATURE & DECOUVERTES GOLDEN MOON DIFFUSER manual

Optex
Optex X-Zone T Quick setup guide

Daktronics
Daktronics BA-2009 DISPLAY MANUAL

Rittal
Rittal DK 7030.150 Assembly and operating instructions

DS Produkte
DS Produkte 08324 operating instructions

Manitowoc
Manitowoc K00175 installation instructions

elsner elektronik
elsner elektronik AQS/TH PF Technical specifications and installation instructions

Blaupunkt
Blaupunkt SVGS-S2 quick start guide

Apogee Instruments
Apogee Instruments SQ-624-SS owner's manual

Rosemount
Rosemount 396R instruction manual

Orion
Orion StarSeek instruction manual

Lanaform
Lanaform AROMA ZEN manual