manuals.online logo
Brands
  1. Home
  2. •
  3. Brands
  4. •
  5. Gage Bilt
  6. •
  7. Tools
  8. •
  9. Gage Bilt 640A-50 User manual

Gage Bilt 640A-50 User manual

640A-50 OFFSET NOSE ASSEMBLIES
FOR 2000 SERIES CHERRYLOCK® RIVETS
DESCRIPTION
This is a mechanically shifting offset nose assembly designed for installing Cherrylock® 2000 series rivets up to 1/2" grip length in limited access
areas. There is a separate nose assembly required for each head style (universal and countersunk) and each shank diameter. These nose as-
semblies should not be used on bulbed Cherrylock® rivets larger than 5/32" diameter.
These nose assemblies fit directly on the GB740 Installation Tool
(See installation instructions for attaching to GB784 Tool on page 4)
*For 5/32”-1/4” only— To install 1/8” CherryLOCK rivets use GB715 and 615A-61 nose assembly.
44766 Centre Court Clinton Twp. MI 48038 USA
Ph: +1 (586) 226-1500 Fax: +1 (586) 226-1505
[email protected] / www.gagebilt.com
GAGE BILT
MADE in USA
RIVET DIA. NOSE ASSEMBLY
5/32" 5C-640A-50 Countersunk Head
5U-640A-50 Universal Head
3/16" 6C-640A-50 Countersunk Head
6U-640A-50 Universal Head
1/4" 8C-640A-50 Countersunk Head
8U-640A-50 Universal Head
2Rev. 3/18
GAGE BILT ●640A-50 Pulling Heads
PARTS LIST FOR 640A PULLING HEAD
1
10
11
12
13
14
15
16 17
8
9
2
3
4
22
23 26
25
21
5
6
7
18
19 20
27
26
25
24
22
28
29
30
25
26
13
5U-640A-50 5C-640A-50 6U-640A-50 6C-640A-50 8U-640A-50 8C-640A-50
1 1 Cover 60402 60402 60402 60402 60402 60402
2 1 Cap Screw 400107 400107 400107 400107 400107 400107
3 1 Set Screw S402 S402 S402 S402 S402 S402
4 1 Shift Slide 60403 60403 60403 60403 60403 60403
5 1 Collet 60404 60404 60404 60404 60404 60404
6 1 Stop Block 60508 60508 60813 60813 60813 60813
7 1 Cap Screw 400100 400100 400100 400100 400100 400100
8 1 Stem Stop 70401 70401 70401 70401 70401 70401
9 1 Jaws (Inc. 400777 O'Ring) 30526 30526 30626 30626 30830 30830
10 1 Ejector Pin 60406 60406 60406 60406 60406 60406
11 1 Ejector Spring 50413 50413 50413 50413 50413 50413
12 1 Follower 40407 40407 40407 40407 40407 40407
13 2 Bumper A-720 A-720 - - - -
13 3 Bumper - - A-720 A-720 A-720 A-720
14 1 Spacer 55402 55402 55402 55402 55402 55402
15 1 Jaw Spring 50410 50410 50410 50410 50410 50410
16 1 Washer 50411 50411 50411 50411 50411 50411
17 1 Retaining Ring S405 S405 S405 S405 S405 S405
18 1 Outer Anvil 10546 10547 10673 10674 10859 10860
19 1 Set Screw S924 S924 S924 S924 S924 S924
20 1 Rocker Arm 60408 60408 60408 60408 60408 60408
21 1 Inner Anvil 19507 19507 19607 19607 19805 19805
22 2 Retaining Ring S404 S404 S404 S404 S404 S404
23 1 Pivot Pin 60409 60409 60409 60409 60409 60409
24 1 Guard 60410 60410 60410 60410 60410 60410
25 5 Button Head Cap Screw S714 S714 S714 S714 S714 S714
26 5 Washer S42 S42 S42 S42 S42 S42
27 1 Frame 60511 60511 60607 60607 60815 60815
28 1 Jam Nut 70821 70821 70821 70821 70821 70821
29 1 Collet Adapter 60414 60414 60414 60414 60414 60414
30 1 Adapter 60415 60415 60415 60415 60415 60415
Nose Assemblies
Ref.
No.
Qty.
Description
3Rev. 3/18
GAGE BILT ●640A-50 Pulling Heads
MAINTENANCE, REPAIR AND ADJUSTMENTS
ADJUSTING NOSE ASSEMBLY
These nose assemblies are factory adjusted to properly install rivets
in the A-Group (shorter lengths). If nose assembly has been
disassembled for repair it will be necessary to readjust it. Gages can
be purchased and are identified by their color: 1/8" No. 628-4 is
green; 5/32" No. 628-5 is red; 3/16" No. 628-6 is blue; and 1/4" No.
628-8 is plain.
SHIFT-POINT ADJUSTMENT
This adjustment determines the flushness of the broke pintail. After
the lock ring is set, the pintail should fracture substantially flush with
the rivet head.
1. If the stem breaks below flush, loosen cap screw (2) and turn set
screw (3) clockwise 1/4 turn (maximum). Tighten cap screw (2).
2. Test setting by installing rivet and repeat if necessary.
3. If stem breaks above flush, loosen cap screw (2) and turn set
screw (3) counterclockwise 1/4 turn (maximum). Tighten cap
screw (2).
4. Test setting by installing rivet and repeat if necessary.
5. If nose assembly is so far out of adjustment that it does not
respond to these 1/4 turn adjustments, it may be quicker to
remove the rocker arm (20) and shift slide (4) and reposition the
adjusting screw (3) to its approximate starting position outlined
under Assembly Instructions line 2.
ASSEMBLY INSTRUCTIONS
1. Replace any broken or worn parts. When reassembling drawbolt,
press in special washer (16) while inserting retaining ring (17).
When retaining ring is in place turn special washer until its lug is
positioned between the ends of the retaining ring.
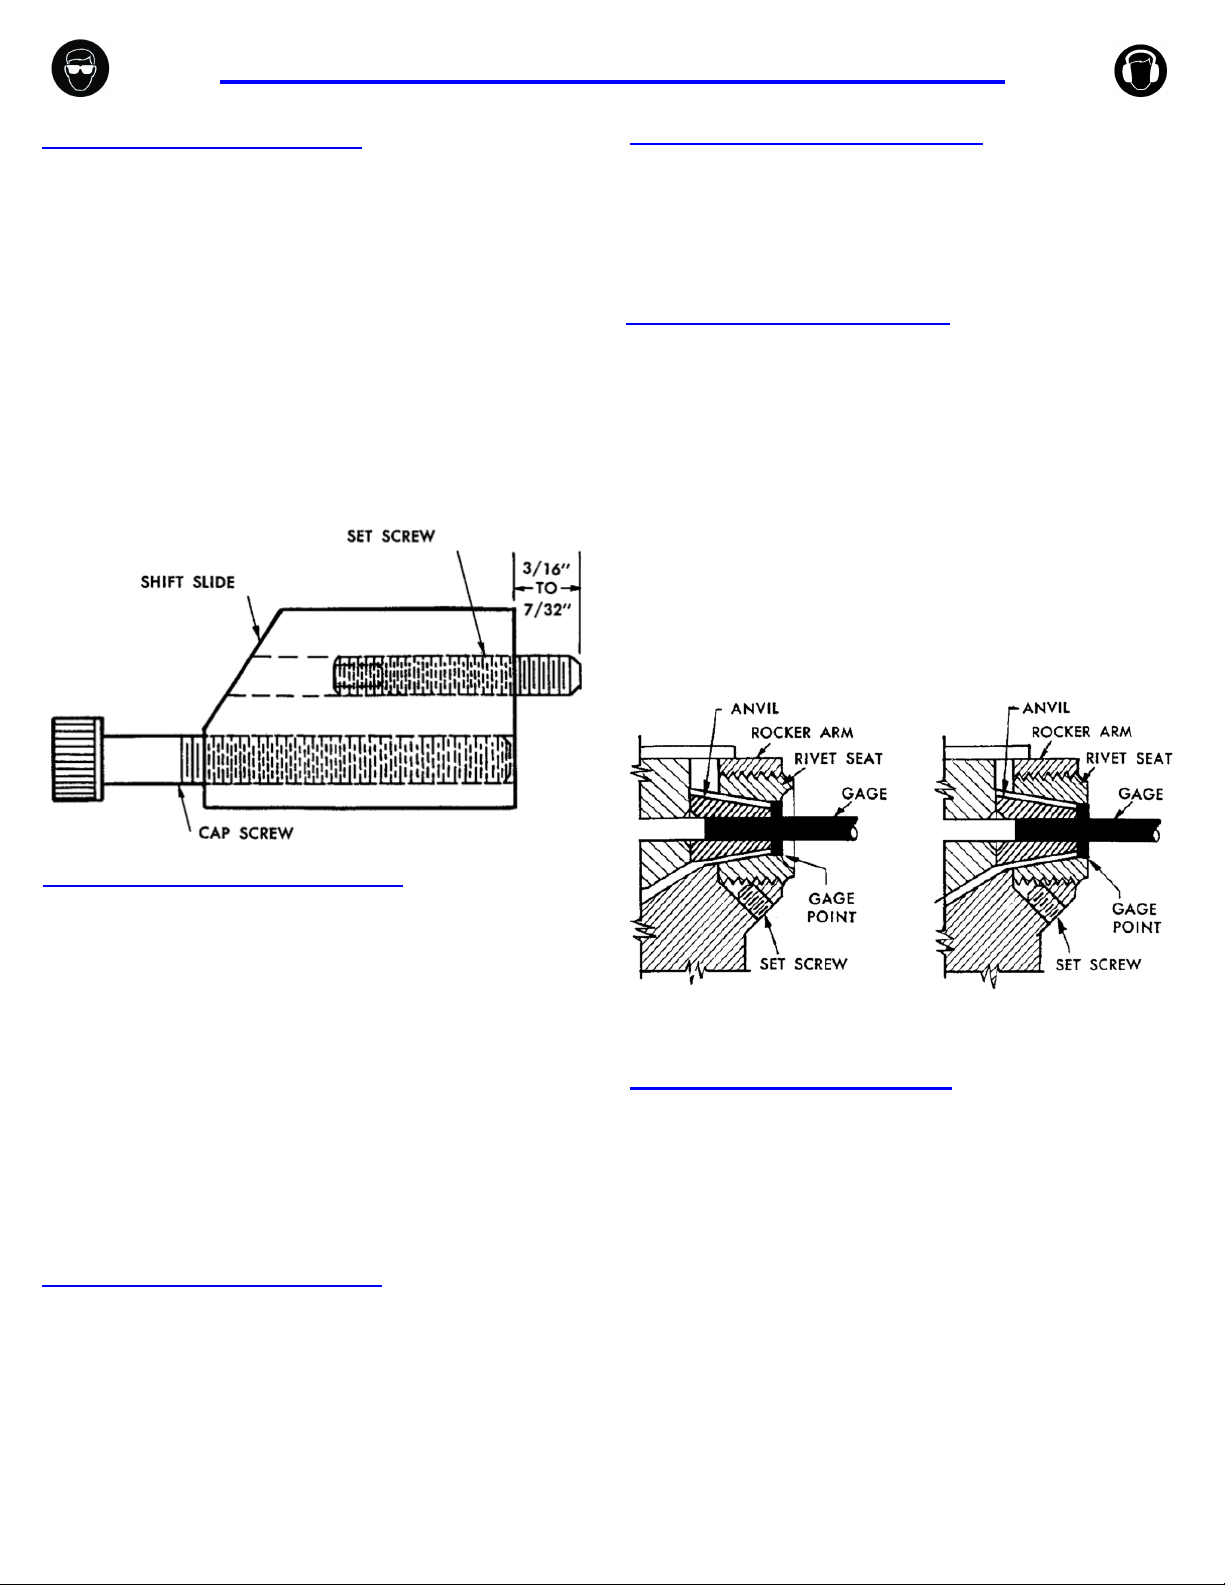
2. If shift slide (4) has been removed from nose assembly for repair
or replacement, it should be repositioned by turning screw (3)
until it protrudes from the back of the slide 3/16" to 7/32". With the
shift slide pressed snugly against rear of drawbolt (5), run cap
screw (2) in until tight. Shift slide will then be in approximately the
correct operating position, but may require minor adjustments as
shown in the shift point adjustment instructions.
3. Apply a coating of high pressure grease, such as Lubriplate®
130AA, to the top and bottom of drawbolt (5) and to the bottom
of rocker arm (20). Reassemble nose.
DISASSEMBLY INSTRUCTIONS
1. Loosen jam nut (28) and remove adapter sleeve (30). Remove
drawbolt adapter (29).
2. Remove four button head screws (25) and lift off cover (1).
3. Remove retaining ring (22), button screw (25), guard (24) and
pivot pin (23). This will allow rocker arm (20), anvil (21) and
drawbolt (5) to be removed from sleeve assembly (27).
4. To disassemble drawbolt, remove retaining ring (17) and
washer (16). The stem stop (8), jaws (9), ejector (10), spring
(11),follower (12), seat (13), spacer (14) and spring (15) will then
come out of rear of drawbolt.
5. It is not usually necessary to remove the shift slide (4), stop block
(6) or outer anvil (18), but if any of them have been damaged
they may be removed by loosening screws (2), (7) and (19).
CLEANING NOSE ASSEMBLY
It is important that the nose assembly be kept clean, especially
around the riveting end, as adhesives, chips, sealants, etc. Will
clog the serrations of the jaws and cause slipping. The outer anvil
and the inner anvil must be kept especially clean since foreign mat-
ter can build up and keep the anvil from going all the way forward
to set the locking collar in the rivet.
An occasional application of good grade high pressure grease,
such as Lubriplate 130AA, to the bottoms of the drawbolt and rock-
er arm will prolong the life of these parts.
INNER ANVIL ADJUSTMENT
1. When adjusting nose assembly, either on or off tool, make sure
the drawbolt 5) is in the full forward position.
2. Push rocker arm (20) back toward drawbolt so it will rest on shift
slide (4).
3. Insert short end of setting gage into outer anvil (18) until inner
face of gage collar rests against end of inner anvil (21) and anvil
rests on crossbar in sleeve. Outer face of gage collar should be
approximately .010 above face of countersunk head outer anvil
or approximately .010 above bottom recess on universal head
outer anvil.
4. If adjustment is required, loosen set screw (19) and turn outer
anvil (18) for proper positioning.
5. Tighten set screw (19) snugly to prevent anvil from Getting out of
adjustment.
Universal Head Countersunk Head
4Rev. 3/18
GAGE BILT ●640A-50 Pulling Heads
Cherrylock® is a registered trademark of Cherry Aerospace Fasteners. Lubriplate® is a registered trademark of Friske Brothers Refining Co.
INSTALLATION INSTRUCTIONS
FOR ATTACHING TO GB740 TOOL
1. Connect tool to air supply, making sure head piston of the tool is
in its full forward position.
2. Screw pulling head onto piston assy (740409) on tool.
3. After pulling head is attached, then back off pulling head until
hole in the adapter sleeve (60415) lines up with one of holes in
nose fitting (740101) on tool.
4. Secure to tool using Soc. Hd. Cap Screws (401208) with lined up
hole. Secure second screw in secondary location. See GB740
tool manual.
INSTALLATION INSTRUCTIONS USING 784740
ADAPTER FOR ATTACHING TO GB784 TOOL
*For 5/32”-1/4” only
To install 1/8” CherryLOCK rivets use
GB715 and 615A-61 nose assembly
1. Connect tool to air supply, making sure head piston of the tool is
in its full forward position.
2. Install adapter (784740) onto tool.
Adapter (784740) screws onto head piston (784112) on tool.
INSTALLATION INSTRUCTIONS USING 784740
ADAPTER FOR ATTACHING TO GB784 TOOL
cont.
3. Attach the pulling head to the adapter (784740).
4. After pulling head is attached, then back off pulling head until
hole in the adapter sleeve (60415) lines up with one of holes in
nose assembly adapter (784740).
5. Secure to tool using Soc. Hd. Cap Screws (401208) with lined up
hole. Secure second screw in secondary location.
Note: The shift point setting on the tool must be adjusted to
compensate for the longer stroke when using adapters.
6. Remove limit pins.
7. Turn adjusting knob counter-clockwise until it stops.
Adjuster Knob
Limit Pin
The GB784 will now install Cherrylock rivets up to 1/2” grip
length. Before using a straight 681 series pulling head again,
the tool must be re-adjusted using stroke setting gage (784159).
See GB784 tool manual for instructions.
Seller warrants that all goods covered by this catalog will conform
to applicable specifications and will replace or repair, EXW our plant, any
goods providing defective from faulty workmanship, or material, for 1 year
from date of shipment.
Said warranty to remain in effect if, and only if, such goods are
used in accordance with all instructions as to maintenance, operation and
use, set forth in manuals and instruction sheets furnished by seller.
Sellers obligation under this warranty shall be limited to the repair
or rework of the goods supplied or replacement thereof, at Seller’s option,
and in no case is to exceed the invoice value of said goods. Under no
circumstances will the seller be liable for incidental or consequential
damages or for damages incurred by the buyer or subsequent user in
repairing or replacing defective goods or if the goods covered by this
warranty are reworked or subjected to any type of additional processing.
This warranty is void if Seller is not notified in writing of any
rejections or defects within 1 year after the receipt of the material by the
customer.
THIS WARRANTY IS MADE IN LIEU OF ALL OTHER WARRANTIES
EXPRESSED OR IMPLIED, INCLUDING MERCHANTABILITY.
WARRANTY
Adapter
(784740)
Adapter
(784740)

Other Gage Bilt Tools manuals

Gage Bilt GB722 User manual

Gage Bilt

Gage Bilt GB722 User manual

Gage Bilt GB731SH-5 User manual

Gage Bilt

Gage Bilt GB731SH-5 User manual

Gage Bilt GB2581 User manual

Gage Bilt

Gage Bilt GB2581 User manual

Gage Bilt GB706LGP User manual

Gage Bilt

Gage Bilt GB706LGP User manual

Gage Bilt GB730 User manual

Gage Bilt

Gage Bilt GB730 User manual

Gage Bilt GB734 User manual

Gage Bilt

Gage Bilt GB734 User manual

Gage Bilt GB568 User manual

Gage Bilt

Gage Bilt GB568 User manual

Gage Bilt GB745/206-500 User manual

Gage Bilt

Gage Bilt GB745/206-500 User manual

Gage Bilt GBP704FSH User manual

Gage Bilt

Gage Bilt GBP704FSH User manual

Gage Bilt GB704SR-8 User manual

Gage Bilt

Gage Bilt GB704SR-8 User manual

Gage Bilt GB752SR-8 User manual

Gage Bilt

Gage Bilt GB752SR-8 User manual

Gage Bilt GB713SR User manual

Gage Bilt

Gage Bilt GB713SR User manual

Gage Bilt GB108 User manual

Gage Bilt

Gage Bilt GB108 User manual

Gage Bilt GB731SHV5/LB68 User manual

Gage Bilt

Gage Bilt GB731SHV5/LB68 User manual

Gage Bilt GB743SRVT Owner's manual

Gage Bilt

Gage Bilt GB743SRVT Owner's manual

Gage Bilt GB713SH-5 User manual

Gage Bilt

Gage Bilt GB713SH-5 User manual

Gage Bilt GB743SHVT User manual

Gage Bilt

Gage Bilt GB743SHVT User manual

Gage Bilt GB902 User manual

Gage Bilt

Gage Bilt GB902 User manual

Gage Bilt GB7720 User manual

Gage Bilt

Gage Bilt GB7720 User manual

Gage Bilt GB55B User manual

Gage Bilt

Gage Bilt GB55B User manual

Gage Bilt GB745SH-12 User manual

Gage Bilt

Gage Bilt GB745SH-12 User manual

Gage Bilt GB2581WS User manual

Gage Bilt

Gage Bilt GB2581WS User manual

Gage Bilt GB510L User manual

Gage Bilt

Gage Bilt GB510L User manual

Gage Bilt GB731OS/206 User manual

Gage Bilt

Gage Bilt GB731OS/206 User manual

Popular Tools manuals by other brands

tormek T-1 manual

tormek

tormek T-1 manual

FISCHBEIN F user manual

FISCHBEIN

FISCHBEIN F user manual

Rothenberger H600 Instructions for use

Rothenberger

Rothenberger H600 Instructions for use

Harbor Freight Tools Tidy-Up Organizer 02453 Assembly and operating instructions

Harbor Freight Tools

Harbor Freight Tools Tidy-Up Organizer 02453 Assembly and operating instructions

Kreg KPHJ310 owner's manual

Kreg

Kreg KPHJ310 owner's manual

Black & Decker W006B instruction manual

Black & Decker

Black & Decker W006B instruction manual

Rose electronics PINPUSHER PRO owner's manual

Rose electronics

Rose electronics PINPUSHER PRO owner's manual

BlueSpot 07962 user manual

BlueSpot

BlueSpot 07962 user manual

STEELTEC XWS071 instruction manual

STEELTEC

STEELTEC XWS071 instruction manual

TREND COMBI 651 user manual

TREND

TREND COMBI 651 user manual

DeWalt DW742 manual

DeWalt

DeWalt DW742 manual

Makita HR008G instruction manual

Makita

Makita HR008G instruction manual

Sealey VS779.V4 manual

Sealey

Sealey VS779.V4 manual

TRI tool 302 Operation manual

TRI tool

TRI tool 302 Operation manual

RODCRAFT RC6758 Operator's manual

RODCRAFT

RODCRAFT RC6758 Operator's manual

M7 DS-201 instruction manual

M7

M7 DS-201 instruction manual

Draper 19525 manual

Draper

Draper 19525 manual

ZURN QCRTLDMRKIT-1 installation instructions

ZURN

ZURN QCRTLDMRKIT-1 installation instructions

manuals.online logo
manuals.online logoBrands
  • About & Mission
  • Contact us
  • Privacy Policy
  • Terms and Conditions

Copyright 2025 Manuals.Online. All Rights Reserved.