Gait up Physilog 5 User manual

Gait Up SA
EPFL Innovation Park, Bat C. CH-1015 Lausanne
www.gaitup.com
TVA CHE-145.136.760
Physilog5 user manual v1.2.6 Date: 19.06.2018
Copyright © 2018, All Rights Reserved - Gait Up SA. CH-1015 Switzerland 1
User manual
Thank you for purchasing Physilog®5, the Swiss quality movement sensor. This manual introduces
how to use the different features of the sensor.
Table of Contents
1. Physilog®5 elements.................................................................................................................................. 2
2. Charging..................................................................................................................................................... 2
3. Recording with Physilog®5 ........................................................................................................................ 3
3.1. Standalone measurement ..................................................................................................................... 3
3.2. Standalone synchronous measurement with multiple Physilog®5....................................................... 3
3.3. Start measurement from Android application...................................................................................... 4
4. Data Analysis ............................................................................................................................................. 6
5. Practical Considerations ............................................................................................................................ 6
5.1. Fixation .................................................................................................................................................. 6
5.2. Handling / Maintenance........................................................................................................................ 6
5.3. How to update Date and Time of the Physilog®5.................................................................................. 9
5.4. How to update firmware of Physilog®5 with nRF Connect ................................................................... 9
5.5. Sensor specifications ........................................................................................................................... 12
5.6. Battery autonomy estimations............................................................................................................ 13
5.7. Troubleshoot ....................................................................................................................................... 13
6. Limited Warranty & Support Policy......................................................................................................... 15
7. Certification claims.................................................................................................................................. 16
Contact information ........................................................................................................................................ 17

Gait Up SA
EPFL Innovation Park, Bat C. CH-1015 Lausanne
www.gaitup.com
TVA CHE-145.136.760
Physilog5 user manual v1.2.6 Date: 19.06.2018
Copyright © 2018, All Rights Reserved - Gait Up SA. CH-1015 Switzerland 2
1. Physilog®5 elements
2. Charging
The Physilog®5 is charged via the microUSB port. Plug the microUSB connector of the cable delivered
with the Physilog®5 to the Physilog®. Plug the USB connector to a Computer or charger (see voltage
specifications below). Physilog®5 must be turned off for charging. Do not charge Physilog® when
room temperature is outside of range 0°C to 45°C.
Be careful to plug the microUSB cable in the correct orientation into the
Physilog®, forcing the connector may permanently damage the Physilog® and
compromise its waterproofing.
Low battery level is indicated by orange (red and green LED on) blinking during measurement or if
the Physilog® blinks rapidly 3 times red when starting and doesn't start the recording (see LED
indications below). A battery level estimation is available in the GaitUp mobile application (free to
download from www.gaitup.com/support or from Google Play Store). When the Physilog® is
discharged, plug it for charging for at least 30 minutes before use.
It is recommended to avoid complete discharging of the Physilog®5, therefore check that the
Physilog® sensors are off when you store them. After a long period without using the Physilog®, plug
it for charging for at least 30 minutes before use. It may happen that the LED doesn't blink orange
at the beginning of charging after the battery was very low, to see the charging ongoing shortly push
the main button or disconnect and reconnect after some charging time.

Gait Up SA
EPFL Innovation Park, Bat C. CH-1015 Lausanne
www.gaitup.com
TVA CHE-145.136.760
Physilog5 user manual v1.2.6 Date: 19.06.2018
Copyright © 2018, All Rights Reserved - Gait Up SA. CH-1015 Switzerland 3
Supply Voltage specifications
The Physilog® 5 should be charged using USB at 5V, 100mA. For charging, the ambient temperature
must lie between 0°C and 45°C.
3. Recording with Physilog®5
There are two ways to start and stop a measurement with the Physilog®5:
3.1.Standalone measurement
Press on the main button (for about 2 secs, until the green light turns off) to start the measurement.
During measurement, the Physilog® blinks green.
Hold the main button for 3 seconds, until the light turns orange to stop the measurement. When
the measurement has been concluded, the LED shortly blinks green three times.
3.2.Standalone synchronous measurement with multiple Physilog®5
Starting from firmware version 1.1.0 (June 2017):
The Physilog®5 sensors synchronize regularly during the measurement. A network includes one
single master sensor and several slave sensors (from one to as many as wished). Multiple sensor
networks can be created by selecting a different radio channel. The network configuration is done
via the Research ToolKit Desktop software (see RTK user manual for details) and is saved in the
conf.bin file on each Physilog®5.
To perform a measurement with synchronized Physilog®5, turn on all sensors of the network with
the main button (like for standalone measurement above) with short time intervals (all must be
started within one minute). No precise order of starting the sensors is necessary. Each sensor starts
recording data from start and once it is synchronized with the master sensor it will blink green
synchronously with the master sensor. To stop the measurement, push the main button of the
sensors until the LED turns orange, you can turn off the sensors in any order.

Gait Up SA
EPFL Innovation Park, Bat C. CH-1015 Lausanne
www.gaitup.com
TVA CHE-145.136.760
Physilog5 user manual v1.2.6 Date: 19.06.2018
Copyright © 2018, All Rights Reserved - Gait Up SA. CH-1015 Switzerland 4
Firmware before v1.1.0:
The Physilog®5 sensors synchronize automatically at start when they are correctly configured. Slave
sensors contain a file named “slave.txt”, the Master sensor doesn't have such a file. You can create
and delete the “slave.txt” file as you need for your sensor network configuration. A sensor network
can contain as many slave sensors as wished, but there must be a single Master sensor.
Multiple sensor networks can be created by selecting a different radio channel, therefore create a
file called “radio.txt” and write a number between 2 and 80 inside the file (which sets the radio
channel) and copy-paste it on all Physilog® (also the Master) that are part of a network. Each
network should have a different radio channel in order to exclude cross-talk and one and only one
Master per network must be defined.
To perform a measurement with synchronized Physilog®5 follow the steps below:
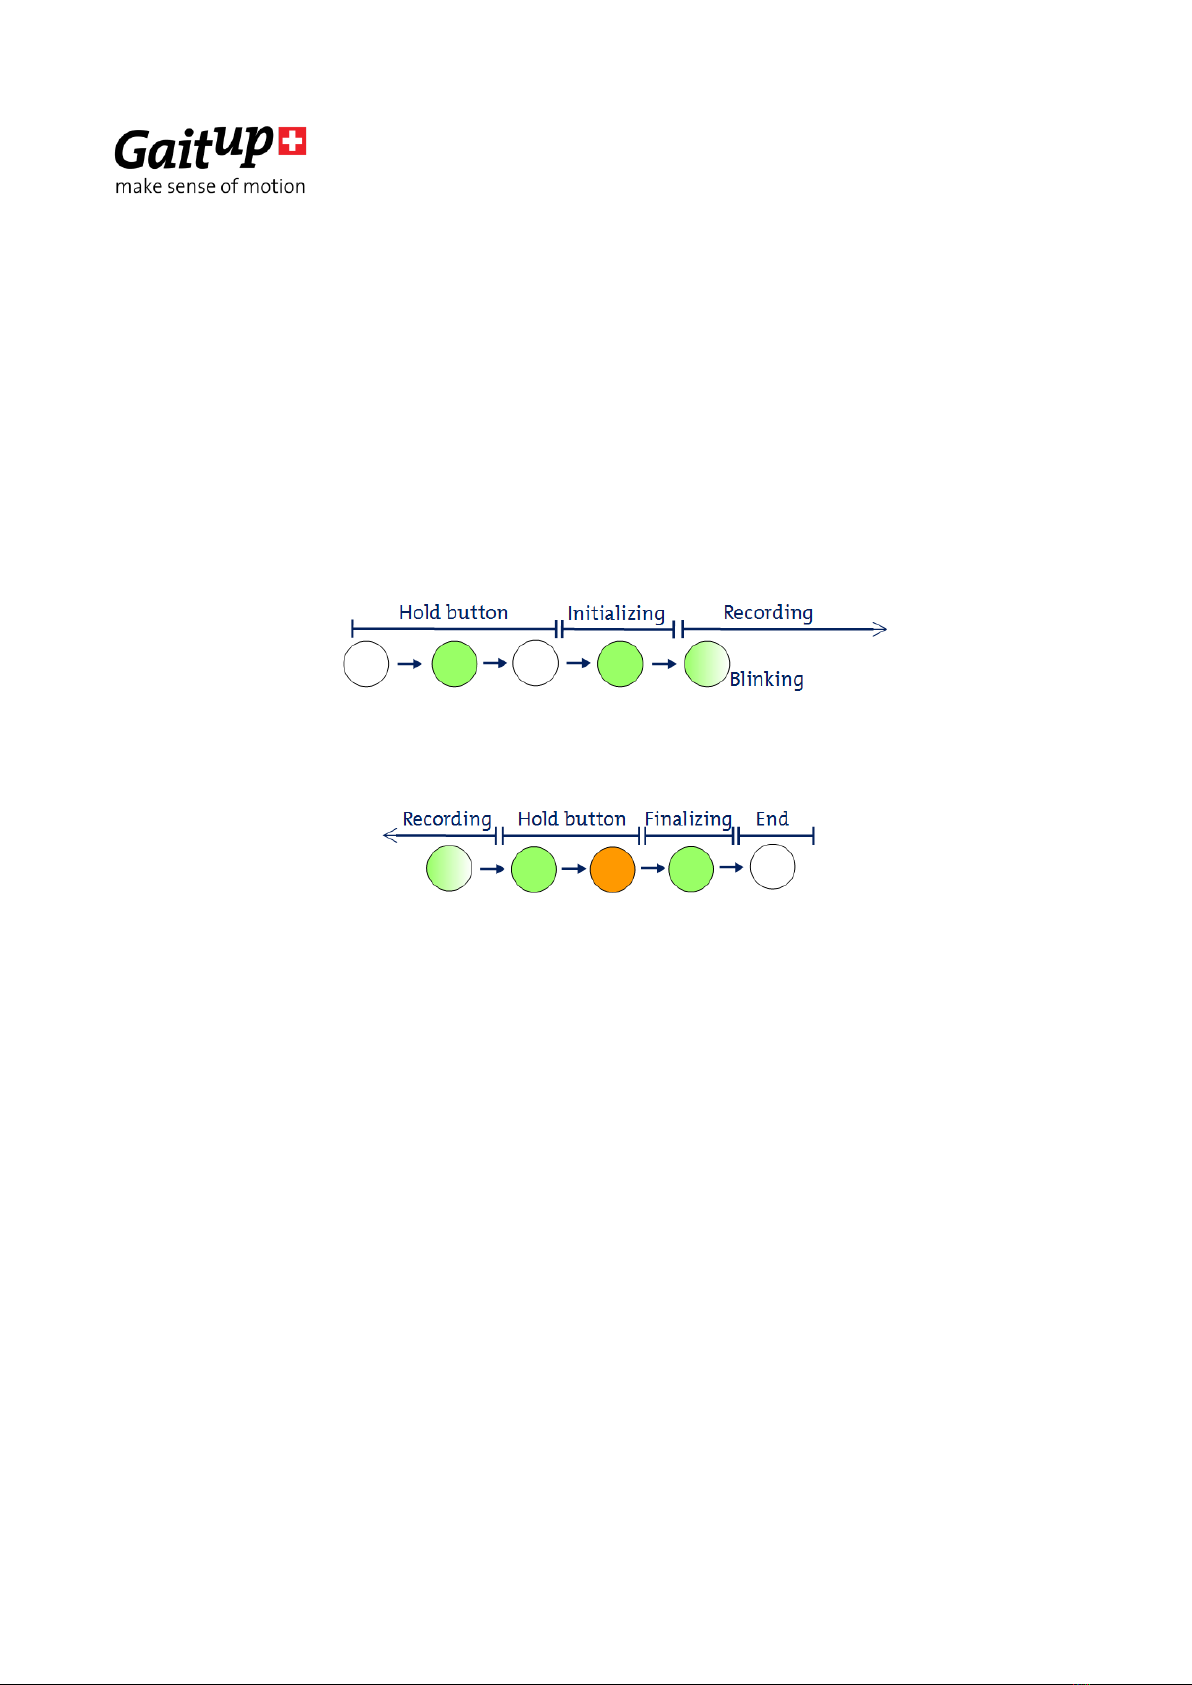
1) Start the sensors with the main button (like for standalone measurement above). One of the
sensors (Master) will start to blink green, the others (Slaves) shine green and don't record until they
receive the synchronization signal from the Master sensor.
2) Once the sensors are synchronized, they blink green synchronously with the Master sensor and
record.
3) To stop the measurement, press the main button of the Slave sensors. They shine green until they
have received the final synchronization information from the Master. The Master must be turned
off as last, after all the Slave sensors have turned off the green LED.
To start a Slave sensor without receiving the signal from the Master, shortly press the main button
when it is shining green, the sensor will start the measurement without being synchronized to other
sensors. To stop slave sensors without waiting for Master synchronization, shortly press the main
button again when the LED is shining green after turning off the recording.
3.3.Start measurement from Android application
The GaitUp companion Android application allows to start Physilog®5. Two modes are available in
the application, for details refer to the user manual of the Android application. There is no need to
pair your Physilog® with the tablet prior to Bluetooth communication, just select the Physilog® from
the list in the app.
Troubleshoot: If a sensor is not detected by the tablet, shortly press the main button of the sensor
to enter detection mode. If the sensor can still not be connected, check that it has enough battery
and is not connected to another mobile device and if necessary ultimately do a reset of the sensor
as explained in section 5.7 Troubleshoot.

Gait Up SA
EPFL Innovation Park, Bat C. CH-1015 Lausanne
www.gaitup.com
TVA CHE-145.136.760
Physilog5 user manual v1.2.6 Date: 19.06.2018
Copyright © 2018, All Rights Reserved - Gait Up SA. CH-1015 Switzerland 5
Briefly, the first mode one is called “Physilog Measure” and allows to start and stop data recording
of the Physilog® of up to two sensors at the same time. When pushing the “Start measurement”
button, the connected Physilog start recording and sending the data file to the tablet. When
launching two Physilog®5 at the same time using the tablet application they can be synchronized in
post-processing in Matlab.
The data is streamed to the tablet during the measurement. For high sampling frequencies (over
64Hz) and multiple Physilog®, the data transfer encounters some delay and remaining data is
transferred after the end of the measurement.
Data saved on the tablet only contains accelerometer and gyroscope data, even if the barometer
was turned on. The original data with all sensors is saved on the Physilog®.
During the measurement, the Physilog®5 blinks green where each blink is made of two short flashes.
To stop the measurement, click on the “Stop measurement” button in the application. In case the
sensors have not sent all data to the tablet during the measurement, they twinkle orange to show
that data transfer is still ongoing. The tablet application shows the percentage of the file already
transferred.
The second mode is called “Physilog Visualize”, it can be used to check if the sensor's data looks as
expected. Up to 4 sensors can be connected to the application at the same time for this mode. The
“Physilog Visualize” starts displaying data from connected sensors automatically (no start button).
It does not store the data, neither on the tablet nor on the Physilog®. During the measurement, the
Physilog®5 blink green where each blink is made of two short flashes. To stop data streaming either
disconnect the sensor or exit this part of the application.
Note: Bluetooth 4.0 or higher is required on the mobile device to be able to communicate with
Physilog®5.

Gait Up SA
EPFL Innovation Park, Bat C. CH-1015 Lausanne
www.gaitup.com
TVA CHE-145.136.760
Physilog5 user manual v1.2.6 Date: 19.06.2018
Copyright © 2018, All Rights Reserved - Gait Up SA. CH-1015 Switzerland 6
4. Data Analysis
Physilog® always saves raw data on its internal memory, except when streaming the data live via
Bluetooth in the “Physilog Visualize” part of the app. Users have access to the raw data through
companion software called Research ToolKit (RTK). The RTK is available for computer (PC and Mac).
Functions to read raw data inside MATLAB® are also available. Please refer to the RTK user manual
for more details.
USB data transfer
Data saved on the SD card inside the Physilog® can be accessed using USB data transfer. Therefore,
plug the USB cable to the Physilog® and a computer. The Physilog®5 connects to the computer
almost instantaneously and files can be accessed. One file for each measurement is created and files
are stored in folders depending on creation date (DD_MM_YY for firmware v1.1.0 and YY_MM_DD
for firmware v1.2.2 upwards). The file name is composed of a file number (increasing from 1 to 999),
the body location (as defined in the configuration, f.ex. 'LF') and the sensor serial number. Copy-
paste the files to your computer for analysis. From here you can also rename folders and files or
delete the files from Physilog®'s memory.
Warning: Do not remove the conf.bin file which contains the configuration information, otherwise
the Physilog® will not record any data. If this happens, recreate a configuration using the Research
ToolKit or contact Gait Up support. For firmware v1.1.0 upwards, a default configuration based on
original configuration is created to compensate the removal of the conf.bin file.
5. Practical Considerations
5.1.Fixation
The Physilog®5 comes with a fixation clip as default attachment accessory. Additional clips and
elastic straps with Velcro patches to stick onto the Physilog® can be purchased from Gait Up's online
shop (shop.gaitup.com).
5.2.Handling / Maintenance
Physilog®5 should be handled carefully. In particular, it should not receive shocks, such as fall,
crushing, being hit etc. Do not press too hard on the on/off button, this can damage the button.
Warning: Do not use or charge the Physilog® if the sensor or its case is damaged.
Contact Gait Up about what further action is needed when the case is damaged. In
case the battery is damaged, immediately move the device away from flammable
materials and contact Gait Up's customer support.

Gait Up SA
EPFL Innovation Park, Bat C. CH-1015 Lausanne
www.gaitup.com
TVA CHE-145.136.760
Physilog5 user manual v1.2.6 Date: 19.06.2018
Copyright © 2018, All Rights Reserved - Gait Up SA. CH-1015 Switzerland 7
To benefit from the maximal battery life, fully charge Physilog® sensors before doing
measurements (LED shines green when connected to computer or charger, you can also check
with the App).
Copy trial recordings to your computer: Physilog® is not the best place to keep important data.
Physilog®5 can be used outside. But do not use Physilog®5 to measure water-sport activities
without additional waterproofing.
Do not introduce pointy objects into the small hole besides the USB entry, this irreversibly
damages the waterproofing of the sensor.
Storage: Store in a cool (0°C –30°C) and dry place. The provided box is the perfect place for your
sensor.
Cleaning: Sensors can be cleaned gently using alcohol wipes. Before you clean the device make
sure it is turned off and disconnect all cables. Alcohol used in excess may damage the sensor’s
waterproofing. Make sure to use wipes and not put liquid alcohol directly on the sensor.
Sensors do not need yearly recalibration.
Do not throw Physilog® sensors in the normal trash, dispose of it properly considering local laws
and rules about electronic waste and batteries. Contact Gait Up's customer support for more
information about elimination of Physilog®.
Make sure to know which Physilog® file corresponds to which trial for your analysis –First digits
of file name are automatically incremented for each day of measurement (exceeding 999 resets
the increment back to 1). Note that date of file generation (recorded between one start and stop
of the Physilog®) is visible in the XLS or CSV file and the Matlab structure “header”. If you wish
to adapt internal date and time of the Physilog®, read section below.
Do not remove the “conf.bin” file from the Physilog, otherwise it will create empty files (no
sensor activated). If this happens, recreate a configuration in the Research ToolKit software or
contact Gait Up's customer support. For firmware v1.1.0 upwards, a default configuration based
on original configuration is created to compensate the removal of the conf.bin file.

Gait Up SA
EPFL Innovation Park, Bat C. CH-1015 Lausanne
www.gaitup.com
TVA CHE-145.136.760
Physilog5 user manual v1.2.6 Date: 19.06.2018
Copyright © 2018, All Rights Reserved - Gait Up SA. CH-1015 Switzerland 8
Safety information
Physilog®5 includes a lithium battery. This battery may only be charged over a limited temperature range. Never
attempt to dock or charge your Physilog® when the temperature is outside of the range of 0 to 45°C.
Physilog®5 should be charged through USB connection with a computer. An external charger may be used; note
that no charger is provided by Gait Up. Gait Up declines any responsibility due to charger usage.
Supply voltage should be as follows: DC, 5V. Current consumption is 100mA. All external circuits connected to the
Physilog®5 should be «Safety Extra Low Voltage» and «limited Power Sources» circuits as described in the following
standards: IEC60950-1:2005+/A1:2010 & EN60950-1:2006+/A11:2009+/A1:2010+/A12:2011
Warnhinweise:
Physilog®5 enthält eine Lithium Batterie. Die Batterie soll nur in einer definierten Temperaturspanne aufgeladen
werden. Versuchen Sie nie Ihren Physilog® an den Computer anzuschliessen oder aufzuladen, wenn die
Aussentemperatur nicht zwischen 0°C und 45°C ist.
Sensoren sollen durch eine USB Verbindung mit einem Computer aufgeladen werden. Ein externes Ladegerät kann
benutzt werden; Gait Up empfiehlt und liefert aber kein externes Ladegerät. Gait Up übernimmt keine Haftung falls
ein Ladegerät gebraucht wird.
Die erlaubte Netzspannung ist: DC, 5V. Stromaufnahme beträgt 100mA. Alle an den Physilog®5 angeschlossenen
externe Stromkreise sollen die «Sicherheitskleinspannung” und “mit begrenzter Leistung” Regeln erfüllen, die in
den folgenden Normen beschrieben sind: IEC60950-1:2005+/A1:2010 und EN60950-
1:2006+/A11:2009+/A1:2010+/A12:2011
Informations relatives à la sécurité:
Physilog®5 contient une batterie au lithium. La batterie ne doit être chargée que si la température extérieure est
dans les limites définies. N’essayez jamais de connecter ou charger votre Physilog®5 si la température ambiante est
en dehors des limites de 0 à 45°C.
Physilog®5 doit être chargé par une connexion USB avec un ordinateur. Un chargeur externe peut être utilisé; mais
Gait Up ne livre et ne recommande pas de chargeur. Gait Up refuse toute responsabilité liée à l’utilisation d’un
chargeur externe.
La tension de réseau devrait être: DC, 5V. La consommation de courant est de 100mA. Tout circuits connectés à
Physilog®5 doivent être «très basse tension de protection» et «source à tension limité» comme décrit dans les
normes suivantes: IEC60950-1:2005+/A1:2010 et EN60950-1:2006+/A11:2009+/A1:2010+/A12:2011

Gait Up SA
EPFL Innovation Park, Bat C. CH-1015 Lausanne
www.gaitup.com
TVA CHE-145.136.760
Physilog5 user manual v1.2.6 Date: 19.06.2018
Copyright © 2018, All Rights Reserved - Gait Up SA. CH-1015 Switzerland 9
5.3.How to update Date and Time of the Physilog®5
Via computer:
Create a new text file on the Desktop of your computer or directly on the Physilog® sensor (on
Windows: right click, new>text file, on Mac: open text editor and save file as textfile)
Leave it empty and rename it to TIME (complete name with file extension: TIME.txt)
Copy-paste the file to the Physilog® if you saved it on the Desktop
Disconnect the Physilog® from the computer to update the time and date to the hour when the
file has been created
Create a new text file each time you update the date, do not just rename or modify an existing
TIME.txt file (TIME.txt file previously created will update to the date it was created, so in the past).
The TIME.txt file will disappear from Physilog's memory when disconnecting the Physilog® from the
computer, therefore it is normal to not find it the next time you open the Physilog® on the computer.
Via Android application:
Connect the Physilog® to the Android companion application inside the “Physilog Measure” mode.
Start a short measurement from the app, you can stop the measurement as soon as the stop button
is available. Wait until the file transfer is finished and the app shows the green checkmark. Then
disconnect the sensors or completely quit the app.
5.4.How to update firmware of Physilog®5 with nRF Connect
The firmware is updated via Bluetooth. Therefore, install the nRF application on a mobile or tablet
(Android or iOS) and follow the steps below. It may be necessary to install a file manager application
in addition to the nRF app to be able to select the firmware file from a chosen location of file storage
on your device.
Android
Install the “nRF Connect for Mobile” app on the Android device
Download the latest firmware version from the email to the Android
device
Open the nRF Connect app and enable all necessary permissions
(Bluetooth and Position, see pictures below)
Go to Scanner tab and scan for surrounding Physilog (shortly push the
main button of the Physilog®5 to enter detection mode)
Select connect of one Physilog®5 sensor in the list
Plug the selected Physilog to a power source to be sure to have enough
battery to perform the update

Gait Up SA
EPFL Innovation Park, Bat C. CH-1015 Lausanne
www.gaitup.com
TVA CHE-145.136.760
Physilog5 user manual v1.2.6 Date: 19.06.2018
Copyright © 2018, All Rights Reserved - Gait Up SA. CH-1015 Switzerland 10
In the top right corner of the app click on the DFU button (on the right of “Disconnect”) and
select “Distribution Packet (ZIP)” from the proposed options
Get the new firmware file from where it was downloaded
Wait until the graph in the app has shown that 100% of the firmware was transferred, this may
take some minutes
Disconnect the Physilog® by clicking on “Disconnect” and close the tab of the Physilog®5
For firmware versions before v1.2.2 you need to do a reset of the Physilog® (hold the main
button until the LED shines orange, blinks red and then stops)
Plug the Physilog® to the computer and update the date and time (see above)

Gait Up SA
EPFL Innovation Park, Bat C. CH-1015 Lausanne
www.gaitup.com
TVA CHE-145.136.760
Physilog5 user manual v1.2.6 Date: 19.06.2018
Copyright © 2018, All Rights Reserved - Gait Up SA. CH-1015 Switzerland 11
iOS
Install the “nRF Toolbox” on the iOS device
Download the latest firmware version from the email to the iOS device
Add the downloaded firmware to nRF Toolbox by connecting the iOS
device to the computer:
Open iTunes and select your phone
Select the “Apps” tab on the left and scroll down
Under “File Sharing” select the nRF Toolbox app and add the Firmware
file to the Documents list
Click on “Done” and disconnect phone from computer
Open the nRF Connect app on the iOS device and enable Buetooth
Open DFU option of the app
Click on “Select File” and go to the tab “user files” where you find the firmware added to the
app earlier
Shortly push the main button of the Physilog®5 to enter detection mode
Click on “Select device” button and look for surrounding Physilog
Select connect of one Physilog®5 sensors in the list
Plug the selected Physilog to a power source to be sure to have enough battery to perform the
update
Click on “Upload” and wait until the percentage has arrived at 100%, this may take some minutes
For firmware versions before v1.2.2 you need to do a reset of the Physilog® (hold the main
button until the LED shines orange, blinks red and then stops)
Plug the Physilog® to the computer and update the date and time (see above)

Gait Up SA
EPFL Innovation Park, Bat C. CH-1015 Lausanne
www.gaitup.com
TVA CHE-145.136.760
Physilog5 user manual v1.2.6 Date: 19.06.2018
Copyright © 2018, All Rights Reserved - Gait Up SA. CH-1015 Switzerland 12
5.5.Sensor specifications
Component
Manufacturer
Remarks
Inertial Sensors
STMicroelectronics
3D Accelerometer up to 16g
3D Gyroscope up to 2000°/s
Ambient Sensor
STMicroelectronics
Barometric altitude from 260 to 1260 hPa
Temperature sensor accuracy of +/-1.5°C
Radio Chip
Nordic Semiconductors
Multi-standard: Bluetooth Low Energy (BLE), Ant+,
and Near field communication (NFC)
Internal Memory
Apacer
Class 10 microSD Card, 8Gb
Microcontroller
Nordic Semiconductors
ARM® Cortex® M4 with floating-point for on-board
processing
Micro-usb interface
Amphenol FCI & Microchip
Waterproof IP64, with dedicated chip for fast data
transfer. High-speed USB 2.0
Battery
Renata
Lithium Ion Polymer Accumulators 3.7V 140mAh
Plastic Enclosure
ABS Polylac® PA-757
Biocompatible with bi-color LED and 8mm button
Operating Temperature
From-20° to 45°C
Assembly
Locatis Electronics SA (CH)
Weight 11 grams
Dimensions 26,5 x 47,5 x 10 mm
Extension Board
(optional)
Ublox
Melexis
Low-power GPS/GNSS module
High-quality 3D Magnetometer
Component Manufacturer Remarks
3D orientation
3D orientation of the sensor is calculated on-board during the measurement when in streaming
mode (sensor started through “Physilog Visualize”). A 3D model of the Physilog®5 which indicates
its orientation can be displayed in the companion app for illustration purposes. The Matlab function
to read the .BIN file has the option to output the quaternions and Euler angles.

Gait Up SA
EPFL Innovation Park, Bat C. CH-1015 Lausanne
www.gaitup.com
TVA CHE-145.136.760
Physilog5 user manual v1.2.6 Date: 19.06.2018
Copyright © 2018, All Rights Reserved - Gait Up SA. CH-1015 Switzerland 13
5.6.Battery autonomy estimations
Measuring channels
Radio settings
Firmware
version
Approx.
Autonomy *
3D
Accelerometer
3D Gyroscope
Barometric
pressure
Master / slave /
no radio
Version (release
date)
Hours
256Hz
256Hz
64Hz
-
1.0.2
(02.03.2017)
18h
128Hz
128Hz
64Hz
Master / slave
pairs / no radio
1.1.0
(14.06.2017)
20h
128Hz
128Hz
64Hz
Slave without
master
1.1.0
(14.06.2017)
10h
256Hz
256Hz
64Hz
Master / slave
pairs / no radio
1.1.0
(14.06.2017)
18h
256Hz
256Hz
64Hz
Slave without
master
1.1.0
(14.06.2017)
10h
512Hz
512Hz
64Hz
Master / slave
pairs / no radio
1.1.0
(14.06.2017)
15h
512Hz
512Hz
64Hz
Slave without
master
1.1.0
(14.06.2017)
10h
*Autonomy measured at room temperature
5.7.Troubleshoot
Soft reset
The soft reset is the manipulation which can be done if the Physilog® is not working properly. To do
a soft reset, hold the main button for 15 seconds. The LED shines green, turns off and finally blinks
red/orange and then stops. If the problem persists, fill out the contact form on the support page
serial number and describe the problem in as much detail as possible (number of red blinks, last
manipulation, firmware version etc.).
Hard reset
If the soft reset doesn’t allow to recover Physilog®, a hard reset is necessary. A hard reset is done
when the sensor’s battery goes completely out (few days to several weeks depending on firmware
version and charging state). To force a hard reset, introduce a thin item (like the end of a paperclip)
into the hole besides the USB entry and gently press until you feel a button pressed inside the sensor.
Warning: This manipulation destroys the waterproofing membrane and the sensor is therefore no

Gait Up SA
EPFL Innovation Park, Bat C. CH-1015 Lausanne
www.gaitup.com
TVA CHE-145.136.760
Physilog5 user manual v1.2.6 Date: 19.06.2018
Copyright © 2018, All Rights Reserved - Gait Up SA. CH-1015 Switzerland 14
longer waterproof. The forced hard reset is the ultimate way to make Physilog® responsive again, it
should only be used in desperate cases. Before you apply it, let the sensor rest for 5 minutes
(especially if the sensor is unresponsive due to a problem during a firmware update) and be sure
that the sensor is not unresponsive due to completely discharged battery.
LED indications
Situation
Description
Meaning
Connected via USB
Green continuous
Fully charged
Orange blinking
Charging
Multicolor blinking
Data transfer
Red continuous
Error 1
During standalone
measurement
Green blinking
Measuring
Green continuous
Waiting for synchronization
Orange blinking
Low battery
During
measurement
started from
application
Green blinking (2 flashes per blink)
Measuring and sending data to application
Orange blinking (2 flashes per blink)
Measuring, connection to application to send
data lost
Green/orange blinking (1 green, 1 orange flash
per blink)
Measuring and sending data to application with
low battery
Error indications
2 rapid red blinks
Error 2
3 rapid red blinks
Error 3
4 rapid red blinks
Error 4
5 rapid red blinks
Error 5
6 rapid red blinks
Error 6
Troubleshoot for error indications
Error Type*
Troubleshoot
Error 1
Disconnect and replug the Physilog®
Error 2
Contact Gait Up
Error 3
Charge the Physilog®
Error 4
Contact Gait Up
Error 5
Contact Gait Up
Error 6
Empty the memory card
*see LED indication above

Gait Up SA
EPFL Innovation Park, Bat C. CH-1015 Lausanne
www.gaitup.com
TVA CHE-145.136.760
Physilog5 user manual v1.2.6 Date: 19.06.2018
Copyright © 2018, All Rights Reserved - Gait Up SA. CH-1015 Switzerland 15
6. Limited Warranty & Support Policy
Warranty:
Gait Up offers 12 months parts and labour on Physilog® starting from the date of delivery. If within one year from the
date of delivery to the customer the equipment does not comply with the foregoing Limited warranty, Gait Up will at
Gait Up’s option, repair, replace or refund the purchase price of the defective equipment free of charge to the customer.
Customers requesting repair, replacement or refund are required to ship, the Physilog® to Gait Up. As a condition of
this warranty, customers must contact Gait Up’s customer service for instructions on and approval of shipment prior to
returning any defective Physilog®. The warranty shall not apply to any product or component thereof which has been
repaired or altered by anyone other than Gait Up in any manner so as, in Gait Up’s judgement, to affect its service ability,
or any product been subject to alteration, accident, misuse, abuse, neglect or abnormal wear. Gait up warrants solely
to the original purchaser (customer). Only the terms expressed in this warranty shall apply and no distributor,
corporation or individual is authorized to amend, modify or extend this warranty in any way.
Gait Up shall have no liability for any consequential, incidental or special damages by reason of any act or omission or
arising out of or in connection with the equipment or its rental, delivery, installation, maintenance, operation,
performance or use, including without limitation any loss of use, lost revenue, lost profits or a cost associated with
downtime. The obligations contained in this paragraph continue beyond the term of this limited warranty.
Physilog® and Gait Analysis Software are not considered as proper Medical Devices, since they do not support directly
diagnosis, but they provide data which have to be analysed and approved by medical doctors for them to make their
diagnosis. Reclamations regarding medical devices will not be considered.
Support Policy:
Support does not include:
support for 3rd party hardware, software, mailing lists or web content
writing or debugging customer applications and deployments
detailed explanations of the engineering principles behind our software and hardware
support for systemic problems beyond the scope of the actual Physilog® and existing systems software (IT issues,
computer operation)
support for customers whose conduct fails to meet professional standards
Occasionally we engage in more interactive support or consulting. Interactive support is a customer courtesy and is
provided at Gait Up’s discretion. It does not invalidate the support policy described above. There is no guarantee of
performance, timeliness, or establishment of a continuous support relationship. Consulting is subject to acceptance of
a formal statement of work.

Gait Up SA
EPFL Innovation Park, Bat C. CH-1015 Lausanne
www.gaitup.com
TVA CHE-145.136.760
Physilog5 user manual v1.2.6 Date: 19.06.2018
Copyright © 2018, All Rights Reserved - Gait Up SA. CH-1015 Switzerland 16
7. Certification claims
IC statement
Under Industry Canada regulations, this radio transmitter may only operate using an antenna of a type and maximum (or lesser) gain
approved for the transmitter by Industry Canada. To reduce potential radio interference to other users, the antenna type and its gain
should be so chosen that the equivalent isotropically radiated power (e.i.r.p.) is not more than that necessary for successful
communication. This device complies with Industry Canada licence-exempt RSS standard(s). Operation is subject to the following two
conditions: (1) this device may not cause interference, and (2) this device must accept any interference, including interference that
may cause undesired operation of the device. This device complies with Industry Canada radiation exposure limits set forth for
general population. This device must not be co-located or operating in conjunction with any other antenna or transmitter.
Conformément à la réglementation d'Industrie Canada, le présent émetteur radio peut fonctionner avec une antenne d'un type et
d'un gain maximal (ou inférieur) approuvé pour l'émetteur par Industrie Canada. Dans le but de réduire les risques de brouillage
radioélectrique à l'intention des autres utilisateurs, il faut choisir le type d'antenne et son gain de sorte que la puissance isotrope
rayonnée équivalente (p.i.r.e.) ne dépasse pas l'intensité nécessaire à l'établissement d'une communication satisfaisante. Le présent
appareil est conforme aux CNR d'Industrie Canada applicables aux appareils radio exempts de licence. L'exploitation est autorisée
aux deux conditions suivantes : (1) l'appareil ne doit pas produire de brouillage, et (2) l'utilisateur de l'appareil doit accepter tout
brouillage radioélectrique subi, même si le brouillage est susceptible d'en compromettre le fonctionnement. Le présent appareil est
conforme aux niveaux limites d’exigences d’exposition RF pour la population globale définies par Industrie Canada. L’appareil ne doit
pas être installé à proximité ou être utilisé en conjonction avec une autre antenne ou un autre émetteur.
FCC statement
This device complies with Part 15 of the FCC Rules. Operation is subject to the following two conditions: (1) this device may not cause
harmful interference, and (2) this device must accept any interference received, including interference that may cause undesired
operation.
NOTE: This equipment has been tested and found to comply with the limits for a Class B digital device, pursuant to part 15 of the FCC
Rules. These limits are designed to provide reasonable protection against harmful interference in a residential installation. This
equipment generates, uses and can radiate radio frequency energy and, if not installed and used in accordance with the instruction,
may cause harmful interference to radio communications. However, there is no guarantee that interference will not occur in a
particular installation. If this equipment does cause harmful interference to radio or television reception which can be determined
by turning the equipment off and on, the user is encouraged to try to correct interference by one or more of the following measures:
Reorient or relocate the receiving antenna.
Increase the separation between the equipment and receiver.
Connect the equipment into an outlet on circuit different from that to which the receiver is connected.
Consult the dealer or an experienced radio/TV technician for help.
This device complies with FCC radiation exposure limits set forth for general population. This device must not be co-located or
operating in conjunction with any other antenna or transmitter.
Caution: the user that changes or modifications not expressly approved by the party responsible for compliance
could void the user's authority to operate the equipment.

Gait Up SA
EPFL Innovation Park, Bat C. CH-1015 Lausanne
www.gaitup.com
TVA CHE-145.136.760
Physilog5 user manual v1.2.6 Date: 19.06.2018
Copyright © 2018, All Rights Reserved - Gait Up SA. CH-1015 Switzerland 17
Contact information
At Gait Up, we welcome your feedback and questions.
Please contact us at:
EPFL Innov’ Park - C
CH-1015 Lausanne
tel: +41 21 633 7527
web: www.gaitup.com
Version
Changes
Responsible
Date
1.2.0
Initial release to public
Rebekka Anker
4 jan. 2017
1.2.1
Changes related to firmware 1.0.2:
- Radio channel selection
- End of measurement synchronization
- File name description
- Firmware update –reset at end
- Physilog®5 autonomy updated
Rebekka Anker
21 feb. 2017
1.2.2
Changes related to firmware 1.1.0:
- Fixation clip image
- Continuous synchronisation
- BLE measurements
- Time update with application
- BLE measurement LED indications
- Autonomy
- Certification statements
Rebekka Anker
12 June 2017
1.2.3
Complete information for certification
Rebekka Anker
08.08.2017
1.2.4
Reformat and update information
Rebekka Anker
17.10.2017
1.2.5
Changes related to firmware v1.2.2:
- Firmware update: no reset requested anymore
- File folder names YY_MM_DD
- LED error indication not repeated 3 times
Rebekka Anker
16.02.2018
1.2.6
- Charging voltage specifications updated from 4.2 to
5V
- Hard reset instructions
Rebekka Anker
19.06.2018
Other manuals for Physilog 5
1
Table of contents
Other Gait up Accessories manuals