Gait up GAIT UP GO User manual

NOTE : some tests stop automatically after the movement is completed or after a fixed amount of time
(f.ex. 2min walking test, 5 sit to stand test). For more information about the test, check the
complementary instructions which can be accessed by clicking on the question mark button on the
right side of the test title on the instructions screen.
Fig. 65. Complementary instructions
Table 4. Automatic test end criteria
Test type
Stop automatically after:
Monopodal balance comparison
30 seconds (x 2)
One leg balance
30 seconds
Balance on two legs
30 seconds
Semi-tandem balance
30 seconds
Tandem balance
30 seconds
Romberg test
30 seconds (x 2)
Sit to stand transfer
5 sit to stand detected
Vertical jump 1 leg
1 jump detected (x 2)
Vertical jump 2 legs
3 jumps detected
2 minutes walking test
2 minutes
Timed Up and Go
1 Timed Up and Go detected
Timed Up and Go in dual task
1 Timed Up and Go detected
ENGLISH
50/84

When the participant has understood the instructions and is ready to perform the test, press “Go”, In
that moment, the Participant can start to perform the movement explained in the instructions shown
in the user interface of the application.
Fig. 66. Instruction and test start - iOS Fig. 67. Instruction test start - Android
NOTE: The wireless communication between the Physilog6 sensor device accessory and the mobile
phone / tablet is limited in distance. Do not separate the sensor device from the Gait Up GO mobile
application further than 5 meters (16 feet).
At the end of the test, if it did not automatically stop, tap the “End” button appearing on your screen
to complete the recording. The Gait Up GO medical device will analyze the recorded data.
Fig. 68. Recording ongoing
If the test has been successfully performed, a green check mark will appear on the screen, together
with the name of the test. Any comment about the performance of the test (f.ex. pain at the left hip)
can be optionally added. This comment will be displayed on the test report. Tap “Save” to register the
results and be able to generate a report.
ENGLISH
51/84

Fig. 69. Screen after completing a test - iOS Fig. 70. Screen after completing a test - Android
The user can delete the test result in case of any problem happening with the execution of the
instructions provided by the mobile application or if the test had to be interrupted by any cause. In this
case, the performed test data is deleted and no report can be generated later.
NOTE: Data analysis problems can arise due to a bad quality movement or recording. In those cases,
an error message is popping up on the screen warning the user, who has the choice of deciding
whether the recorded raw data (no personal or clinical data contained in the recorded raw data) is
shared with Gait Up or not. Data sharing has uniquely the goal of helping Gait Up SA to improve the
product. To share such data, a user account must be registered on the mobile phone/tablet and
internet access is required.
Fig. 71 Pop-up in case of error during the recording
NOTE: The previous test is an example (jump test) in the Gait Up GO application but the same
procedure should be used for all the tests contained in the mobile application.
ENGLISH
52/84

End of the test with no direct access to the results
During the test assignment it is possible to select “Direct access to results” or “No direct access to
results” Please refer to the “Assign test” section to check how to activate or inactivate this setting.
Fig. 72. Direct access to results option
If the direct access to the report results is inactivated, a message will pop up informing that the test
results have been saved. The report can be unlocked later by the medical professional.
Fig. 73. Test has been saved - iOS Fig. 74. Test has been saved - Android
After tapping “OK” on the information text box, the mobile application displays the session screen
from where the user can select another test in the list.
The test report can later be accessed by the medical professional inside the password protected part
of the Gait Up GO mobile application (see section 4.5.8).
End of the test with Limited admin mode (direct access to the results)
If the “Direct access to results” is activated, the User will be able to spend credits and access the
reports immediately at the end of the test after clicking “Save”. A confirmation request will be
generated for the user to confirm the spending of one credit to generate and display the report (see
section 4.5.8 for more information).
ENGLISH
53/84

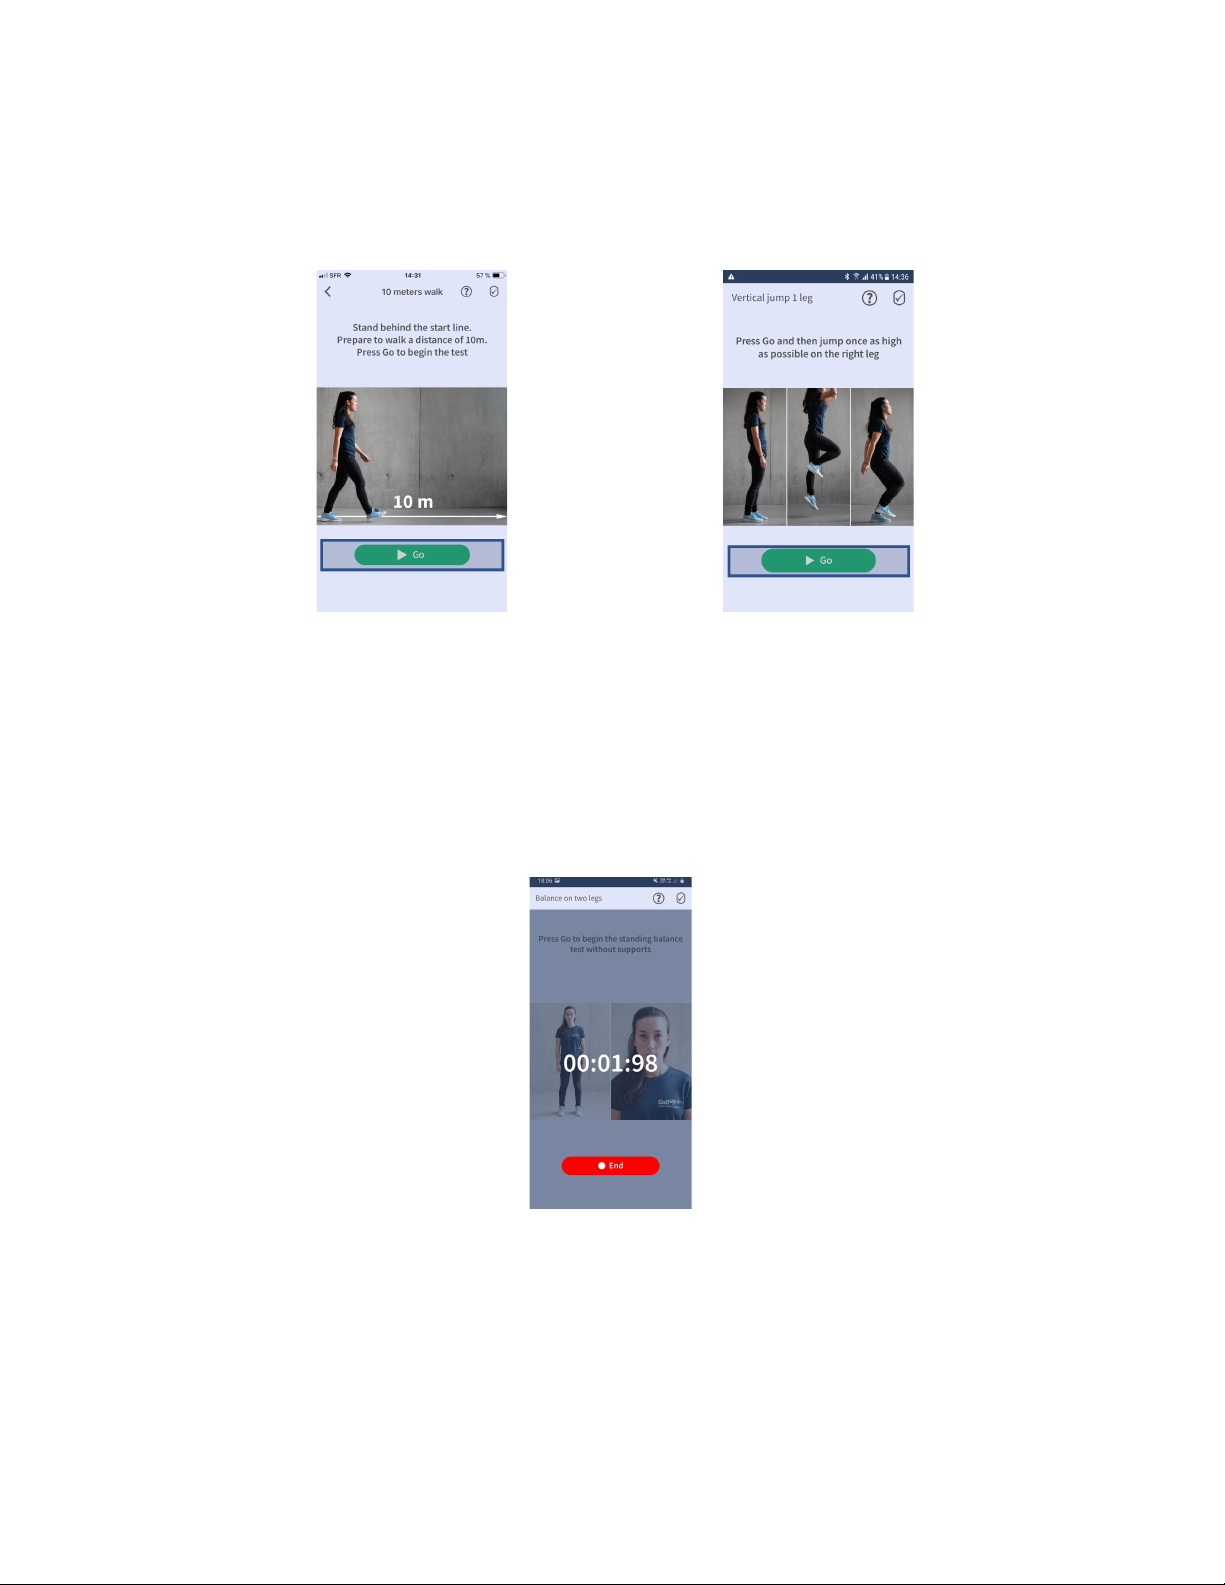
After closing the report, The Gait Up GO mobile application displays the session screen from where the
user can select another test from the list.
NOTE: In order to generate reports, the Gait Up GO Mobile Application needs to be connected to the
Internet by using WiFi or mobile data.
4.5.8 Generate, manage and interpret test reports
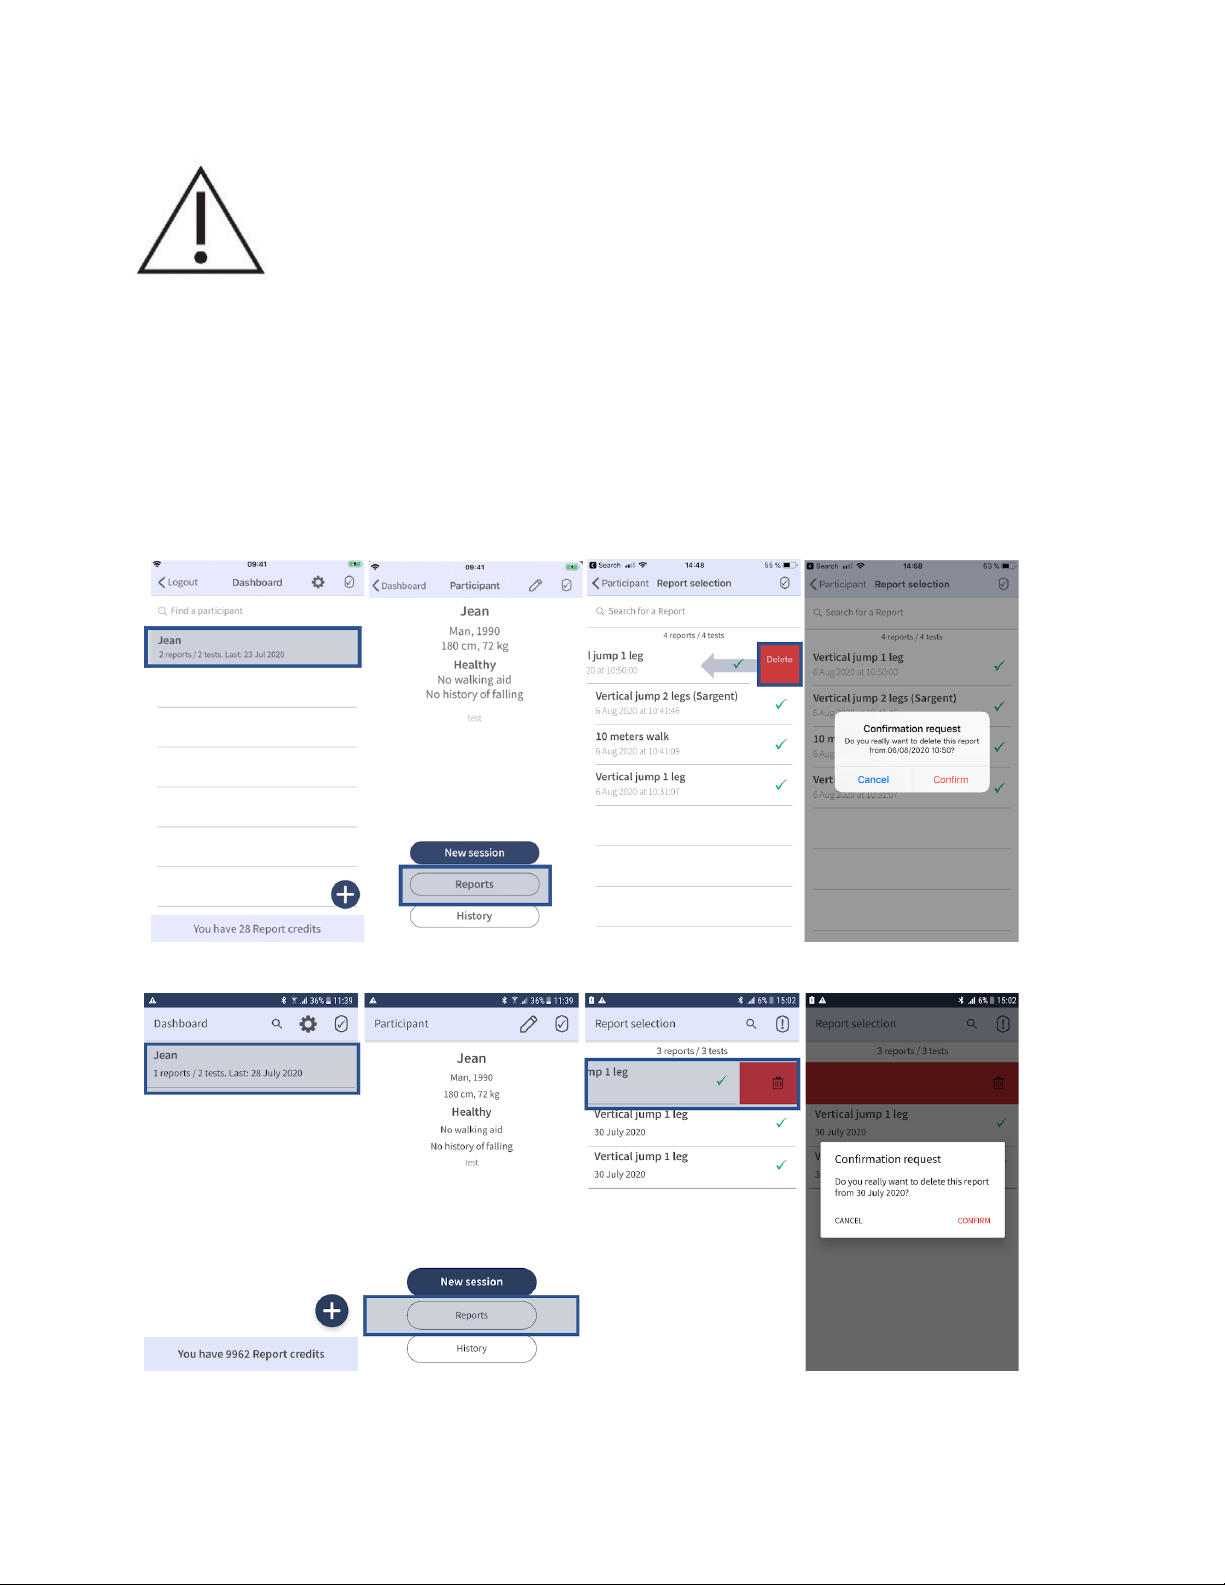
The Gait Up GO medical device works with a pay per report model, where the user can perform as
many tests as wanted for free and needs to spend credits only when generating and displaying the
result reports. For each credit, one report can be generated. For frequent users it is possible to
purchase an “unlimited license” which allows to generate as many reports as wanted for a yearly flat
rate fee. The “unlimited license” is linked to the Physilog6 serial number which allows a group of users
who are using the same Physilog6 but with distinct login accounts to benefit from the unlimited
number of reports.
There are two ways to generate and display reports:
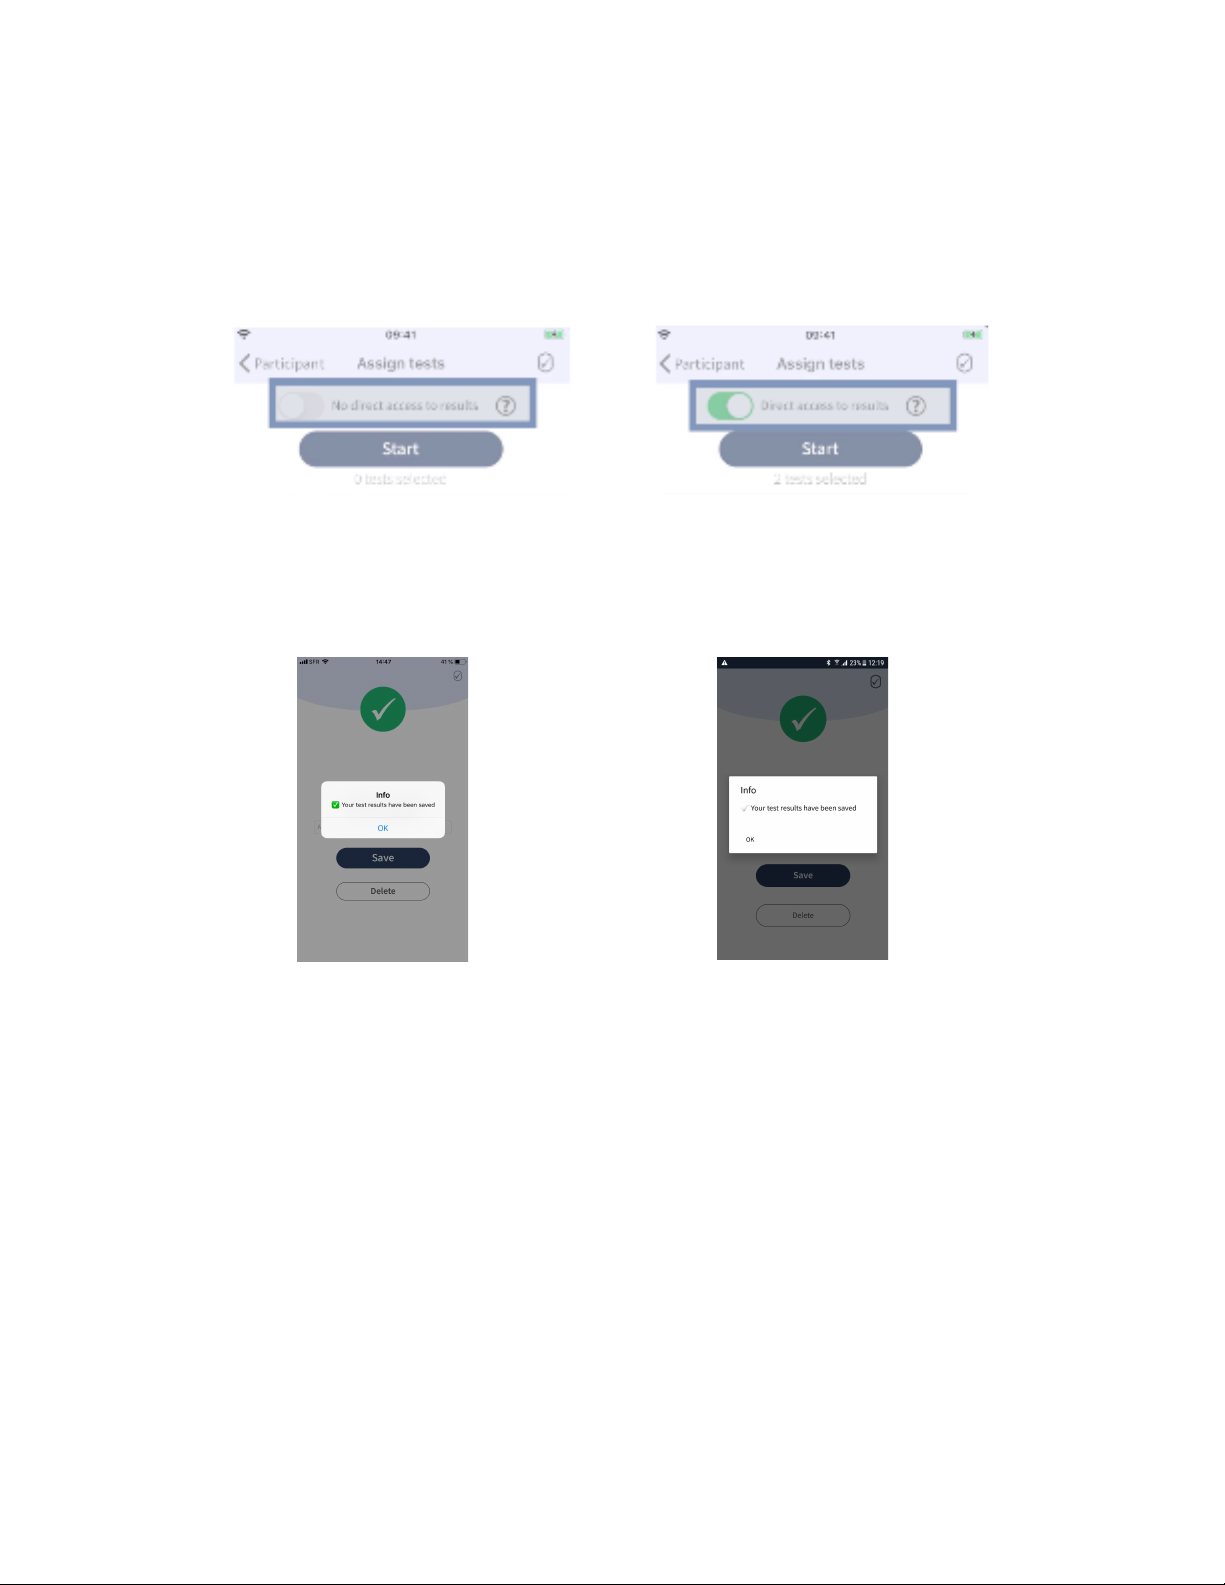
Limited admin mode - Direct access to results is activated: the user can spend credits and display the
test report directly after performing and saving a test. This direct access needs to be activated by the
medical professional before starting a new session (see section 4.5.6 - “Limited Admin mode”).
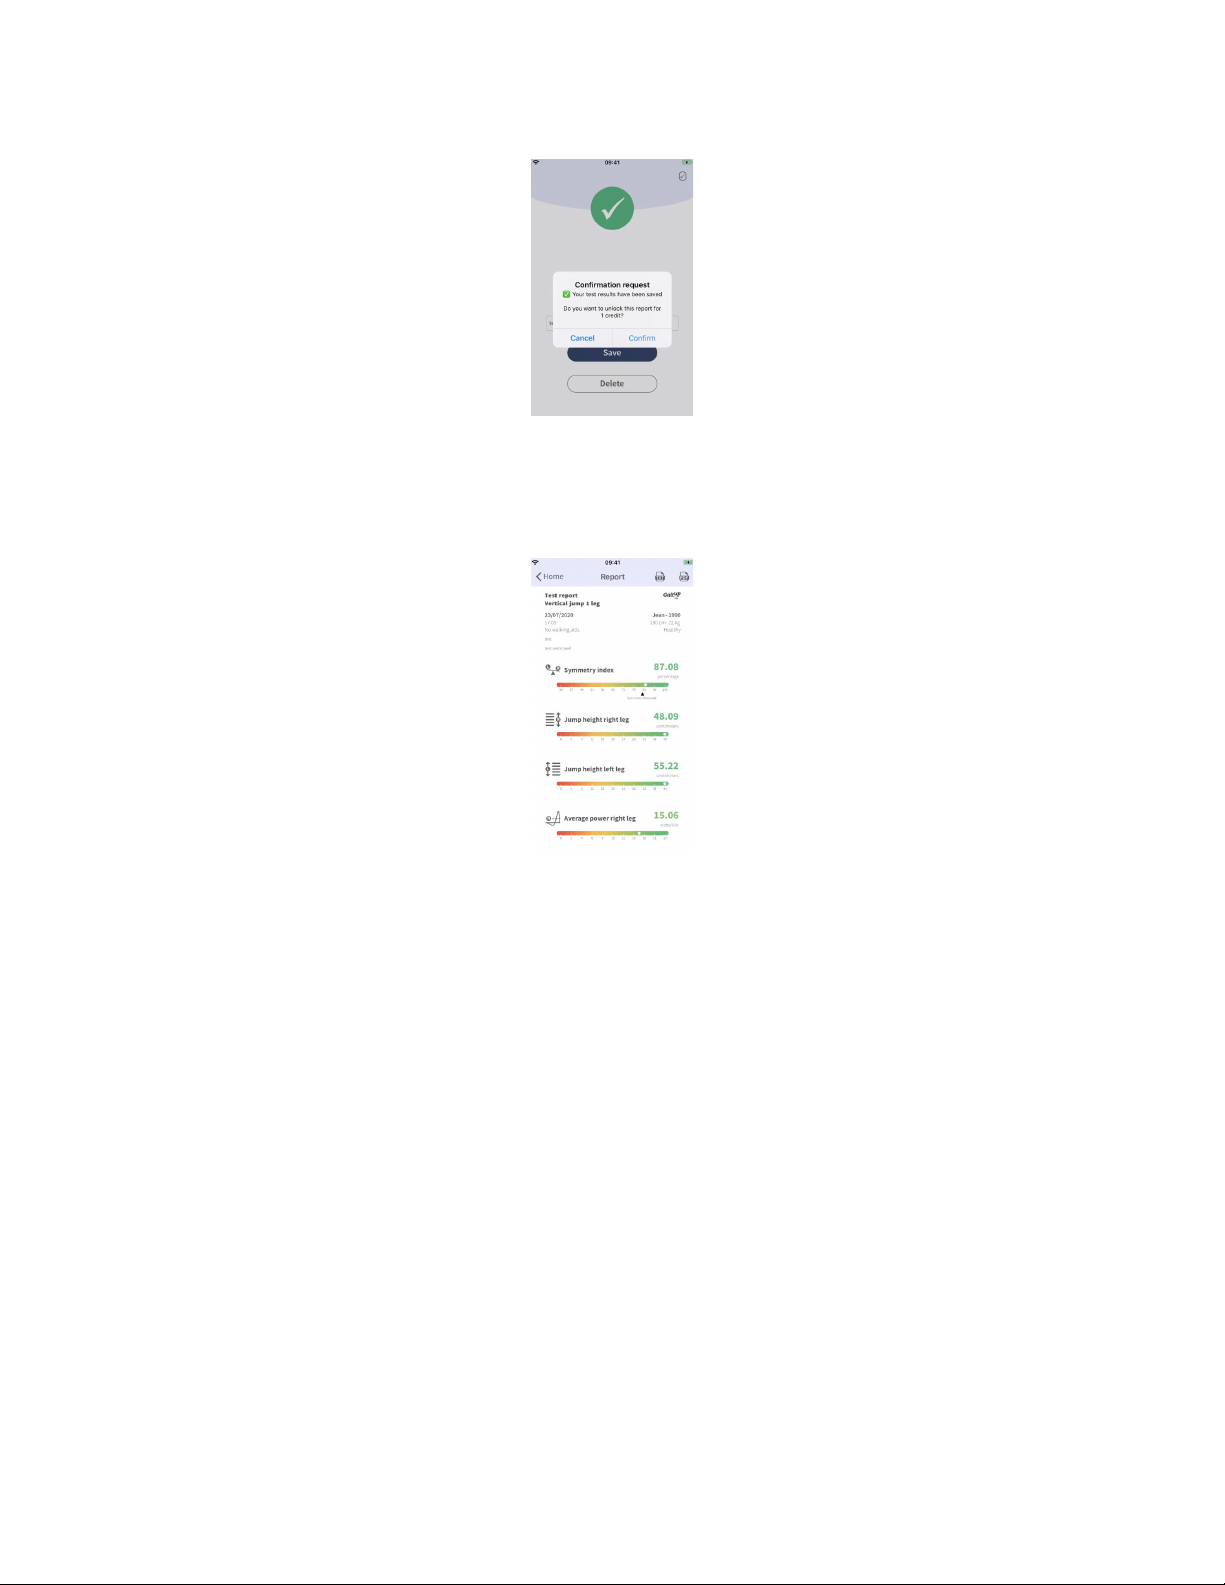
Generated reports must always be analysed and interpreted by a medical professional.
Inside password protected space - Direct access to results inactivated by the medical professional:
the user cannot generate a test report directly at the end of the test. In order to generate the report for
the performed test, it is required to login to the password protected part of the Gait Up GO mobile
application. This must always be done by the medical professional.
The two modes respond to different use scenarios. The unlimited admin mode with direct access to
results is useful during therapy sessions where the medical professional is using the device to assess a
Participant and wants to see the report immediately after the test. For the home use case where the
Participant is using the device without physical presence of the medical professional, the inactivation
of direct access to the result allows the medical professional to control the spending of credits from his
account. In addition, it ensures that the Participant is not confronted to the results without the
presence of a medical professional who can interpret and explain the outcomes to the Participant.
Generate a report using Limited admin mode (direct access to the results)
If the “Direct access to results” is activated, the participant will be able to spend credits and access the
reports immediately at the end of the test after clicking “Save”. After saving the test result, a
confirmation request is displayed. If “Confirm” is selected, the report will be unlocked by using one
credit and it will be displayed inside the Gait Up GO mobile application.
NOTE: for tests performed with a Physilog6 sensor accessory linked to an unlimited license, the report
will automatically be displayed after clicking “Save”, if the direct access to reports is activated.
ENGLISH
54/84

Fig. 75. Confirmation request - iOS
NOTE: In order to generate reports, the Gait Up GO Mobile Application needs to be connected to the
Internet by using WiFi or mobile data.
Fig. 76. Report generated - iOS - Android
After generating the report, it will always be available inside the password protected space (see
section 4.5.8).
Generate and manage reports inside the password protected part
In order to access and manage all past reports and generate reports in case the direct access to results
is not activated, the medical professional needs to login to the password protected part of the Gait Up
GO mobile application.
Go to the login screen by pressing the “Login” or back button. The medical professional logs in with
his/her account used to start the assessment session. Then the participant for which a report should
be displayed can be selected from the Dashboard and the associated test results opened by clicking on
“Reports”.
ENGLISH
55/84

Fig. 77. How to access the report in the password protected part - iOS
Fig. 78. How to access the report in the password protected part - Android
The reports are ordered according to their date with the most recent at the top. Newly performed tests
for which the report has not yet been generated appear with a lock sign. To generate the report, select
the report from the list. A confirmation message allows to validate the spending of one credit to
generate and unlock the report.
NOTE: All tests recorded with a Physilog6 attributed to an unlimited license are automatically
unlocked.
NOTE: In order to generate reports, the Gait Up GO Mobile Application needs to be connected to the
Internet by using WiFi or mobile data.
NOTE: A report which was unlocked once stays unlocked for the future, each report needs to be paid
for only once and can be displayed as many times as wished.
The report list can be filtered according to the test name using the search bar like on the Dashboard
screen.
ENGLISH
56/84

It is highly recommended to save the results to the patient folder and/or the medical
professional’s computer. The data collected using Gait Up GO is locally stored on the
mobile phone / tablet and the loss or damage of said mobile device implies that the
results are no longer accessible.
Delete a report
It is possible to delete reports from the list of reports available for a given Participant. Reports are
deleted from the list by sliding the list entry to the left or right of the screen. To permanently delete the
report, press confirm in the pop-up window. Be careful, deleted reports cannot be recovered and will
no longer appear in report comparisons (see section 4.5.9.). It is recommended to save all reports to a
computer to avoid loss of data due to bad manipulation inside the Gait Up GO mobile application (see
section 4.5.8). Credits spent to unlock reports are not restituted when deleting a report.
Fig. 79. How to delete a report - iOS
Fig. 80. How to delete a report - Android
ENGLISH
57/84

Sharing a report
The Gait Up GO mobile application should never serve as a storage unit for the generated reports. Each
time a report is generated for a specific patient, it is recommended that it is shared and saved in a
computer where the Participant folder is located.
To share the reports, tap on the text or pdf symbols located in the upper right corner of the screen.
There are different sharing options such as via email or bluetooth.
Fig. 81. How to share a report - iOS
Fig. 82. How to share a report - Android
Report interpretation
Each test provides a given set of result parameters which are presented in a test report.
ENGLISH
58/84

Fig. 83. Test report example and its components
Report component
Description
a) Test name
Name of the performed test
b) Test date
Date and time when the test was performed
c) Participant
information
Summary of participant information including:
●Name
●Birth year
●Height and weight
●Use or not of Walking aid
●Health condition
d) Comments
The comment added to the participant profile and the comment added at
the end of the test
e) Clinical result
The first result is for all tests the main clinical result associated with the
clinical test. This is the result obtained from performing the same clinical
test without Gait Up GO medical device.
f) Test result value
Result value for a given parameter. The color adapts accordingly to the
ENGLISH
59/84

Table 5. List of report components and their description
The report can be exported by pressing the text or pdf icon on the top right hand corner. This allows
for example to send the report directly to an electronic patient folder or share the result via email.
4.5.9. Report comparison
The “History” button accessible from the participant profile screen allows to open the report
comparison view of the Gait Up GO mobile application.
For each test assigned to a specific Participant for which at least two reports have been generated, a
comparison of the results is possible. The history is available when several reports of the same test
have been generated for the same Participant. This feature allows the Healthcare Professional to have
and visualise factual data about the progression of the Participant over the time.
It is possible to export history reports into pdf or text format for sharing and sending it to a computer
or electronic patient record file.
position of the result on the colorbar. The units of the result value are also
indicated.
g) Normative
threshold value
For some result parameters, specific values are highlighted by a triangle
below the colored bar. These are threshold values which indicate interesting
reference points such as the average of the population of the same age or
physiological reference values.
h) Colorbar based on
literature normative
values
All result parameters are displayed with respect to normative data from
scientific literature. Where the color is red means that the achieved result is
poor compared to Participants of similar age and health condition (if
literature is available). Results in the green area are equal or better than the
result of similar Participants presented in the literature.
i) Additional results
Additional result parameters which are calculated thanks to Gait Up GO and
the presence of the Physilog6 sensor which records the movement data
during the test.
ENGLISH
60/84

Fig. 84. How to access to the “History” section - iOS
Fig. 85. How to access to the “History” section - Android
Comparison report interpretation
ENGLISH
61/84

Fig. 86. Comparison report example and its components
Table 6. List of comparison report components and their description
Report component
Description
a) Test name
Name of the performed test
b) Participant
information
Summary of participant information including:
●Name
●Gender
●Birth year
●Height
c) Parameter name
Name of the result parameter with its icon
d) Result values
For each report generated for this test and participant, the test result value
of the parameter is displayed. A line is drawn between values in order to
visualize the evolution of the test result.
e) Test dates
For each test result value the date at which the test has been performed is
shown. The order of displayed results is chronological with the most recent
on the right side.
ENGLISH
62/84

5. CLEANING, MAINTENANCE AND STORAGE
Please, refer to section 1 Safety Information.
Both, the Physilog6 sensor device and the clip accessories can be manually cleaned and disinfected
carefully using wipes with different chemicals (available at drugstore or pharmacy) detailed under
section 5.1 of the present document.
5.1. Cleaning
Clean and disinfect the Physilog6 sensor device and the clip accessories before the first use at home as
follows:
●Unpair the Physilog6 sensor device from the Mobile Application by closing the Gait Up GO
mobile application prior to cleaning
●Unclick the Physilog6 sensor device from the clip accessories prior to cleaning
●Unplug the Physilog6 sensor device from the USB cable/power prior to cleaning
●Use Hydrogen peroxide 3%, bleach solution 50% or saline solution to clean and disinfect the
Physilog6 sensor device’s clip accessories. Do not use a cleaning spray, but carefully wipe it
using a humid wipe.
●Use 96% ethanol solution or 70% isopropyl solution to clean and disinfect the physilog6 sensor
device’s plastic enclosure. Do not use a cleaning spray, but carefully wipe it using a humid
wipe.
●Liquids and foreign material (e.g. dust) must not be allowed to enter the Physilog6 accessory
device. Do not clean the device with excessive liquid.
●Ensure that the Physilog6 sensor device and the clip accessories are dry prior to being used
again.
5.2. Maintenance
The Gait Up GO medical device is tested and calibrated prior to distribution. Under normal conditions,
the characteristics of the device do not vary.
●The Physilog®6 should be handled carefully.
●If the Gait Up GO medical device (incl. all its accessories) shows functional instabilities or any
visual defects, stop using it and contact the customer service.
The Physilog®6 firmware is updated using the Gait Up GO mobile application provided by Gait Up SA
according to the instructions of use section 4.5.5.
The Physilog®6 sensor device does not include any consumables (one-time use).
The fixation clips used to fix the Physilog6 sensor device on the Participant’s body are spare parts. If
they get damaged, please contact Gait Up SA support to purchase new ones.
ENGLISH
63/84

5.3. Storing and transporting the device
●Do not store the Physilog6 sensor device connected to the USB cable.
●Unclip the Physilog6 sensor device from the shoelace clip accessory before storing it.
●Place all components within the original packaging, each of them in its dedicated space inside
the casing.
●Store it in a cool (-20 - +60°C) and dry place at a stable temperature and ambient humidity
(25%-70%, non-condensing).
5.4. Environmental conditions for operation.
The Gait Up GO medical device must be used in accordance with the following conditions:
●Temperature: [0-30] °C
●Humidity: [10-70]%
●Pressure: [600-1070] hPA
The Gait Up GO medical device must be stored in accordance with the following conditions:
●Temperature: [-20-+60]°C
●Humidity: [25-70]%
●Pressure: [600-1070] hPA
The Gait Up GO medical device must be transported in accordance with the following conditions:
●Temperature: [-20-60]°C
●Humidity: [25-70]%
●Pressure: [600-1070] hPA
ENGLISH
64/84

6. TROUBLESHOOTING
What do you
see/hear
Problem
What to do
More Information
The Gait Up GO
mobile
application
displays an error
pop-up after you
select a test,
indicating that it
cannot connect to
the Physilog6
sensor device
There is a
problem with
the connection
to the
Physilog6
sensor device
Make sure that the
sensor device accessory
is in proximity of your
mobile device.
Control that the sensor
device accessory has
enough battery to be
connected to the
application.
Click on the sensor
information button ( )
to check that the linked
sensor device accessory
corresponds to the
sensor in your
possession (last four
digits of serial number on
the back of the sensor
corresponding to the
number indicated in the
mobile application).
Before handing a Gait Up GO
device to a Participant for
independent use, make sure
that the linked sensor
corresponds to the sensor
device accessory you provide
and is correctly connecting
to the mobile application.
The setting of the linked
sensor device accessory is
managed inside the
password protected part of
the application to which the
end user does not have
access.
The Gait Up GO
mobile
application
displays an error
pop-up after you
select a test,
indicating that the
sensor device
accessory has
incompatible
firmware
The Physilog6
sensor device
accessory has
incompatible
firmware
version.
Update the sensor device
firmware by pressing the
"Update Physilog"
button.
This error can appear during
the first use after you update
the Gait Up GO mobile device
or after installation of the
application on a new mobile
device.
The Gait Up GO
mobile
application
There is a
problem with
the Physilog6
The recording is
interrupted,
acknowledge the error
Depending on the problem,
the error message will
display a recommendation
ENGLISH
65/84

Table 7. Troubleshooting
When and how to perform a manual reset of the Physilog6 sensor device accessory
In case the Physilog6 sensor cannot be connected to the Gait Up GO mobile application, after
controlling that the correct sensor is linked, that it has enough battery and is in proximity and after
restarting the Gait Up GO mobile application, a reset of the Physilog6 device can solve the problem.
•Unplug Physilog6 if it is charging.
• Press the sensor button for 15 seconds, it will blink orange and beep.
•Release the button and wait until the blinking stops.
indicates an error
pop-up during a
recording
sensor device
accessory
message inside the Gait
Up GO mobile
application and follow
the recommendation in
the error message.
to the user. It can be for
example that the sensor
device accessory does not
have enough battery to start
or continue a recording and
that you should recharge it.
In case that the mobile
application can solve the
sensor device accessory
problem on it's own, the
sensor device accessory will
perform a reset without your
intervention and a new
recording can be started.
The Physilog6
sensor device
accessory emits a
beep sound and
briefly blinks red
and orange
The Physilog6
sensor device
accessory has
performed a
reset
Nothing needs to be
done, the sensor device
accessory just solved its
issue on its own.
The Gait Up GO mobile
application can trigger a
reset of the sensor device
accessory without your
intervention if it detects a
problem.
The Physilog6
sensor device
accessory is
blinking yellow
during the
recording
The battery of
the sensor
device
accessory is
getting low
Complete the test, then
recharge the sensor
device accessory
During recording, the sensor
device accessory normally
blinks green. If the battery
gets low, the blinking turns
orange.
ENGLISH
66/84

Customer Support
The customer support is provided by:
Gait Up SA
EPFL Innovation Park
Bâtiment C
CH-1015 Lausanne
Switzerland
Phone: +41 21 633 7527 (office hours: 8h30 to 17h30 CET, Monday to Friday)
General contact email: [email protected]
Email: [email protected]
Reporting an adverse event
If any serious incident occurs that is directly or indirectly related to the use of Gait Up GO medical
device, please report it immediately to the legal manufacturer (Mindmaze SA) and to the competent
authority of your country and of where the Participant is established (if different).
ENGLISH
67/84

7. WARRANTY
30 Days Return Policy:
If you are not satisfied with any Gait Up product that you have purchased directly from Gait Up you can
return the product within 30 days following the date of shipment by Gait Up. If the item is returned
unused, undamaged, and in its original condition we will exchange it or offer a refund of the purchase
price paid. All returned products must be packed in the original packaging including any accessories,
manuals, documentation, and registration that shipped with the product. Damage and missing part
restocking fees may apply. Shipping and handling charges, as well as taxes paid (e.g., state, customs,
VAT) are not refundable. You are responsible for and must prepay all shipping charges and you shall
assume all risk of loss or damage to the product while in transit to Gait Up.
24 Months Limited Warranty:
Gait Up warrants all products sold or offered directly by Gait Up against defects in materials and
workmanship under normal use for a period of 24 months from the date of retail purchase by the
original purchaser (“Warranty Period”). Under this warranty, if a defect arises and a valid claim is
received by Gait Up within the Warranty Period, at its option and to the extent permitted by law, Gait
Up will either (1) repair the product at no charge, using new or refurbished replacement parts or (2)
exchange the product with a new or refurbished product. A replacement product or part assumes the
remaining warranty of the original product. To obtain warranty service, you must deliver the product
at your expense, to the address specified by Gait Up. For specific instructions on how to obtain
that the operation of the product will be uninterrupted or error-free and is not responsible for damage
arising from failure to follow instructions relating to proper usage of the product. This warranty does
not apply to a product or part of a product that has been altered or modified. In addition, this warranty
does not apply: (a) to damage caused by use with non-Gait Up products; (b) to damage caused by
accident, abuse, misuse, flood, fire, earthquake or other external causes; (c) to damage caused by
operating the product outside of the permitted or intended uses described by Gait Up or with
improper voltage or power supply; or (d) to damage caused by service (including upgrades and
expansions) performed by anyone who is not a representative of Gait Up. Recovery and reinstallation
of software programs and user data are not covered under this warranty.
Occasionally Gait Up engages in more interactive support or consulting. Interactive support is at
customer courtesy and is provided at Gait Up’s discretion. It does not invalidate the support policy
described above. There is no guarantee of performance, timeliness, or establishment of a continuous
support relationship. Consulting is subject to acceptance of a formal statement of work.
Warranty and Support conditions may change without prior notice. Please refer to the Sales terms and
conditions on Gait Up’s website.
8. DISPOSAL
The expected service life of the Gait Up GO medical device and all its accessories is 2 years of normal
usage (300 assessment sessions per month under the specified operating conditions).
ENGLISH
68/84

Disposal of Gait Up GO medical device (incl. all its accessories)
The Gait Up GO medical device is composed of electrical and electronic components such as the
battery included in the Physilog6 sensor device.
In case of rejection, it is recommended to follow this procedure:
●Clean carefully the Physilog6 sensor device and the clip accessories following the cleaning
procedure described under section 5
●Contact Gait Up SA customer support to get shipping information
Gait Up SA will take care of the treatment, collection, recycling and disposal of all the components of
the Gait Up GO medical device.
ENGLISH
69/84
Other manuals for GAIT UP GO
3
Table of contents
Other Gait up Personal Care Product manuals
Popular Personal Care Product manuals by other brands

American Standard
American Standard Elongated Toilet Seat 5284.016 Specification sheet

Philips
Philips sonicare AirFloss Ultra instructions

Beurer
Beurer FM 100 Instructions for use

Lanaform
Lanaform Perfect Nail manual

Happy Electronics
Happy Electronics Victory Bluetooth user guide

SAFEHIP
SAFEHIP ACTIVE quick start guide