GAL A X Y AUDIO Quick Start Guide
TQ6
Battery Powered Traveler Quest PA System
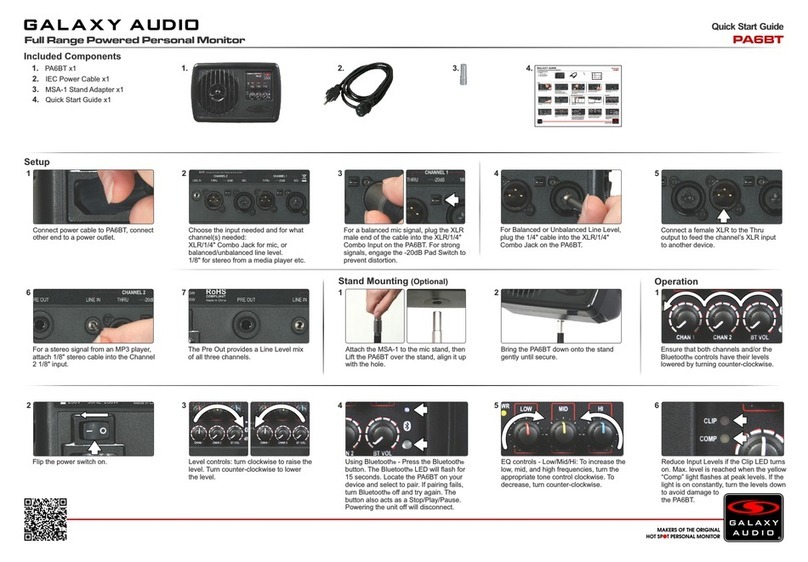
Included Components
1. TQ6 x1
4. Quick Start Guide x1
3. IEC Power Cable x1
Connect power cable to TQ6, connect
other end to a power outlet to charge
immediately. Once charged, the TQ6 can
be operated on AC or Battery Power.
2
Connect your microphone to CH1 with
an XLR Cable, or connect a Stereo Line
Level source to the CH2 RCA inputs.
3
The 1/4" Line Output can be used to
send the TQ6 audio to another sound
system or recorder.
2
Setup
1
Lift the TQ6 over the speaker stand
and align the speaker pole with the pole
socket on the bottom of the TQ6.
Power on the TQ6 by pressing the
power switch into the ON position. The
Power LED will light up.
2
Operation
1
Start with the Master Level set about
mid-way, and the Tone set mid-way
between Treble and Bass. All other level
controls should be turned down (counter-
clockwise to lower, clockwise to increase).
Stand Mounting (Optional)
1
6
MP3 Player Power/Modes: Power on the
built-in MP3 player by pressing and
holding the Power/Mode button. Press
Mode button to switch between SD, USB,
and Bluetooth modes.
7
MP3 Player Skip/Volume: Skip forward or
backward between tracks by pressing the
skip buttons. Holding the buttons down
will increase or decrease the volume.
The level is also controlled by the MP3
Level knob.
3
Level control: Use the Channel Level
control to raise your input to the desired
level. If needed, the Master Level can
be raised.
MP3 Player Repeat: Pressing the
Repeat button once will repeat the current
track. Pressing a 2nd time will repeat a
folder. Pressing a 3rd time will repeat all.
Press once more and the repeat function
will be turned off.
4.
1.
Bring the TQ6 down onto the speaker
stand gently until it is fully inserted.
4
To adjust the Tone, turn the Tone knob
clockwise for more Bass, or turn the knob
counter-clockwise for more Treble.
5
Raise the Echo Level to add echo to the
mic input source.
8
MP3 Player Play/Pause/Folder: Pressing
Play/Pause will either play or pause the
audio. Press and Hold the button for the
Folder function. You can switch between
folders in an SD or USB device.
9
MP3 Player Bluetooth: In Bluetooth
mode, pairing is activated. Make sure
your Bluetooth enabled Smart Device is
on. Find the TQ6 in the device list, then
select it to pair.
10
3.2.
2. Remote x1
GAL AX Y AUDIO Quick Start Guide
TQ6
Battery Powered Traveler Quest PA System
Included Components
1. TQ6 x1
4. Quick Start Guide x1
3. IEC Power Cable x1
Connect power cable to TQ6, connect
other end to a power outlet to charge
immediately. Once charged, the TQ6 can
be operated on AC or Battery Power.
2
Connect your microphone to CH1 with
an XLR Cable, or connect a Stereo Line
Level source to the CH2 RCA inputs.
3
The 1/4" Line Output can be used to
send the TQ6 audio to another sound
system or recorder.
2
Setup
1
Lift the TQ6 over the speaker stand
and align the speaker pole with the pole
socket on the bottom of the TQ6.
Power on the TQ6 by pressing the
power switch into the ON position. The
Power LED will light up.
2
Operation
1
Start with the Master Level set about
mid-way, and the Tone set mid-way
between Treble and Bass. All other level
controls should be turned down (counter-
clockwise to lower, clockwise to increase).
Stand Mounting (Optional)
1
6
MP3 Player Power/Modes: Power on the
built-in MP3 player by pressing and
holding the Power/Mode button. Press
Mode button to switch between SD, USB,
and Bluetooth modes.
7
MP3 Player Skip/Volume: Skip forward or
backward between tracks by pressing the
skip buttons. Holding the buttons down
will increase or decrease the volume.
The level is also controlled by the MP3
Level knob.
3
Level control: Use the Channel Level
control to raise your input to the desired
level. If needed, the Master Level can
be raised.
MP3 Player Repeat: Pressing the
Repeat button once will repeat the current
track. Pressing a 2nd time will repeat a
folder. Pressing a 3rd time will repeat all.
Press once more and the repeat function
will be turned off.
4.
1.
Bring the TQ6 down onto the speaker
stand gently until it is fully inserted.
4
To adjust the Tone, turn the Tone knob
clockwise for more Bass, or turn the knob
counter-clockwise for more Treble.
5
Raise the Echo Level to add echo to the
mic input source.
8
MP3 Player Play/Pause/Folder: Pressing
Play/Pause will either play or pause the
audio. Press and Hold the button for the
Folder function. You can switch between
folders in an SD or USB device.
9
MP3 Player Bluetooth: In Bluetooth
mode, pairing is activated. Make sure
your Bluetooth enabled Smart Device is
on. Find the TQ6 in the device list, then
select it to pair.
10
3.2.
2. Remote x1
