Game On Sport SAFETY NET User manual

V
EILIGHEIDSNET
Montage handleiding
Service & info: www.gameonsport.com

Toezicht van een volwassene: *Alleen een volwassene dient dit net op te zetten.
*Zorg voor toezicht van een volwassene als kinderen spelen op een
trampoline met safety net.
Bescherm spelende kinderen: *Voorkom valpartijen en verstikking: gebruik alleen de ingang om in/uit
de trampoline te klimmen.
*Help jonge kinderen bij het in/uitklimmen.
SAFETY NETVOOR TRAMPOLINES
LEES DEZE HANDLEIDING DOORVOORDAT U MET DE
MONTAGE BEGINT.

INHOUDVAN DIT PAKKET:
Nummer Omschrijving 305/366/396/423/457/488 cm
(6 poten)
305/366/396/423/457 cm
(5 poten)
305/366/396/423 cm
(4 poten)
183/244/305 cm
(3 poten)
1 Gegalvaniseerde buis 6 of 12 stuks 5 of 10 stuks 4 of 8 stuks 3 of 6 stuks
2 Gegalvaniseerde buis 6 of 12 stuks 5 of 10 stuks 4 of 8 stuks 3 of 6 stuks
3 Klemhuls met schroeven 6 of 12 stuks 5 of 10 stuks 4 of 8 stuks 3 of 6 stuks
4 Stop 6 of 12 stuks 5 of 10 stuks 4 of 8 stuks 3 of 6 stuks
5 Tube Ø 42 mm 6 of 12 stuks 5 of 10 stuks 4 of 8 stuks 3 of 6 stuks
6 Tube Ø 38 mm 6 of 12 stuks 5 of 10 stuks 4 of 8 stuks 3 of 6 stuks
7 Safety Net 1 stuks 1 stuks 1 stuks 1 stuks
8 Afstandhouder 6 of 12 stuks 5 of 10 stuks 4 of 8 stuks 3 of 6 stuks
9 Dop 6 of 12 stuks 5 of 10 stuks 4 of 8 stuks 3 of 6 stuks
10 Buis hoezen 6 of 12 stuks 5 of 10 stuks 4 of 8 stuks 3 of 6 stuks
11 Meetlint 1 stuks 1 stuks 1 stuks 1 stuks
ONDERDELENSCHEMA:
Gegalvaniseerde buis:
1.
2.
3.Klemhulsmetschroeven 4.Stop 5.
Tube Ø 42 mm 6.Tube Ø 42 mm
7.SafetyNet 8.Afstandhouder 9.Dop
10.Buishoezen
11. Meetlint
MONTAGE INSTRUCTIES

STAP 1:
Meet de doorsnede van de poten van de trampoline met het bijgeleverde meetlint.Voor diameter Ø 48 mm,zie afbeelding
A1A, voor Ø 42 mm zie afbeelding A1B en voor Ø 38 mm zie afbeelding A1C.Voor een gemakkelijke montage kunt u de
beschermrand aan de onderzijde losmaken.
- 1 -
MONTAGE INSTRUCTIES
A1A
A3
A1B A1C

STAP 2:
Steek buizen 1 en 2 in elkaar zoals op afbeelding 1. Schuif de buis in de hoes (afb. 2) en bevestig een dop aan het uiteinde.
(afb. 3)
STEP 3:
Als de diameter van het frame Ø 42 mm of Ø 38 mm is, plaatst u de afstandhouder (onderdeel 8) tussen het trampoline
frame en de klemhuls om de verbinding steviger te maken. (Zie afbeelding A4).Als de diameter Ø 48 mm of Ø 45 mm is,
monteert u de klemhuls zonder afstandhouder.(Zie afbeelding A5.) Als de klemhulzen zijn gemonteerd,schuift u de buizen
in de klemhuls tot in de stop. Draai hierna alle schroeven aan,
MONTAGE INSTRUCTIES
Afb. 1
Afb. 2
Afb. 3

STAP 3: Spreid het net uit op de mat van de trampoline (zie afbeelding 5). Zoek het gedeelte met de ingang en leg dit iop
de plek waar u de ingang wilt hebben. De rand met de ingenaaide lussen is de bovenzijde. Haak deze lussen om de
bovenkant van de staanders. (Zie afbeelding B, B1 en B2.)
STAP 4: (kies welke van toepassing is op uw net)
Clip de haken aan het net aan de
V-ringen van de trampoline, zoals
in afbeelding A en B.
Clip de haken aan het net aan de
V-ringen van de trampoline, zoals in
afbeelding A en B.
Afb. 5
MONTAGE INSTRUCTIESVOOR HET NET

STAP 5: Plaats de haakjes in de V-ringen zoals in Figuur 6.
STAP 6:Als u bij de laatste haken bent aangekomen, heeft u meer kracht nodig om het net naar beneden te trekken.
Extra hulp van 2 volwassenen kan nodig zijn.
IMPORTANT WARNING!!
GA TERUG EN CONTROLEER OF ALLE HAKEN GOED VAST ZITTEN, OF ALLE SCHARNIEREN GOED VAST
ZITTEN EN OF ALLE SCHROEVEN GOED ZIJN AANGEDRAAID, ZODAT HET NET STRAK GESPANNEN
STAAT. DIT IS NOODZZAKELIJK VOOR EEN GOEDE WERKING VAN HET NET.
!
Afb. 6
Afb. 7

WAARSCHUWING – ALGEMEENVEILIGHEIDSADVIES
Lees deze aanwijzingen voor het gebruik, en bewaar ze om ze laten nogmaals te kunnen lezen.
Zorg ervoor dat het net door volwassenen in elkaar is gezet, volgens de instructies in de handleiding.
Kinderen mogen NOOIT de trampoline gebruiken zonder toezicht van een volwassene met verstand van
trampoline springen.
Laat kinderen NOOIT zonder toezicht in het veiligheidsnet.
Volg ALTIJD de veiligheidsinstructies van uw trampoline en veiligheidsnet op.
Klim, hang en spring NOOIT op/tegen de wanden van het net.
Gebruik het net niet als het materiaal beschadigd raak.
Het net is ALEEN bedoeld om te voorkomen dat kinderen van de trampoline vallen en zich bezeren.
Laat kinderen GEEN speelgoed of andere dingen meenemen in het veiligheidsnet.
Gebruik
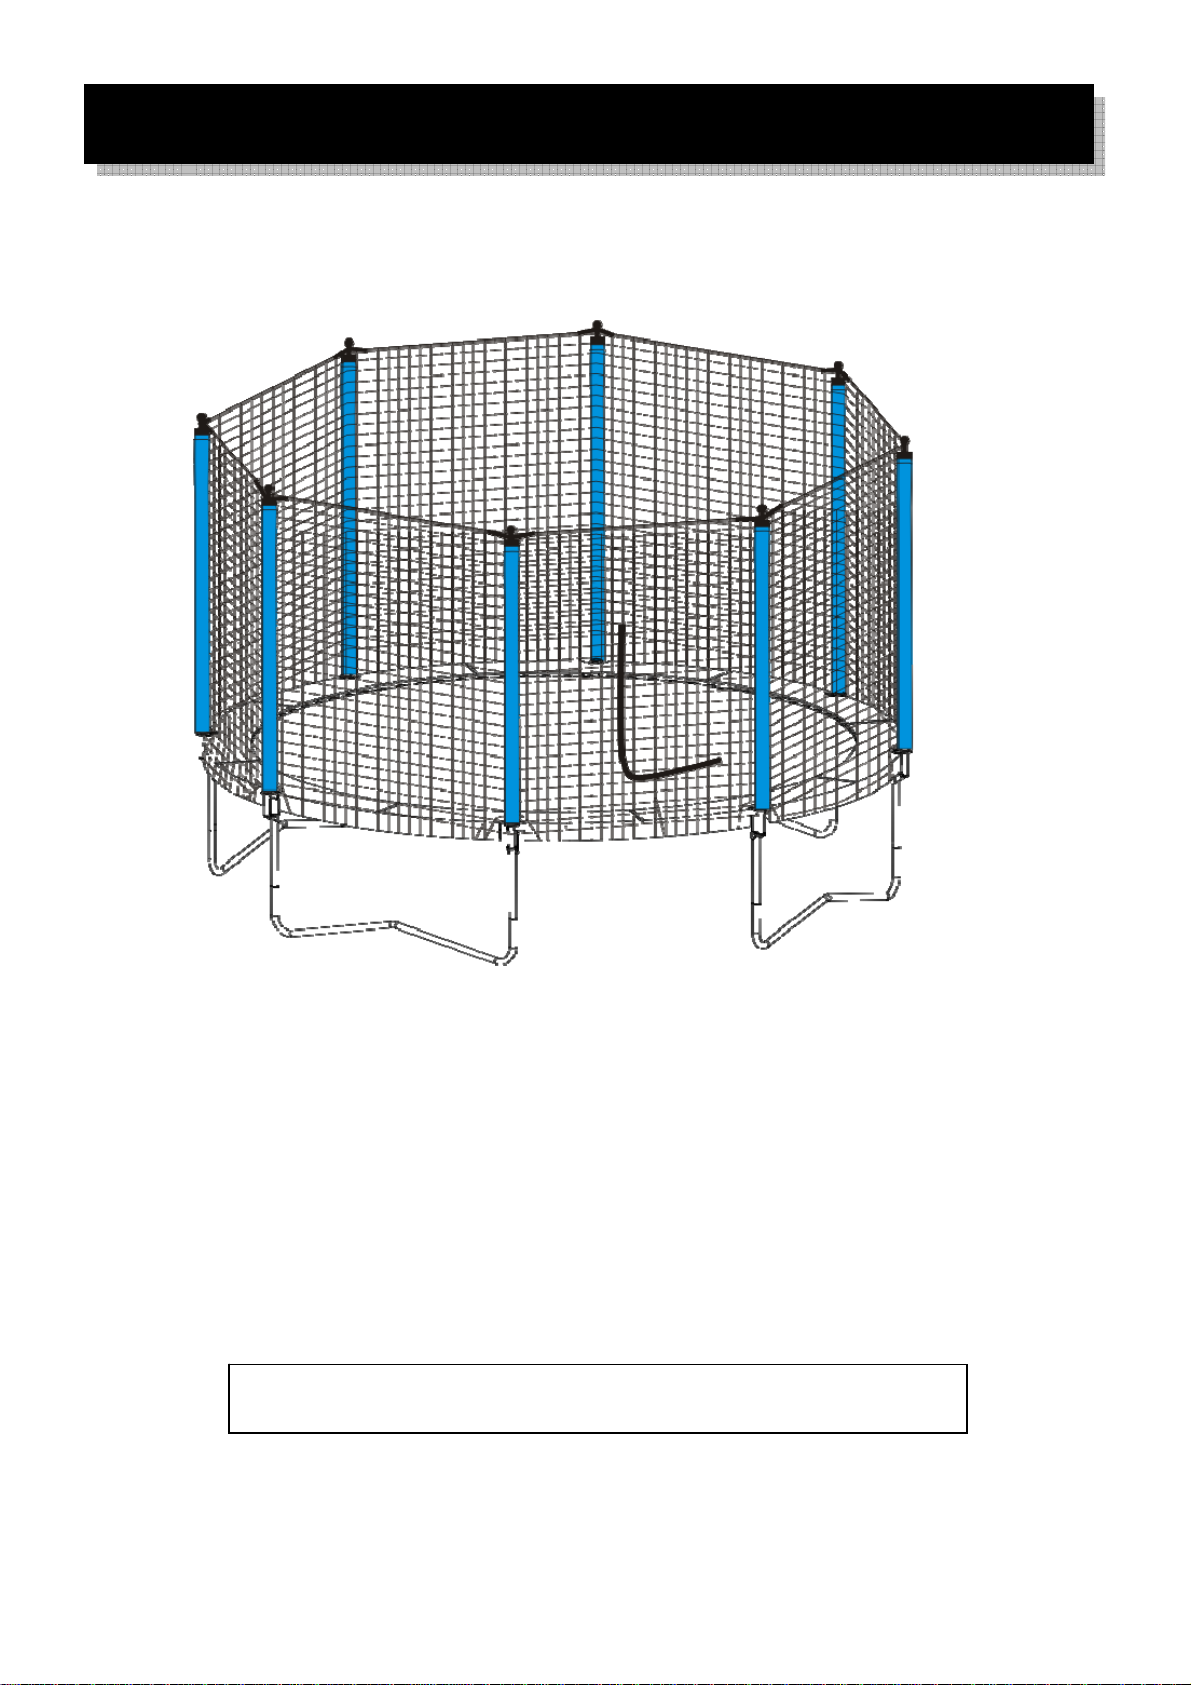
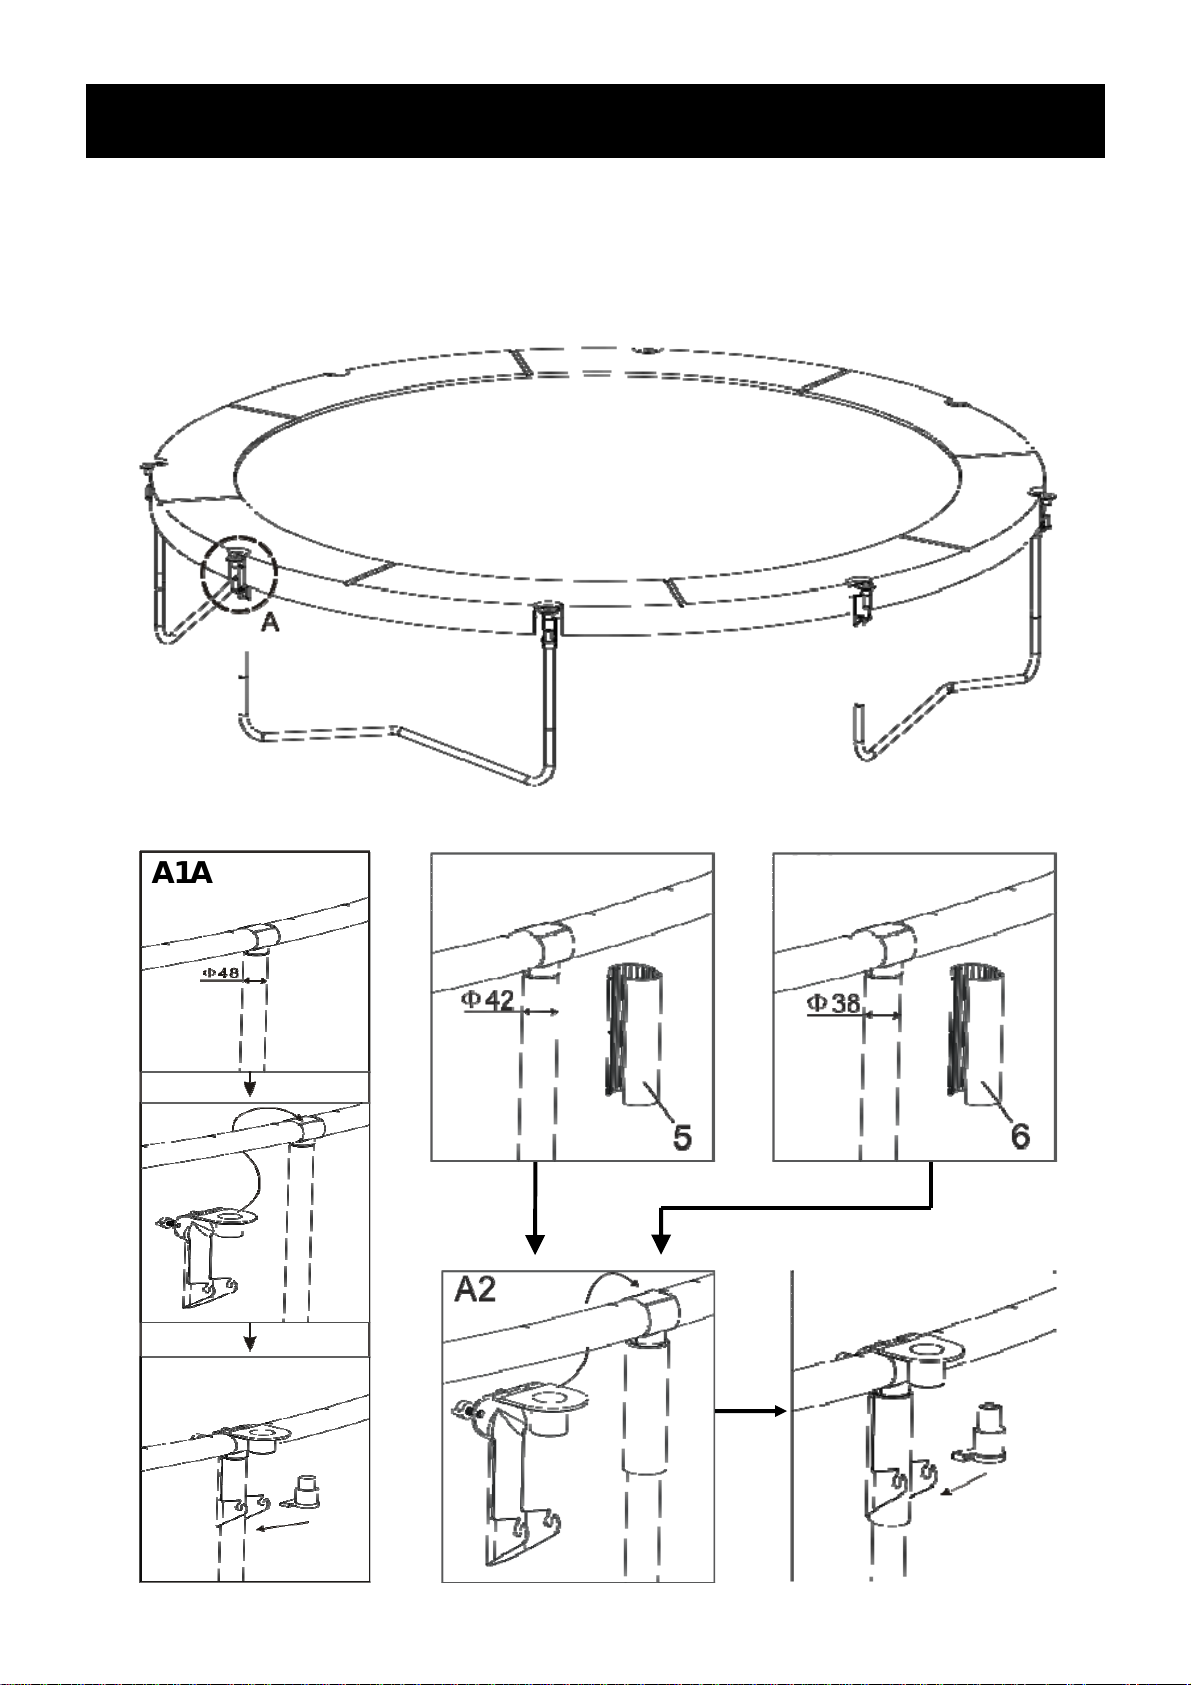
Montage instructies – dit veiligheidsnet moet door een volwassene in elkaar worden gezet. Het net moet precies
volgend de handleiding in elkaar worden gezet. Het in elkaar zetten is makkelijker met de hulp van een tweede
volwassene. Dit net bevat kleine onderdelen en is daardoor niet geschikt voor kinderen onder de 3 jaar.
Controleer alle onderdelen voordat u met de montage begint. Als er onderdelen ontbreken,zet het net dan niet in
elkaar voordat u reserve onderdelen hebt gekregen.
Veiligheidsinformatie
Dit veiligheidsnet is ontworpen voor thuisgebruik door kinderen van 6 jaar of ouder. Het net is niet gemaakt om
tegenaan te stuiteren. Het is ontworpen als veiligheidsnet om de in- en uitgang te bewaken, en om springers
zelfvertrouwen, balans en coördinatie te leren zonder het risico van de trampoline af te vallen.
Children should not wear cycle helmets while playing on the trampoline.
Het frame van uw trampoline is van metaal en geleidt elektriciteit. Neem geen elektrische apparaten (lampen,
verwarmingselementen, verlengsnoeren, huishoudelijke apparaten, etc.) mee in het veiligheidsnet om elektrocutie te
vermijden.
Laat nooit meer dan 1 persoon tegelijk op de trampoline. Meerdere springers kunnen tegen elkaar botsen wat tot
verwonding kan leiden.
Uw trampoline staat boven de grond, dus er is een risico dat kinderen zich bezeren bij het naar buiten klimmen. Door de
opening in het veiligheidsnet. Assisteer kinderen bij het in/uitklimmen van het net. Gebruik alleen de ingang van het
veiligheidsnet om naar binnen/buiten te klimmen.
Onderhoud
Controleer uw product regelmatig, minstens 1 keer per maand. Let daarbij extra goed op verbindingen en schroeven.
Als onderdelen slijtage vertonen, dienen ze te worden vervangen.Als u dit niet doet, kan uw product defect raken en
kunnen zich ongelukken voordoen. Gebruik uw product niet totdat het correct en volledig is geïnstalleerd en
gecontroleerd.
BELANGRIJK – AUB LEZEN!

De gegalvaniseerde buisdelen kunnen onderhoud nodig hebben. Als zich roest op het oppervlak voordoet, kunt u dit
verwijderen met een staalborstel of grof schuurpapier, en daarna aflakken met niet-toxische verf.
Laat geen huisdieren op de trampoline of in het veiligheidsnet toe. Met hun nagels en tanden kunnen zij het materiaal
beschadigen.
Let op dat er geen vuur wordt gemaakt in de buurt van de trampoline of het net. Vonken en kooltjes kunnen ver worden
meegevoerd door de wind en uw trampoline of net beschadigen.
Elke grote trampoline, met of zonder veiligheidsnet, kan bij sterke wind worden omgeblazen. Onder dit soort
weersomstandigheden adviseren wij u het veiligheidsnet te verwijderen en op te bergen op een droge plaats.
Import v.d. Meulen Sneek B.V. P.O. Box 80, 8600 AB SNEEK/NL

S
A
FETY NET
Manual
Service & info: www.gameonsport.com

Adult Supervision *Adult assembly required.
*Adult supervision required for children using Safety net.
Protect Children: *Prevent falls and strangulation---Exit through the door only, and use caution.
*Assistyoung children inand outofSafetynet.
Safety net for trampoline
W
ARNING: READ AND FOLLOW THIS INSTRUCTION,
PRIORTO ASSEMBLE AND USE OF THIS E
Q
UIPMENT.

PACKAGE CONTENTS :
Reference
Number Description 305-366-396-423-457-488 cm
(6 legs)
305-366-396-423-457 cm
(5 legs)
305-366-396-423 cm
(4 legs)
183-244-305 cm
(3 legs)
1 Galvanized pipe 6 or 12 PCS 5 or 10 PCS 4 or 8 PCS 3 or 6 PCS
2 Galvanized pipe
6 or 12 PCS 5 or 10 PCS 4 or 8 PCS 3 or 6 PCS
3 Safety Net Bracket 6 or 12 PCS 5 or 10 PCS 4 or 8 PCS 3 or 6 PCS
4 Fixer 6 or 12 PCS 5 or 10 PCS 4 or 8 PCS 3 or 6 PCS
5 Φ42 Ringent Tube 6 or 12 PCS 5 or 10 PCS 4 or 8 PCS 3 or 6 PCS
6 Φ38 Ringent Tube 6 or 12 PCS 5 or 10 PCS 4 or 8 PCS 3 or 6 PCS
7 Safety Net 1 PC 1 PC 1 PC 1PC
8 Arc Washer
6 or 12 PCS 5 or 10 PCS 4 or 8 PCS 3 or 6 PCS
9 Cap 6 or 12 PCS 5 or 10 PCS 4 or 8 PCS 3 or 6 PCS
10 Pole Cover
6 or 12 PCS 5 or 10 PCS 4 or 8 PCS 3 or 6 PCS
11 Ruler 1 PC 1 PC 1 PC 1PC
DIAGRAMS FOR PARTS:
GALVANIZED PIPE:
1.
2.
OTHERS:
3.SafetyNetBracket 4.Fixer 5.Φ42RINGENTTUBE 6.Φ38 RINGENTTUBE
7.SafetyNet 8.ArcWasher 9.CAP
10. Pole Cover
11. Ruler
ASSEMBLY INSTRUCTION

STEP 1:
Please check the trampoline leg(s) tube diameter using the ruler: if they are ø48mm - please see A1a,ø42mm - please see
the A1b, and ø38mm - please see the A1c.
- 1 -
ASSEMBLY INSTRUCTION FOR PROTECTIVE NET
A1A
A3
A1B A1C

STEP 2:
PUT STEEL PIPES #1 AND #2 CONNECTED TOGETHER AS SHOWN IN FIGURE 1. MAKE POLE COVER COVER
THE STEEL PIPE AS SHOWN IN FIGURE 2.ATTACH A CAP AT THE END OF THE PIPES.
STEP 3:
PLEASE PUT THE ARC WASHER(8) BETWEEN TRAMPOLINE FRAME AND BRACKET TO FIRM (SHOWN
IN A4).
THE SUPPORT PIPES CORRESPOND ANEAR TO EACH BRACKET ORDERLY, TH EN FASTENED ALL SCREW SETS
(SHOWN IN A5).
ASSEMBLY INSTRUCTION FOR PROTECTIVE NET
FIGURE 1
FIGURE 2
FIGURE 3

STEP 3:Stretch Net Assembly (#5) out.Locate the panel with the doorway and align the net as to where you would like to
get in and out of the trampoline.The edge with the pre-sewn hanging loop is the upper part of the net and will be hooked
at the top of the pole. (See B)
STEP 4: (choose the one that is appropriate for your safety net)
ASSEMBLY INSTRUCTION FOR PROTECTIVE NET
Hang the end of hook to the
V-ring as shown A and B.
Press one side of the elasticity button,
and then hang the end of hook to the
V-ring as shown A and B.
FIGURE 5

STEP 5: Hook the net to the V-rings as as in Figure 6.
STEP 6: When you come to the last hooks (see Figure 7) you will need more force to pull down the net. Extra
help from 2 adults may be necessary.
IMPORTANT WARNING!!
YOU SHOULD GO BACK NOW AND STRETCH ALL ATTACHMENT HOOKS TIGHT AND DOUBLE CHECK
TO SEE WHETHER YOU HAVE FASTENED THE JIGS USE THE SCREW SETS OR NOT, SO THE SAFETY NET
STANDS STIFF. OTHERWISE, THE SAFETY NET WILL NOT FUNCTION PROPERLY. THEN FINISH
ASSEMBLING.
!
FIGURE 6
FIGURE 7

WARNING – GENERAL SAFETY ADVICE
Please read the instructions before use, and retain for future reference.
Ensure the trampoline Safety Net has been assembled correctly, as per the instructions in the manual.
Children MUST NEVER use the trampoline unless supervised by a responsible adult with knowledge of
trampoline use.
Children MUST NEVER be left unattended inside the Safety Net at any time.
ALWAYS follow the safety warnings stated with your trampoline instructions in conjunction with using Safety
Net.
DO NOT climb, swing or intentionally jump onto the panels or poles of the Safety Net.
If the Safety Net material becomes damaged refrain from use.
The Safety Net is ONLY intended to be used to reduce the risk of injury from falling off the trampoline.
DO NOT let children take items or toys into the Safety Net.
Please read and refer to other warnings and use information in the trampoline and Safety Net instructions
before use.
Use
Assembly Information - This Safety Net must be assembled by an adult. They must be assembled exactly in
accordance with the assembly instructions. Enlisting the aid of a helper will make assembly easier. This Safety Net
contains small parts and is not suitable for children under 3 years. Please take an inventory of all parts before
assembly. Should there be any missing parts, the equipment must not be used until replacement parts have been
fitted.
Safety Information
This Safety Net is designed and made for family domestic use only by people 6 years and older. It is not a rebounding
device. It is designed as an Safety Net to control entry and exit to and from the trampoline and, allow jumpers to gain
confidence, balance, coordination and agility without the fear of rebounding off the trampoline, where injury could occur.
Children should not wear cycle helmets while playing on the trampoline.
The frame of your trampoline is made of steel and it will conduct electricity. No electrical equipment (lights, heaters,
extension cords,household appliances,etc.) should be permitted in or on the Safety Net under any circumstances to avoid
the risk of electrocution.
Never allow more than one person to use the trampoline at a time. Multiple users may collide with each other and this
can result in serious injury.
As your trampoline mat is raised off the ground, there is the risk of a fall when exiting the trampoline through the door of
the Safety Net.Children should be assisted when entering and exiting the Safety Net so to reduce their risk of falling.Only
the door of the trampoline Safety Net should be used to enter or exit the Safety Net.
Maintenance
With all products it is vital that the equipment is checked regularly and often by an adult.The complete products should be
checked at least once a month, and particular attention should be paid to connections and fastenings. If any parts exhibit
signs of wear and tear, they may need to be replaced. Failure to do this may result in the product malfunctioning and
IMPORTANT – PLEASE READ!

causing injury.
The product must not be used until properly and fully installed and checked. Galvanised tubular products may require
occasional maintenance. If surface rust appears it should be removed with either a wire brush or coarse sandpaper, and
the area treated with non-toxic paint.
To avoid damage to the Safety Net,do not allow pets or other animals inside.Their claws and teeth can damage the netting
and the trampoline mat.
Make sure that no bonfires are lit close enough to threaten your trampoline and Safety Net. In windy conditions, sparks
and embers can travel significant distances and burn holes in both the Safety Net netting and trampoline mat.
Any large trampoline, with or without an Safety Net, can be blown around in high winds and cause injury or damage.We
recommend that the Safety Net should be removed under these conditions and stored in a dry place.
Import v.d. Meulen Sneek B.V. P.O. Box 80, 8600 AB SNEEK/NL

SICHERHEITSNETZ
Anleitung
Service & Info: www.gameonsport.com

Beaufsichtigung durch Erwachsene: * Eine Beaufsichtigung durch Erwachsene ist erforderlich.
* Eine Beaufsichtigung durch Erwachsene ist erforderlich, wenn Kinder das Zelt nutzen.
Schutz für Kinder: * Verhindern Sie Stürze und Strangulierungen, verlassen sie das Netz nur durch
die Tür und lassen Sie Vorsicht walten.
ANLEITUNG SICHERHEITSNETZ
VORSICHT: LESEN SIE DIE FOLGENDEN INSTRUKTIONENVOR
DEM AUFBAU ODER DER NUTZUNG DES SCHUTZNETZES
Table of contents
Languages:
Popular Safety Equipment manuals by other brands

Honeywell
Honeywell EBI XLS MASS NOTIFICATION SYSTEM Configuration, Preset Setup, Operation

Latchways
Latchways R20 User instructions

MSA
MSA HUB Fireservice Standard quick start guide

Dräger
Dräger PARAT C Series Instructions for use

Carmanah
Carmanah WW200 user manual

Antec
Antec STOPMAX VISION Instructions for use